When you need to perform database backup and data analysis, you can use the data export function of Data Management (DMS) to export databases by submitting a ticket.
Prerequisites
The database must be one of the following types:
MySQL series: self-managed MySQL, ApsaraDB RDS for MySQL, PolarDB for MySQL, AnalyticDB for MySQL, and ApsaraDB for OceanBase in MySQL mode.
SQL Server series: self-managed SQL Server and ApsaraDB RDS for SQL Server.
PostgreSQL series: self-managed PostgreSQL, ApsaraDB RDS for PostgreSQL, PolarDB for PostgreSQL, and AnalyticDB for PostgreSQL.
Oracle series: PolarDB for PostgreSQL(Compatible with Oracle).
ApsaraDB for MariaDB and other MariaDB databases.
You must be logged in to the target database in DMS and have the necessary data export permissions. For more information, see View my permissions and Apply for permissions on resources.
Data export limits
Control mode | Row limit | File size limit |
Flexible Management | Up to 1,000,000 rows per day at no charge. | Maximum of 50 GB per file. |
Stable Change | Up to 20,000,000 rows per day at no charge. | Maximum of 50 GB per file. |
Secure Collaboration | Unlimited | Maximum of 50 GB per file. |
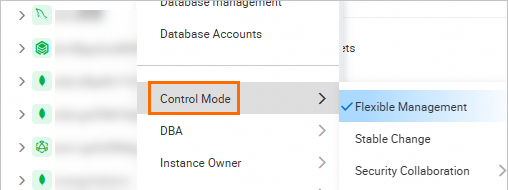
If the current control mode of the instance does not meet your requirements, the administrator or DBA can change the control mode.
The Flexible Management mode is free of charge, while the Stable Change and Secure Collaboration modes are charged. For pricing details, see Billable items (DMS).
Precaution
When exporting to Excel format, each cell in the table can contain a maximum of 32,767 characters. If exceeded, the export will fail.
Procedure
- Log on to the DMS console V5.0.
Move the pointer over the
 icon in the upper-left corner of the DMS console and choose . Note
If you use the DMS console in normal mode, choose in the top navigation bar.
Configure the parameters for the data export ticket.
Parameter
Description
Database Name
Select the database to export.
Exported Table
Select Partial Tables or All Tables. If you select Partial Tables, you must select the desired tables in the right-side pane.
NoteTo configure filter conditions for partial tables, double-click WHERE Clause.
Stakeholder
Specified stakeholders can view and collaborate on the ticket. Only stakeholders, administrators, and DBAs can view the ticket.
Export Content
Select the content to export from the table:
Data: The table data, exported as INSERT statements.
Structure: The table structure to be exported, presented as CREATE statements.
Data & Structure: Both the data and structure of the table are exported.
File Format
Select the format for the exported file. Valid values:
SQL
CSV
EXCEL
Exported Structure Type
Select the structure types to export.
Procedure
Function
Trigger
View
Event
NoteThe options displayed in the console vary by database type.
Export Time
The timeout period for the export task, in seconds. The value can range from 0 to 2,147,483. If you do not configure this parameter, the instance-level export timeout is used by default. To view the instance-level export timeout, see Add a database instance.
NoteIf the task duration exceeds the specified timeout period before the export is complete, the task will fail.
More Options
Click Big Data Export Options or SQL Script Options and select the desired export options.
Attachments
You can upload an image or a document to provide additional information about the export operation.
After you configure the parameters, click Submit and wait for the approval.
You can view the approval progress in the Approval section of the ticket details page.
NoteDatabase exports from instances in Flexible Management or Stable Change mode do not require approval.
The approval process for tickets is configured by administrators or DBAs. For more information about how to customize an approval process, see Customize approval workflows for tickets.
After the ticket is approved, click Download Exported File in the Download section.
What to do next
After the database export is complete, if you no longer need the capabilities of Stable Change or Secure Collaboration control modes, unsubscribe from the control mode to reduce costs. To do so, perform the following steps:
Change the control mode of the instance to Flexible Management.
In DMS Order Management, release the control mode instance. For more information, see Refund policy.
When the export is no longer needed, close the ticket promptly to prevent unnecessary data exposure.
Related API operations
FAQ
Q: If I changed the control mode before exporting data, can I switch the instance control mode back to the original mode after the export?
A: Yes, you can switch the instance's control mode back to its original setting after the export is finished. For detailed instructions, see Change the Control Mode of an instance.