When your cluster’s capacity planning cannot meet the scheduling needs of application pods, use node autoscaling to automatically scale nodes. Node autoscaling works best for scenarios with small-scale scaling—such as fewer than 20 elastic node pools or fewer than 100 nodes per elastic node pool—steady traffic fluctuations, predictable or periodic resource demand, and business needs that a single batch of resource scaling can satisfy.
Before you begin
To use node autoscaling effectively, read node scaling first and understand the following:
![]() Node autoscaling: how it works and its features
Node autoscaling: how it works and its features
![]() Which business scenarios node autoscaling supports
Which business scenarios node autoscaling supports
![]() Important considerations before using node autoscaling
Important considerations before using node autoscaling
![]() When scaling in, subscription instances are removed from the cluster but not released. To avoid extra costs, use pay-as-you-go instances when enabling this feature.
When scaling in, subscription instances are removed from the cluster but not released. To avoid extra costs, use pay-as-you-go instances when enabling this feature.
Important notes
Before you begin, make sure you have enabled Auto Scaling (ESS).
See Important notes for quotas and limits on node scaling.
Node autoscaling has known limitations with certain scheduling policies. These may cause scaling results to differ from expectations. If your workloads or components use unsupported scheduling policies, adjust them as follows:
Solution 1: Switch to instant node elasticity.
Solution 2: Deploy affected workloads or components in node pools where node scaling is disabled.
For example, deploy the ack-node-local-dns-admission-controller component in a node pool where node scaling is disabled, and declare the following node affinity requirements in the component configuration.
nodeAffinity:
  requiredDuringSchedulingIgnoredDuringExecution:
    nodeSelectorTerms:
    - matchExpressions:
      - key: "k8s.aliyun.com"
        operator: "NotIn"
        values: ["true"]
The cluster-autoscaler component requires node resources during updates or deployments. If resources are insufficient, updates or deployments may fail and cause scaling errors. Ensure sufficient node resources.
This feature includes the following steps:
Step 1: Enable node autoscaling for the cluster: The automatic scaling policies configured for node pools take effect only after you enable the node autoscaling feature at the cluster level.
Step 2: Configure an elastic node pool: Node autoscaling applies only to node pools configured for auto-scaling. So, set the scaling mode of your target node pool to Auto.
Step 1: Enable node autoscaling for the cluster
Log on to the Container Service Management Console . In the navigation pane on the left, click Clusters.
On the Clusters page, click the name of your cluster. In the navigation pane on the left, click .
On the Node Pools page, click Configure next to Node Scaling.

If this is your first time using node autoscaling, follow the on-screen prompts to enable ESS and complete authorization. Skip this step if ESS is already enabled and authorized.
For ACK managed clusters: Complete the AliyunCSManagedAutoScalerRole authorization.
For ACK dedicated clusters: Authorize both the KubernetesWorkerRole role and the AliyunCSManagedAutoScalerRolePolicy system policy. Use the links below.
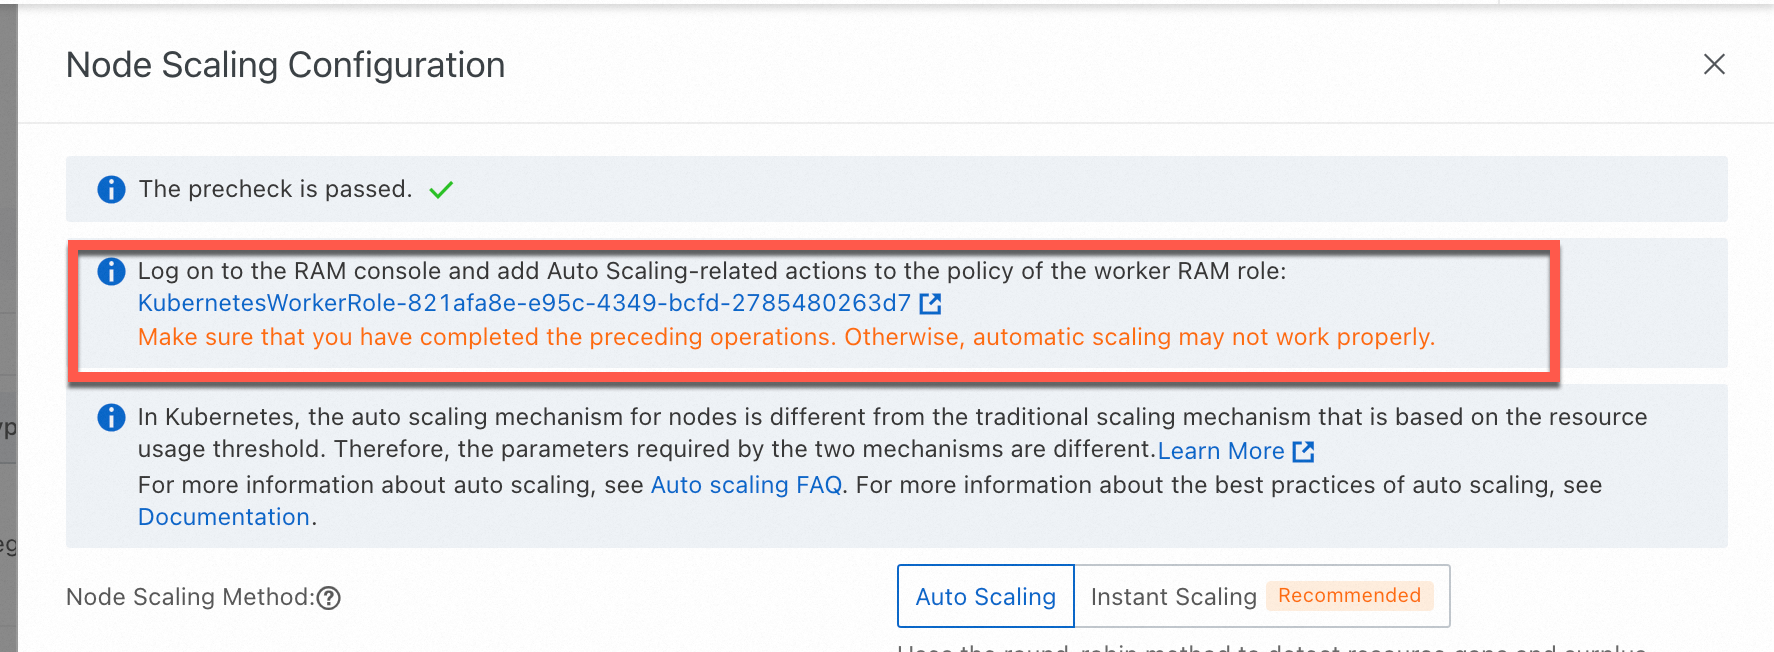
On the Node Scaling Configuration page, set Node Scaling Method to Auto Scaling. Configure the scaling settings and click OK.
You can change the node scaling method later. To switch, select instant node elasticity, then carefully read and follow the on-screen instructions.
Setting
Description
Node Pool Scale-Out Order Policy
Random policy: When multiple node pools are eligible for scale-out, pick one at random.
Default policy: When multiple node pools are eligible for scale-out, pick the one with the least resource waste.
Priority policy: When multiple node pools are eligible for scale-out, pick the one with the highest priority.
Set node pool priority using the Node Pool Scale-Out Priority parameter.
Node Pool Scale-Out Priority
Set the scale-out priority for a node pool. This setting takes effect only when Node Pool Scale-Out Order Policy is set to Priority policy.
Valid values: integers from 1 to 100. Higher numbers mean higher priority.
Click Add to the right of the parameter. Select a node pool with auto-scaling enabled and assign it a priority.
If no node pool with auto-scaling enabled is available, skip this setting now. Set priorities after completing Step 2: Configure an elastic node pool.
Elasticity Sensitivity
Adjust how often the system checks whether scaling is needed. Default value: 60 seconds.
During scaling, the elasticity component triggers scale-out automatically based on scheduling status.
ImportantECS nodes: The elasticity component may scale in a node only when all three conditions are met: Scale-In Threshold, Scale-In Trigger Delay, and Silence Time.
GPU nodes: The elasticity component may scale in a GPU node only when all three conditions are met: GPU Scale-In Threshold, Scale-In Trigger Delay, and Silence Time.
Allow Scale-In
Whether to allow node scale-in. When disabled, scale-in settings do not take effect. Set this carefully.
Scale-In Threshold
For node pools with node autoscaling enabled, this is the ratio of requested resources (Request) to total resource capacity per node.
A node may be scaled in only when this ratio falls below the threshold — meaning CPU and memory usage on the node are both below the Scale-In Threshold.
GPU Scale-In Threshold
The scale-in threshold for GPU instances.
A GPU node may be scaled in only when this ratio falls below the threshold — meaning CPU, memory, and GPU usage on the node are all below the GPU Scale-In Threshold.
Scale-In Trigger Delay
The time between detecting a scale-in need and actually performing scale-in. Unit: minutes. Default value: 10 minutes.
ImportantThe elasticity component may scale in a node only after both the Scale-In Threshold is met and the Scale-In Trigger Delay passes.
Silence Time
The time after the most recent scale-out during which the elasticity component does not perform scale-in.
During silence time, the elasticity component does not scale in nodes but still checks whether nodes qualify for scale-in. After silence time ends, if a node meets both the scale-in threshold and scale-in trigger delay, the elasticity component performs scale-in normally. For example, if silence time is 10 minutes and scale-in trigger delay is 5 minutes, the elasticity component will not scale in nodes for 10 minutes after the last scale-out. But within those 10 minutes, it checks whether nodes meet scale-in conditions. Once silence time ends and the node meets the scale-in threshold and has waited at least 5 minutes, the elasticity component proceeds with scale-in.
Step 2: Configure an elastic node pool
You can either configure an existing node pool by changing its Scaling Mode to Auto, or create a new node pool with auto-scaling enabled.
For details, see Create and manage node pools. Key settings include the following:
Setting | Description |
Scaling Mode |
|
Instance Count | The minimum instance count and maximum instance count for scaling in the node pool. This does not include existing instances. Note
|
Instance-related settings | When scaling out, nodes are allocated from the configured ECS instance families. To improve scale-out success rates, select multiple instance types across multiple zones to avoid unavailability or insufficient inventory. The specific instance type used for scaling is determined by the configured Scaling Policy. To ensure business stability and accurate resource scheduling, do not mix GPU and non-GPU instance types in the same node pool. Configure instance types for scaling in one of two ways:
Refer to the console's elasticity strength recommendations for configuration, or view node pool elasticity strength after creation. For ACK-unsupported instance types and node configuration recommendations, see ECS instance type configuration recommendations. Cloud resource and billing information: |
Operating System | When enabling auto-scaling, you can select Alibaba Cloud Linux, Windows images, or Windows Core images. If you select a Windows or Windows Core image, the system automatically adds the taint |
Node Labels | Labels added to the cluster are automatically applied to nodes created by auto-scaling. Important Auto-scaling recognizes labels and taints only when they map to node pool tags. Node pool tags have a limit. Keep the total number of ECS tags, taints, and node labels for elastic node pools under 12. |
Scaling Policy | Configure how the node pool selects instances during scaling.
|
Use Pay-as-you-go Instances When Spot Instances Are Insufficient | Requires selecting spot instances as the billing method. When enabled, if sufficient spot instances cannot be created due to price or inventory reasons, ACK automatically attempts to create pay-as-you-go instances as a supplement. Cloud resource and billing information: |
Enable Supplemental Preemptible Instances | Requires selecting spot instances as the billing method. When enabled, upon receiving a system notification that a spot instance will be reclaimed (5 minutes before reclamation), ACK attempts to scale out new instances for compensation.
Active release of spot instances may cause business disruptions. To improve compensation success rates, we recommend also enabling Use Pay-as-you-go Instances When Spot Instances Are Insufficient. Cloud resource and billing information: |
Scaling Mode | Requires enabling Auto Scaling for the node pool and setting Scaling Mode to Auto.
|
Taints | After adding taints, the cluster will not schedule pods to that node. |
Step 3: (Optional) Verify the result
After completing the steps above, you can use node autoscaling. The node pool shows that auto-scaling has started, and the cluster has automatically installed the cluster-autoscaler component.
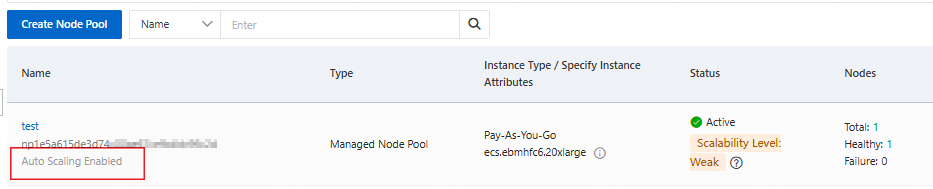
Auto-scaling is enabled for the node pool
On the Node Pools page, the node pool list shows node pools with auto-scaling enabled.
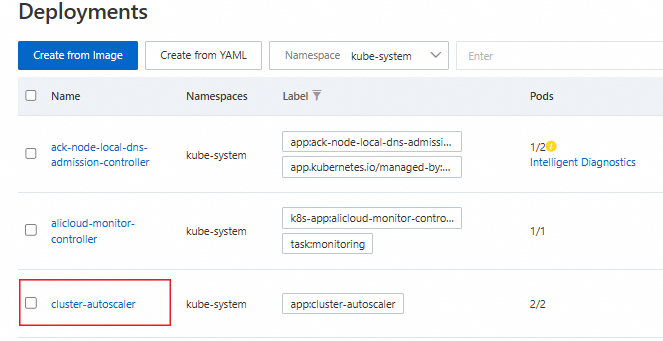
The cluster-autoscaler component is installed
In the left navigation pane of the cluster management page, choose .
Select the kube-system namespace to view the cluster-autoscaler component.
FAQ
Category | Subcategory | Link |
Scaling behavior of node auto scaling | ||
Does cluster-autoscaler support CustomResourceDefinitions (CRDs)? | ||
Custom scaling behavior | ||
The cluster-autoscaler add-on related | ||