
By Jeff Cleverley,Alibaba Cloud Tech Share Author
This is the first tutorial of a series that will culminate with a fresh WordPress site running on an Alibaba Cloud ECS Instance running a highly performant LEMP Stack.
In this tutorial, we will create an instance running Ubuntu 16.04, and then secure the server by creating a superuser and disabling root login, and finally configuring the Ubuntu UFW (Uncomplicated FireWall).
The next tutorial will lead you through the process to complete a modern LEMP stack, with the highly performant combination of NGINX, MariaDB, and PHP7.
The third tutorial in the series will run through Domain Management for your site, adding DNS records, and installing a Let’s Encrypt SSL certificate.
In the final tutorial we will be installing WordPress via both the WordPress Command Line (WP-CLI), and by using wget/curl.
These tutorials assume that you have already registered your account with Alibaba Cloud and, having verified your payment method, you are ready to proceed with provisioning a server from the Alibaba Cloud Console:
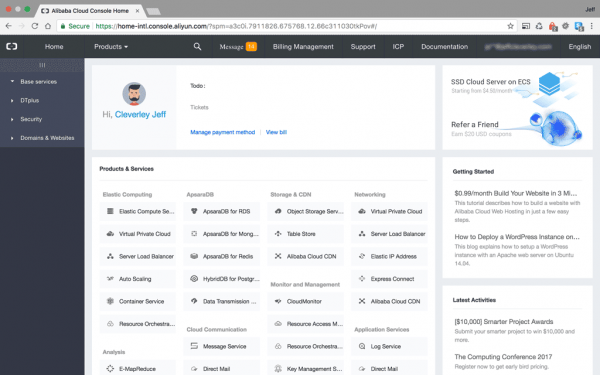
<Alibaba Cloud Console Management Panel>
From the screenshot above you can see the Elastic Compute Services (ECS) link in the top right of the main products and services panel. Click that link to move through to the ECS Overview Panel, as seen below:
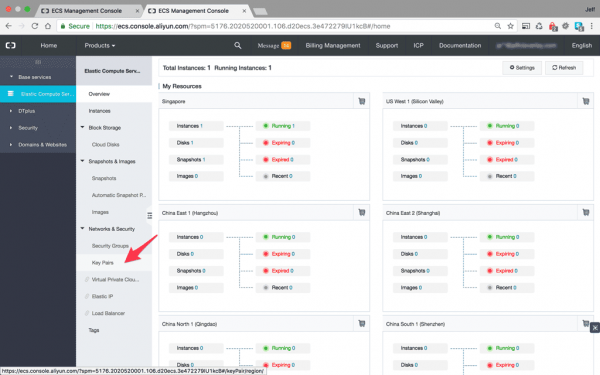
<ECS overview panel – go to key pairs first>
At this point it may seem natural to move directly on to provisioning an instance. You can do this, either by clicking the instances link on the horizontal menu to the right, or by clicking the shopping cart links located at the top right of the server location panel you are interested in.
However, I do recommend against doing this at this point, and I suggest instead to first generate an SSH 'Key Pairing'.
Why, you may ask?
I suggest this, because during the server provisioning process you must either attach a Public SSH key, or set Password Authentication as a method to log in to your server remotely.
If you don't have a 'Key Pair' already attached to your account, then it will take you out of the provisioning workflow, and you may reset your previously selected choices.
(If you are using macOS or Linux, but don't have an SSH key, move directly to Step1b. If you already have an SSH key pair, you can move directly to step 2.)
In the past, the easiest way to generate an SSH Key Pair on Windows machine was by using PuTTY
However, since the 2016 Anniversary Update, Windows 10 now includes a full Ubuntu-based Bash Shell that can run Linux software directly on Windows, made possible by the 'Windows Subsystem for Linux'. Microsoft worked with Canonical to develop this solution, which allows Windows users to run the same command line utilities that Linux and macOS benefit from.
If you are running an older version of Windows, and don't have access to this utility, then instructions for using PuTTY can be found here.
Open the settings app and head to Update & Security > For developer. Activate 'Developer mode' from the selection of radio buttons as follows:
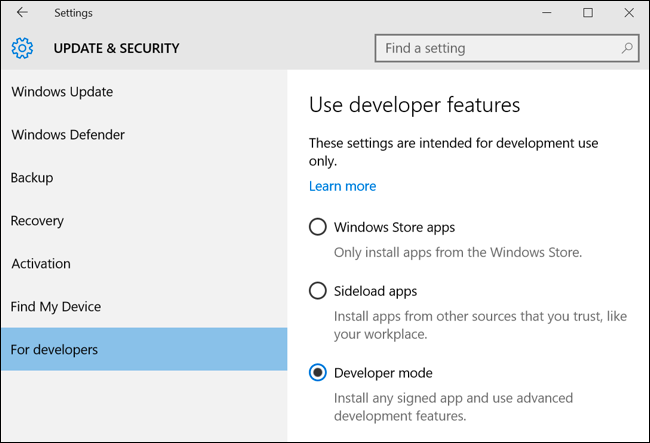
<Windows 10 Developers Panel in the Settings App>
Next, go to the Control Panel and select 'Programs', and then select 'Turn Windows Features On or Off' under the Programs and Features.
A window will appear with a long list of Windows features, find and enable the 'Windows Subsystem for Linux(Beta)' option, then click okay. As seen below:
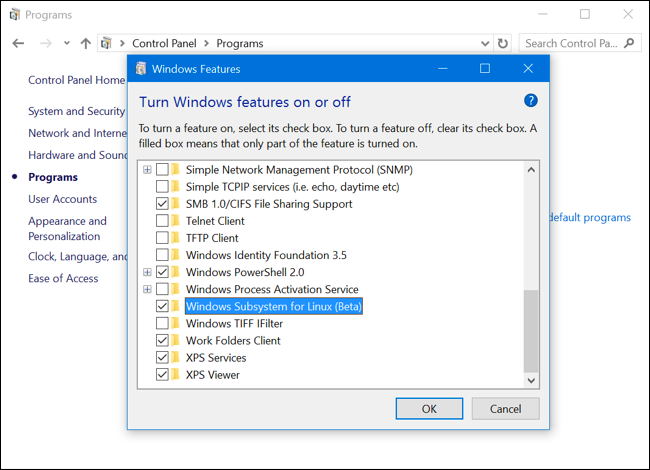
<Turn Windows Features On or Off – Windows Subsystem for Linux>
After you have done this, you will be prompted to reboot your computer. Click 'Restart Now' to do this so that Windows can install the Bash subsystem.
Upon restart, either click the Start button, or press the Windows Key, type 'bash' and press 'enter':
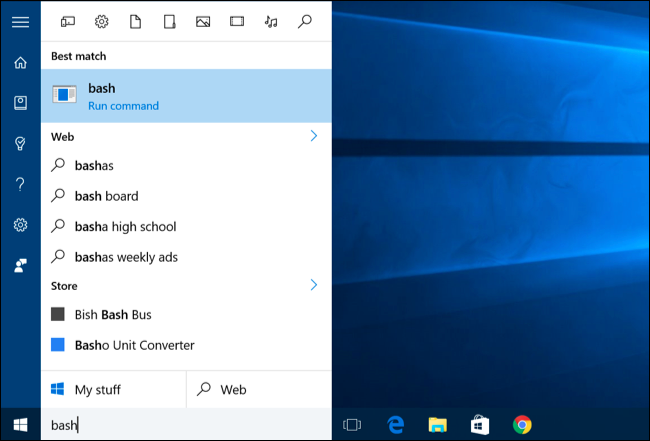
<Search Cortana for Bash >
When the bash.exe file is executed for the first time, a command line window will appear with a prompt to accept the terms of service. Once you accept this, the command will download the 'Bash on Ubuntu' application from the Windows store. You will then be asked to create the requisite user account and password for use in the Bash environment:
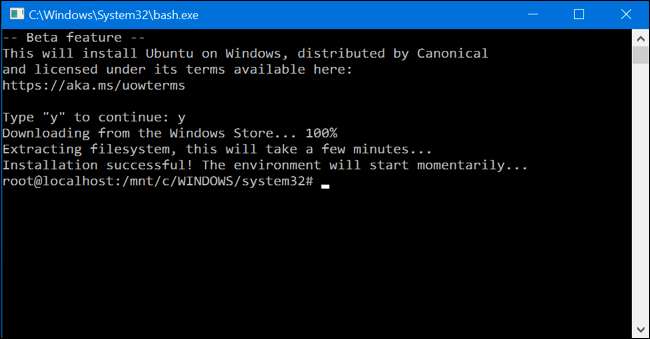
<Windows Bash Environment>
With this 'Bash on Ubuntu on Windows' you can now follow the same instructions and use the same commands in this Command Line interface as Linux/macOS users do in the terminal.
From now on, whenever these tutorial mentions 'terminal' follow the same instructions within the Bash command line.
Open the terminal on your local machine, and enter the following command:
$ ssh-keygen Assuming your local user was called "localuser", you should see the following in your terminal:
Generating public/private rsa key pair.
Enter file in which to save the key (/Users/localuser/.ssh/id_rsa):
(NB. Windows users local directory will be c/users/localuser/.ssh/id_rsa - the absolute path for windows systems in a standard configuration will prefix localuser with c/users/ )
This is the common path, so I suggest accepting this file name and location by just hitting 'enter' to accept.
You will also be prompted for a passphrase to further secure the key, this is entirely optional but does increase the security of your key pairing.
Now, you have generated both a private key, id_rsa, and a public key, id_rsa.pub, in the .ssh directory of your localuser's home directory.
These keys are needed to remote tunnel into your server, so be very careful not to delete or otherwise lose them. By default, they are stored in a hidden folder (a directory beginning with “.”) so they should be safe.
In your Alibaba Cloud Console, select 'Key Pairs' from the right horizontal menu, and then 'Create Key Pair' from the top right blue button, as seen below:
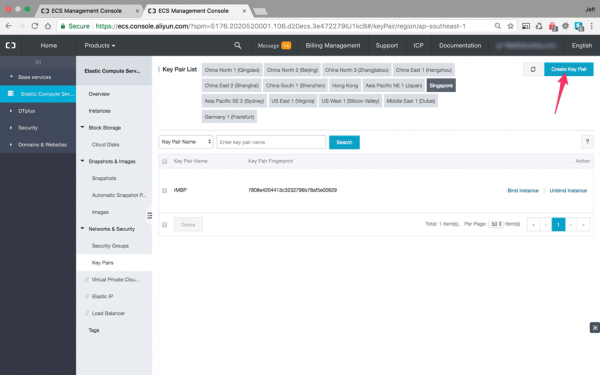
<Key Pairs Settings Pane – create new pair>
This will open a new settings panel as can be seen below:
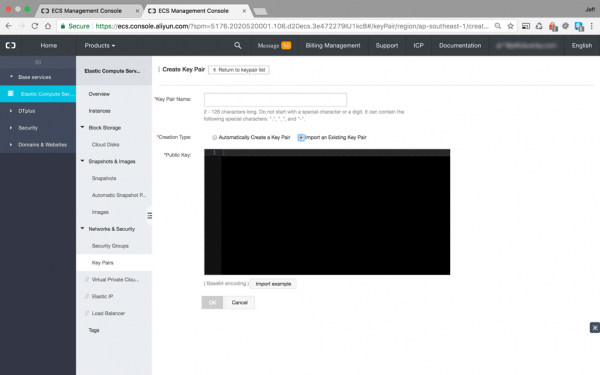
<New Key Pair settings – Import an Existing Public Key>
First you need to name your key pair.
Next there are two radio buttons, the left button will automatically generate a new key pair, while the right gives you the option to import an existing key pair.
If you choose the left radio button, Alibaba Cloud will generate a .pem file, however since we have already generated our key pair, we can select the right radio button, and import our public key.
Once you select the option to import a key pair, a large black textarea box will appear as in the screenshot above.
Return to the terminal on your local machine, and use the following command to print out your public id_rsa.pub key in the terminal window:
$ cat ~/.ssh/id_rsa.pub Your terminal should print out a key that looks something like this:
ssh-rsa AAAAB3NzaC1yc2EAAAADAQABAAABAQD0NlbKiLwqNHF/H+OcQd6S hGz34874
sdkniwncnOYrwyUBqkBtulfZObTqh6vhbNxTChUbrIZpICE9wqTYVIvND Rc75bM2Y +ko2UsxygWC+yxwG9pwvShHw/PCYxdE232n5l1hQe38VPDlEOBcti8Z RYO42XQxv0jcb86jbpbNoqO2yCfa/Aj6hJaSLcbGVdZRAijU/JCcKd7WT GIIhGWrw43q+HDLuF+9Z local_user@computer.local
Select all of the text printed out, and copy it to your clipboard, then paste it into the textarea box provided in the ECS key pairs settings panel from earlier.
Once complete, click OK and you will have created the key pairing you need. This will be available when provisioning your server.
To create your ECS instance you can either choose the Overview panel link, or the Instance panel link, from the Horizontal menu.
In the Overviews page, you can click the cart link to start the process as seen below:
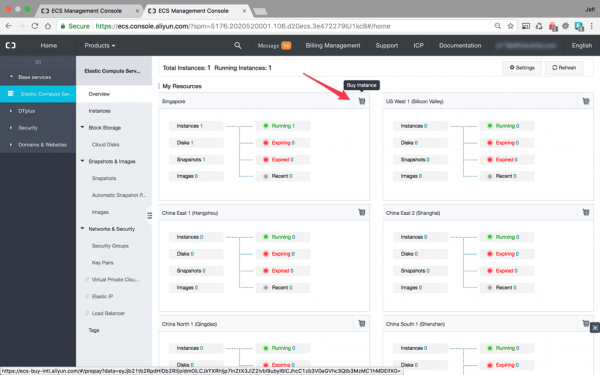
<ECS Overview – Buy instance = Create New Instance >
Alternatively, from the Instances panel, you can select 'Create Instance' from the blue button in the top right.
A new window will open for you to create an Instance. This window contains all the different configuration options, with a price bar along the bottom to dynamically show you have configuration changes affect the pricing and running costs of your server on the fly:
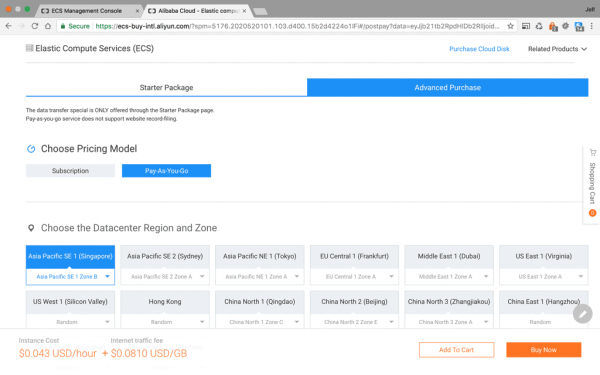
<Choose a pricing model and datacenter >
As you can see, there are two primary purchasing models available at the very top, either Starter Packages or Advanced Purchases.
Advanced purchases offer more granular control, both on the subscription pricing model, and server configuration choices, while the starter packages offer a more limited range of set configurations. However, these configurations will be sufficient for most WordPress installations, and offer some excellent value for money.
For this tutorial, I have selected a Singapore based server, on a 'Pay- as-you-go' pricing model, from the Advanced Purchases tab.
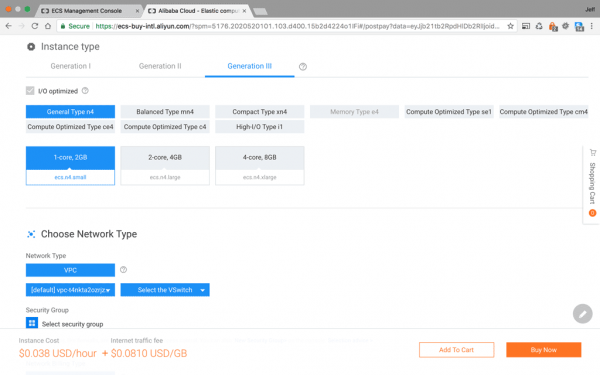
<Choose your instance and network type >
Next we need to choose our Instance type, and network type. As you can see from the screenshot above, there are 3 generations of instance types, based upon different processor architecture:
I chose a small general type n4 instance, with a single core and 2GB of ram, from the Generation III tab, this is the least expensive option but is more than suitable for a standard WordPress installation.
After selecting your instance type, you must also select your network type, ‘VSwitch’, and security group. The security group allows you to open and close different ports, there will only be a default option to select for now, but we will be editing this later in the series to open ports for our Let’s Encrypt SSL.
Next up is the Data Transfer and Operating System configurations:
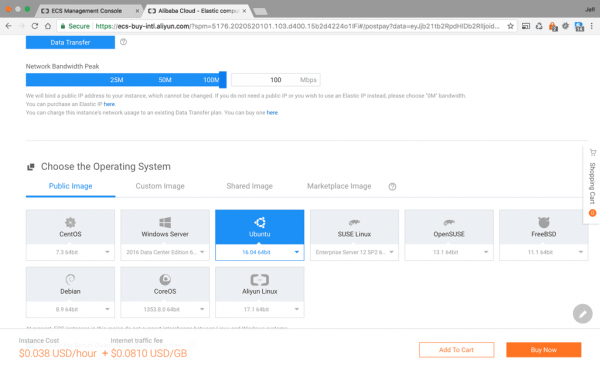
<Set your network bandwidth and choose an OS>
Each starter package comes with a set data transfer limit, after which data will be metered, but with the advanced packages all data transfer is metered. If you wish to limit your exposure to potentially greater data transfer costs, you can set a Network Bandwidth limit.
To be allocated a static IP address, you need to set your Network Bandwidth above 1Mbps.
Below the Data transfer settings, you can select from a wide range of Operating system configurations. We will be sticking to an Ubuntu 16.04 image, but if you prefer you should select from a variety of OS flavors, including popular Linux distributions, Windows and even Unix. There are also a wide variety of preconfigured packages available from the marketplace, the option to upload your own image and more.
Once you have chosen your image, there are the Storage and Security settings:
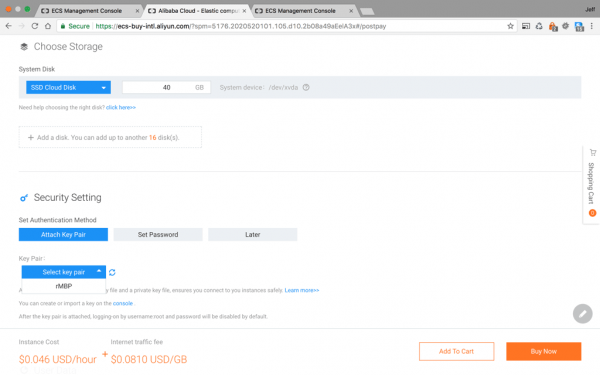
<Choose your storage and attach your SSH public key>
For storage you can select between an ‘Ultra Cloud Disk’ or an ‘SSD Cloud Disk’, I am interested in getting the best performance so I chose the ‘SSD Cloud Disk’, it increases the post per hour by about 30%, but I consider this cost worth it.
Now we come to the security settings, this is where you will attach your SSH Key Pair that we created earlier. When you click the select button, your key should appear in the drop down box.
The final configuration is to name your instance:
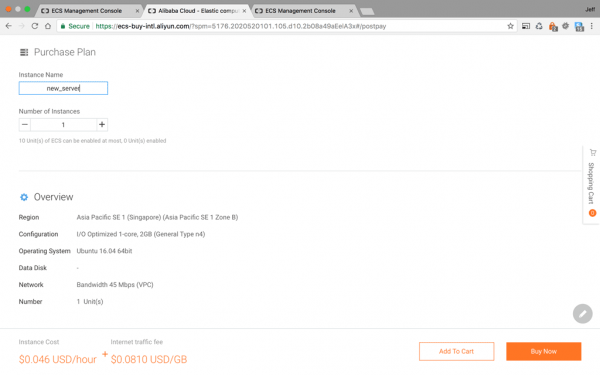
<Name your instance and check the overview>
This name will also be the hostname for your instance. Once you have chosen a hostname, you should check the overview and click the buy now button in the bottom right of the screen.
This will take you to an order confirmation page:
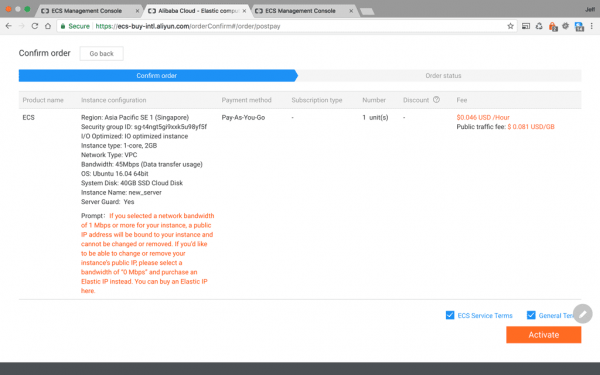
<Check the terms and confirm your order to activate the instance>
Before your instance is activated, you must confirm your order and agree to the ECS service terms and Alibaba General terms by checking the applicable boxes then clicking the Activate button.
Once you have done this you will be redirected back to the Instances Console panel. This will list all your instances in each selected region, along with their IP addresses, general configurations, and links for management and reconfiguration:
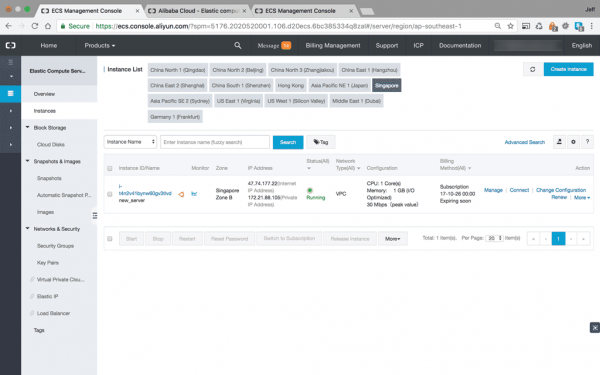
<Behold your instance!>
Copy your instances IP address from the console panel, then open your terminal and log in as root user using the following command:
$ ssh root@your_server_ip(remember to replace ‘your_server_ip’ with the IP address of your instance)
Assuming you attached the Key Pair correctly during configuration, and you used the correct IP address, then the login process will include a warning about host authenticity, accept the warning and add the key to your known hosts, and your terminal should look like the following:
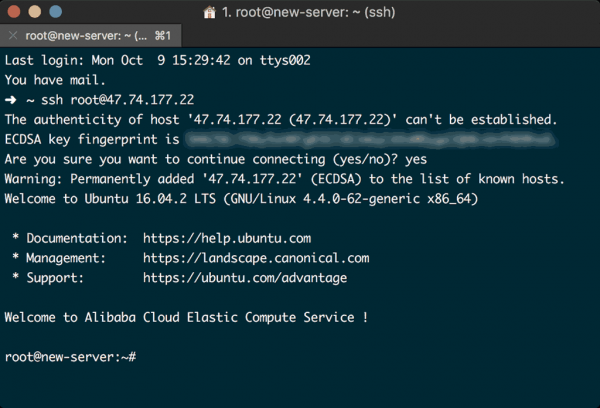
<Log in as root >
A few words about Root
In a Linux environment the Root user is the administrative user with a very broad range of escalated privileges. It is common practice to discourage the use of the root account on a daily/regular basis, primarily because this account has such heightened privileges that it’s very very easy to accidently cause havoc on your system, seemingly innocuous changes can be very destructive.
Given the inherent risks of using the root account, our plan is to create a superuser for everyday server management. To do that we create a new user, and then add them to the Sudo group, this grants them the escalated sudo privileges required to make administrative changes on the system when necessary. The use of these sudo privileges will require a password entry from the superuser.
Once we have done this, we will disable remote root access to the server, helping securing it from attacks.
Create a new user with the following command. The new user I’ve created for this tutorial is called new_user, you should replace that name with one of your choosing:
# adduser new_userWhen you’re in the root user, the terminal command line will begin with the # hash symbol. An account with standard privileges uses the $ line beginning. When you see # remember to be very careful.
You will be asked to provide a password, and add some user details. You should, of course, enter a strong password, but only fill in the additional details only if you like as they aren’t requisite, hitting ENTER in any field will just skip it.
Now you have a new user account with standard privileges, and since we want to disable root login later, we need to add this user to the sudo group to create the “superuser” with the necessary root privileges to do complete administrative tasks.
To do that issue the following command as root:
# usermod -aG sudo new_userYour terminal screen should now look similar to this:
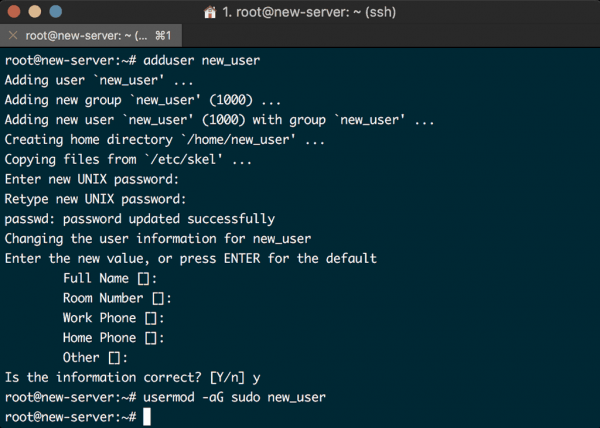
<Add a new superuser >
Remember the Public Key we added to our Alibaba account? That key is only available to the root user, therefore if we disabled root login now it would be impossible for our new_user to login.
That means we need to add that public key to a soon-to-be-created .ssh directory in our new_user‘s home directory.
First we need to switch to the new_user from root user by entering the following command:
$ su - new_userNow we are in the new_user‘s home directory, located here in the full path /home/new_user/ .
Create a new directory called .ssh, and restrict its permissions, with the following command:
$ mkdir ~/.ssh
$ chmod 700 ~/.ssh
Now, create and open a file in the .ssh directory called authorized_keys, using the built in nano text editor:
$ nano ~/.ssh/authorized_keysCopy the same public key from earlier, id_rsa.pub, and paste it into the editor. Enter CTRL + X to exit the file, and y to save the changes, then ENTER to confirm the correct file name.
Once this is completed we need to restrict the permissions of the authorized_keys file, and return to the root user with the following commands:
$ chmod 600 ~/.ssh/authorized_keys
$ exitWith your public key installed and accessible, your new_user will be able to login to the Instance directly. That means we can now further secure the server by disabling password-only authentication, and root login.
Doing this will restrict access to your server to Public Key Authentication only, meaning that the only way for someone to login to your server is if they possess the private key that pairs with the public key previously installed. In addition, disabling root login means that even if someone did manage to get your private key, they would still be locked out unless they also knew your password.
If you have been following along exactly, you will be in the root account, if however you are still in your new superuser account, then just add sudo before each of the following commands.
Open the SSH daemon configuration file for editing:
# nano /etc/ssh/sshd_configWe are looking for 4 settings. We need to set PasswordAuthentication no, PermitRootLogin no, PubkeyAuthentication yes, and finally, ChallengeResponseAuthentication no.
The following screenshots show you the correct settings in the config file:
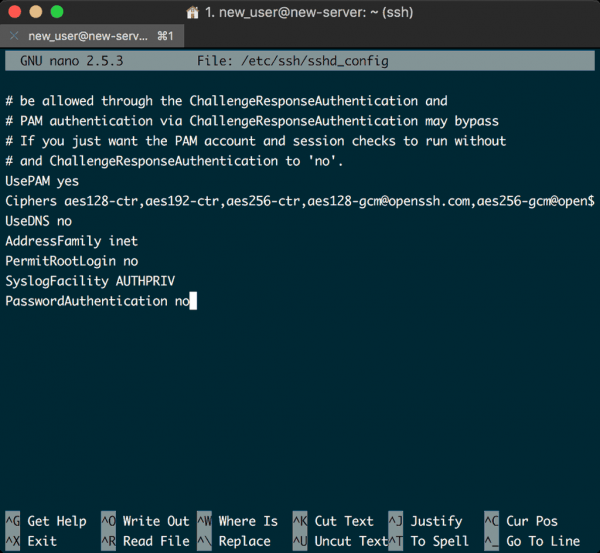
<PermitRootLogin no | PasswordAuthentication no>
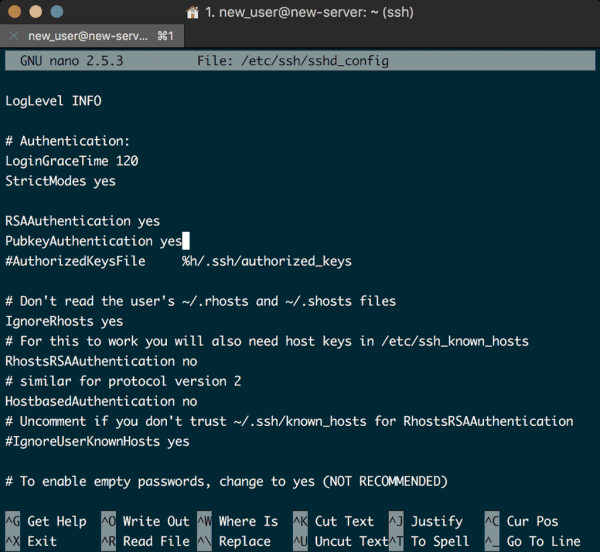
<PubKeyAuthentication yes>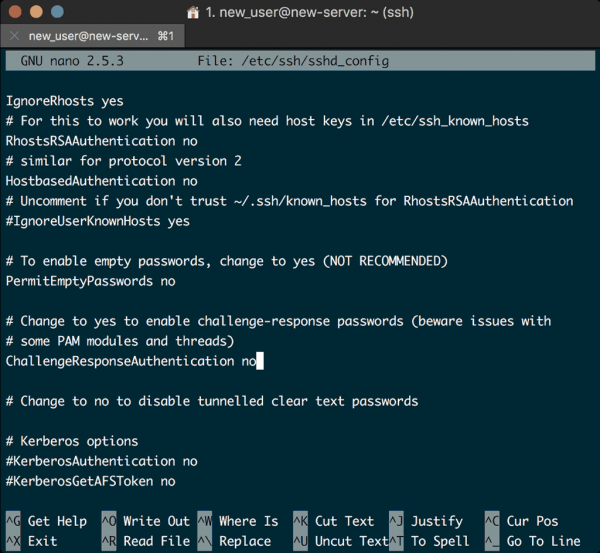
<ChallengeResponseAuthentication no>
Once these are set, save and exit the config file by typing Ctrl+X and confirming the changes.
With these changes, your server will only be accessible by logging in with your superuser account using your ssh key.
That being said, don’t go rushing and logging out of your server until we’ve confirmed everything is working as it should, otherwise our server will be inaccessible from the terminal, and would require resetting the root login from the Alibaba console.
Open a new terminal on your local machine, and login to your server using the new account that you created. Remember to replace new_user and your_server_ip with your superuser and Instances’s IP address:
$ ssh new_user@your_server_ipIf all our configurations have been correct then you should see something like:
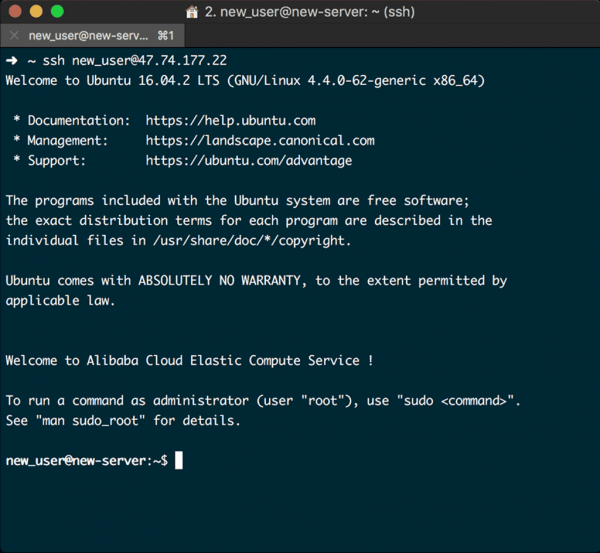
<Test your superuser login before logging out of root>
Well done, your superuser now has login access to your server via SSH public key authentication.
We now need to test to ensure that root login has been disabled, to do that issue the following command in your terminal:
$ ssh root@your_server_ipOf course, remembering to replace your_server_ip with your actual server IP.
All being well, your login should be denied, with your terminal outputting something like:

<Ensure root login is denied>
The last thing we are going to do in this tutorial, is set up the simple firewall that comes with Ubuntu, aptly name UFW, the Uncomplicated Fire Wall.
It is both very easy to configure, and gives some level of protection from nefarious attacks.
Whenever applications are installed to Ubuntu they register their profiles with UFW, this allows the firewall to, very easily, manage the applications by name.
We need to configure UFW to allow SSH connections before we enable it, so we can still log in, otherwise there may be tears.
Since OpenSSH already has a profile registered with UFW you will be able to see it by typing the following command. And remember, now we are logged in as our superuser, we need to type sudo before each command that requires administrative privileges:
$ sudo ufw app listWhich should return:
Available applications:
OpenSSH
Before we enable the firewall, we need to ensure SSH connections are allowed through, to do that issue the following command:
$ sudo ufw allow OpenSSHOnce this is done, enable the firewall by entering:
$ sudo ufw enableIt will issue a warning, and require you to type y and press ENTER. Once completed, you can verify that SSH connections are allowed through the UFW by issuing the following command:
$ sudo ufw statusThe above combinations of commands and outputs should result in a terminal that looks like the following:
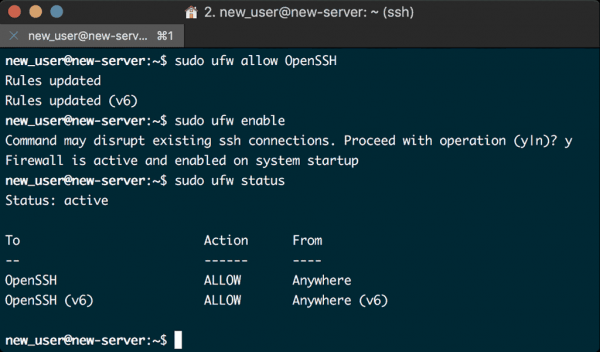
<Configure UFW to allow OpenSSH connections>
Now you have provisioned an Alibaba EC2 instance with an Ubuntu 16.04 installation, and performed the necessary actions to secure it.
This provides a versatile foundation upon which we will complete our LEMP stack, which we will do in the next tutorial.

2,599 posts | 764 followers
FollowAlibaba Clouder - July 8, 2020
Alibaba Clouder - December 5, 2017
Alibaba Clouder - July 3, 2018
Alibaba Clouder - May 20, 2019
Alibaba Clouder - December 6, 2017
Alibaba Clouder - May 8, 2019

2,599 posts | 764 followers
Follow Anti DDoS Basic
A cloud-based security service that protects your data and application from DDoS attacks
Learn MoreMore Posts by Alibaba Clouder