This is the first tutorial of a series that will culminate with a fresh WordPress site running on an Alibaba Cloud ECS Instance running a highly performant LEMP Stack.
In this tutorial, we will create an instance running Ubuntu 16.04, and then secure the server by creating a superuser and disabling root login, and finally configuring the Ubuntu UFW (Uncomplicated FireWall).
The next tutorial will lead you through the process to complete a modern LEMP stack, with the highly performant combination of NGINX, MariaDB, and PHP7.
The third tutorial in the series will run through Domain Management for your site, adding DNS records, and installing a Let’s Encrypt SSL certificate.
In the final tutorial we will be installing WordPress via both the WordPress Command Line (WP-CLI), and by using wget/curl.
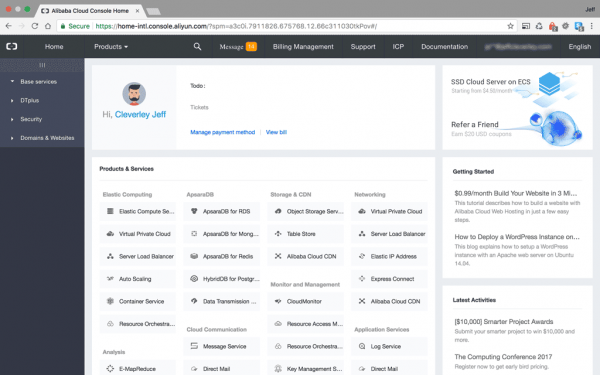
These tutorials assume that you have already registered your account with Alibaba Cloud and, having verified your payment method, you are ready to proceed with provisioning a server from the Alibaba Cloud Console:
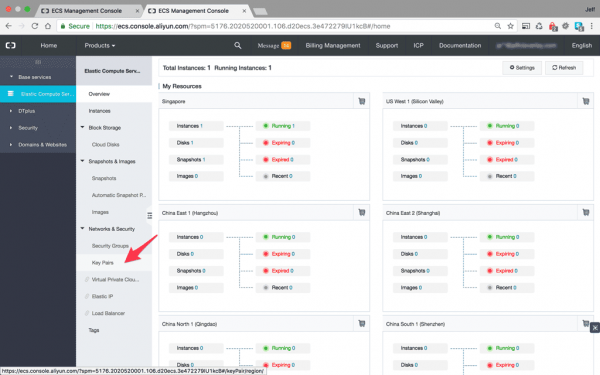
From the screenshot above you can see the Elastic Compute Services (ECS) link in the top right of the main products and services panel. Click that link to move through to the ECS Overview Panel, as seen below:

At this point it may seem natural to move directly on to provisioning an instance. You can do this, either by clicking the instances link on the horizontal menu to the right, or by clicking the shopping cart links located at the top right of the server location panel you are interested in.
In this article, I will be sharing my experience of building a high-performance LEMP stack on Alibaba Cloud for my personal website.
In today's post, I'm going to show you how I deployed my website, sarathy.tech, on Alibaba Cloud.
I built my website using WordPress on Alibaba Cloud Elastic Compute Service (ECS) instance with Nginx, PHP 7.2, FastCGI, MariaDB, and Redis caching for maximum performance.
Before you get started, I'm assuming that you already have a basic understanding of the cloud, networking, and knowledge of Linux command line.
You also need a functional domain name for your website.
If you don't have an account already, you can sign up here. New users can enjoy $300-$1200 worth in free trial, valid for 2 months. If you are not sure how to do this, refer to this tutorial.
After setting up an account, you're ready to deploy a high performance WordPress website!
Log In into Alibaba Cloud Console by entering your Email and Password. You may need to enter a security code for security purposes.
In the Alibaba Cloud Console, click Products and select Elastic Compute Service from the list.
Click Instances, and choose your Region from top left drop-down menu. A list of available regions will be displayed.
Click Create Instance. For my instance, I have selected the following configurations.
I have selected an IO Optimized instance with 4GB of physical memory (RAM) and 1 virtual CPU. If your website will be hosting more dynamic content, consider purchasing a higher-spec instance.
Now you have to select an appropriate Image for your instance. I have chosen an Ubuntu 16.04 image for my server.
Enable Security Enhancements. This feature will add some security features like backdoor detection, remote login alerts, etc.
There are a few other configurations to consider, I have chosen the default settings for the rest.
This three-part tutorial walks you through setting up WordPress advanced management with WP-CLI. Part 1 focuses on setting up WP-CLI on Alibaba Cloud ECS.
WordPress is the most popular content management system used to develop websites with dynamic content on the web. Much of WordPress's popularity has been gained due to the ease of use that it provides by it's Graphical User Interface (GUI). WordPress has always provided a full feature set in a package that is easy for beginners to get started.
Since its early days as a blogging platform it has evolved into a much more widely used resource, often being used for large e-commerce sites, enterprise sites, social networks, and more. Part of its progress into a platform used by more serious developers, was the introduction of WP-CLI - the official WordPress Command Line Interface.
The Command Line Interface (CLI) has long been popular with developers due to the speed and efficiency with which you can perform tasks on your machine. Using a wide variety of tools, developers have boosted their productivity and sped up their development process. The WP-CLI affords WordPress developers and site maintainers the same benefits and efficiencies.
WP-CLI is now an officially supported project of the WordPress foundation and has it's own site and developers handbook, you can find a full list of all it's commands and tools here.
This is the first in a 3-part series that will take a deep dive into the advanced WordPress management abilities provided by WP-CLI. In this tutorial we will look at installing WP-CLI on your instance, and preparing the correct permissions and user roles for it to work properly, after that we will see how it can be used to manage your WordPress content. In the following tutorials, we will dive deeper into more advanced functionality, such as managing your themes and plugins, media, users and database. Before finally showing you how it can be leveraged to manage hundreds of sites across all of your Instances, speed up development of custom plugins and themes, and even extended to provide custom functionality by creating your own commands.
Through effective use of WP-CLI you will see how you can even reduce bloat of your WordPress sites through the removal of the need for several widely used plugins.
This tutorial assumes you already have an Alibaba Cloud ECS Instance provisioned and with one (or several) WordPress sites running on it.
Throughout the series, I will be using my superuser 'new_user' and will be issuing 'root' commands using the sudo command. When you follow the commands please remember to replace my user with your own.
I will also be using my test domains 'an-example-domain.com' and 'another-example-domain.com' in the code examples, remember to replace my site domains with your own when you issue the commands.
In Part 1 of this series about Caching solutions for WordPress on the Alibaba Cloud we set up server monitor and ran some load testing on the server to take performance benchmarks for our server prior to enabling any caching.
We then set up a Redis server on our Alibaba instance and configured it to work as an Object cache for our WordPress site, this reduced the database queries that are one of the biggest performance bottlenecks for WordPress.
The other major performance bottleneck for WordPress is caused by processing PHP, therefore in order to further improve the performance of our site, we need to reduce the amount of PHP that our web server has to process.
This is where page caching comes in.
Object caching can seriously improve your WordPress site's performance by optimizing the process of querying the database, but there is still a lot of overhead when serving a page request since the server is required to process PHP.
This overhead is caused by WordPress and PHP needing to build the requested HTML page on every single page load. We can reduce this drain on server resources by caching the HTML version of the requested page once it has been built, then on the next request for this page we simply serve the cached HTML page and can avoid hitting WordPress or PHP altogether.
This type of static page caching is especially useful on sites where the content for each page rarely updates.
There are different options available for static page caching however, so first let's consider our options.
Varnish Cache is a well respected web application accelerator also knowns as a caching HTTP reverse proxy. Basically, you install it in front of any server (in our case NGINX) that speaks HTTP and it will cache the returned contents of any page requests.
It is really, really fast.
The reason I have chosen to use NGINX FastCGI caching over Varnish caching in this series is because Varnish doesn't support the HTTPS protocol, and NGINX FastCGI caching is approximately as fast.
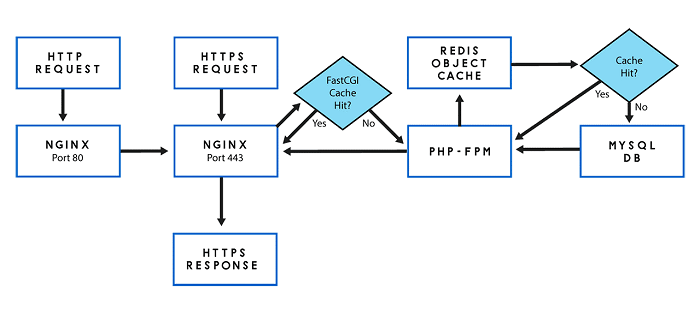
Our WordPress site has been configured to use a Let's Encrypt SSL to benefit from the advantages of HTTP2 that are only available via HTTPS. Therefore, to use Varnish cache we would need an HTTP terminator sitting in front of it to intercept and decrypt HTTPS page requests on port 443 before passing them to the Varnish cache. We could use NGINX for this purpose, but we must ask whether this increased complexity is worthwhile.
Here are two diagrams that clearly illustrate why I chose to forgo Varnish caching for NGINX FastCGI caching:
Simple Application Server is a new generation computing service for stand-alone application scenarios. It provides one-click application deployment and supports all-in-one services such as domain name resolution, website publishing, security, O&M, and application management. This optimizes the user experience of setting up a simple application and makes it easier for entry-level users to use cloud computing products.
In this Clouder lesson, you will learn how to conveniently publish a WordPress website with a set of prescribed scripts using Alibaba Cloud ROS service.
To find out more detail about ROS, please access:
https://www.alibabacloud.com/product/ros
This topic describes how to deploy a WordPress site with a MySQL database on Kubernetes.

This document introduces how to share WordPress attachments across different containers by creating OSSFS data volumes in Alibaba Cloud Container Service.
Docker containers simplify WordPress deployment. With Alibaba Cloud Container Service, you can use an orchestration template to deploy WordPress with one click.
This document introduces how to use OSSFS data volumes of Alibaba Cloud Container Service to share WordPress attachments across different containers, without any code modifications.
OSSFS data volume, a third-party data volume provided by Alibaba Cloud Container Service, packages various cloud storages (such as Object Storage Service (OSS)) as data volumes and then directly mounts them to the containers. This means the data volumes can be shared across different containers and automatically re-mounted to the containers when the containers are restarted or migrated.
Websoft9 WordPress is a pre-configured, ready to run image for running WordPress on Alibaba Cloud.
This image is built with Ubuntu16.04 64bit and bundled with following popular software for web service solution. In order to display web pages to our site visitors, we employ Nginx, a modern, efficient web server. Optimized to add your security concern.
Simple Application Server is a new generation computing service for stand-alone application scenarios. It provides one-click application deployment and supports all-in-one services such as domain name resolution, website publishing, security, O&M, and application management. This optimizes the user experience of setting up a simple application and makes it easier for entry-level users to use cloud computing products.
Alibaba Cloud provides available and flexible web hosting solution, which is easy to use, supports wide range of CMS, high security protection and data reliability.
Alibaba Cloud Partners with Aryaka to Deliver a Global and Fully Managed SD-WAN Solution

2,593 posts | 793 followers
FollowAlibaba Clouder - August 15, 2018
Alibaba Cloud Community - March 11, 2022
Alibaba Clouder - May 6, 2019
ApsaraDB - August 30, 2021
Alibaba Clouder - July 20, 2018
Alibaba Clouder - June 29, 2018

2,593 posts | 793 followers
Follow Domains
Over 20 million domain, free WHOIS privacy protection.
Learn More Web Hosting
Explore how our Web Hosting solutions help small and medium sized companies power their websites and online businesses.
Learn MoreMore Posts by Alibaba Clouder