The Red Hat OpenShift Container Platform (OCP) is a development and deployment platform for containerized software. It is designed to make it simple for developers and operations staff to create, install, and maintain software, allowing supported applications to scale from a few machines to thousands of machines serving millions of clients. OCP offers efficient and scalable platform management mechanisms and processes based on Kubernetes. OCP helps you to deploy containerized software from a single cloud to various clouds using Red Hat open-source technology.
If you want to learn about Red Hat OpenShift Container Platform and why Red Hat built a strategic partnership with Alibaba Cloud, click here.
1.1. Deployment architecture
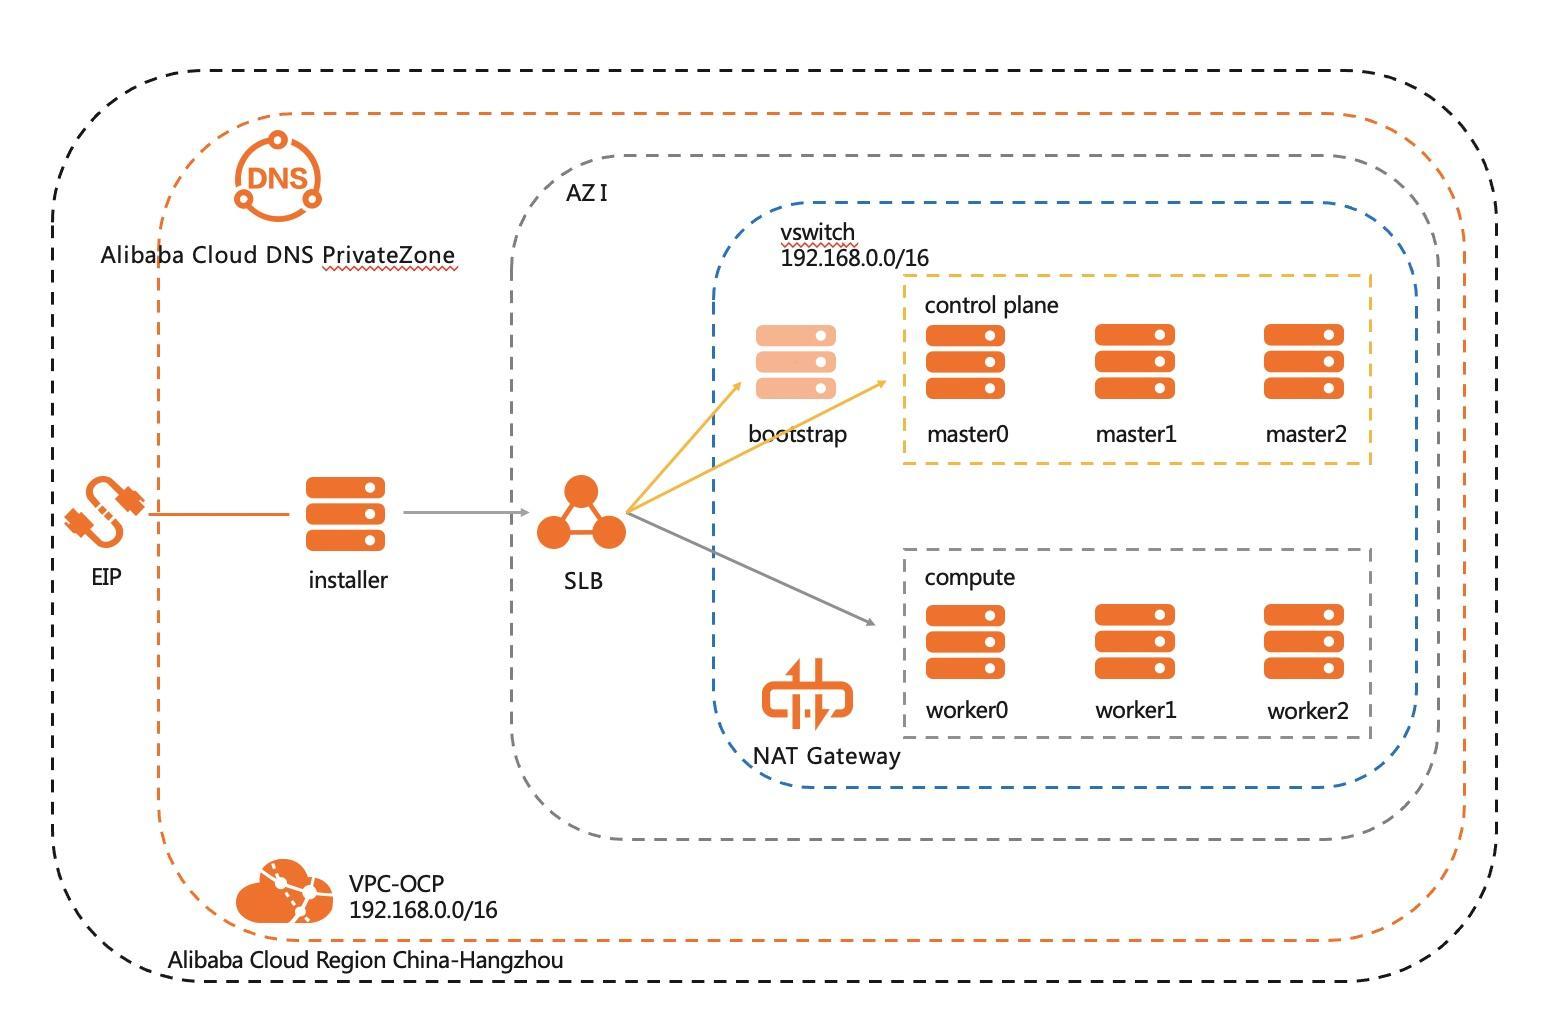
A small-sized OCP cluster includes the following machines:
Note: In this cluster, you must use the bootstrap machine to deploy the master machines on the control plane. You can delete the bootstrap machine after you install the cluster.
The bootstrap machine, master machines on the control plane, and compute (worker) machines must run the Red Hat Enterprise Linux CoreOS (RHCOS) operating system. RHCOS runs based on Red Hat Enterprise Linux (RHEL) 8 and inherits all of its hardware certifications and requirements.
The following figure shows the deployment architecture.
1.2. Machine configuration requirements
The following table describes the minimum requirements for each machine in the cluster.

1.3. Alibaba Cloud resources
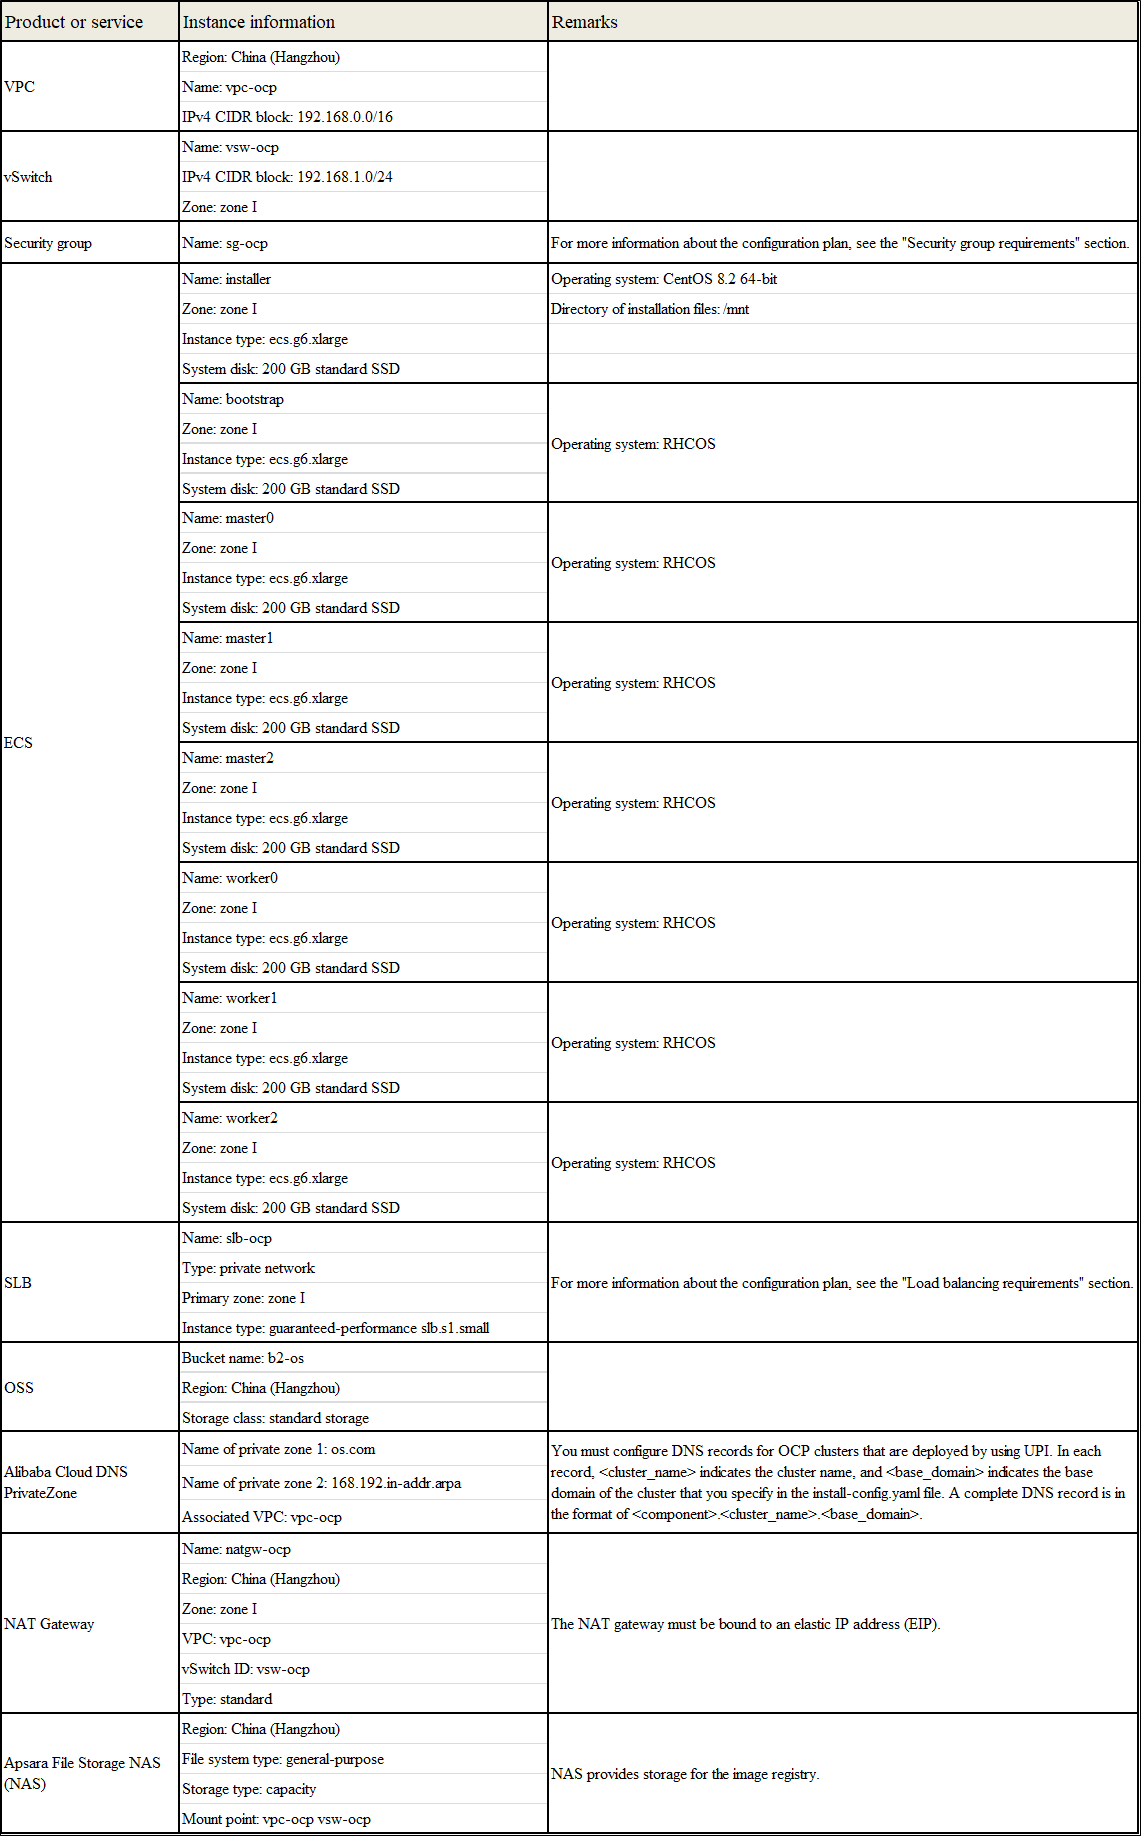
Note: This document describes how to install an OCP cluster. Therefore, the Alibaba Cloud products or services with the minimum specifications are used. If you deploy an OCP cluster in other environments, you can configure the specifications of Alibaba Cloud products or services based on your actual needs.
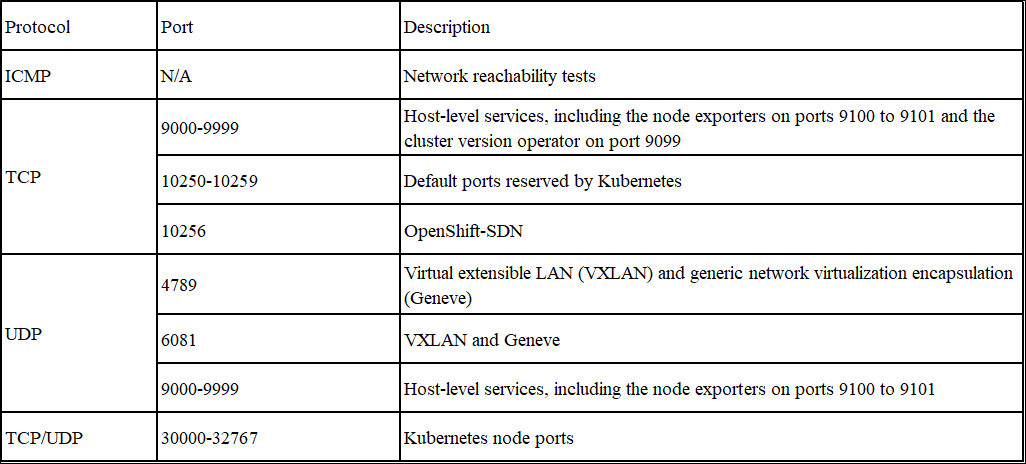
1.4. Security group requirements
The following tables describe the ports that must be available.
All machines in the cluster
All control plane machines

1.5. Load balancing requirements
The following tables describe the ports that must be configured on the frontend and backend of SLB.
API load balancer

Application ingress load balancer

You must create a VPC, an ECS instance, a security group, a NAT gateway, and a NAS instance on Alibaba Cloud. These are prerequisites for installing an OCP cluster.
2.1. Create a VPC and a vSwitch
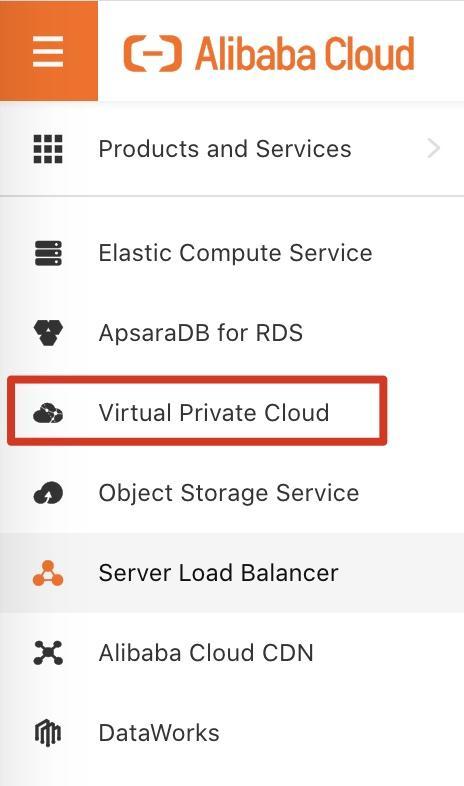
Step 1: Log on to the Alibaba Cloud Management Console. Move the pointer over the More icon in the upper-left corner and choose Products and Services > Virtual Private Cloud to go to the VPC console.
Step 2: In the upper navigation bar, set the region to China (Hangzhou). Then, click Create VPC.

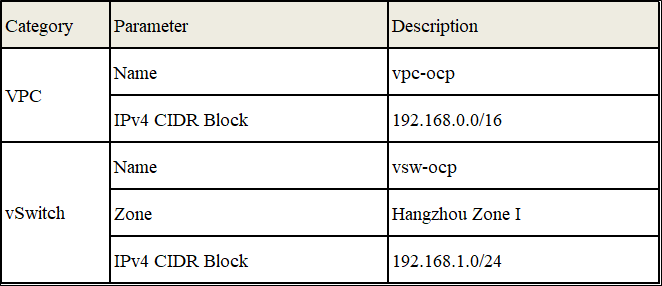
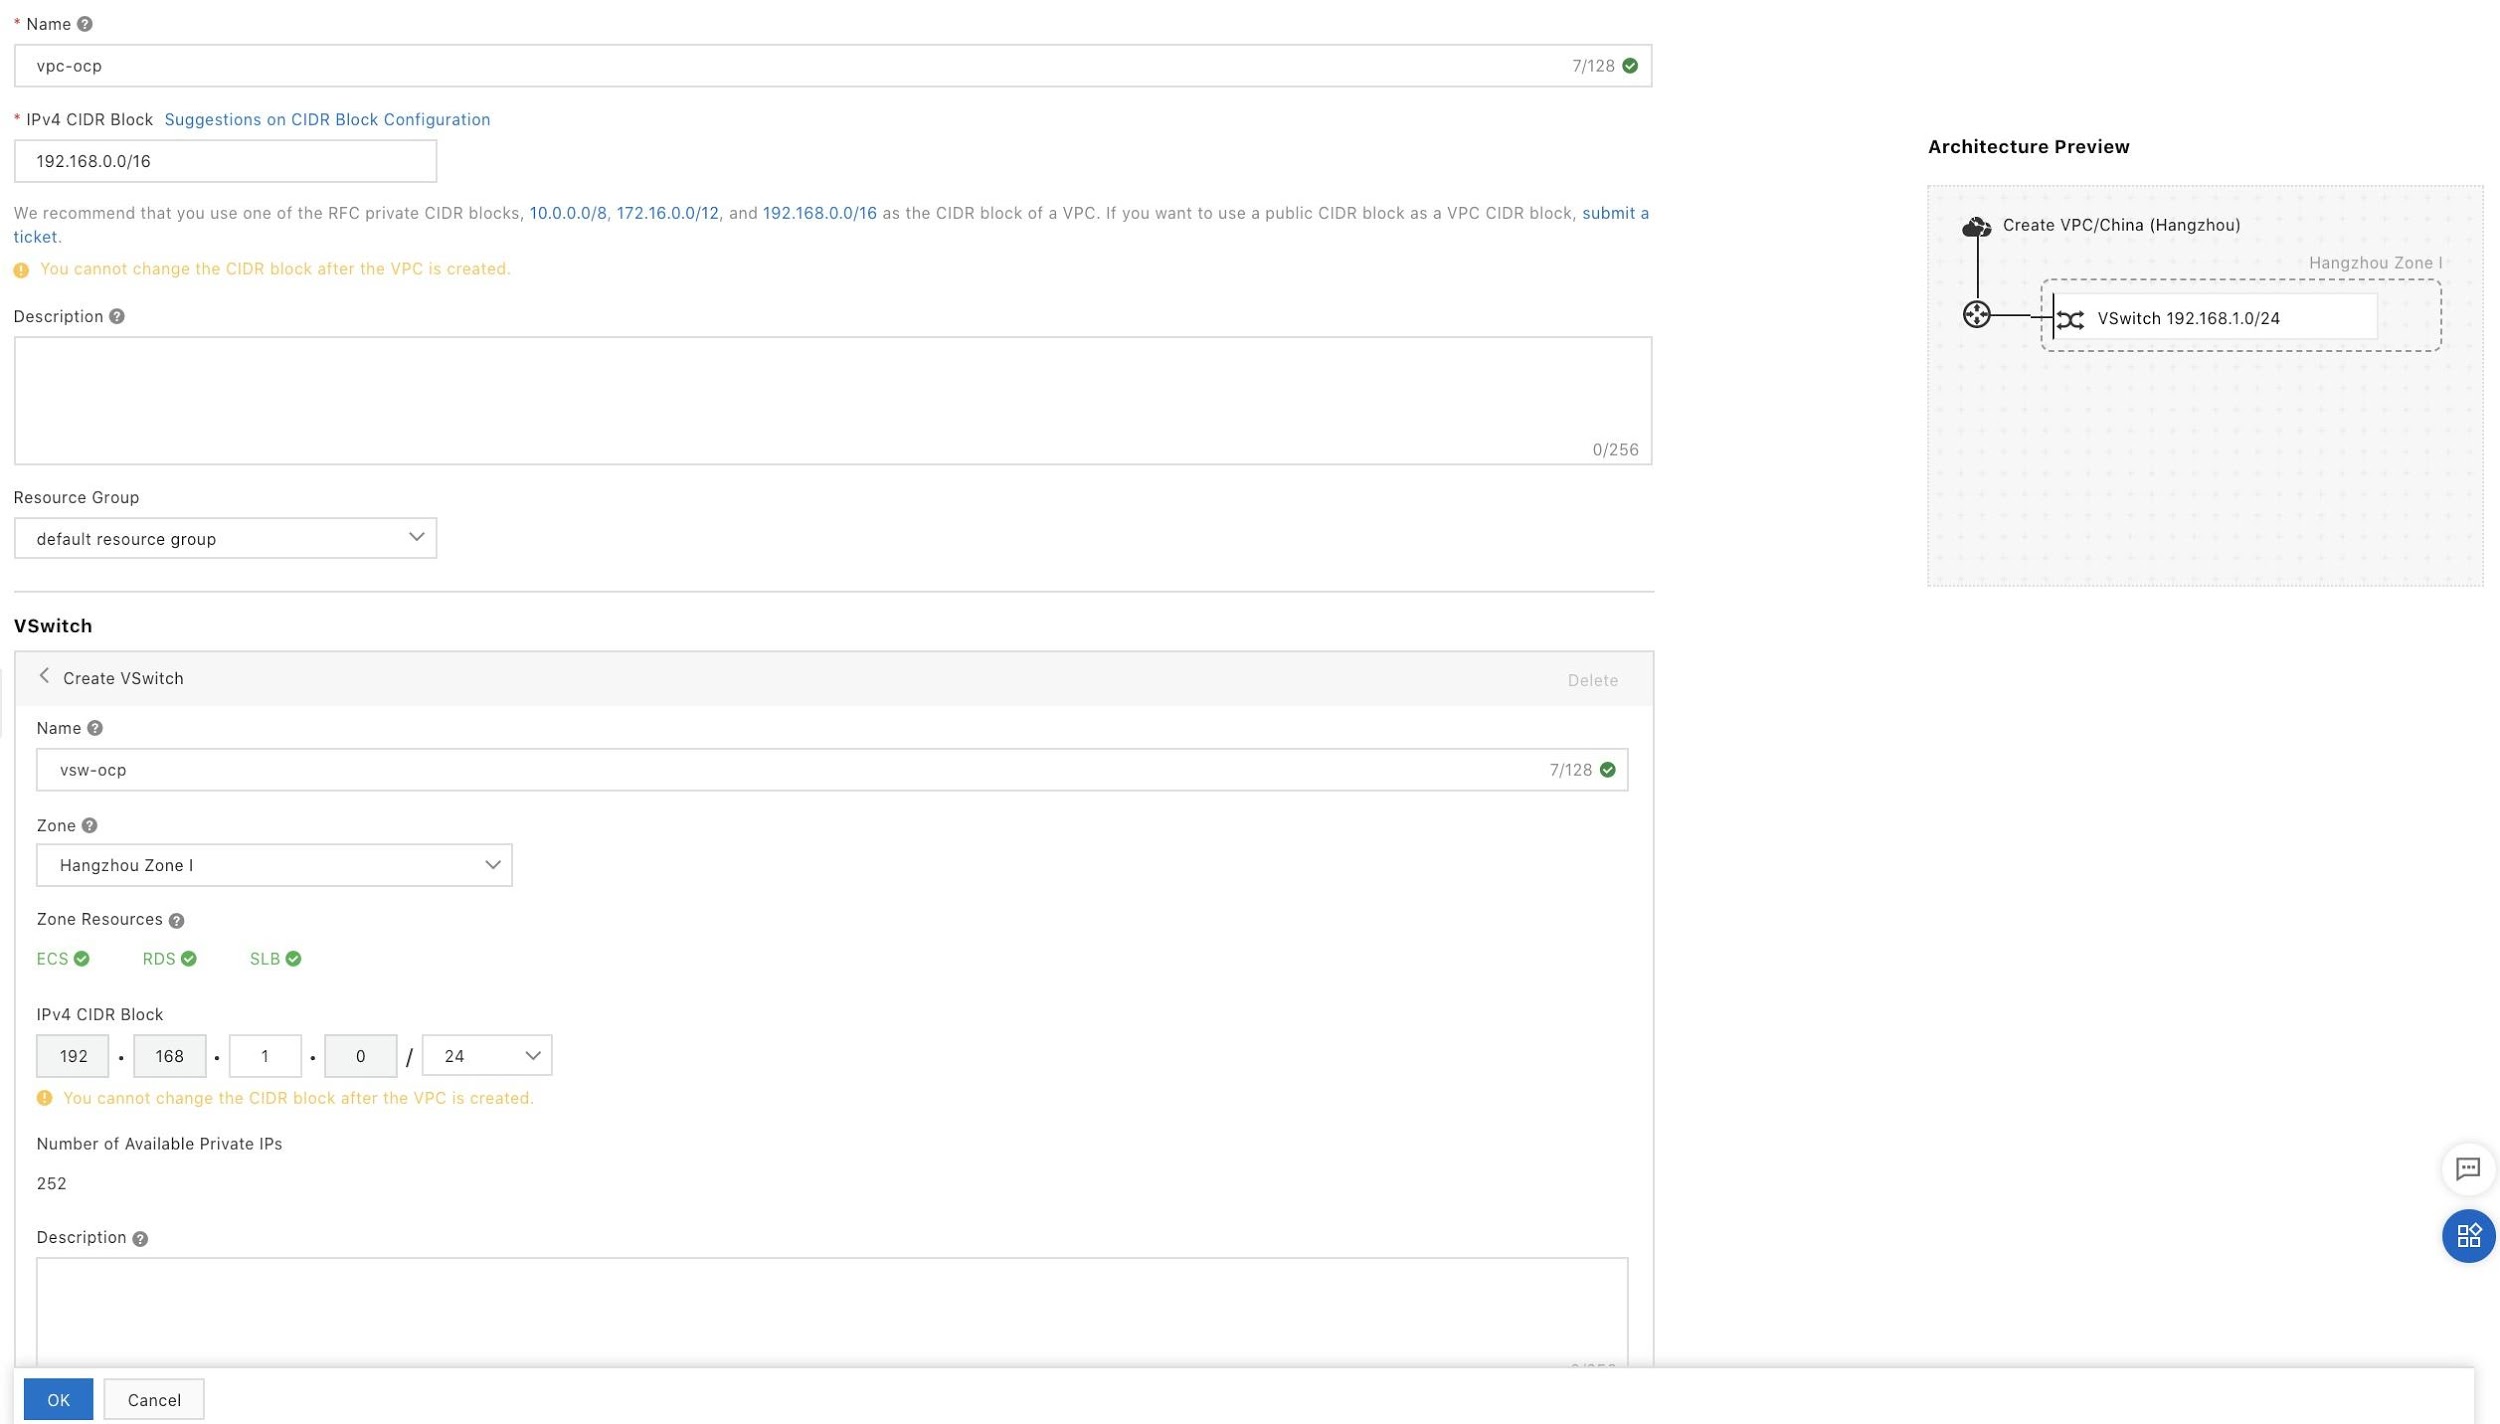
Step 3: On the Create VPC page, set the parameters related to the VPC and vSwitch, as described in the following table.
Step 4: Click OK.
2.2. Create a security group
Create a security group for the ECS instance where the OCP cluster runs.
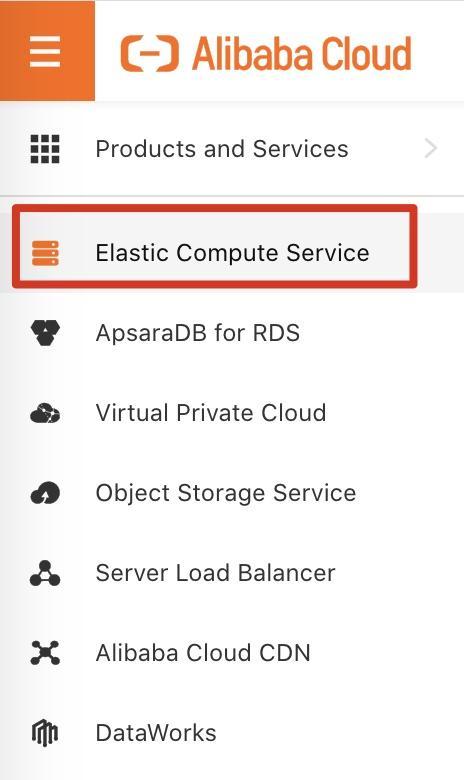
Step 1: Log on to the Alibaba Cloud Management Console. Move the pointer over the more icon in the upper-left corner and choose Products and Services > Elastic Compute Service to go to the ECS console.
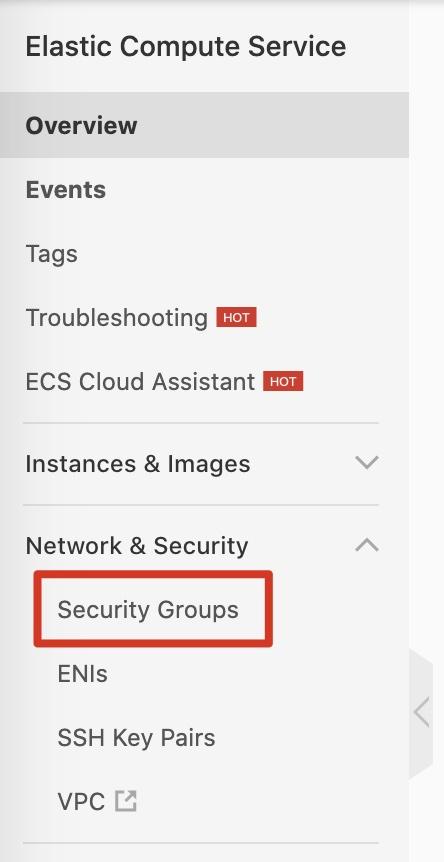
Step 2: On the left-side navigation pane, choose Network & Security > Security Groups. On the Security Groups page, click Create Security Group in the upper-right corner.
Step 3: Set the security group name to sg-ocp and select the vpc-ocp VPC that you created. Click OK, then select Create Rules Now.
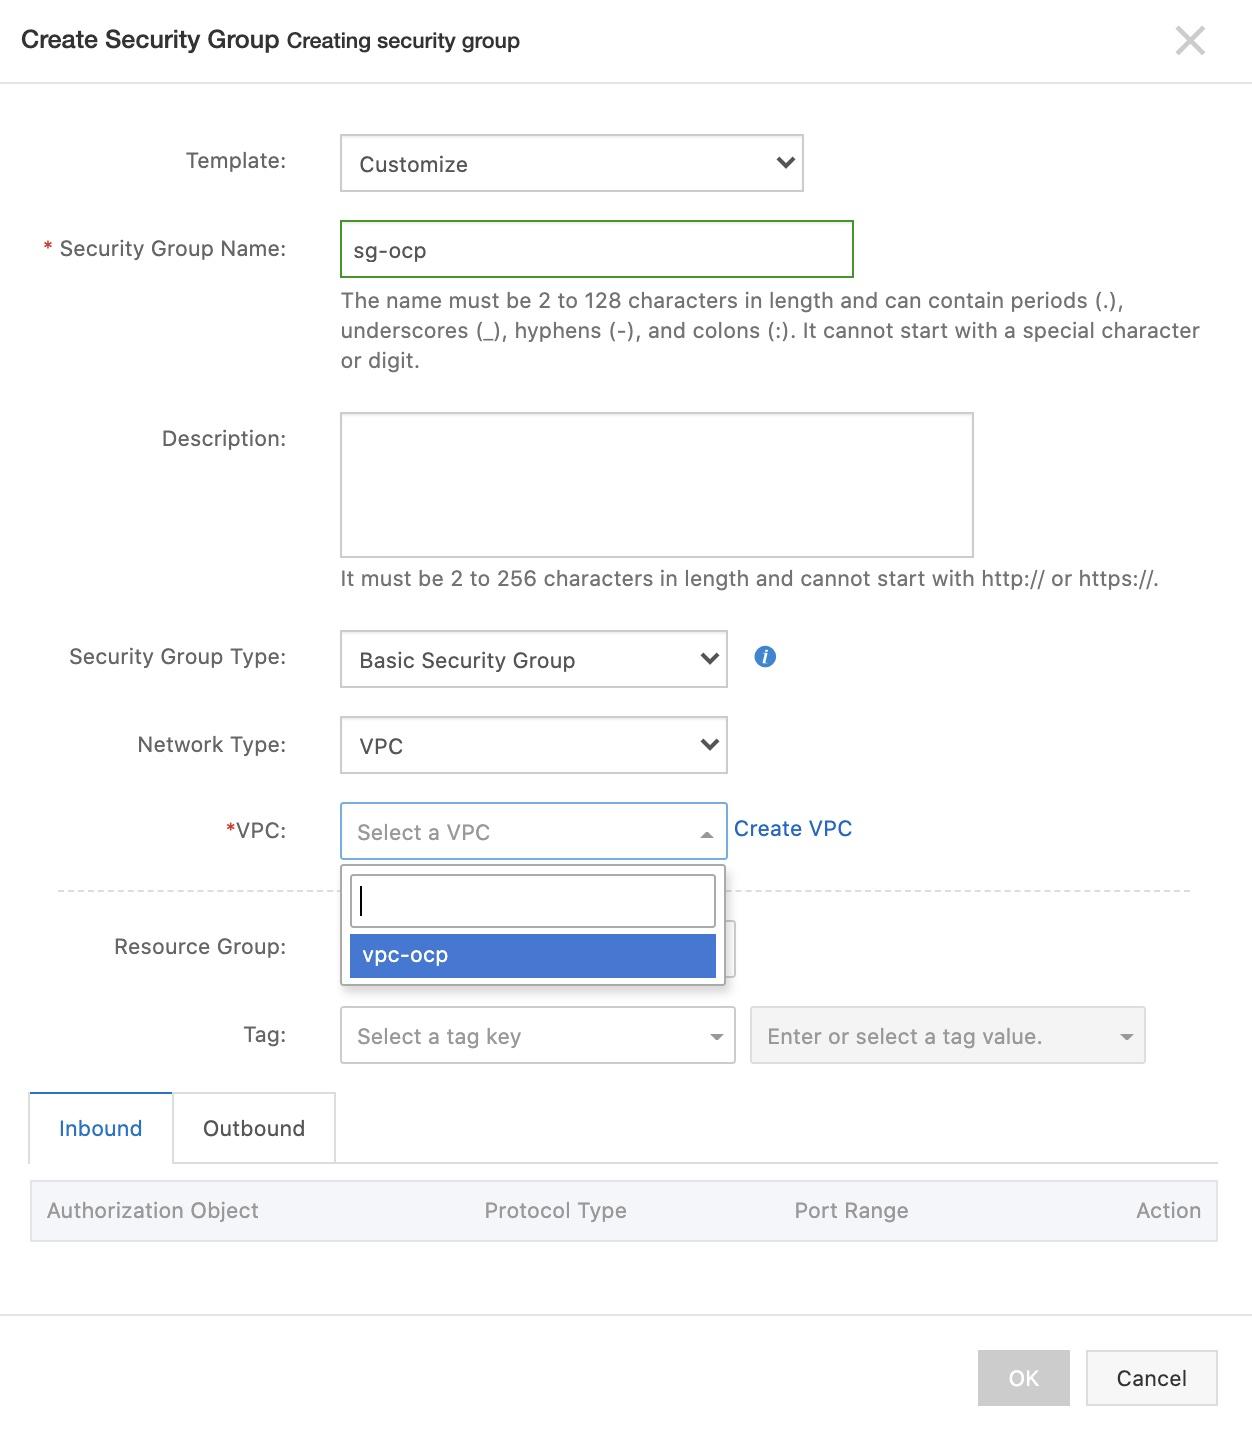
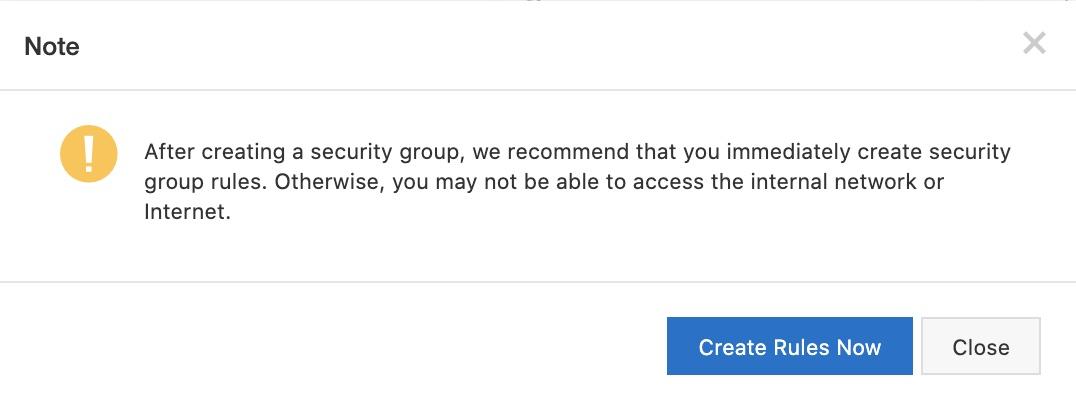
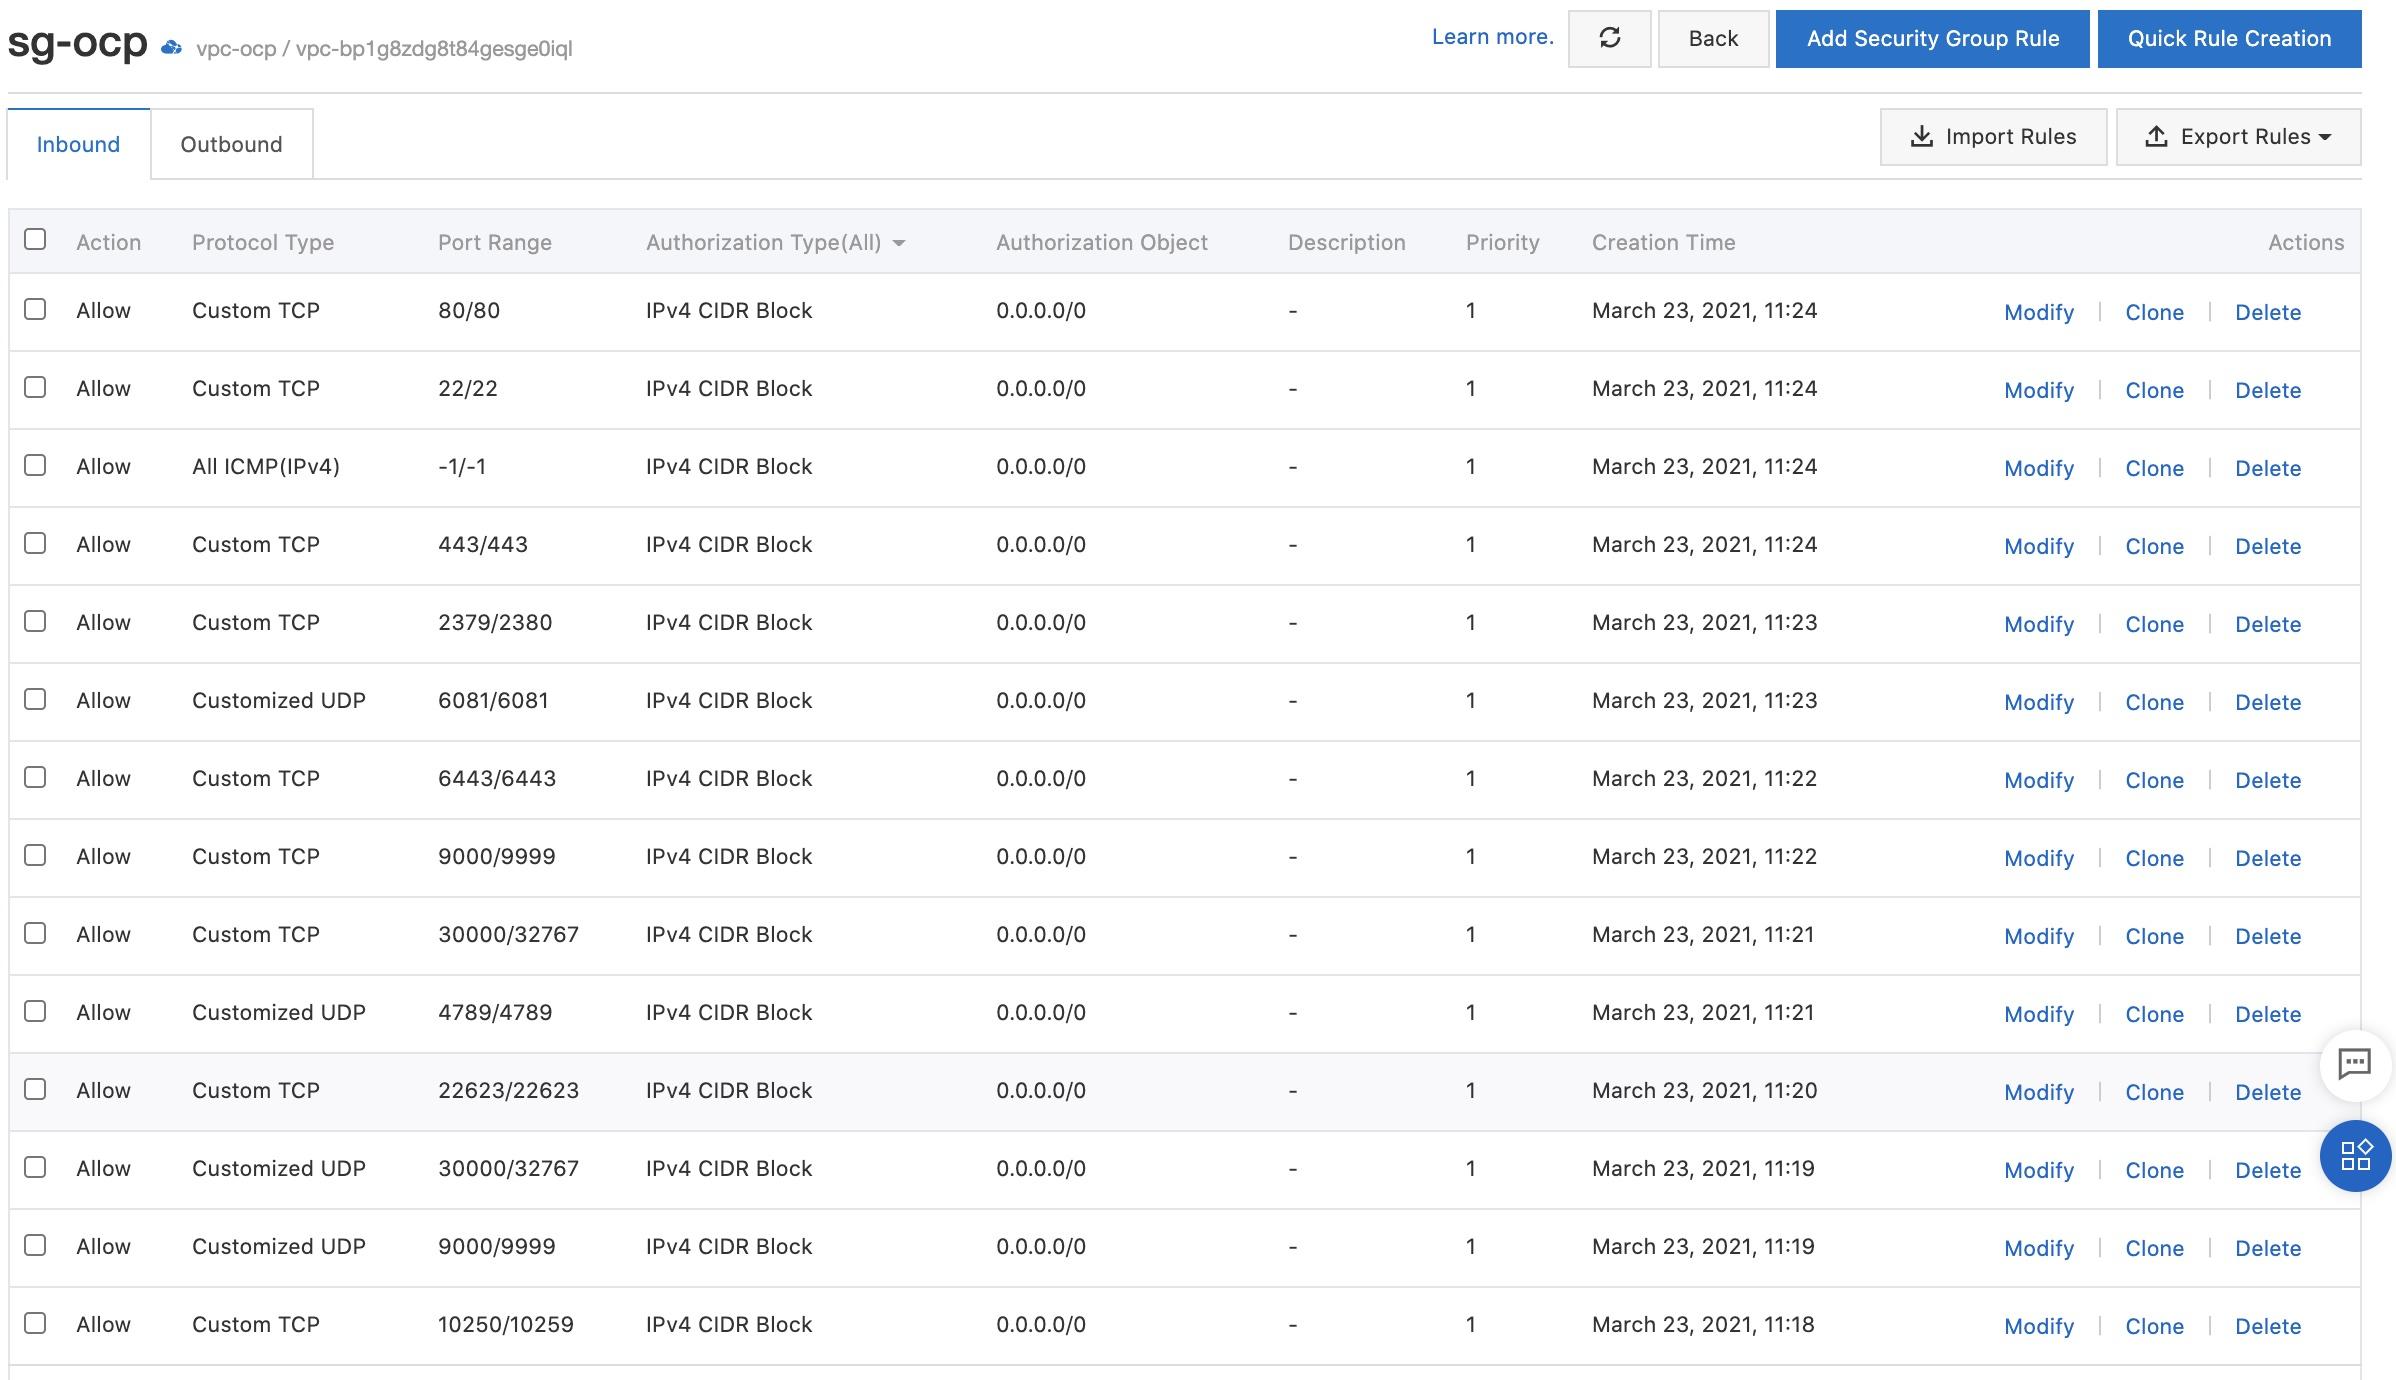
Step 4: In the security group rule section, add inbound security group rules as shown in the following figure.
2.3. Create an ECS instance named installer
Create an ECS instance named "installer" to install the OCP cluster. After you install the OCP cluster, you can use the installer instance to log on to the cluster.
Step 1: Log on to the Alibaba Cloud Management Console. Move the pointer over the More icon in the upper-left corner and choose Products and Services > Elastic Compute Service to go to the ECS console.
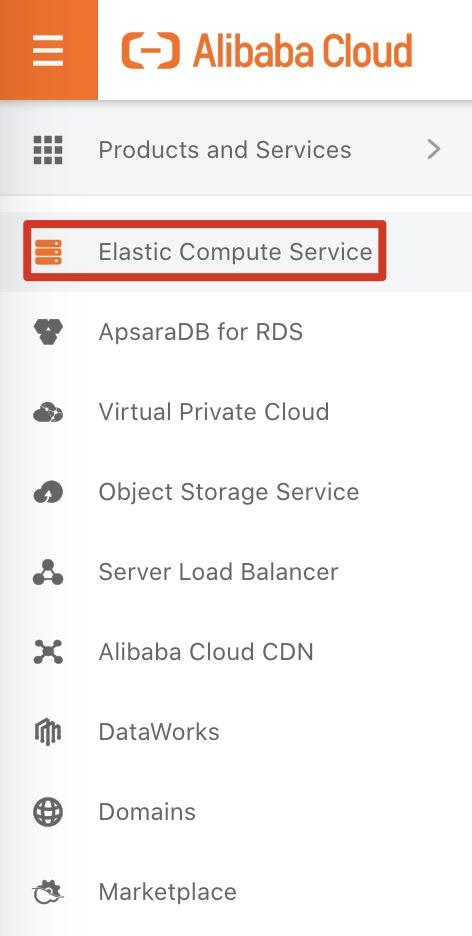
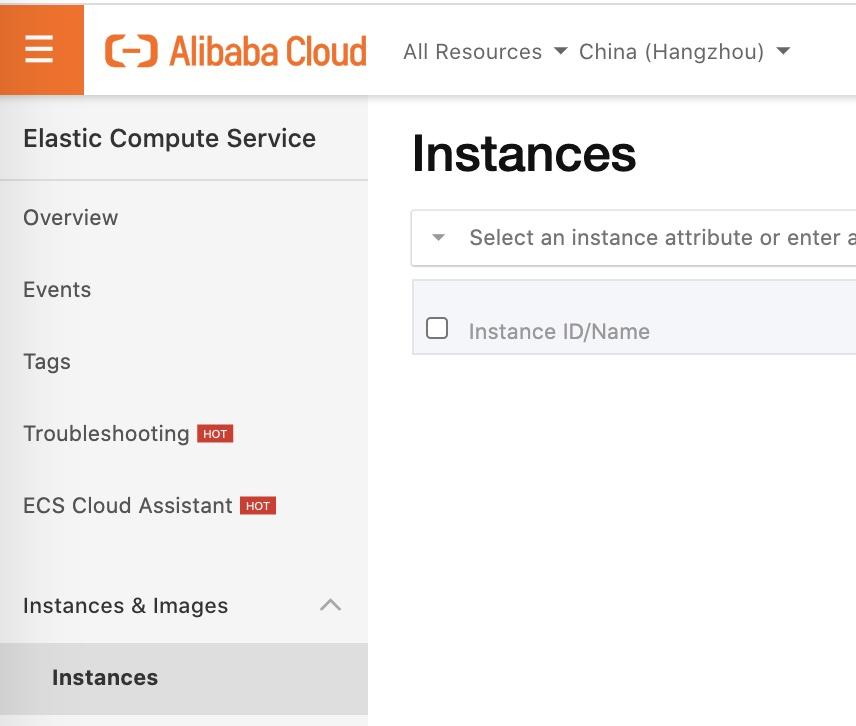
Step 2: On the left-side of the navigation pane, choose Instances & Images > Instances. In the top navigation bar, set the region to China (Hongzhou). Then, click Create Instance.
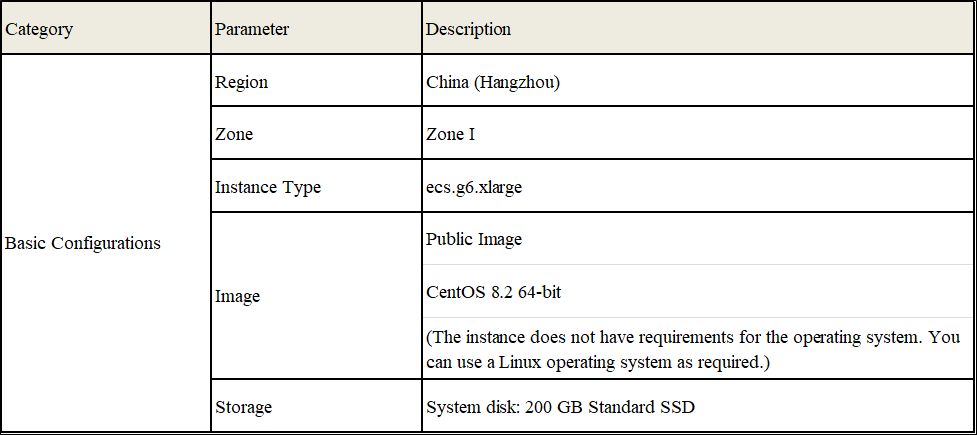
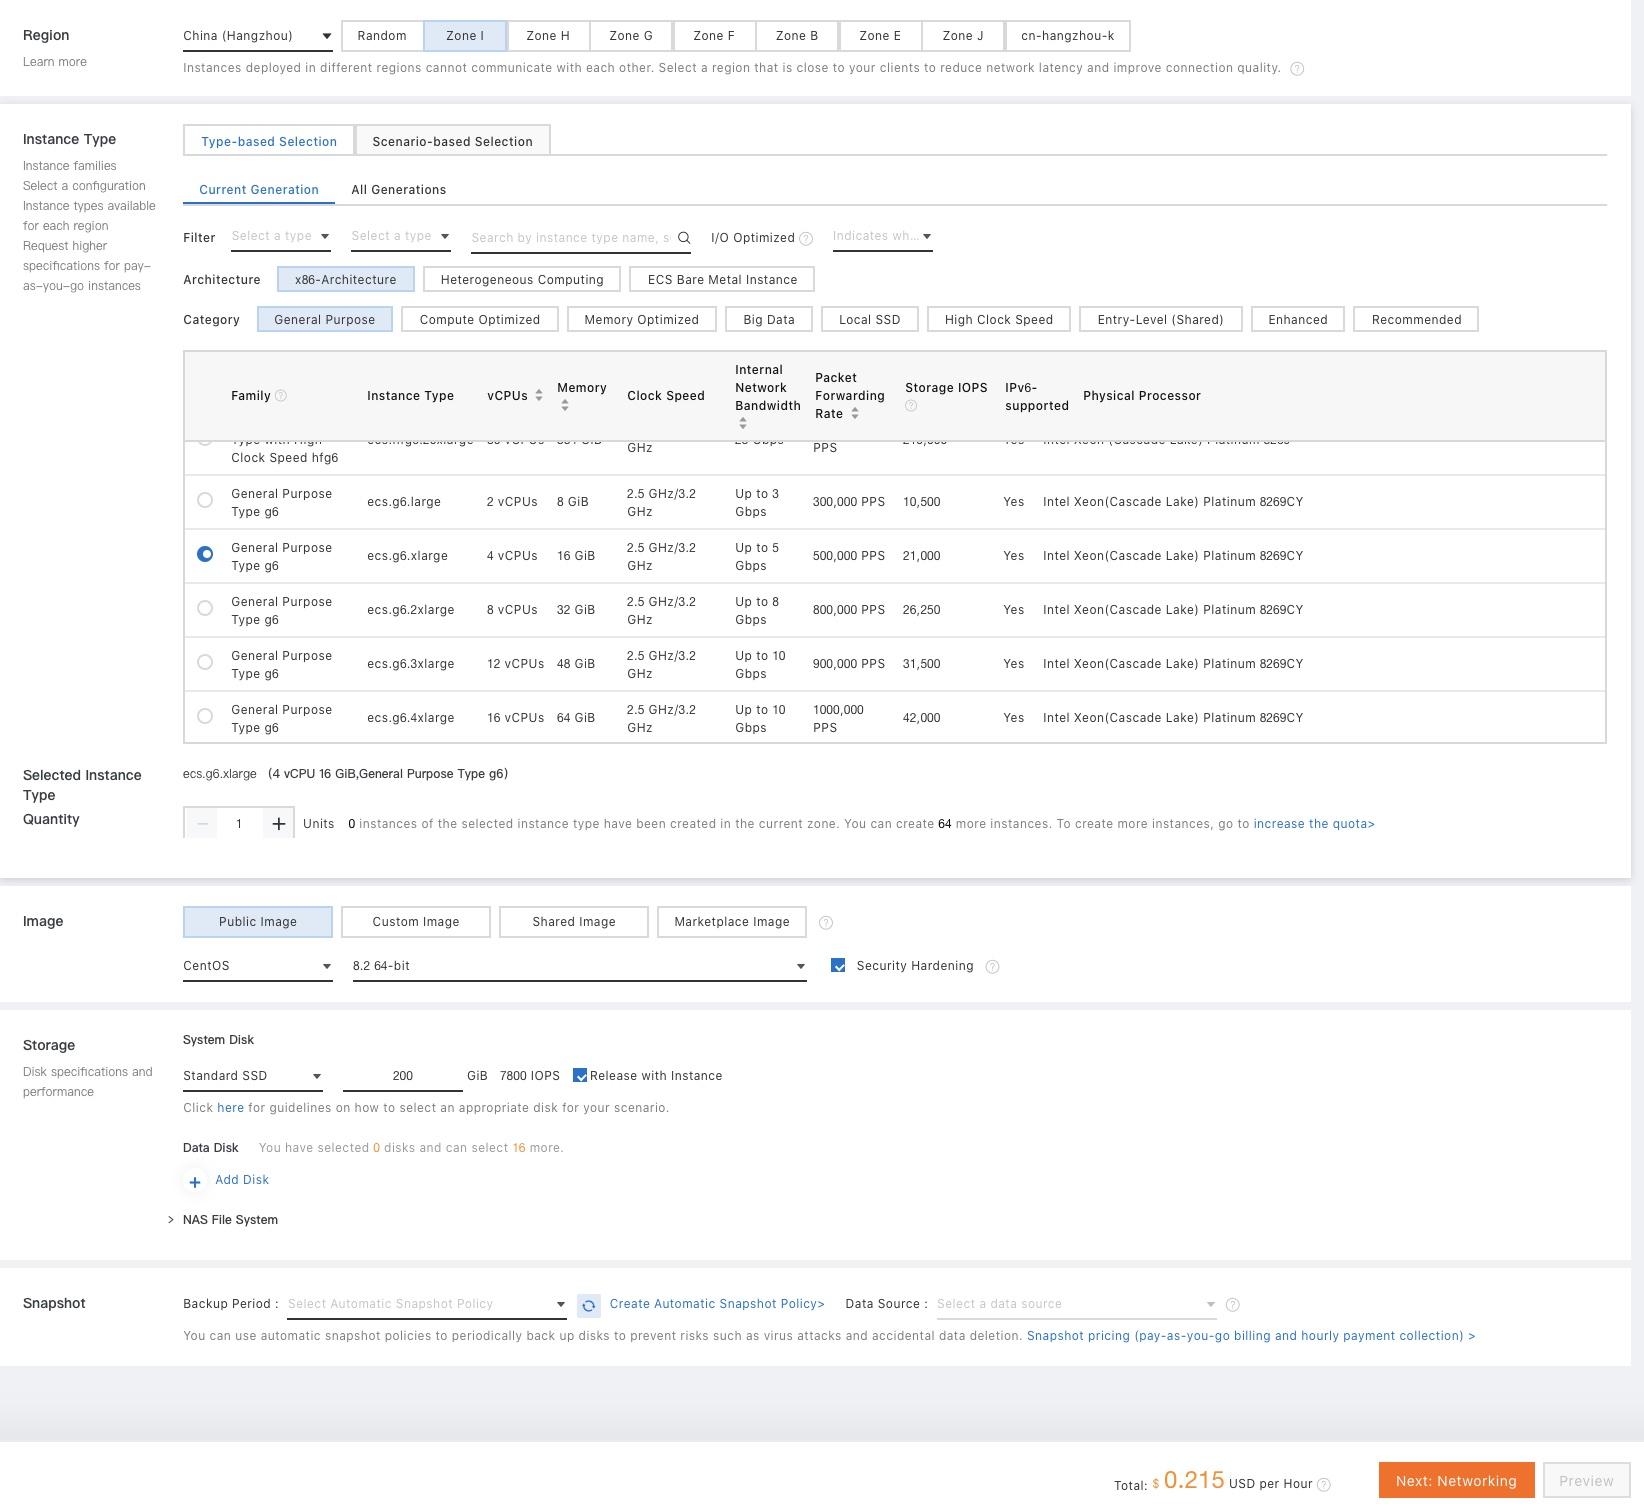
Step 3: On the Basic Configurations page, set the required parameters.
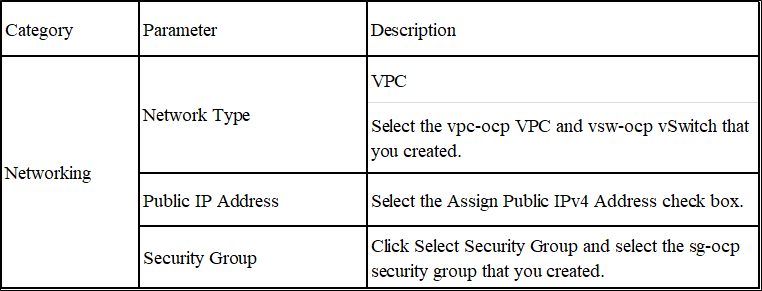
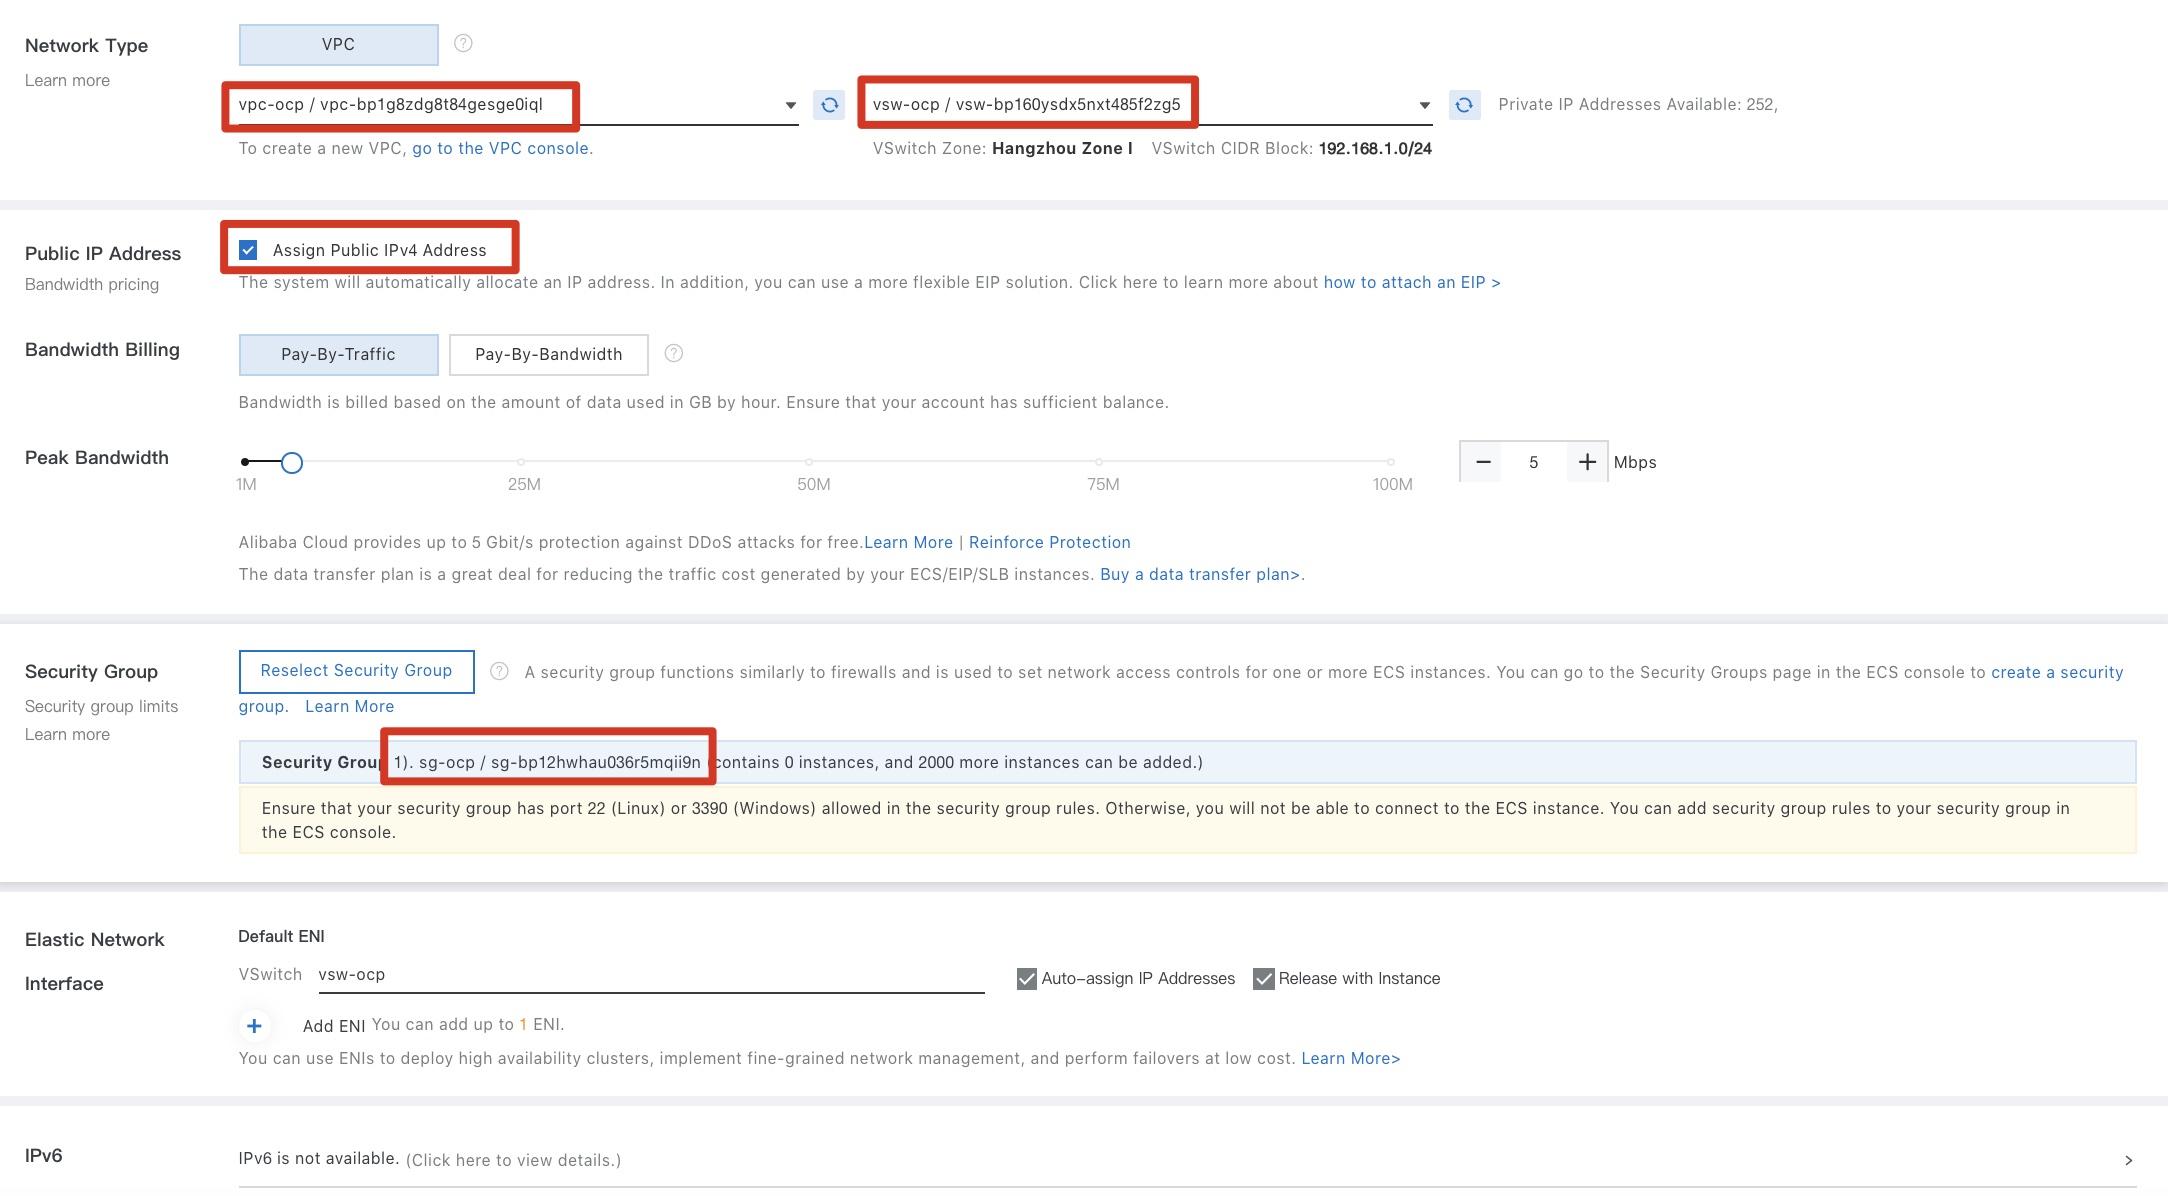
Step 4: On the Networking page, set the required parameters, as described in the following table. Click Next: System Configurations.
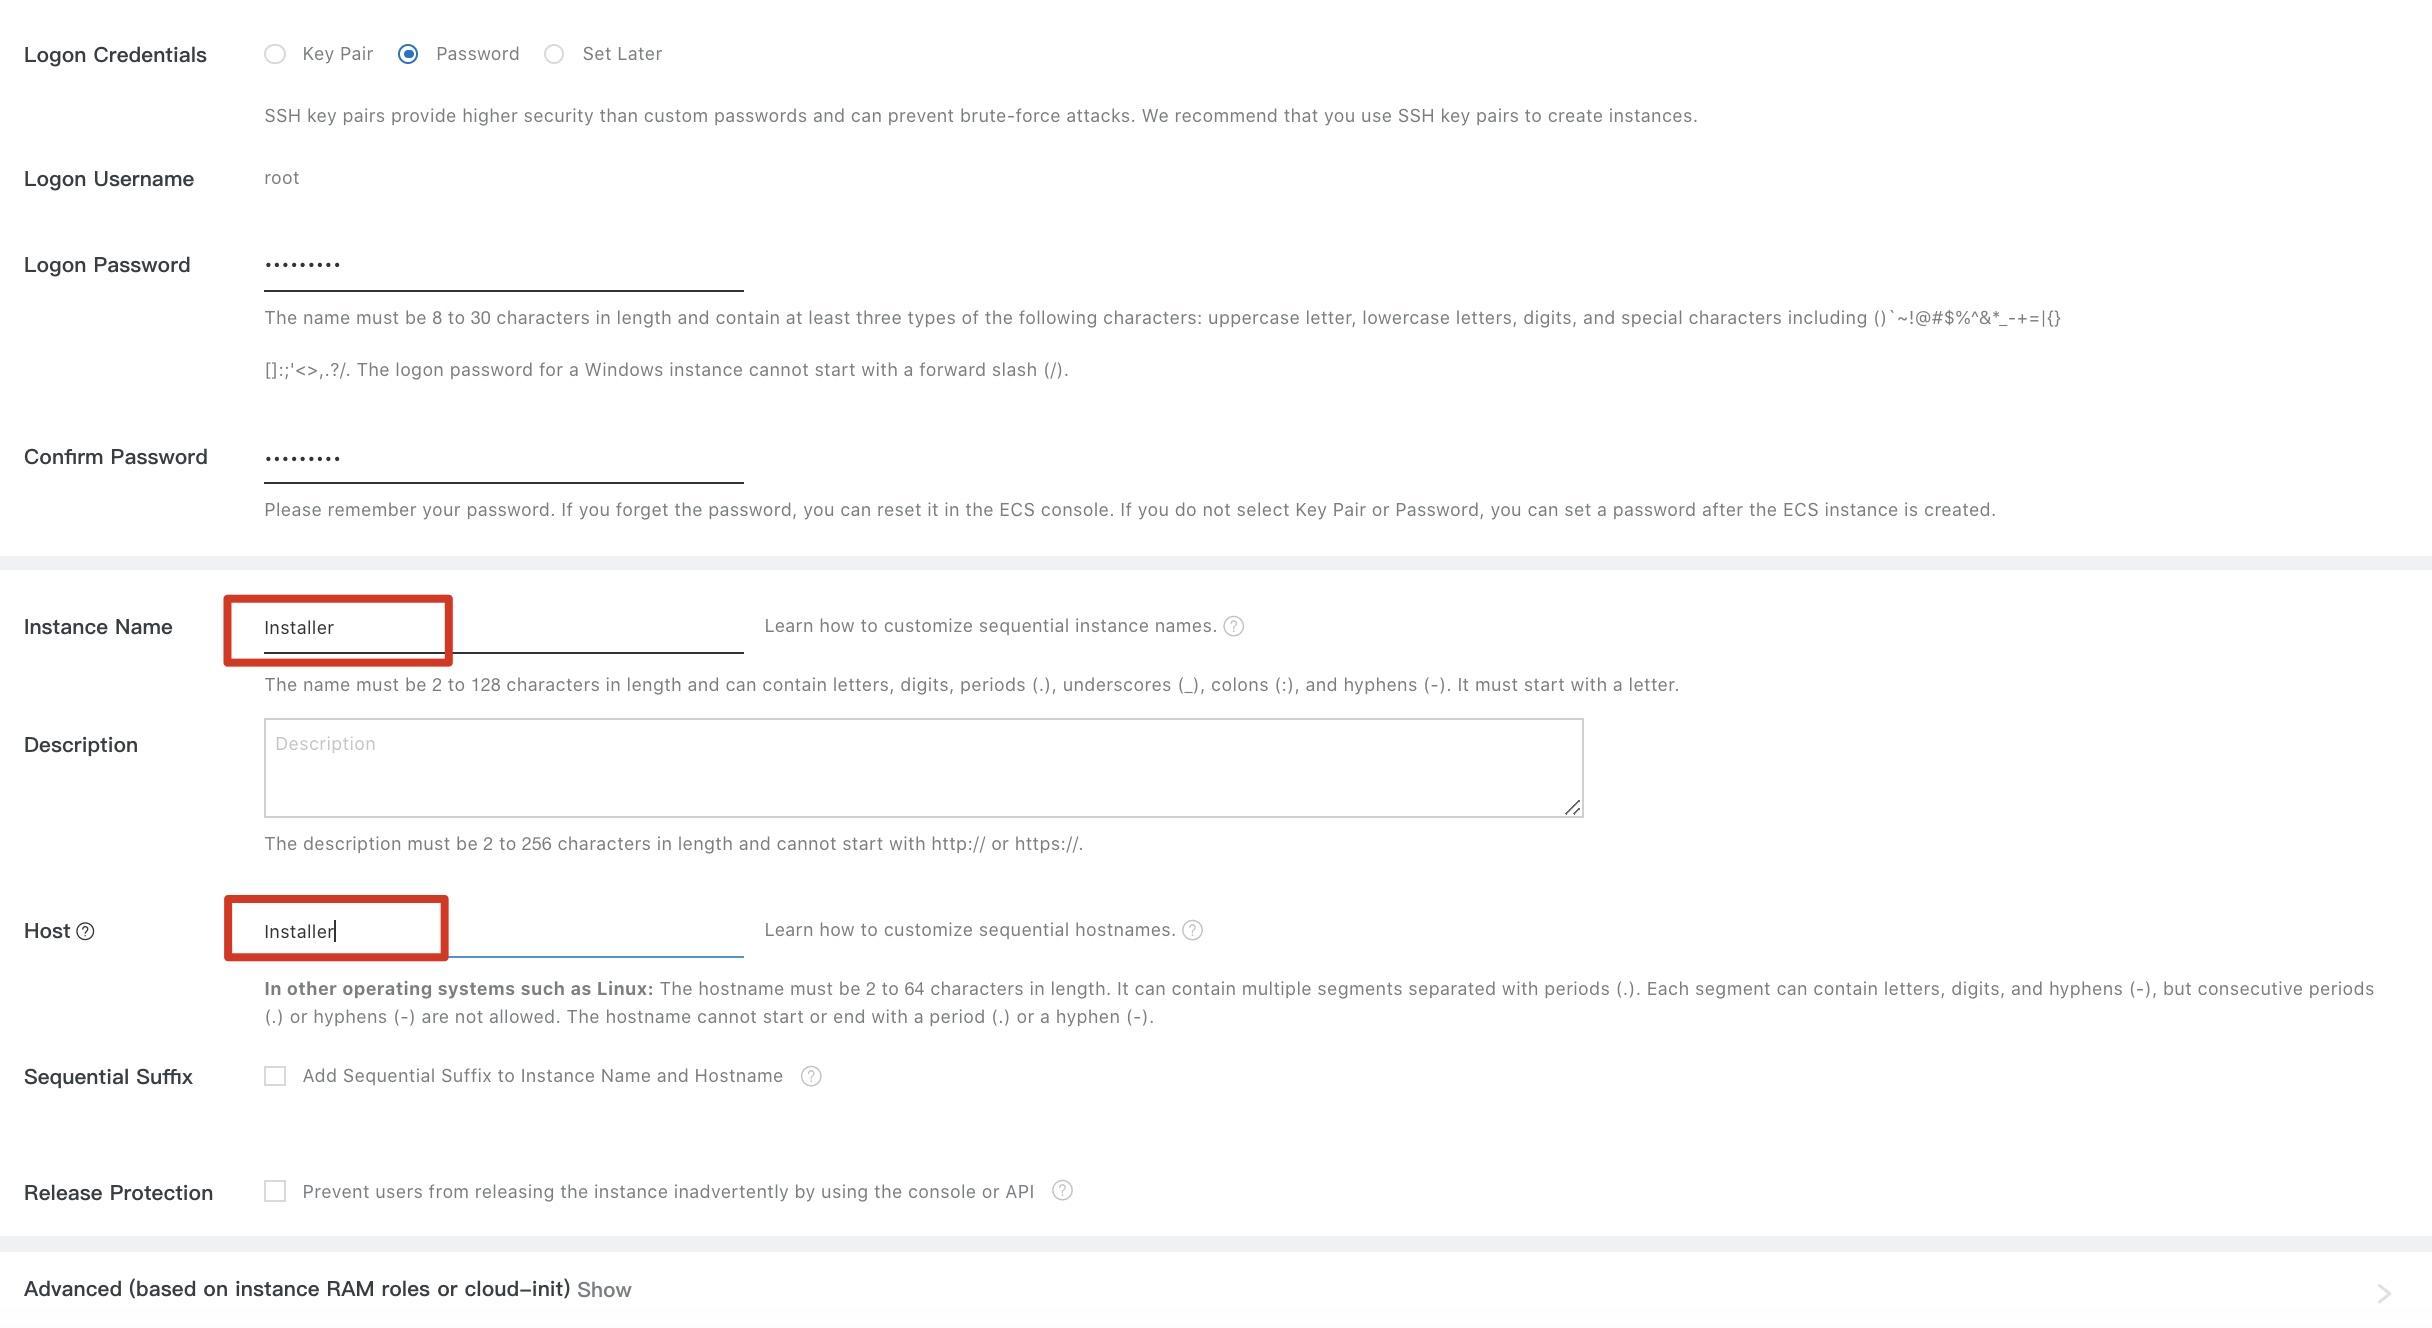
Step 5: In the System Configurations step, set the required parameters. Then, click Preview.
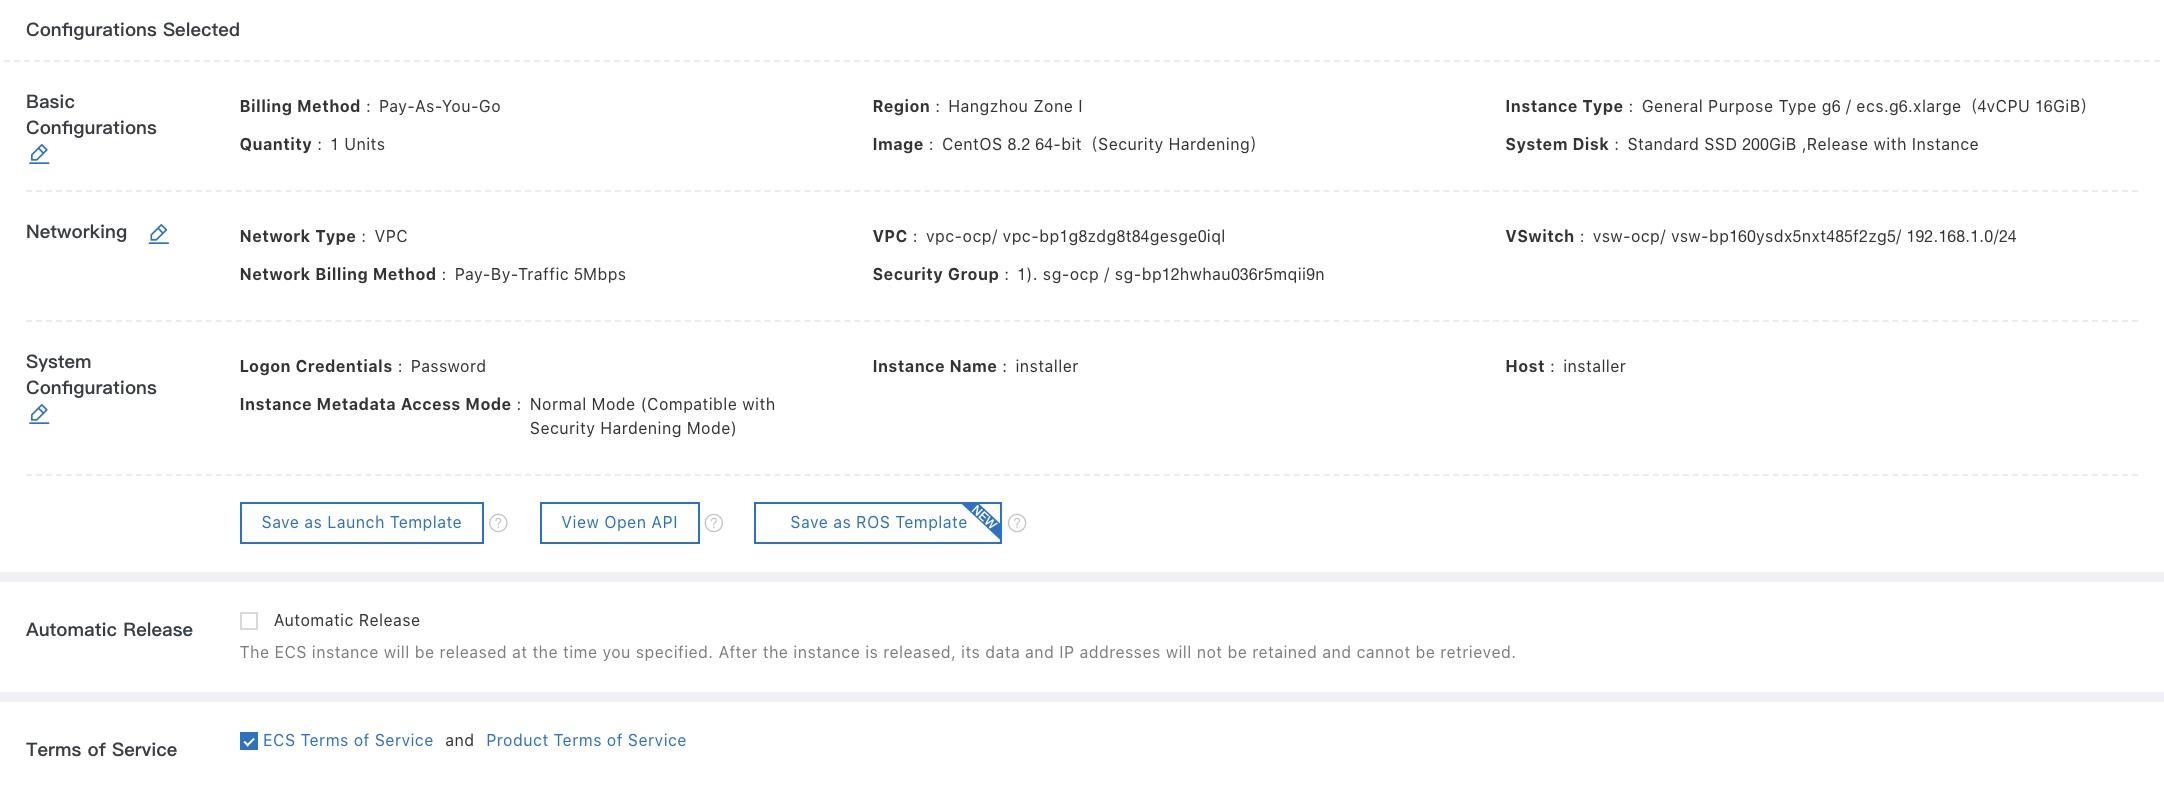
Step 6: In the Preview step, verify the configurations, read the ECS Terms of Service and Product Terms of Service, select the ECS Terms of Service and Product Terms of Service check box, and then click Create Order.
Step 7: After the installer instance is created, view the details of the installer instance on the Instances page. The public IP address is used as the remote logon address of the installer instance.

2.4. Create an OSS bucket
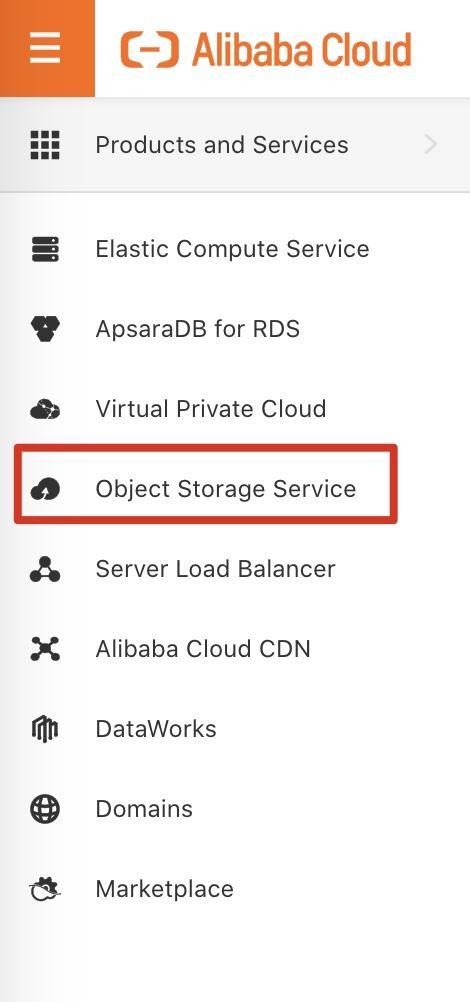
Step 1: Log on to the Alibaba Cloud Management Console. Move the pointer over the More icon in the upper-left corner and click Object Storage Service to go to the OSS console.
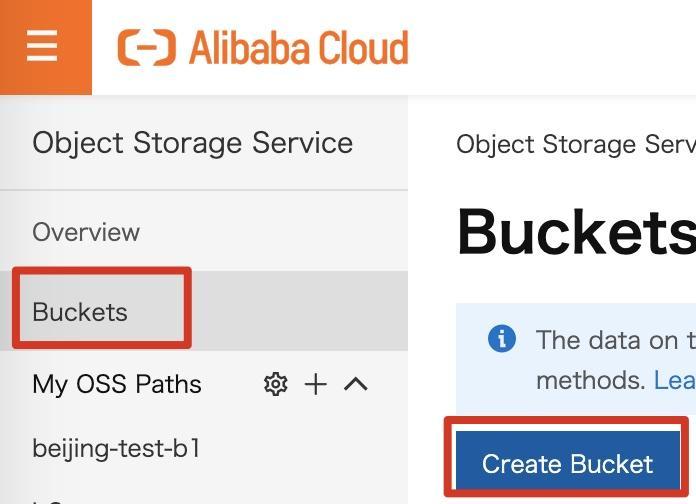
Step 2: On the left-side of the navigation pane, click Buckets. On the Buckets page, click Create Bucket.
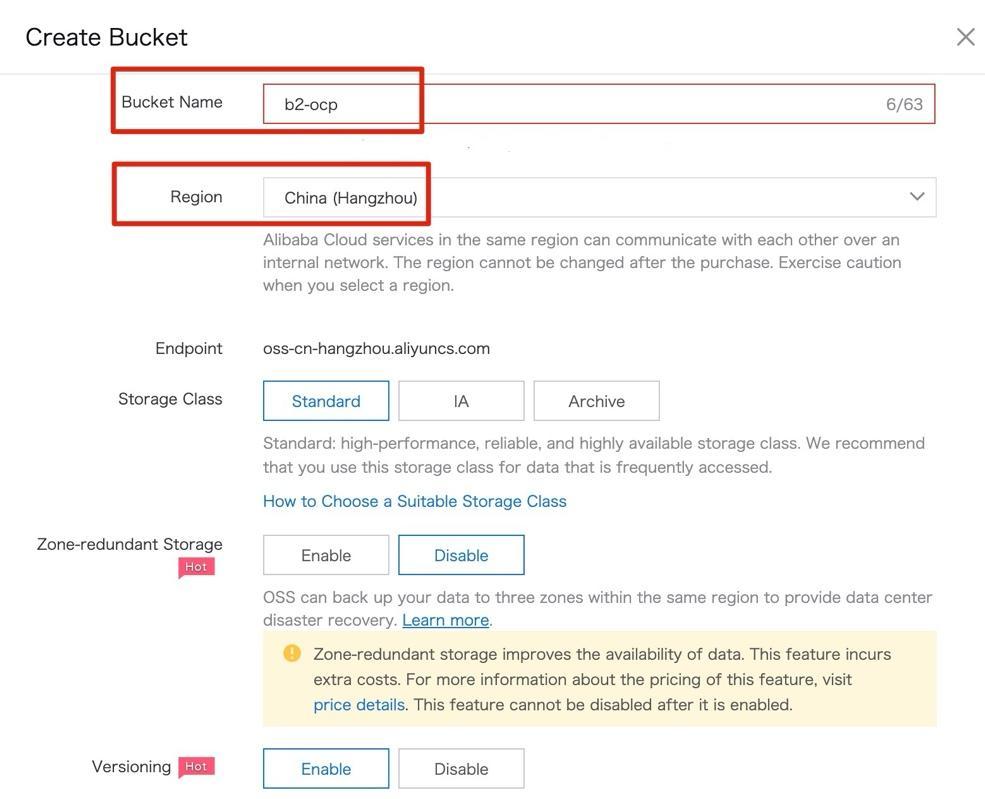
Step 3: In the Create Bucket panel, set the Bucket Name parameter to b2-ocp and the Region parameter to China (Hangzhou). Set other parameters and click OK.
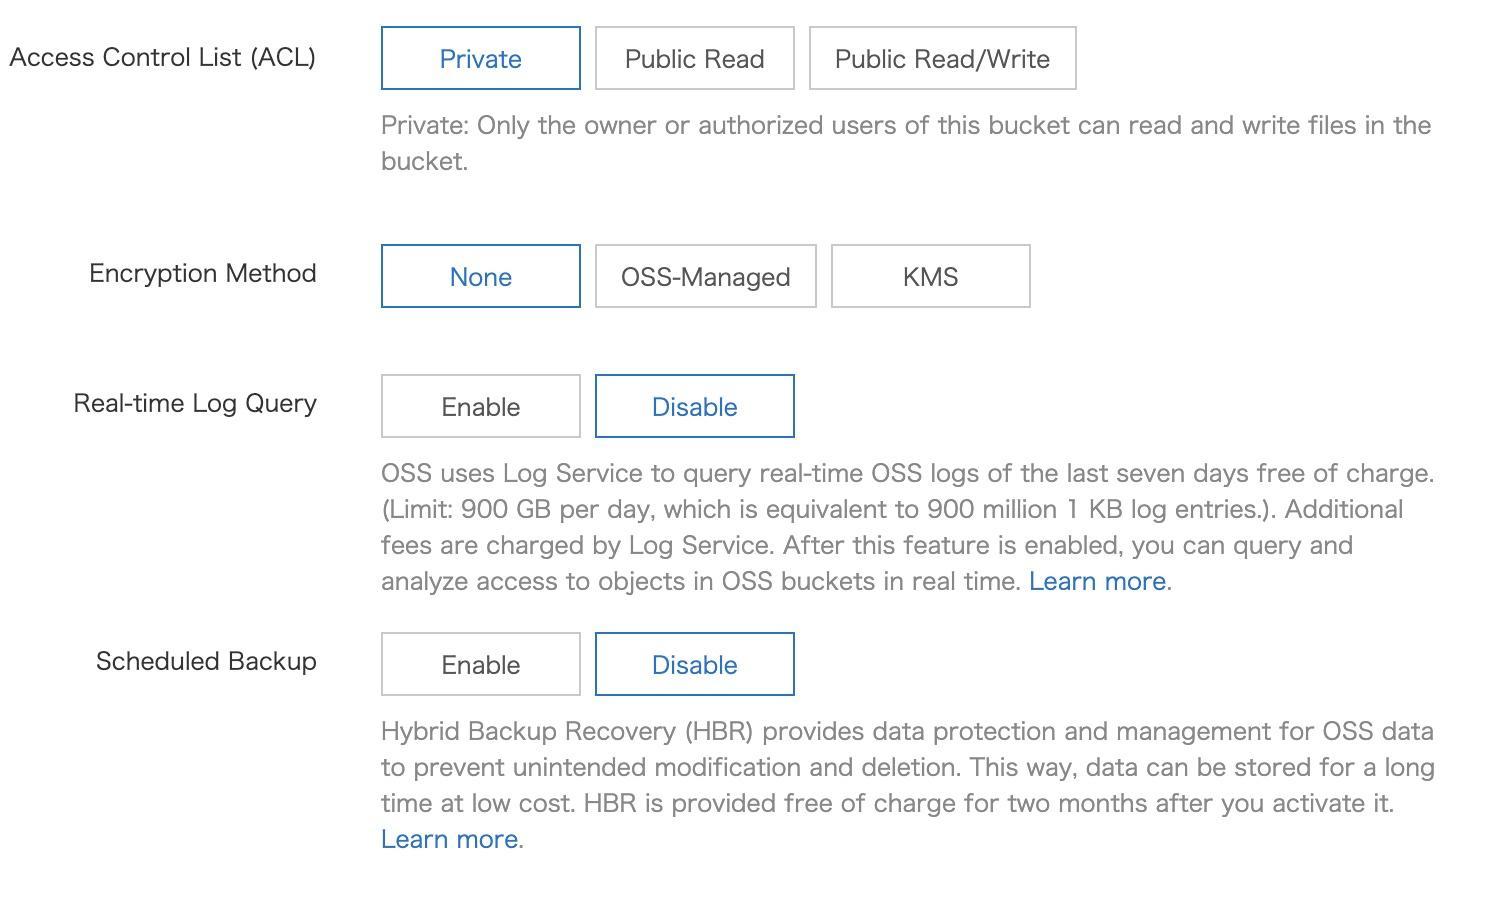
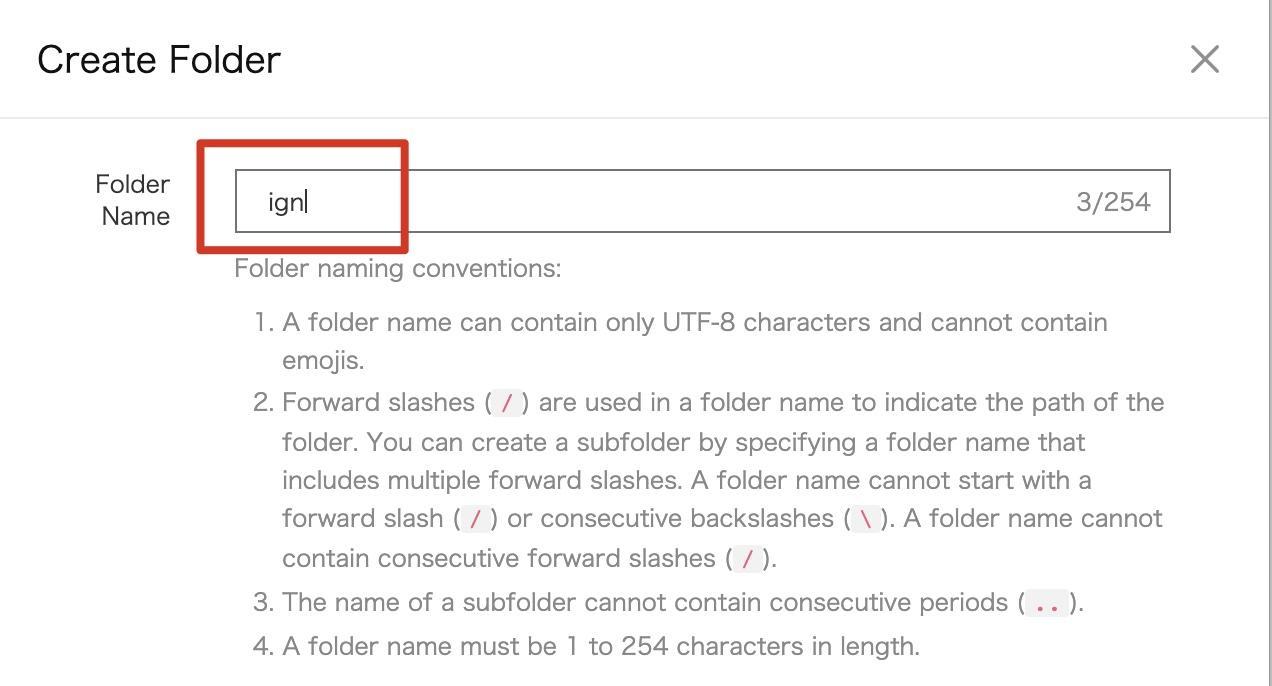
Step 4: After the b2-ocp bucket is created, the overview page of the bucket appears. On the left-side of the navigation pane, click Files. Then, click Create Folder.
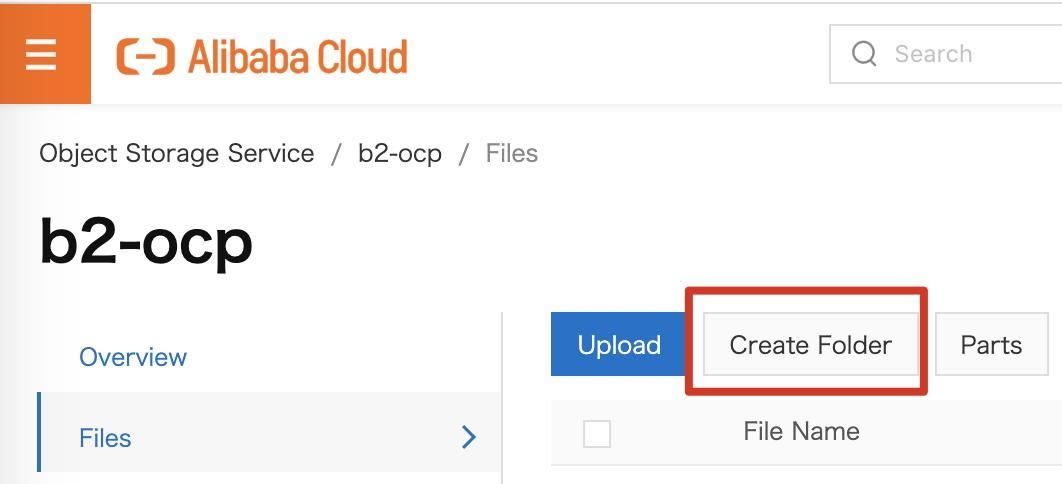
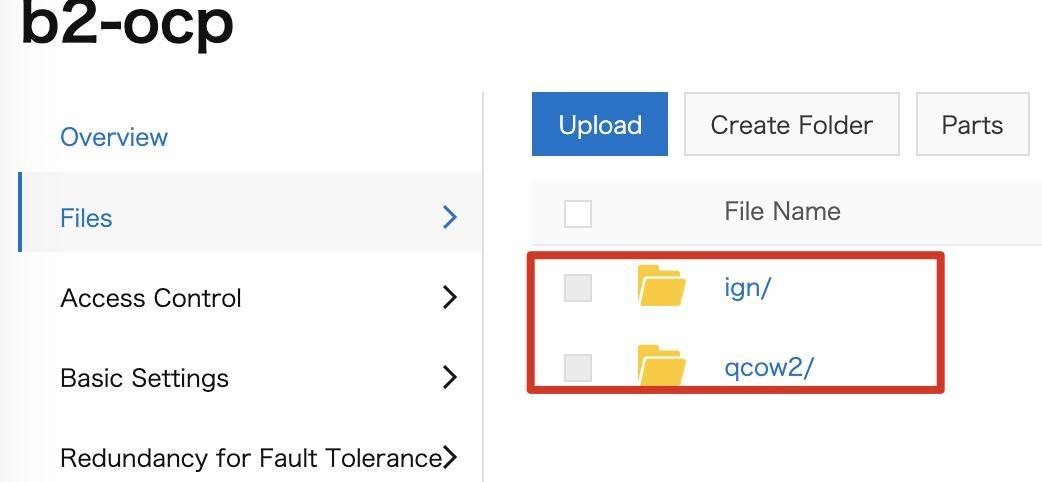
Step 5: Create two folders and name them ign and qcow2.
2.5. Create a NAT gateway
Step 1: Log on to the Alibaba Cloud Management Console. Move the pointer over the More icon in the upper-left corner and choose Products and Services > NAT Gateway to go to the NAT Gateway console.
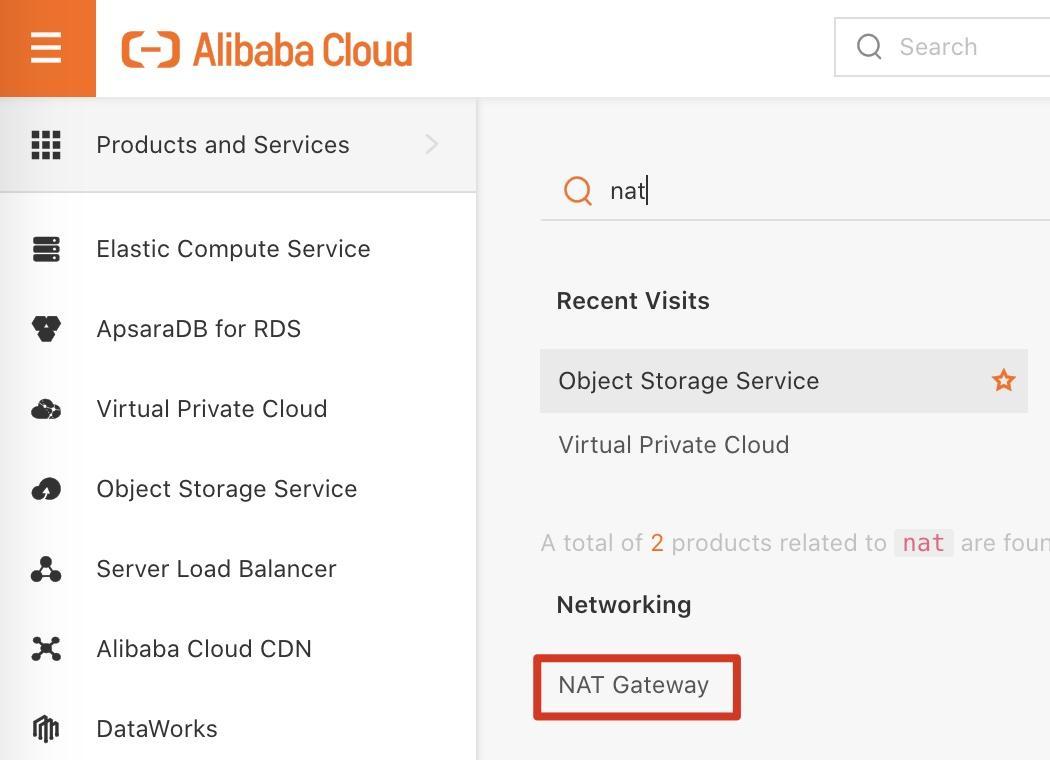
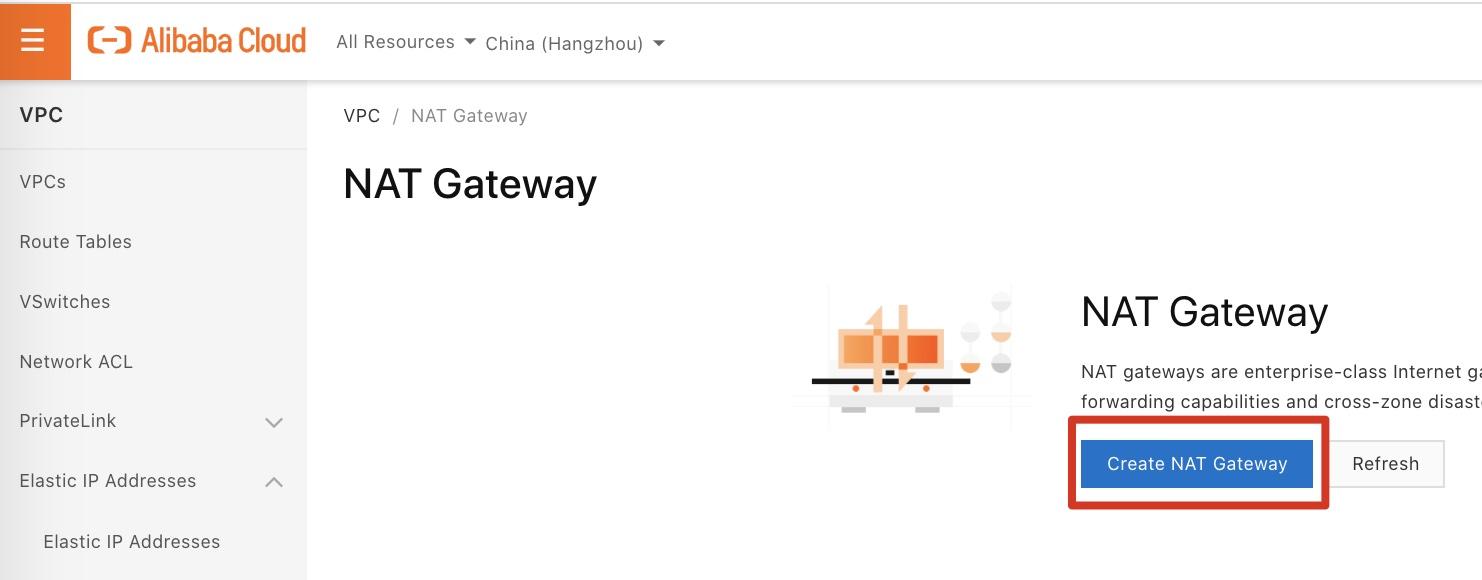
Step 2: Set the region to China (Hangzhou) and click Create NAT Gateway.
Step 3: Set the required parameters, as shown in the following figure. Then, click Buy Now.
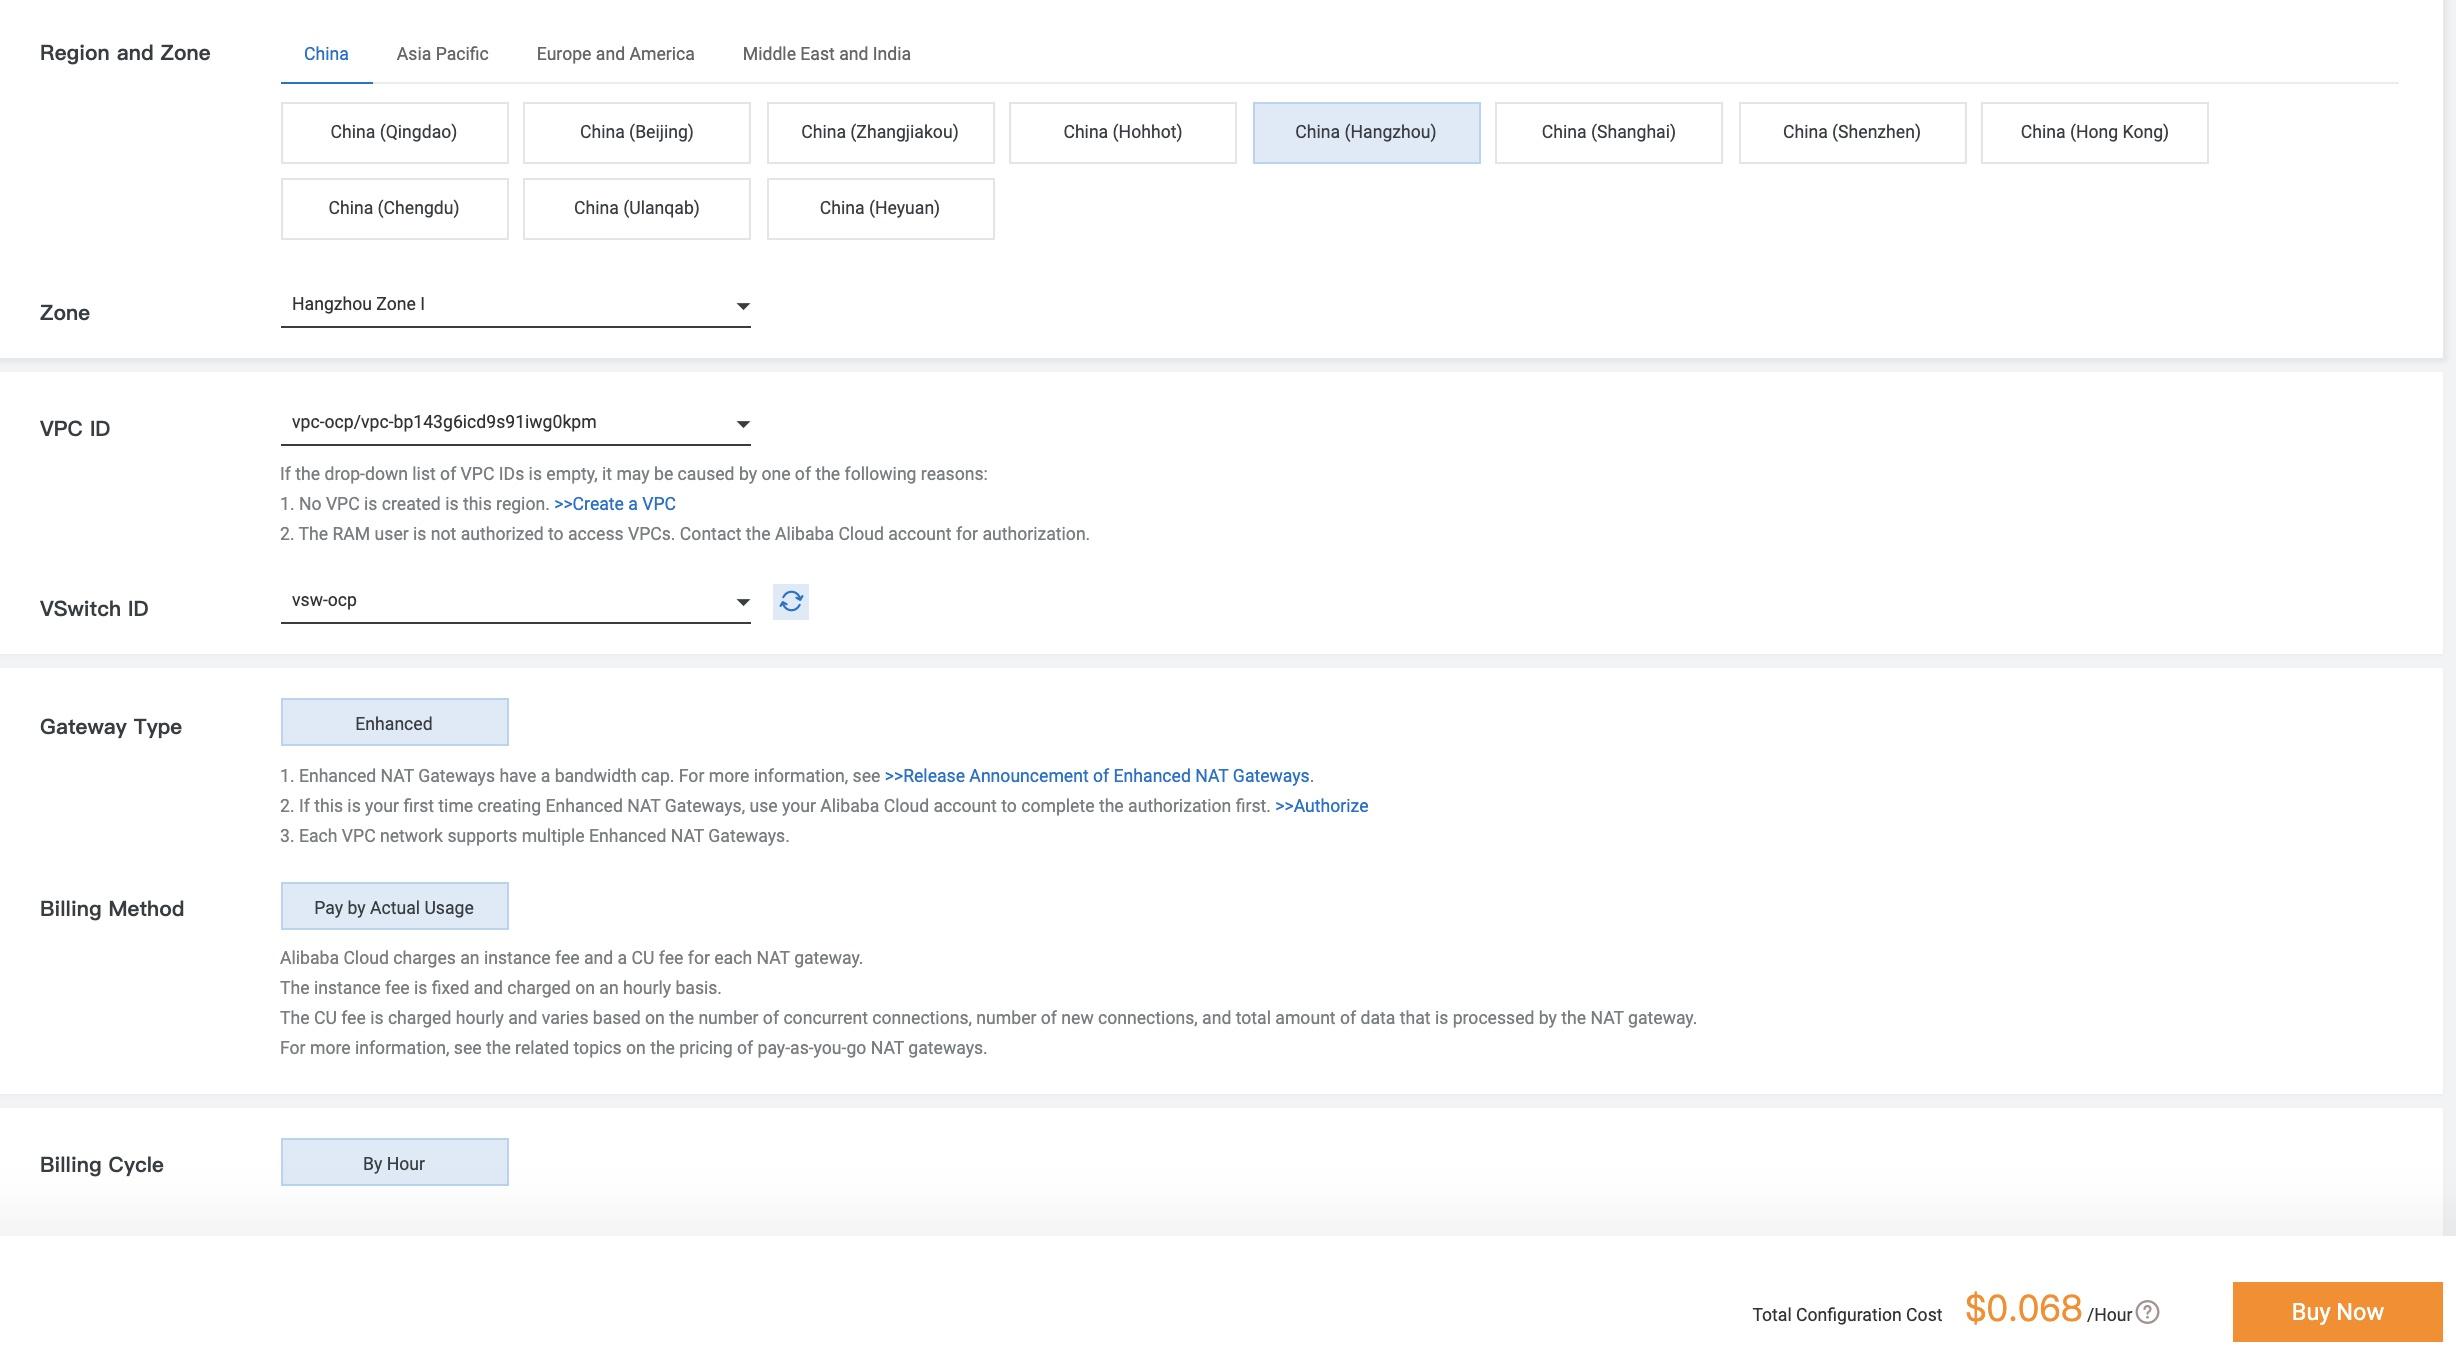
Step 4: Return to the NAT Gateway page. On the left-side of the navigation pane, click Elastic IP Addresses, then click Create EIP.
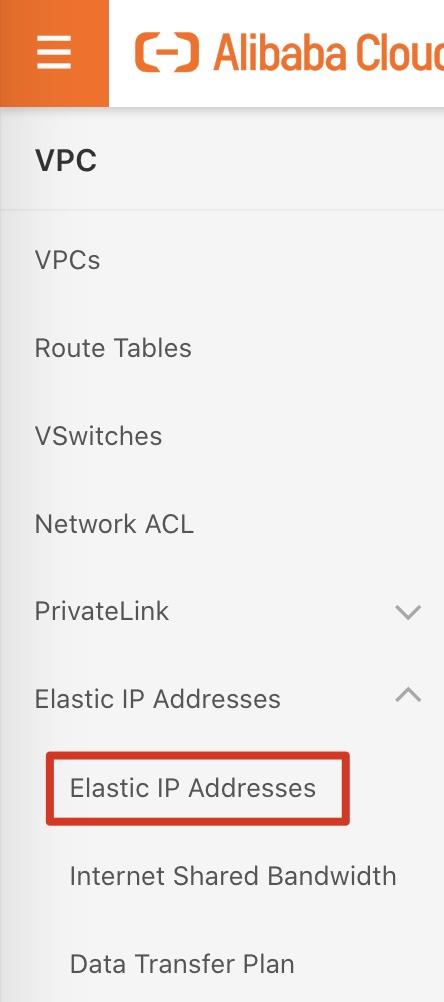
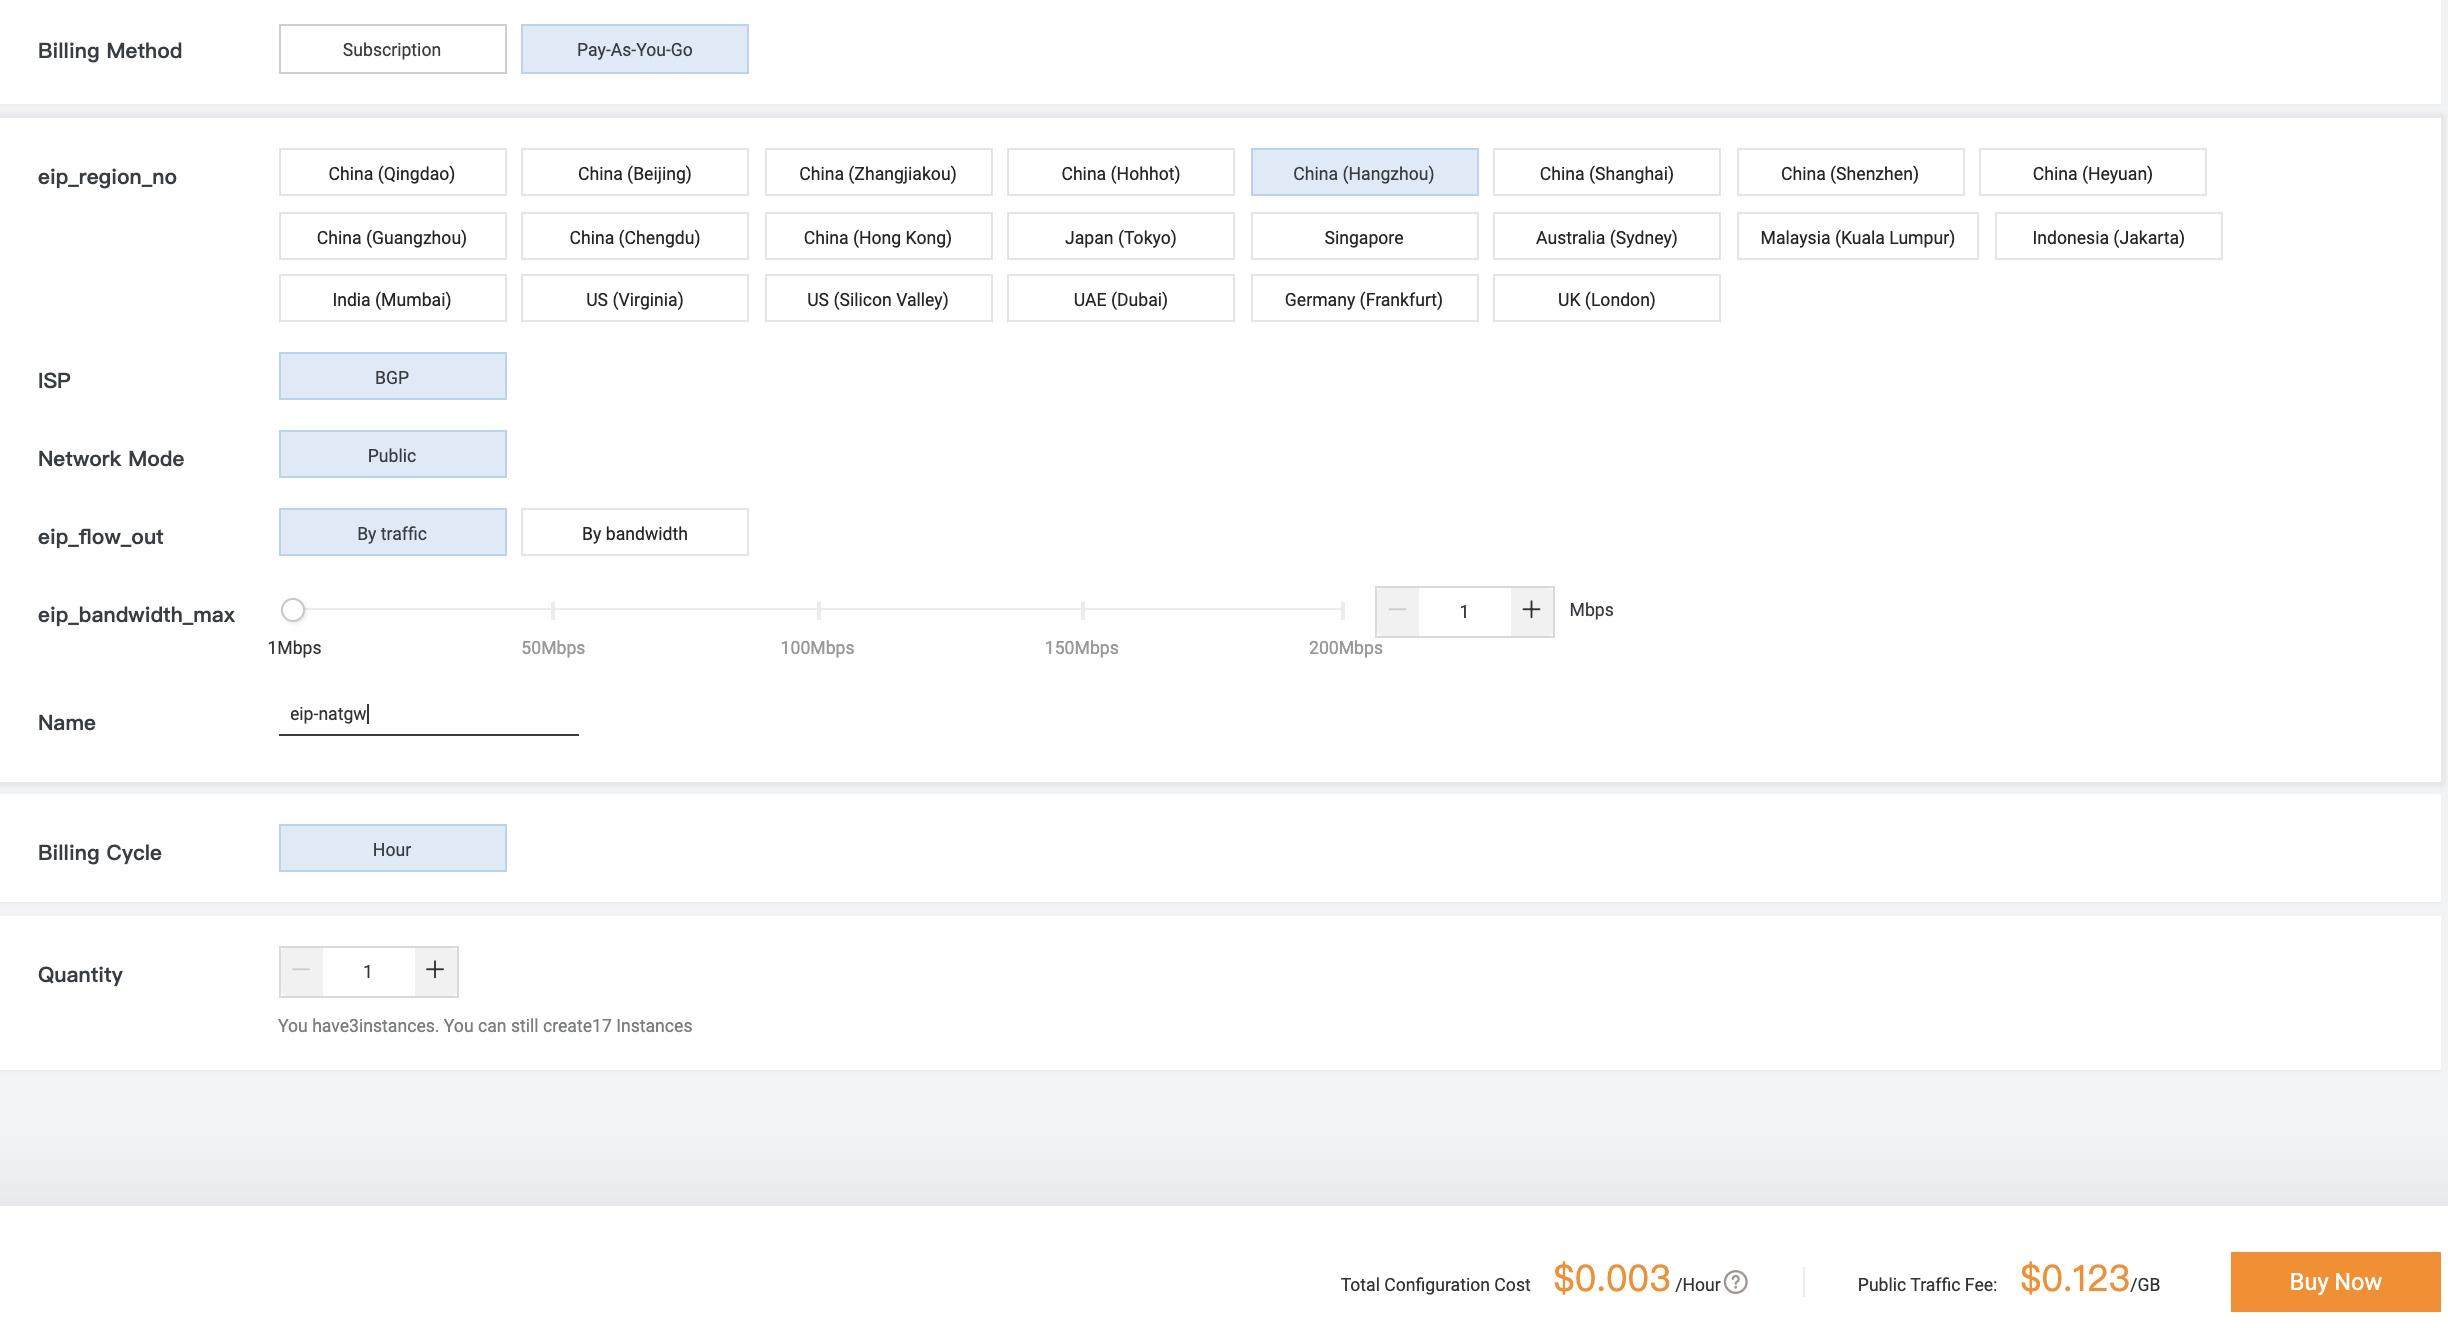
Step 5: Select the EIP that you created and bind it to the NAT gateway.


Step 6: Return to the NAT Gateway page. Find the NAT gateway that you created and click Configure SNAT in the Actions column.

Step 7: Click Create SNAT Entry.
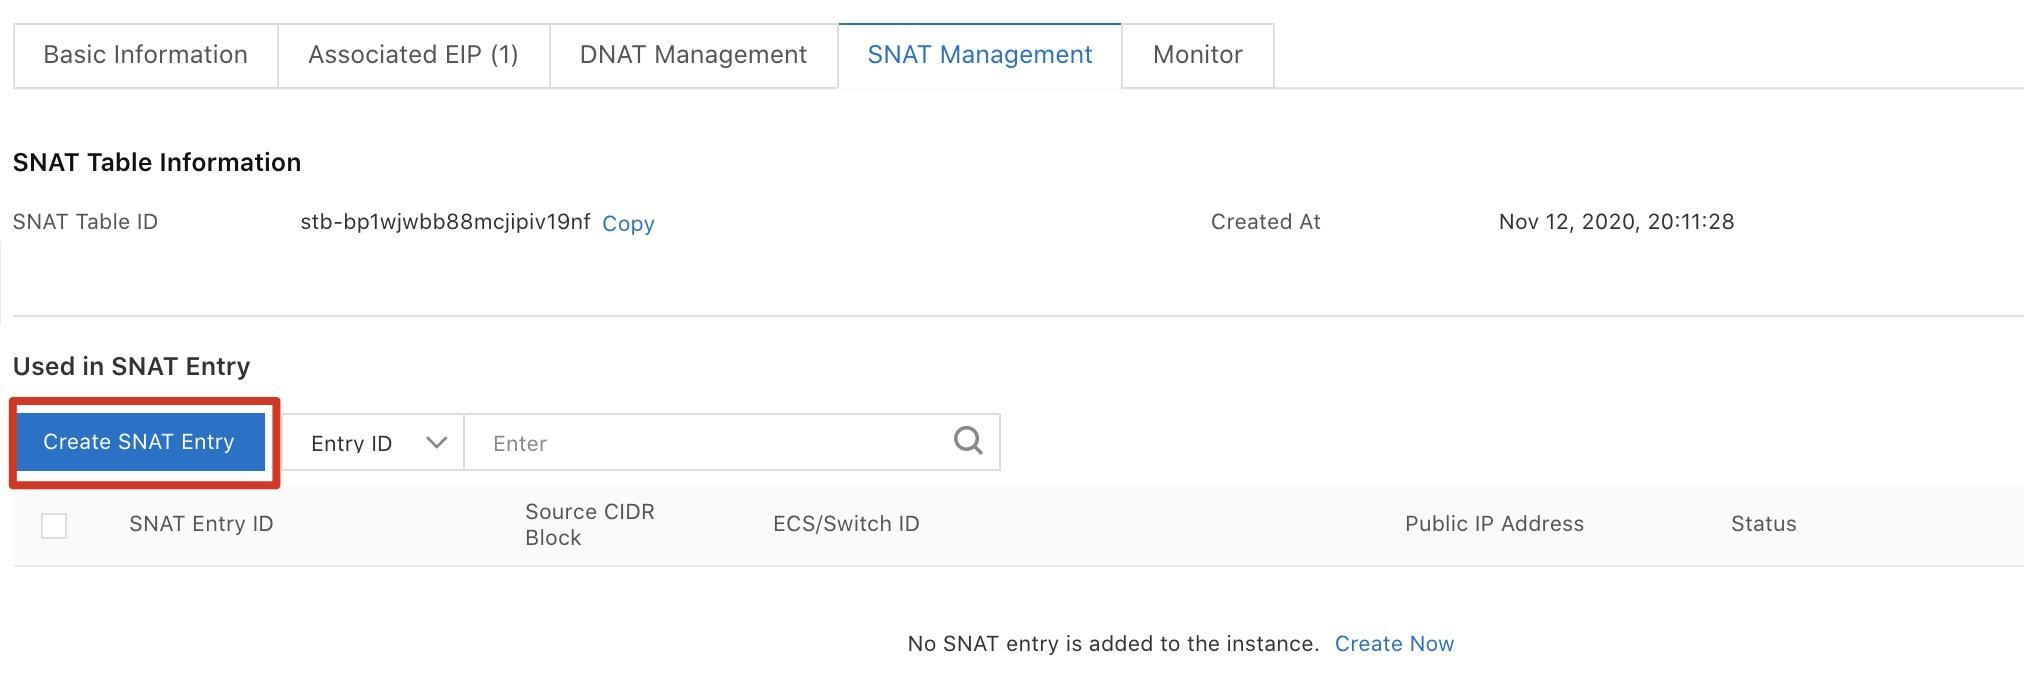
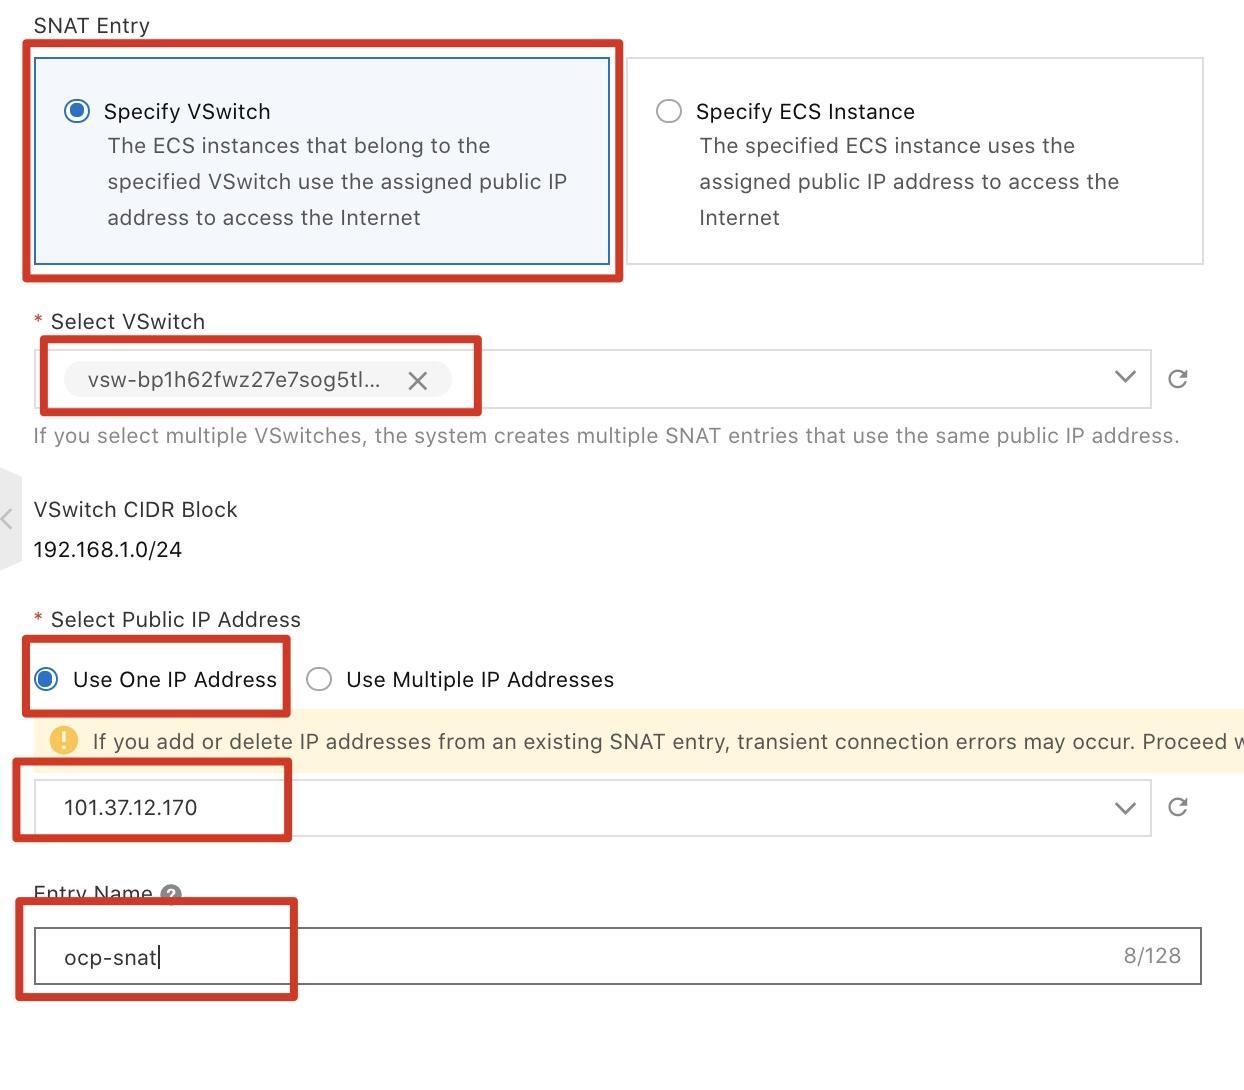
Step 8: On the Create SNAT Entry page, click the Specify VSwitch tab, select vsw-ocp as the vSwitch, select the created and bound EIP as the public IP address, enter the entry name, and then click OK.
2.6. Create a NAS instance
Create a NAS instance to provide storage for the image registry.
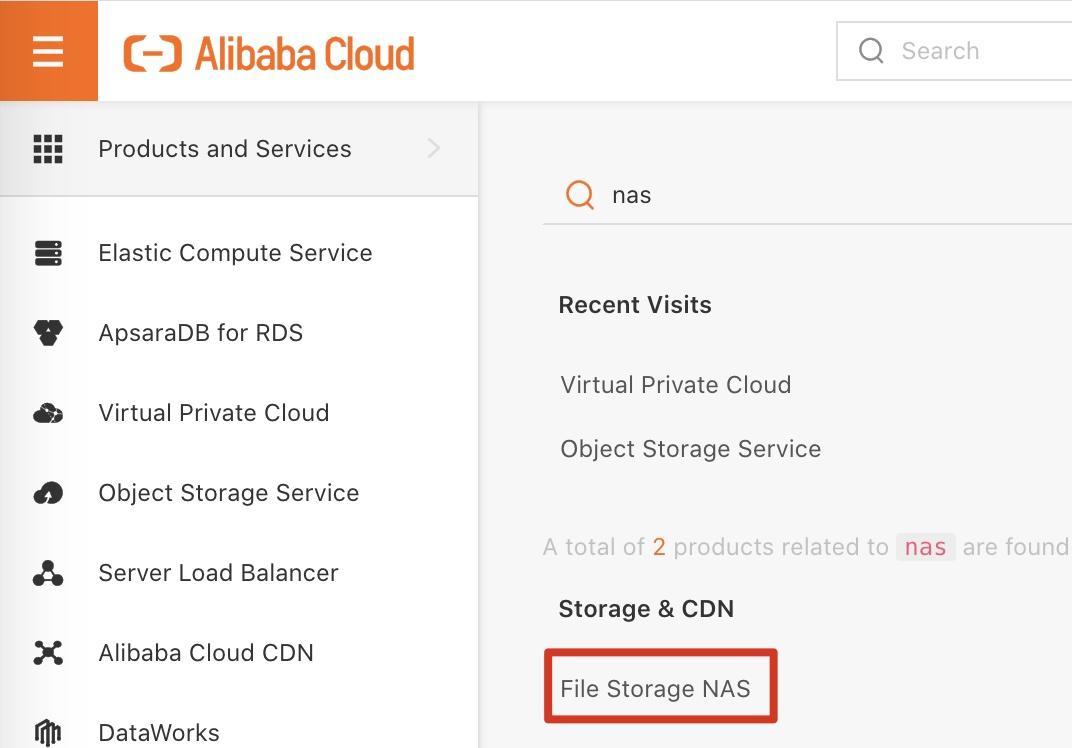
Step 1: Log on to the Alibaba Cloud Management Console. Move the pointer over the More icon in the upper-left corner and choose Products and Services > File Storage NAS to go to the NAS console.
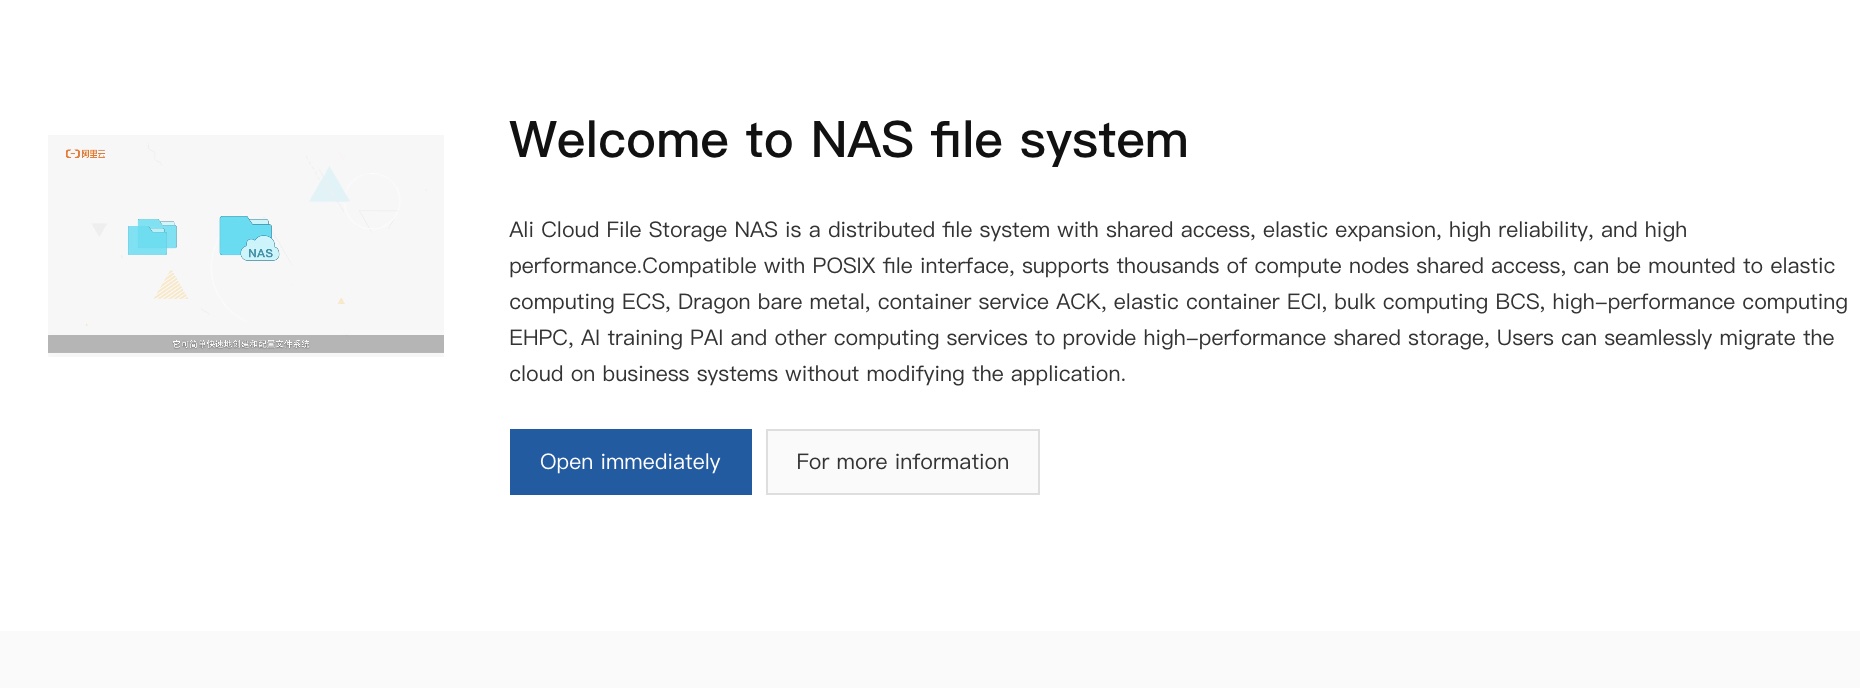
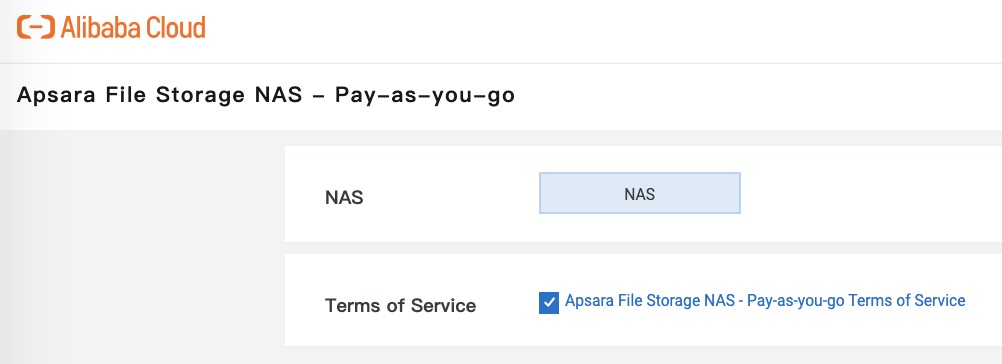
Note: If you are using NAS for the first time, there will be a welcome page, click Open immediately, then select Terms of Service check box, finally click Activate Now.
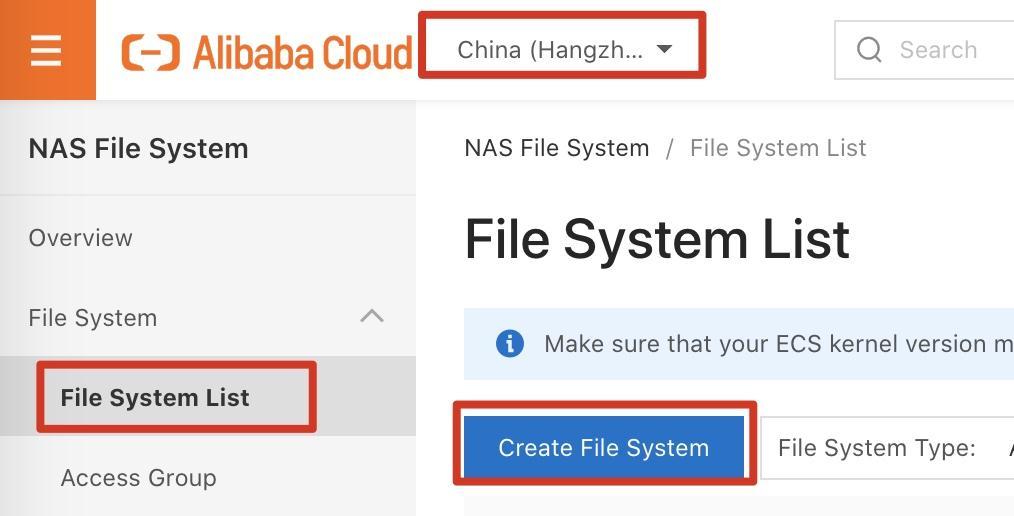
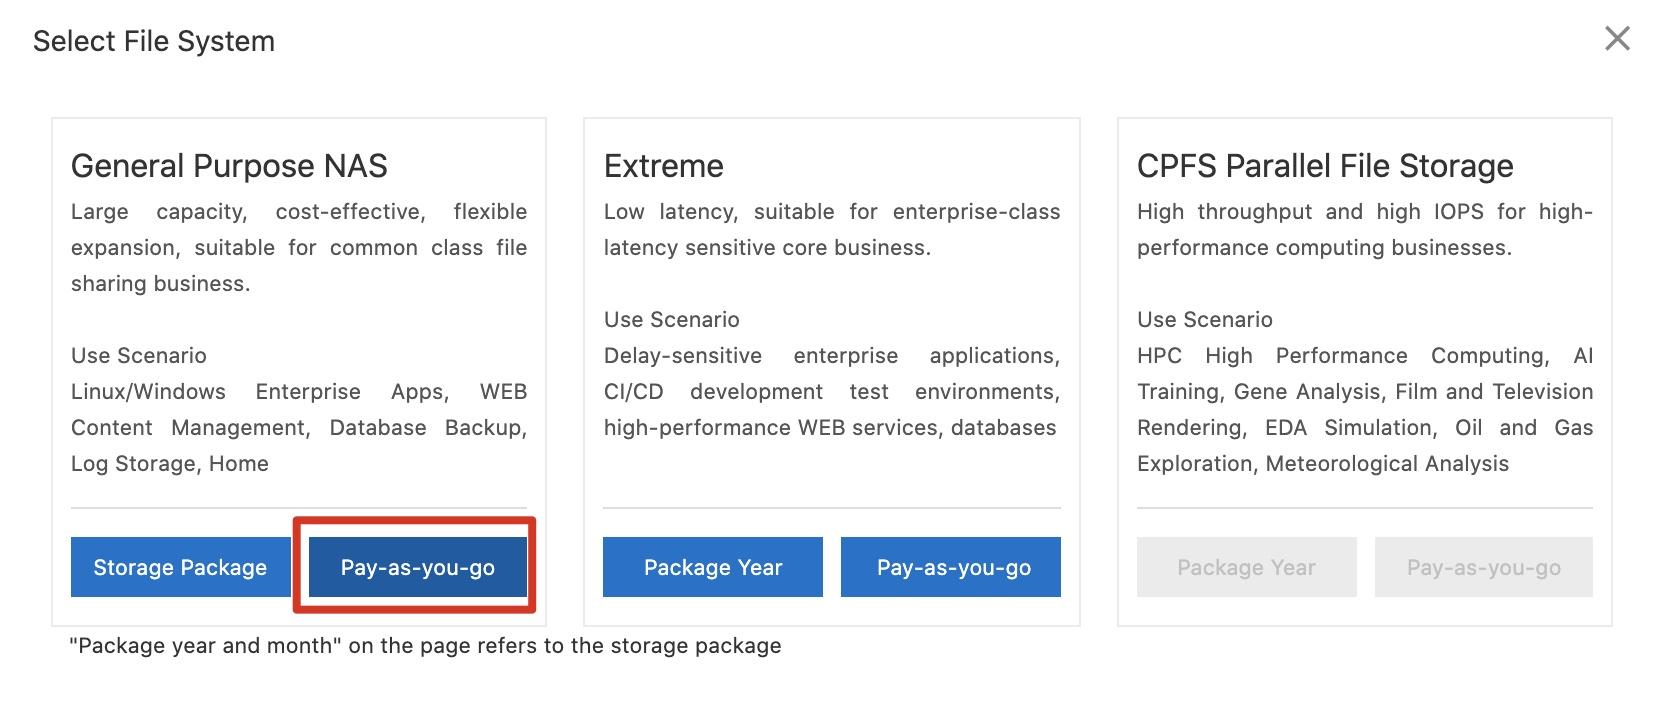
Step 2: On the left-side of the navigation pane, click File System List. On the File System List page, set the region to China (Hangzhou) and click Create File System, then click Pay-as-you-go under General Purpose NAS.
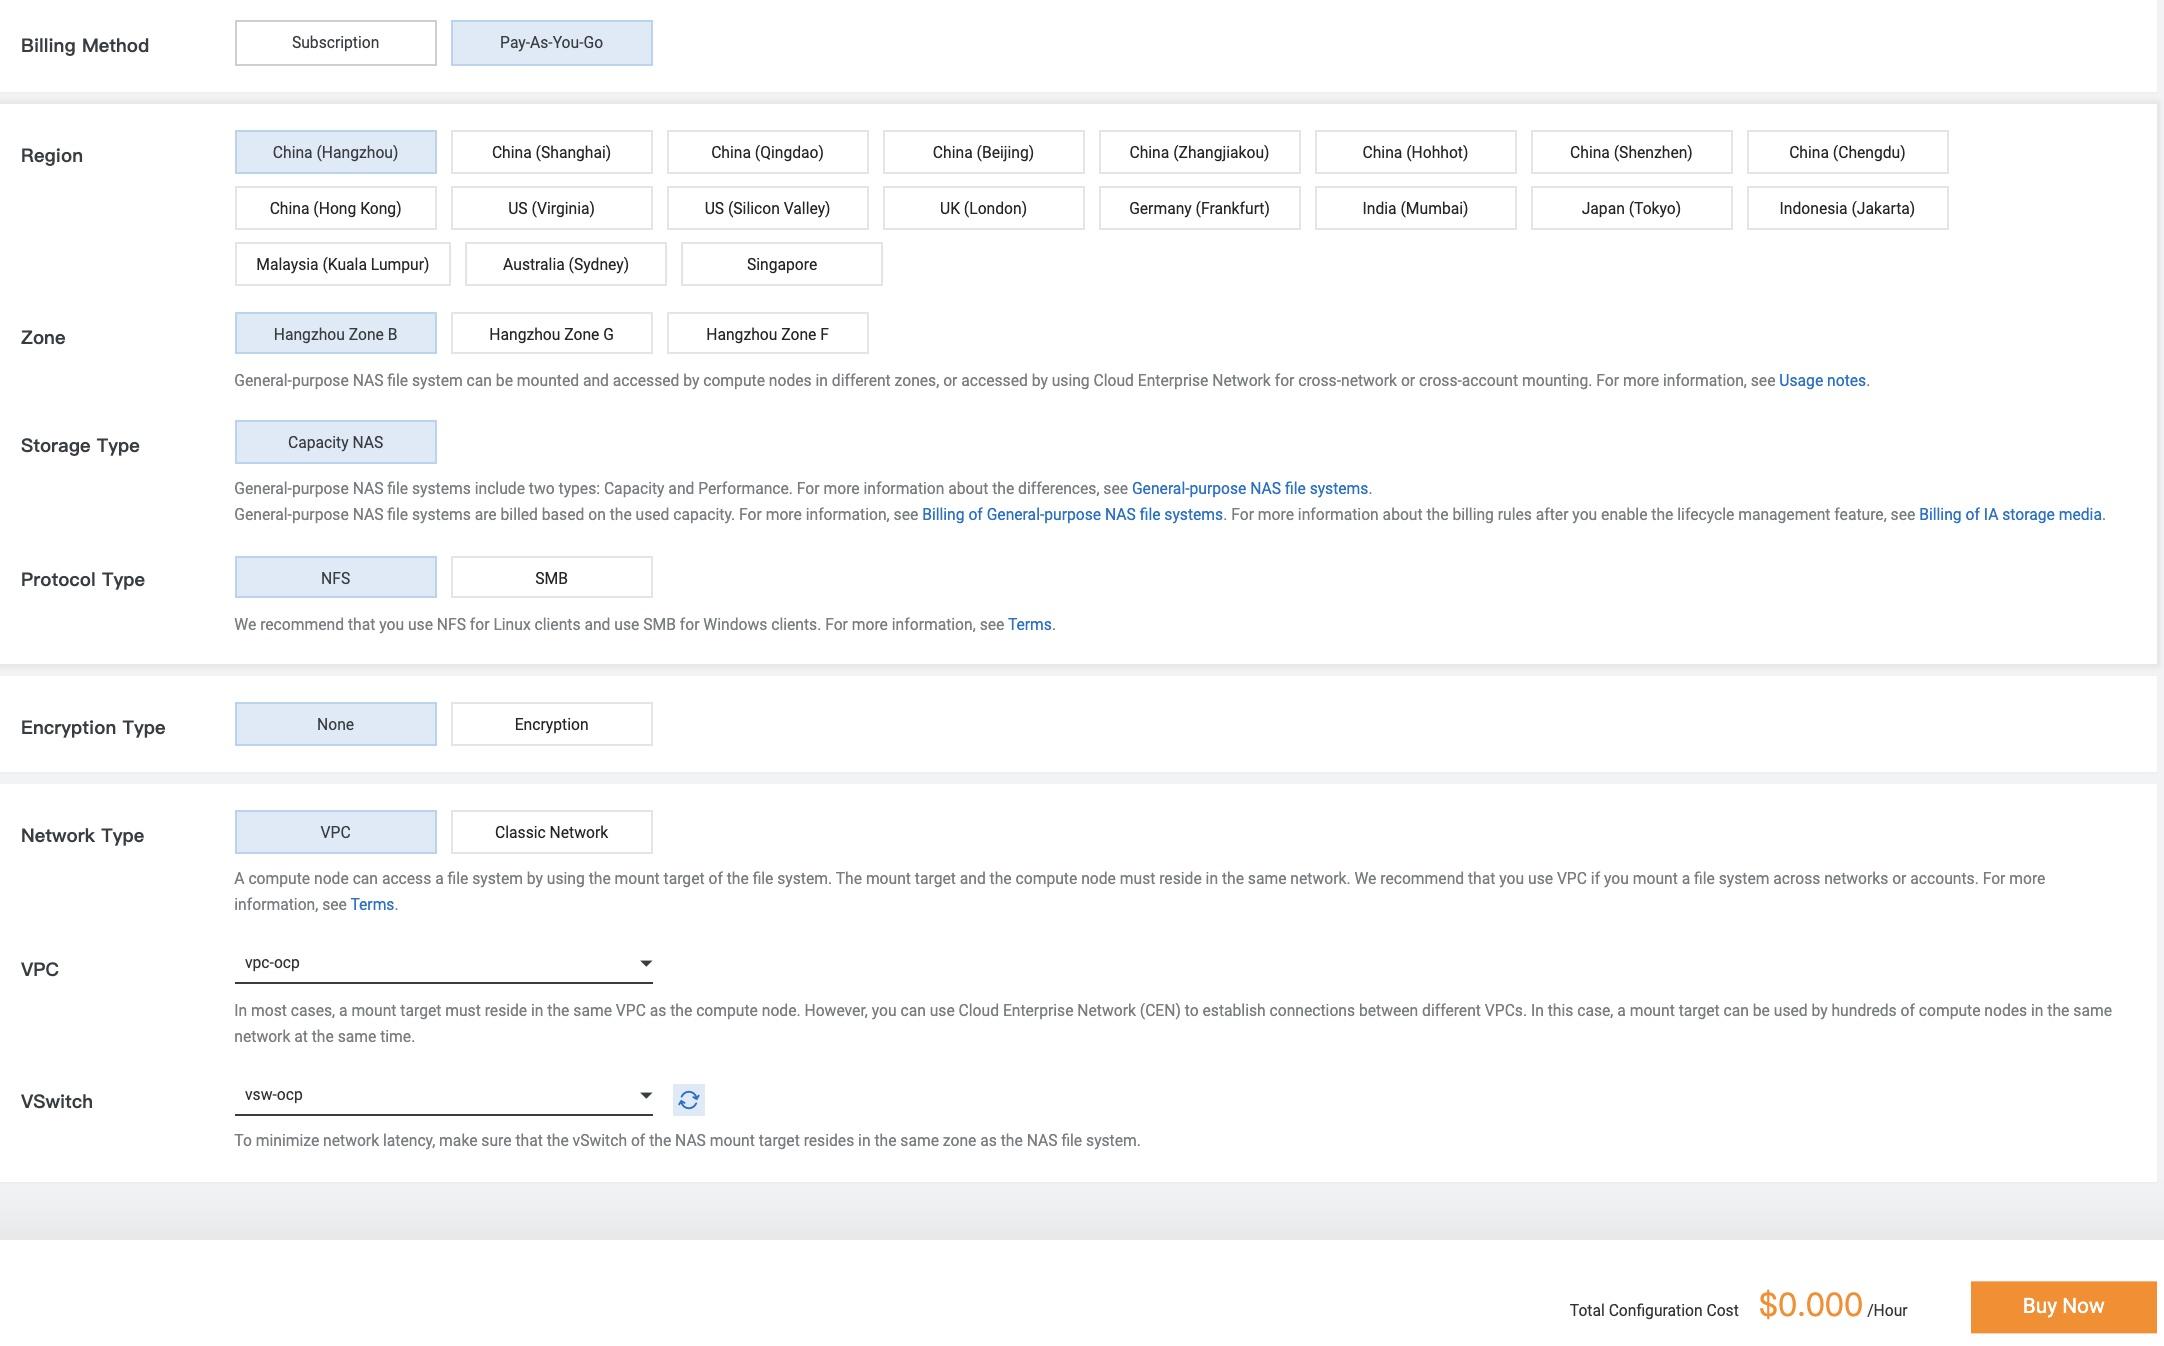
Step 3: Select vpc-ocp as the VPC and vsw-ocp as the vSwitch. Then, click Buy Now.
Note: There are two types of general purpose NAS, Capacity NAS and Performance NAS, which can be selected as required. Different regions may have different supplies.
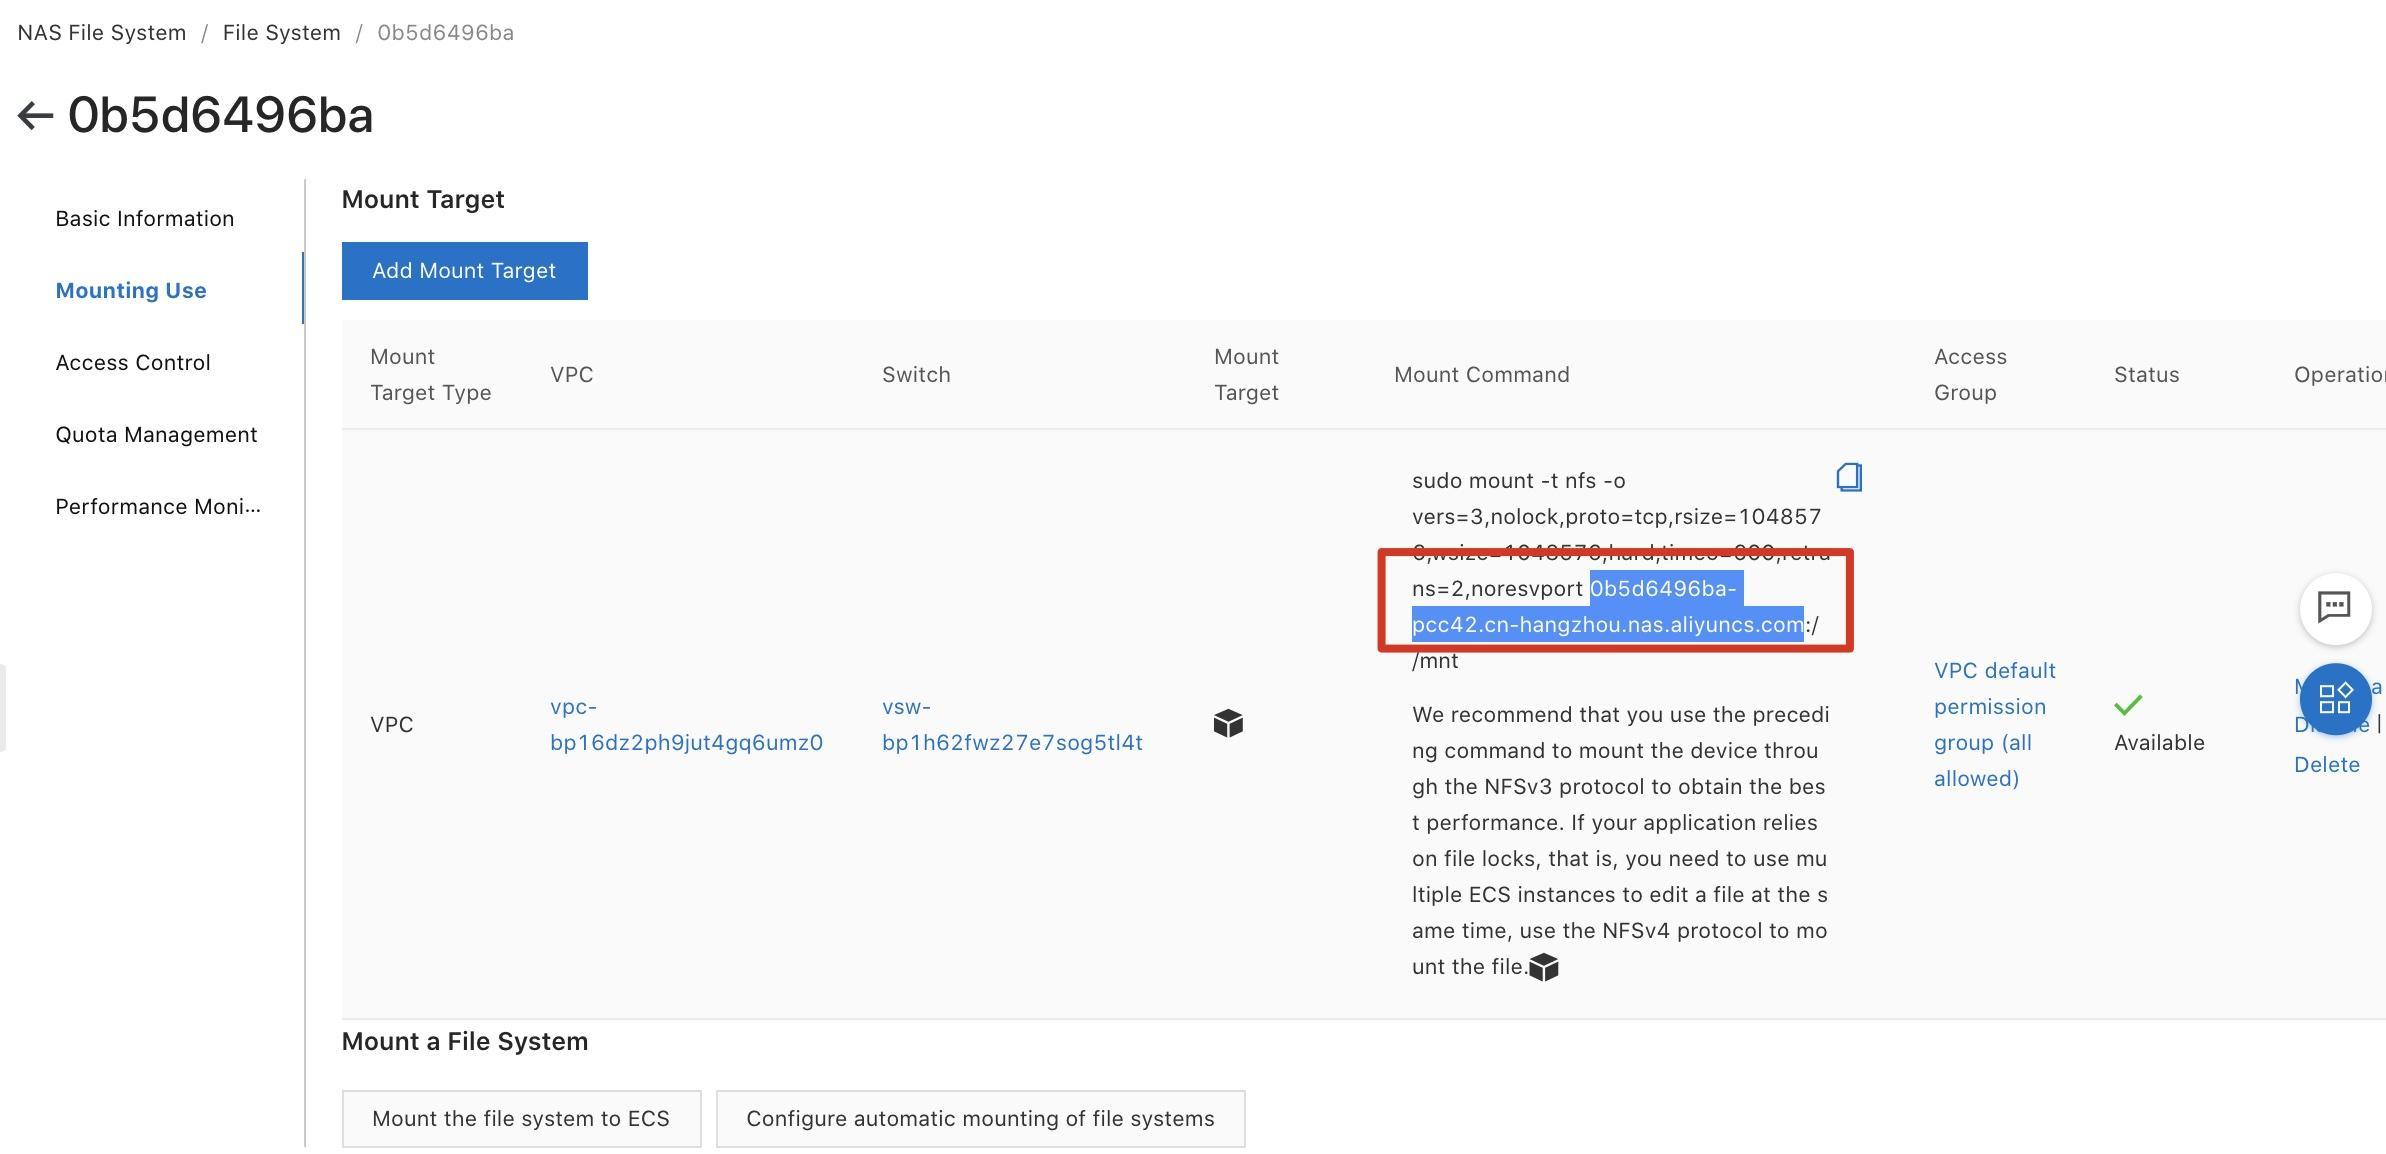
Step 4: Click the created NAS instance. On the details page of the NAS instance, click Mounting Use on the left-side of the navigation pane. Copy and save the NAS mounting address in the Mount Command column. In this example, the NAS mounting address is 0b5d6496ba-pcc42.cn-hangzhou.nas.aliyuncs.com.

Alibaba Cloud Elastic Compute Service (ECS) provides fast memory and the latest Intel CPUs to help you to power your cloud applications and achieve faster results with low latency.
Server Load Balancer (SLB) distributes network traffic across groups of backend servers to improve the service capability and application availability. It provides load balancing services at Layer 4 and functions as a reverse proxy at Layer 7.
A virtual private cloud service that provides an isolated cloud network to operate resources in a secure environment.
Alibaba Cloud DNS PrivateZone is a Virtual Private Cloud-based (VPC) domain name system (DNS) service for Alibaba Cloud users.
An encrypted and secure cloud storage service that can store, process, and access massive amounts of data from anywhere in the world

2,599 posts | 763 followers
FollowAlibaba Clouder - April 21, 2021
Alibaba Clouder - April 12, 2021
Alibaba Clouder - April 19, 2021
Alibaba Clouder - September 29, 2018
Alibaba Clouder - July 26, 2019
Alibaba Clouder - October 16, 2019

2,599 posts | 763 followers
Follow ECS(Elastic Compute Service)
Elastic and secure virtual cloud servers to cater all your cloud hosting needs.
Learn More OSS(Object Storage Service)
An encrypted and secure cloud storage service which stores, processes and accesses massive amounts of data from anywhere in the world
Learn MoreMore Posts by Alibaba Clouder