
Authors: Bo Teng
Reviewers: Bo Teng, Rosa Wang, Weiwei Jiang
Red Hat OpenShift Container Platform (OCP) is a platform for developing and running containerized applications. It is designed to help developers and operations personnel to easily build, deploy, and manage applications, allowing the supported applications to expand from a small number of machines to thousands of machines that can serve millions of clients. Based on Kubernetes, OCP provides powerful and flexible platform management tools and processes. By using open-source technologies of Red Hat, OCP allows you to deploy containerized applications from a single cloud to multiple clouds.
Compared with other platforms of Red Hat OpenShift, OCP provides enterprises with complete control over their Kubernetes environments. You can install and deploy OCP by using installer-provisioned infrastructure (IPI) or user-provisioned infrastructure (UPI). This document provides detailed instructions on how to install and deploy OCP 4.6 on Alibaba Cloud. For more information about how to install OCP, see the official installation guide from Red Hat.
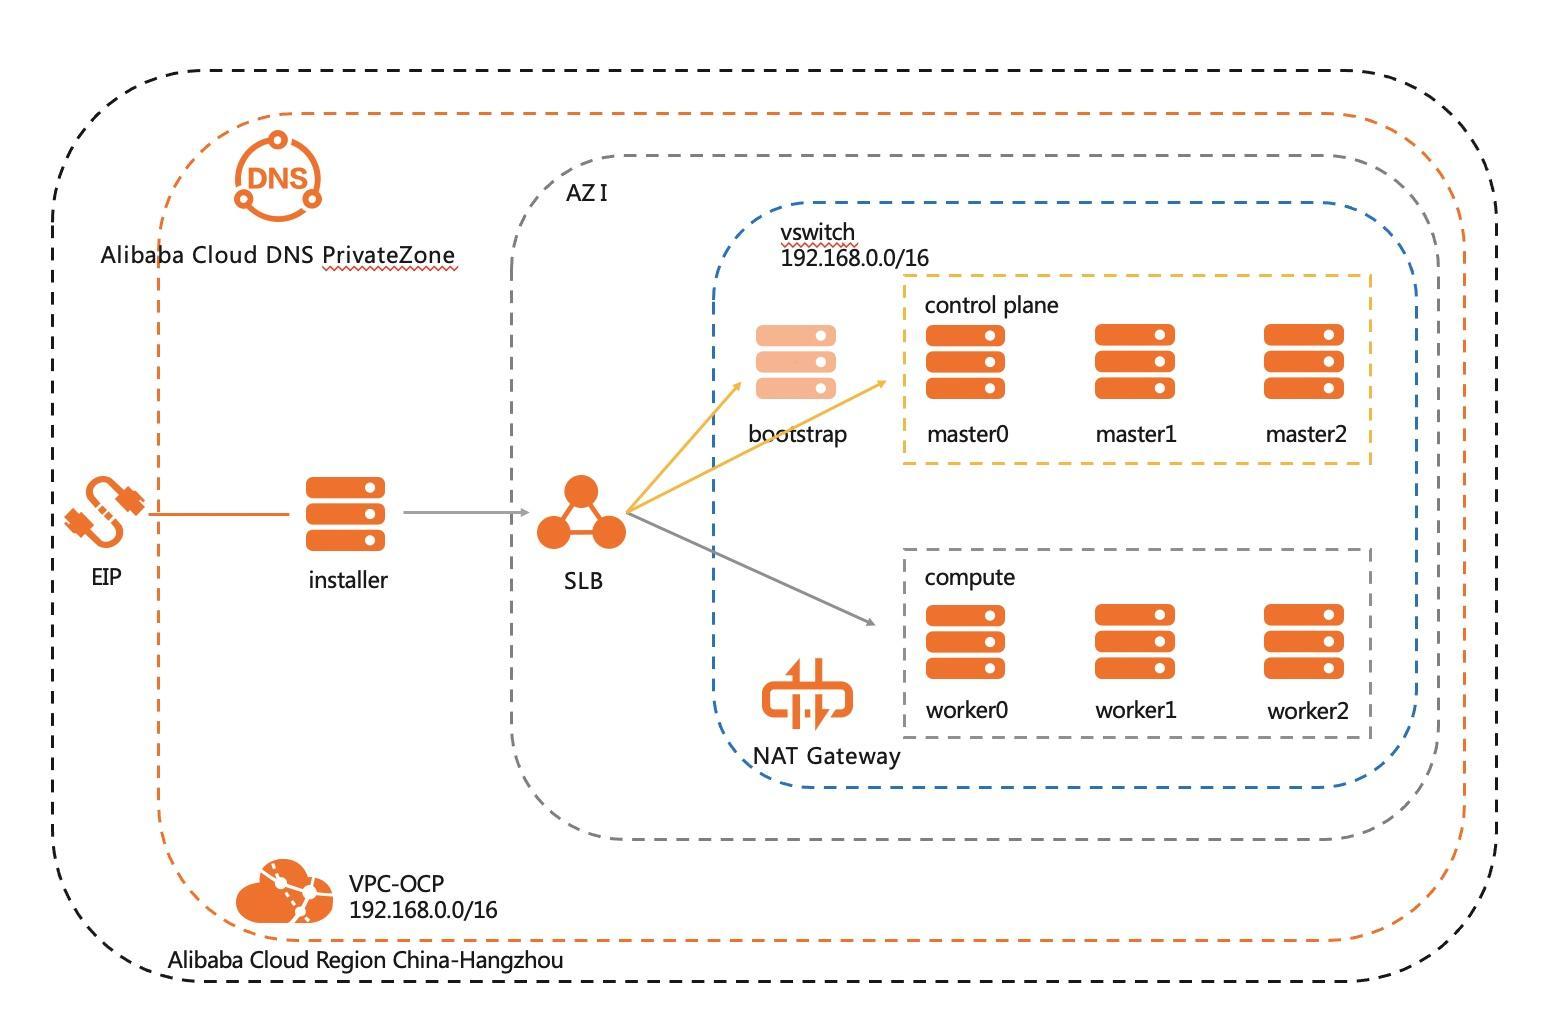
This document describes how to deploy a small-sized OCP cluster. The cluster includes the following machines:
Note: In this cluster, you must use the bootstrap machine to deploy the master machines on the control plane. You can delete the bootstrap machine after you install the cluster.
The bootstrap machine, master machines on the control plane, and compute (worker) machines must run the Red Hat Enterprise Linux CoreOS (RHCOS) operating system. RHCOS runs based on Red Hat Enterprise Linux (RHEL) 8 and inherits all of its hardware certifications and requirements.
The following figure shows the deployment architecture.
The following table describes the minimum requirements for each machine in the cluster.

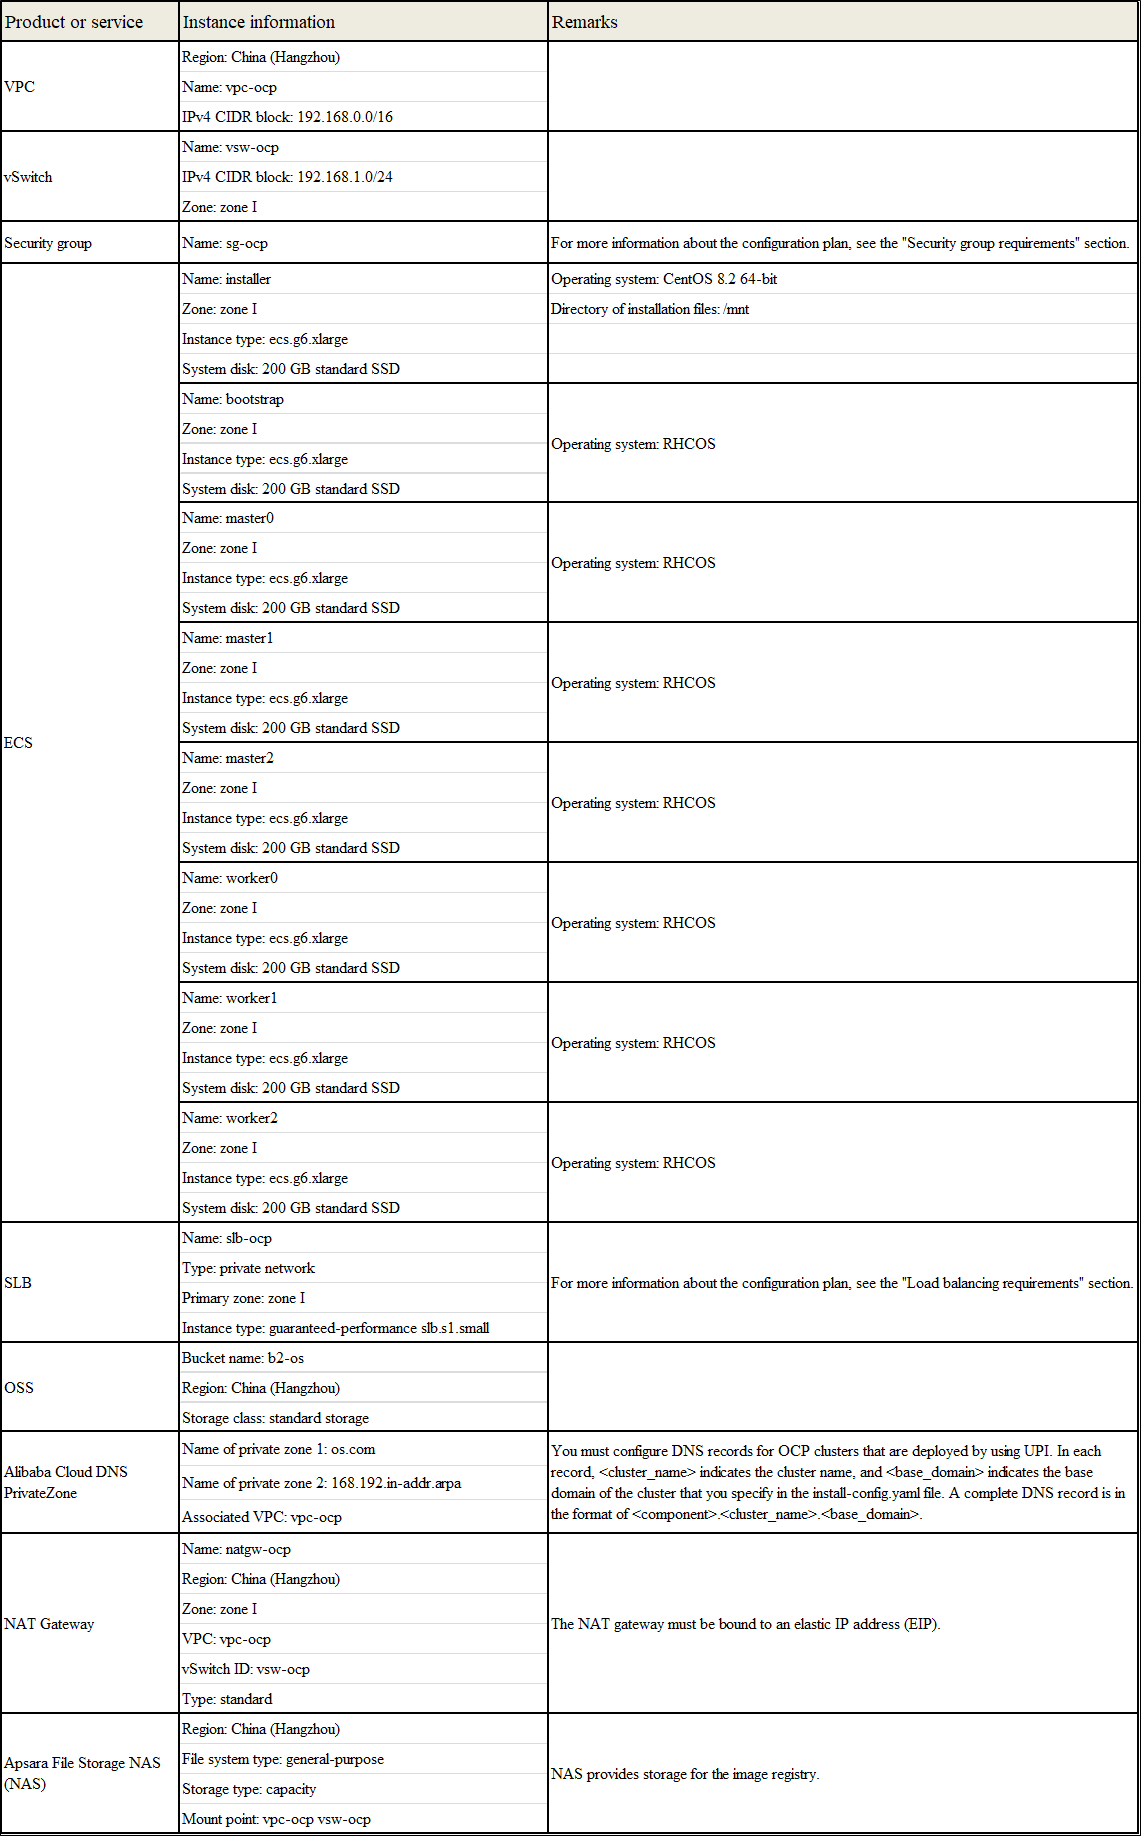
Note: This document describes how to install an OCP cluster. Therefore, the Alibaba Cloud products or services with the minimum specifications are used. If you deploy an OCP cluster in other environments, you can configure the specifications of Alibaba Cloud products or services based on your actual needs.
The following tables describe the ports that must be available.
All machines in the cluster
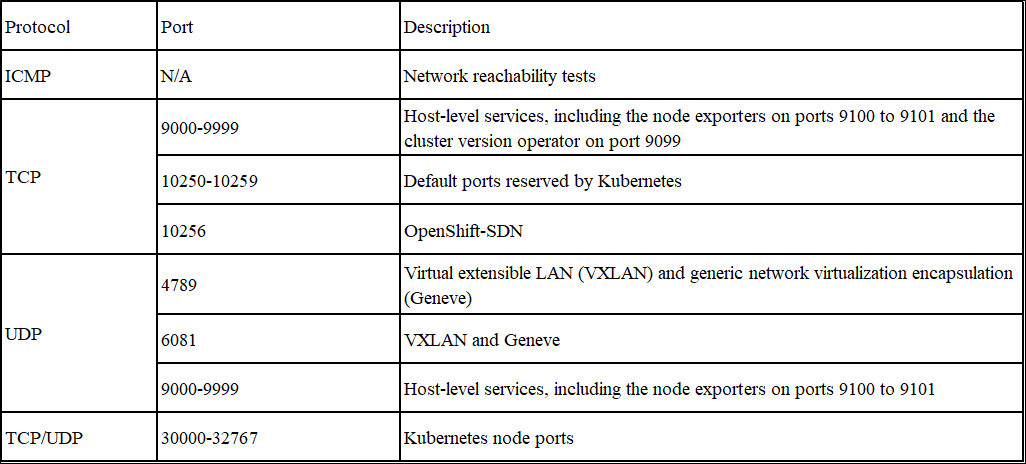
All control plane machines

The following tables describe the ports that must be configured on the frontend and backend of SLB.
API load balancer

Application ingress load balancer

You must create a VPC, an ECS instance, a security group, a NAT gateway, and a NAS instance on Alibaba Cloud. These are prerequisites for installing an OCP cluster.
Step 1: Log on to the Alibaba Cloud Management Console. Move the pointer over the More icon in the upper-left corner and choose Products and Services > Virtual Private Cloud to go to the VPC console.
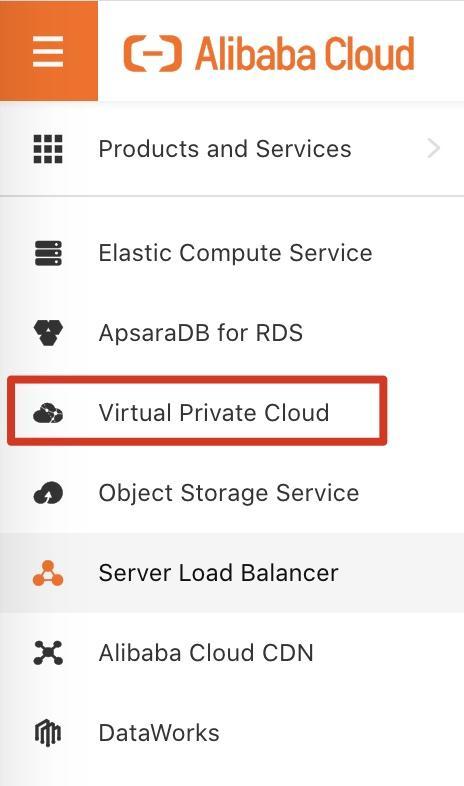
Step 2: In the upper navigation bar, set the region to China (Hangzhou). Then, click Create VPC.

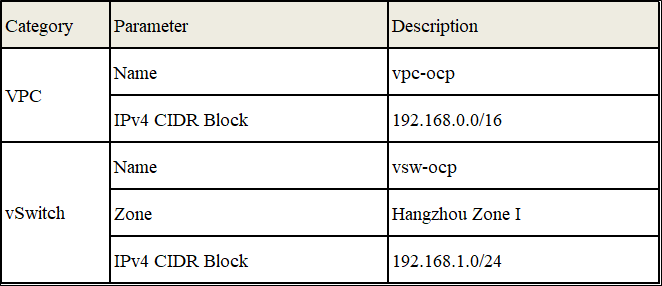
Step 3: On the Create VPC page, set the parameters related to the VPC and vSwitch, as described in the following table.
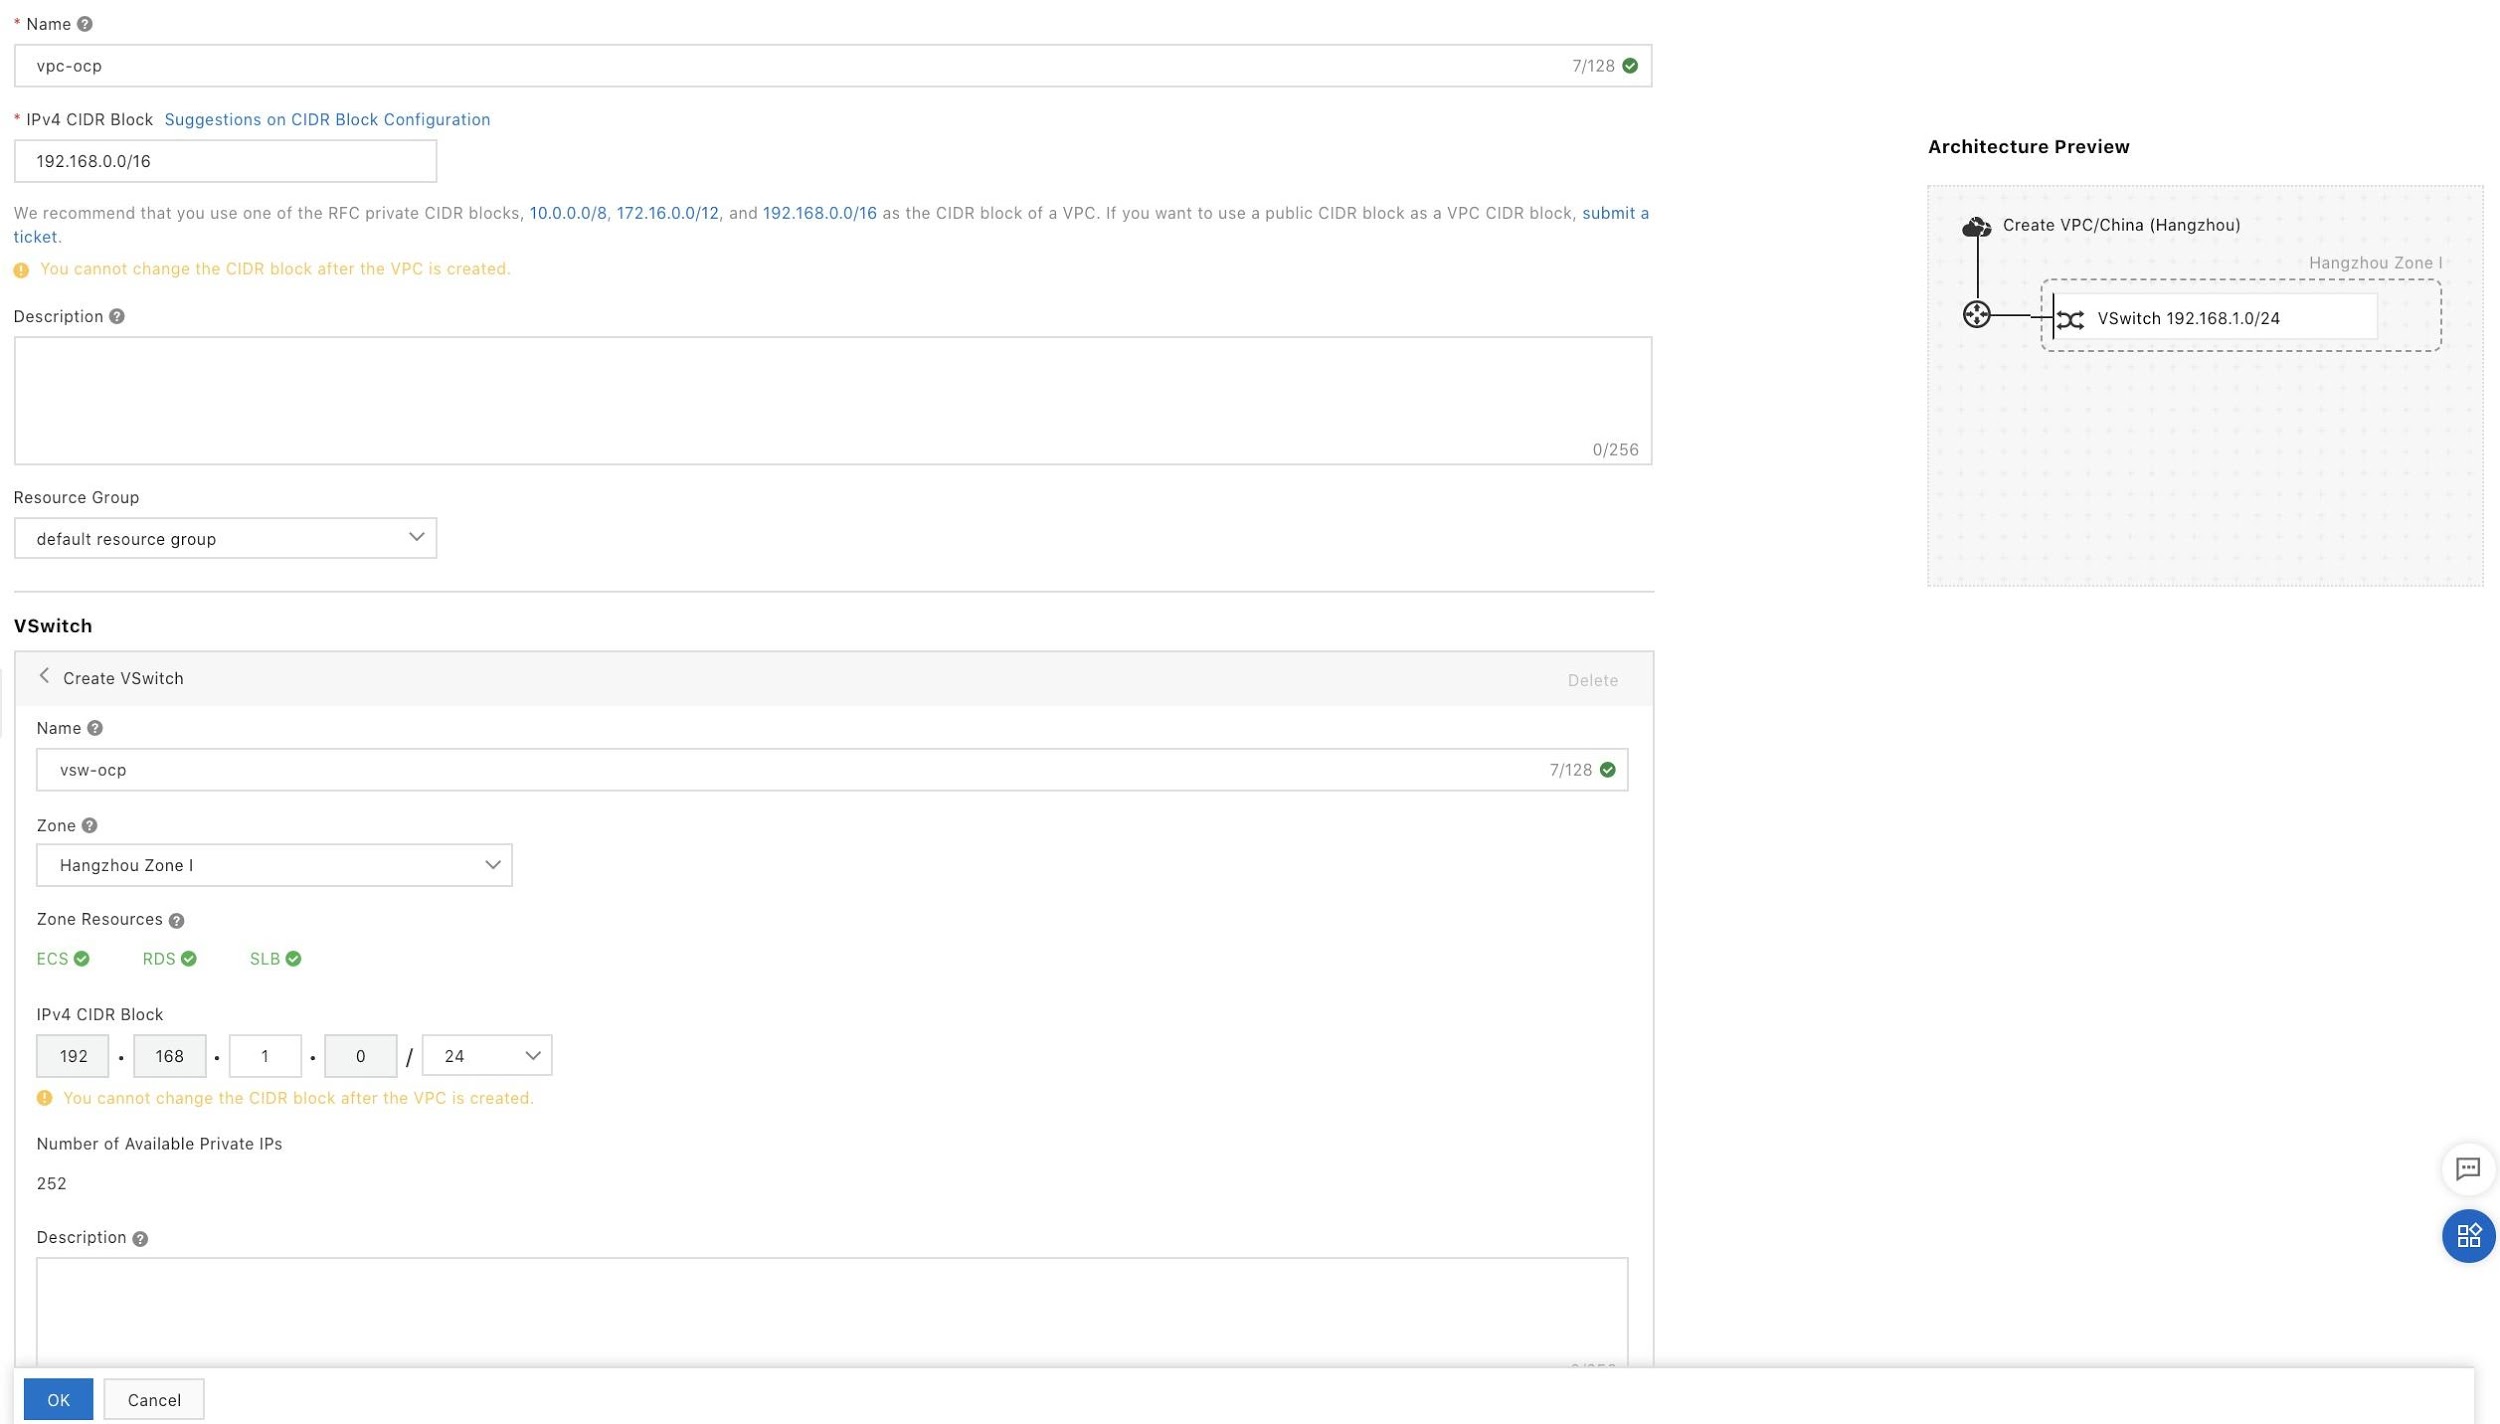
Step 4: Click OK.
Create a security group for the ECS instance where the OCP cluster runs.
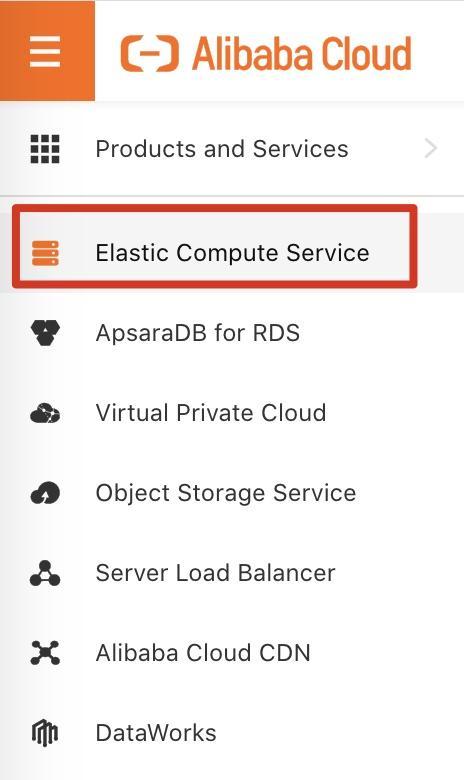
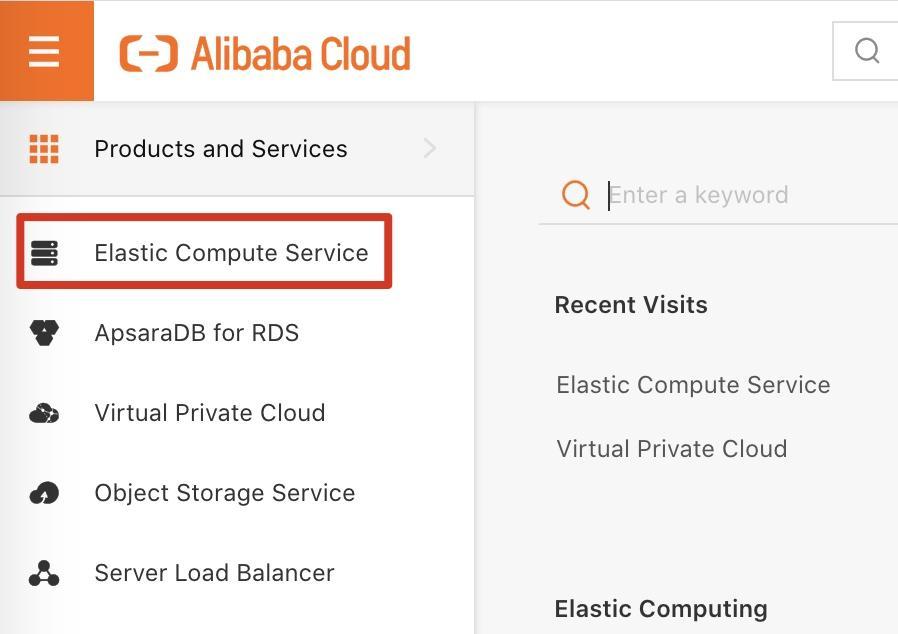
Step 1: Log on to the Alibaba Cloud Management Console. Move the pointer over the more icon in the upper-left corner and choose Products and Services > Elastic Compute Service to go to the ECS console.
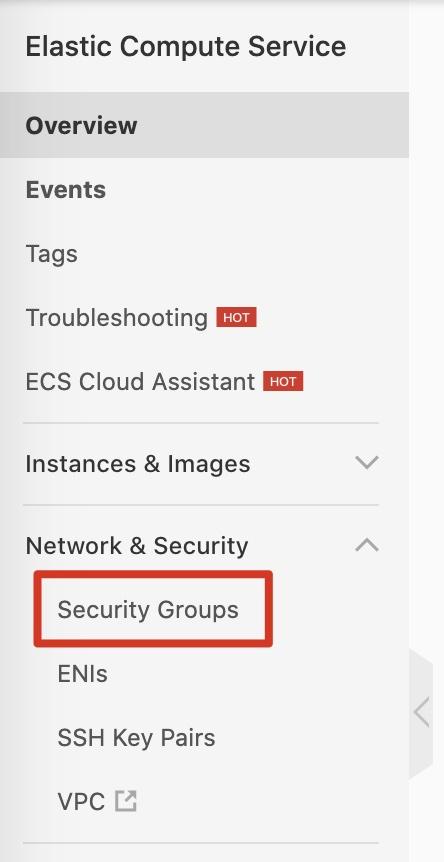
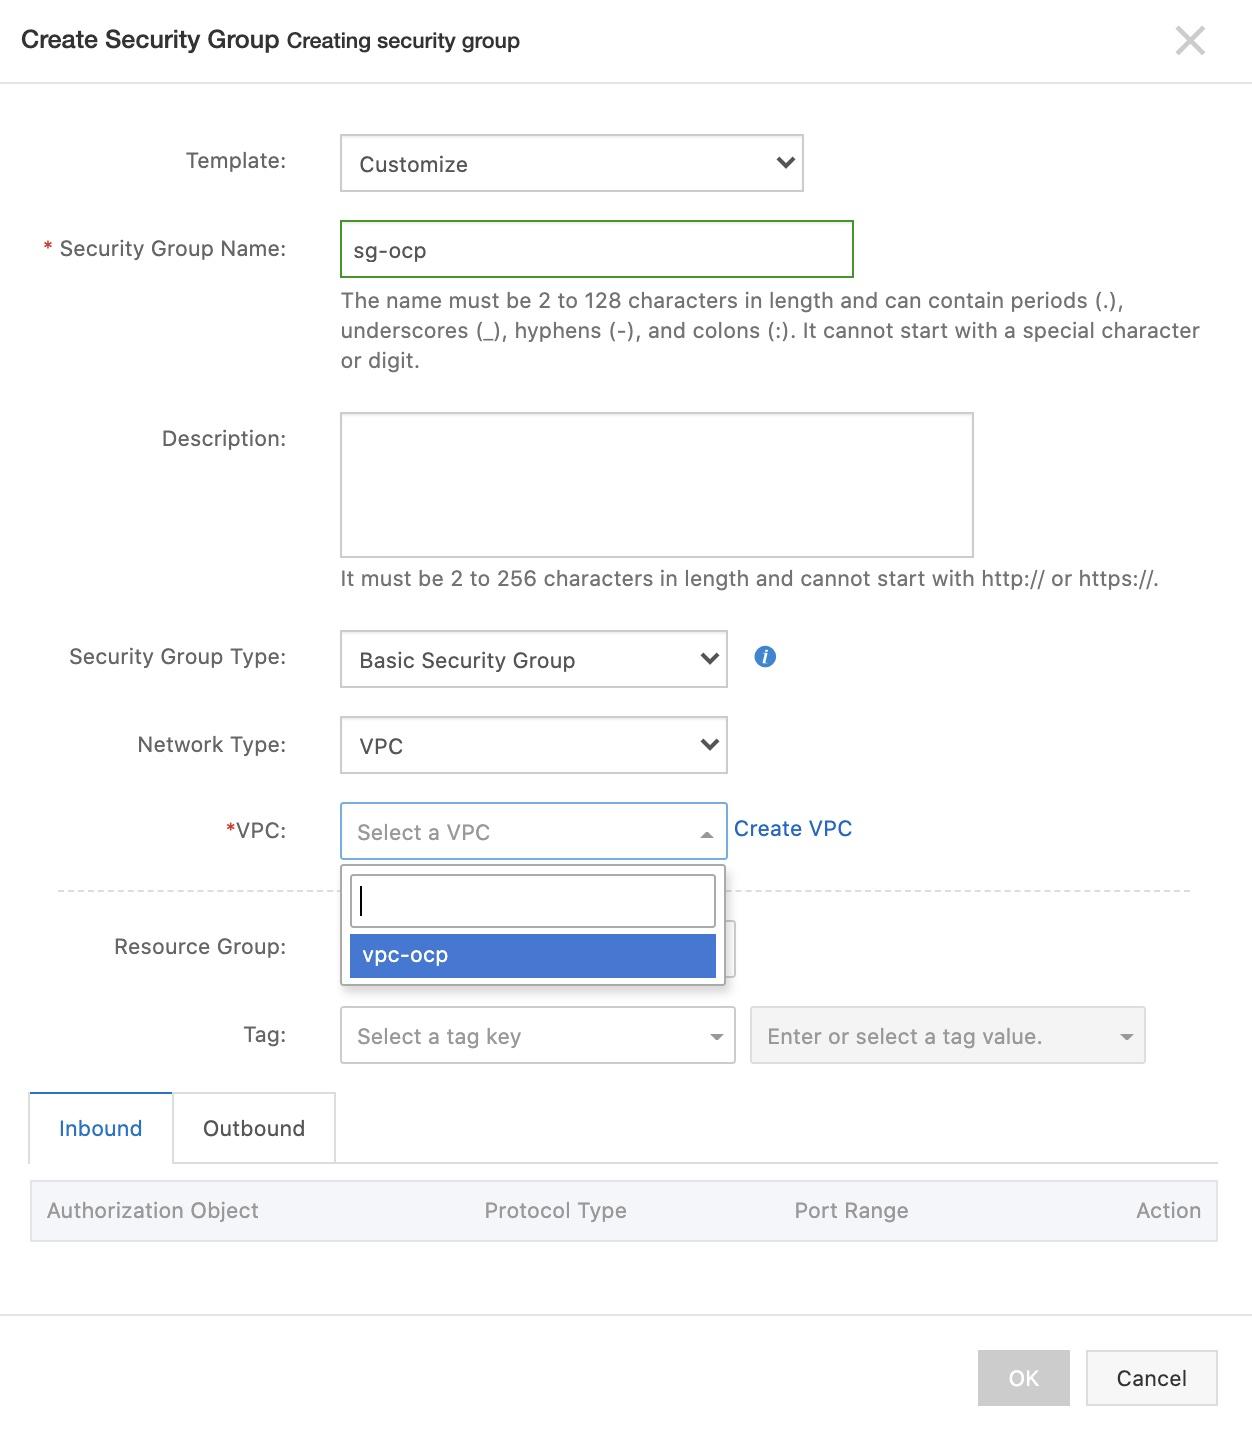
Step 2: On the left-side navigation pane, choose Network & Security > Security Groups. On the Security Groups page, click Create Security Group in the upper-right corner.
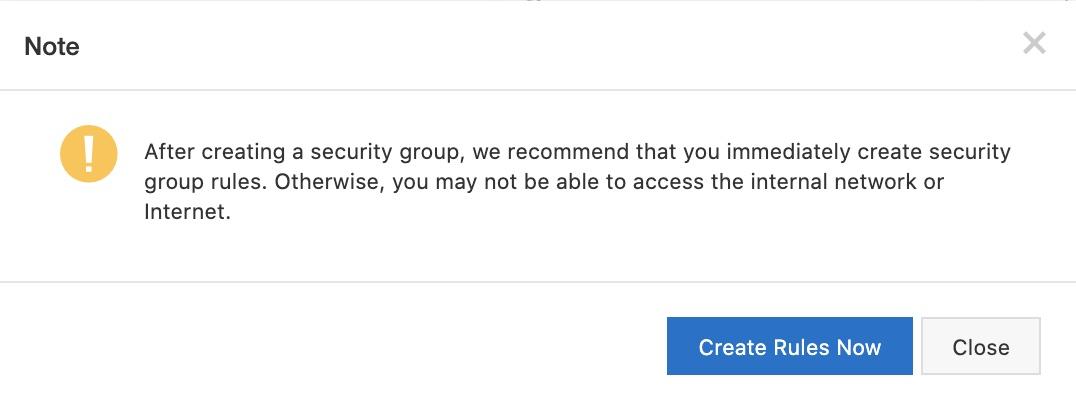
Step 3: Set the security group name to sg-ocp and select the vpc-ocp VPC that you created. Click OK, then select Create Rules Now.
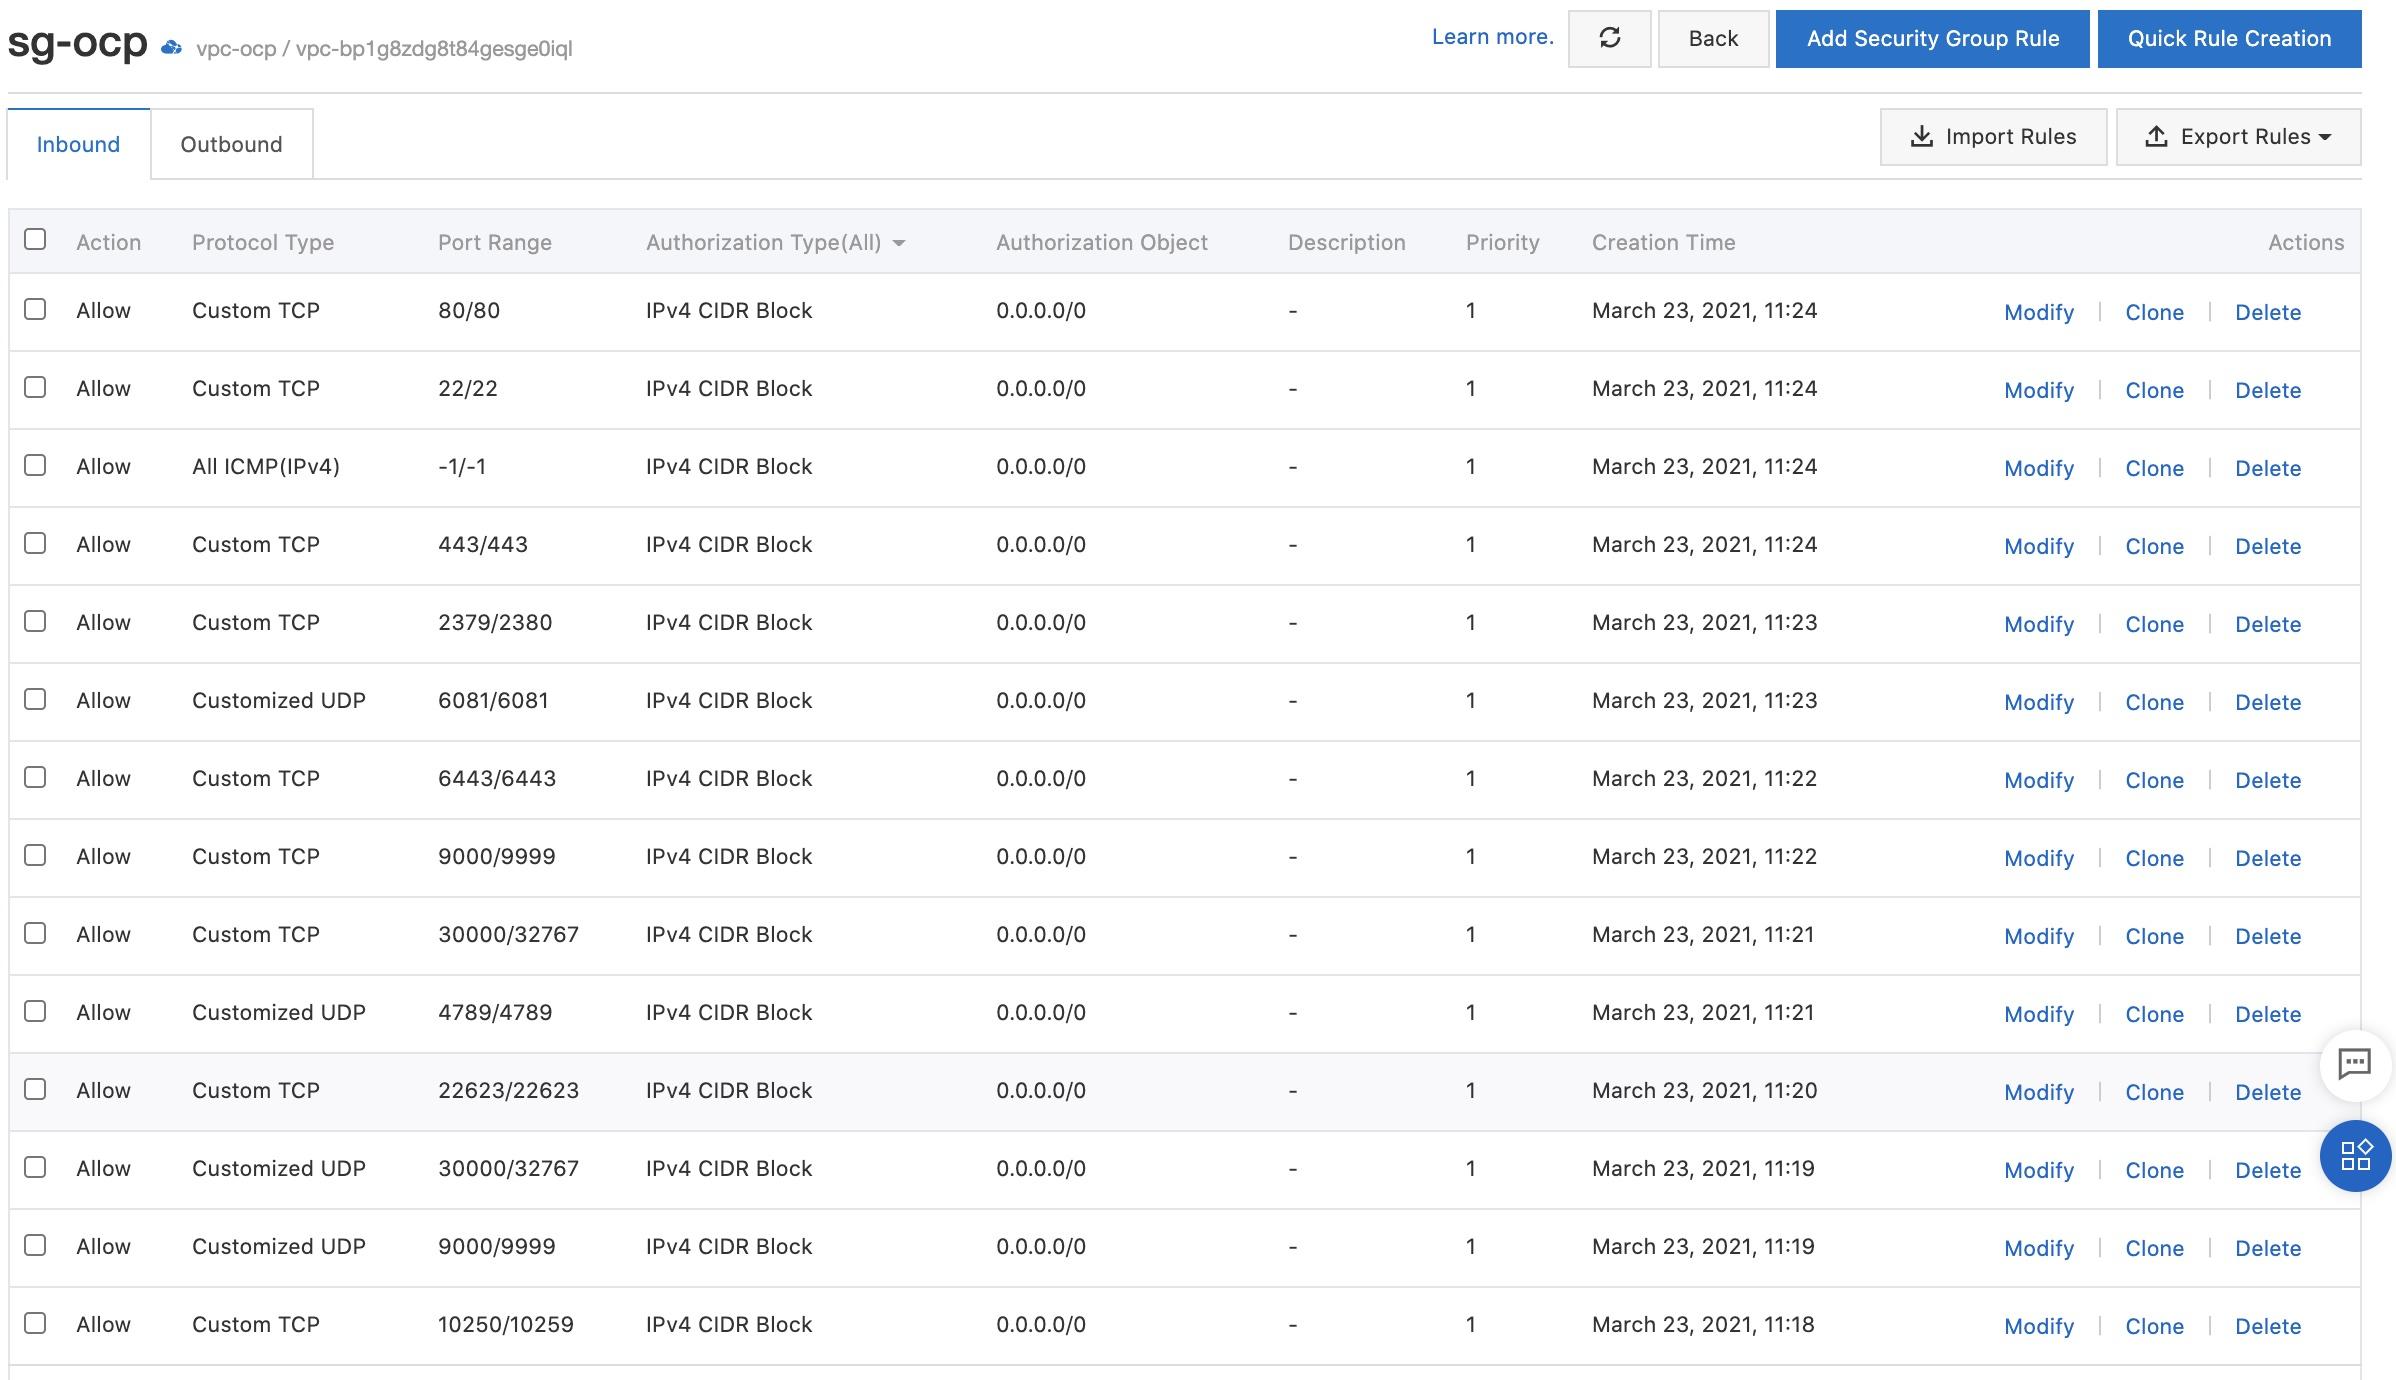
Step 4: In the security group rule section, add inbound security group rules as shown in the following figure.
Create an ECS instance named "installer" to install the OCP cluster. After you install the OCP cluster, you can use the installer instance to log on to the cluster.
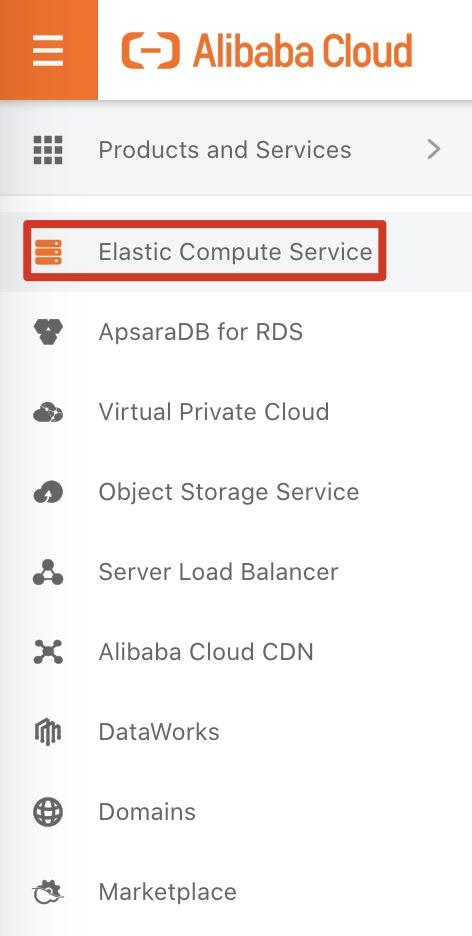
Step 1: Log on to the Alibaba Cloud Management Console. Move the pointer over the More icon in the upper-left corner and choose Products and Services > Elastic Compute Service to go to the ECS console.
Step 2: On the left-side of the navigation pane, choose Instances & Images > Instances. In the top navigation bar, set the region to China (Hongzhou). Then, click Create Instance.
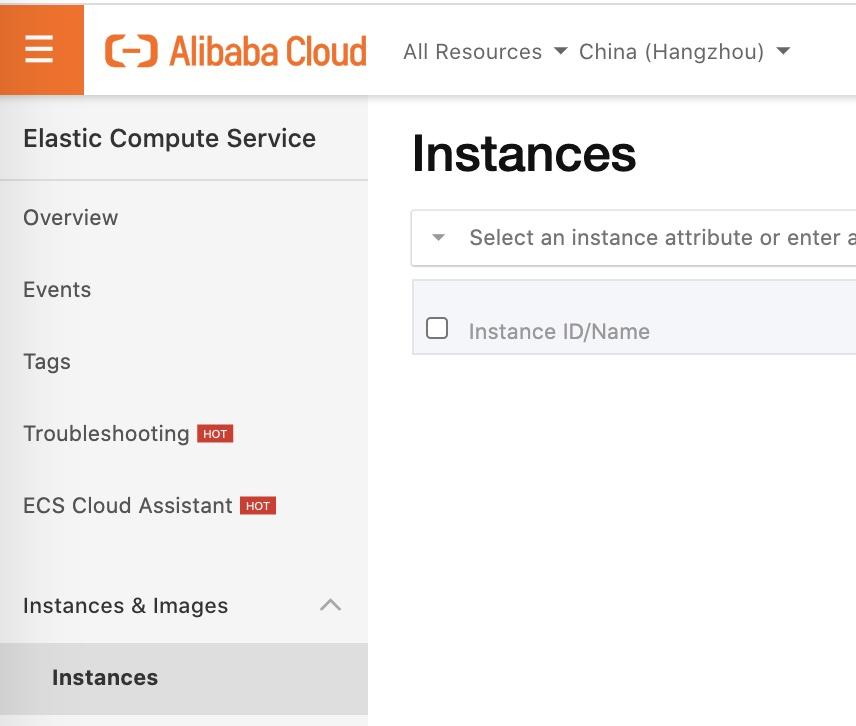
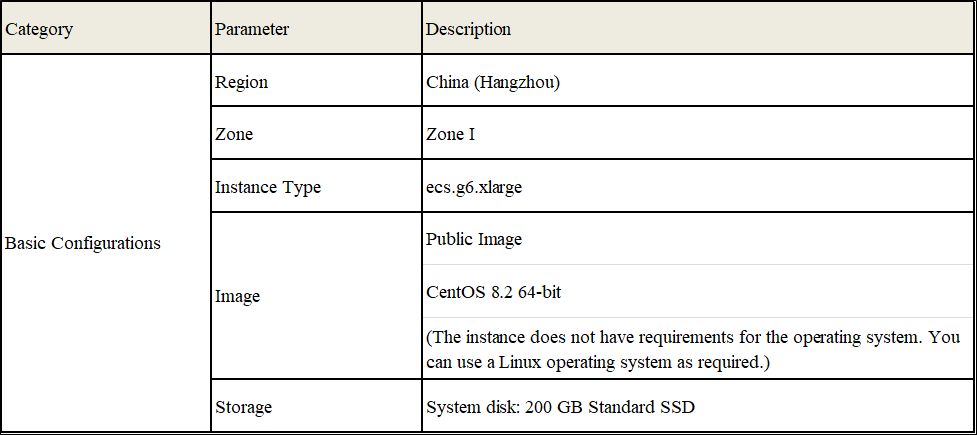
Step 3: On the Basic Configurations page, set the required parameters.
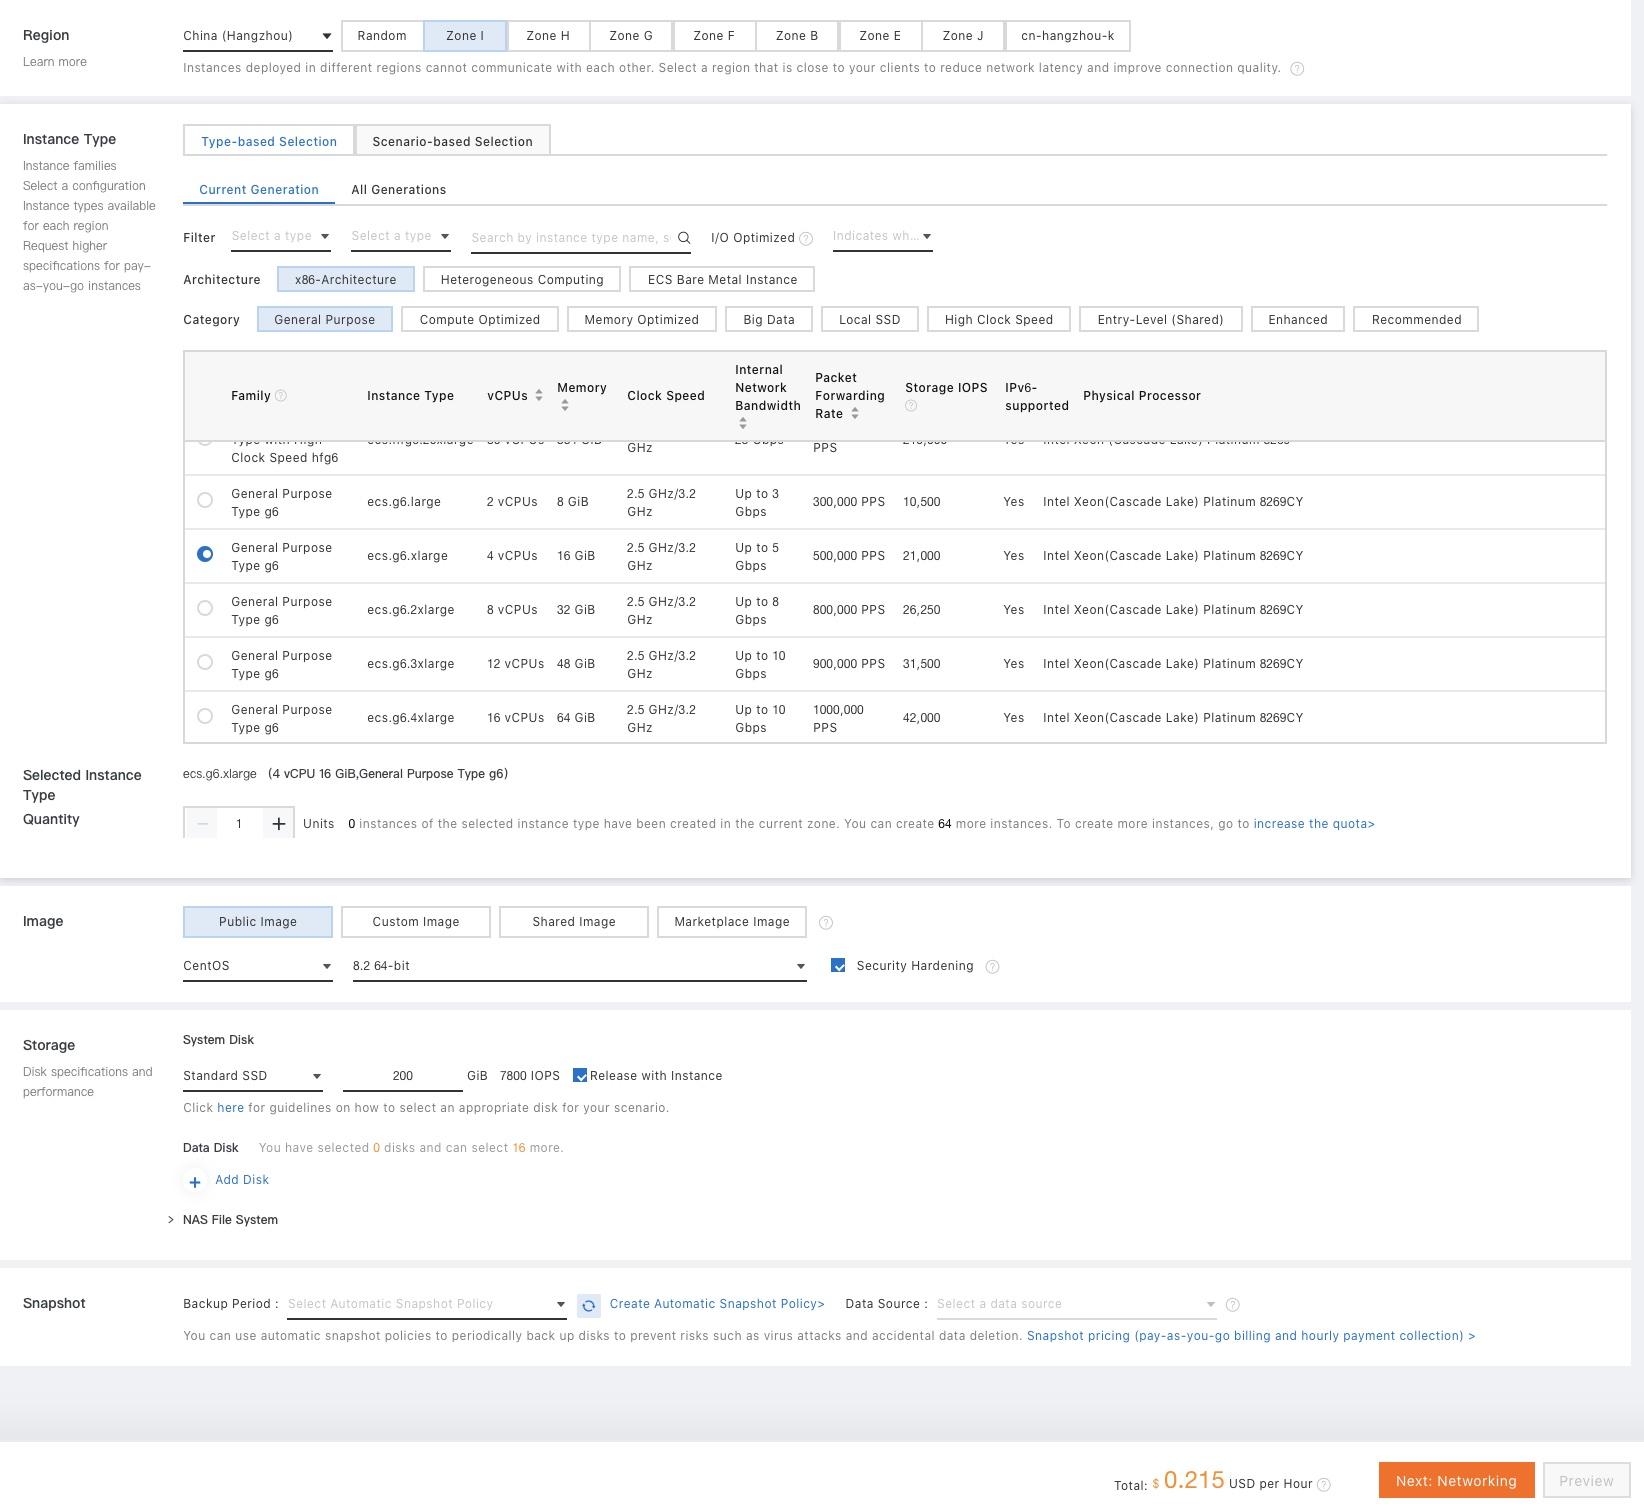
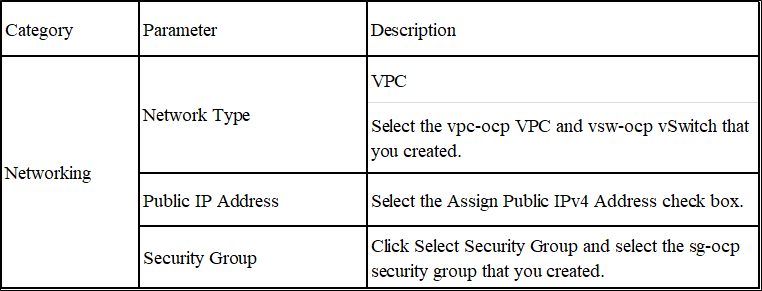
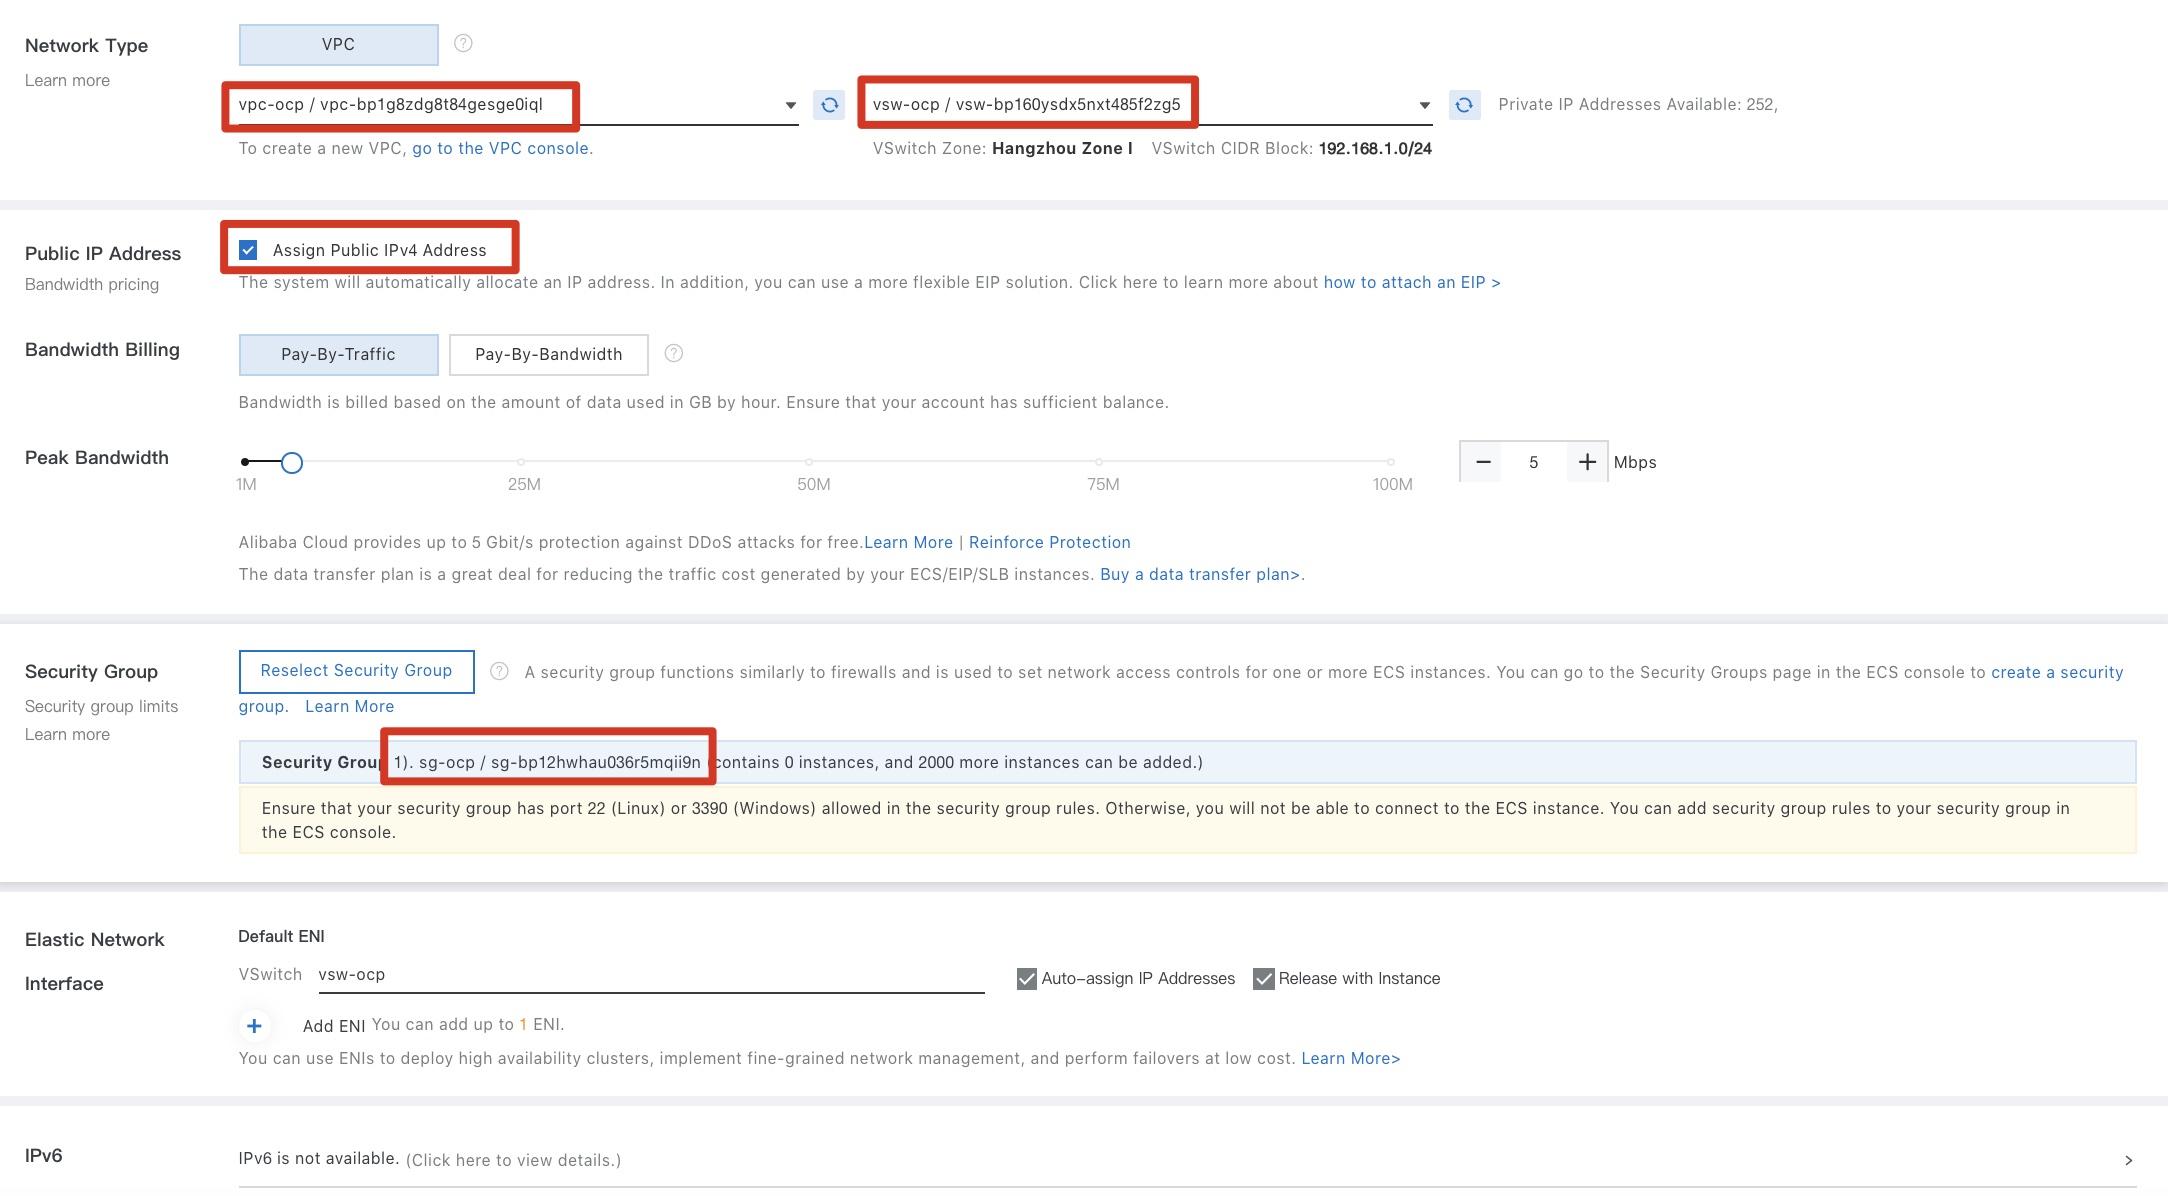
Step 4: On the Networking page, set the required parameters, as described in the following table. Click Next: System Configurations.
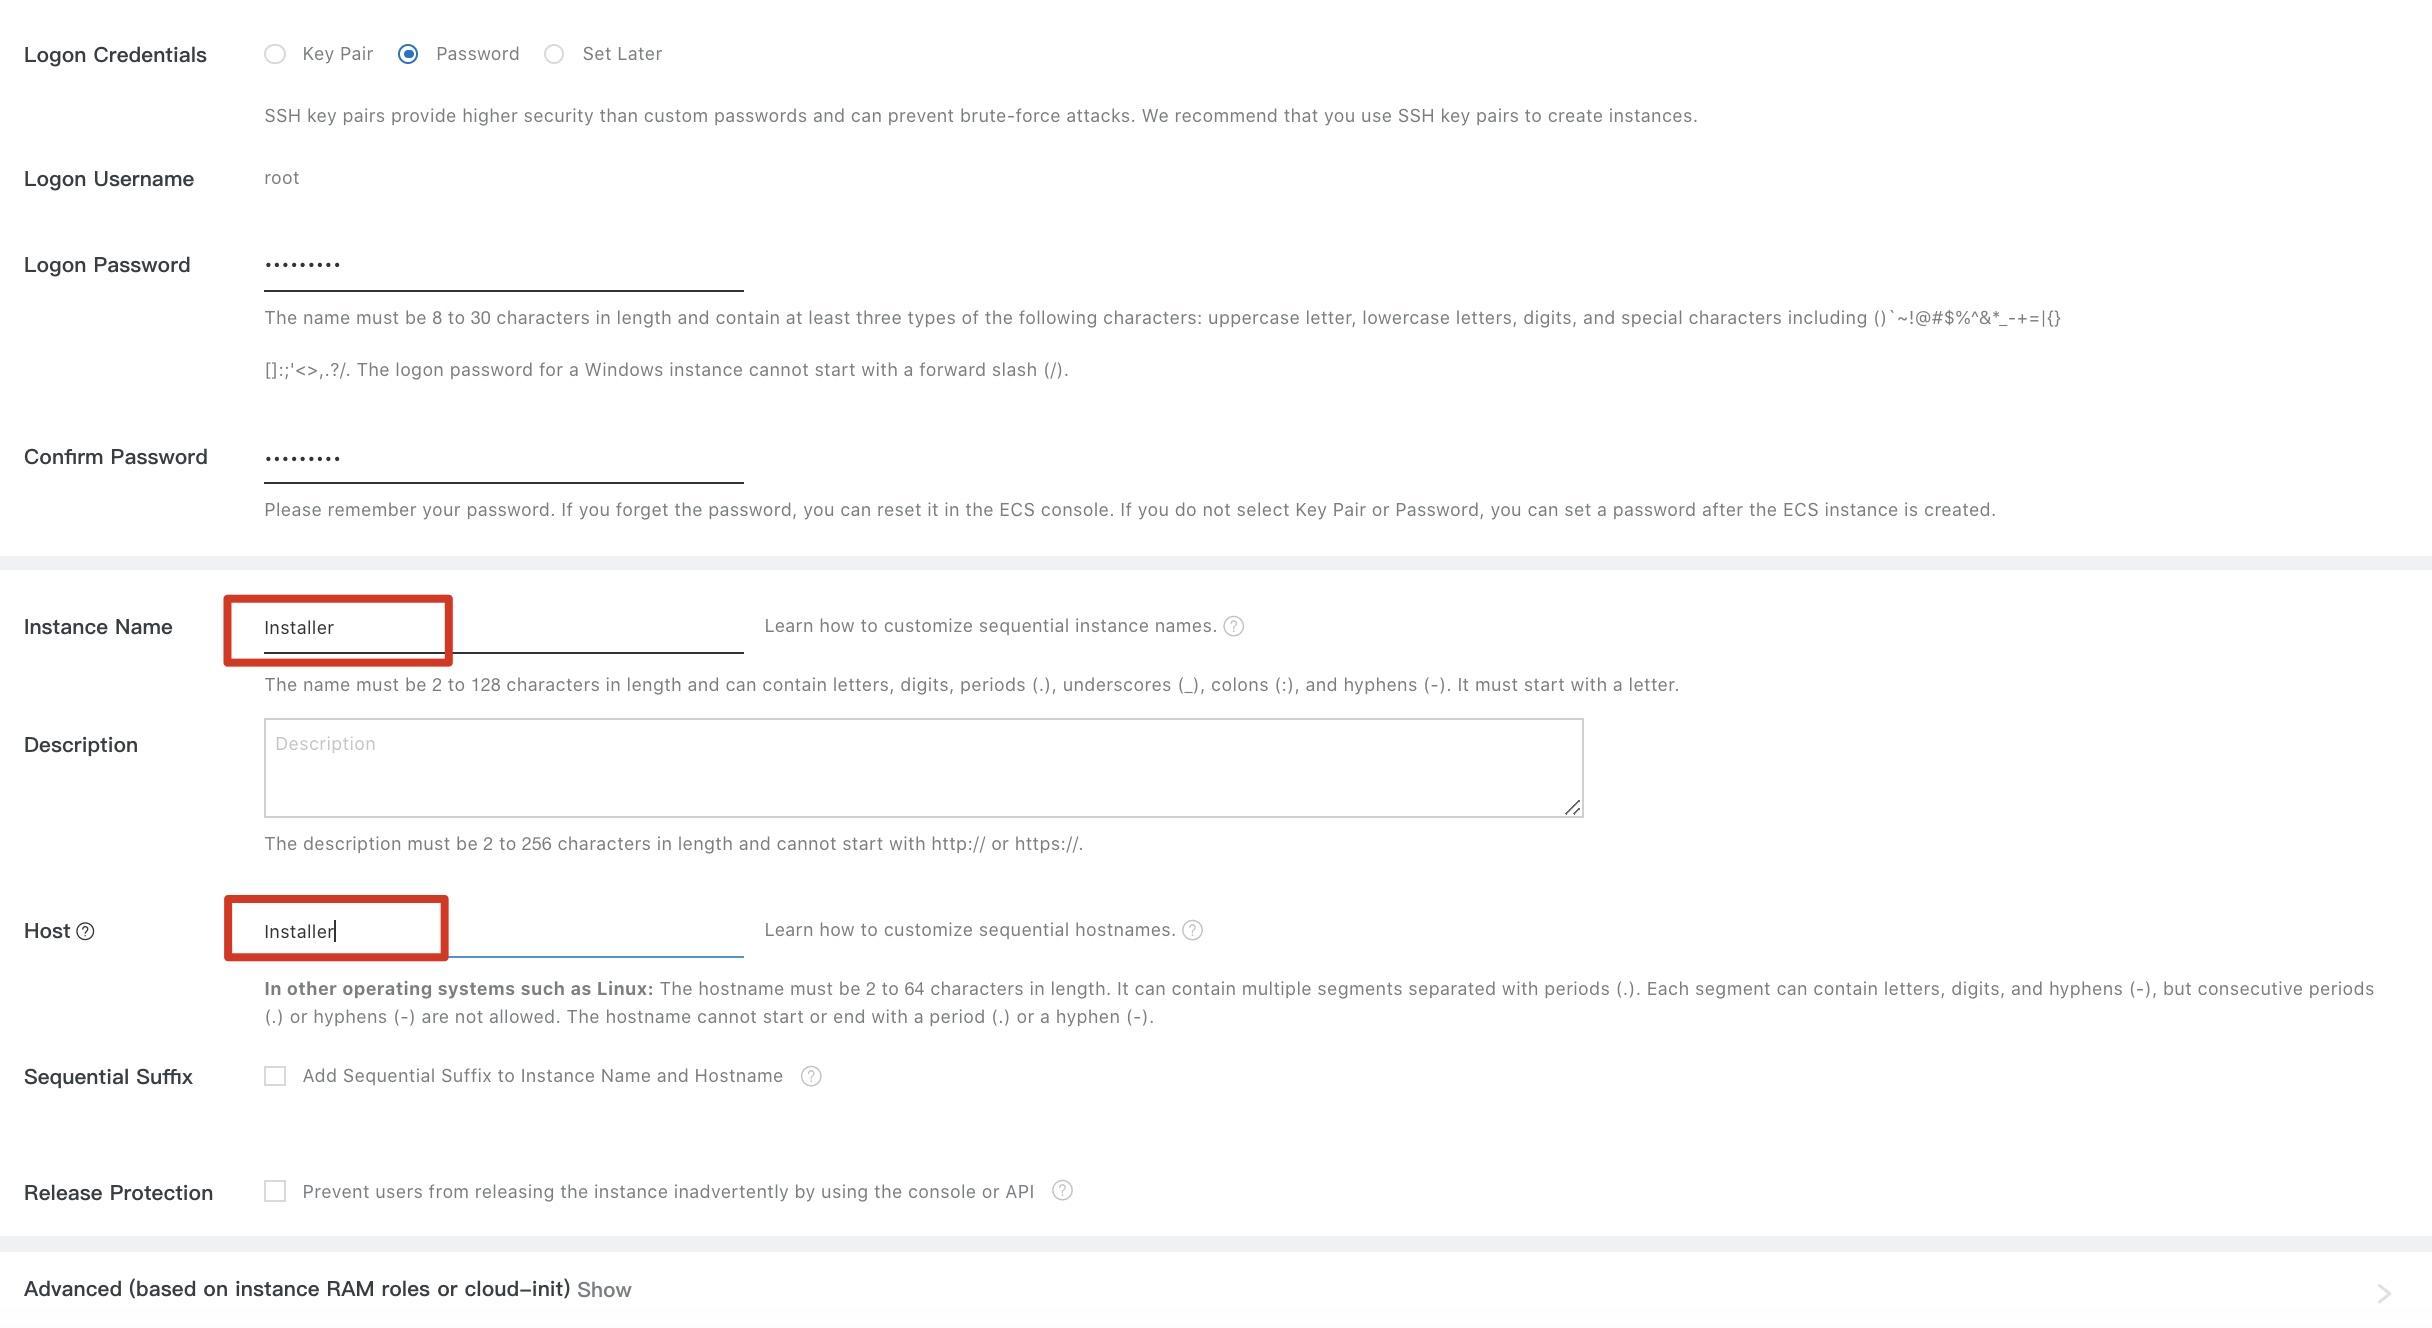
Step 5: In the System Configurations step, set the required parameters. Then, click Preview.
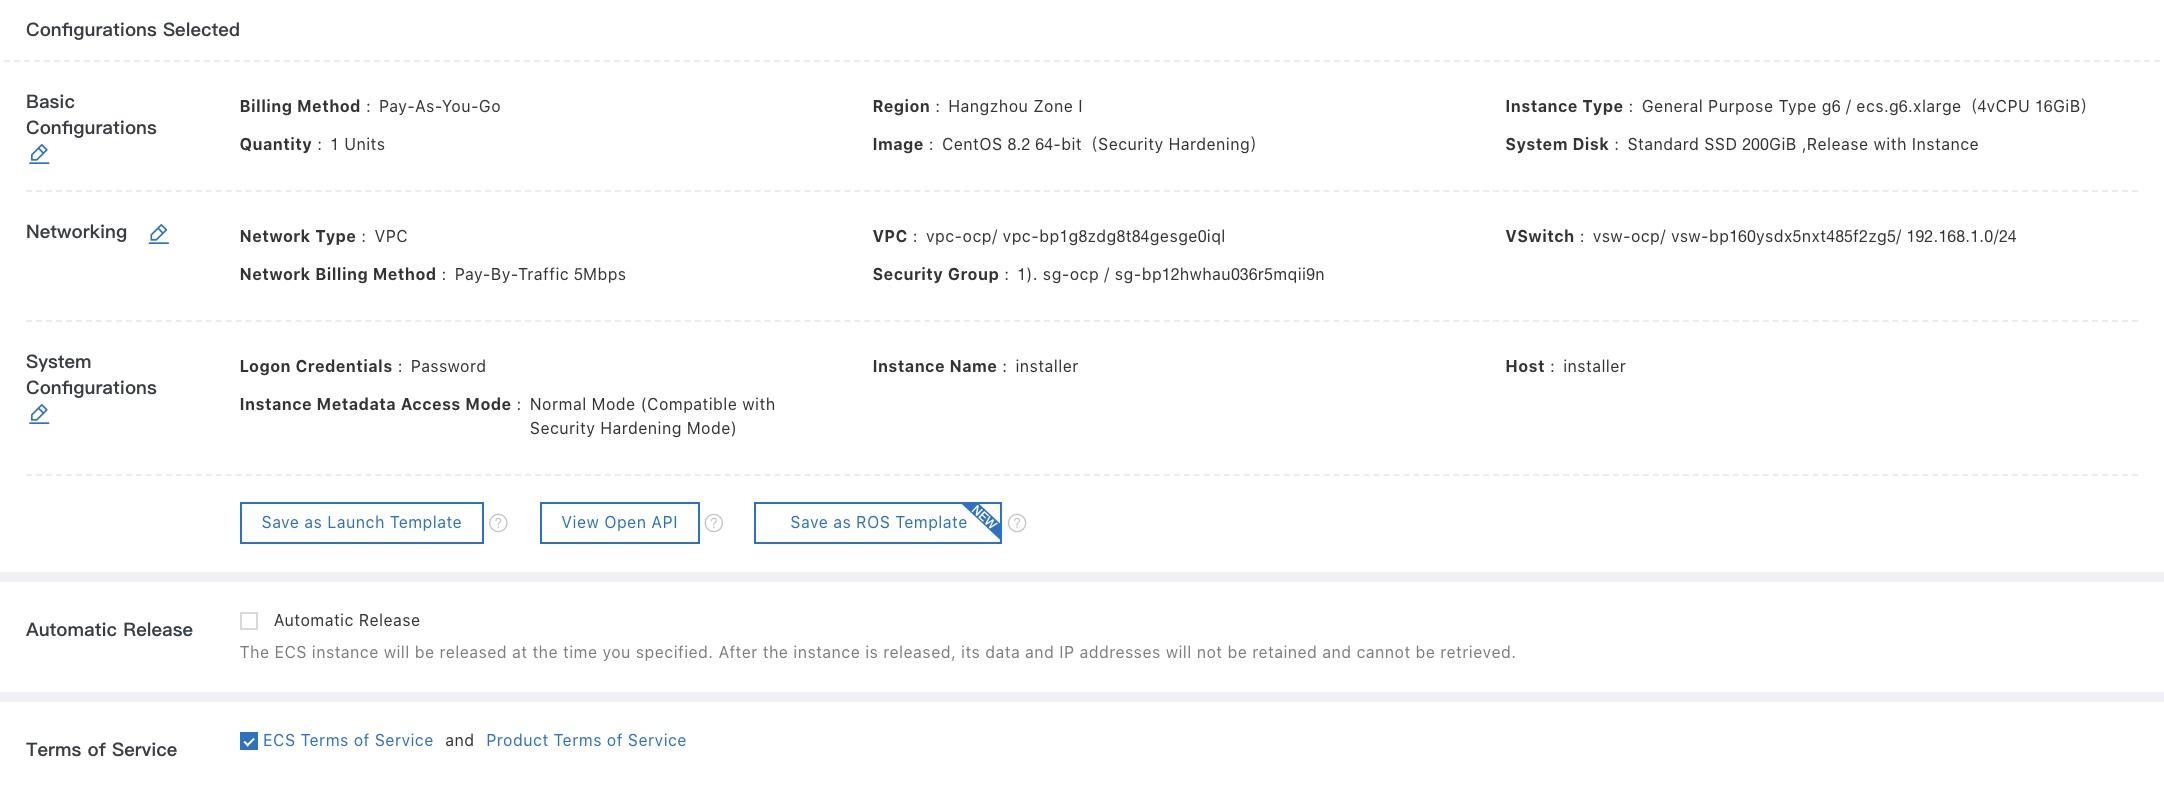
Step 6: In the Preview step, verify the configurations, read the ECS Terms of Service and Product Terms of Service, select the ECS Terms of Service and Product Terms of Service check box, and then click Create Order.
Step 7: After the installer instance is created, view the details of the installer instance on the Instances page. The public IP address is used as the remote logon address of the installer instance.

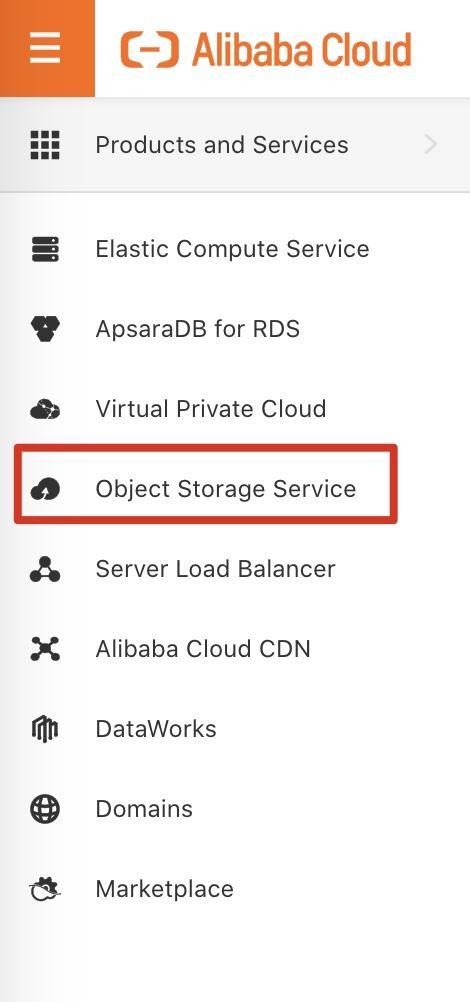
Step 1: Log on to the Alibaba Cloud Management Console. Move the pointer over the More icon in the upper-left corner and click Object Storage Service to go to the OSS console.
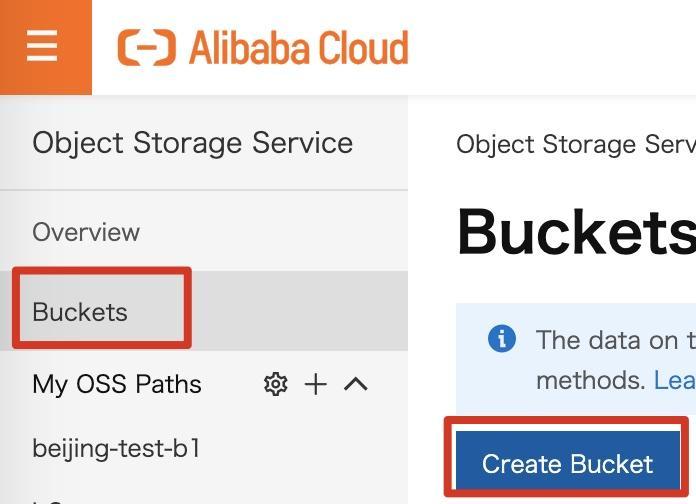
Step 2: On the left-side of the navigation pane, click Buckets. On the Buckets page, click Create Bucket.
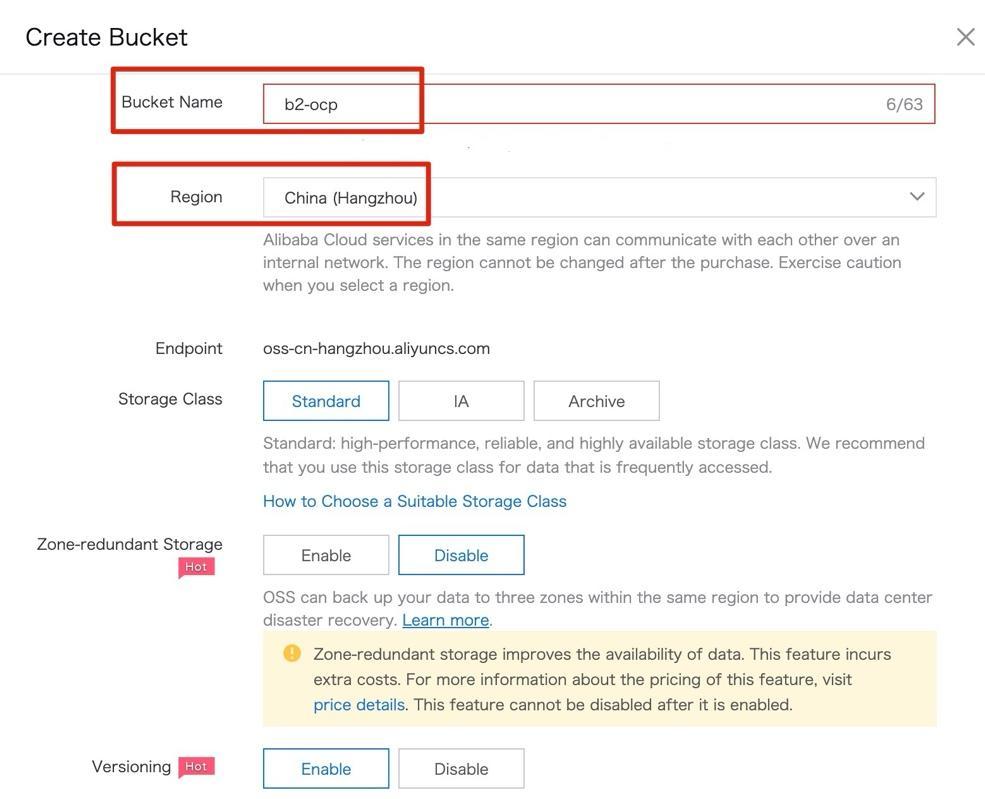
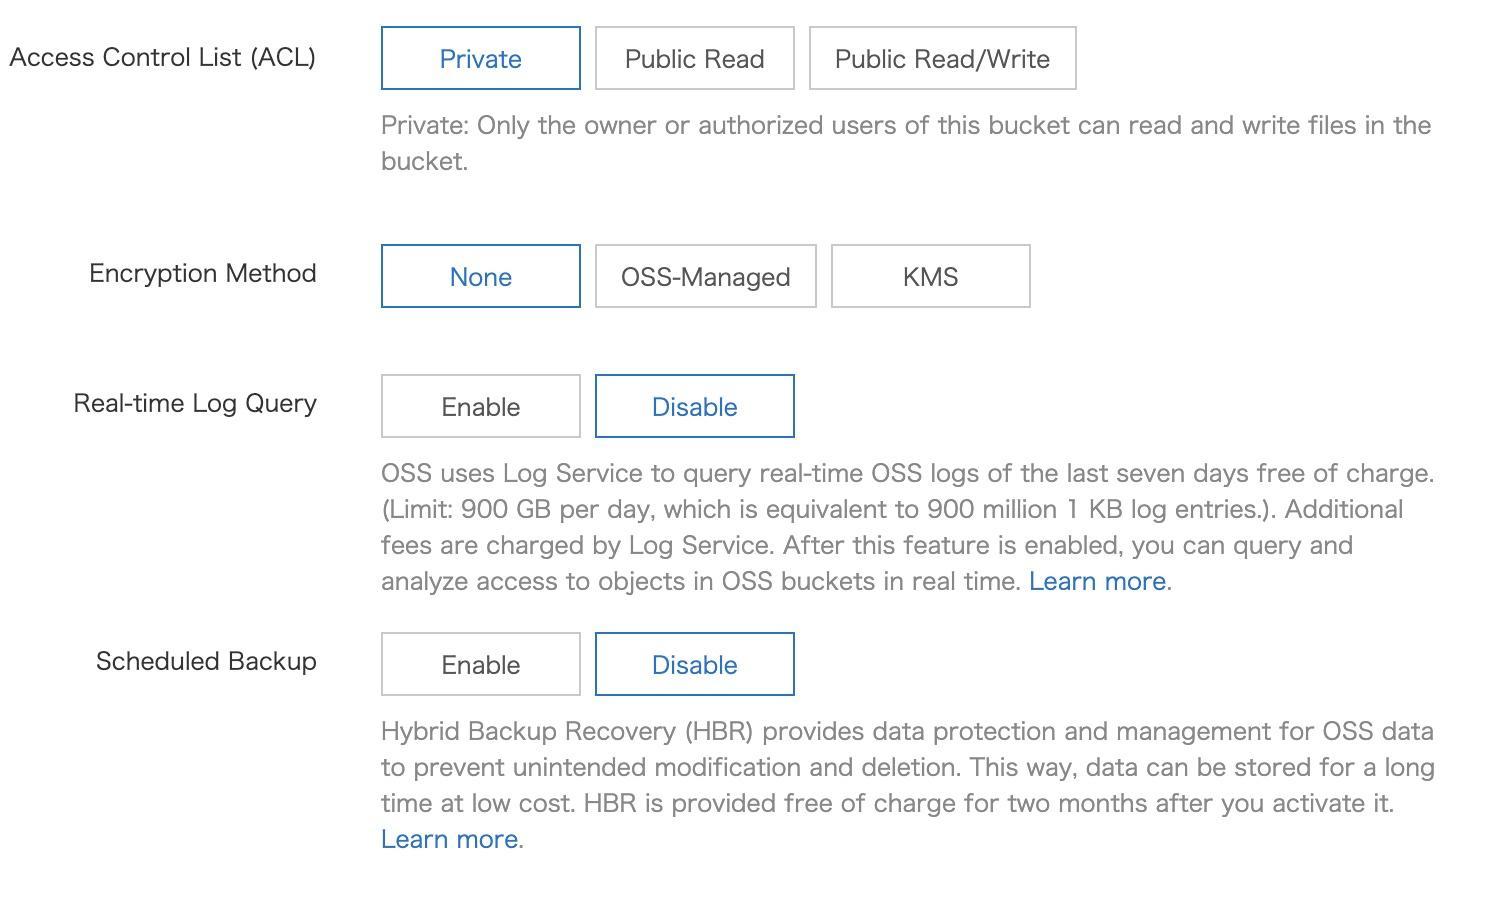
Step 3: In the Create Bucket panel, set the Bucket Name parameter to b2-ocp and the Region parameter to China (Hangzhou). Set other parameters and click OK.
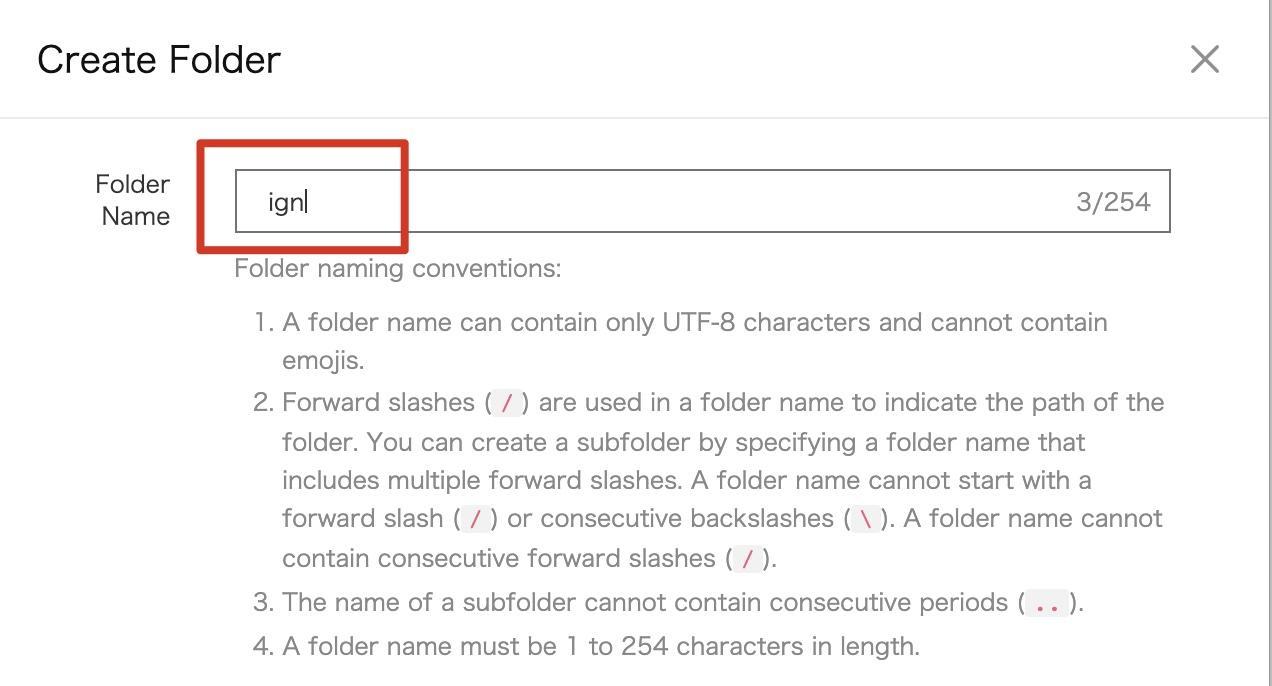
Step 4: After the b2-ocp bucket is created, the overview page of the bucket appears. On the left-side of the navigation pane, click Files. Then, click Create Folder.
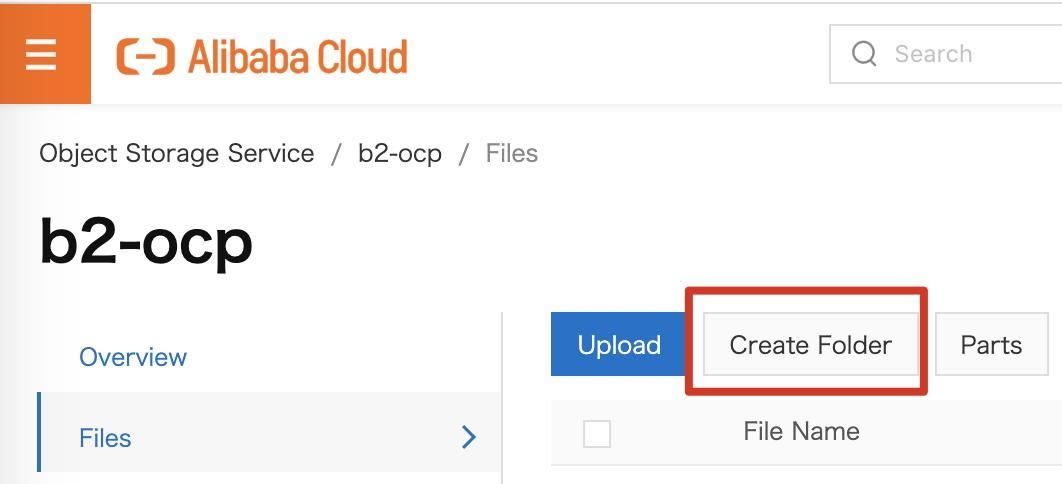
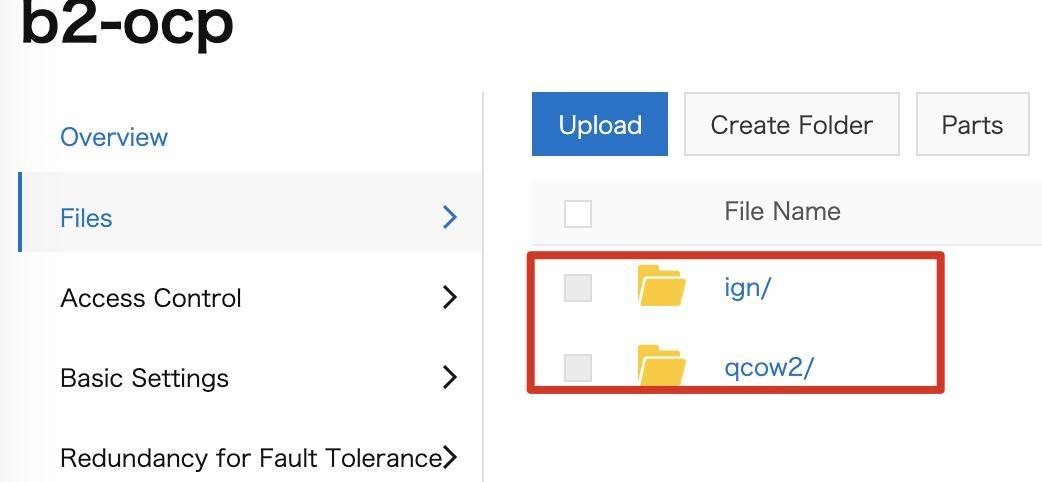
Step 5: Create two folders and name them ign and qcow2.
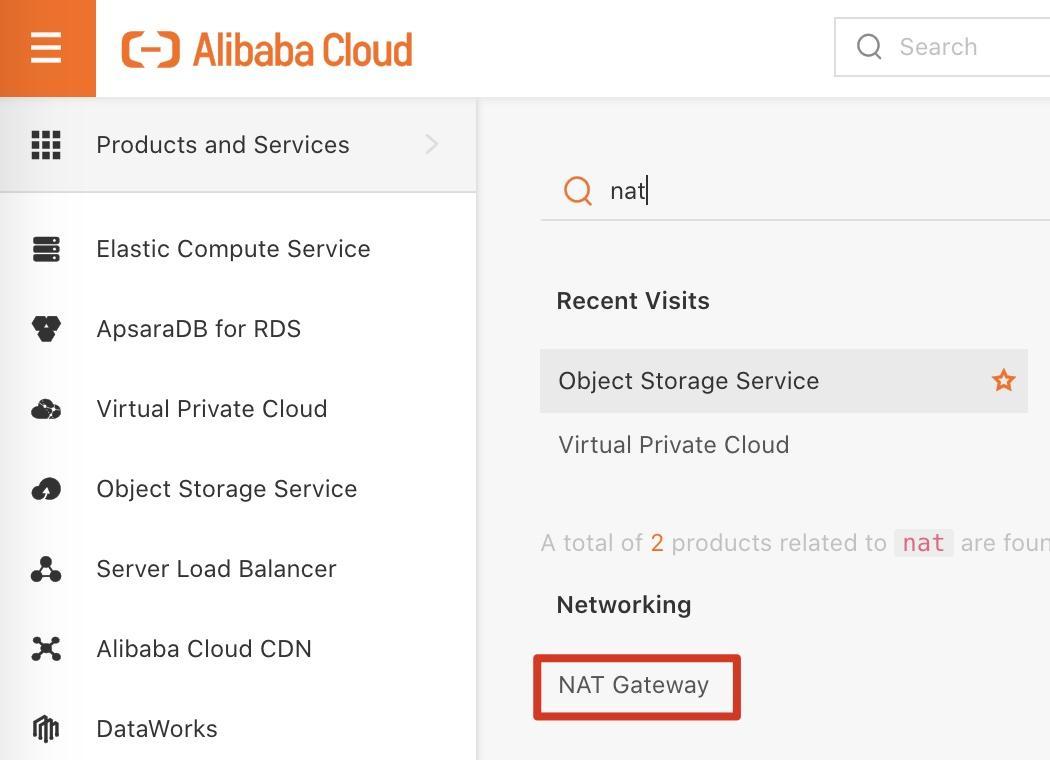
Step 1: Log on to the Alibaba Cloud Management Console. Move the pointer over the More icon in the upper-left corner and choose Products and Services > NAT Gateway to go to the NAT Gateway console.
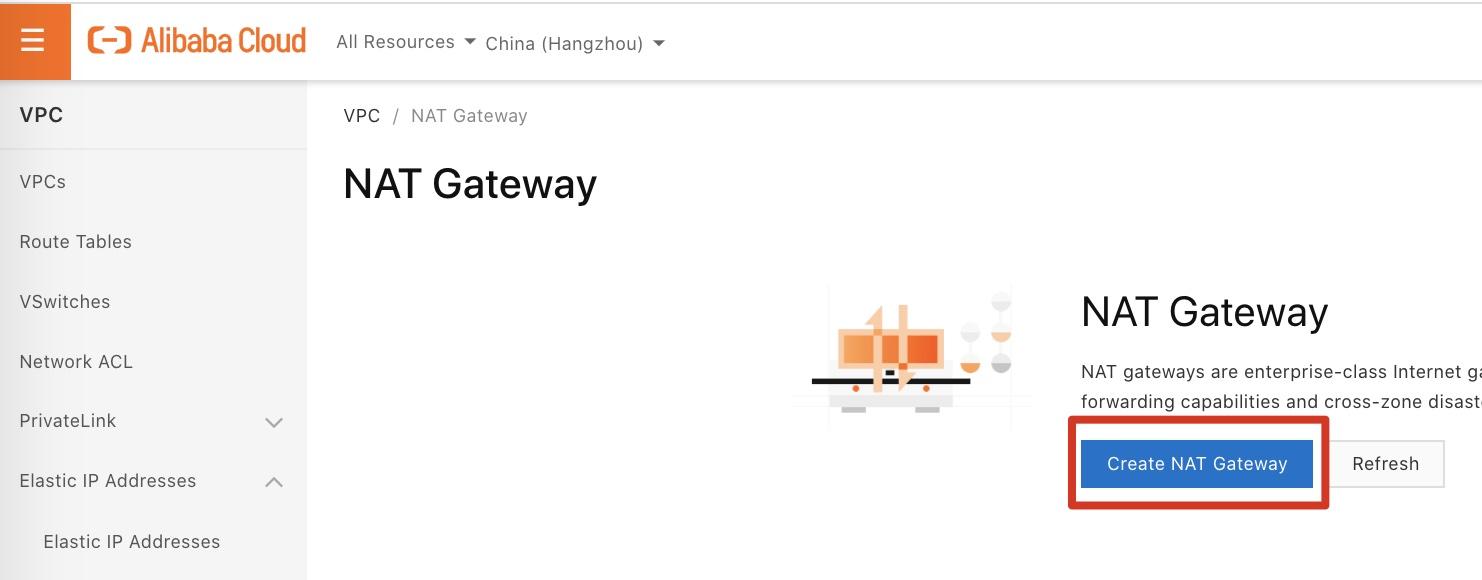
Step 2: Set the region to China (Hangzhou) and click Create NAT Gateway.
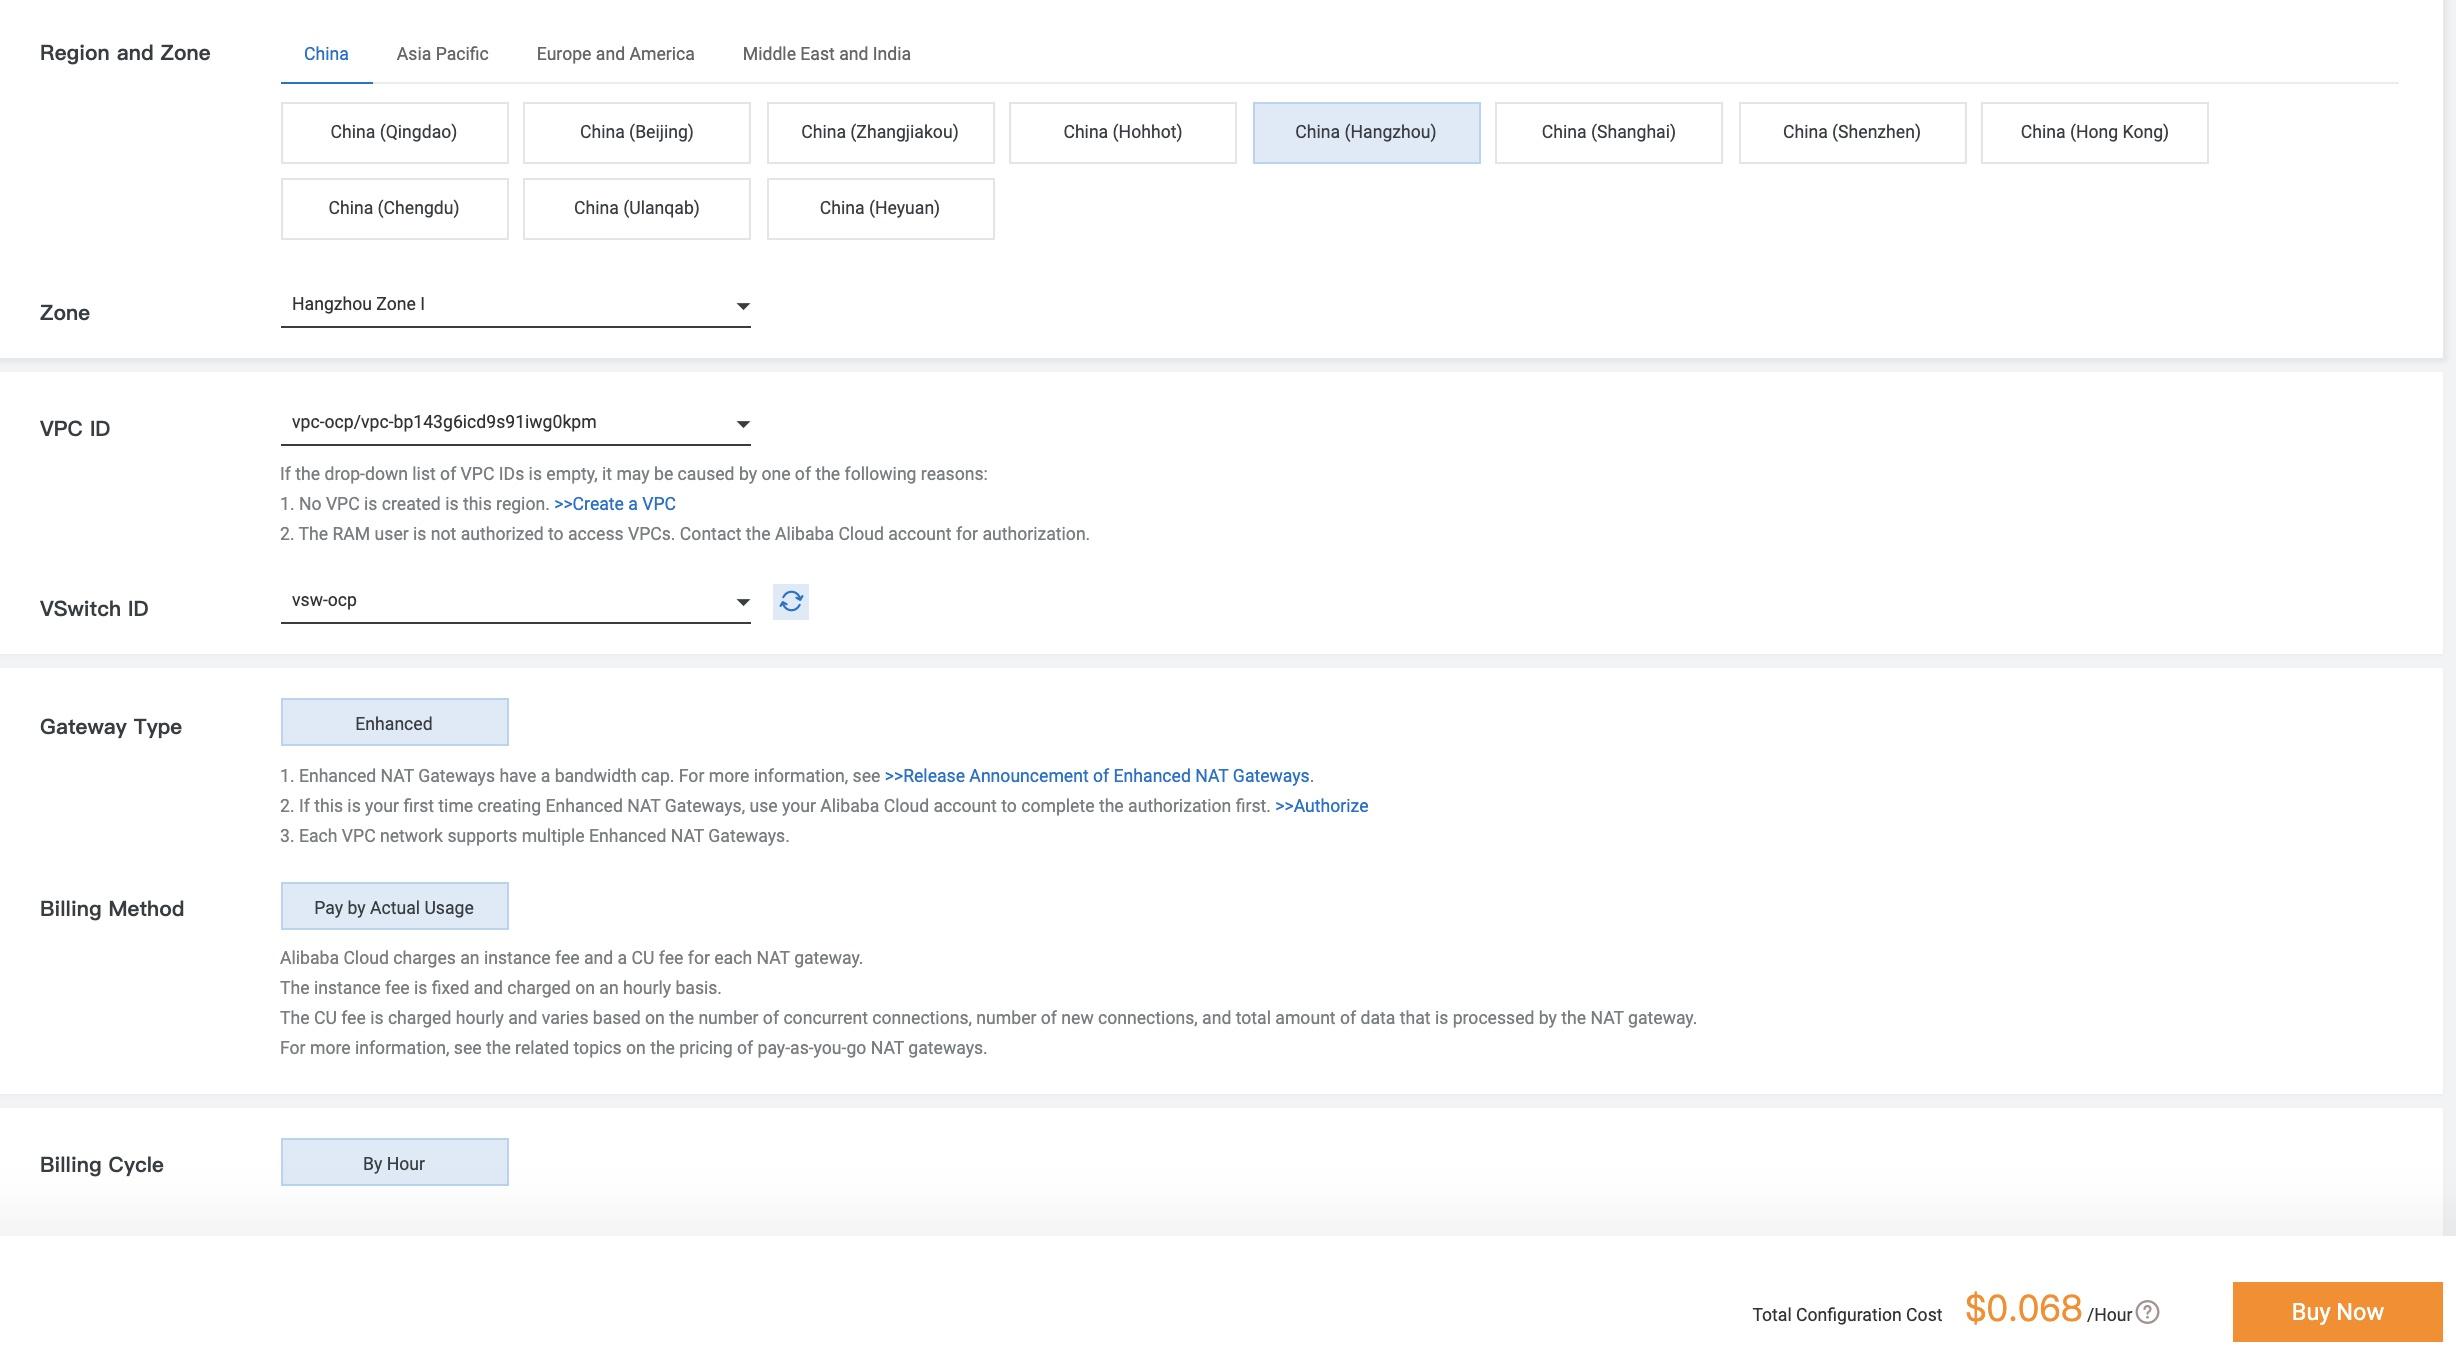
Step 3: Set the required parameters, as shown in the following figure. Then, click Buy Now.
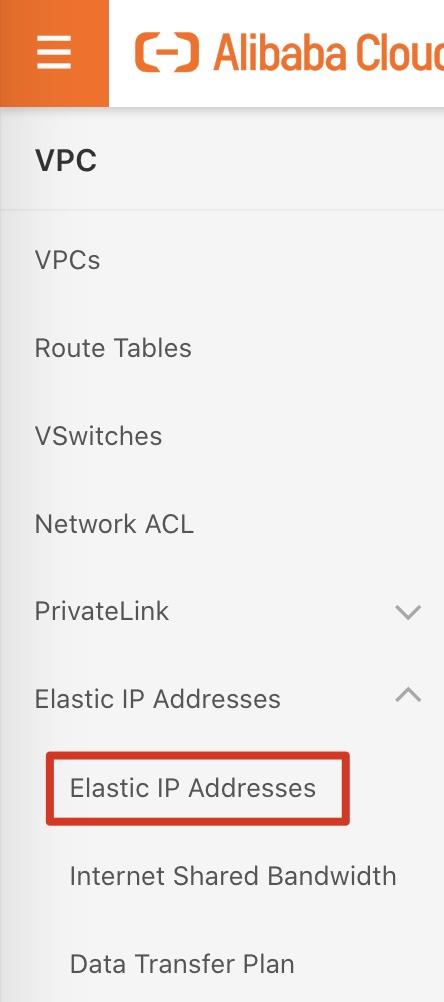
Step 4: Return to the NAT Gateway page. On the left-side of the navigation pane, click Elastic IP Addresses, then click Create EIP.
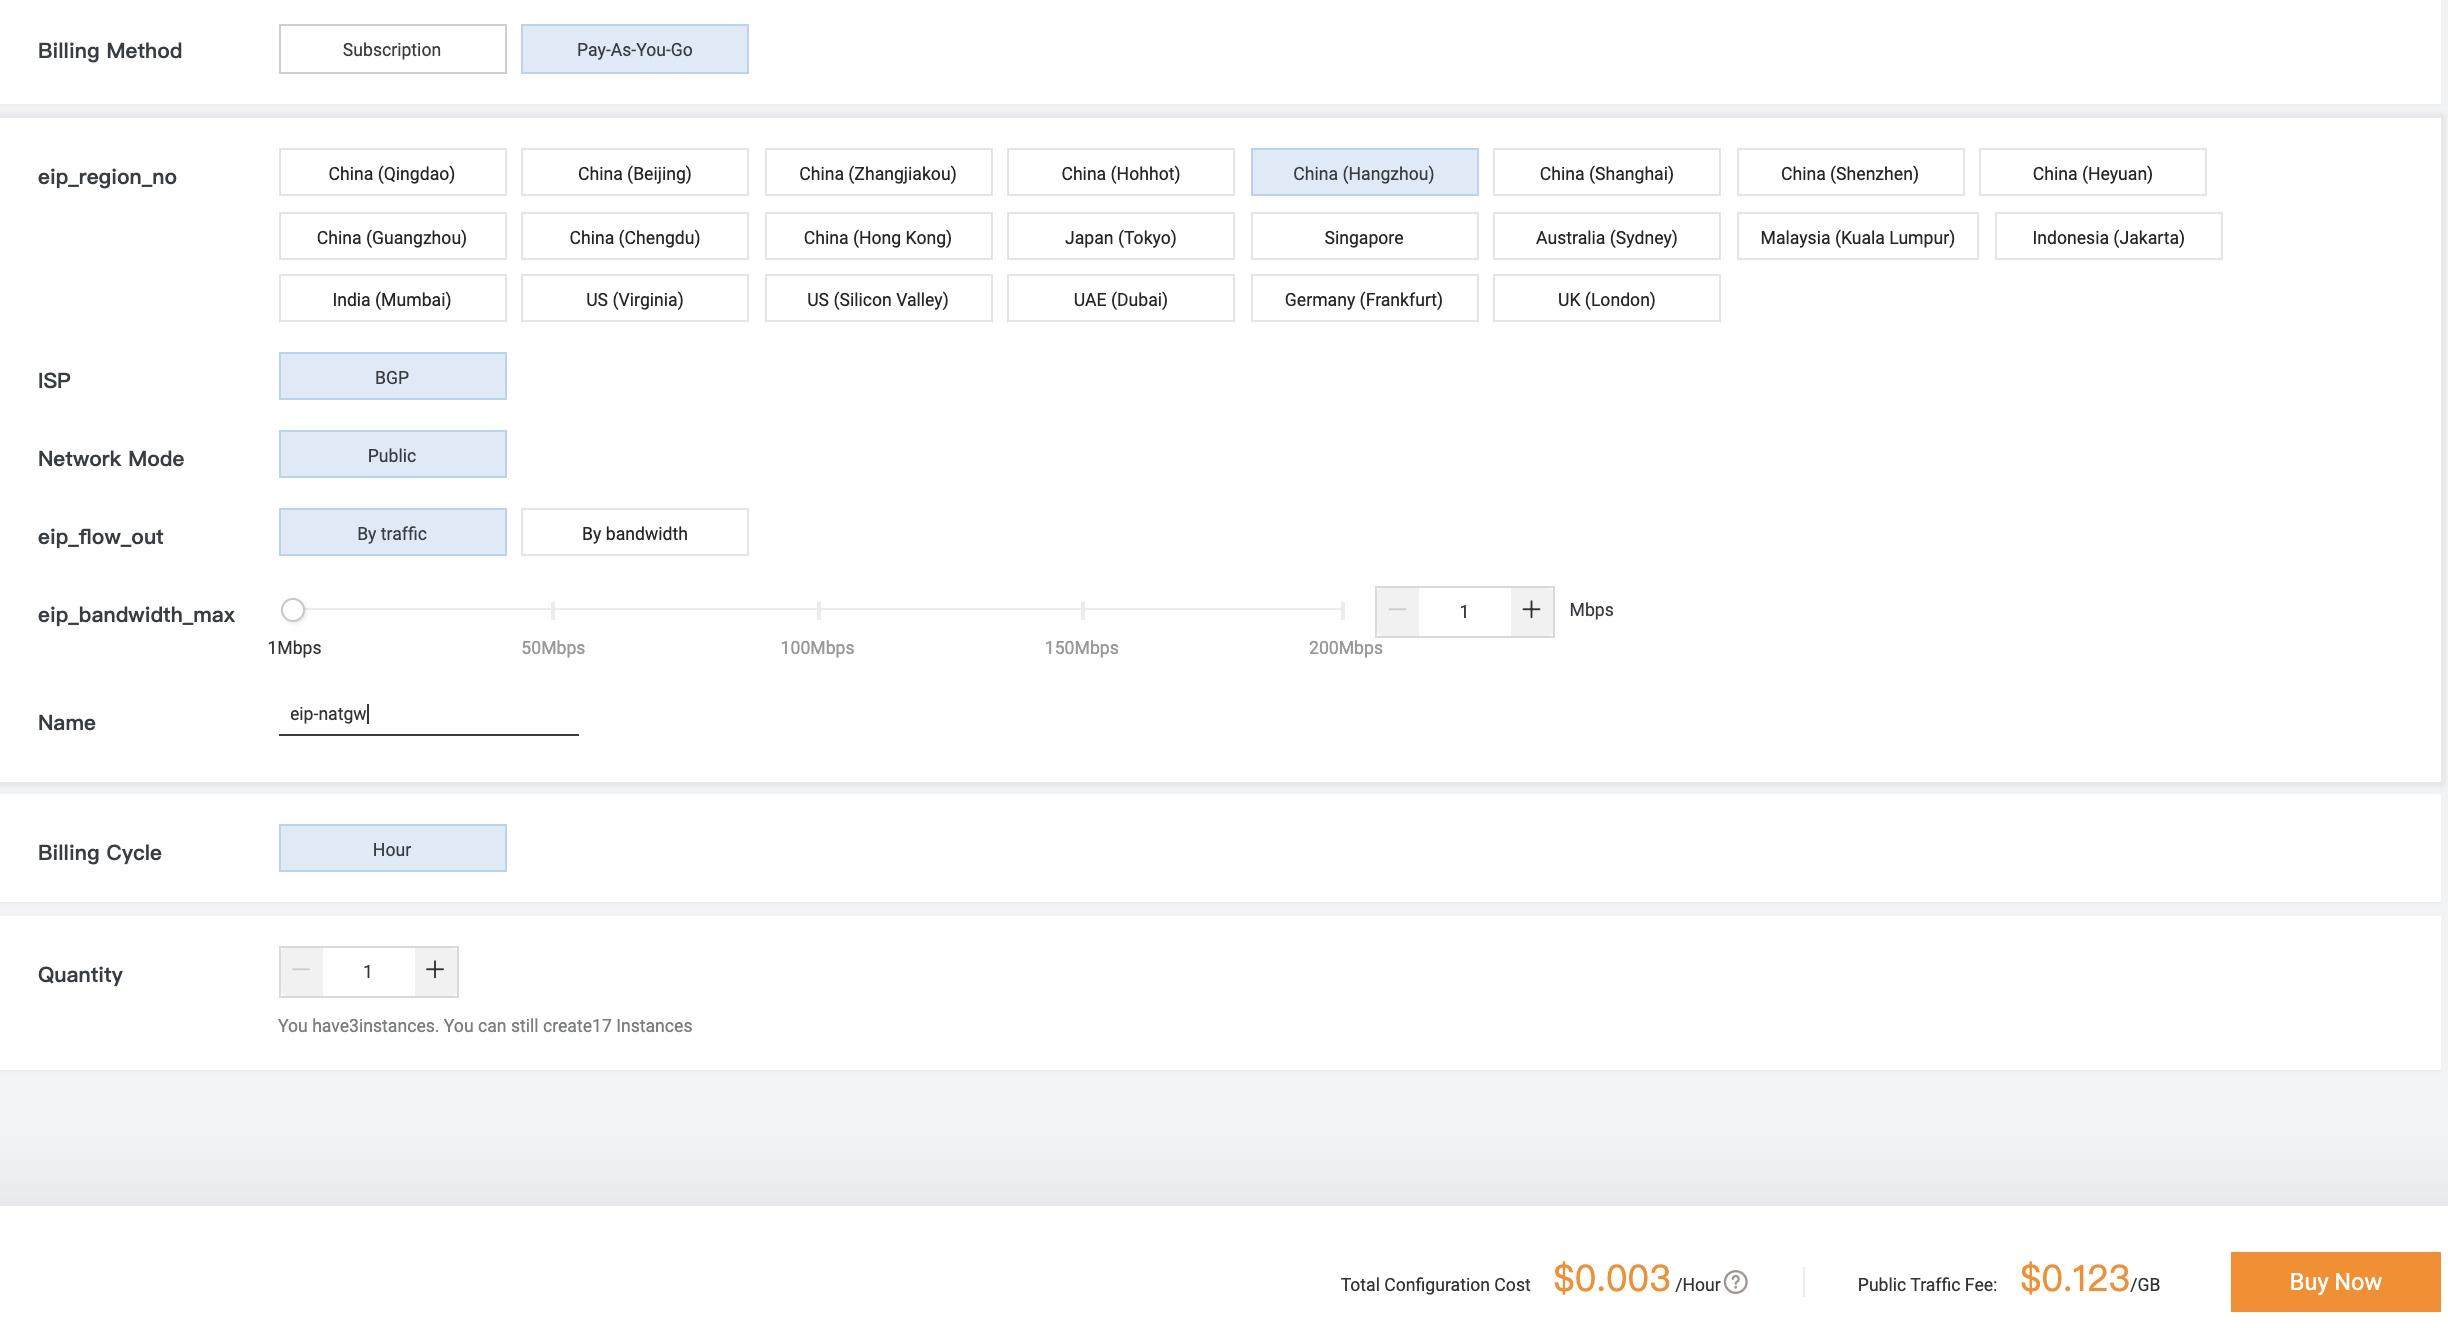
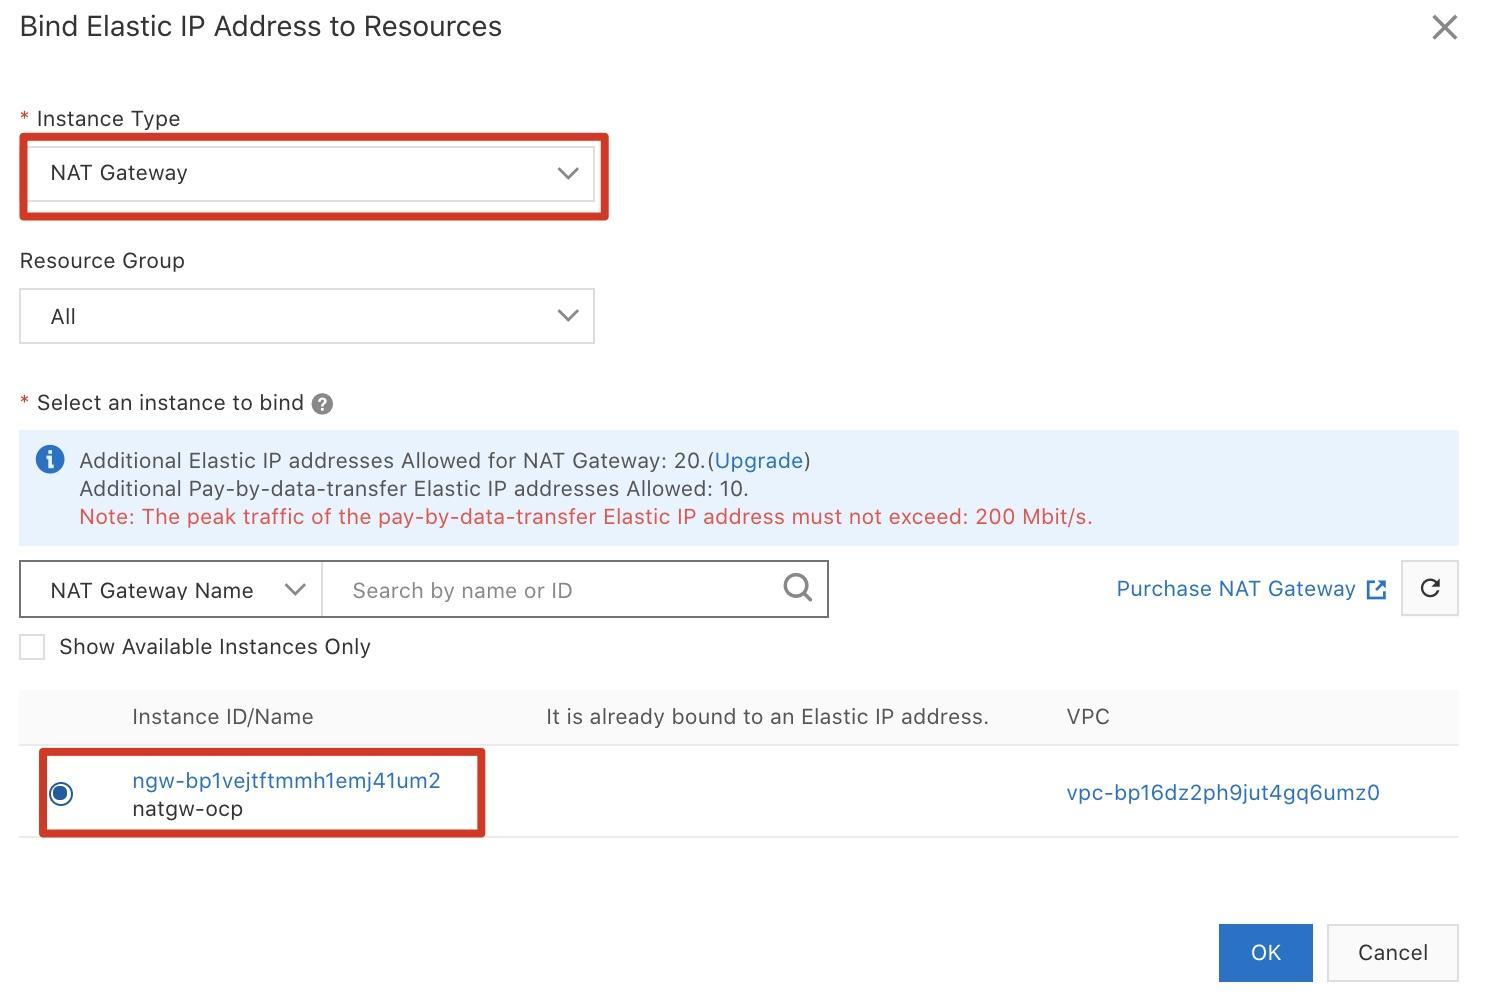
Step 5: Select the EIP that you created and bind it to the NAT gateway.

Step 6: Return to the NAT Gateway page. Find the NAT gateway that you created and click Configure SNAT in the Actions column.

Step 7: Click Create SNAT Entry.
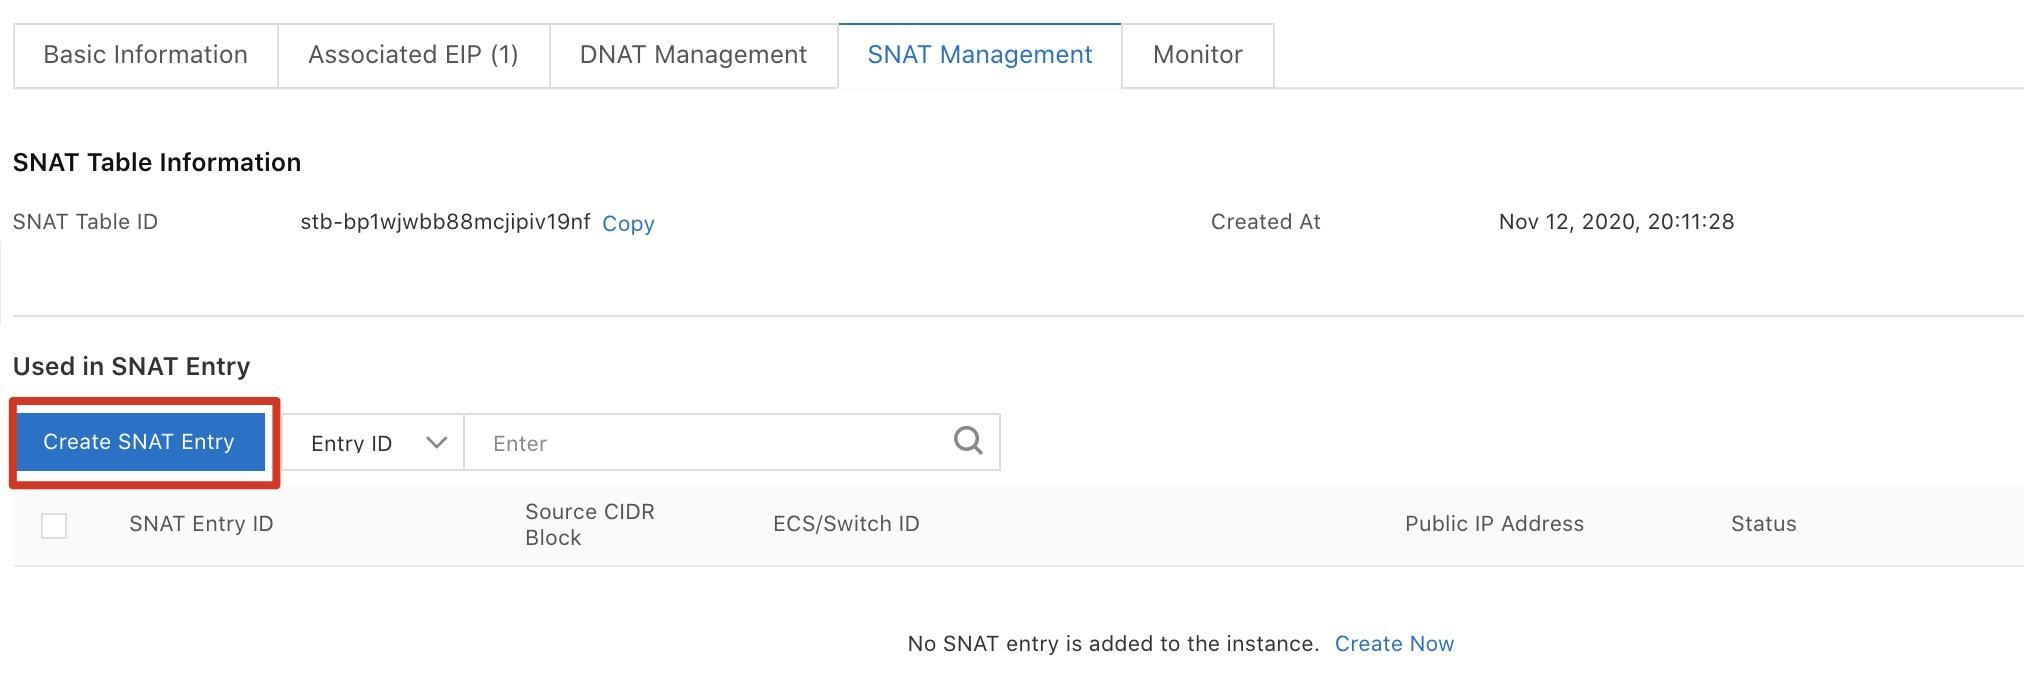
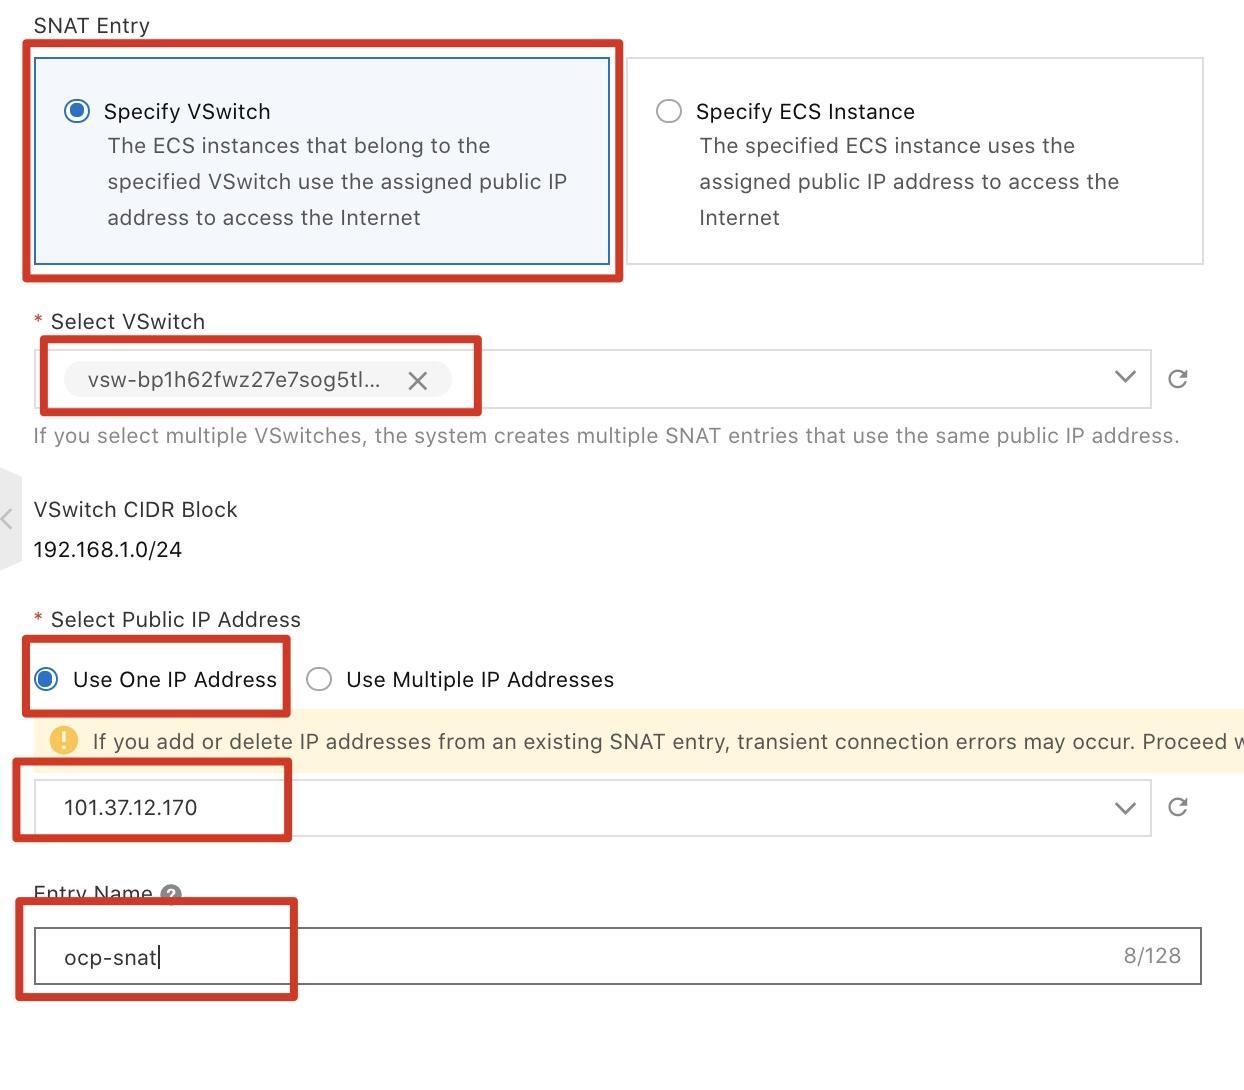
Step 8: On the Create SNAT Entry page, click the Specify VSwitch tab, select vsw-ocp as the vSwitch, select the created and bound EIP as the public IP address, enter the entry name, and then click OK.
Create a NAS instance to provide storage for the image registry.
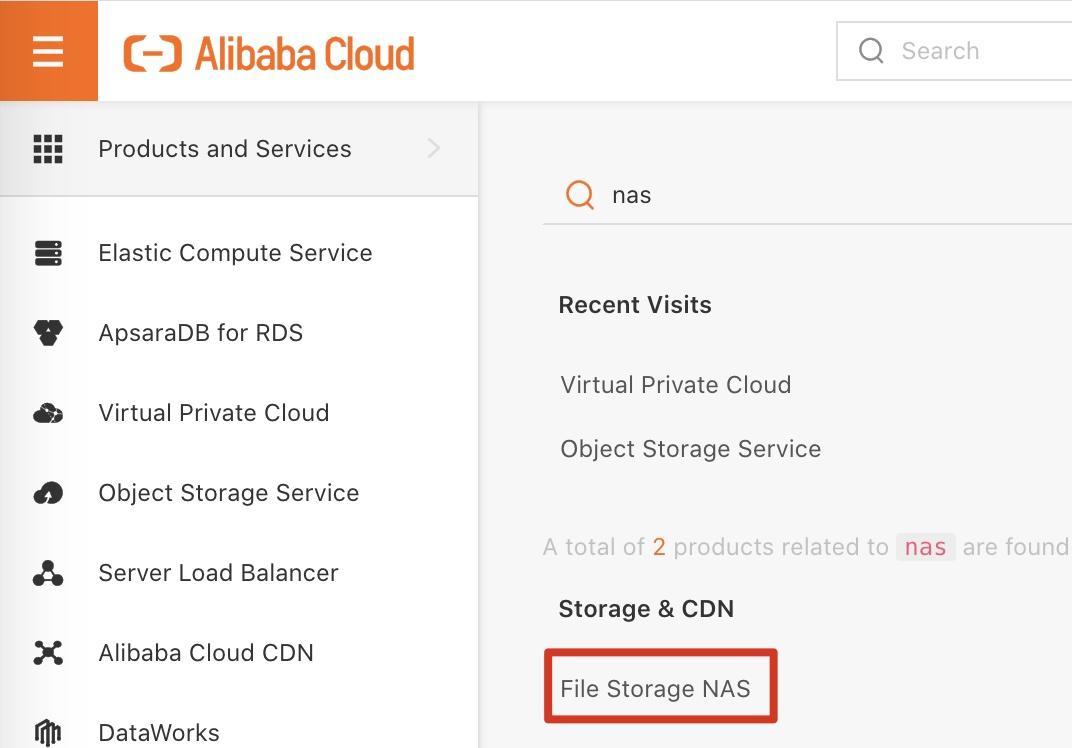
Step 1: Log on to the Alibaba Cloud Management Console. Move the pointer over the More icon in the upper-left corner and choose Products and Services > File Storage NAS to go to the NAS console.
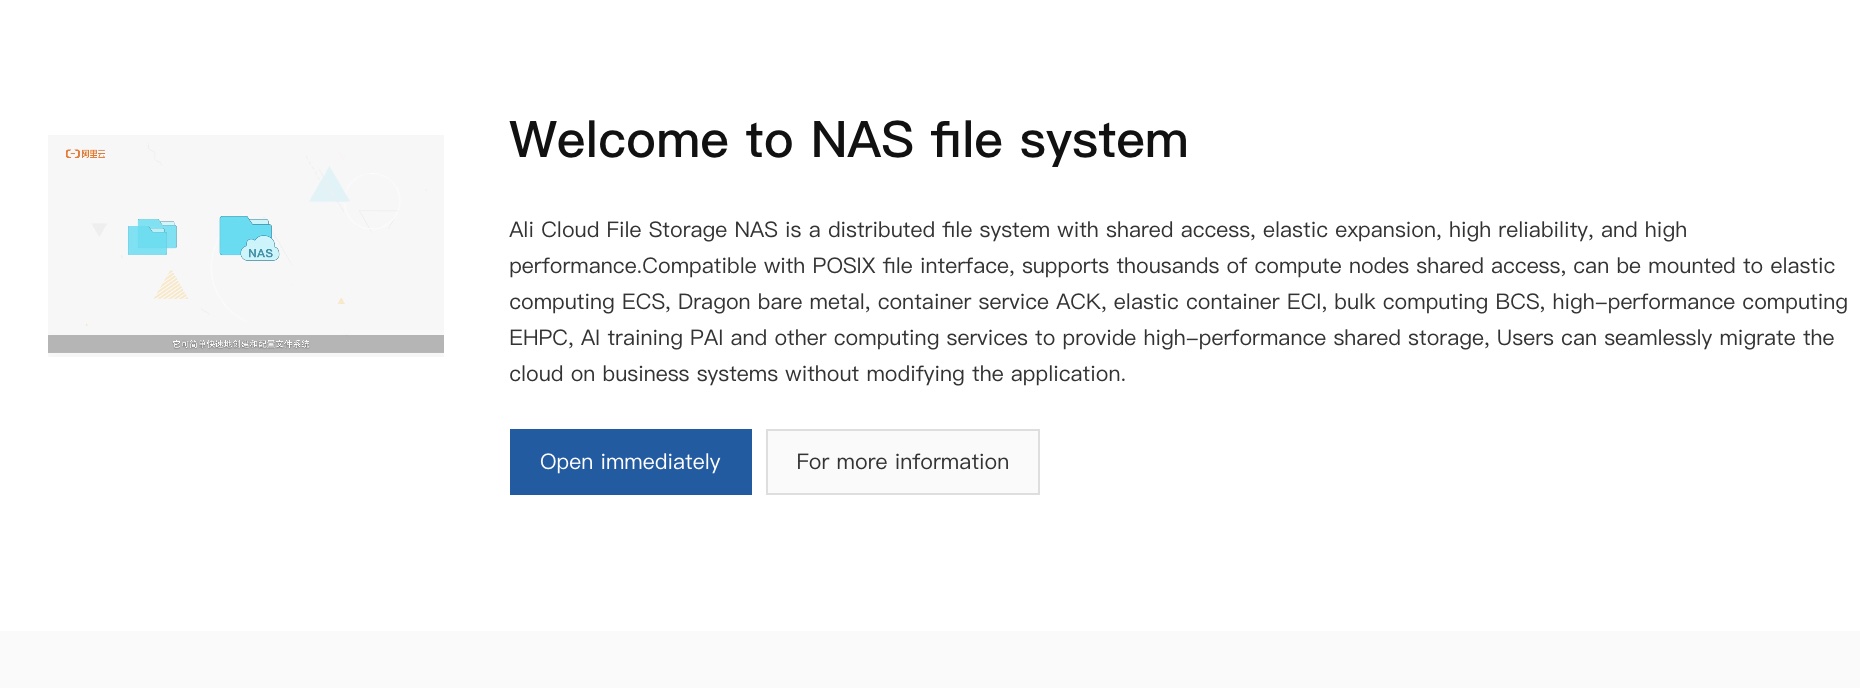
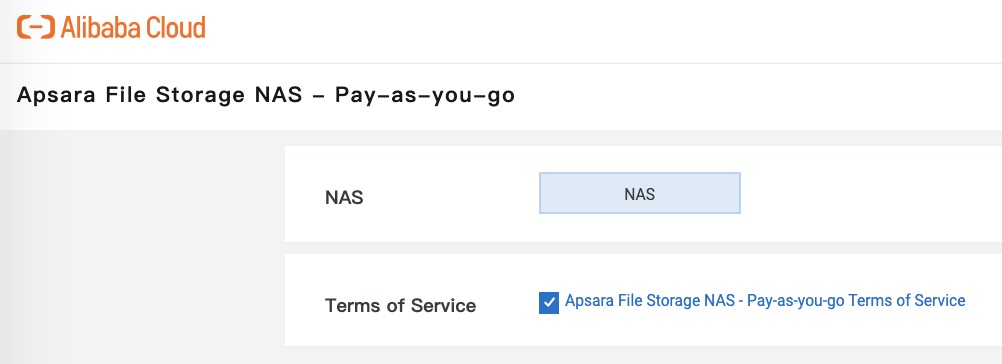
Note: If you are using NAS for the first time, there will be a welcome page, click Open immediately, then select Terms of Service check box, finally click Activate Now.
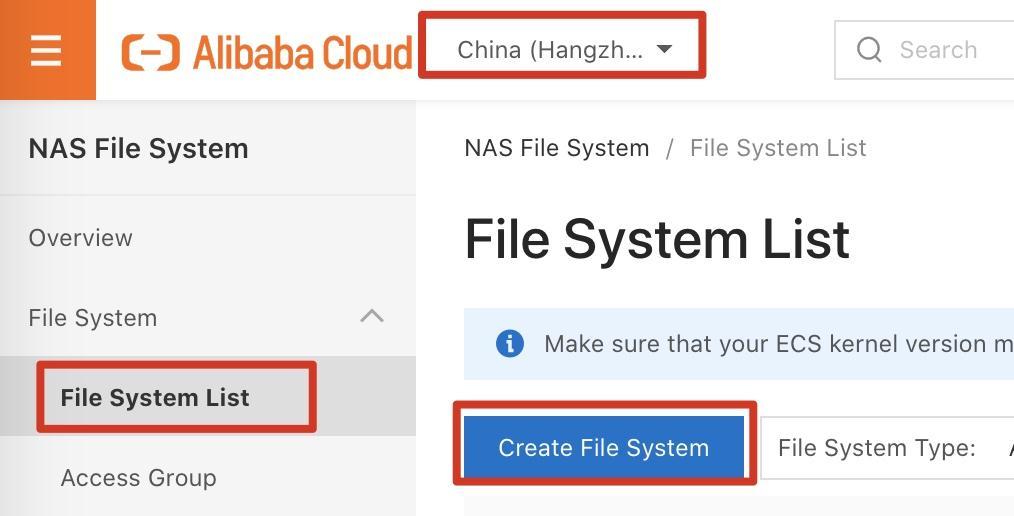
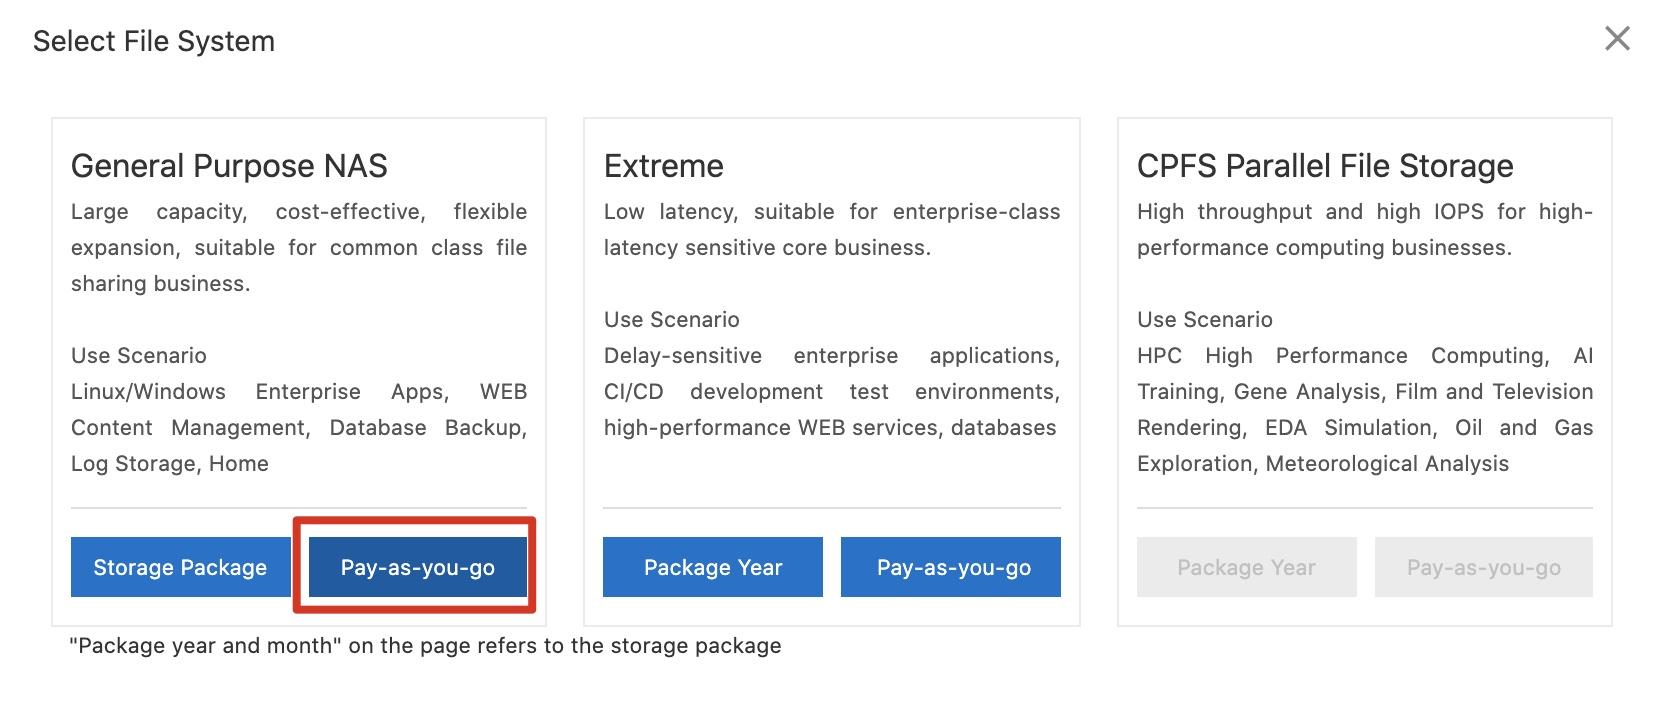
Step 2: On the left-side of the navigation pane, click File System List. On the File System List page, set the region to China (Hangzhou) and click Create File System, then click Pay-as-you-go under General Purpose NAS.
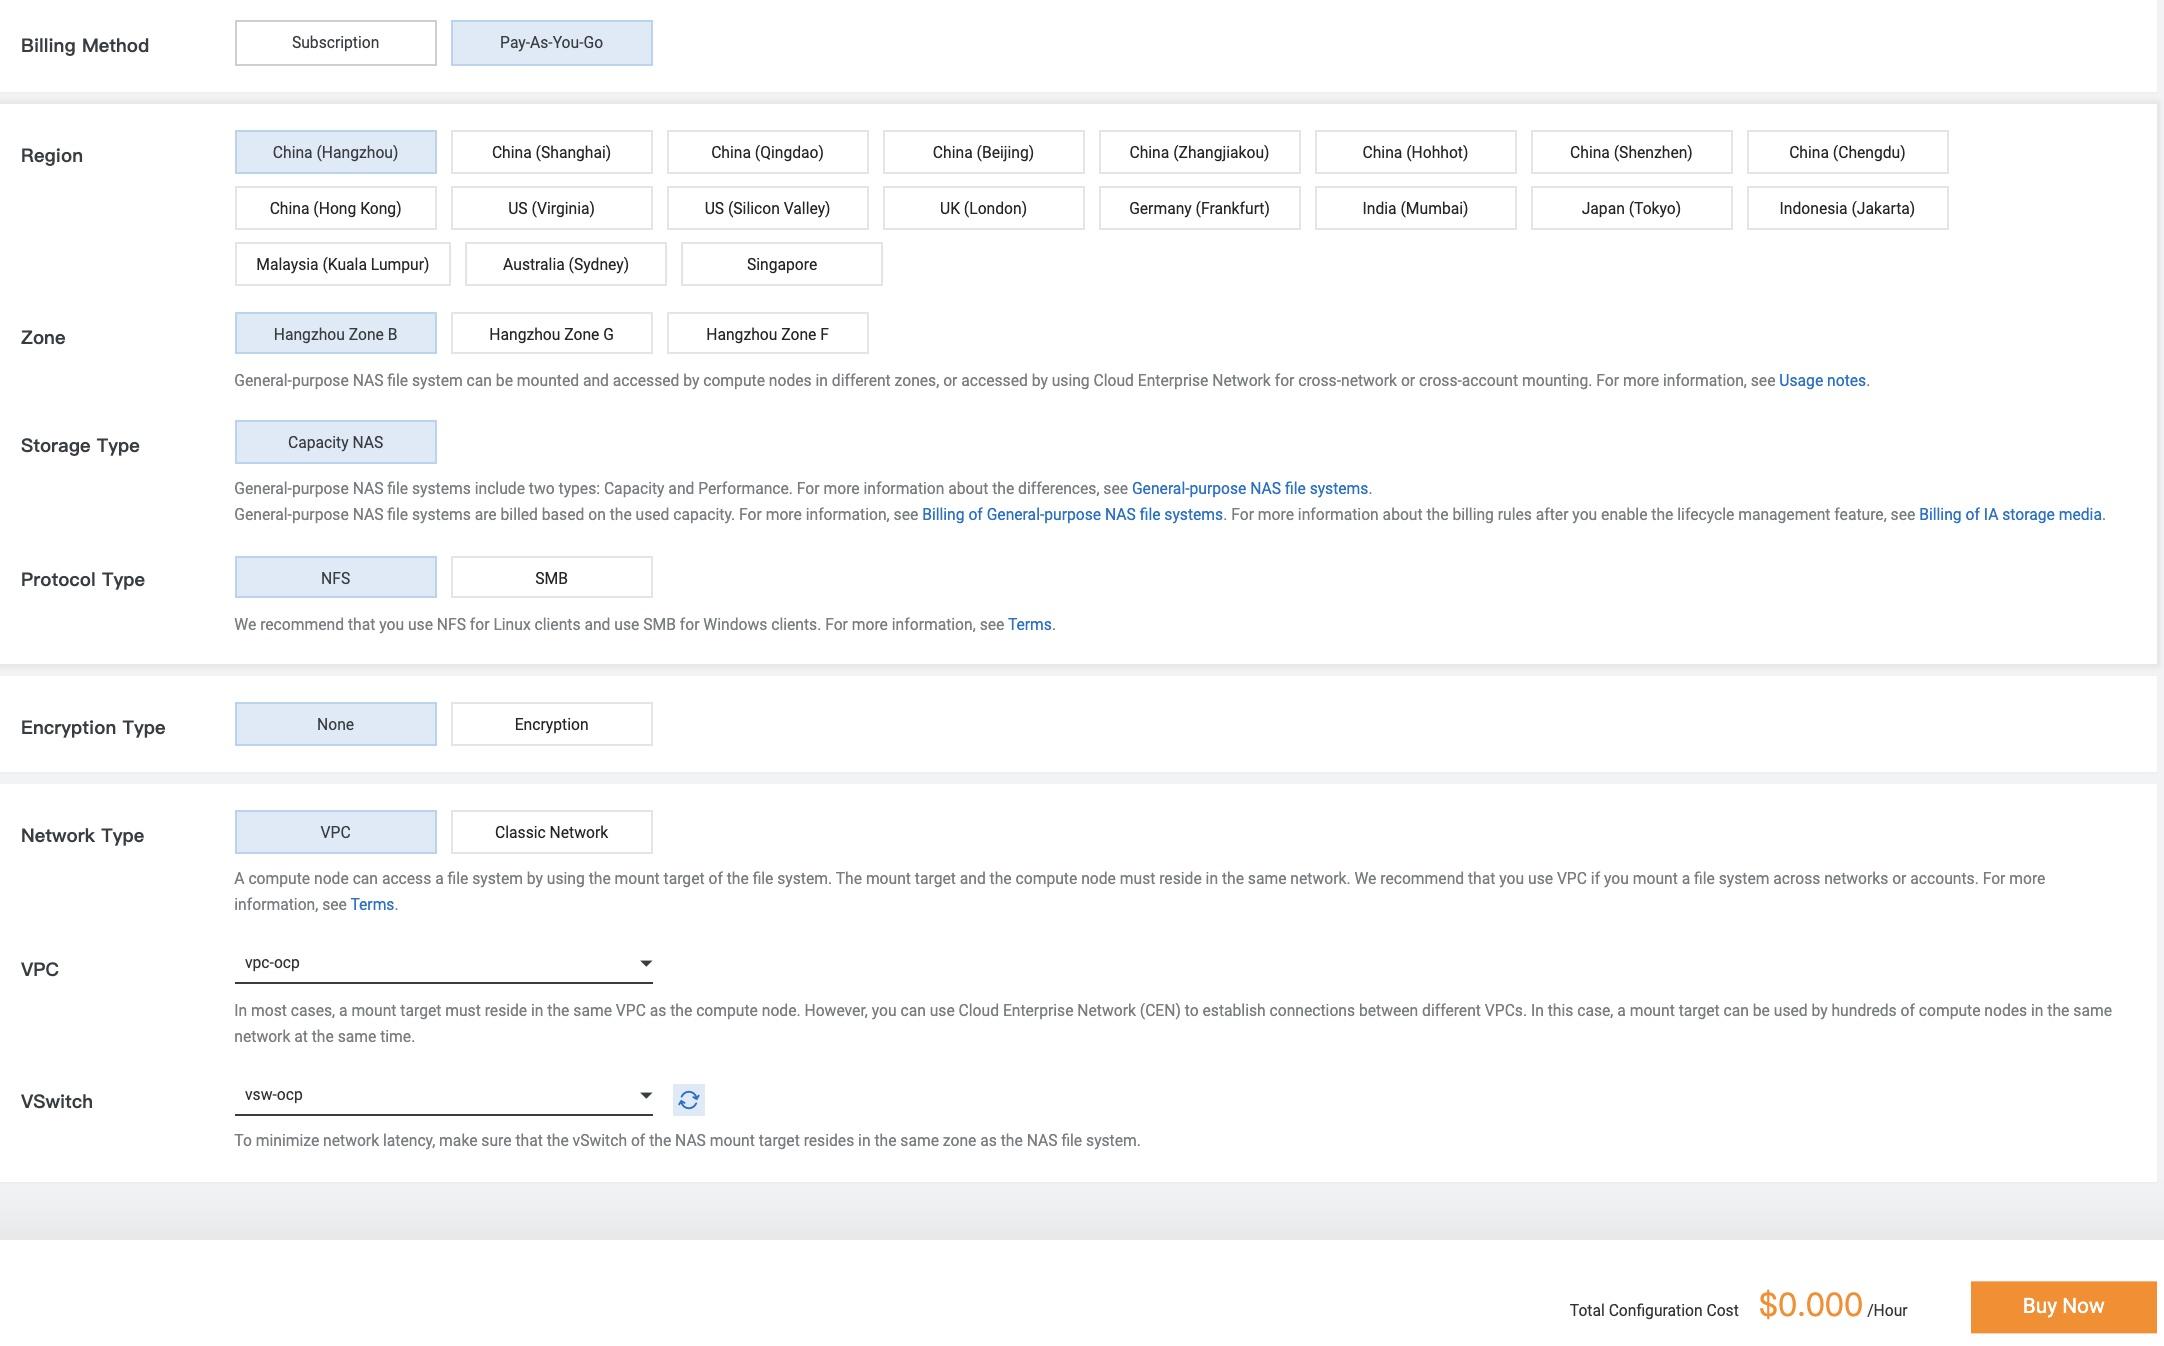
Step 3: Select vpc-ocp as the VPC and vsw-ocp as the vSwitch. Then, click Buy Now.
Note: There are two types of general purpose NAS, Capacity NAS and Performance NAS, which can be selected as required. Different regions may have different supplies.
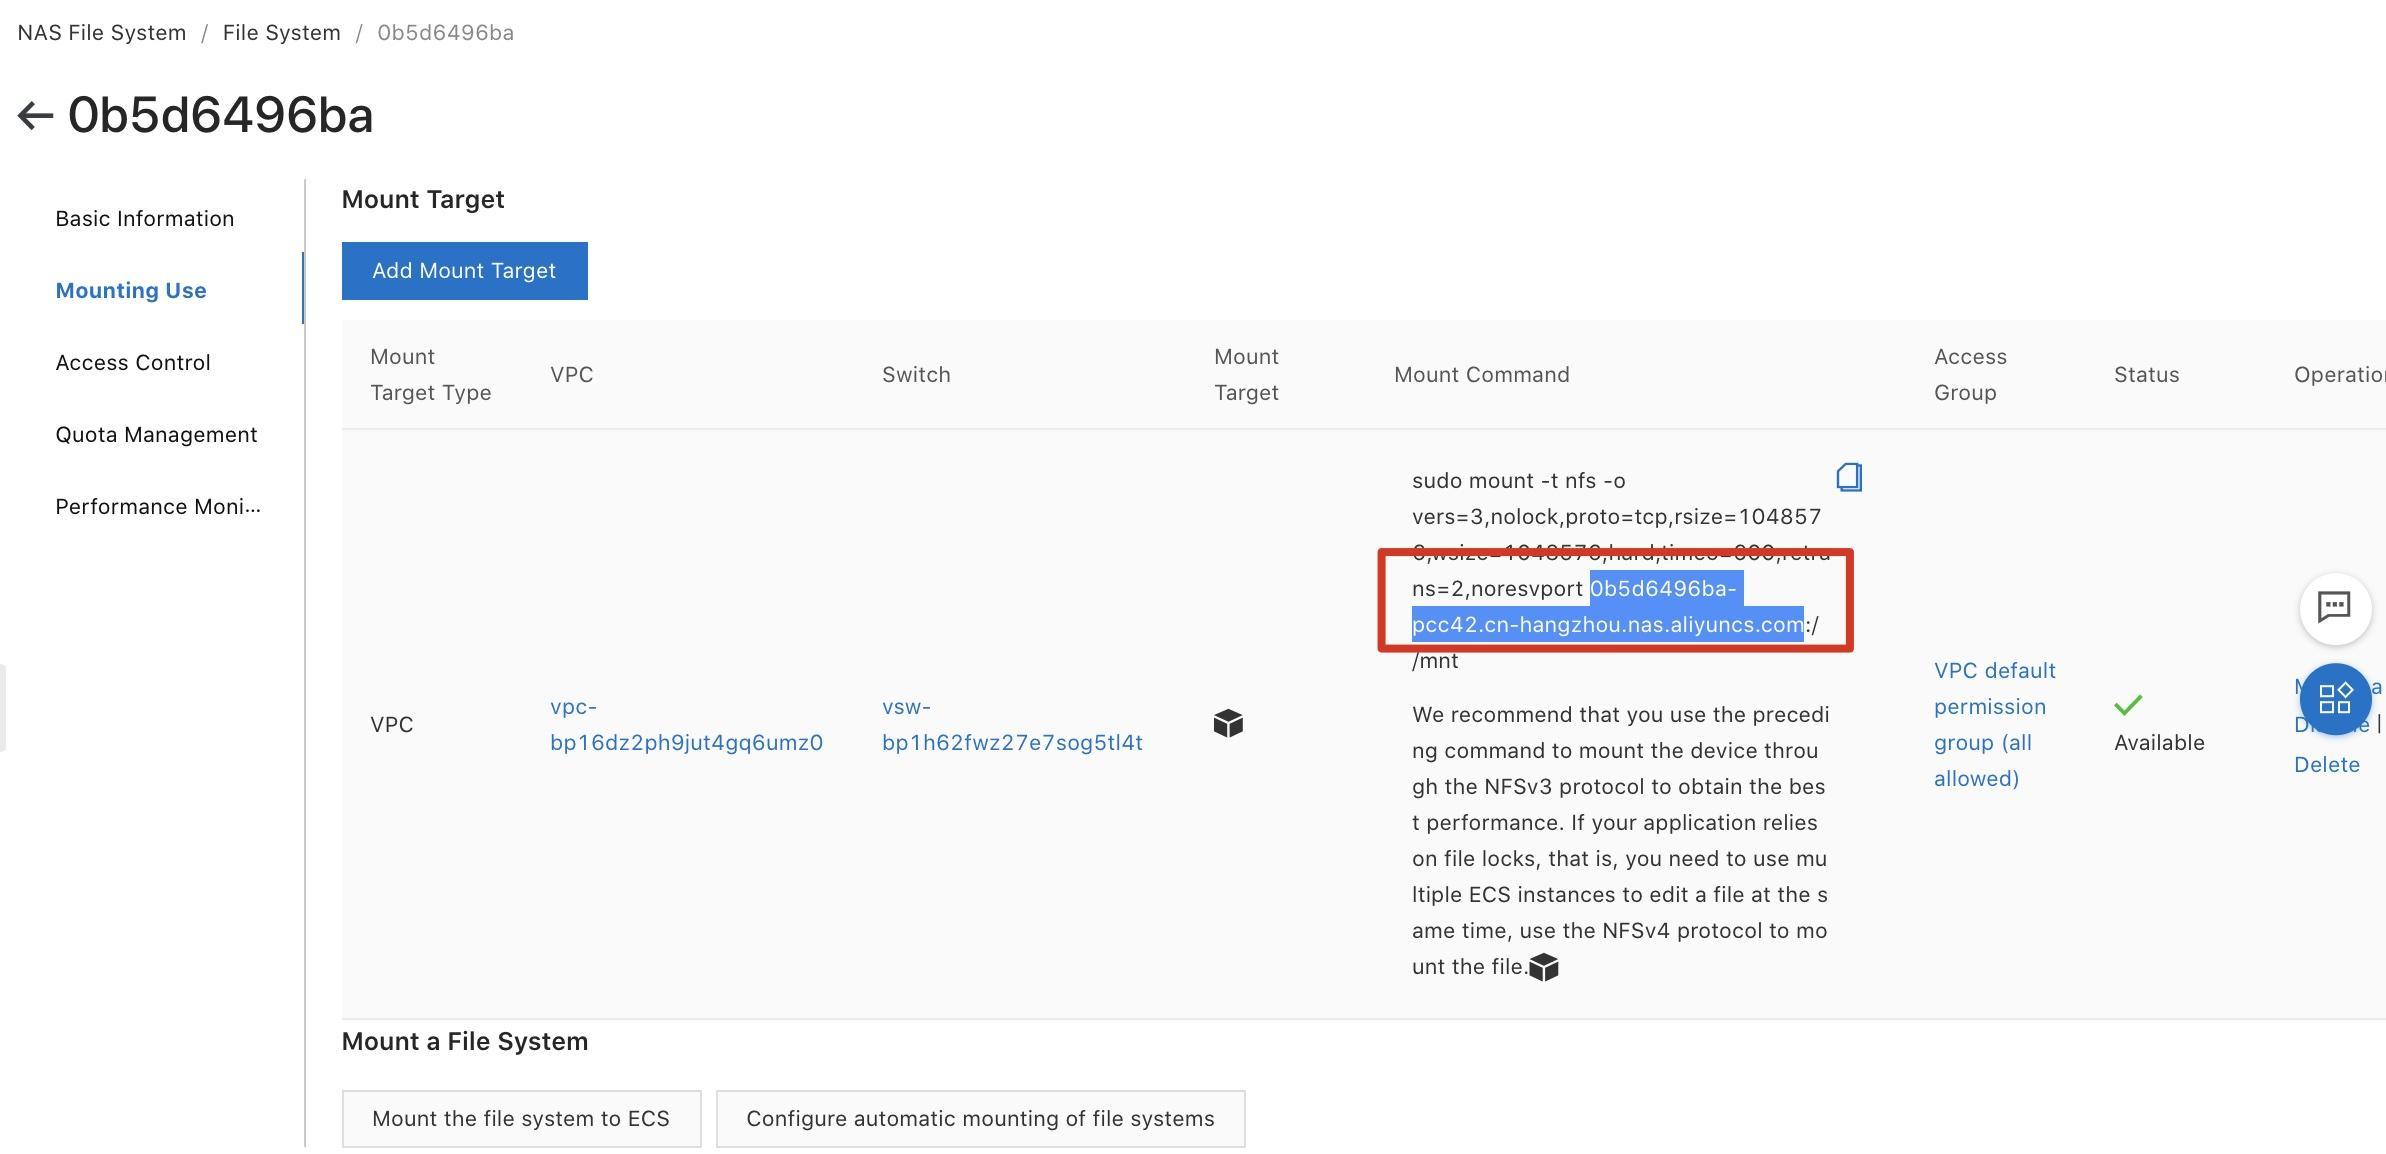
Step 4: Click the created NAS instance. On the details page of the NAS instance, click Mounting Use on the left-side of the navigation pane. Copy and save the NAS mounting address in the Mount Command column. In this example, the NAS mounting address is 0b5d6496ba-pcc42.cn-hangzhou.nas.aliyuncs.com.

Step 1: Use an SSH client to log on to the installer instance with the username and password of the root user over the public IP address 47.98.106.153.
Step 2: Run the following commands:
$ cd ~/.ssh
Create an SSH key.
$ ssh-keygen -t rsa -b 4096 -N '' -f rsa_key_1
Start an ssh-agent process as a background task.
$ eval "$(ssh-agent -s)"
Add the SSH key to the ssh-agent process.
$ ssh-add rsa_key_1
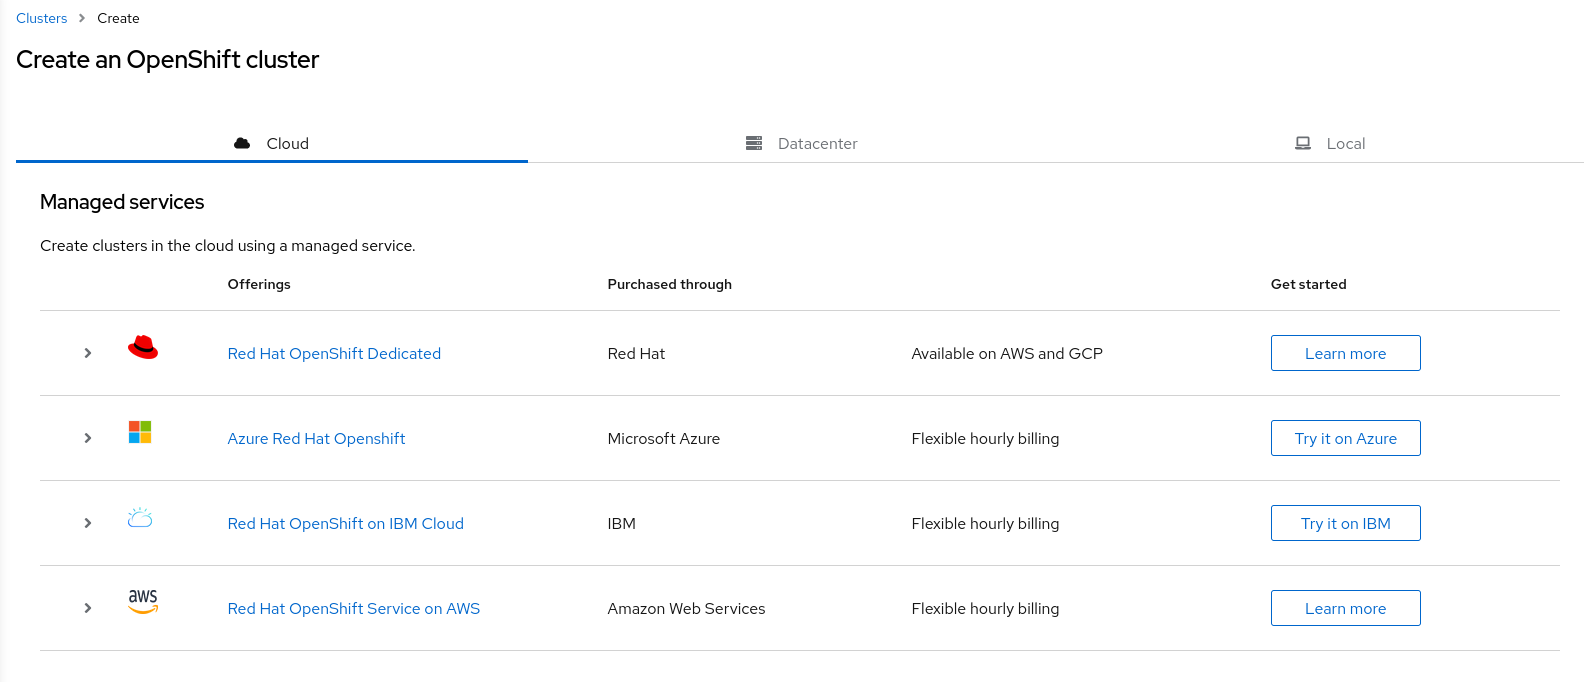
Identity added: rsa_key1 (root@os-installer)Step 1: Log on Red Hat OpenShift Cluster Manager to the Create an OpenShift Cluster page with Red Hat account.
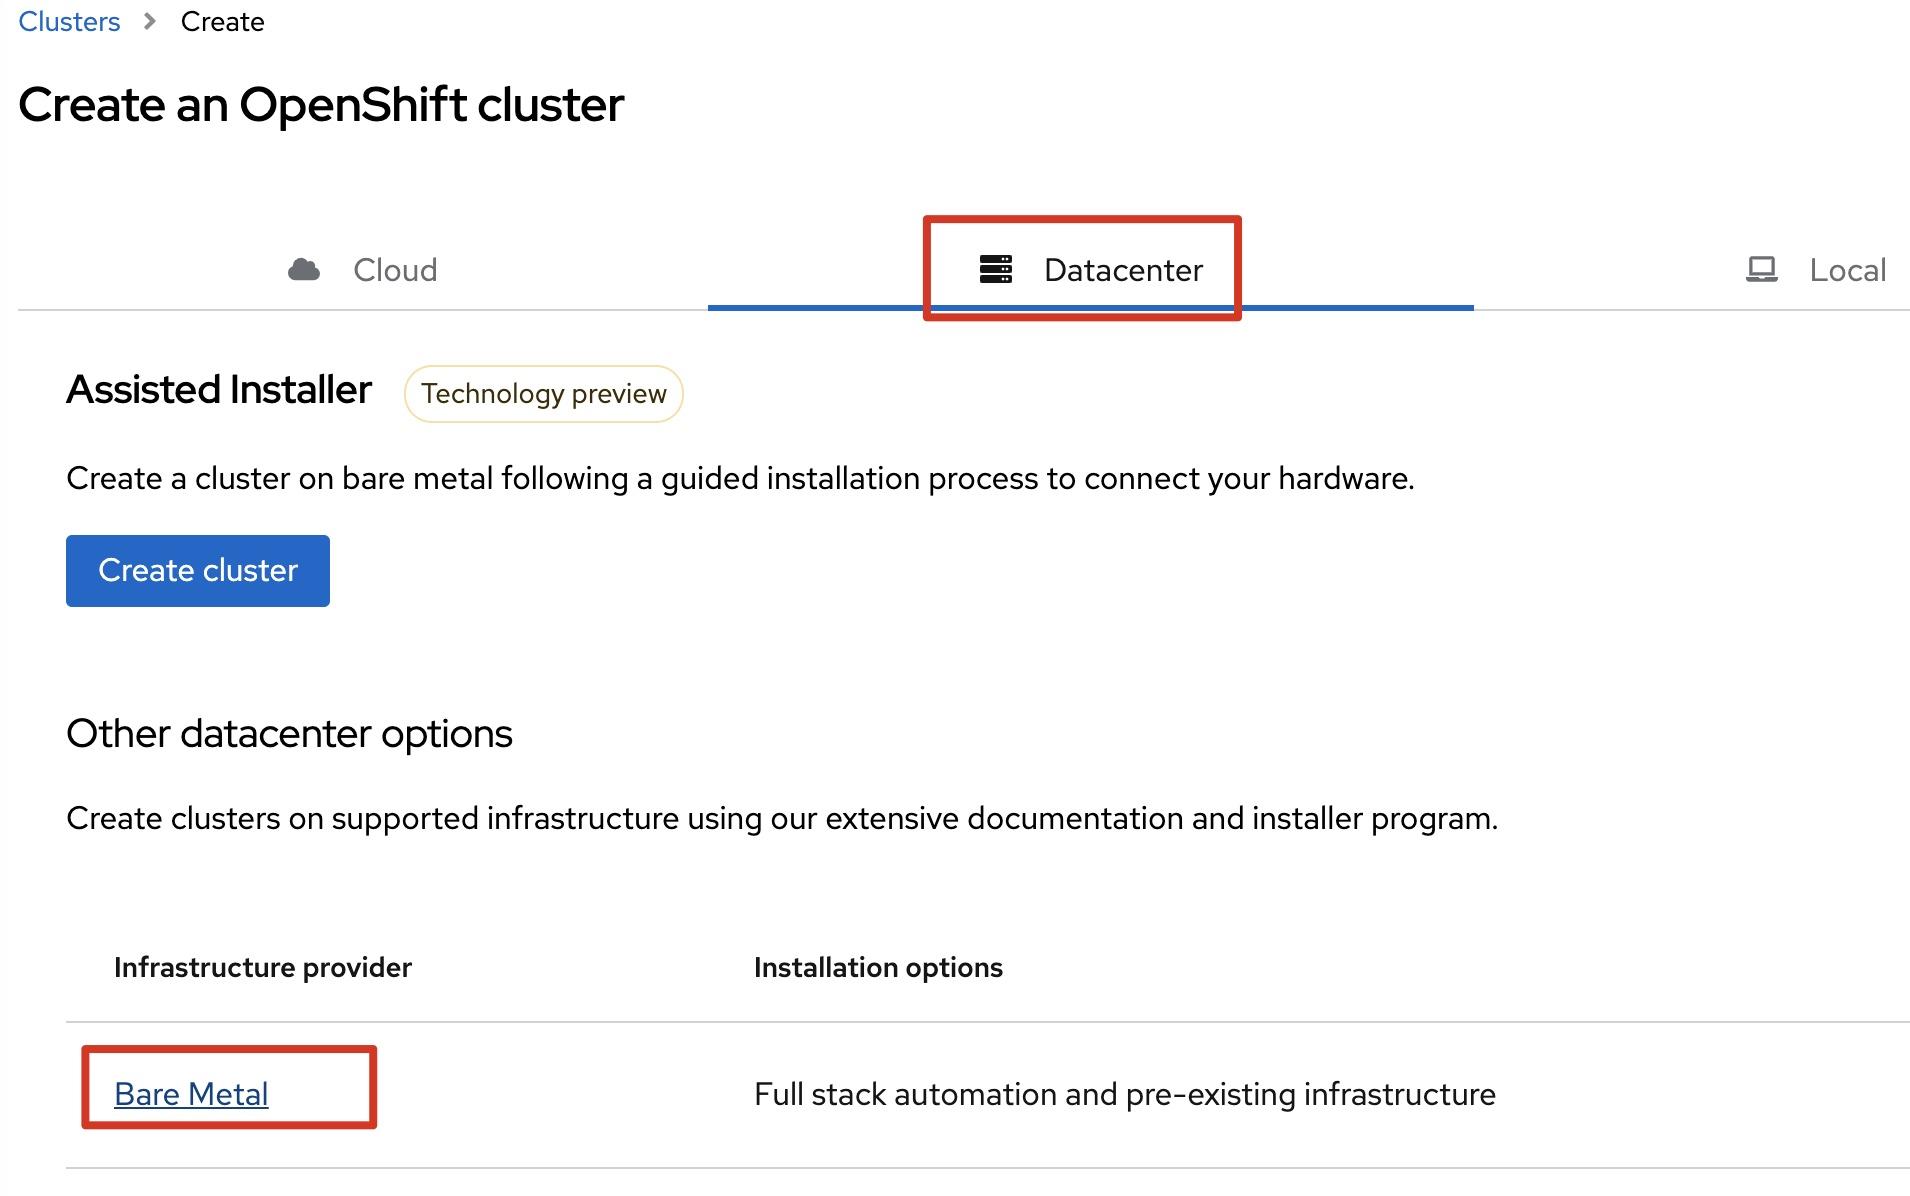
Select Datacenter, then click Bare Metal.
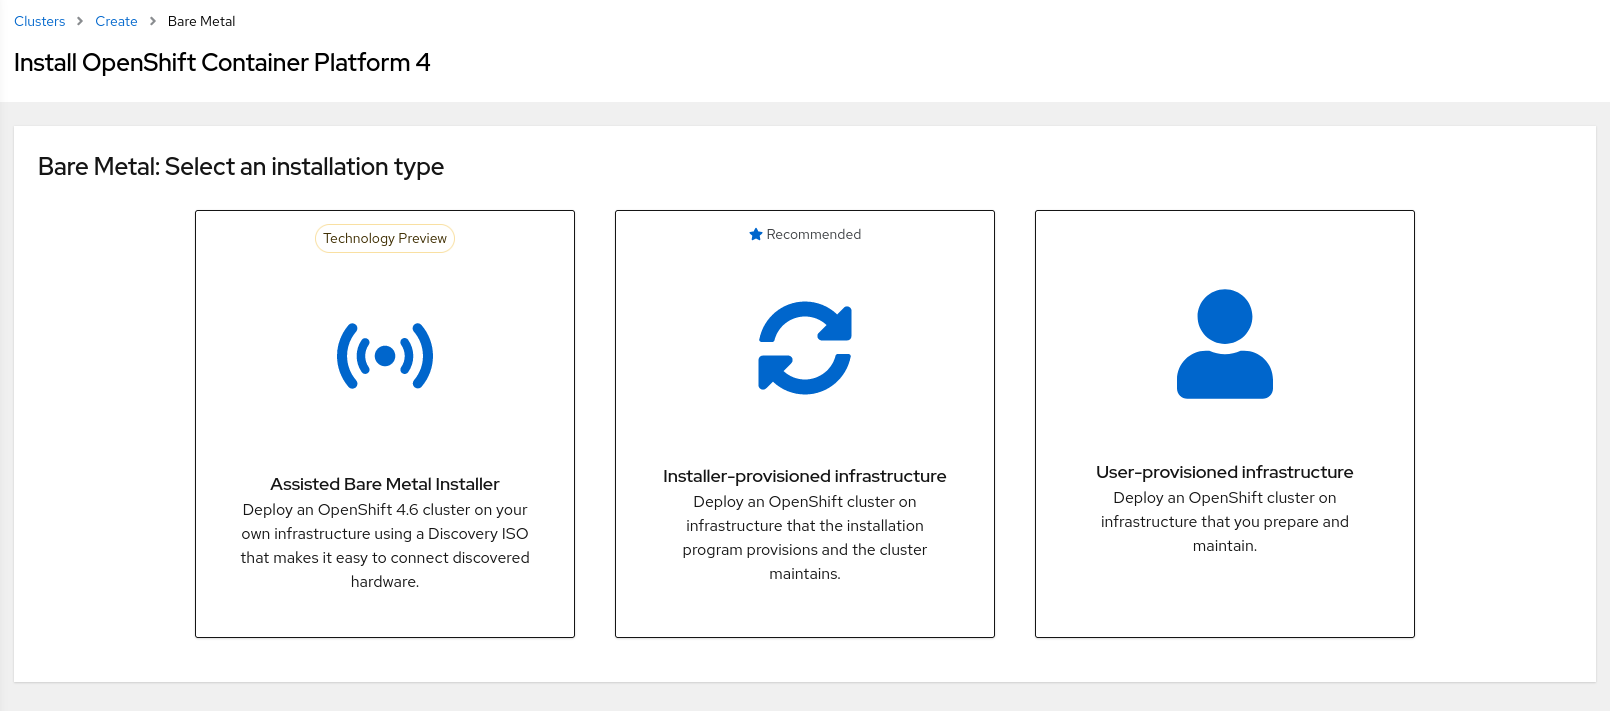
Select the installation type User-provisioned infrastructure.
Step 2: On the Install OpenShift on Bare Metal with user-provisioned infrastructure page, select the operating system from the OpenShift installer drop-down list. Valid values include Linux and MacOS. The Linux operating system is used in this example. Right-click Download installer and copy the link https://mirror.openshift.com/pub/openshift-v4/clients/ocp/latest-4.6/openshift-install-linux.tar.gz
Note: This is always the latest installer download link: https://mirror.openshift.com/pub/openshift-v4/clients/ocp/latest/openshift-install-linux.tar.gz
Use an SSH client to log on to the installer instance, download OpenShift installation package, and then extract the installation program.
Note: We recommend that you store all OpenShift installation programs in the same directory. In this example, all OpenShift installation programs are stored in /mnt directory.
Download OpenShift installation package.
$ wget https://mirror.openshift.com/pub/openshift-v4/clients/ocp/latest/openshift-install-linux.tar.gz

Extract the installation program.
$ tar xvf openshift-install-linux.tar.gz
README.md
openshift-install
Step 3: On the Install OpenShift on Bare Metal with user-provisioned infrastructure page, click Copy pull secret and save the pull secret.
Step 1: On the Install OpenShift on Bare Metal with user-provisioned infrastructure page, select Linux from the Command line interface drop-down list. Then, right-click Download command-line tools and copy the link https://mirror.openshift.com/pub/openshift-v4/clients/ocp/latest-4.6/openshift-client-linux.tar.gz
Note: This is always the latest command-line tools downlink: https://mirror.openshift.com/pub/openshift-v4/clients/ocp/latest/openshift-client-linux.tar.gz
Download the CLI client package and extract the CLI client on the installer instance.
Download the CLI client package and extract the CLI client.
$ wget https://mirror.openshift.com/pub/openshift-v4/clients/ocp/latest-4.6/openshift-client-linux.tar.gz
$ tar xvf openshift-client-linux.tar.gz
README.md
oc
kubectl
Step 2: Set the oc execution file as a system environment variable.
View the current PATH settings.
$ echo $PATH
/usr/local/sbin:/usr/local/bin:/usr/sbin:/usr/bin:/root/bin
Add the oc binary code to the PATH directory.
Step 3: After the preceding configuration is complete, you can run the following oc command on the installer instance to check whether the installation is successful.
$ oc <command>Create the install-config.yaml file in the /mnt directory of the installer instance to specify more information about the platform of your OCP cluster or change the values of required parameters. You can use the following sample code in the file:
apiVersion: v1
baseDomain: os.com
compute:
- hyperthreading: Enabled
  name: worker
  replicas: 0
controlPlane:
  hyperthreading: Enabled
  name: master
  replicas: 3
metadata:
  name: alicloud
networking:
  clusterNetwork:
  - cidr: 10.128.0.0/14
    hostPrefix: 23
  networkType: OpenShiftSDN
  serviceNetwork:
  - 172.30.0.0/16
platform:
  none: {}
fips: false
pullSecret: '{"auths": ...}'
sshKey: 'ssh-ed25519 AAAA...'
Note:
1) The value of the pullSecret parameter is the pull secret that you copy and save in Step 3 in section 5.2 "Obtain the installation program."
2) The value of the sshKey parameter is the public key of the RSA key pair in the ~/.ssh/ directory of the installer instance.
The following section provides a detailed explanation of the install-config.yaml file:
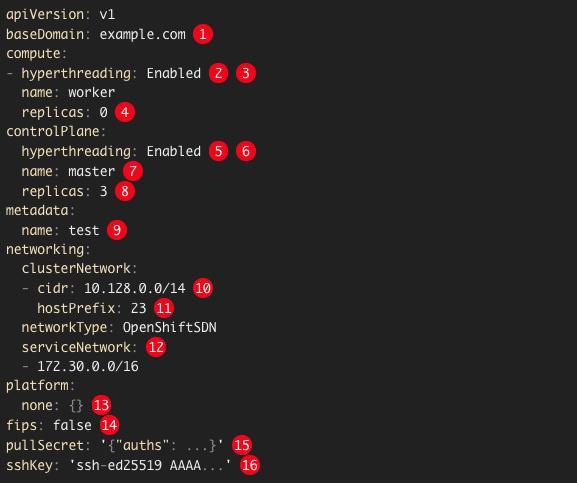
1: the base domain of the cluster. All DNS records must be sub-domains of the base domain and include the cluster name.
2 and 5: The controlPlane section specifies a single mapping, but the compute section specifies a series of mappings. To meet the requirements of different data structures, the first line of the compute section must start with a hyphen (-), whereas the first line of the controlPlane section cannot start with a hyphen (-). Both sections define a single machine pool. Future versions of OCP may define multiple compute pools during installation. Only one control plane pool is used.
3, 6, and 7: specify whether to enable or disable simultaneous multithreading or hyperthreading. By default, simultaneous multithreading is enabled to improve the performance of the machine kernel. You can disable this feature by setting the parameter value to Disabled. If you disable simultaneous multithreading in specific cluster machines, you must disable it in all cluster machines.
4: You must set the value of the replicas parameter to 0. This parameter controls the number of worker machines that the cluster creates and manages for you. The cluster does not create or manage worker machines when UPI is used. You must manually deploy worker machines for the cluster before you finish installing OCP.
8: the number of control plane machines that you add to the cluster. The value must match the number of control plane machines that you deploy because the cluster uses this values as the number of etcd endpoints in the cluster.
9: the cluster name that you specify in your DNS records.
10: a block of IP addresses from which pod IP addresses are allocated. This block cannot overlap with existing physical networks. These IP addresses are used for the pod network. If you need to access a pod from an external network, you must configure SLB and routers to manage the traffic.
11: the subnet prefix length to assign to each individual node. For example, if the hostPrefix parameter is set to 23, each node is assigned a /23 subnet from the given cidr. The number of pod IP addresses is 510, which is calculated based on the following formula: 2^(32 - 23) - 2. If you need to access a node from an external network, configure SLB and routers to manage the traffic.
12: the IP address pool that is used for service IP addresses. You can specify only one IP address pool. If you need to access a service from an external network, configure SLB and routers to manage the traffic.
13: You must set the platform parameter to none. You cannot provide additional platform configuration variables for bare metal infrastructure.
14: specifies whether to enable or disable the Federal Information Processing Standards (FIPS) mode. By default, the FIPS mode is disabled. If the FIPS mode is enabled, the RHCOS machines on which OCP runs bypass the default Kubernetes cipher suite and use the cryptography modules that are provided with RHCOS.
15: the pull secret that you obtained from the Pull Secret page on the Red Hat OpenShift Cluster Manager site. This pull secret allows you to authenticate with the services that are provided by the included authorities. Such services include Quay.io that provides container images for OCP components.
16: the public portion of the default SSH key for the core user in RHCOS.
Step 1: Log on to the installer instance by using SSH, go to the /mnt directory, and then run the following commands:
Create an installation directory to store required installation assets.
$ cd /mnt
$ mkdir installation_dir

Copy the install-config.yaml file to the installation directory.
$ cp install-config.yaml installation_dir/

Generate a manifest.
$ ./openshift-install create manifests --dir=installation_dir
INFO Consuming Install Config from target directory
WARNING Making control-plane schedulable by setting MastersSchedulable to true for Scheduler cluster settings
INFO Manifests created in: installation_dir/manifests and installation_dir/openshift
Step 2: Set the mastersSchedulable parameter in the /Installation_dir/manifests/cluster-scheduler-02-config.yml file to False to prevent pod scheduling on control plane machines.
Step 3: Run the following command in the /mnt directory to generate the ignition configuration files:
Generate the ignition files.
$ ./openshift-install create ignition-configs --dir=installation_dir
INFO Consuming Common Manifests from target directory
INFO Consuming Master Machines from target directory
INFO Consuming Worker Machines from target directory
INFO Consuming Openshift Manifests from target directory
INFO Consuming OpenShift Install (Manifests) from target directory
INFO Ignition-Configs created in: installation_dir and installation_dir/auth
The following files are generated in the /installation_dir directory:
├── auth
│   └── kubeadmin-password
│   └── kubeconfig
├── bootstrap.ign
├── master.ign
├── metadata.json
└── worker.ign
Note: After you create the ignition files, you must create the OCP cluster within 24 hours. Otherwise, the certificate expires.
Step 1: Log on to the installer instance by using SSH, go to /mnt directory, and then run the following commands:
Download the ossutil tool.
$ wget http://gosspublic.alicdn.com/ossutil/1.7.1/ossutil64
Modify the execution permissions of the file.
$ chmod 755 ossutil64

Generate a configuration file in interactive mode.
$ ./ossutil64 config
Enter the name of the configuration file. The file name can contain a path. The default path is /home/user/.ossutil64config. If you press the Enter key without specifying a different destination, the file is generated in the default path. If you want to generate the file in another path, set the --config-file option to the path.
If you do not specify the path of the configuration file, the default path is used. The default path is /home/user/.ossutil64config.

The following parameters are ignored if you press the Enter key without specifying them. To obtain more information about the parameters, run the help config command.
Enter the language CH or EN. The default language is CH. This parameter takes effect after the config command is successfully run.
Enter the endpoint: http://oss-cn-hangzhou.aliyuncs.com.
Enter the AccessKey ID: your AccessKey ID.
Enter the AccessKey secret: your AccessKey secret.
Enter the STS token: You can press the Enter key.

After the preceding configuration is complete, run the following command to check the bucket.
$ ./ossutil64 ls
CreationTime                                 Region    StorageClass    BucketName
2020-11-05 18:03:59 +0800 CST       oss-cn-shanghai        Standard    oss://b1-os
2020-11-18 17:01:11 +0800 CST       oss-cn-hangzhou        Standard    oss://b2-ocp
2020-06-09 15:42:49 +0800 CST        oss-cn-beijing        Standard    oss://beijing-test-b1
Bucket Number is: 4

0.121056(s) elapsed
Step 2: Upload the ignition configuration files to OSS.
Upload the bootstrap.ign file to the ign folder of the b2-ocp bucket.
$ ./ossutil64 cp installation_dir/bootstrap.ign oss://b2-ocp/ign/

Upload the master.ign file to the ign folder of the b2-ocp bucket.
$ ./ossutil64 cp installation_dir/master.ign oss://b2-ocp/ign/

Upload the worker.ign file to the ign folder of the b2-ocp bucket.
$ ./ossutil64 cp installation_dir/worker.ign oss://b2-ocp/ign/
Step 3: Log on to the OSS console. Go to the ign folder and set the read and write permissions of the bootstrap.ign, master.ign, and worker.ign files to public read.
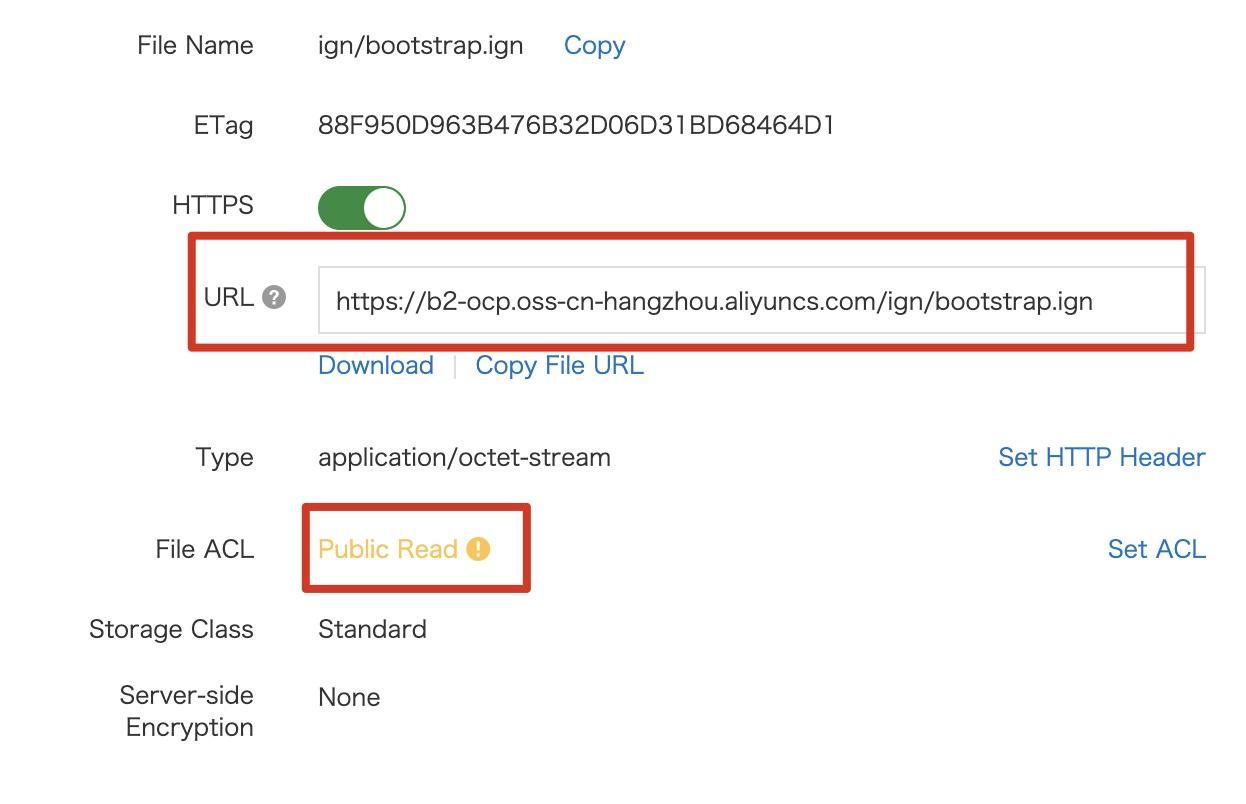
Step 4: Copy the URLs of the preceding three ignition configuration files.
The nodes of the OCP cluster run the CoreOS operating system. The image of this system is unavailable on Alibaba Cloud. You can use the following method to create a custom image of CoreOS.
Step 1: Run Linux operating system on an on-premises physical server that has access to the Internet or an Alibaba Cloud ECS bare metal instance. Visit the Index of /pub/openshift-v4/dependencies/rhcos/latest/latest page, copy the download link of the rhcos-4.6.1-x86_64-live.x86_64.iso image.
Note: This is always the latest RHCOS downlink: https://mirror.openshift.com/pub/openshift-v4/dependencies/rhcos/latest/latest/
Download the rhcos-4.6.1-x86_64-live.x86_64.iso image.
$ cd /mnt
$ mkdir vm
$ cd vm
$ wget https://mirror.openshift.com/pub/openshift-v4/dependencies/rhcos/4.6/latest/rhcos-4.6.1-x86_64-live.x86_64.iso
Step 2: Download and run the libvirt components.
$ yum -y install qemu-img qemu-kvm libvirt libgcrypt-devel
$ systemctl start libvirtd
Step 3: Create disk files in qcow2 format to install CoreOS.
Create a disk file for the bootstrap machine.
$ cd /mnt/vm
$ qemu-img create -f qcow2 coreos-b.qcow2 30g

Create a disk file for the master machines.
$ qemu-img create -f qcow2 coreos-m.qcow2 30g

Create a disk file for the worker machines.
$ qemu-img create -f qcow2 coreos-w.qcow2 30g
Step 4: Create a .xml configuration file for the virtual machine (VM). Take note of the paths of the .qcow2 and .iso files. In this example, the coreos-b VM is used to create a CoreOS image of the bootstrap machine. The coreos-b.xml configuration file contains the following content:
<domain type='kvm' id='2'>
  <name>coreos-b</name>
  <memory unit='KiB'>8388608</memory>
  <currentMemory unit='KiB'>8388608</currentMemory>
  <vcpu placement='static' cpuset='4-31' current='4'>4</vcpu>
  <cpu mode='host-passthrough'>
    <topology sockets='1' cores='4' threads='1'/>
  </cpu>
  <os>
    <type arch='x86_64' machine='pc'>hvm</type>
    <boot dev='hd'/>
    <boot dev='cdrom' />
  </os>
  <features>
    <acpi/>
    <apic/>
    <pae/>
    <hap/>
  </features>
  <clock offset='localtime'>
        <timer name='hpet' present='no'/>
  </clock>
  <on_poweroff>destroy</on_poweroff>
  <on_reboot>restart</on_reboot>
  <on_crash>restart</on_crash>
  <devices>
    <emulator>/usr/bin/qemu-kvm</emulator>
    <disk type='file' device='disk'>
      <driver name='qemu' type='qcow2'/>
    <source file='/mnt/vm/coreos-b.qcow2'/>
      <target dev='vda' bus='virtio'/>
     </disk>
    <disk type='file' device='cdrom'>
        <driver name='qemu' type='raw'/>
                <source file='/mnt/vm/rhcos-4.6.1-x86_64-live.x86_64.iso'/>
        <target dev='hdc' bus='ide'/>
        <readonly/>
        <address type='drive' controller='0' bus='1' target='0' unit='0'/>
</disk>
    <interface type='bridge'>
      <source bridge='virbr0'/>
      <target dev='vnet0'/>
      <model type='virtio'/>
    </interface>
    <input type='tablet' bus='usb'>
      <alias name='input0'/>
    </input>
    <graphics type='vnc' port='5900' autoport='yes' listen='0.0.0.0' keymap='en-us'>
      <listen type='address' address='0.0.0.0'/>
    </graphics>
  </devices>
</domain>
Step 5: Run the "virsh create coreos-b.xml" command to start the VM. Use VNC to connect to the VM and wait for the RHCOS live ISO to boot to the shell prompt.
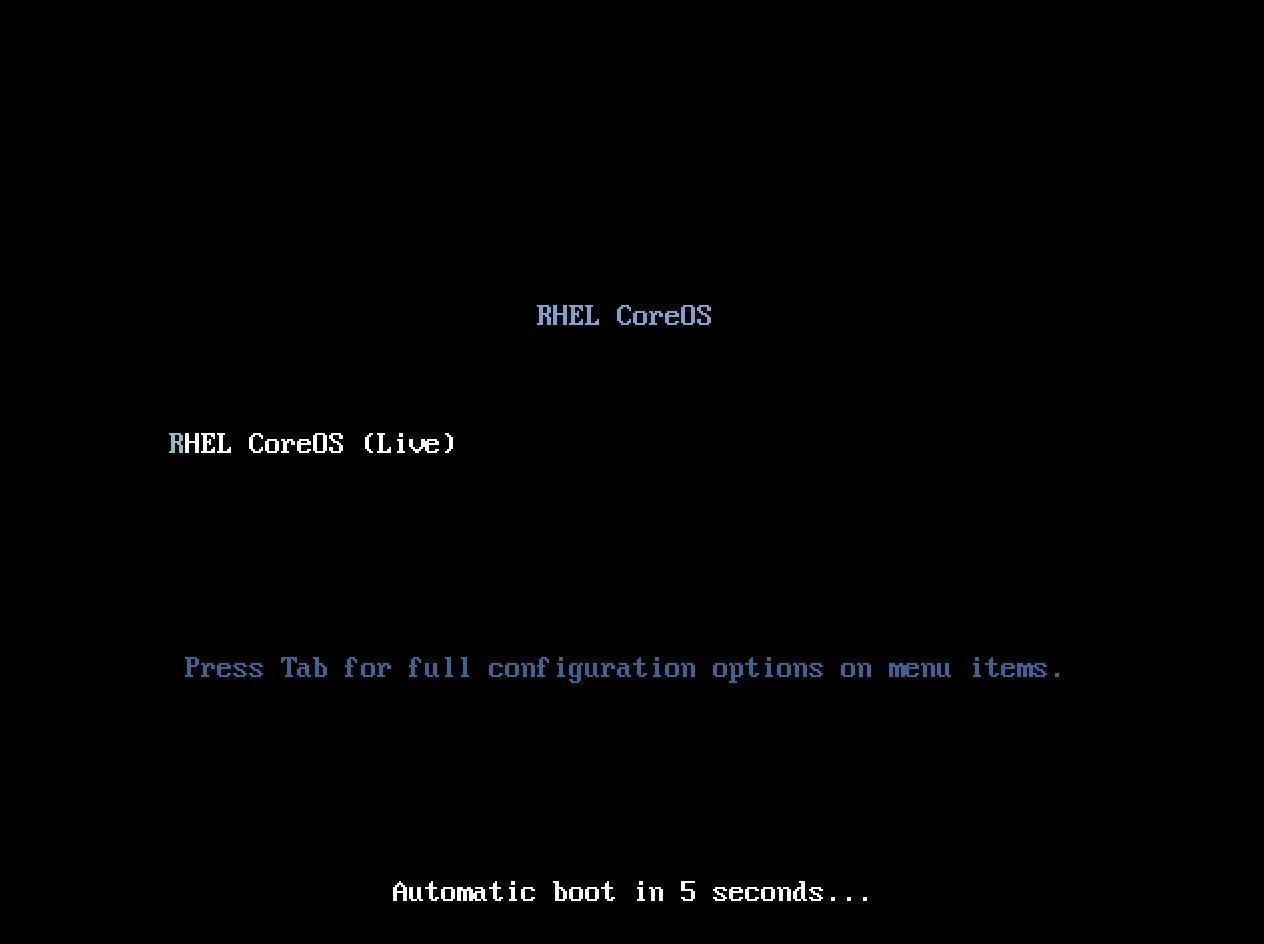
Step 6: Run the following command to install RHCOS and specify the OSS URL of the bootstrap.ign file that you copied as the location of the ignition configuration files.
$ sudo coreos-installer install /dev/vda --ignition-url https://b2-ocp.oss-cn-hangzhou.aliyuncs.com/ign/bootstrap.ign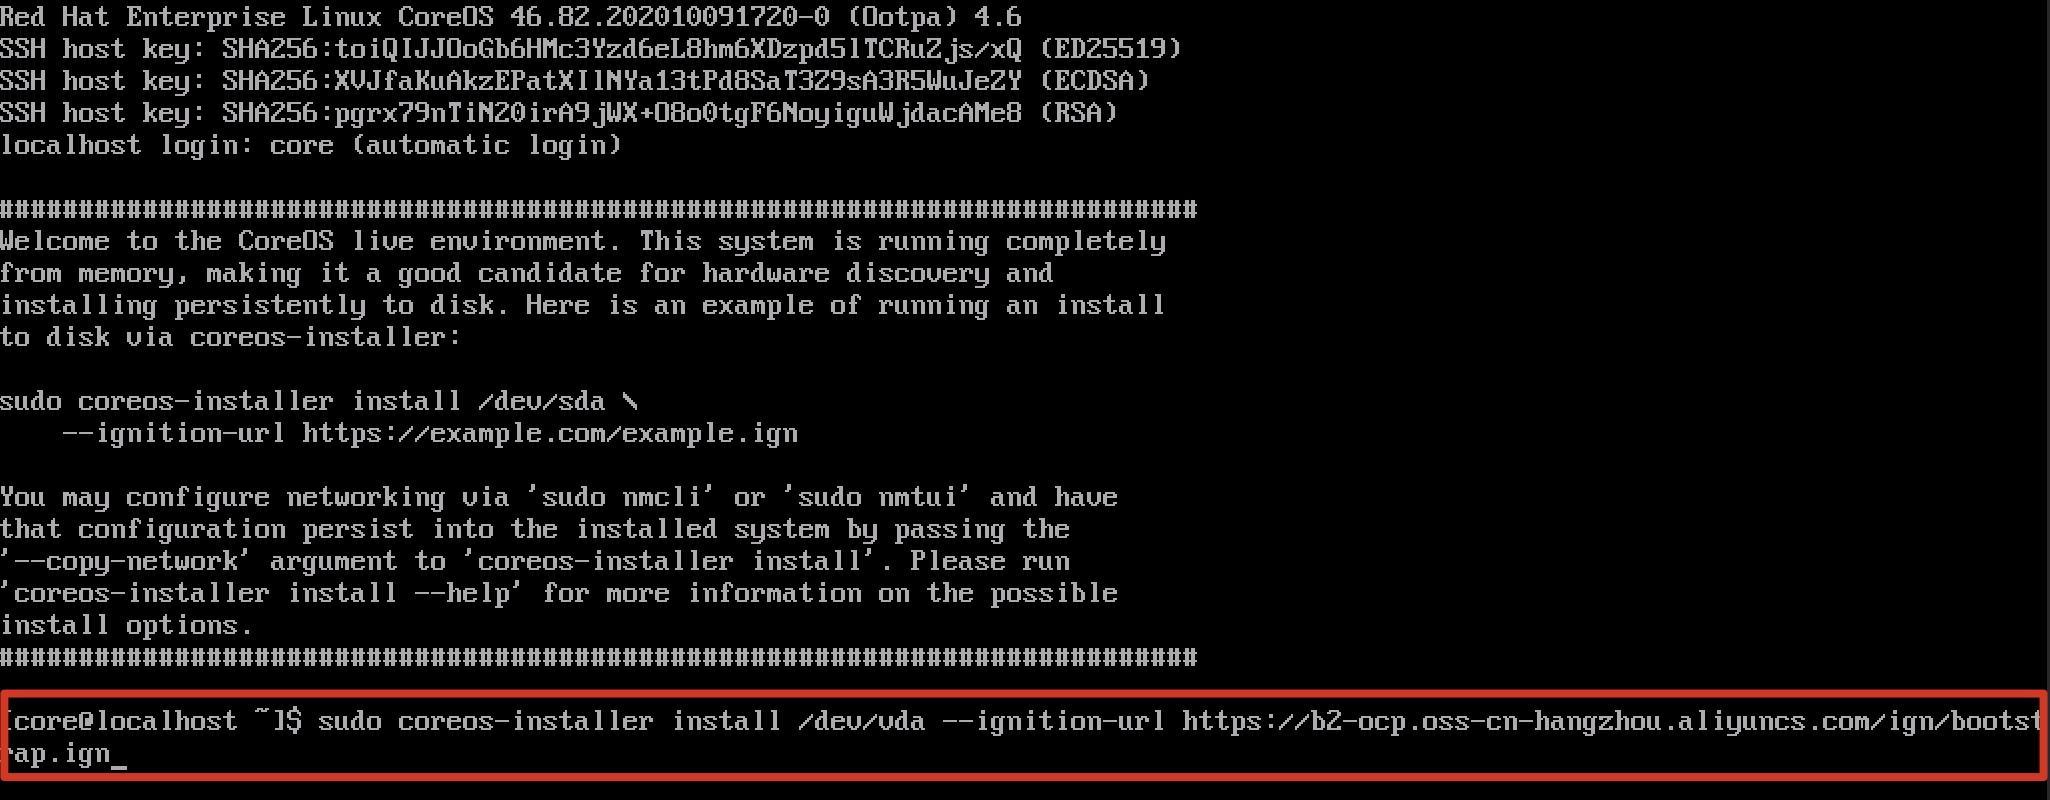
Step 7: Run the following commands on the host to stop the VM and upload the coreos-b.qcow2 disk file to OSS:
Stop the VM.
$ virsh destroy coreos-b

Use ossutil to upload the coreos-b.qcow2 image to OSS. For more information about how to download and configure ossutil, see section 5.6 "Download Alibaba Cloud ossutil and upload the ignition files to OSS."
$ ./ossutil64 cp coreos-b.qcow2 oss://b2-ocp/qcow2/
Step 8: Copy the OSS URL of the disk file.
Step 1: Follow Steps 1 to 6 in section 6.1 "Create a CoreOS image in qcow2 format for the bootstrap machine" to create a CoreOS image for the master machines, and remember to replace bootstrap.ign to master.ign.
$ sudo coreos-installer install /dev/vda --ignition-url https://b2-ocp.oss-cn-hangzhou.aliyuncs.com/ign/master.ignStep 2: Stop the VM on the host and upload the coreos-m.qcow2 disk file to OSS. You do not need to run the reboot command to restart the system.
Stop the VM.
$ virsh destroy coreos-m

Use ossutil to upload the coreos-m.qcow2 image to OSS. For more information about how to download and configure ossutil, see section 5.6 "Download Alibaba Cloud ossutil and upload the ignition files to OSS."
$ ./ossutil64 cp coreos-m.qcow2 oss://b2-ocp/qcow2/
Step 3: Copy the OSS URL of the disk file.
Step 1: Follow Steps 1 to 6 in section 6.1 "Create a CoreOS image in the .qcow2 format for the bootstrap machine" to create a CoreOS image for the worker machines, and remember to replace bootstrap.ign to worker.ign.
$ sudo coreos-installer install /dev/vda --ignition-url https://b2-ocp.oss-cn-hangzhou.aliyuncs.com/ign/worker.ignStep 2: Stop the VM on the host and upload the coreos-w.qcow2 disk file to OSS. You do not need to run the reboot command to restart the system.
Stop the VM.
$ virsh destroy coreos-w
Use ossutil to upload the coreos-w.qcow2 image to OSS. For more information about how to download and configure ossutil, see section 5.6 "Download Alibaba Cloud ossutil and upload the ignition files to OSS."
$ ./ossutil64 cp coreos-w.qcow2 oss://b2-ocp/qcow2/Step 3: Copy the OSS URL of the disk file.
Step 1: Log on to the Alibaba Cloud Management Console. Move the pointer over the More icon in the upper-left corner and choose Products and Services > Elastic Compute Service to go to the ECS console.
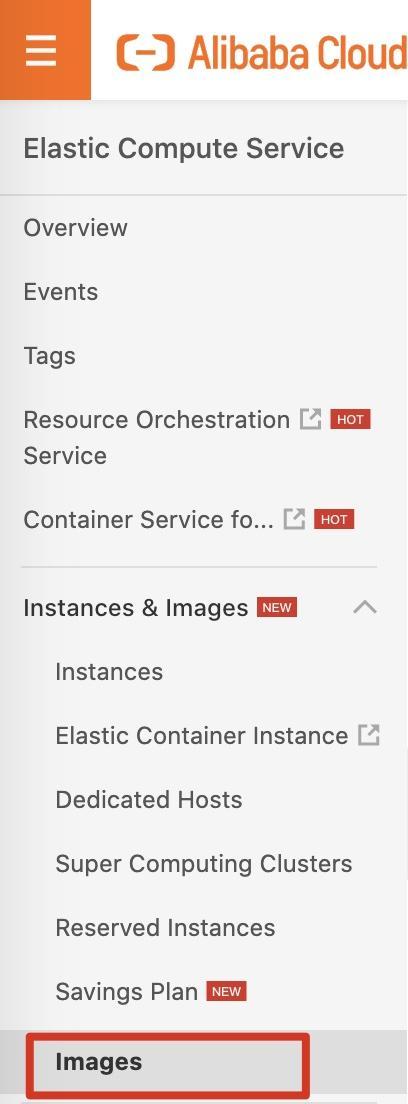
Step 2: Set the region to China (Hangzhou). On the left-side of the navigation pane, choose Instances & Images > Images. On the Images page, click the Custom Images tab.
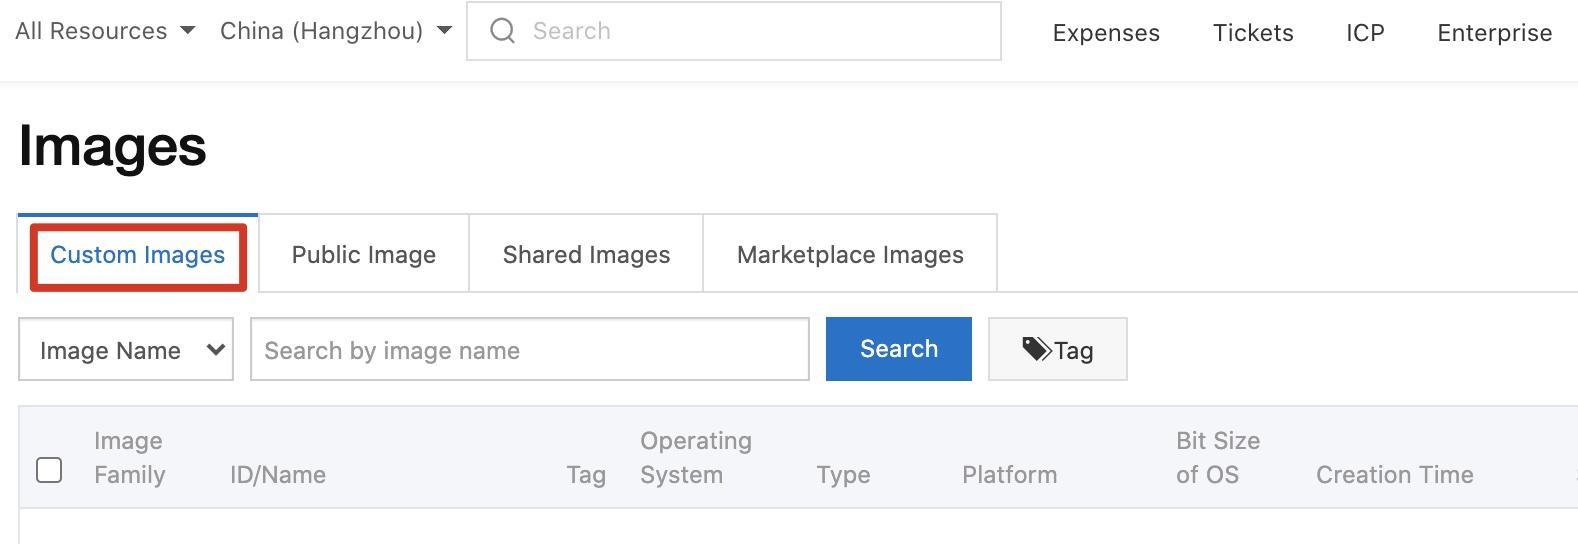
Step 3: Click Import Image in the upper-right corner and select Manually Import.

Step 4: In the Import Image dialog box, set the parameters that are described in the following table and click OK.
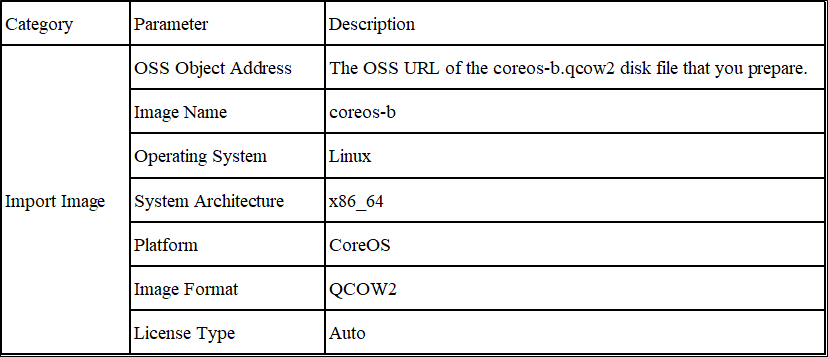
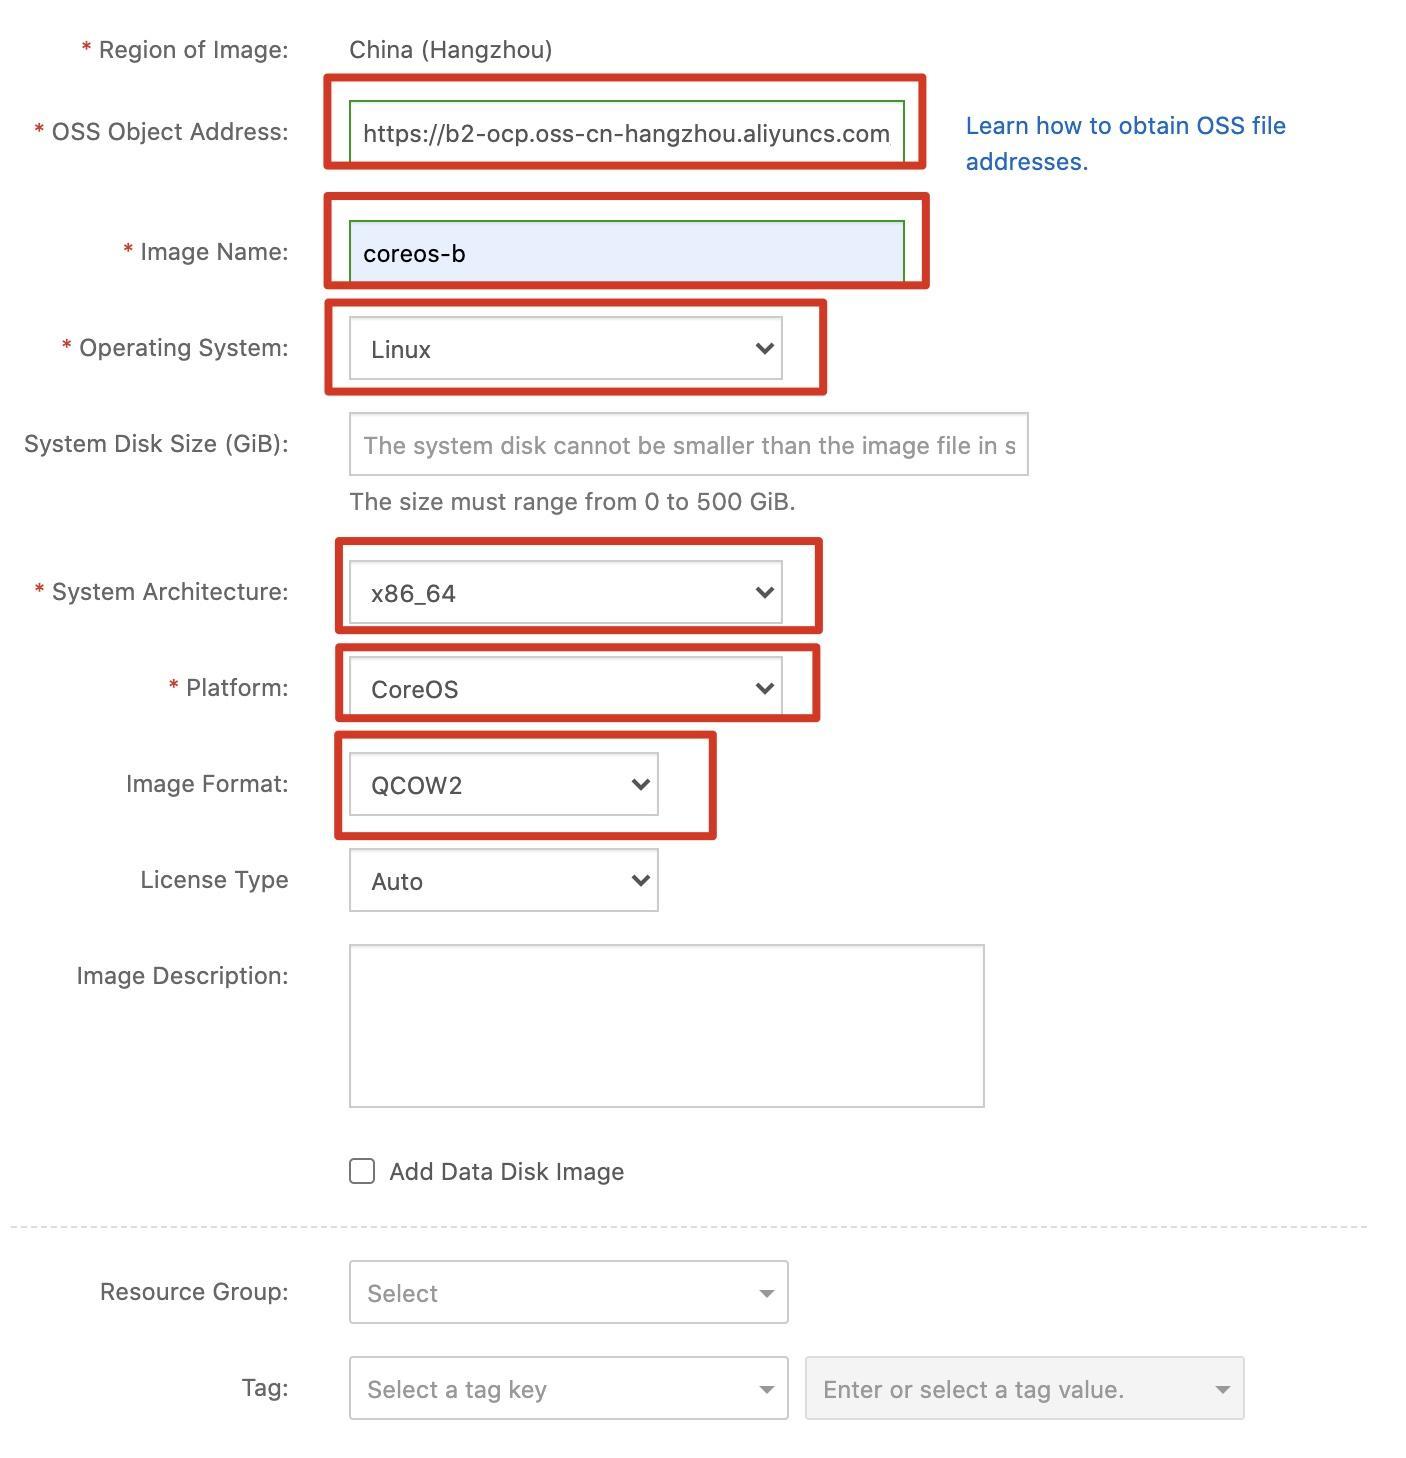
Step 5: Wait until the progress reaches 100%(generally need couple minutes). The custom image of the bootstrap machine is created.


Step 6: Repeat the preceding steps to create custom images for the master and worker machines. Name the images coreos-m and coreos-w.
Step 1: On the Custom Images tab, find the coreos-b image and click Create Instance in the Actions column.

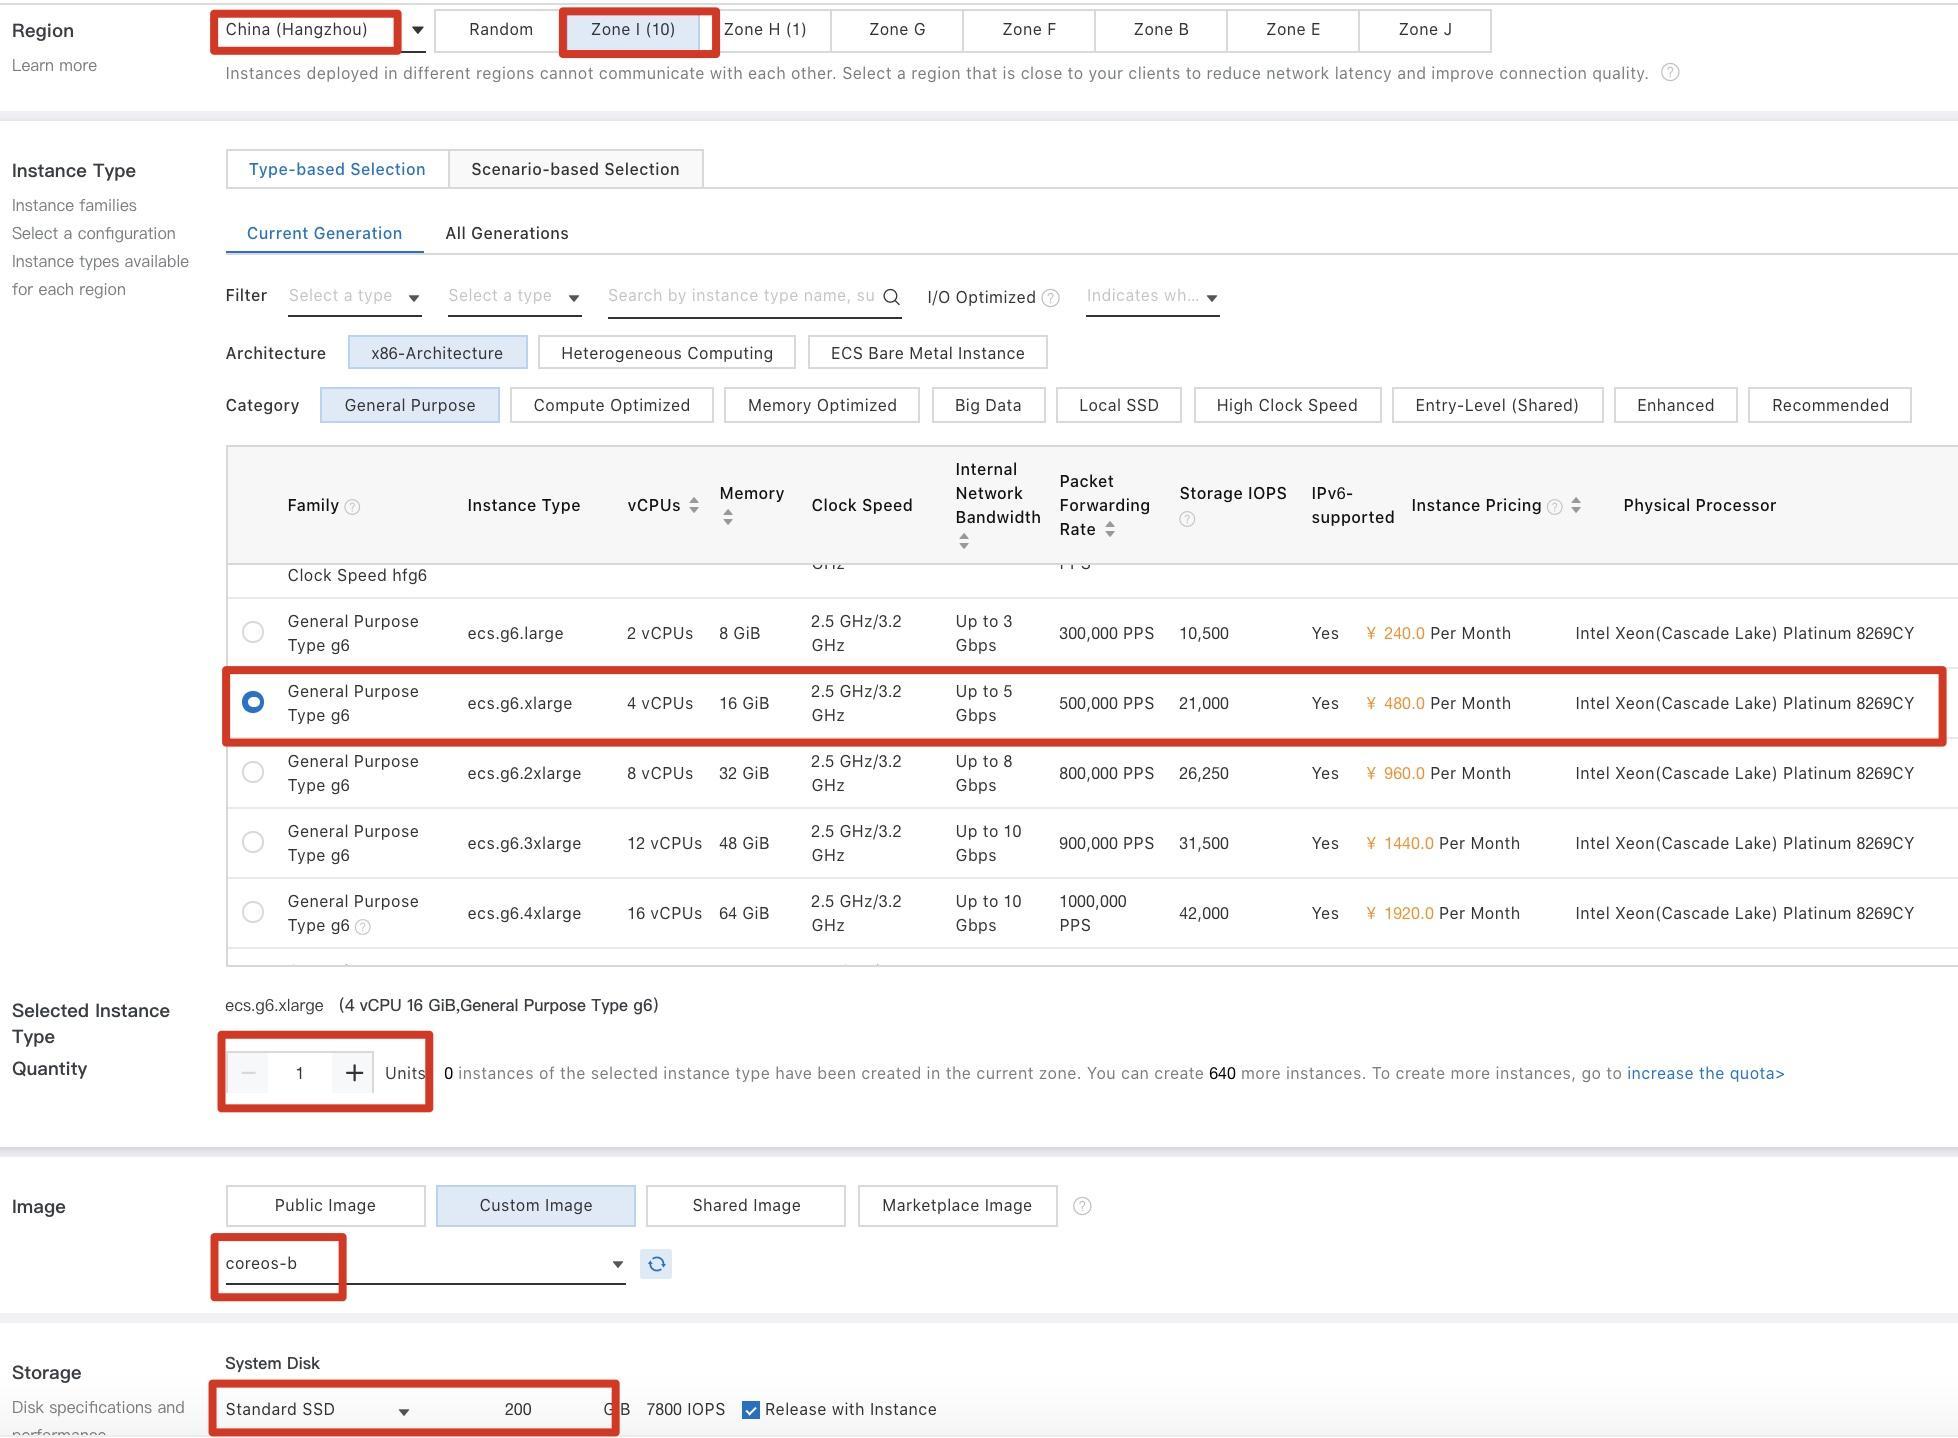
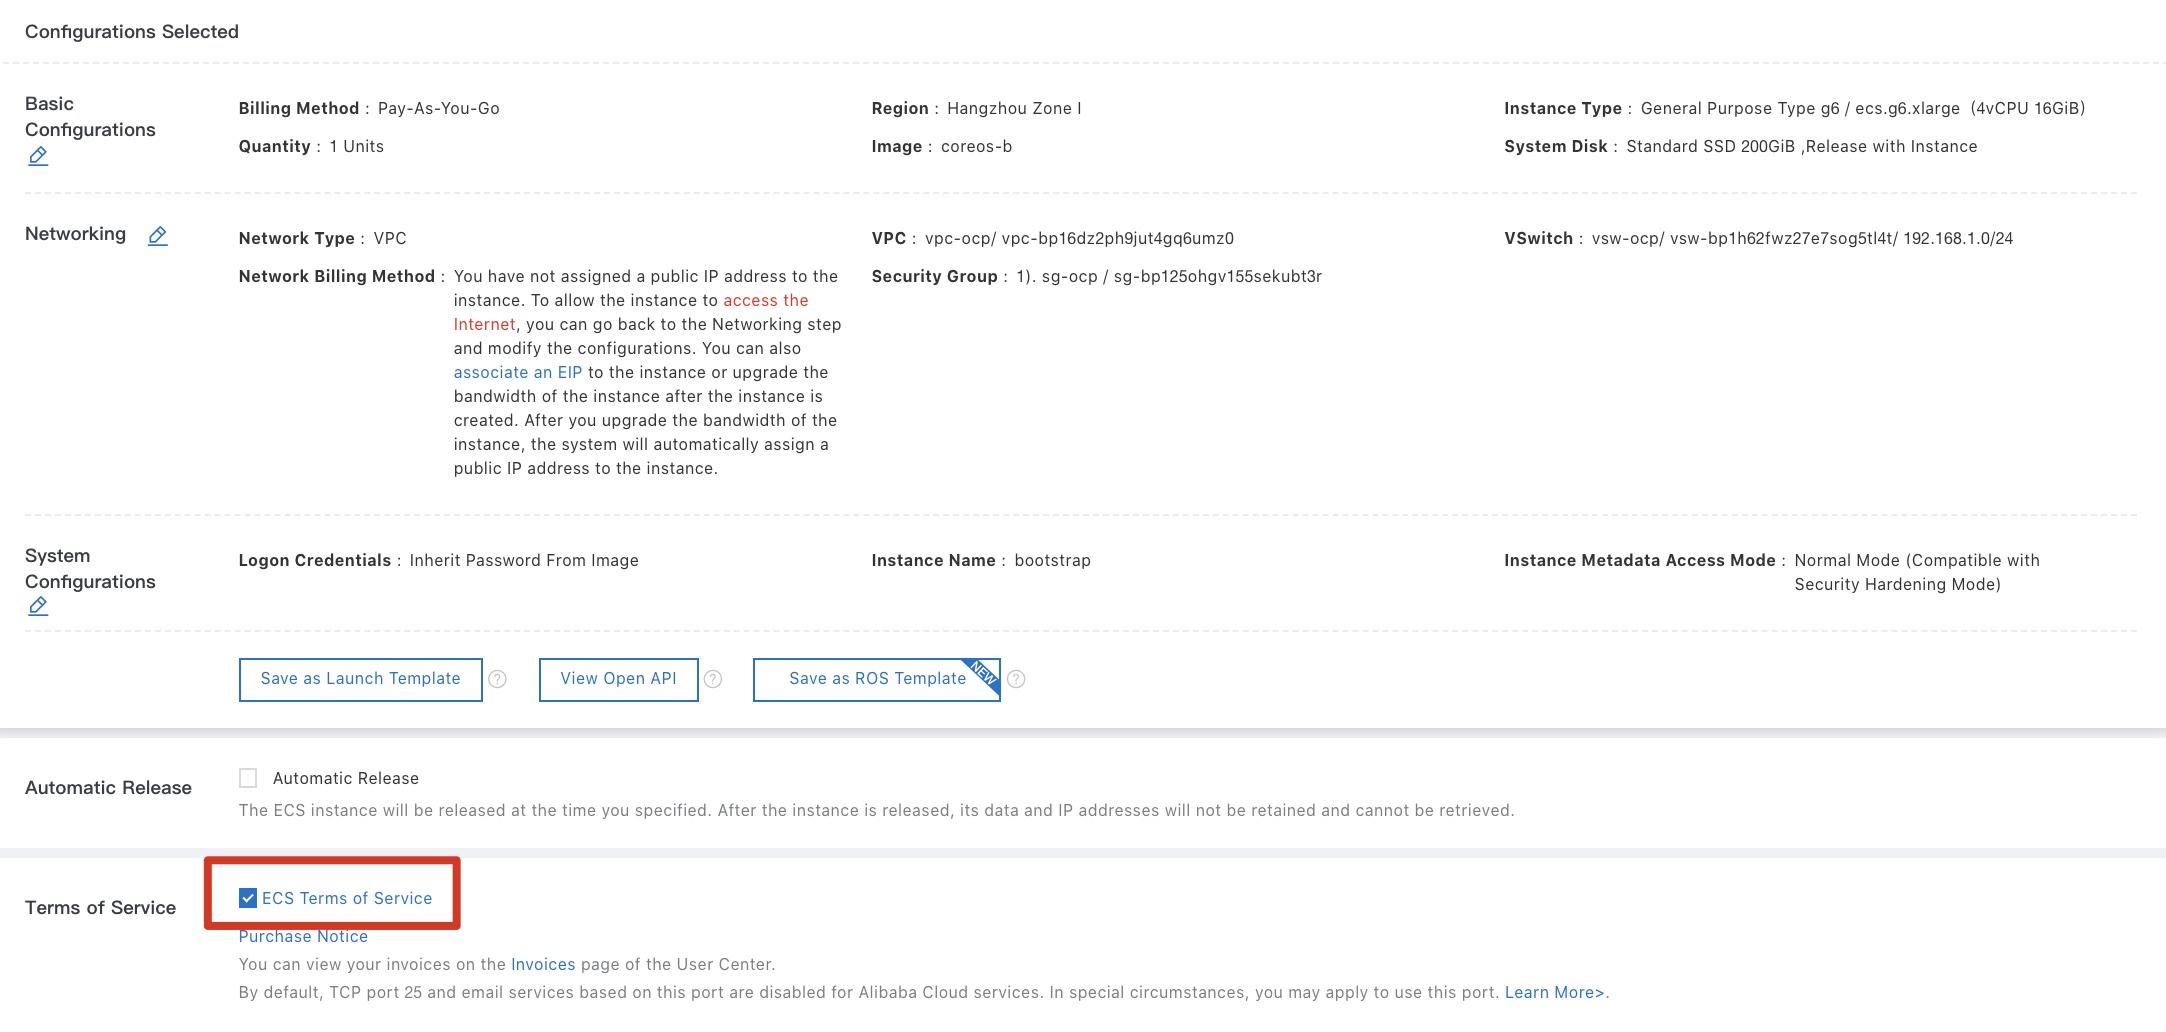
Step 2: Set the region to China (Hangzhou) and zone to Zone I, select ecs.g6.xlarge as the instance type, and then select coreos-b as the image. Select Standard SSD for System Disk in the Storage section and set the capacity to 200 GiB. Then, click Next: Networking.
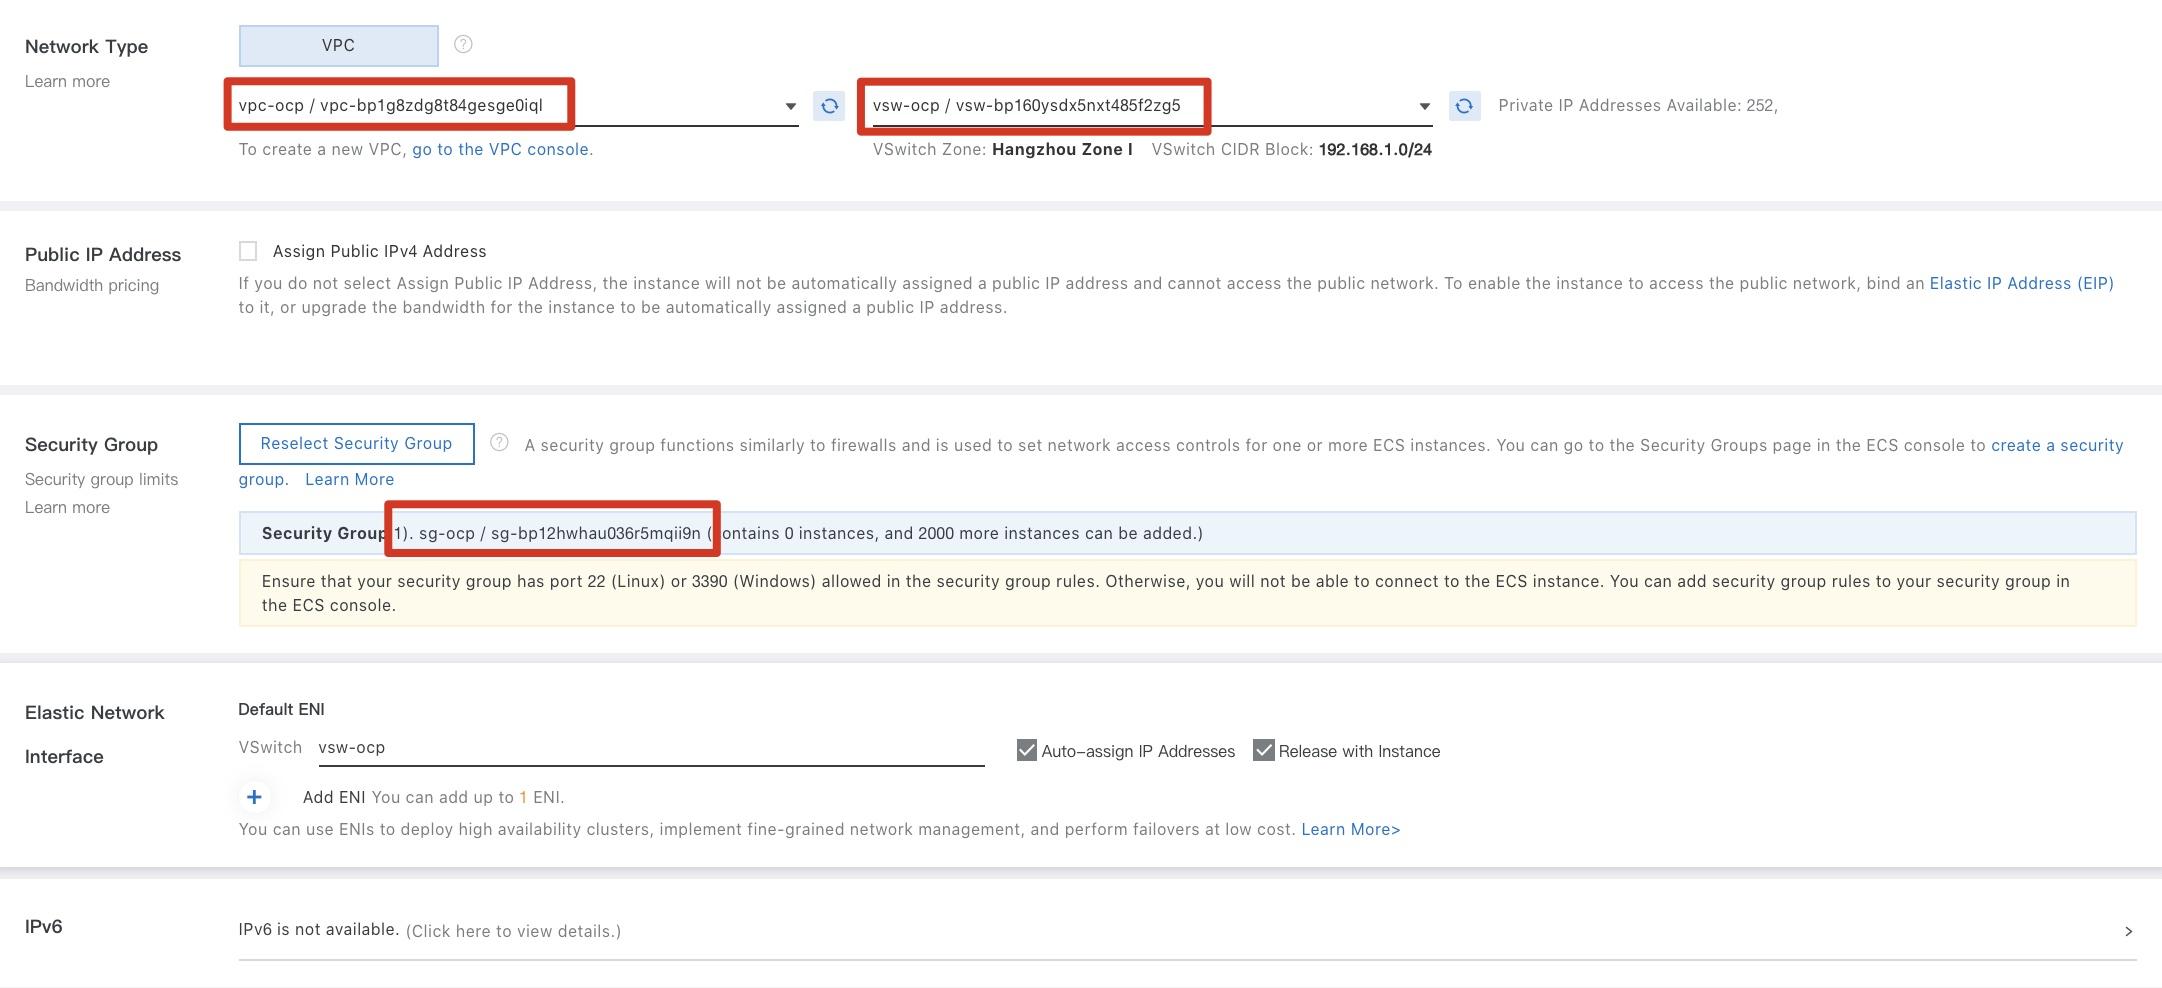
Step 3: In the Networking step, set the VPC to vpc-ocp, the vSwitch to vsw-ocp, and the security group to sg-ocp. Then, click Next: System Configurations.
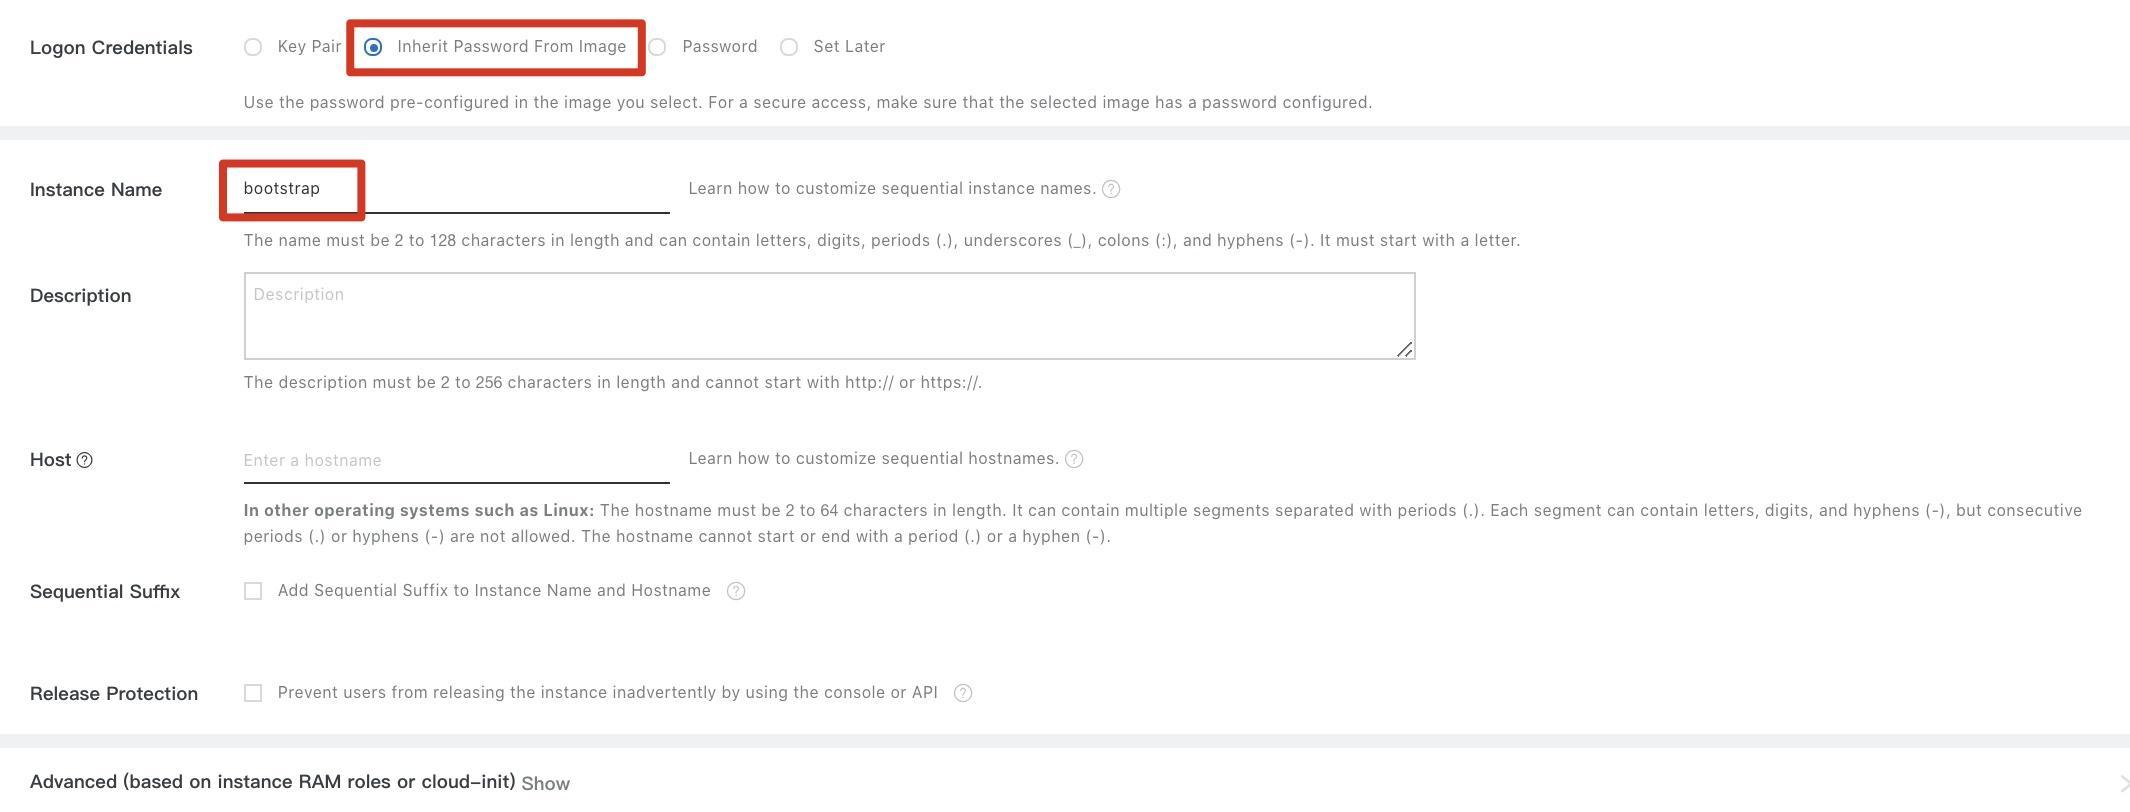
Step 4: In the System Configurations step, select Inherit Password From Image for the logon credential, enter the instance name bootstrap, and then click Preview.
Step 5: In the Preview step, select the ECS Terms of Service and Product Terms of Service check box and click Create Order. The bootstrap machine is created.
Step 6: Repeat Steps 1 to 5 to create three master machines on the control plane based on the coreos-m custom image.
Step 7: Repeat Steps 1 to 5 to create three compute (worker) machines based on the coreos-w custom image.
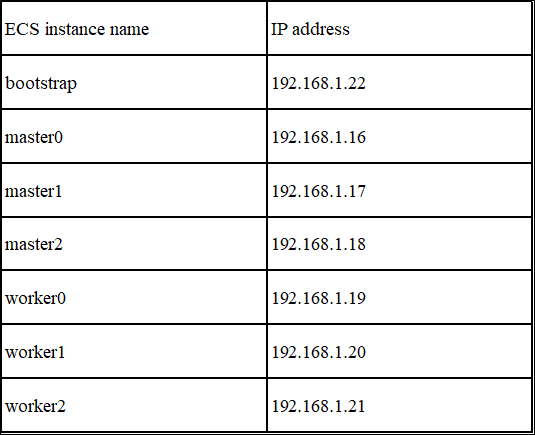
Step 8: After all configurations in Steps 1 to 7 are complete, the bootstrap, master, and worker machines are displayed in the ECS console. Record the IP addresses of the machines.

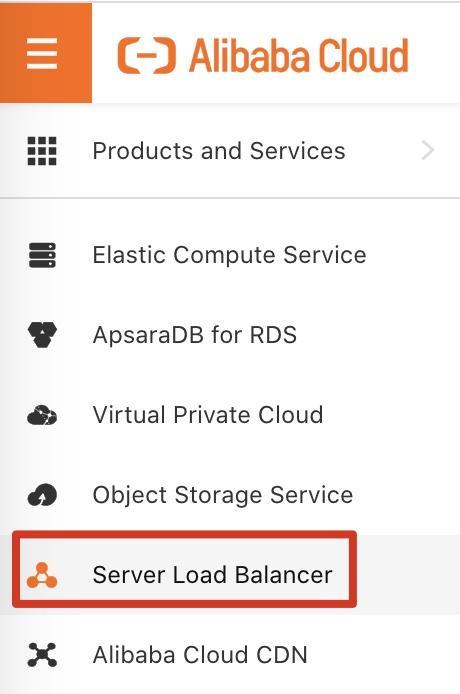
Step 1: Log on to the Alibaba Cloud Management Console. Move the pointer over the More icon in the upper-left corner and choose Products and Services > Server Load Balancer to go to the SLB console.
Step 2: Click Create CLB.

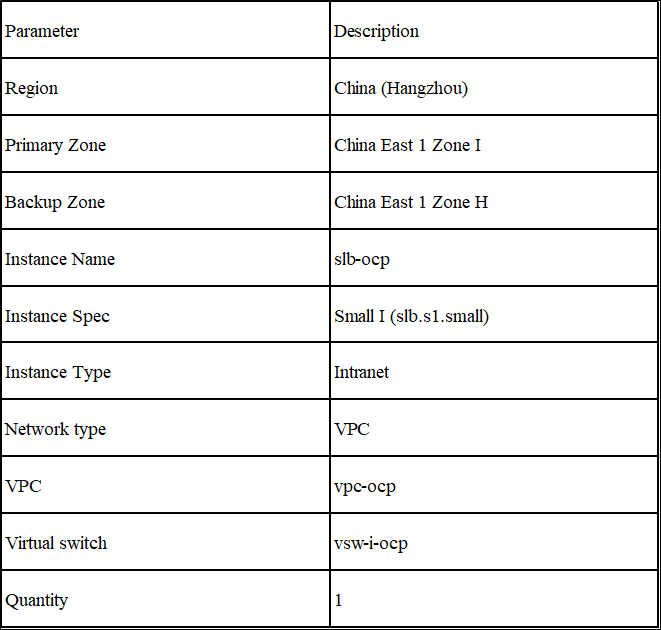
Step 3: On the buy page, set the parameters that are described in the following table and click Buy Now.
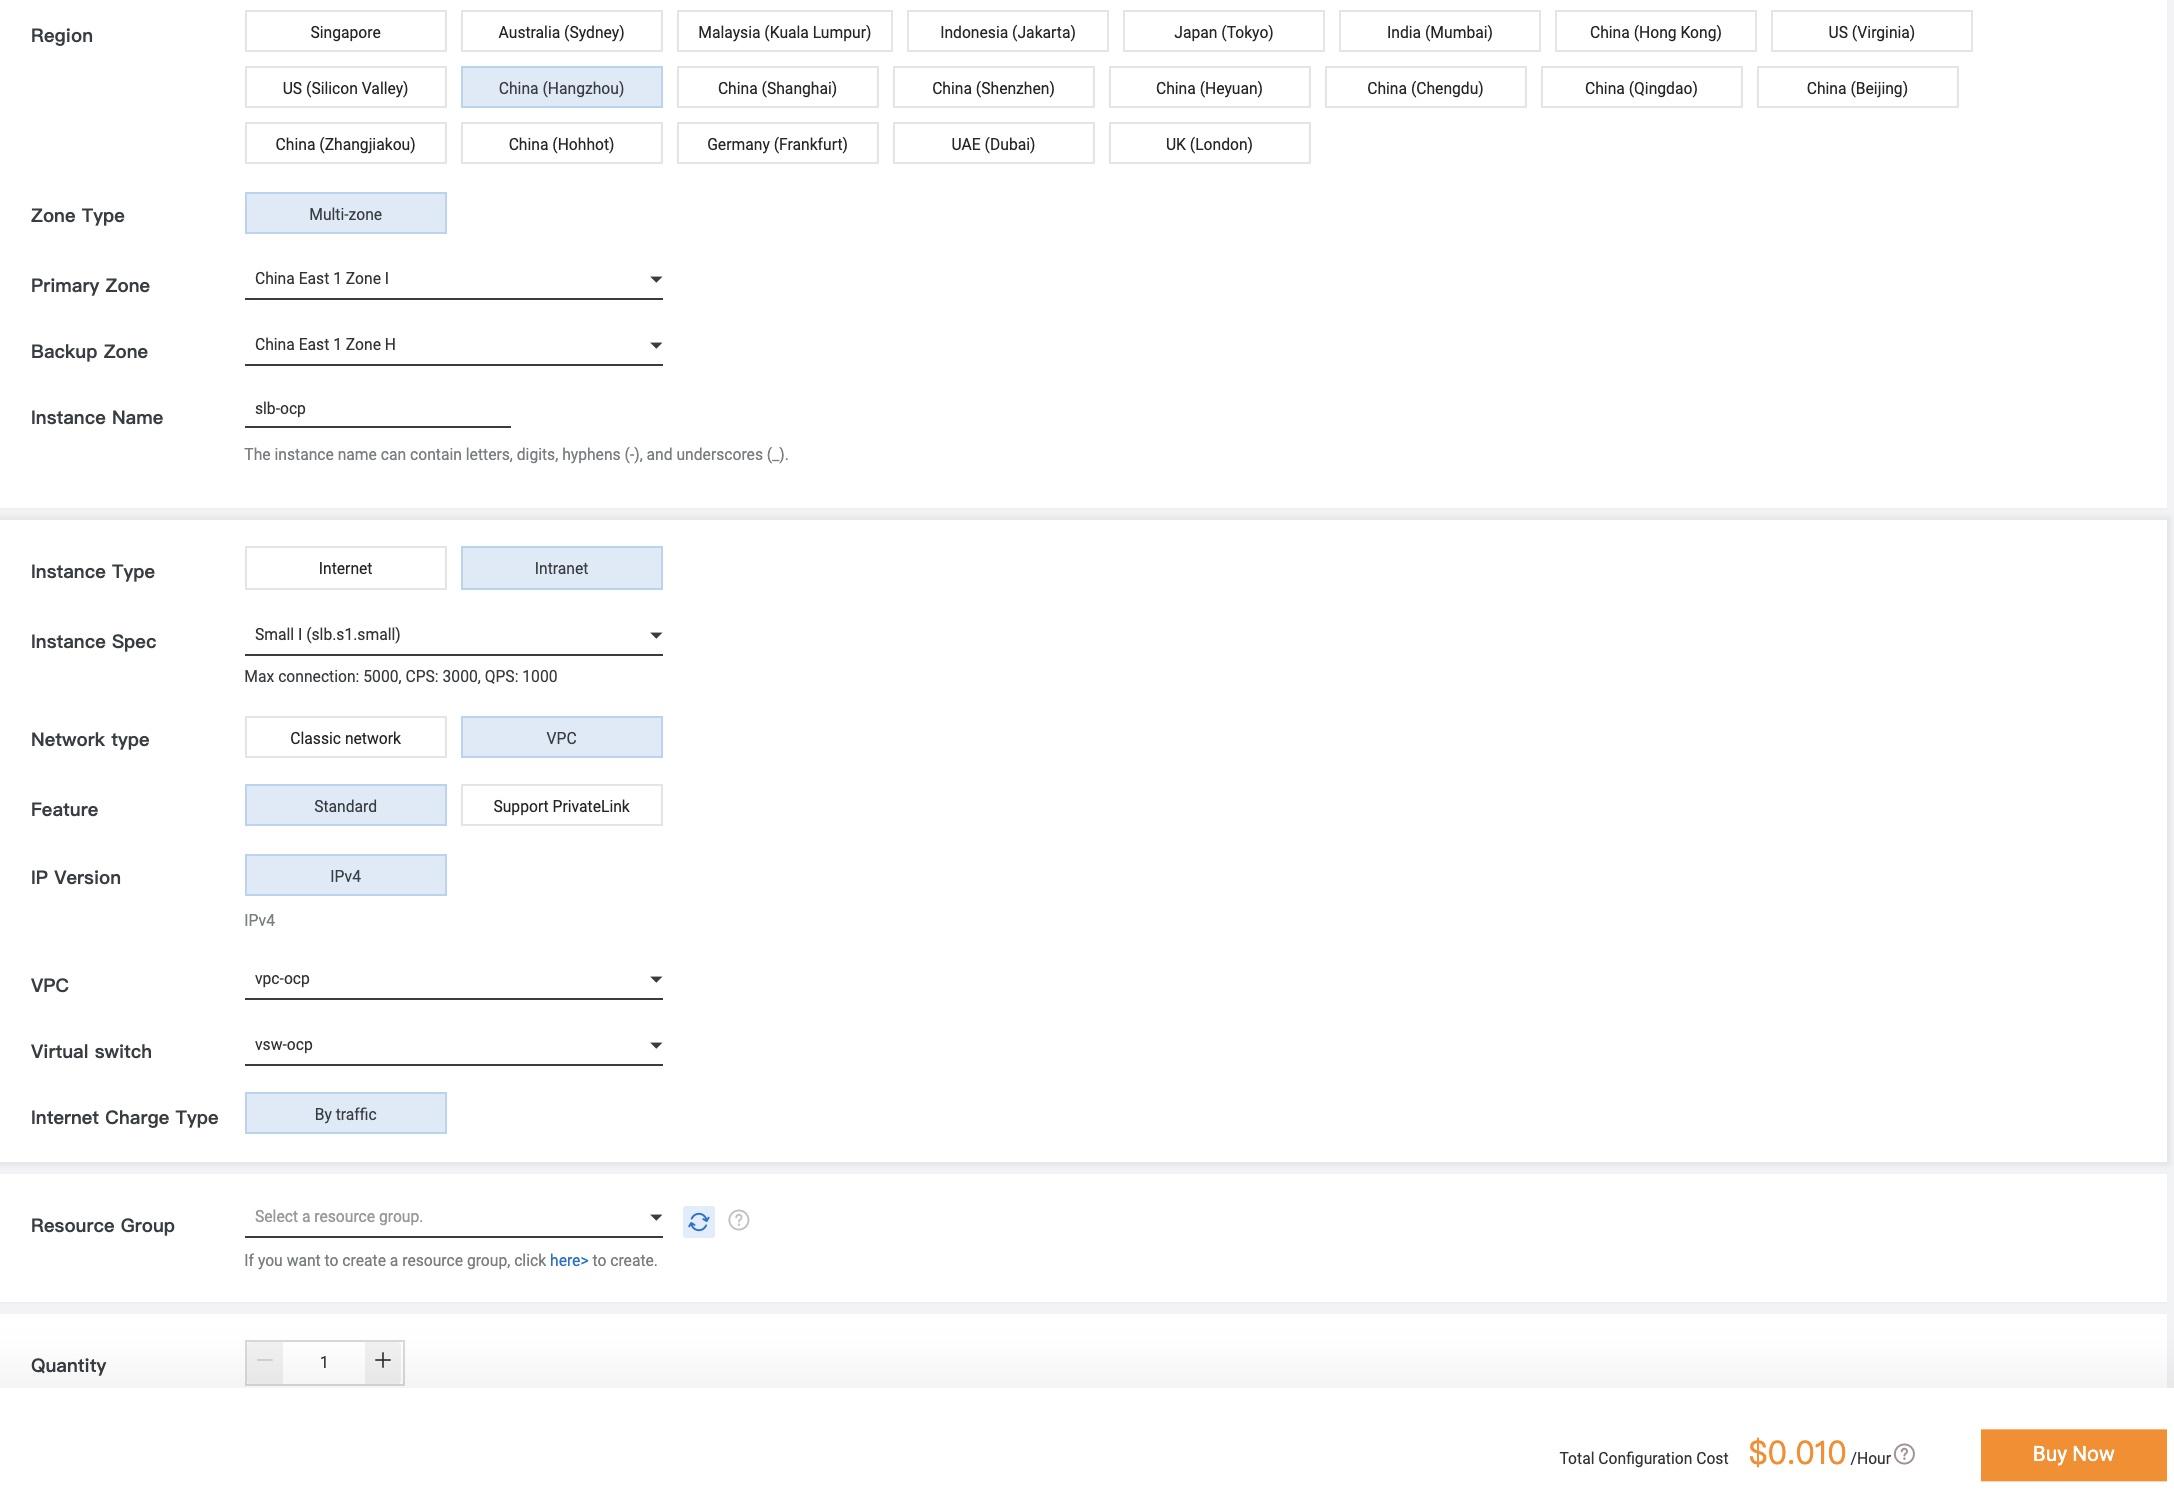
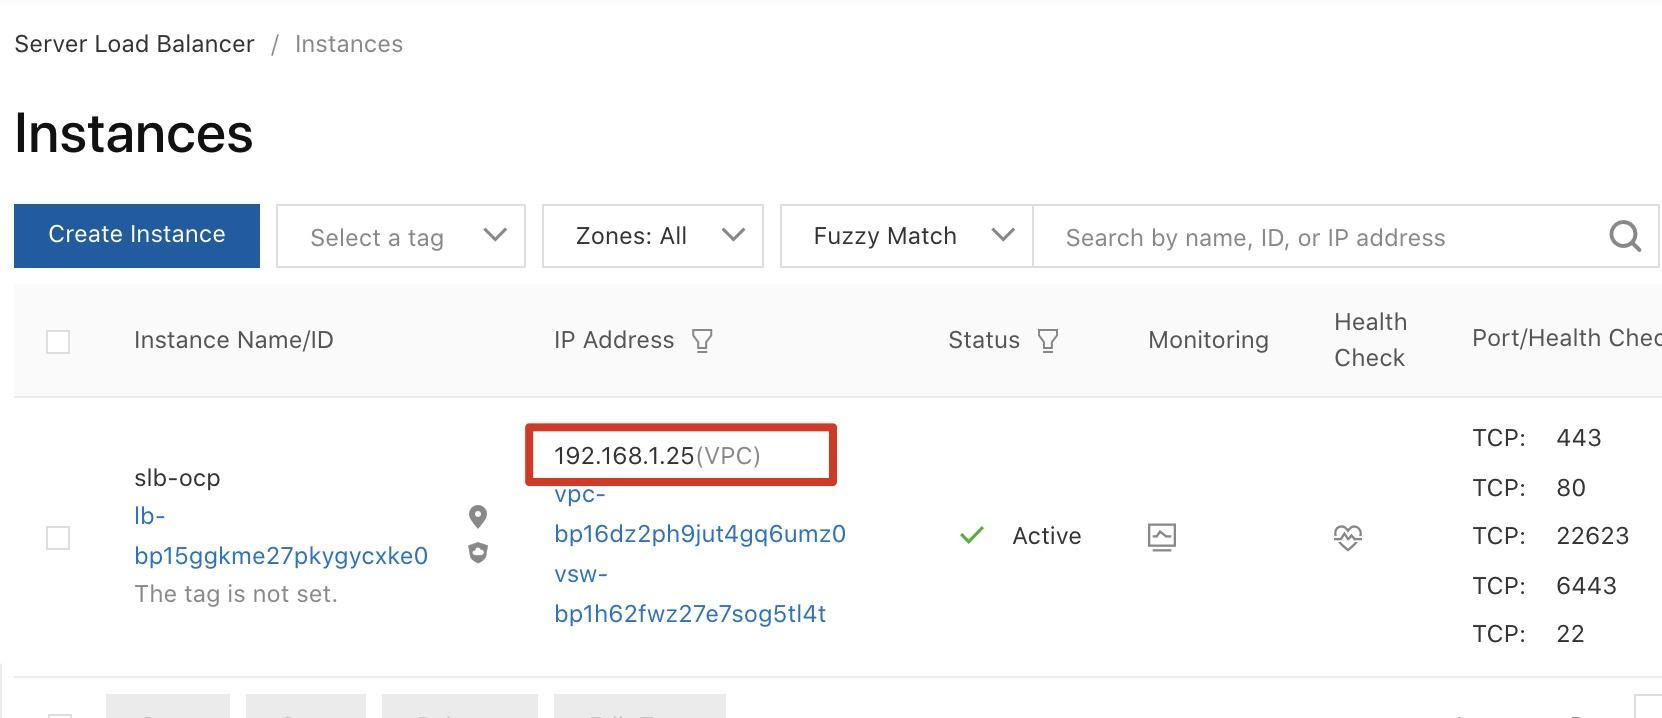
Step 4: Return to the Instances page and verify that the IP address of the SLB instance is 192.168.1.25.
Step 5: In the SLB console, click the slb-ocp instance that you created. On the instance details page, click the Default Server Group tab and click Add.

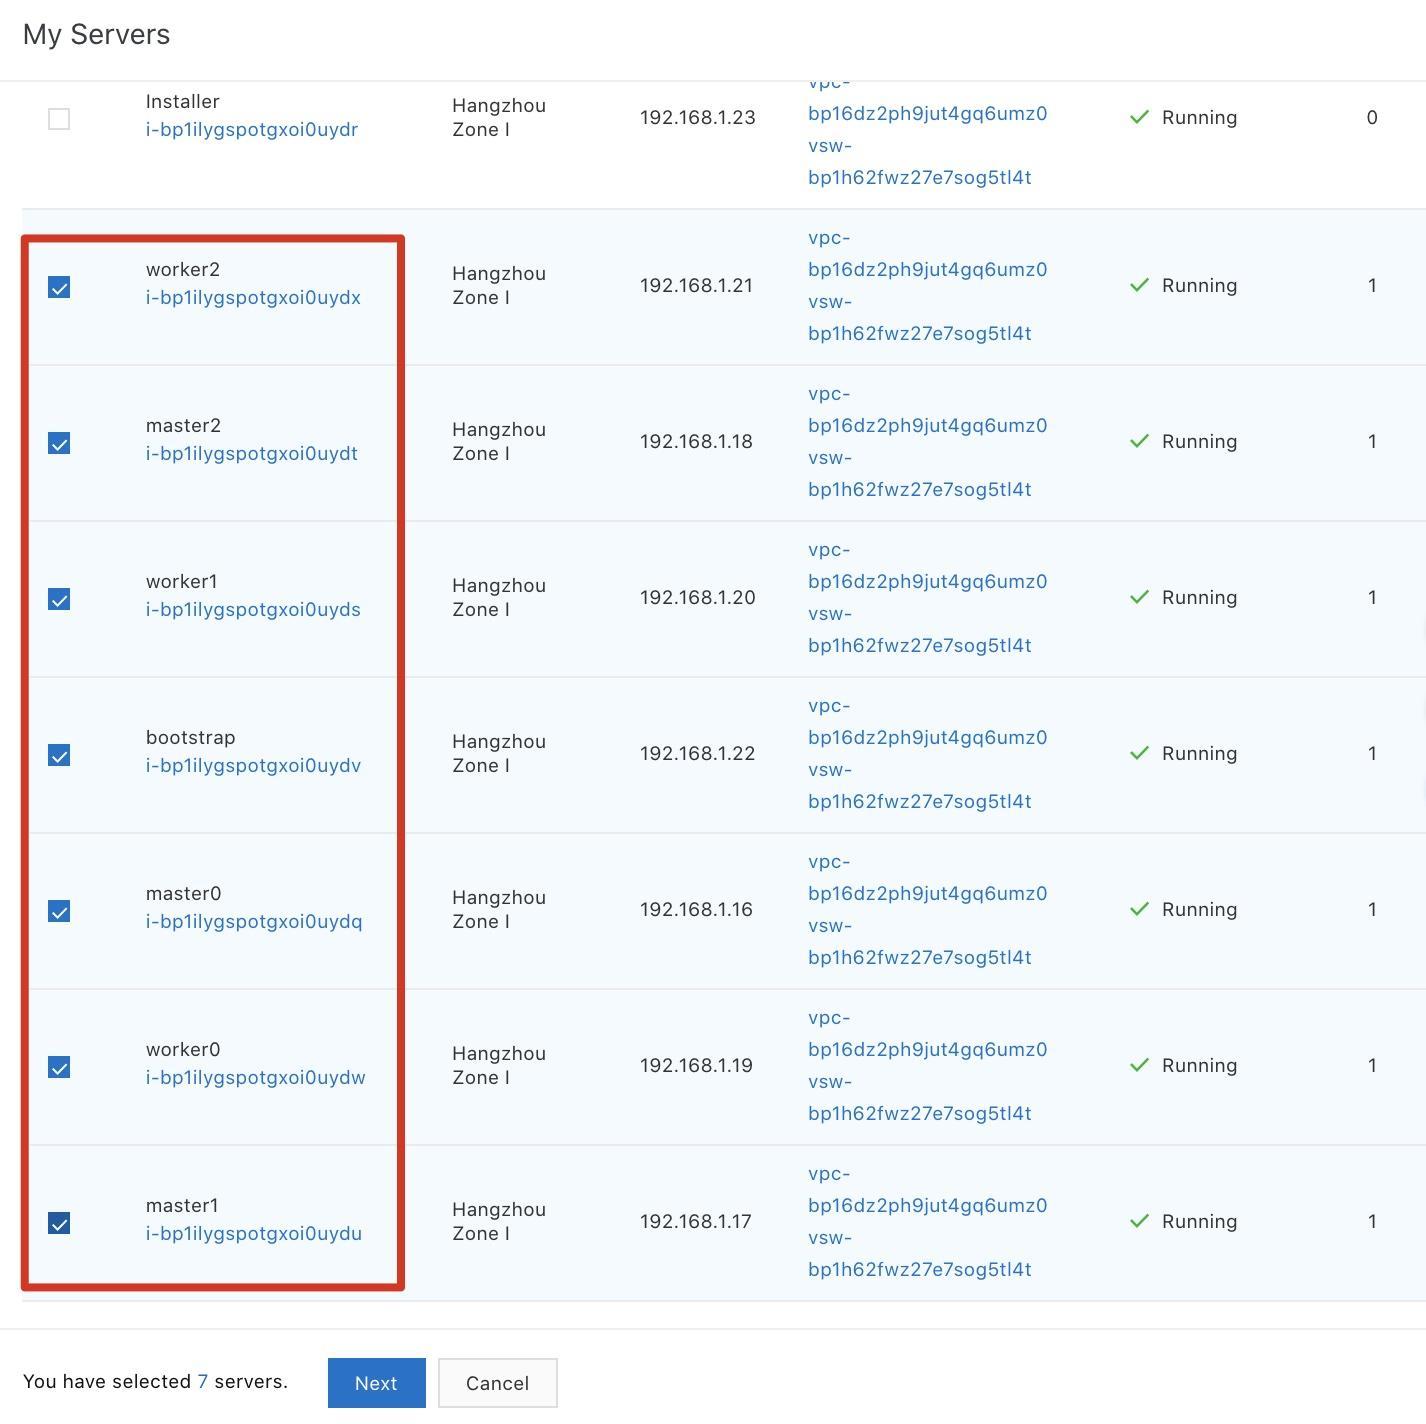
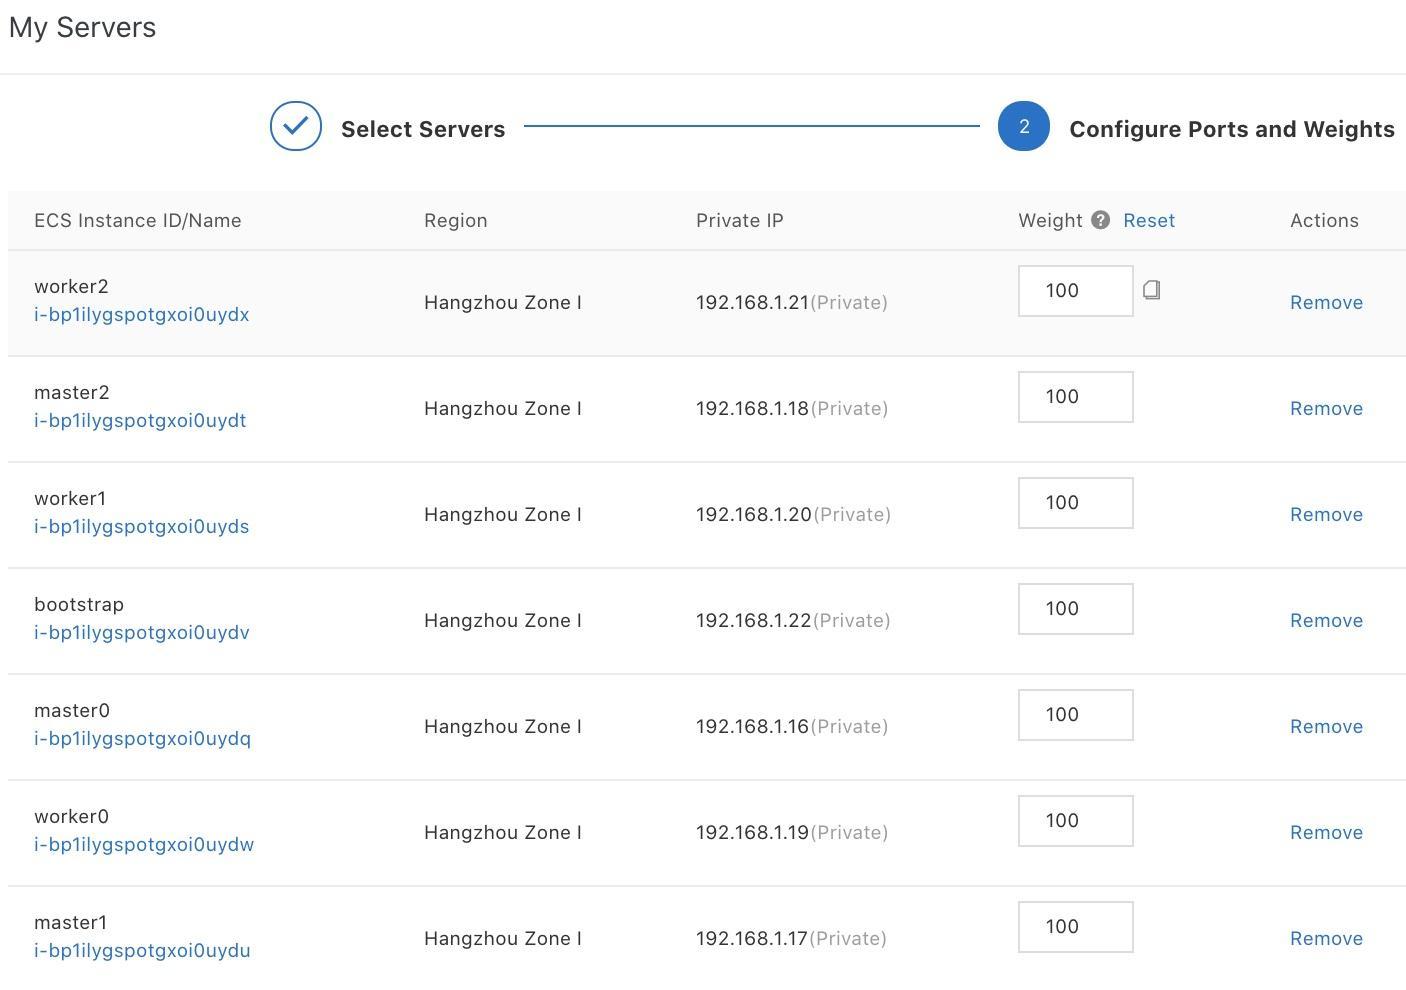
Step 6: In the My Servers panel, select the bootstrap, master0, master1, master2, worker0, worker1, and worker2 instances and click Next. Then, click Add.
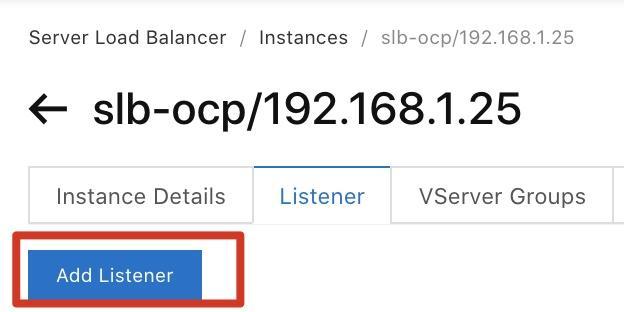
Step 7: On the instance details page, click the Listener tab and click Add Listener.
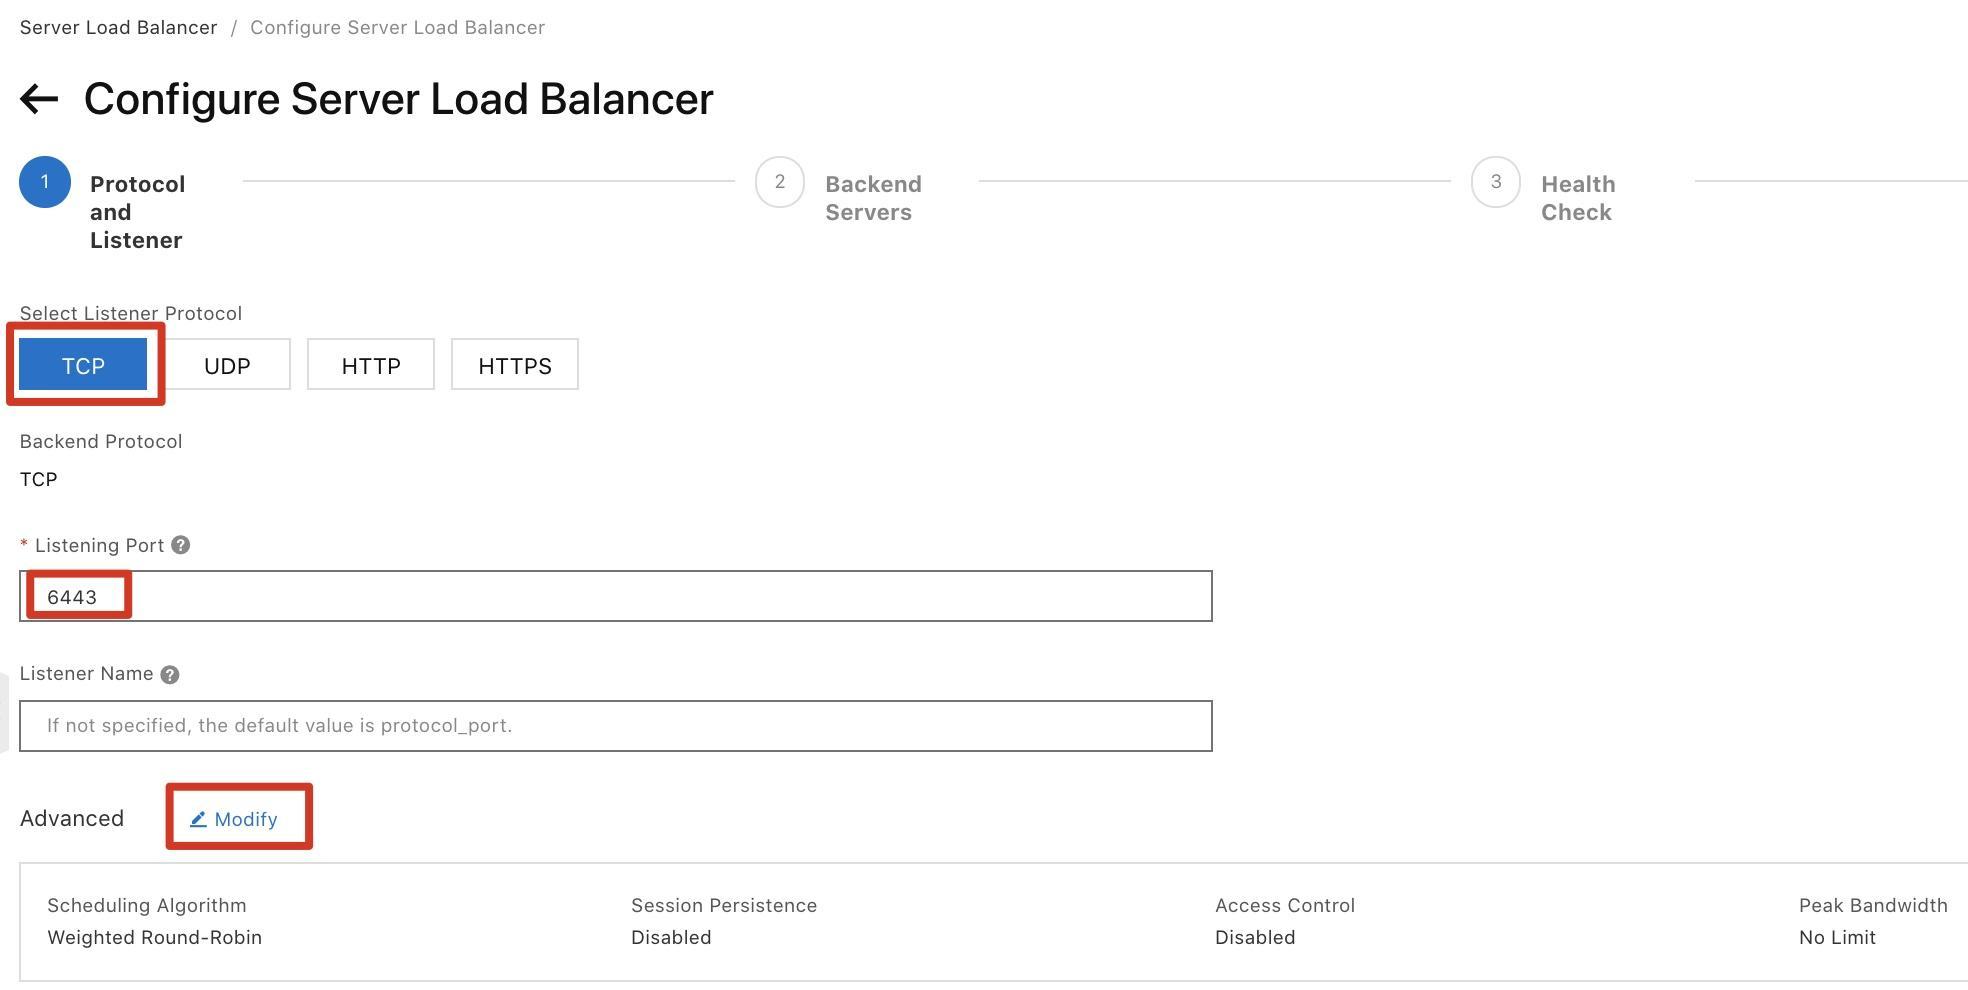
Step 8: In the Protocol and Listener step, set the Listening Port parameter to 6443.
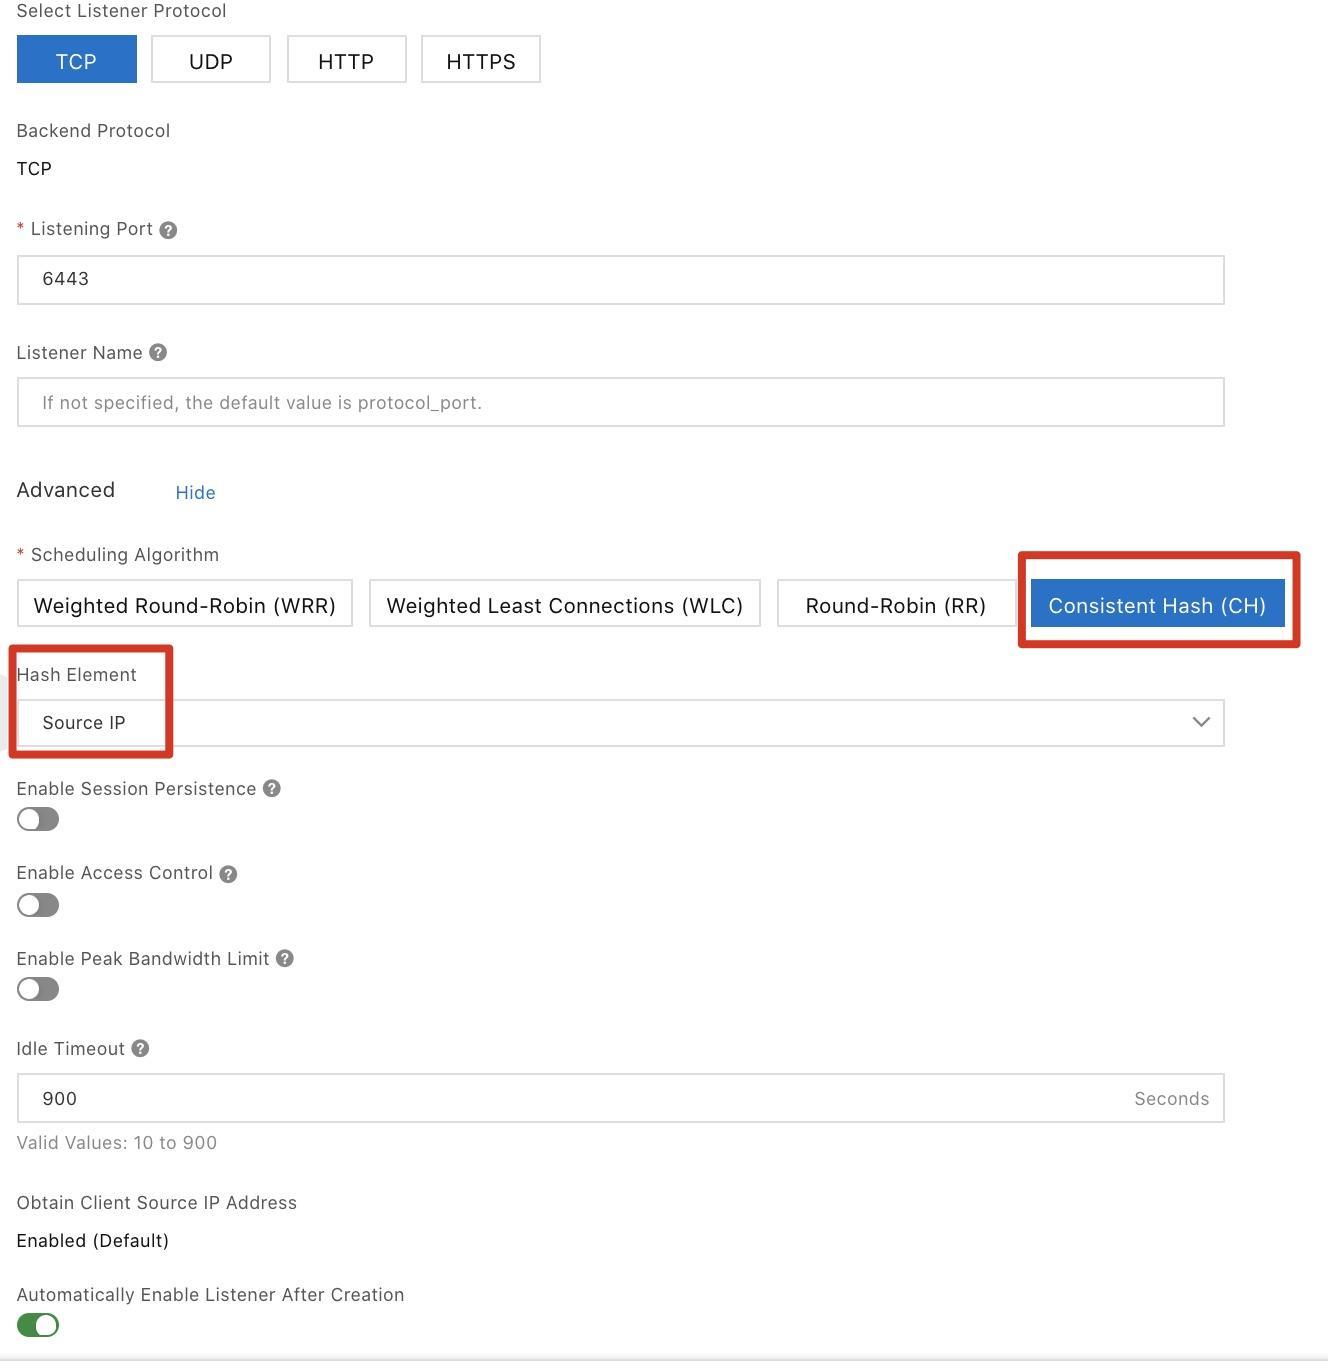
Step 9: Click Modify next to Advanced. Select Consistent Hash (CH) for the Scheduling Algorithm parameter and select Source IP from the Hash Element drop-down list. Then, click Next.
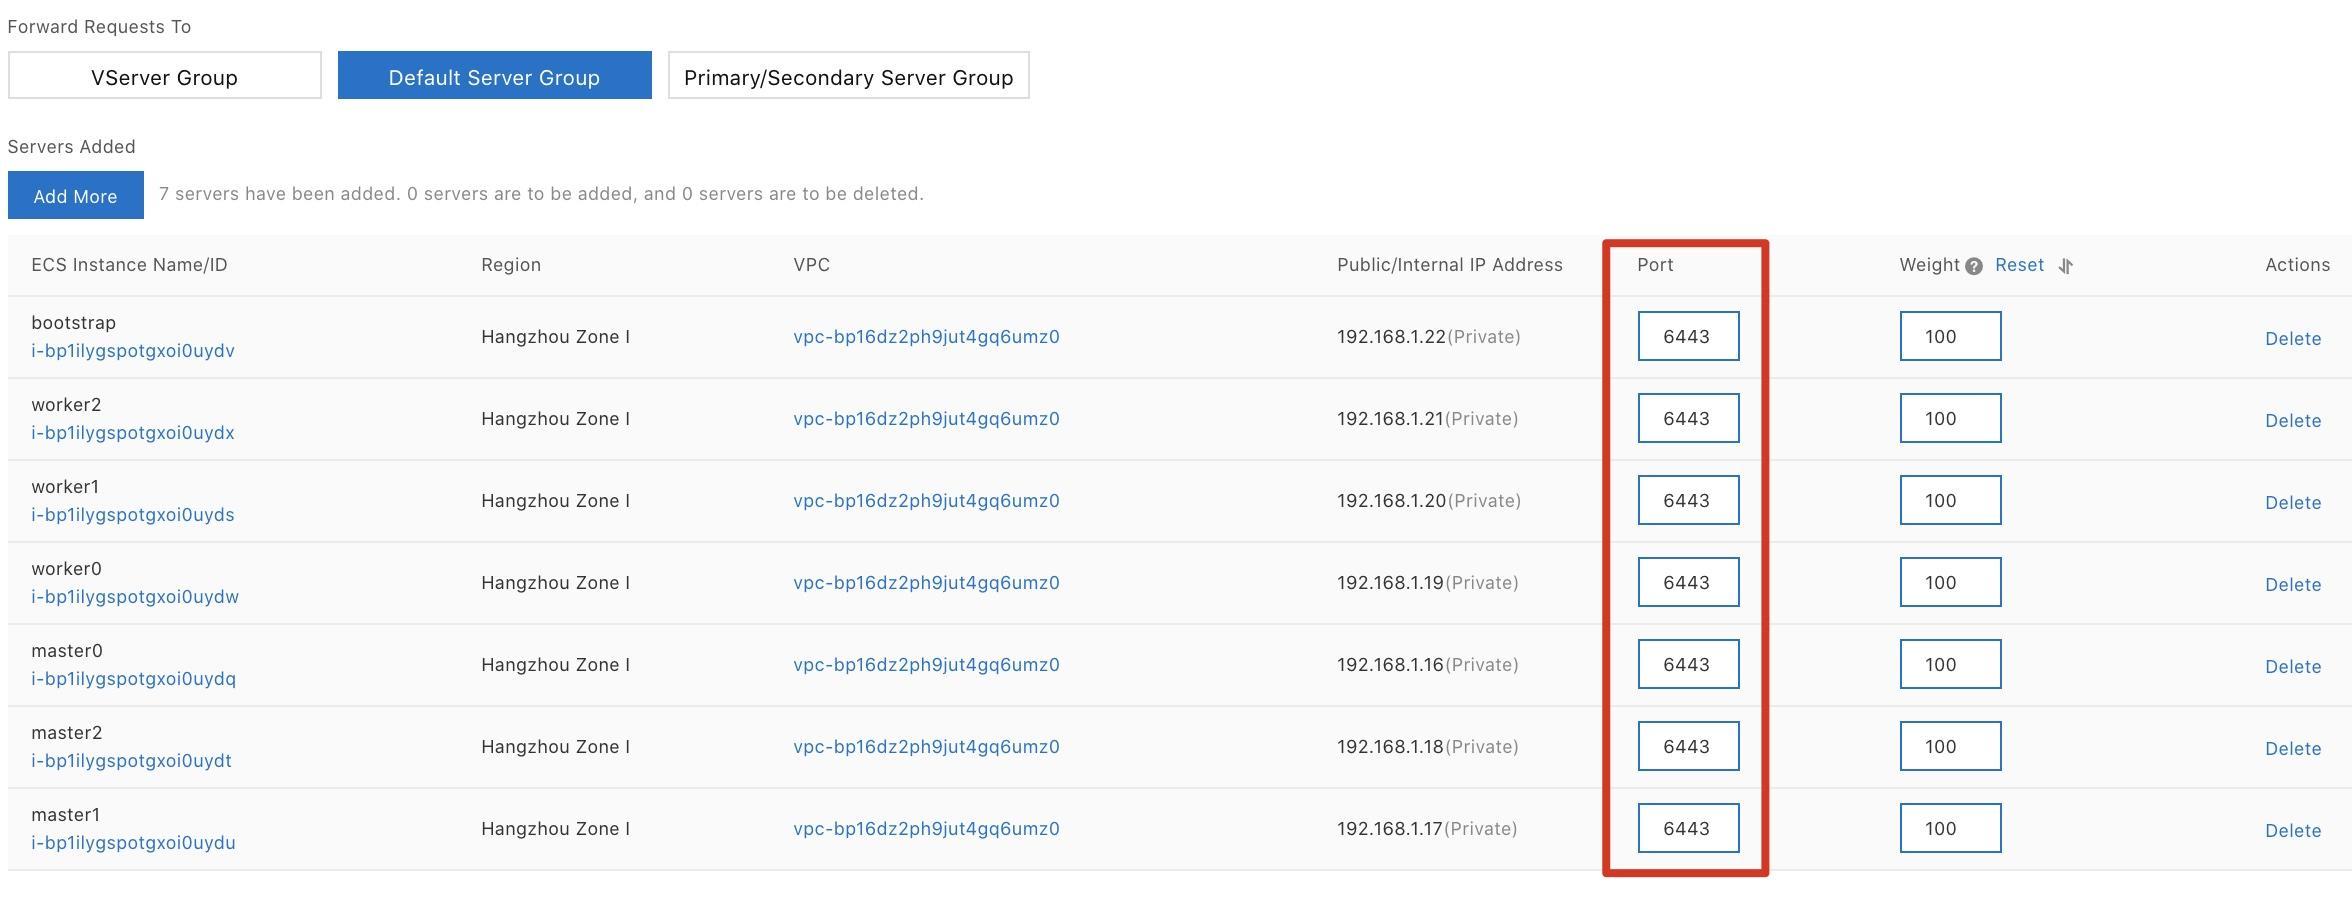
Step 10: In the Backend Servers step, select Default Server Group and configure port 6443 for all ECS instances. Then, click Next.
Step 11: In the Health Check step, use the default values for all parameters.
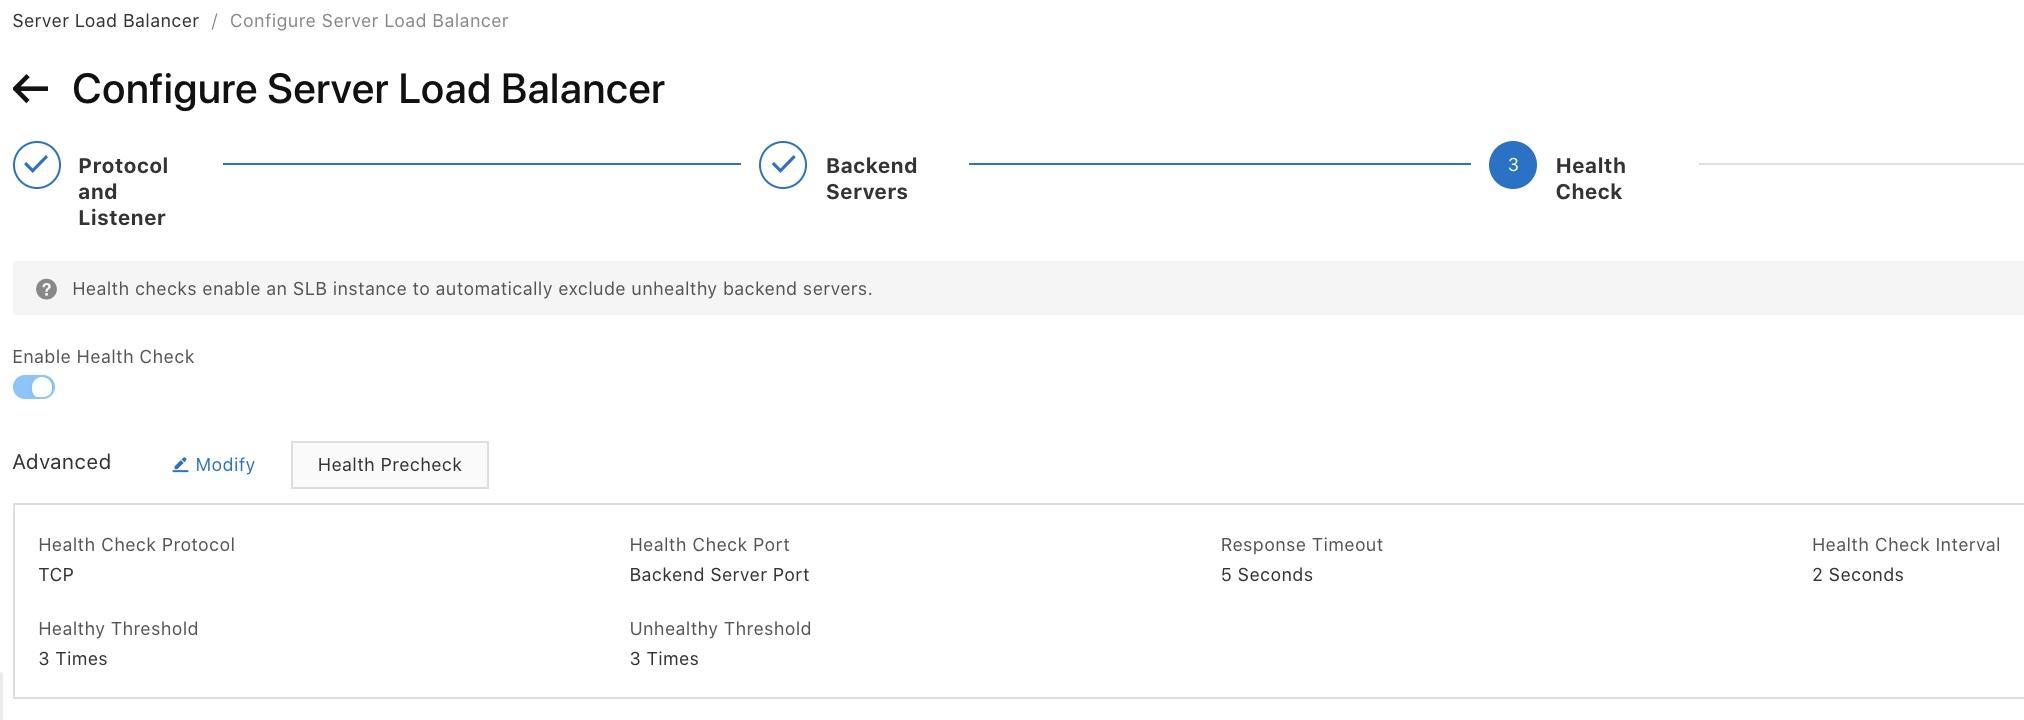
Step 12: In the Confirm step, click Submit.
Step 13: Repeat Steps 8 to 12 to configure the listeners for ports 22623, 443, and 80. Select Default Server Group for all ports. You can add port 22 as a test port.
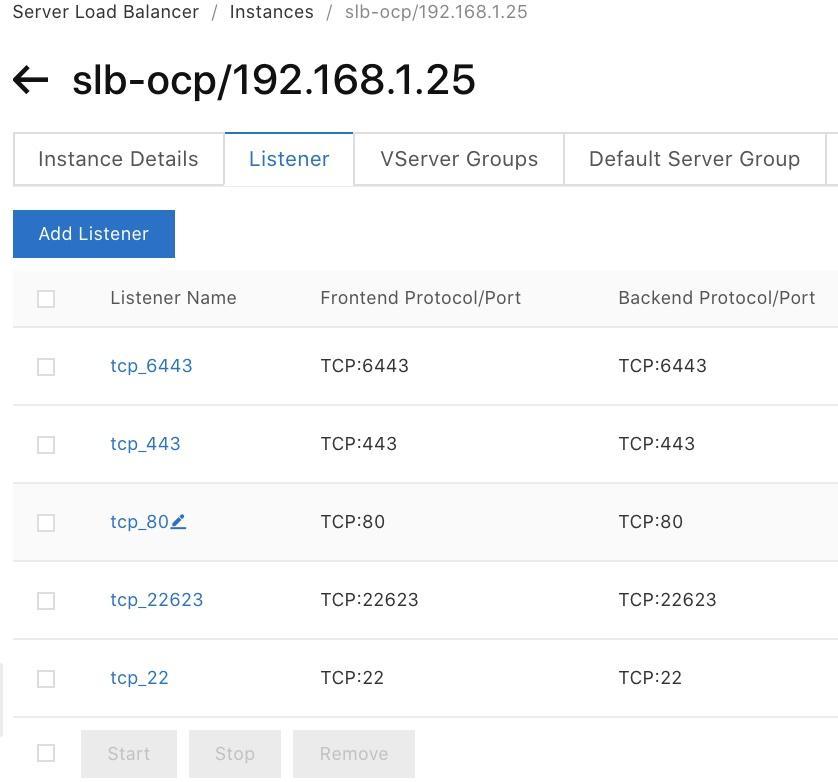
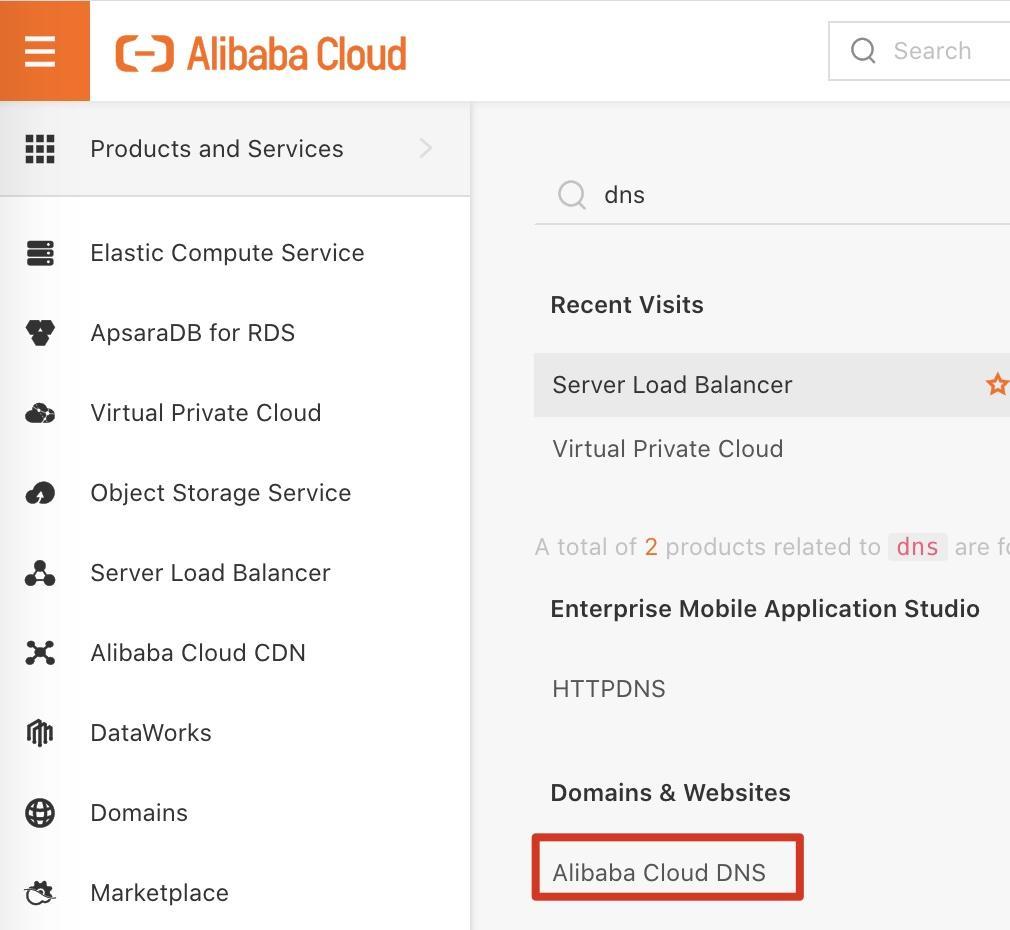
Step 1: Log on to the Alibaba Cloud Management Console. Move the pointer over the More icon in the upper-left corner and choose Products and Services > Alibaba Cloud DNS to go to the DNS console.
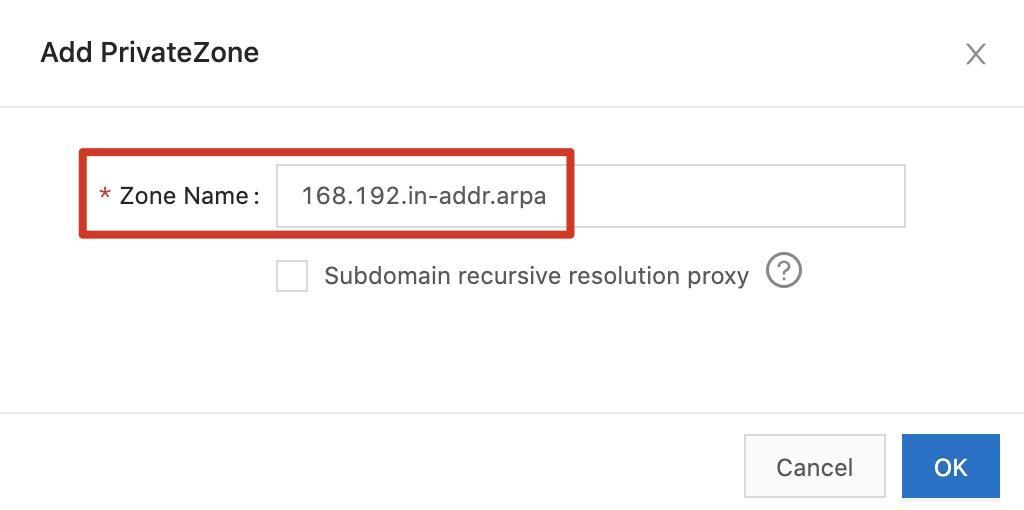
Step 2: On the left-side of the navigation pane, click PrivateZone. On the PrivateZone page, click Add Zone. In the Add PrivateZone dialog box, enter the zone name 168.192.in-addr.arpa and click OK.
Step 3: Click Bind VPC in the Actions column of the zone.

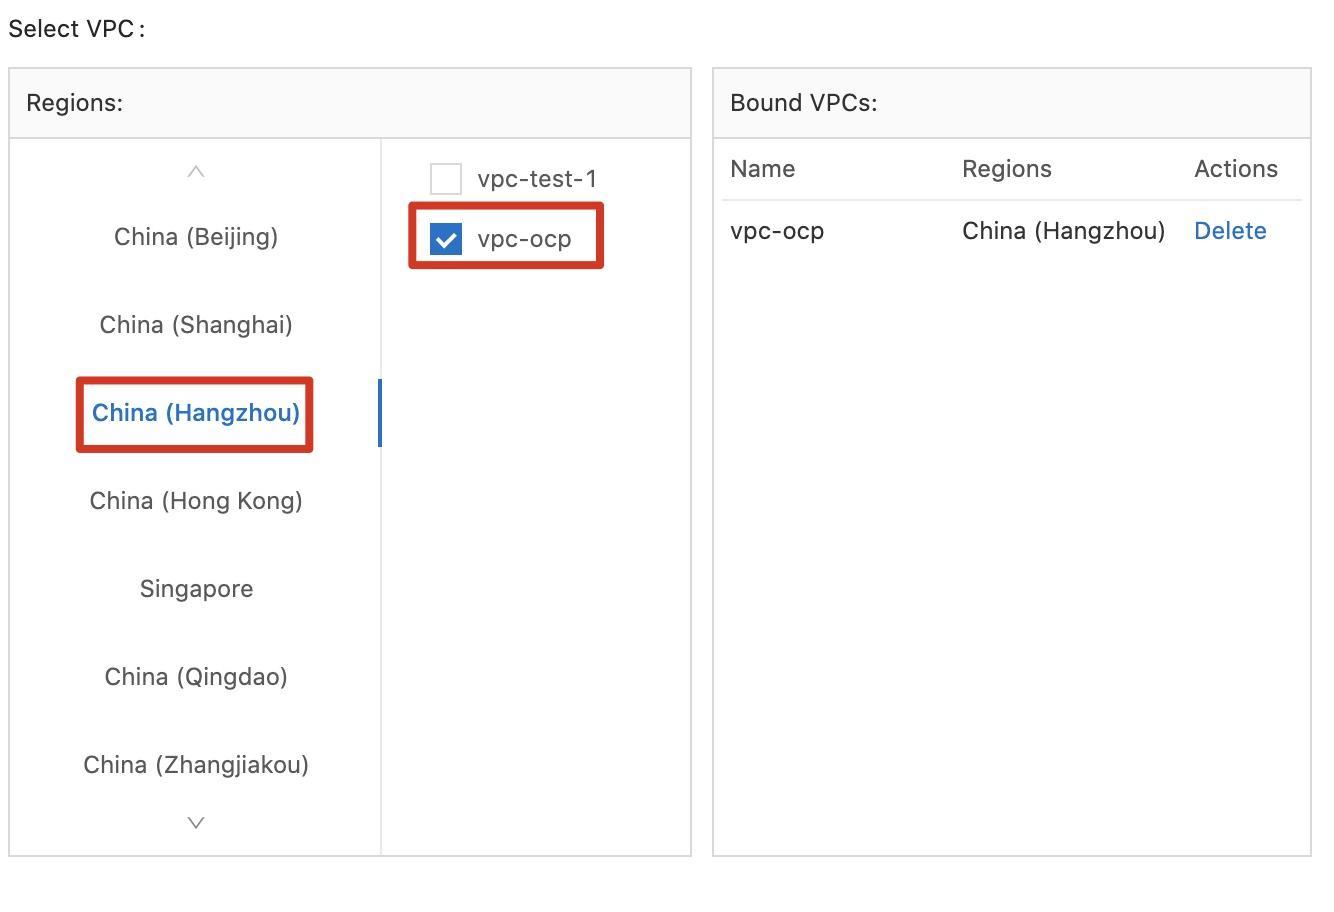
Step 4: In the Bind VPC panel, set the region to China (Hangzhou) and select the vpc-ocp VPC.
Step 5: Click Configure in the Actions column of the zone to add DNS records for the zone.

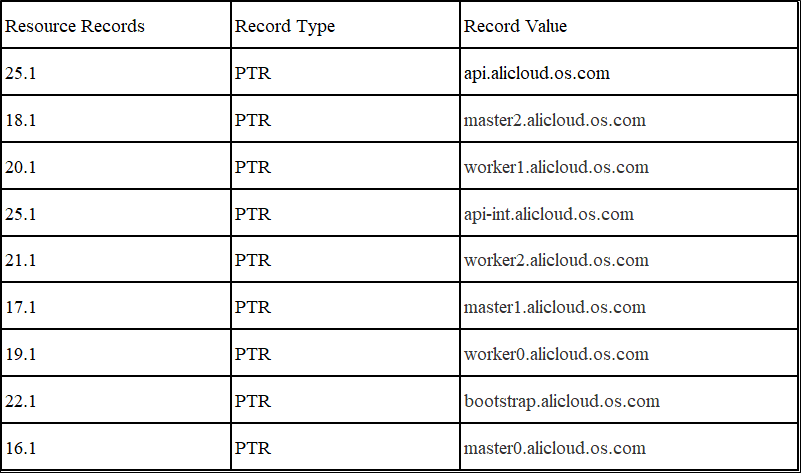
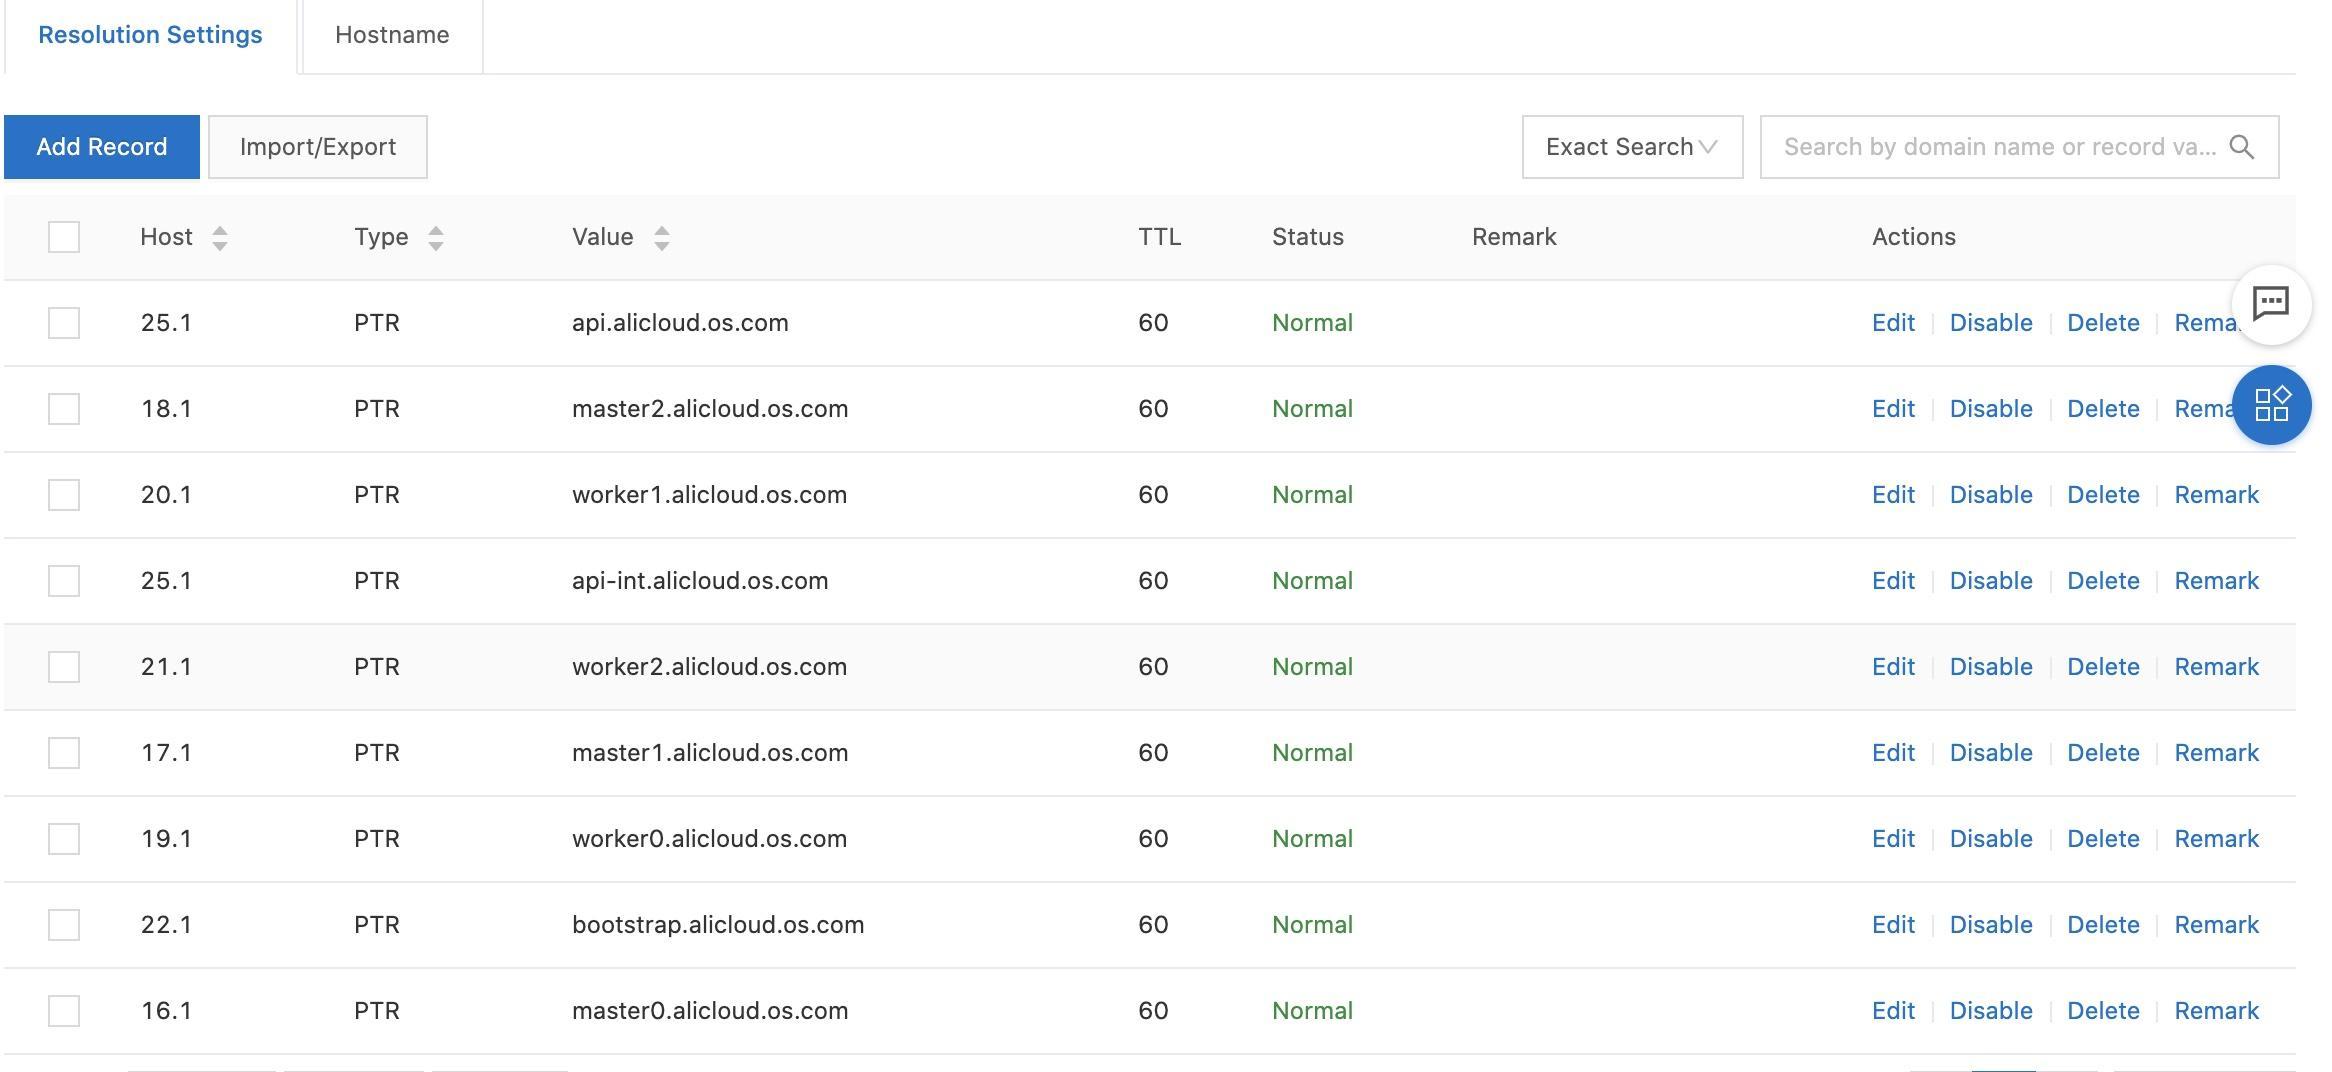
Step 6: Add the DNS records that are described in the following table.
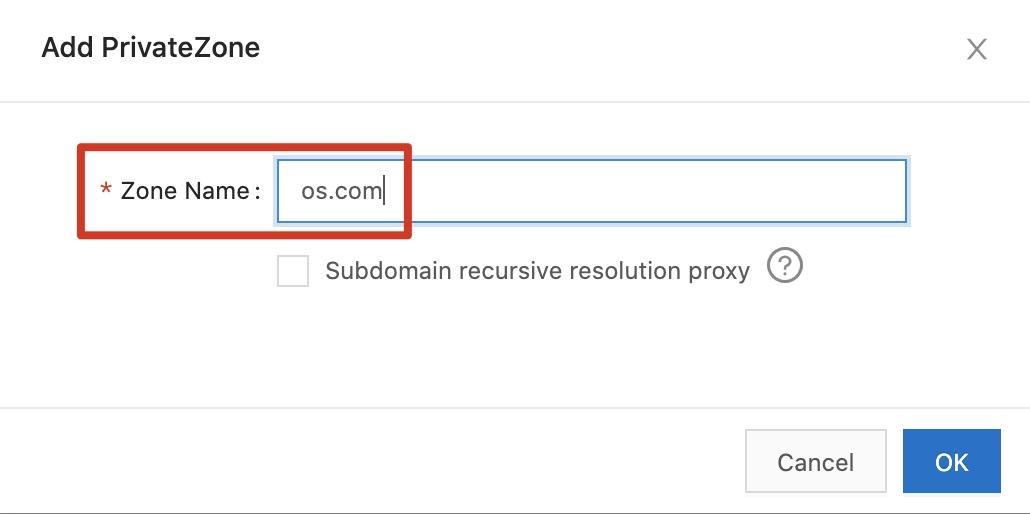
Step 7: Repeat Steps 2 to 6 to create the os.com zone and associate the zone with the vpc-ocp VPC.

Step 8: Click Configure in the Actions column of the zone and add the DNS records that are described in the following table for the zone.
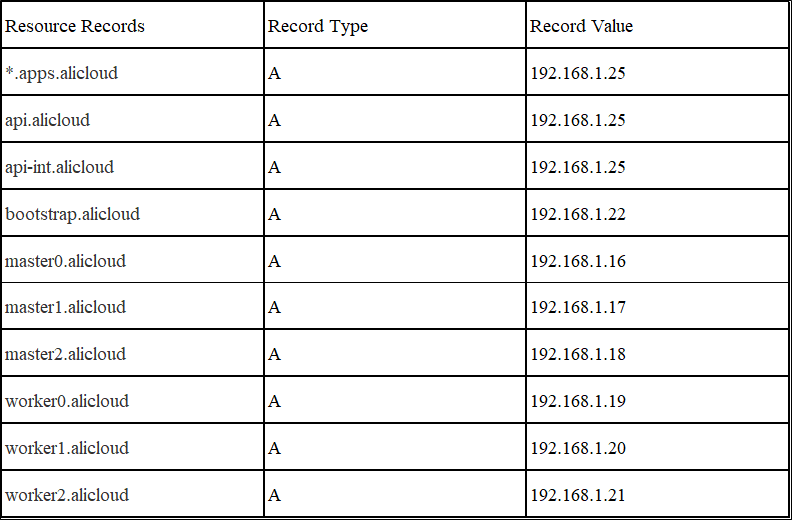
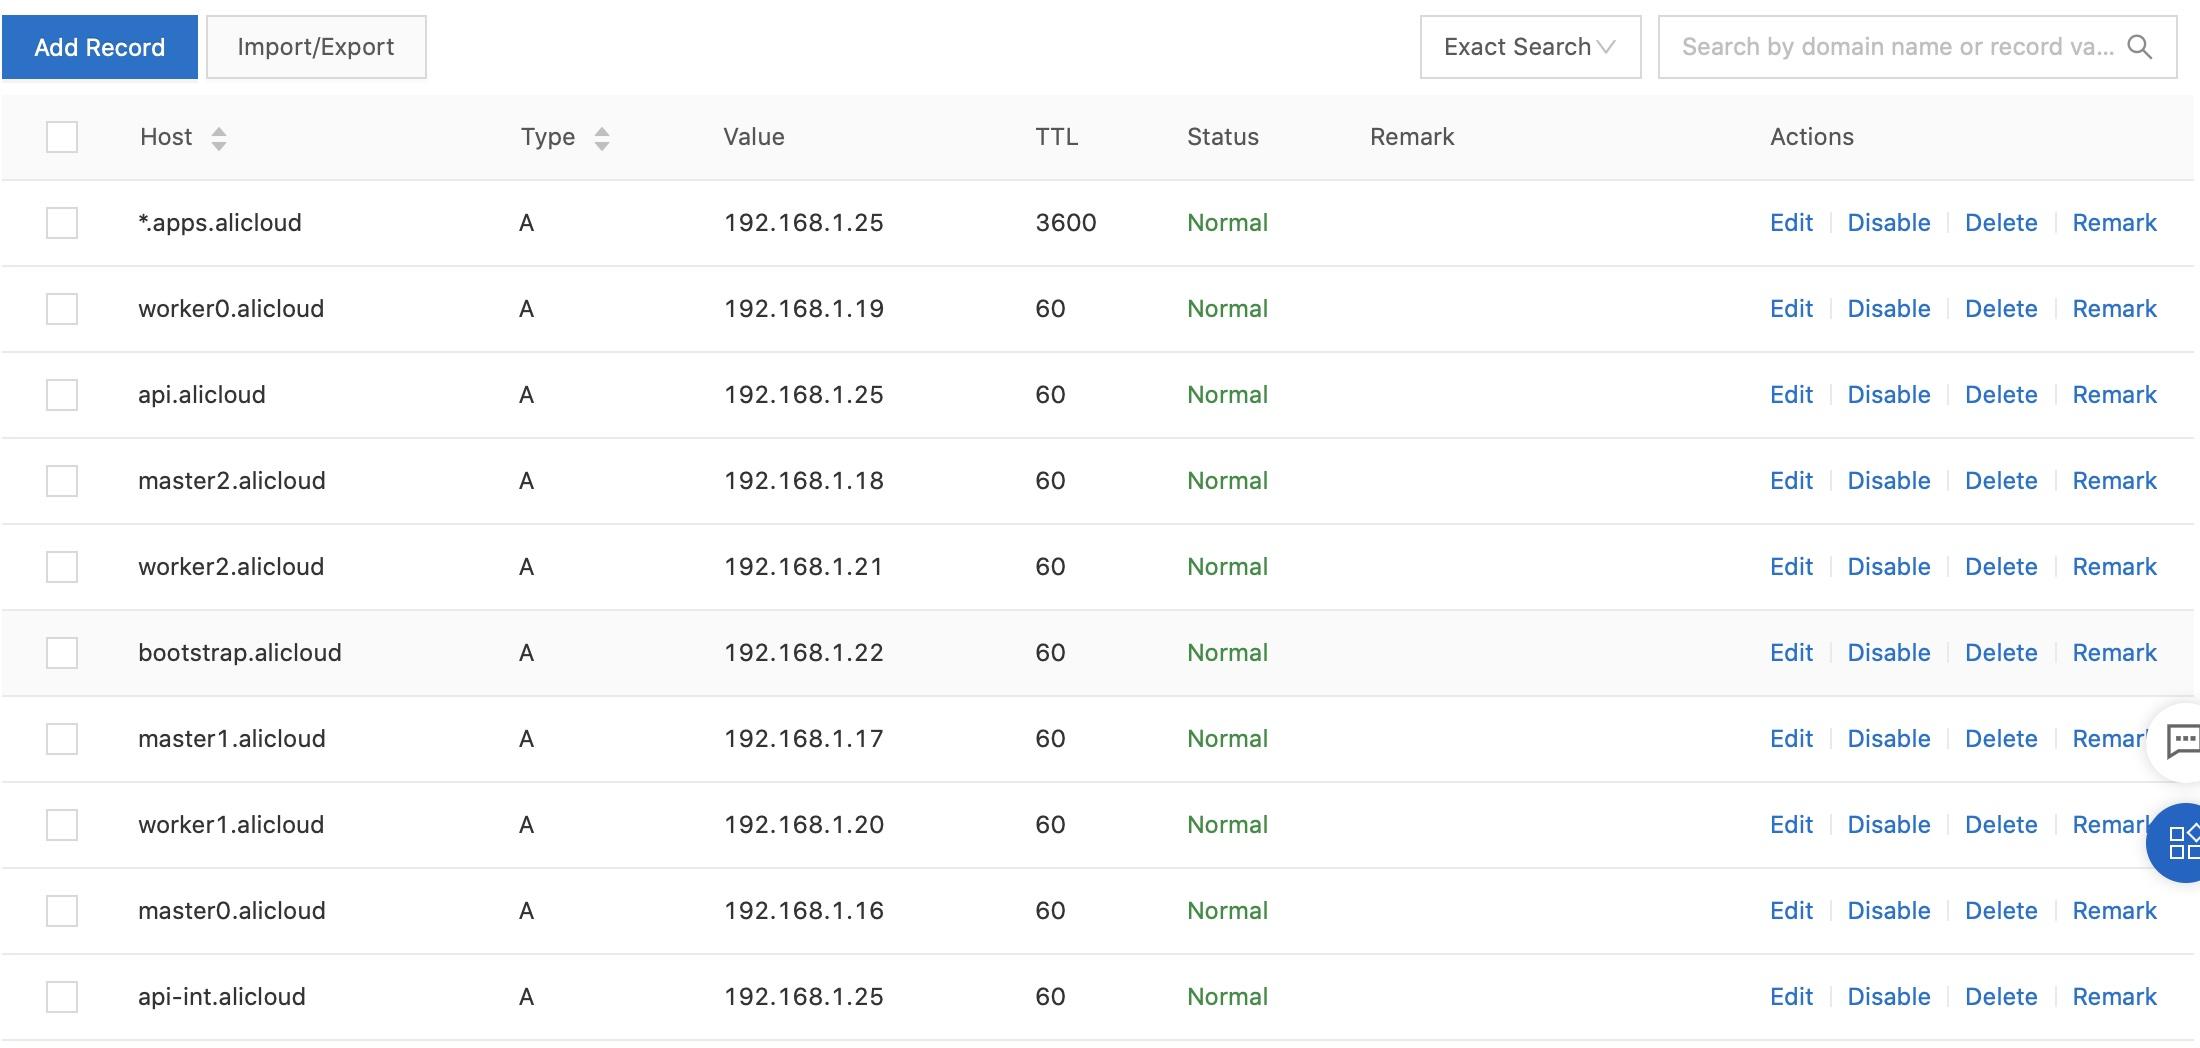
Step 1: Use an SSH client to log on to the installer instance and run the following commands to check the installation progress of the bootstrap machine:
$ cd /mnt
$ ./openshift-install --dir=installation_dir  wait-for bootstrap-complete --log-level INFO
INFO Waiting up to 20m0s for the Kubernetes API at https://api.alicloud.os.com:6443...
INFO API v1.19.0+d59ce34 up
INFO Waiting up to 30m0s for bootstrapping to complete...
INFO It is now safe to remove the bootstrap resources
INFO Time elapsed: 0s
Step 2: After the bootstrap machine is installed, remove the bootstrap machine from the default server group of the SLB instance.
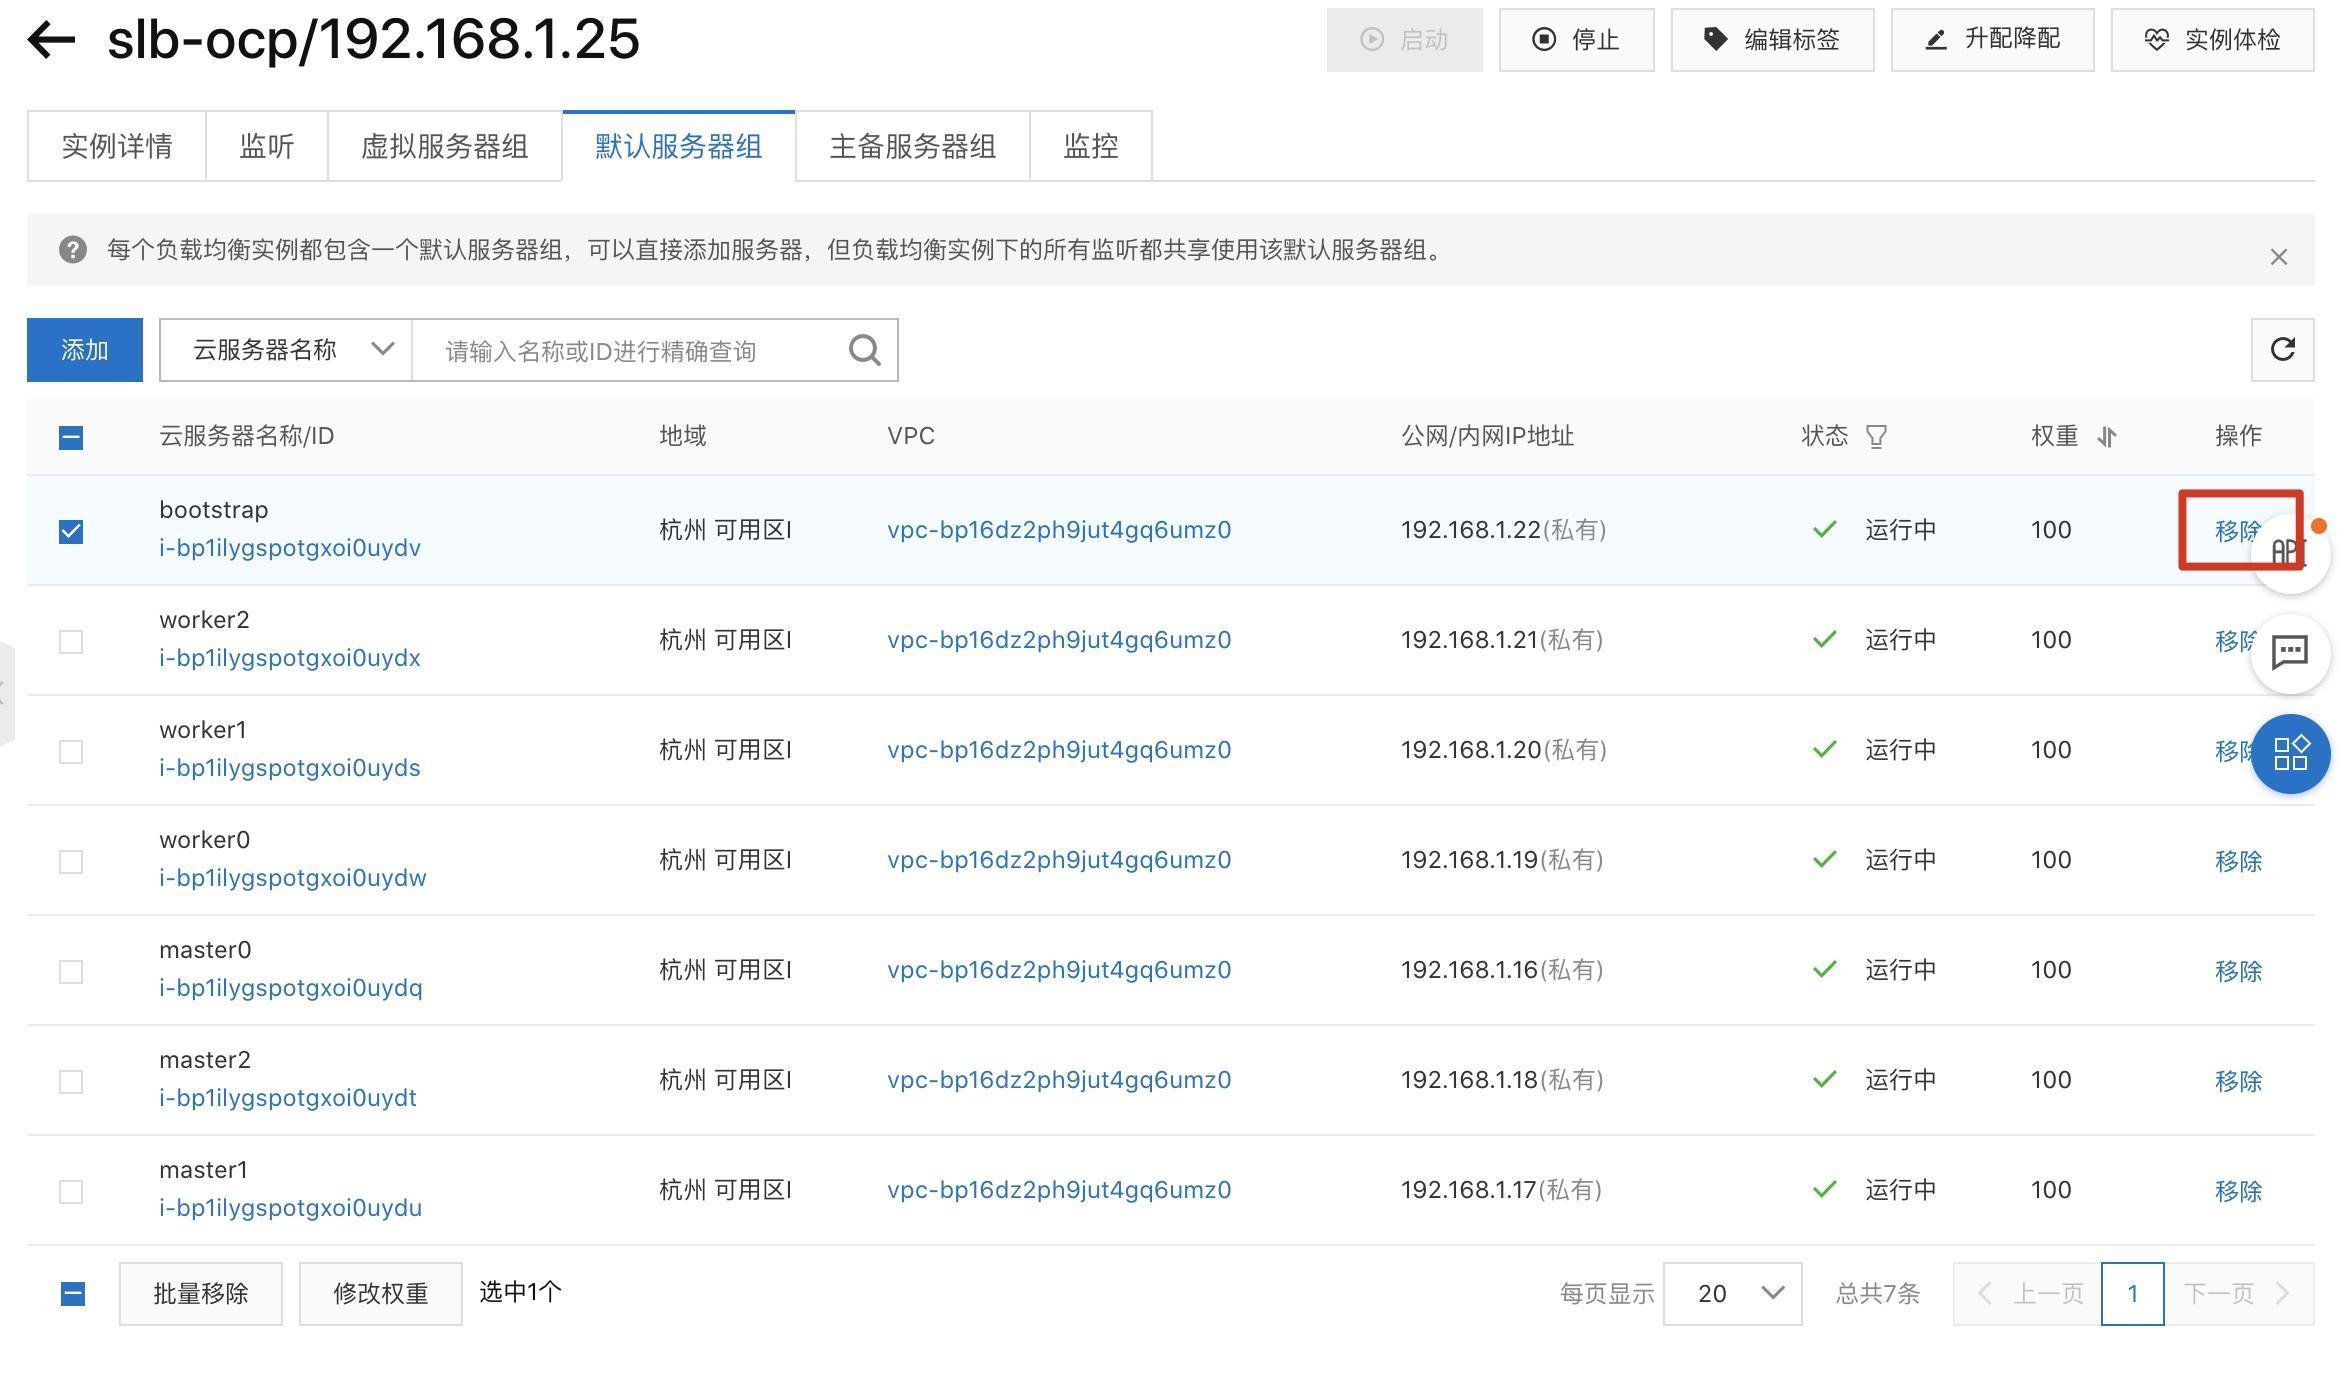
Step 3: After the bootstrap machine is installed, set the KUBECONFIG environment variable to log on to the OCP cluster. The kubeconfig file is created when the OCP cluster is installed. It is used to log on to the cluster and API server by using the CLI.
Set the KUBECONFIG environment variable.
$ export KUBECONFIG=installation_dir/auth/kubeconfig

Run the following command to check whether the oc command can be executed:
$ oc whoami
system:admin
Step 4: Check whether the cluster can recognize each machine.
$ oc get nodes
NAME                      STATUS   ROLES    AGE   VERSION
master0.alicloud.os.com   Ready    master   28m   v1.19.0+d59ce34
master1.alicloud.os.com   Ready    master   26m   v1.19.0+d59ce34
master2.alicloud.os.com   Ready    master   25m   v1.19.0+d59ce34
worker0.alicloud.os.com   NotReady    worker   75s   v1.19.0+d59ce34
worker1.alicloud.os.com   NotReady    worker   71s   v1.19.0+d59ce34
worker2.alicloud.os.com   NotReady    worker   26s   v1.19.0+d59ce34
Step 5: Check the certificate signing requests (CSRs) in the Pending state. Make sure that each machine that is added to the cluster has CSRs in the Pending or Approved state.

$ oc get csrStep 6: Approve all CSRs in the Pending state.
Approve all CSRs in the Pending state.
oc get csr -o go-template='{{range .items}}{{if not .status}}{{.metadata.name}}{{"\n"}}{{end}}{{end}}' | xargs oc adm certificate approve

Make sure that all CSRs are in the Approved state.
$ oc get csr
No resources found
Step 7: Use an SSH client to log on to the installer instance and run the following commands to check the whole installation progress
$ cd /mnt
$ ./openshift-install wait-for install-complete --dir installation_dir --log-level debug
DEBUG OpenShift Installer 4.6.1
DEBUG Built from commit 98e11541c24e95c864328b9b35c64b77836212ed
DEBUG Loading Install Config...
DEBUG   Loading SSH Key...
DEBUG   Loading Base Domain...
DEBUG     Loading Platform...
DEBUG   Loading Cluster Name...
DEBUG     Loading Base Domain...
DEBUG     Loading Platform...
DEBUG   Loading Networking...
DEBUG     Loading Platform...
DEBUG   Loading Pull Secret...
DEBUG   Loading Platform...
DEBUG Using Install Config loaded from state file
INFO Waiting up to 40m0s for the cluster at https://api.alicloud.os.com:6443 to initialize...
DEBUG Still waiting for the cluster to initialize: Working towards 4.6.1: 406 of 668 done (60% complete)
DEBUG Still waiting for the cluster to initialize: Working towards 4.6.1: downloading update
DEBUG Still waiting for the cluster to initialize: Working towards 4.6.1: downloading update
DEBUG Still waiting for the cluster to initialize: Working towards 4.6.1: 2 of 668 done (0% complete)
DEBUG Still waiting for the cluster to initialize: Working towards 4.6.1: 31 of 668 done (4% complete)
DEBUG Still waiting for the cluster to initialize: Working towards 4.6.1: 86 of 668 done (12% complete)
DEBUG Still waiting for the cluster to initialize: Working towards 4.6.1: 90 of 668 done (13% complete)
DEBUG Still waiting for the cluster to initialize: Working towards 4.6.1: 95 of 668 done (14% complete)
DEBUG Still waiting for the cluster to initialize: Working towards 4.6.1: 96 of 668 done (14% complete)
DEBUG Still waiting for the cluster to initialize: Working towards 4.6.1: 98 of 668 done (14% complete)
DEBUG Still waiting for the cluster to initialize: Working towards 4.6.1: 103 of 668 done (15% complete)
DEBUG Still waiting for the cluster to initialize: Working towards 4.6.1: 104 of 668 done (15% complete)
DEBUG Still waiting for the cluster to initialize: Working towards 4.6.1: 105 of 668 done (15% complete)
DEBUG Still waiting for the cluster to initialize: Working towards 4.6.1: 107 of 668 done (16% complete)
DEBUG Still waiting for the cluster to initialize: Working towards 4.6.1: 120 of 668 done (17% complete)
DEBUG Still waiting for the cluster to initialize: Working towards 4.6.1: 121 of 668 done (18% complete)
DEBUG Still waiting for the cluster to initialize: Working towards 4.6.1: 211 of 668 done (31% complete)
DEBUG Still waiting for the cluster to initialize: Working towards 4.6.1: 212 of 668 done (31% complete)
DEBUG Still waiting for the cluster to initialize: Working towards 4.6.1: 215 of 668 done (32% complete)
DEBUG Still waiting for the cluster to initialize: Working towards 4.6.1: 221 of 668 done (33% complete)
DEBUG Still waiting for the cluster to initialize: Working towards 4.6.1: 224 of 668 done (33% complete)
DEBUG Still waiting for the cluster to initialize: Working towards 4.6.1: 226 of 668 done (33% complete)
DEBUG Still waiting for the cluster to initialize: Working towards 4.6.1: 247 of 668 done (36% complete)
DEBUG Still waiting for the cluster to initialize: Working towards 4.6.1: 299 of 668 done (44% complete)
DEBUG Still waiting for the cluster to initialize: Working towards 4.6.1: 323 of 668 done (48% complete)
DEBUG Still waiting for the cluster to initialize: Working towards 4.6.1: 375 of 668 done (56% complete)
DEBUG Still waiting for the cluster to initialize: Working towards 4.6.1: 456 of 668 done (68% complete)
DEBUG Still waiting for the cluster to initialize: Working towards 4.6.1: 479 of 668 done (71% complete)
DEBUG Still waiting for the cluster to initialize: Working towards 4.6.1: 480 of 668 done (71% complete)
DEBUG Still waiting for the cluster to initialize: Working towards 4.6.1: 481 of 668 done (72% complete)
DEBUG Still waiting for the cluster to initialize: Working towards 4.6.1: 487 of 668 done (72% complete)
DEBUG Still waiting for the cluster to initialize: Working towards 4.6.1: 513 of 668 done (76% complete)
DEBUG Still waiting for the cluster to initialize: Working towards 4.6.1: 514 of 668 done (76% complete)
DEBUG Still waiting for the cluster to initialize: Working towards 4.6.1: 516 of 668 done (77% complete)
DEBUG Still waiting for the cluster to initialize: Working towards 4.6.1: 542 of 668 done (81% complete)
DEBUG Still waiting for the cluster to initialize: Working towards 4.6.1: 569 of 668 done (85% complete)
DEBUG Still waiting for the cluster to initialize: Working towards 4.6.1: 598 of 668 done (89% complete)
DEBUG Still waiting for the cluster to initialize: Working towards 4.6.1: 622 of 668 done (93% complete)
DEBUG Still waiting for the cluster to initialize: Working towards 4.6.1: 637 of 668 done (95% complete)
DEBUG Still waiting for the cluster to initialize: Working towards 4.6.1: 648 of 668 done (97% complete)
DEBUG Still waiting for the cluster to initialize: Some cluster operators are still updating: authentication, console, monitoring
DEBUG Still waiting for the cluster to initialize: Working towards 4.6.1: 661 of 668 done (98% complete)
DEBUG Still waiting for the cluster to initialize: Working towards 4.6.1: 662 of 668 done (99% complete), waiting on authentication, monitoring
DEBUG Still waiting for the cluster to initialize: Working towards 4.6.1: 662 of 668 done (99% complete), waiting on authentication, monitoring
DEBUG Still waiting for the cluster to initialize: Working towards 4.6.1: 662 of 668 done (99% complete), waiting on authentication, monitoring
DEBUG Still waiting for the cluster to initialize: Working towards 4.6.1: 662 of 668 done (99% complete)
DEBUG Still waiting for the cluster to initialize: Working towards 4.6.1: 663 of 668 done (99% complete), waiting on authentication
DEBUG Cluster is initialized
INFO Waiting up to 10m0s for the openshift-console route to be created...
DEBUG Route found in openshift-console namespace: console
DEBUG OpenShift console route is admitted
INFO Install complete!
INFO To access the cluster as the system:admin user when using 'oc', run 'export KUBECONFIG=/root/install_dir/auth/kubeconfig'
INFO Access the OpenShift web-console here: https://console-openshift-console.apps.alicloud.os.com
INFO Login to the console with user: "kubeadmin", and password: "xPf47-Niwiv-B8IG8-rakVP"
DEBUG Time elapsed per stage:
DEBUG Cluster Operators: 17m7s
INFO Time elapsed: 17m7s By default, the image registry operator is removed to ensure that the cluster can be installed on all platforms. Therefore, you must modify the image registry configuration after the cluster is installed.
Step 1: Log on to the installer instance by using SSH and run the following commands:
$ oc create -f - <<EOF
apiVersion: v1
kind: PersistentVolume
metadata:
  annotations:
    volume.beta.kubernetes.io/mount-options: vers=3,nolock,proto=tcp,rsize=1048576,wsize=1048576,hard,timeo=600,retrans=2,noresvport
  name: registry
spec:
  accessModes:
  - ReadWriteMany
  capacity:
    storage: 900Gi
  claimRef:
    apiVersion: v1
    kind: PersistentVolumeClaim
    name: nfs-claim
    namespace: openshift-image-registry
  nfs:
    path: /
    server: 1276a948e4f-rqm6.cn-hongkong.nas.aliyuncs.com
  persistentVolumeReclaimPolicy: Retain
  volumeMode: Filesystem
EOF
$ oc create -f - <<EOF
apiVersion: v1
kind: PersistentVolumeClaim
metadata:
  name: nfs-claim
  namespace: openshift-image-registry
spec:
  accessModes:
  - ReadWriteMany
  resources:
    requests:
      storage: 900Gi
  volumeMode: Filesystem
  volumeName: registry
EOF

check pv status
$ oc get pv
check pvc status
$ oc get pvc -n openshift-image-registry

modify imageregistry configuration to apply NAS as the backend storage
$ oc patch configs.imageregistry.operator.openshift.io/cluster --type merge --patch '{"spec":{"managementState": "Managed","storage":{"managementState": "Unmanaged","pvc":{"claim": "nfs-claim"}}}}'
Note: The server address is the mount address of the created NAS instance.
Step 2: Run the following command to check the image registry configuration:
oc get clusteroperator image-registry
Step 1: Use an SSH client to log on to the installer instance and verify that the control plane machines are initialized.
Check whether all components of the cluster are online:
$ oc get clusteroperators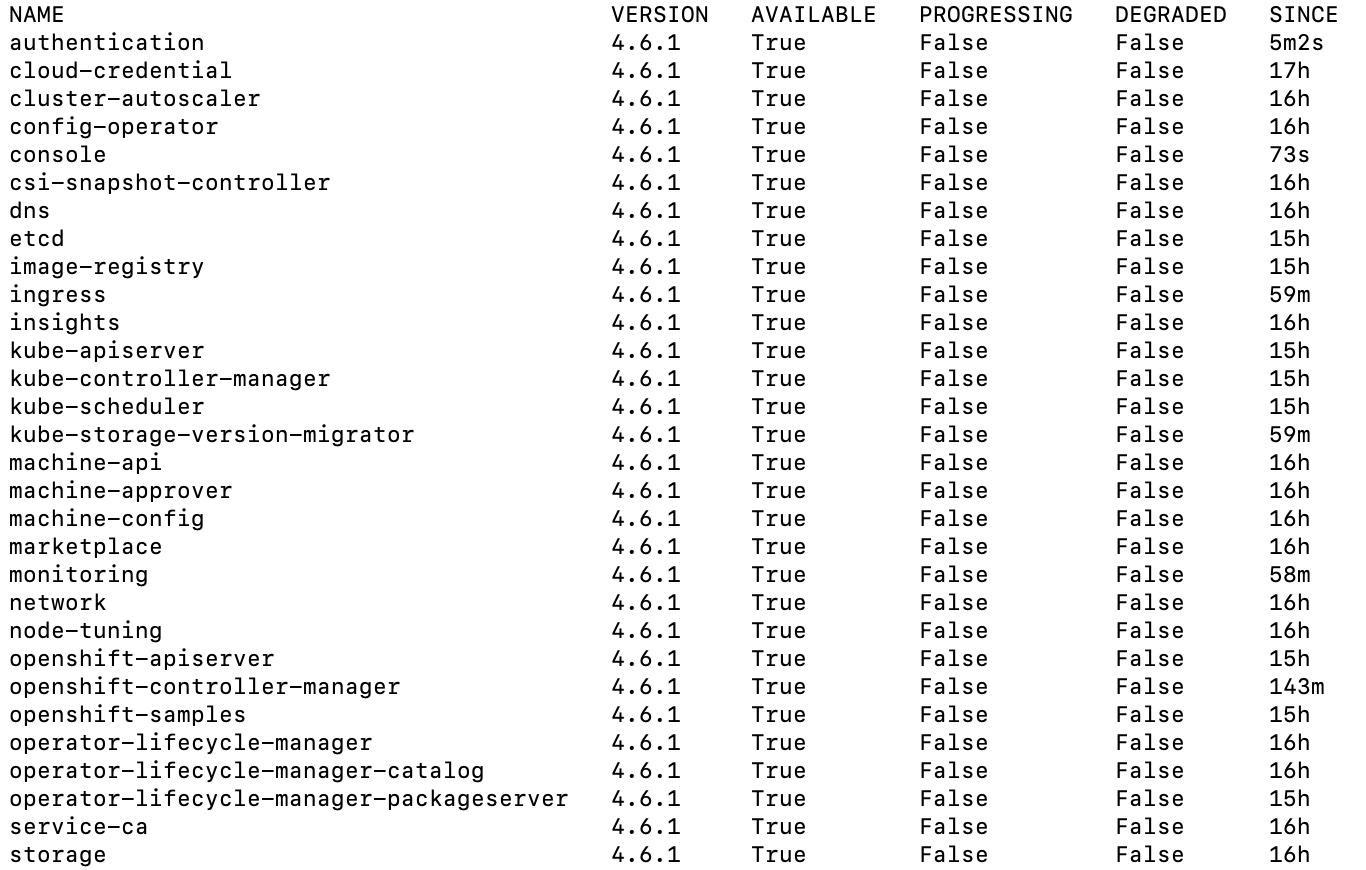
Step 2: If the values in the AVAILABLE column of all operators is True, the cluster is installed. Obtain the logon address of the web console and the username and password of the OCP cluster.
./openshift-install --dir=installation_dir wait-for install-complete
INFO Waiting up to 40m0s for the cluster at https://api.alicloud.os.com:6443 to initialize...
INFO Waiting up to 10m0s for the openshift-console route to be created...
INFO Install complete!
INFO To access the cluster as the system:admin user when using 'oc', run 'export KUBECONFIG=/mnt/installation_dir/auth/kubeconfig'
INFO Access the OpenShift web-console here: https://console-openshift-console.apps.alicloud.os.com
INFO Login to the console with user: "kubeadmin", and password: "xPf47-Niwiv-B8IG8-rakVP"
INFO Time elapsed: 0s
Note: Properly keep the logon address of the web console and the username and password of the OCP cluster for future access purposes.
After the OCP cluster is installed, you can obtain the logon address of the web console, where you can check the cluster status and create applications. To access the web console, you can install a web browser on the installer instance or create a Windows jump server in the VPC where the OCP cluster resides.
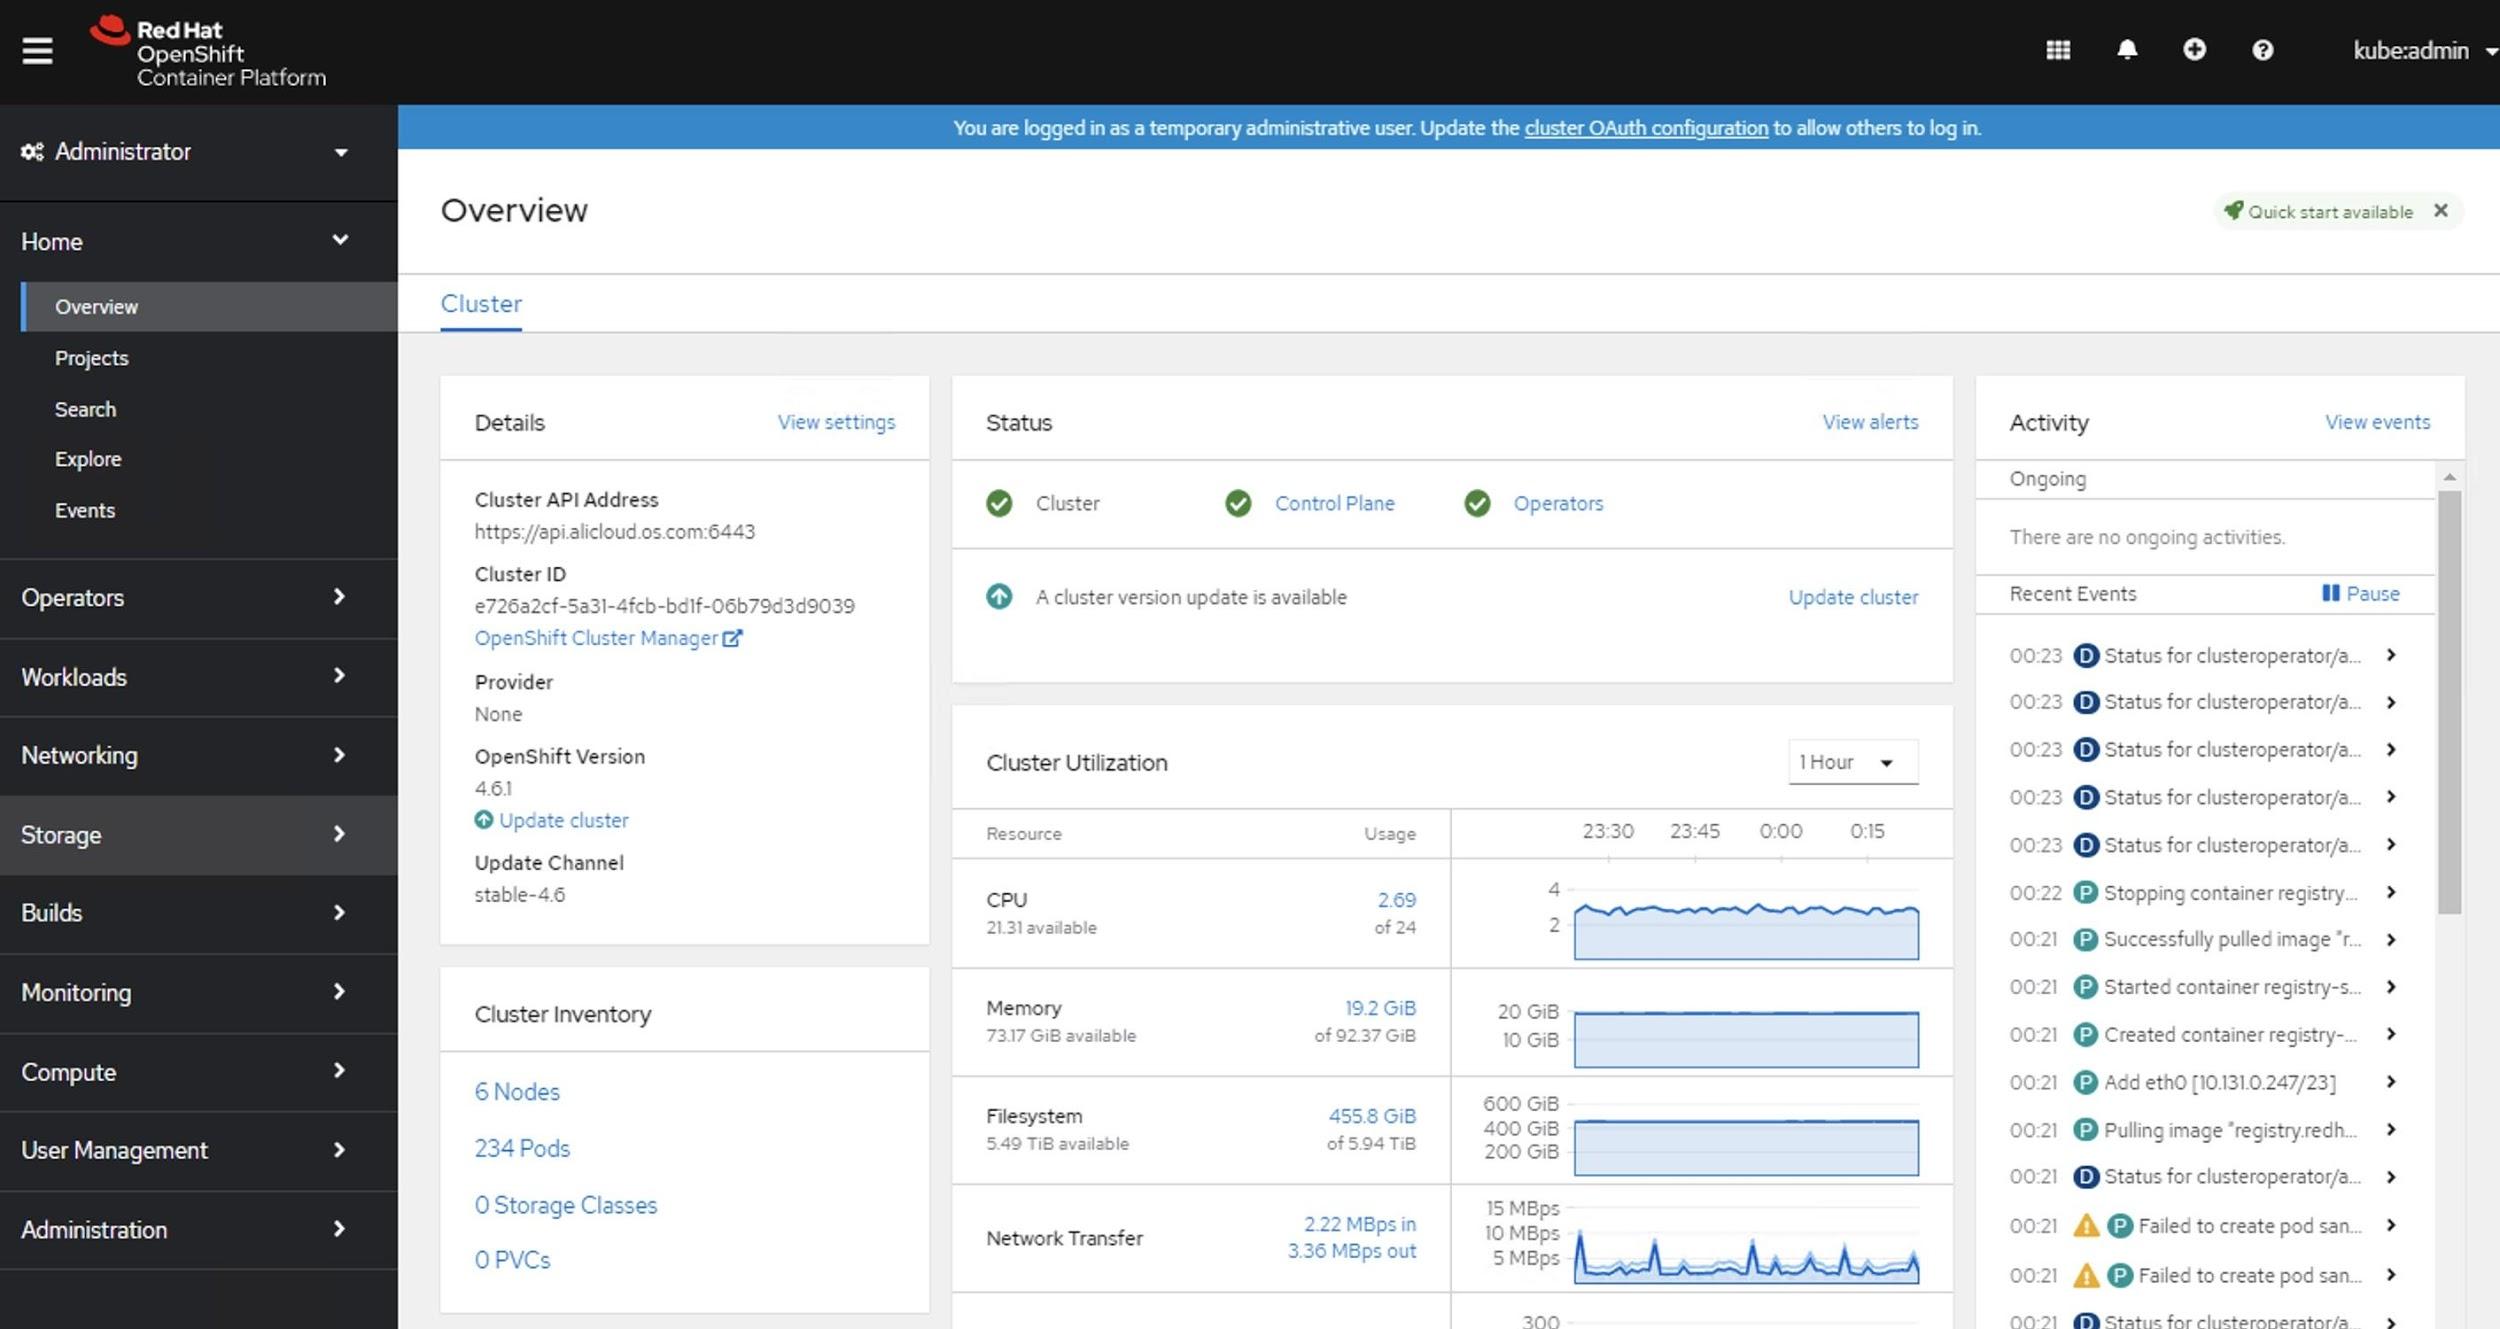
Step 1: Log on to the jump server, open a browser, and enter the logon address of the web console that you obtained: https://console-openshift-console.apps.alicloud.os.com . Then, enter the username kubeadmin and password that you obtained. After you log on to the web console, information about the cluster appears, as shown in the following figure.
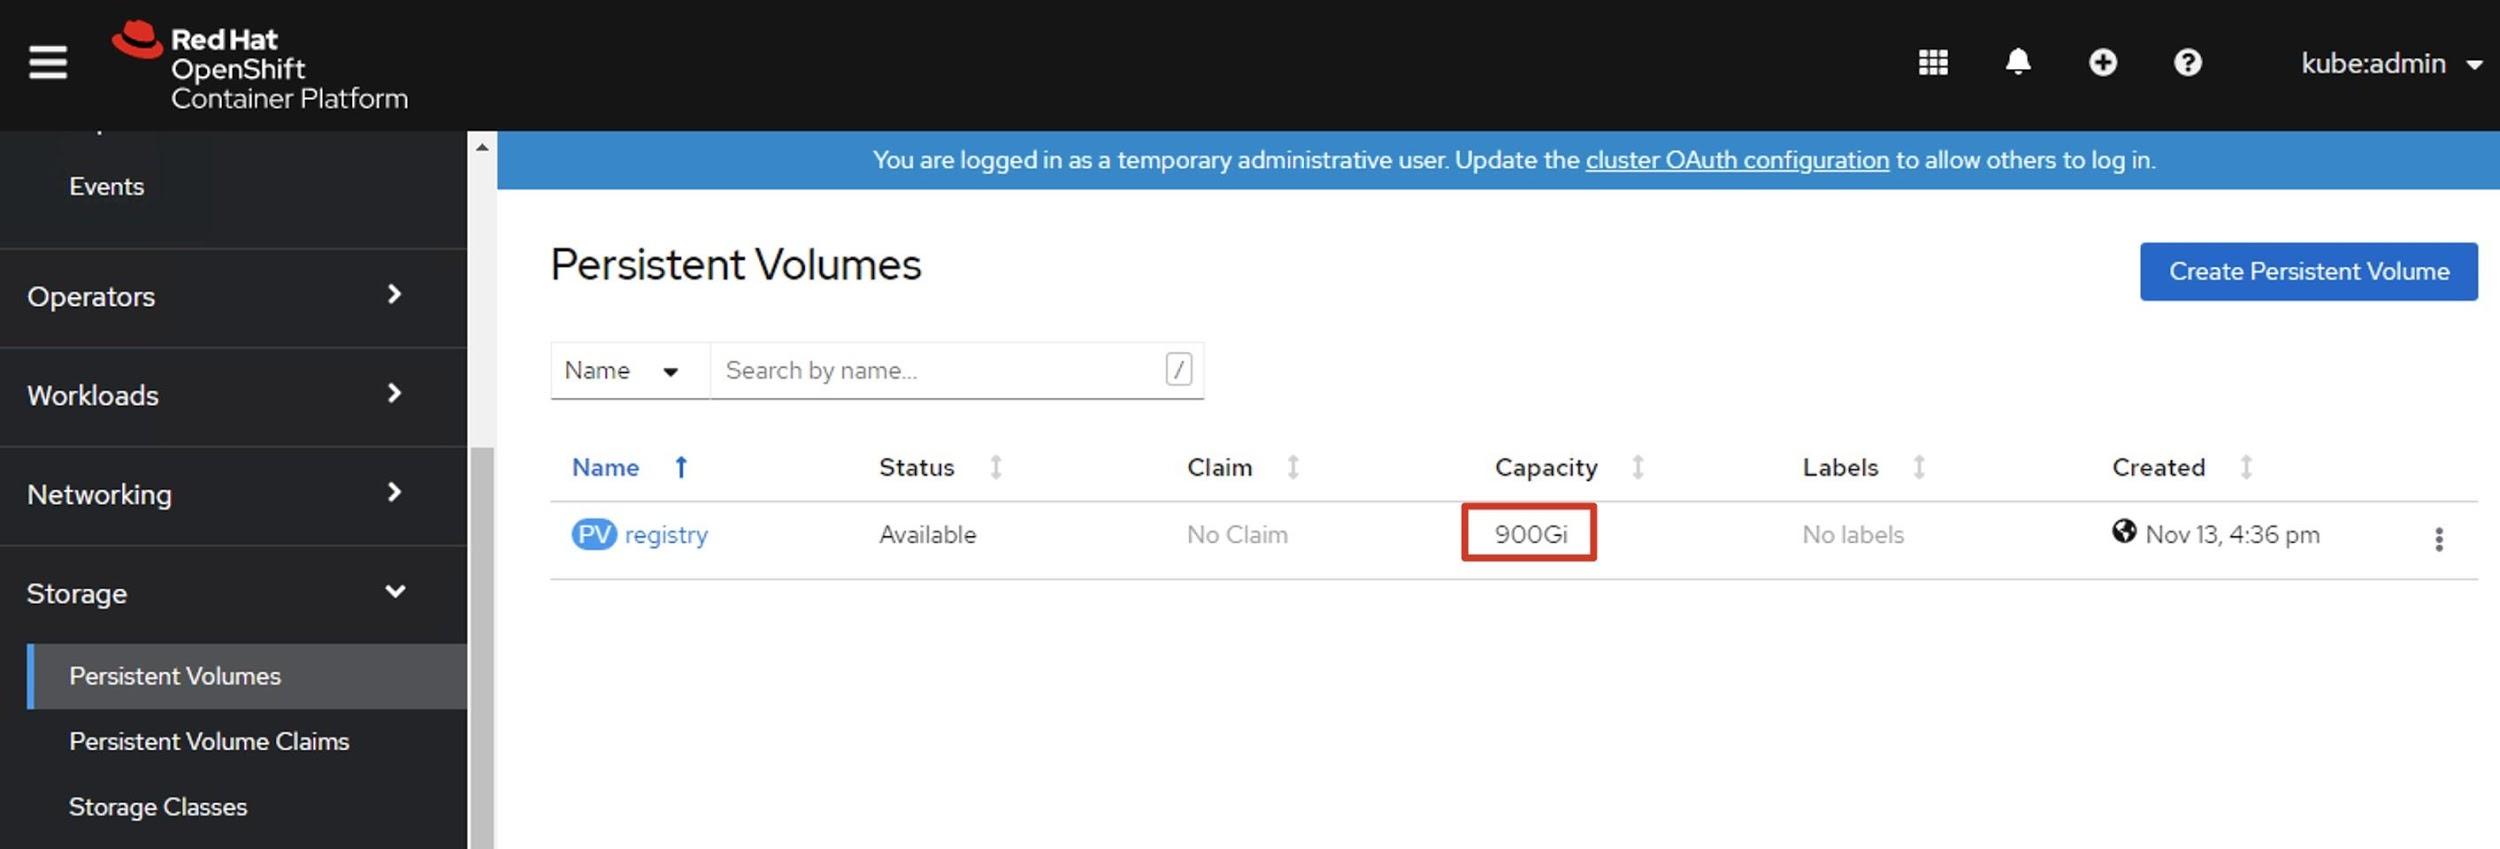
Step 2: View the attributes of the cluster in the administrator view. The following figure shows the attributes of the NAS instance that you created.
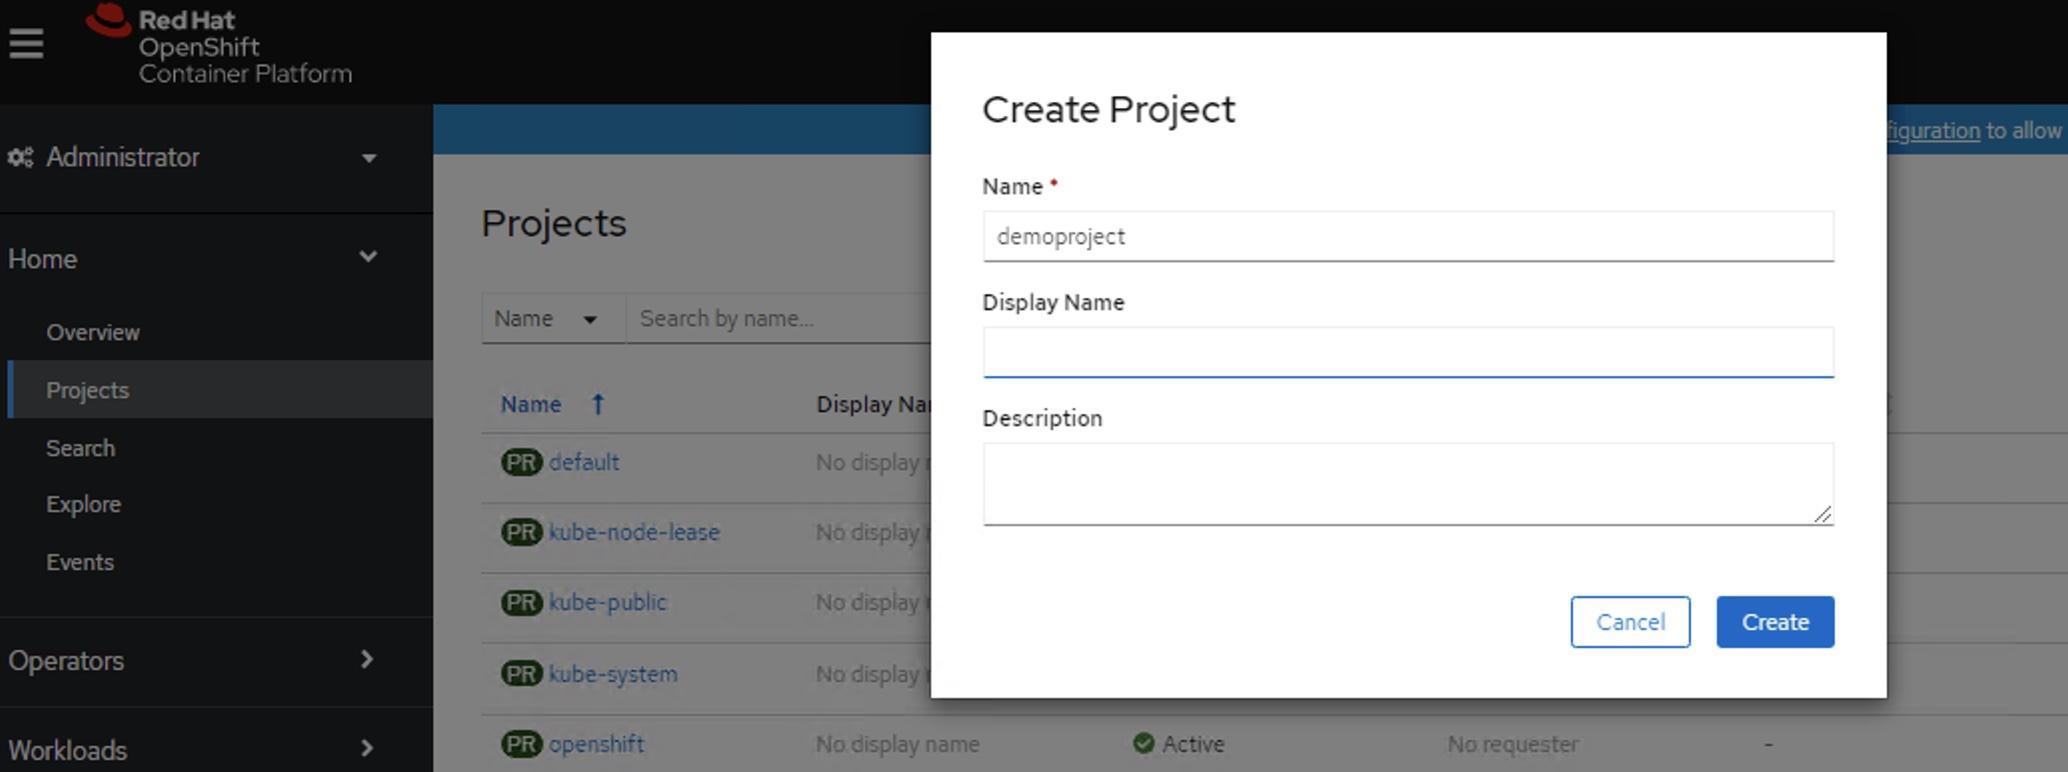
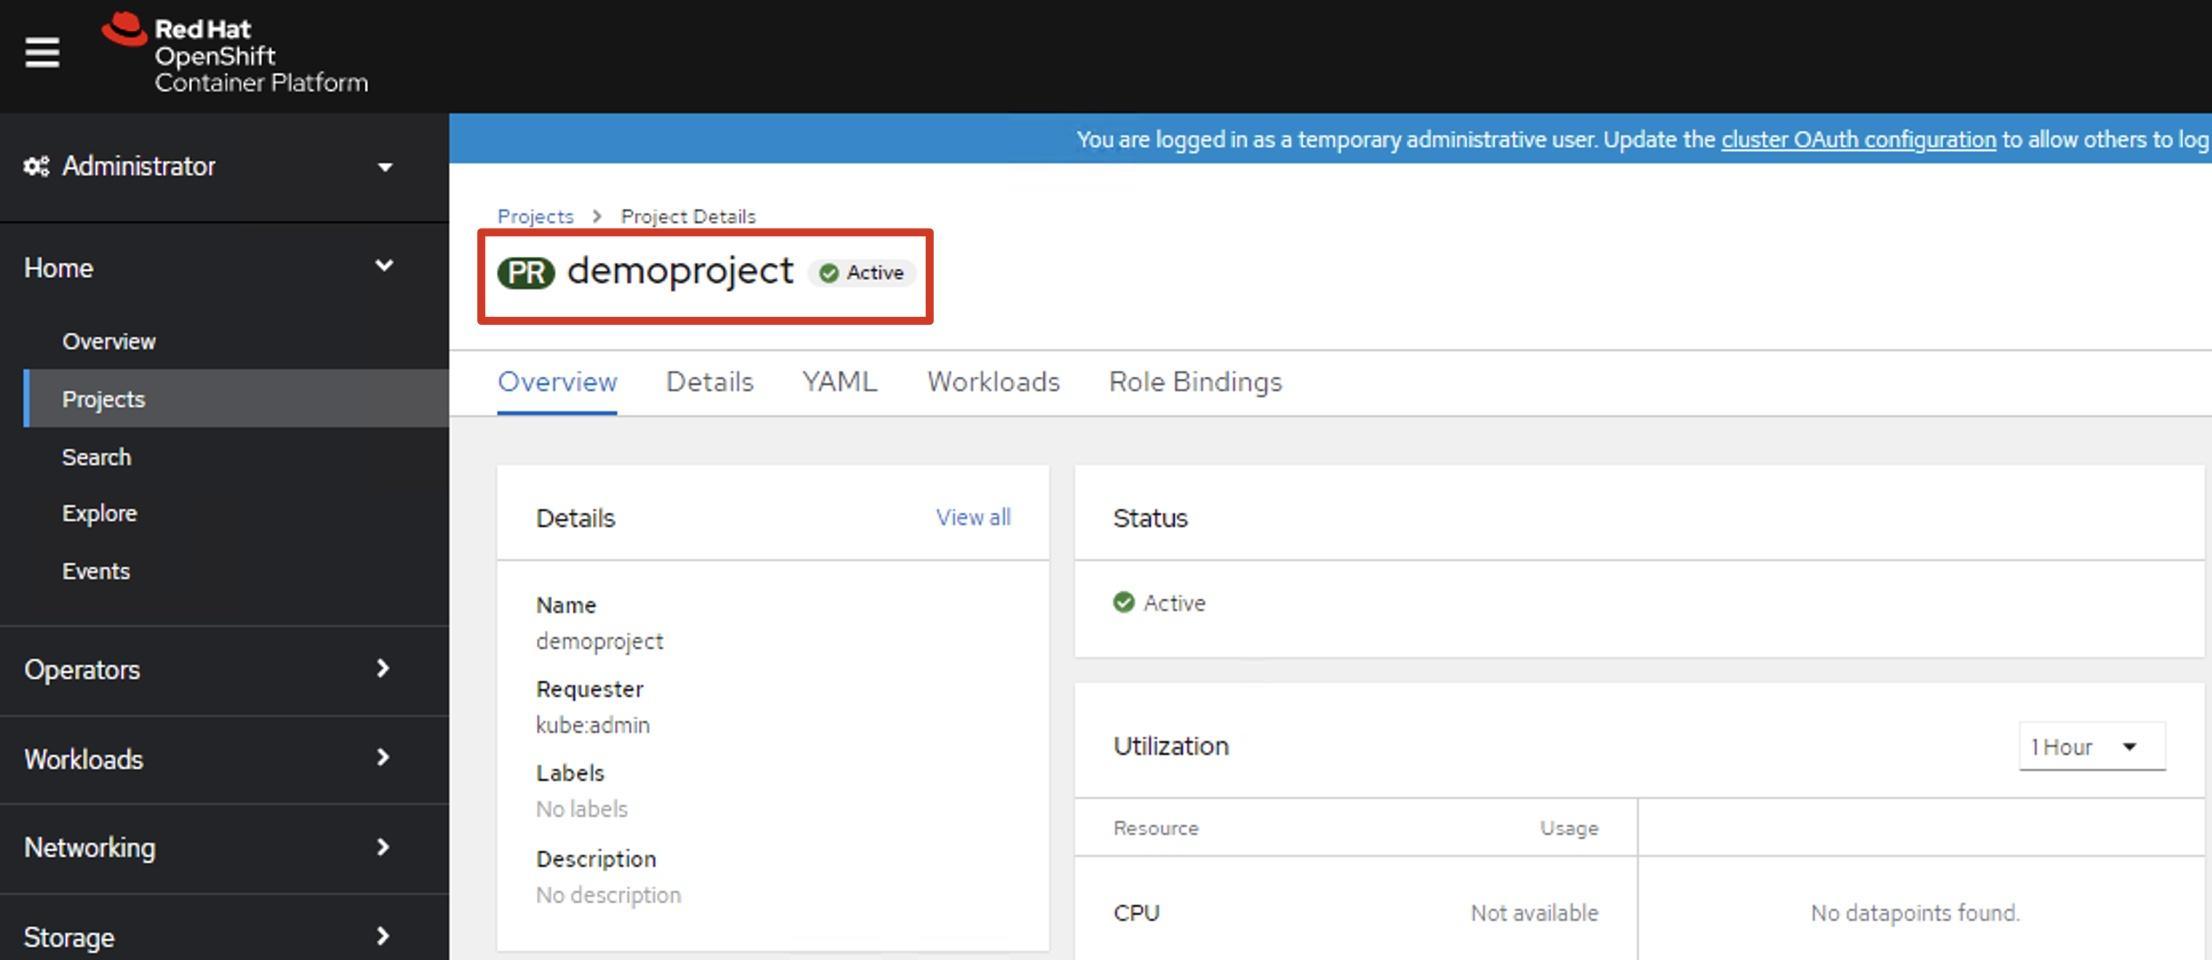
Step 1: In the administrator view, choose Home > Projects on the left-side of the navigation pane, and then click Create Project. Set the Name parameter to demoproject.
Step 2: Switch to the developer view. On the left-side of the navigation pane, click +Add. Switch to the demoproject project that you created and click From Catalog.
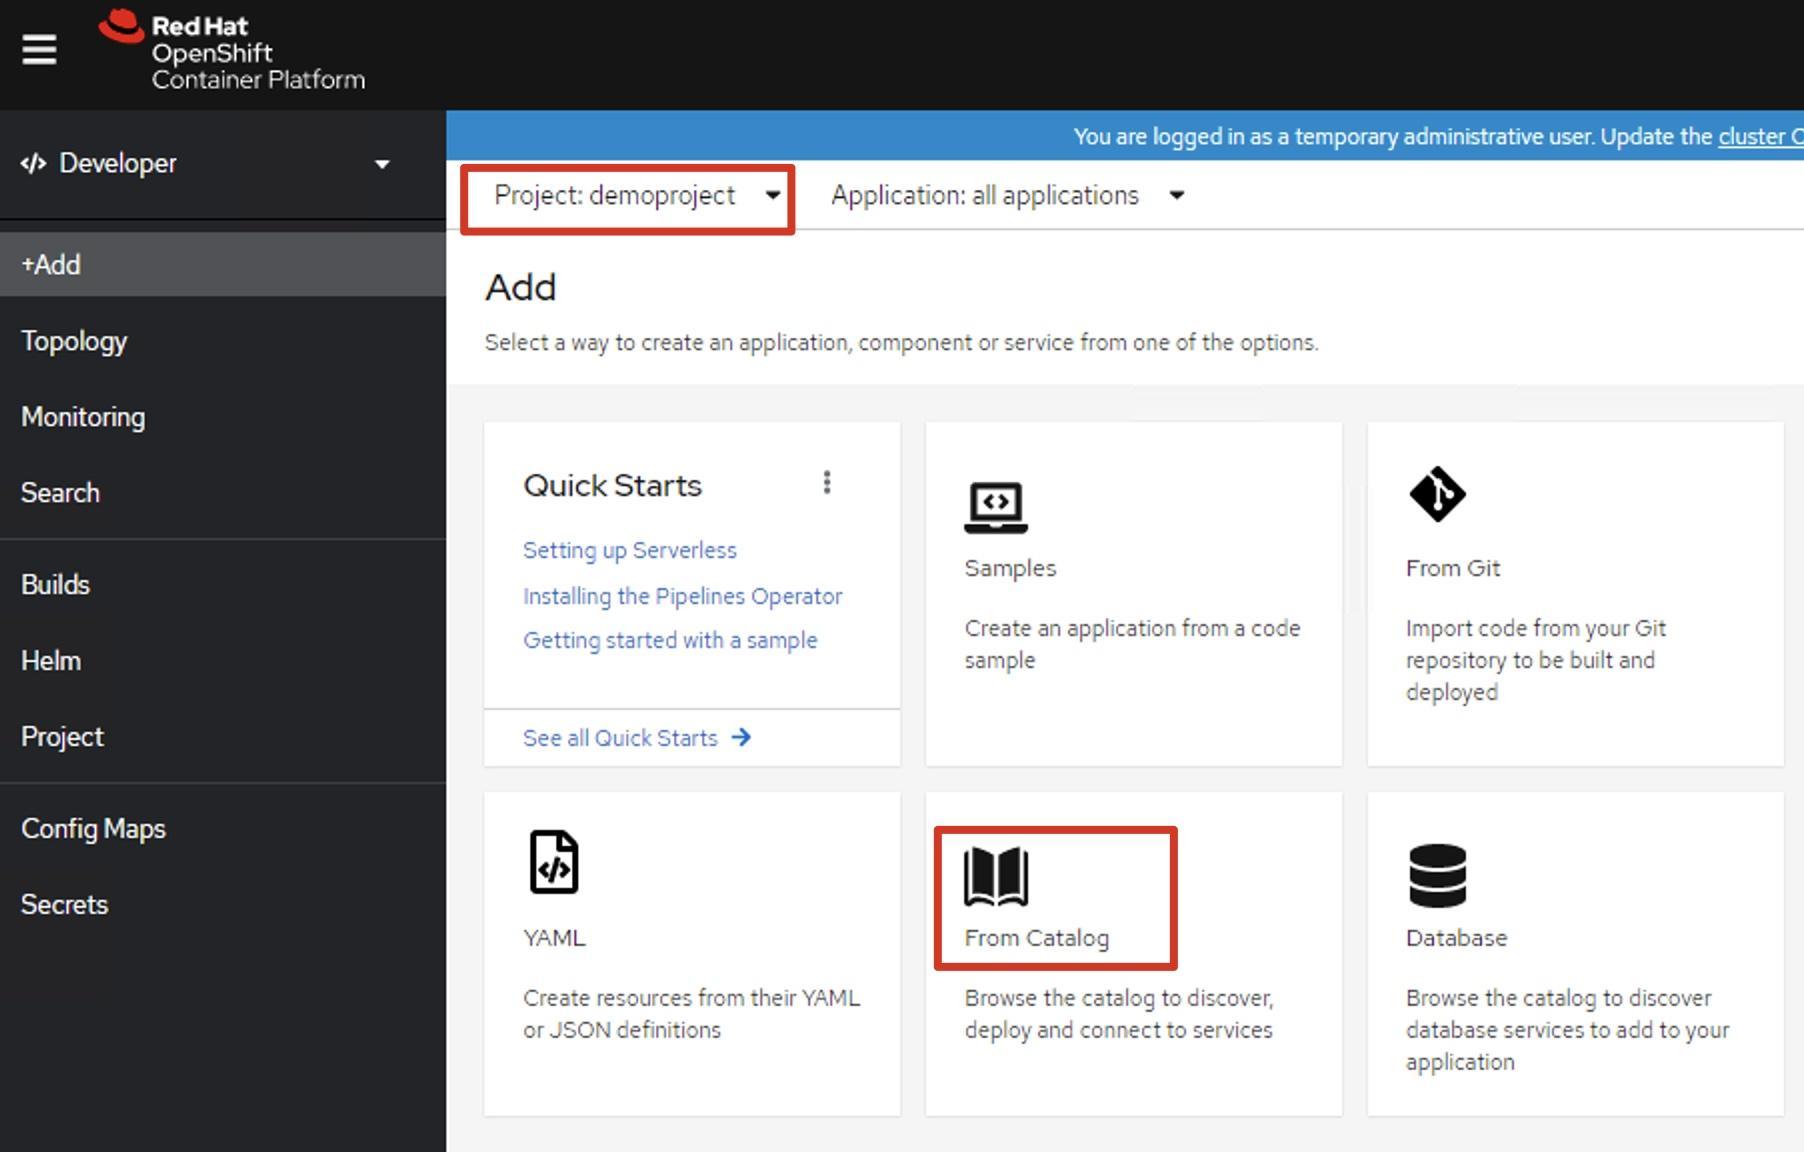
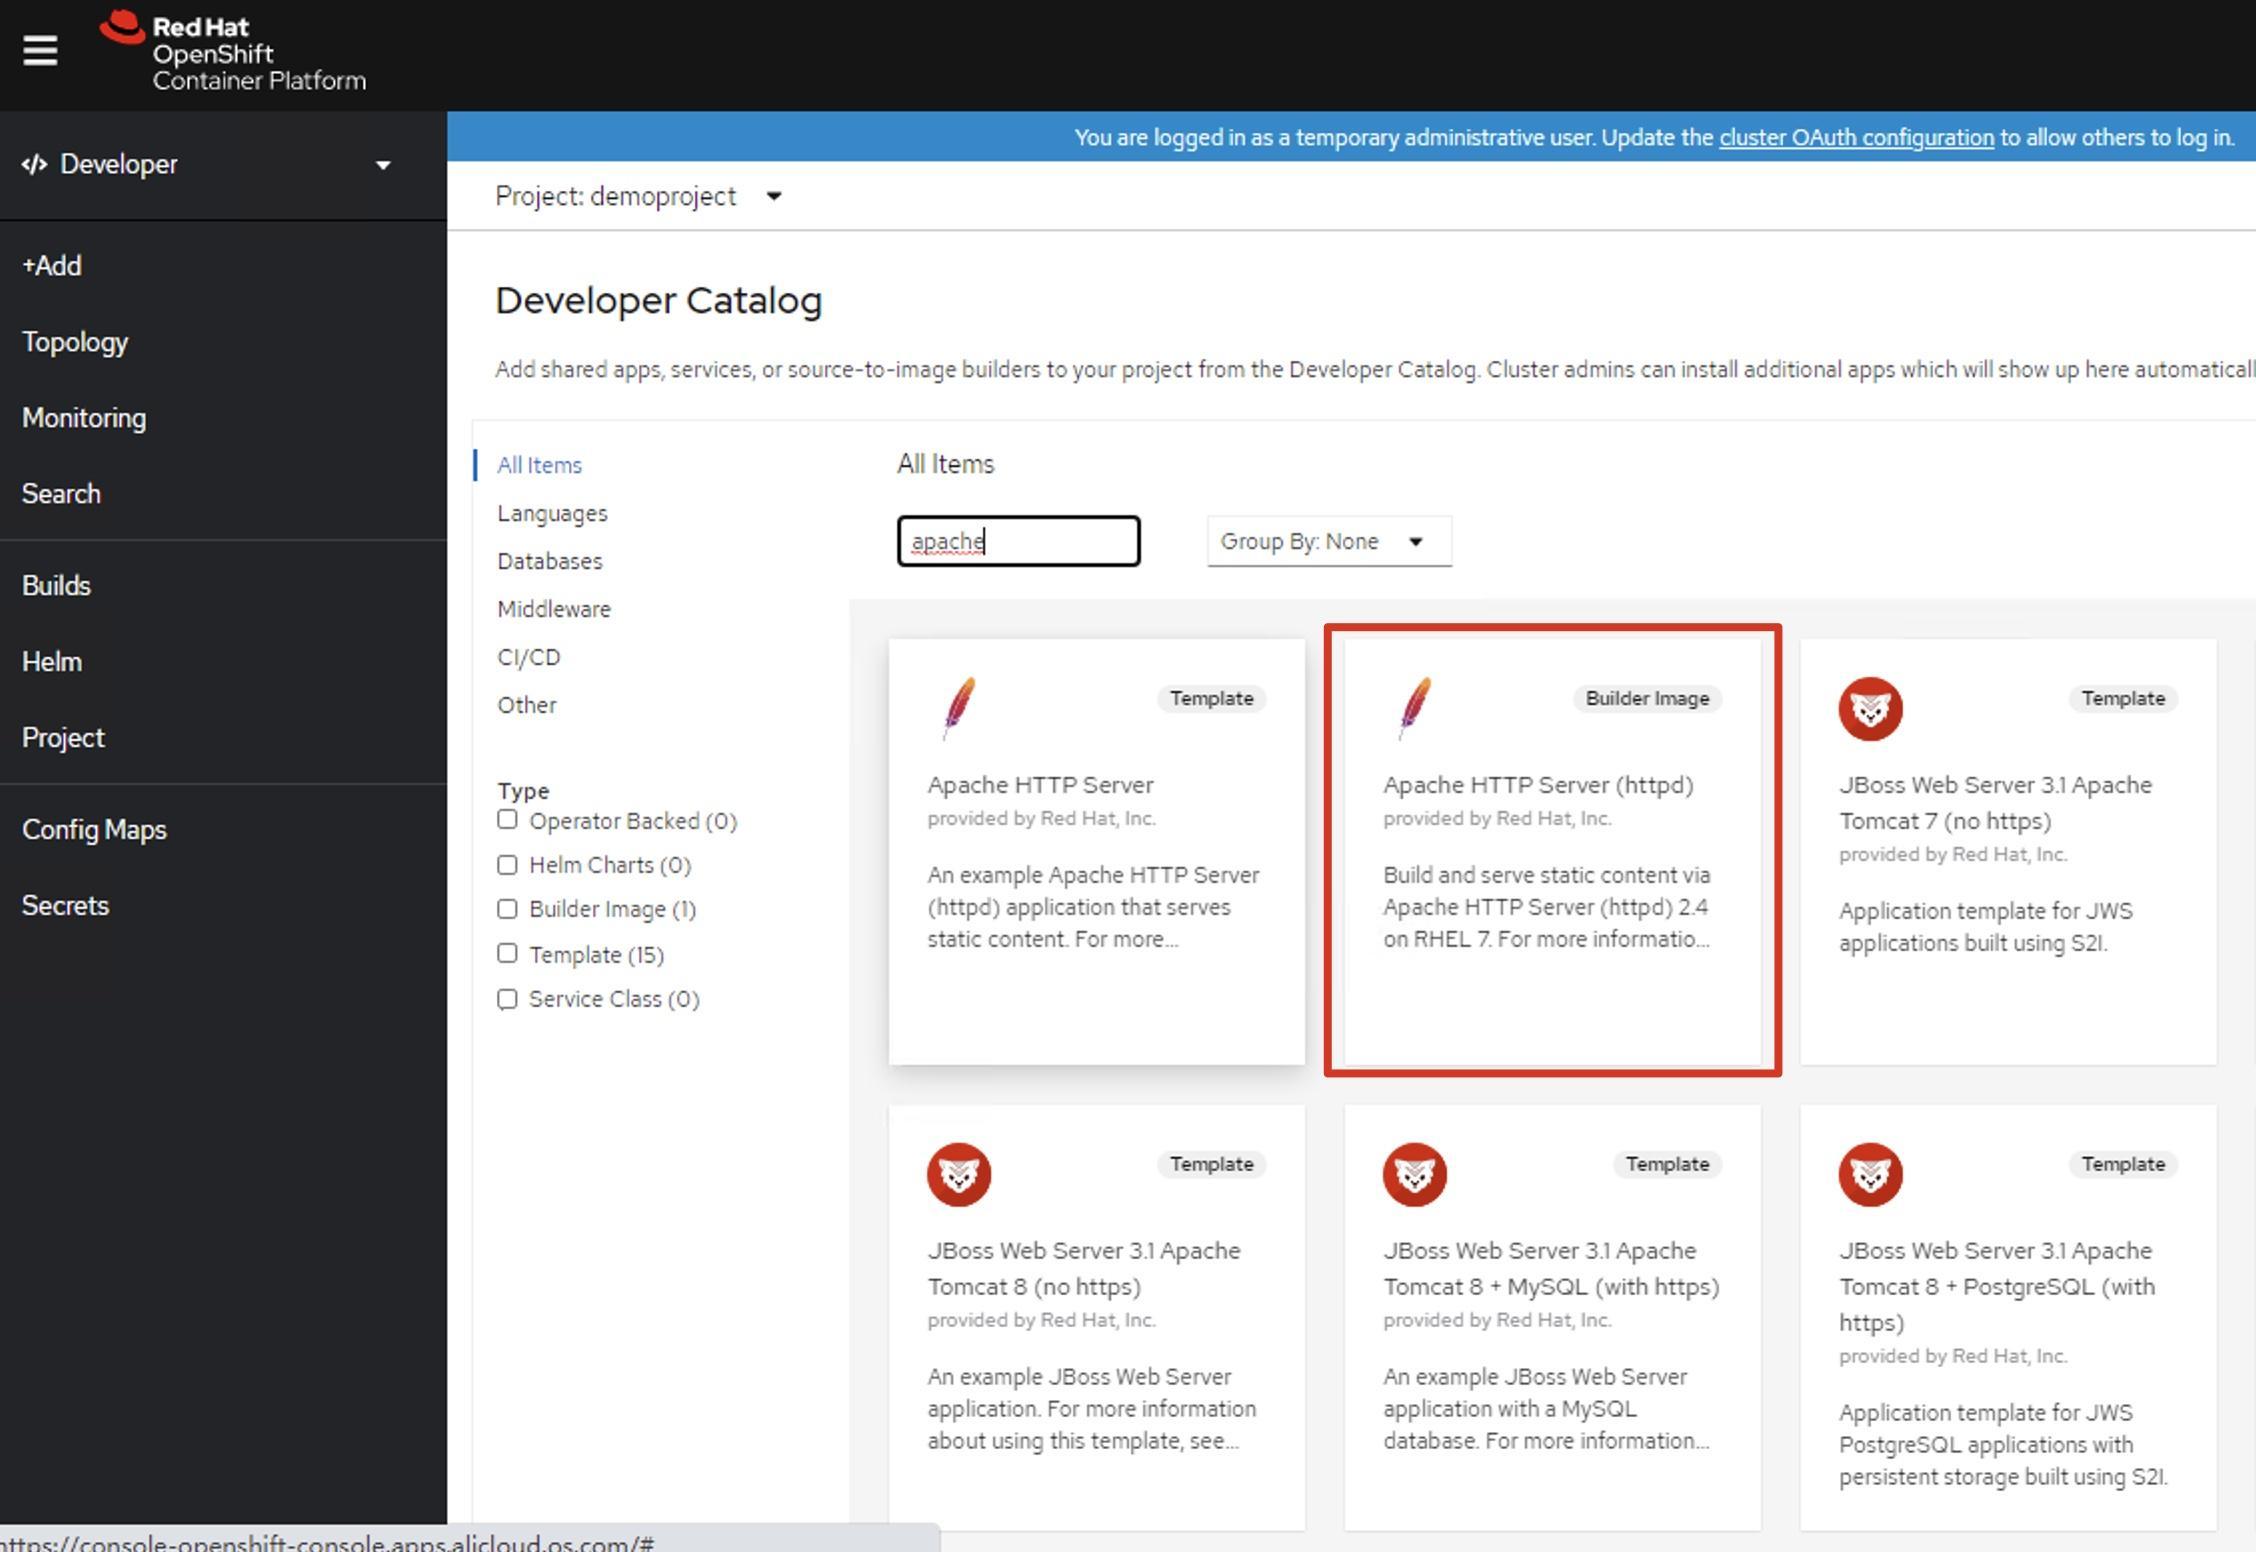
Step 3: In the application list, click Apache HTTP Server(httpd), and then click Create Application.
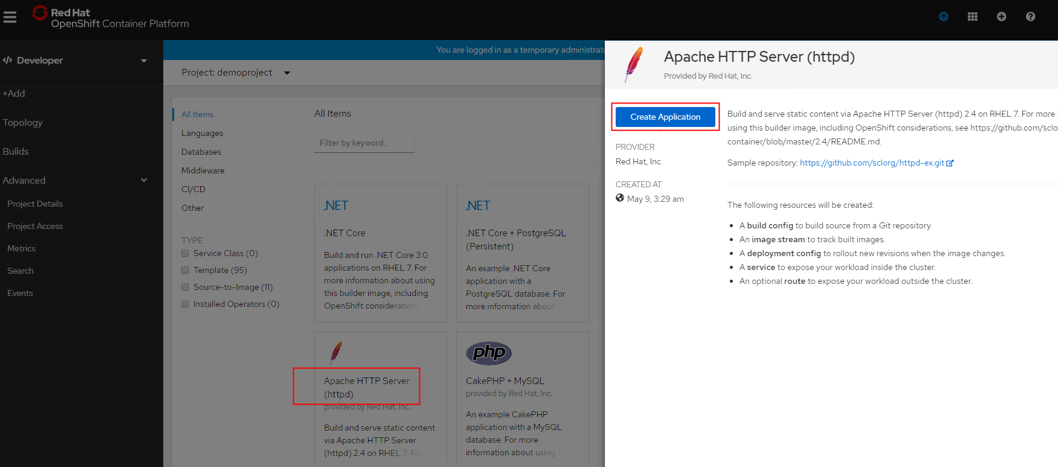
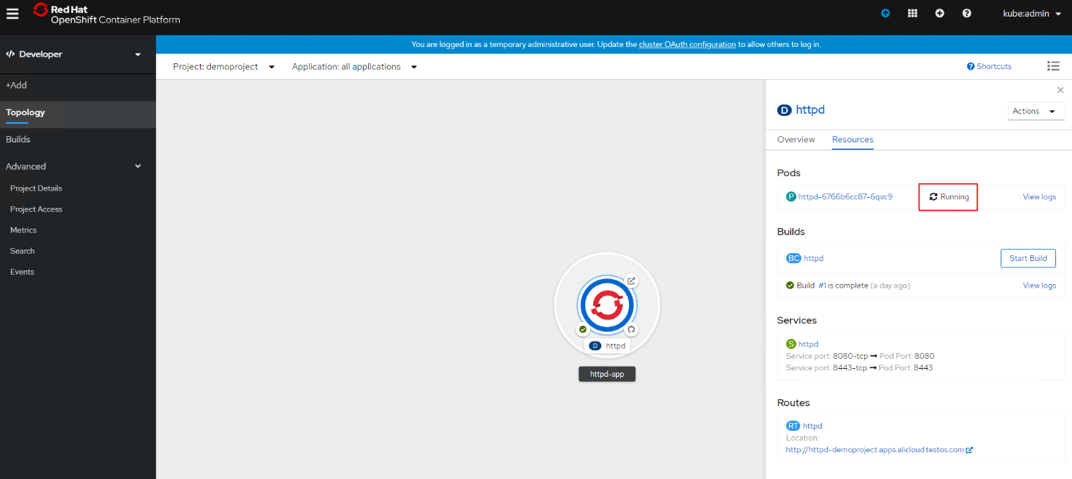
Step 4: Wait 1 to 3 minutes before the deployment is complete. Then, verify that the application is deployed.
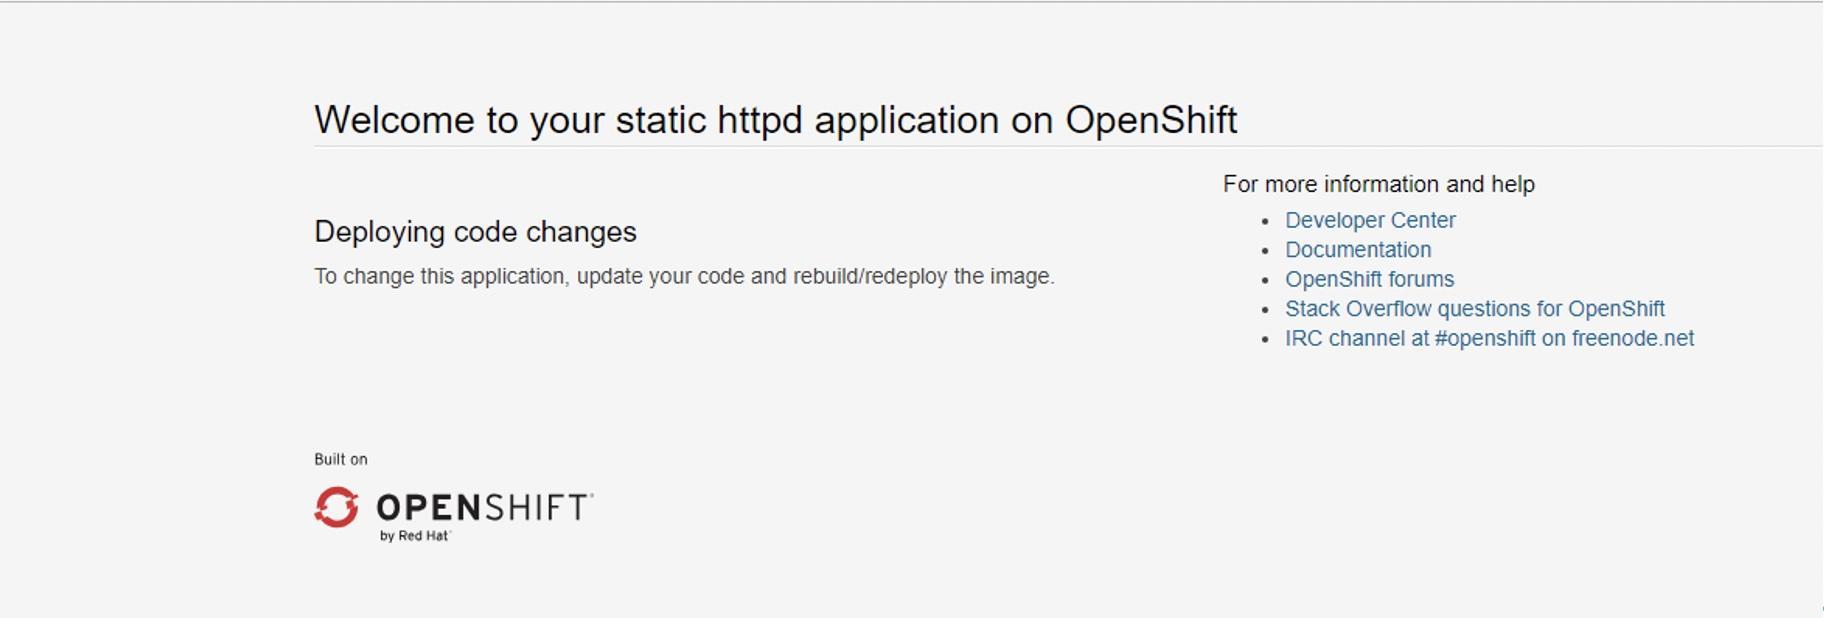
Step 5: Open a browser to access the application page.
Digital Marketing: A Cost-Saving Way to Communicate with Consumers

2,599 posts | 769 followers
FollowAlibaba Clouder - April 19, 2021
Alibaba Clouder - April 21, 2021
Alibaba Clouder - May 13, 2021
Alibaba Clouder - April 20, 2021
Alibaba Cloud Community - April 8, 2022
Marketplace - October 13, 2020

2,599 posts | 769 followers
Follow Red Hat OpenShift on Alibaba Cloud Solution
Build, deploy, and manage applications with high availability, reliability, and elasticity with Red Hat OpenShift on Alibaba Cloud quickly and easily
Learn More ECS(Elastic Compute Service)
Elastic and secure virtual cloud servers to cater all your cloud hosting needs.
Learn More Elastic High Performance Computing Solution
High Performance Computing (HPC) and AI technology helps scientific research institutions to perform viral gene sequencing, conduct new drug research and development, and shorten the research and development cycle.
Learn More Function Compute
Alibaba Cloud Function Compute is a fully-managed event-driven compute service. It allows you to focus on writing and uploading code without the need to manage infrastructure such as servers.
Learn MoreMore Posts by Alibaba Clouder
5126641300868682 January 15, 2022 at 10:10 pm
Hi,Your doc snippet about uploading the qcow2 images to OSS via ossutil is not relevant.The images size is more that 3GiB so it could not be transfered with the ossutil command you've mentioned.
5260192363475477 April 24, 2022 at 3:07 pm
I am the Author. For simple upload by ossutil, the size limitation of the single file is 5GiB, 3GiB should be OK. But anyway Alibaba Cloud is officially support by Openshift 4.10, making image is not yet necessary. Just access cloud.redhat.com and login to get the 4.10 binary and try automatic installation through Openshift IPI.