By Alex, Alibaba Cloud Community Blog author.
This tutorial explores how you can implement an object detection method that relies on deep neural networks on Alibaba Cloud. This kind of method employs the Single Shot MultiBox Detector (SSD) technique based on the paper by Wei, et. al published on Cornel State Library website. The SSD technique functions by discretizing bounding boxes in the output space to a "a set of default boxes with varying aspect ratios and scales" on the feature map location.
The SSD model's network generates scores for each object's presence in the default boxes while making predictions. Thereafter, the model makes adjustments to the respective boxes until the object shape matches. For handling objects of different sizes, the network uses multiple feature maps with different resolutions to come up with predictions of varying resolutions.
The SSD model is relatively simple. The model does not require proposal generation as it eliminates the need for object proposals. In effect, image or pixel resampling is the entire computation required for a single network. SSD is very easy to train and integrate for systems that require a detection component.
The previous tutorial in the series already discussed how to install MXNet and its dependencies. With this tutorial let's understand how to deploy and train an MXNet model using an open-source project.
The following are the essential requirements for this tutorial:
To get started with this model, get the latest Docker image using the command below.
docker pull daviddocker78/mxnet-ssd:gpu_0.12.0_cuda9Refer to the Docker section below for a more comprehensive description.
Alternatively, install supporting modules and then clone the SSD from GitHub. For this demonstration, begin by installing cv2, matplotlib, and numpy python modules. To implement this, install the modules using a pip or package manager as shown below.
sudo apt-get install python-opencv python-matplotlib python-numpyNext, clone the repository in GitHub using the following commands.
sudo apt-get install git
# cd where you would like to clone this repo
cd ~
mkdir mxnet-ssd
cd mxnet-ssd
git clone --recursive https://github.com/zhreshold/mxnet-ssd.git
# ensure that you clone this with --recursive
# if not done correctly or you are using downloaded repo, pull them all via:
# git submodule update --recursive šCinit
Previous tutorials in the series comprehensively explain how to install the MXNet tool on Alibaba Cloud instance running Ubuntu 16.04. Let's take a quick look at the following commands used for building MXNet.
# for Ubuntu/Debian OS
cp make/config.mk ./config.mk
# modify it if requiredThis tutorial uses a pre-trained model for the demonstration. Download the zip from ssd_resnet50_0712.zip by running the following commands.
cd ~
mkdir model
cd model/
wget https://github.com/zhreshold/mxnet-ssd/releases/download/v0.6/resnet50_ssd_512_voc0712_trainval.zip
Extract the zip in the directory and then run the commands below.
python demo.py --gpu 0
#Some pretrained models to work with:
python demo.py --epoch 0 --images ./data/demo/dog.jpg --thresh 0.5
python demo.py --cpu --network resnet50 --data-shape 512
# Give the library some time to load as it may take up some time
For more details, refer to the instructions on python demo.py --help.
If you have successfully run the test pre-trained model, the system is all set for the next step. For training the model, let's understand how to use a Pascal VOC dataset. Although it is possible to use other datasets as well by adding a subclass in the Imdb class in dataset/imdb.py class. The example below has more information about the dataset/pascal_voc.py method.
Note: Since CPU training is exceedingly slow, make sure to enable Compute Unified Device Architecture (CUDA) for training the model. While using CUDNN is optional, we recommend using it.
Refer to this page to download a pre-trained VGG16_reduced model as shown below.
wget https://github.com/zhreshold/mxnet-ssd/releases/download/v0.2-beta/vgg16_reduced.zipAccess the model/directory and unzip the param and .json files.
Now, run the following command to create a directory for the datasets.
cd~
mkdir data/VOCdevkit
mkdir VOCdevkit
Next, refer to the commands below to download the Pascal VOC dataset for training.
cd data/VOCdevkit
wget http://host.robots.ox.ac.uk/pascal/VOC/voc2012/VOCtrainval_11-May-2012.tar
wget http://host.robots.ox.ac.uk/pascal/VOC/voc2007/VOCtrainval_06-Nov-2007.tar
wget http://host.robots.ox.ac.uk/pascal/VOC/voc2007/VOCtest_06-Nov-2007.tar
Run the following commands to extract the data.
tar -xvf VOCtrainval_11-May-2012.tar
tar -xvf VOCtrainval_06-Nov-2007.tar
tar -xvf VOCtest_06-Nov-2007.tar
Make sure to use the trainval set in the VOC2007/2012. It is recommended to have a VOCdevkit folder to store the directories for VOC2007 and VOC2012.
tar -xvf VOCtest_06-Nov-2007.tarSubsequently, link the VOCdevkit folder and data/VOCdevkit folder by default.
ln -s /home/*user/VOCdevkit /home/*user/data/VOCdevkitUse a hard link instead of a copy to save some disk space.
Additionally, improve the training rate by creating the binary file below.
cd /home/*user/mxnet-ssd
bash tools/prepare_pascal.sh
# or if you are using windows OS
python tools/prepare_dataset.py --dataset pascal --year 2007,2012 --set trainval --target ./data/train.lst
python tools/prepare_dataset.py --dataset pascal --year 2007 --set test --target ./data/val.lst --shuffle False
Now the system is all set to start training the model.
python train.pyIn all the instances, the created model uses batch-size=32 and learning_rate=0.004. Change these parameters to accommodate other configurations that you intend to use. There are other training parameters available on train.py --help. For instance, use the following option while working with four GPUs.
# do note that there is yet a perfect training method for training on several GPUs simultaneously.
python train.py --gpus 0,1,2,3 --batch-size 128 --lr 0.001
MXNet is very efficient with memory usage. For example, using a batch-size 32 to train on a VGG16_reduced model only requires 4684 MB if CUDNN (conv1_x and conv2_x fixed) are not used.
Use the command below to evaluate the trained model.
cd /home/*user/mxnet-ssd
python evaluate.py --gpus 0,1 --batch-size 128 --epoch 0Conversion of a trained model to the deployment model eliminates its loss layers and attaches another one to merge results and non-maximum suppression. Note that there is no symbol while loading python.
cd /home/*user/mxnet-ssd
python deploy.py --num-class 20
# then you can run demo with new model without loading python symbol
python demo.py --prefix model/ssd_300_deploy --epoch 0 --deployFind Caffe converter at /path/to/mxnet-ssd/tools/caffe_converter as shown below. The modified converter handles all custom layers in caffe-ssd.
cd /home/*user/mxnet-ssd/ tools/caffe_converter
make
python convert_model.py deploy.prototxt name_of_pretrained_caffe_model.caffemodel ssd_converted
# you will use this model in deploy mode without loading from python symbol
python demo.py --prefix ssd_converted --epoch 1 --deploy
While the conversion does not always work, in this case, it should work without trouble.
This tutorial uses a new interface for composing models. It is significant to note that older models have inconsistencies with names of weights. However, it is still possible to load older models on the new interface by renaming their symbols to legacy_xxx.py and using python train/demo.py --network legacy_xxx to call them.
Consider the example below.
python demo.py --network 'legacy_vgg16_ssd_300.py' --prefix model/ssd_300 --epoch 0To work with Docker, install docker and get the nvidia-docker plugin that runs on Nvidia GPUs. Next, get the prepaid MXNet images by running the command below.
docker pull daviddocker78/mxnet-ssd:gpu_0.12.0_cuda9However, it is also possible to build Docker images by yourself using Dockerfiles.
Run Docker container instances using the following command.
nvidia-docker run -it --rm myImageName:tagFor more detailed information on how to work with Docker, follow this Guide.
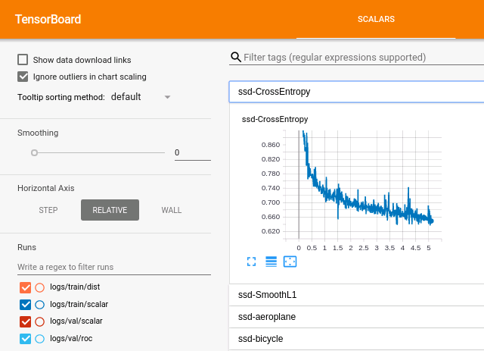
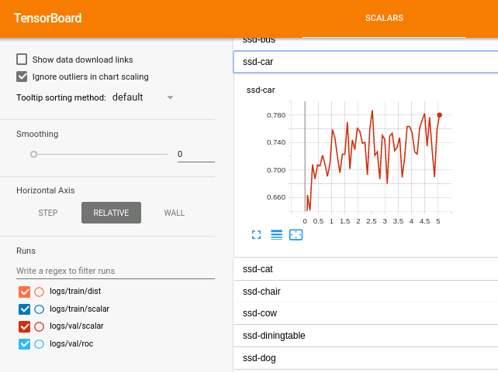
Tensorboard is compatible with MXNet as a visualisation tool. Docker prebuilt images already include it and it is recommended to use for Docker.
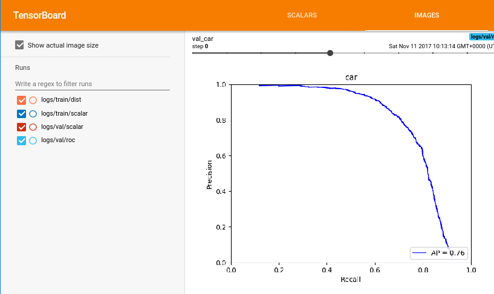
Specify the following parameters to save training loss graphs, classes validation APs, and ROC validation graphs to tensorboard.
python train.py --gpus 0,1,2,3 --batch-size 128 --lr 0.001 --tensorboard TrueAlso, specify the following to save the layer distribution.
python train.py --gpus 0,1,2,3 --batch-size 128 --lr 0.001 --tensorboard True --monitor 40Download the tensorflow docker-image for visualization with Docker using the commands below.
# download pre-built image from Dockerhub
docker pull tensorflow/tensorflow:1.4.0-devel-gpu
# run a container and open a port using '-p' flag.
# attach a volume from where you stored your logs, to a directory inside the container
nvidia-docker run -it --rm -p 0.0.0.0:6006:6006 -v /my/full/experiment/path:/res tensorflow/tensorflow:1.4.0-devel-gpu
cd /res
tensorboard --logdir=.
Note: It is possible to launch TensorBoard without Docker by running the last command. It helps to load TensorEvents for the experiments. Access TensorBoard on the browser from '0.0.0.0:6006'.
The following snapshots show some visualization examples.
Source: GitHub
Source: GitHub
Source: GitHub
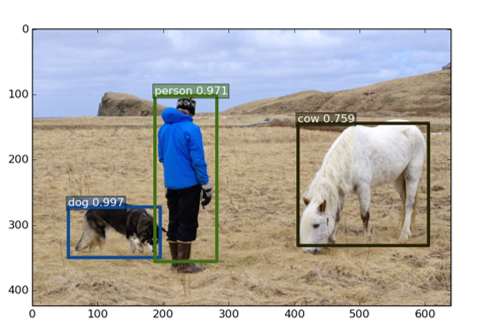
Refer to the following demo result snapshots.
Source: GitHub
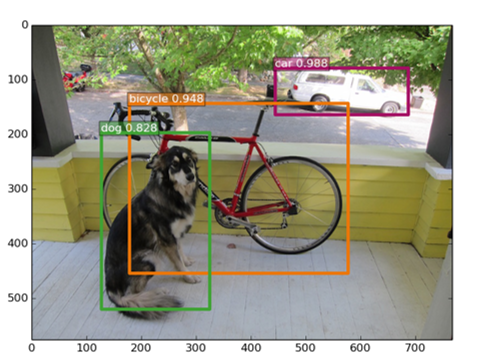
Source: GitHub
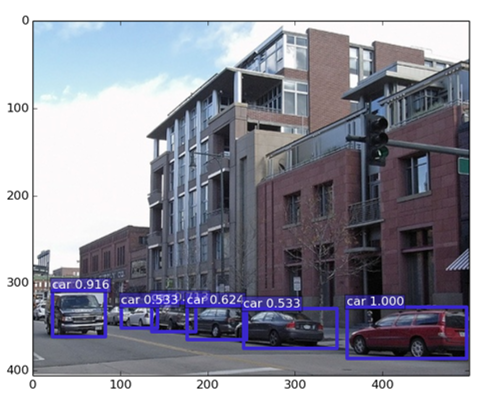
Source: GitHub
The SSD approach uses shallow layers and is not very suitable for neural network prediction due to inadequate high-level features. Thus, it's not dependable for very small objects.
Furthermore, there is a need for a large dataset for training, thereby necessitating a pre-training using Pascal VOC, COCO and Open Images datasets. Overall, it is actually quite powerful in spite of some implementation technicalities.
This tutorial demonstrates the successful deployment and training of an MXNet model. It is crucial to note that the Git repository is synchronized with the official MXNet backend to allow popular methods. The GitHub repository supports MXNet 1.1.0 and 1.2.0. The sample supports multiple trained models through a simple method of composing networks for classification networks. Further, it allows running GPU workloads such as training on Alibaba Cloud with ease and flexibility.
Don't have an Alibaba Cloud account? Sign up for an account and try over 40 products for free worth up to $1300. Get Started with Alibaba Cloud to learn more.
Setting Up Continuous Integration on Alibaba Cloud with Drone
Alibaba F(x) Team - February 5, 2021
Data Geek - April 16, 2024
Alibaba F(x) Team - June 22, 2021
Alibaba Cloud Community - November 22, 2024
Data Geek - April 17, 2024
Alibaba Clouder - November 7, 2019
 Container Service for Kubernetes
Alibaba Cloud Container Service for Kubernetes is a fully managed cloud container management service that supports native Kubernetes and integrates with other Alibaba Cloud products.
Learn More ECS(Elastic Compute Service)
Elastic and secure virtual cloud servers to cater all your cloud hosting needs.
Learn More OSS(Object Storage Service)
An encrypted and secure cloud storage service which stores, processes and accesses massive amounts of data from anywhere in the world
Learn More ACK One
Provides a control plane to allow users to manage Kubernetes clusters that run based on different infrastructure resources
Learn MoreMore Posts by Alex