This tutorial introduces the ApsaraDB Stack, part of Alibaba Cloud's wider suite of database services products, that will free you from the administrative tasks often associated with managing your corporate data.
To use ApsaraDB, you'll need an Alibaba Cloud account. If you don't already have one, head to www.alibabacloud.com and sign up. You'll find a range of free trials and offers to help you try out the facilities.
Traditionally, databases have resided within instances of a database server such as SQL Server, MySQL, MongoDB and others.
Sometimes the database engine runs on the same server as the application whose data it stores. For example, a single Linux server might run Apache, PHP and MySQL.
As the application scales and more performance is required, moving the database to its own server is the obvious next step. Just set up a new Linux or Windows server, install the requisite database engine and migrate the data. Then it's just a case of changing some configuration files within the application code to point the application at the new database server.
As part of the world moved towards cloud computing infrastructure, new database server architecture arrived. Cloud providers such as Alibaba Cloud now offer database server instances as a service. No longer is there any need to run a dedicated Windows or Linux server purely to host a copy of MySQL or SQL Server. No longer do you need to patch your database server or manage its security.
Alibaba Cloud's database service is called ApsaraDB and it's currently available for SQL Server, MySQL, PostgreSQL, and Postgres Plus Advanced Server (PPAS), which is compatible with Oracle.
ApsaraDB instances are fast, cost-effective, easy to back up and very quick to scale when you need additional performance. They all run on SSD drives and you simply pay according to the amount of data you process. If you need more performance or storage, it can be arranged with just a few clicks on the management console. Pricing is based on a monthly subscription that starts from USD $29. Or if you prefer, a pay-as-you-go option starts from less than 3 cents ($0.29) per hour provided that your ApsaraDB instance is active (storage and Internet traffic are additional costs).
Just as with a cloud-based Linux or Windows server instance, ApsaraDB database instances include a comprehensive monitoring system that's built-in. You can keep a close eye on the performance of your hosted databases, in order to help you make decisions about whether additional resources might be required. You can set alarms and triggers so that you will automatically be notified if performance or disk space falls below specified thresholds.
With an ApsaraDB instance, there's no underlying operating system or virtual server for you to pay for, secure, patch or manage. You get to concentrate on managing just your database tables. Everything else is taken care of by Alibaba Cloud.
ApsaraDB includes security features such as real-time monitoring of network traffic, and automatic interception of SQL injection, brute force attacks and other types of database attacks. This is all built into each ApsaraDB instance and does not need to be configured or purchased separately, as would be the case if you hosted your databases on a conventional cloud server running Linux or Windows and a separate relational database management system (RDBMS).
This tutorial will show you how to migrate from a relational PostgreSQL to ApsaraDB for relational PostgreSQL Database.
Further information, as well as documentation about how to use other database technologies apart from PostgreSQL, can be found in the Database Services section of the Products menu on the Alibaba Cloud website.
For the purposes of this tutorial, we will look at the ApsaraDB for RDS product and demonstrate how you can migrate from a relational PostgreSQL database to the ApsaraDB for relational PostgreSQL database.
We will assume that you have already created an RDS instance database. However, if you need to do this, you can follow this online tutorial first: https://www.alibabacloud.com/help/doc-detail/26151.htm
Before you can use the ApsaraDB RDS, a PostgreSQL database and an account must be created for the RDS instance.
For the purposes of this tutorial, we will assume that you are using the pgAdmin 4 as your PostgreSQL client.
It is important to note that in order to migrate your relational PostgreSQL database to an ApsaraDB for RDS PostgreSQL database, you must first create a server on your PostgreSQL client to connect to your RDS instance.
You can achieve this by following these steps:
1. Log on to the ApsaraDB RDS console at rds.console.aliyun.com.
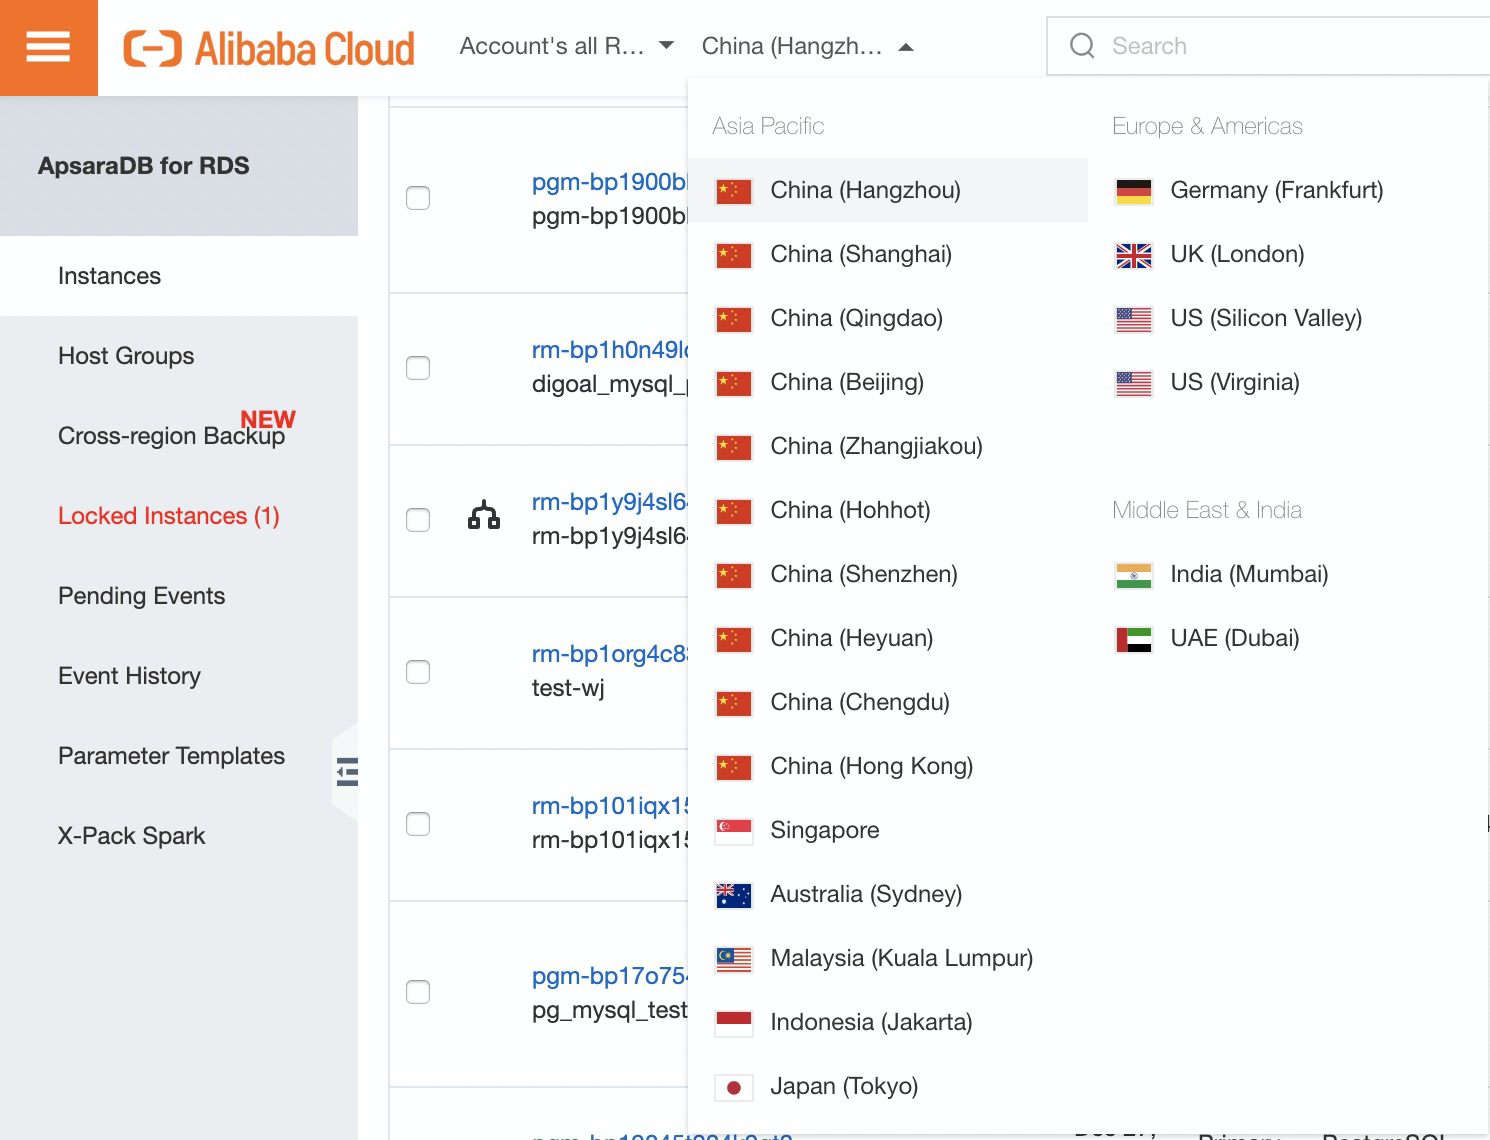
2. Select the region where your target instance is located using the top dropdown menu on the console.
3. 
4. Click the ID of your target instance.
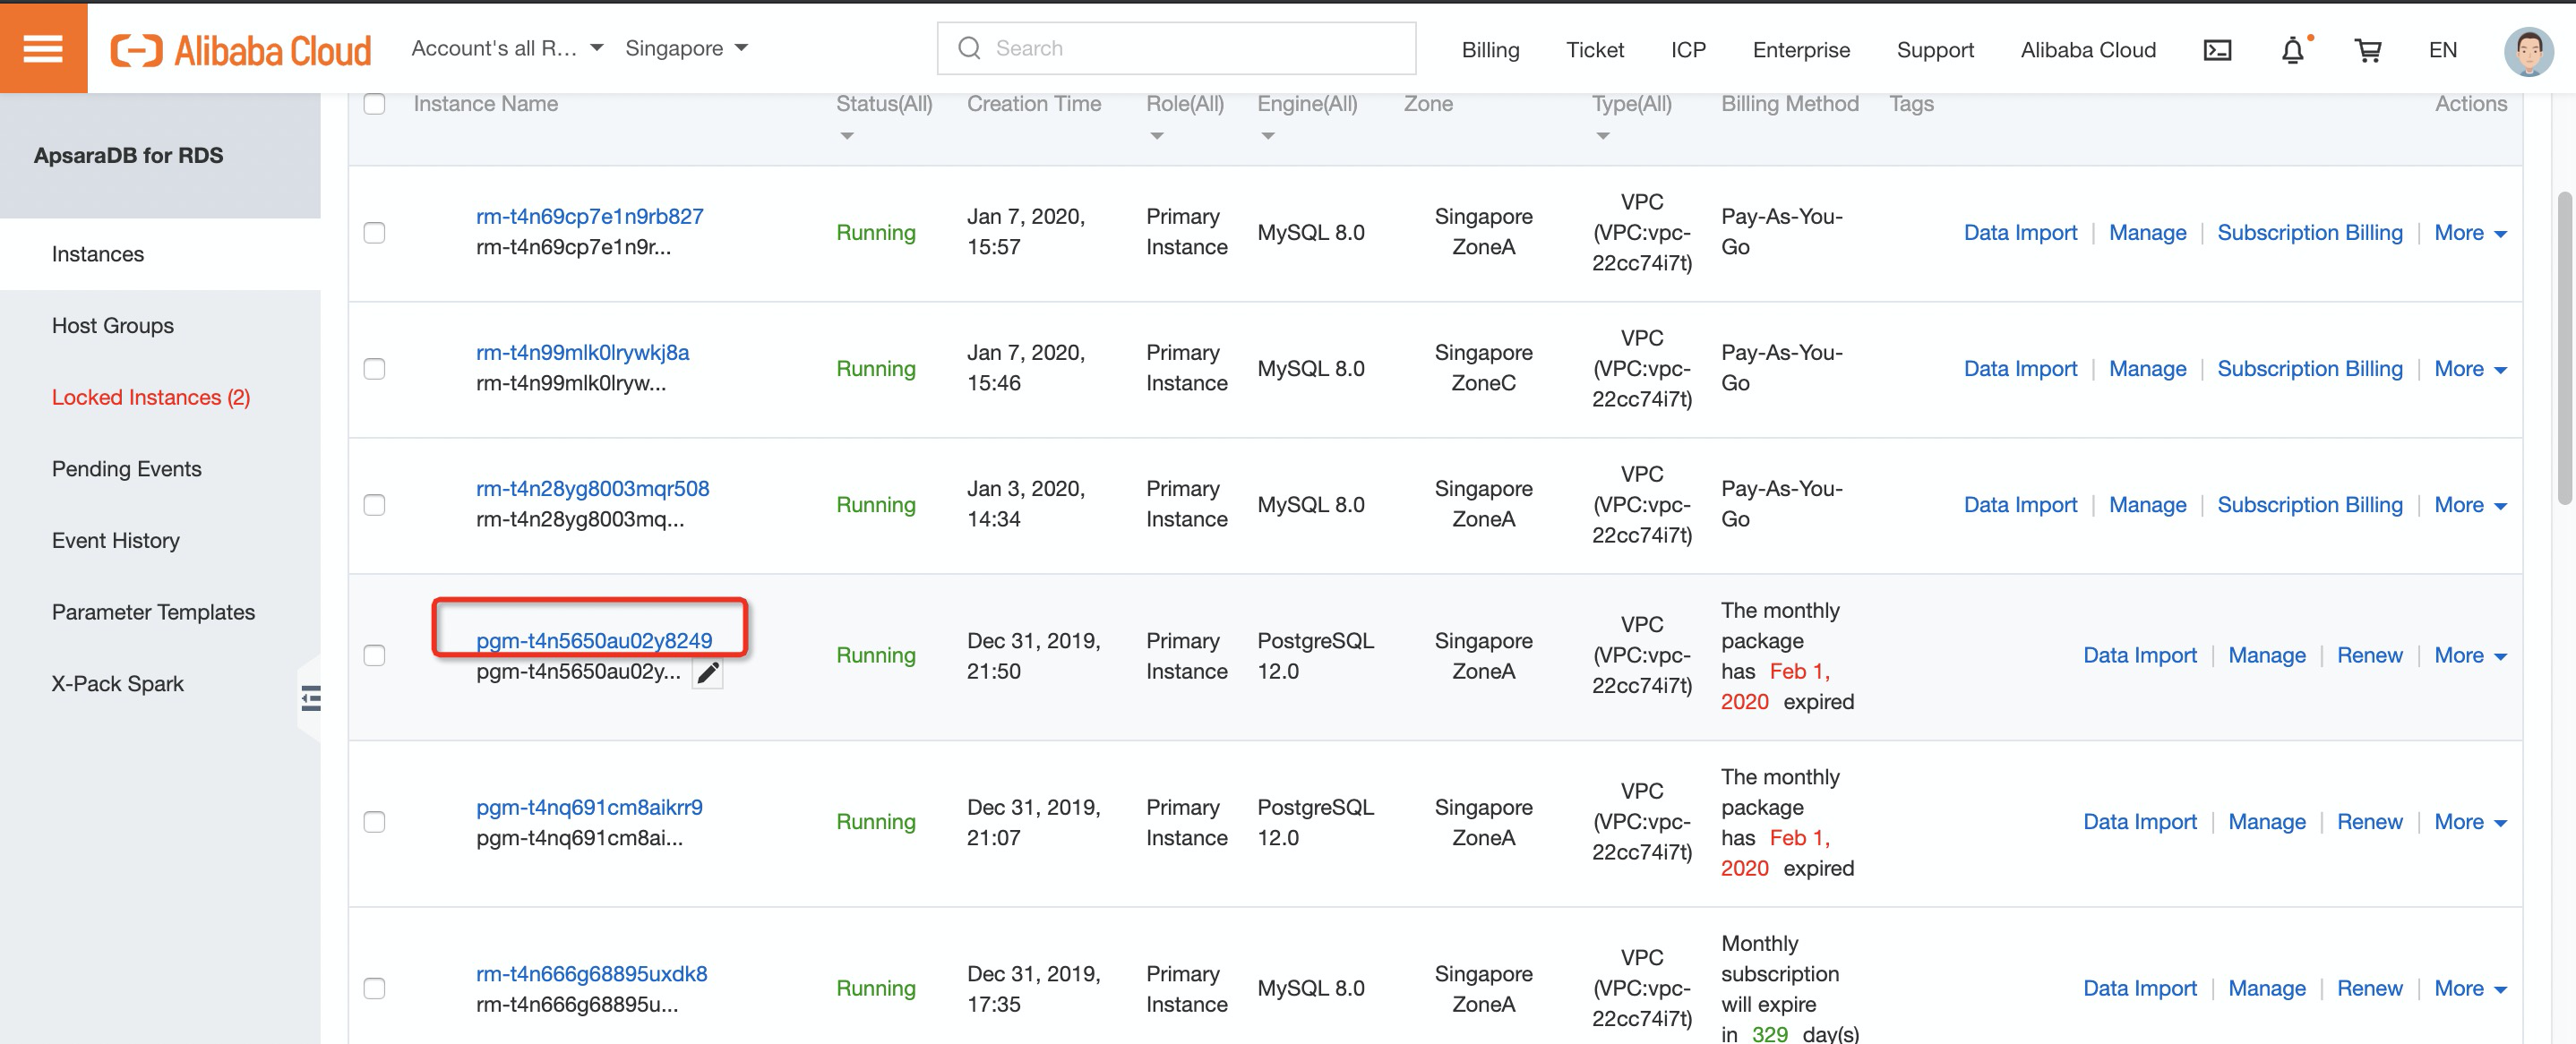
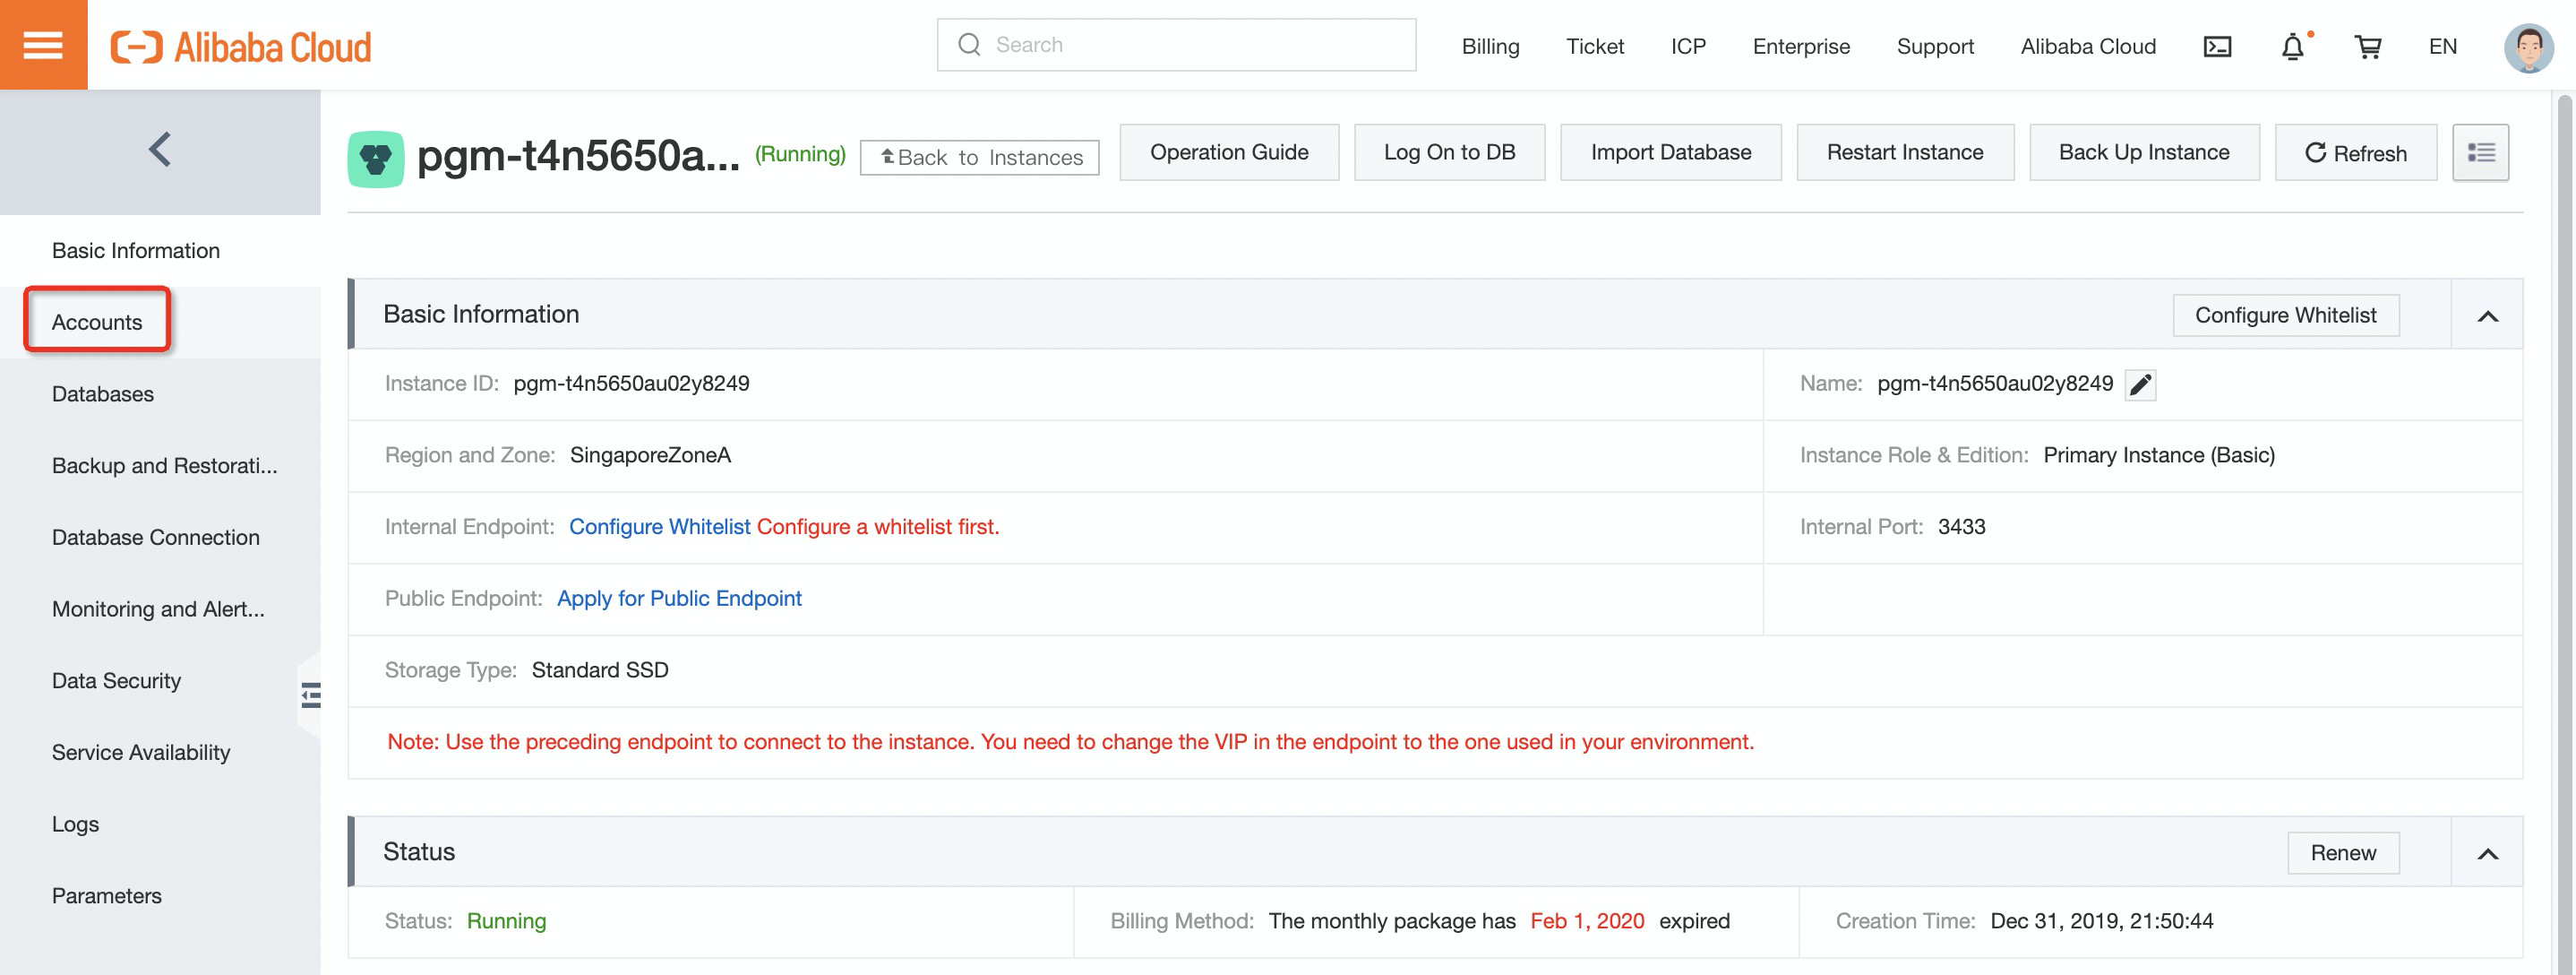
5. In the left-side navigation pane, click Accounts to visit the Account Management page.
6. Click Create Initial Account, as shown in the following figure.

7. To create an account, enter the relevant details in the required fields.
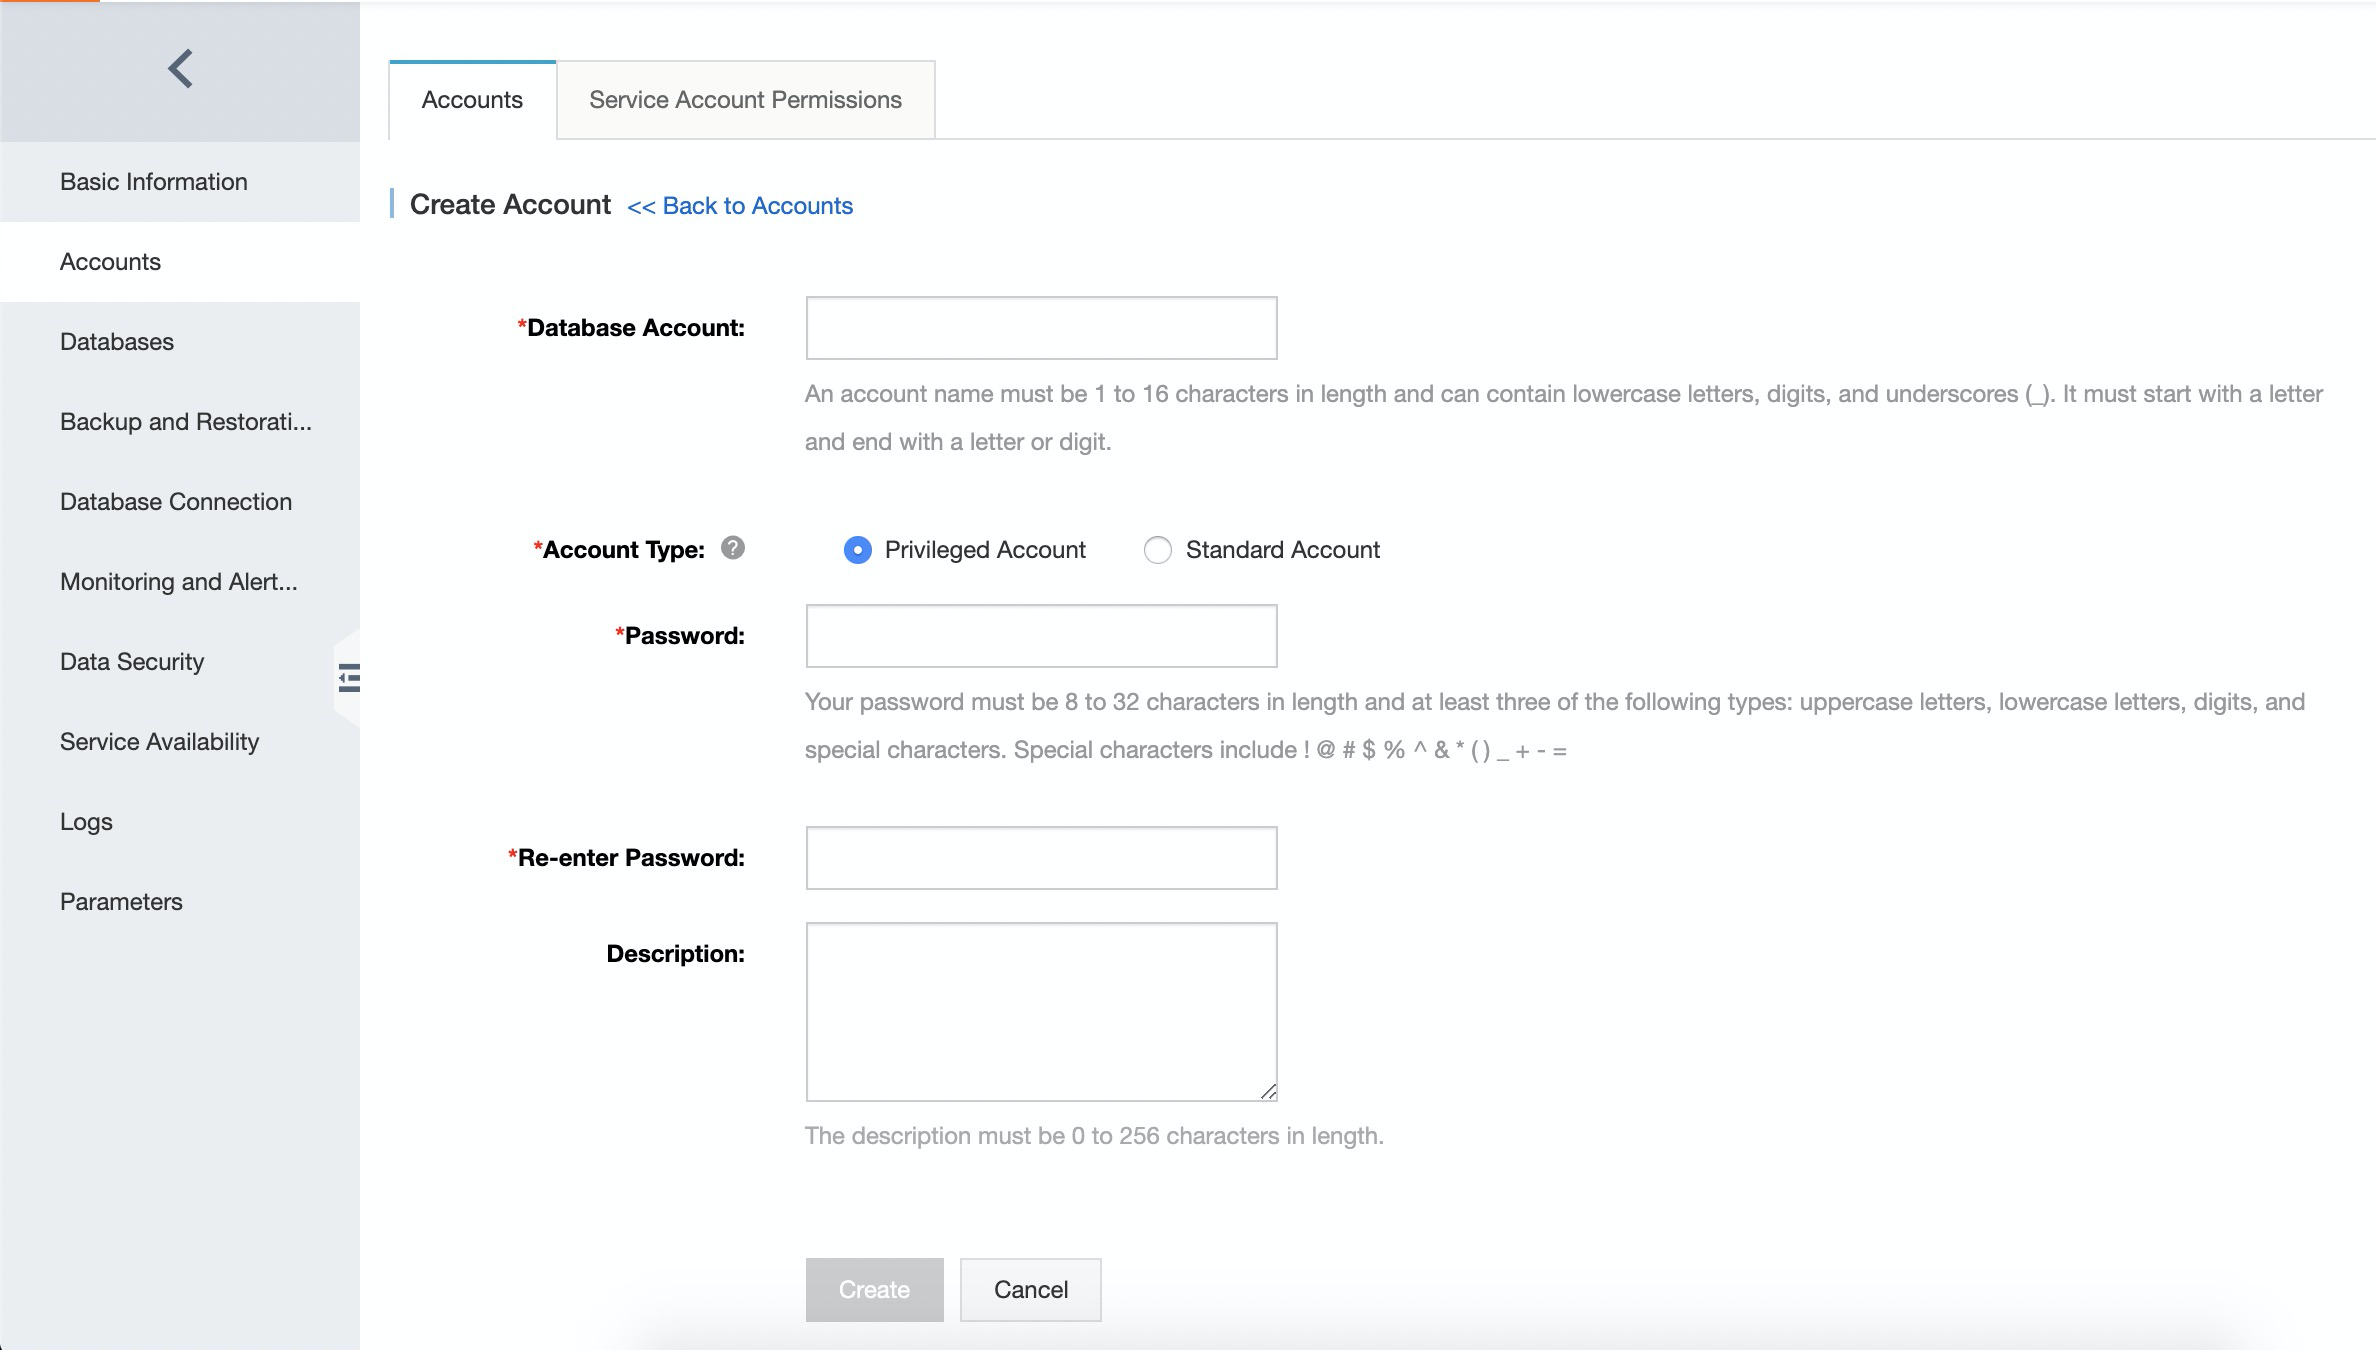
Where the parameters include:
Capital letters
Lower-case letters
Digits
Special characters (!@#$%^&*()_-+=)
8. You will also need to add the IP address of your PostgreSQL client that accesses the RDS instance to the RDS whitelist. To do this, just follow these steps:
Select Security Controls in the left-hand navigation pane to go to the Security Controls page.
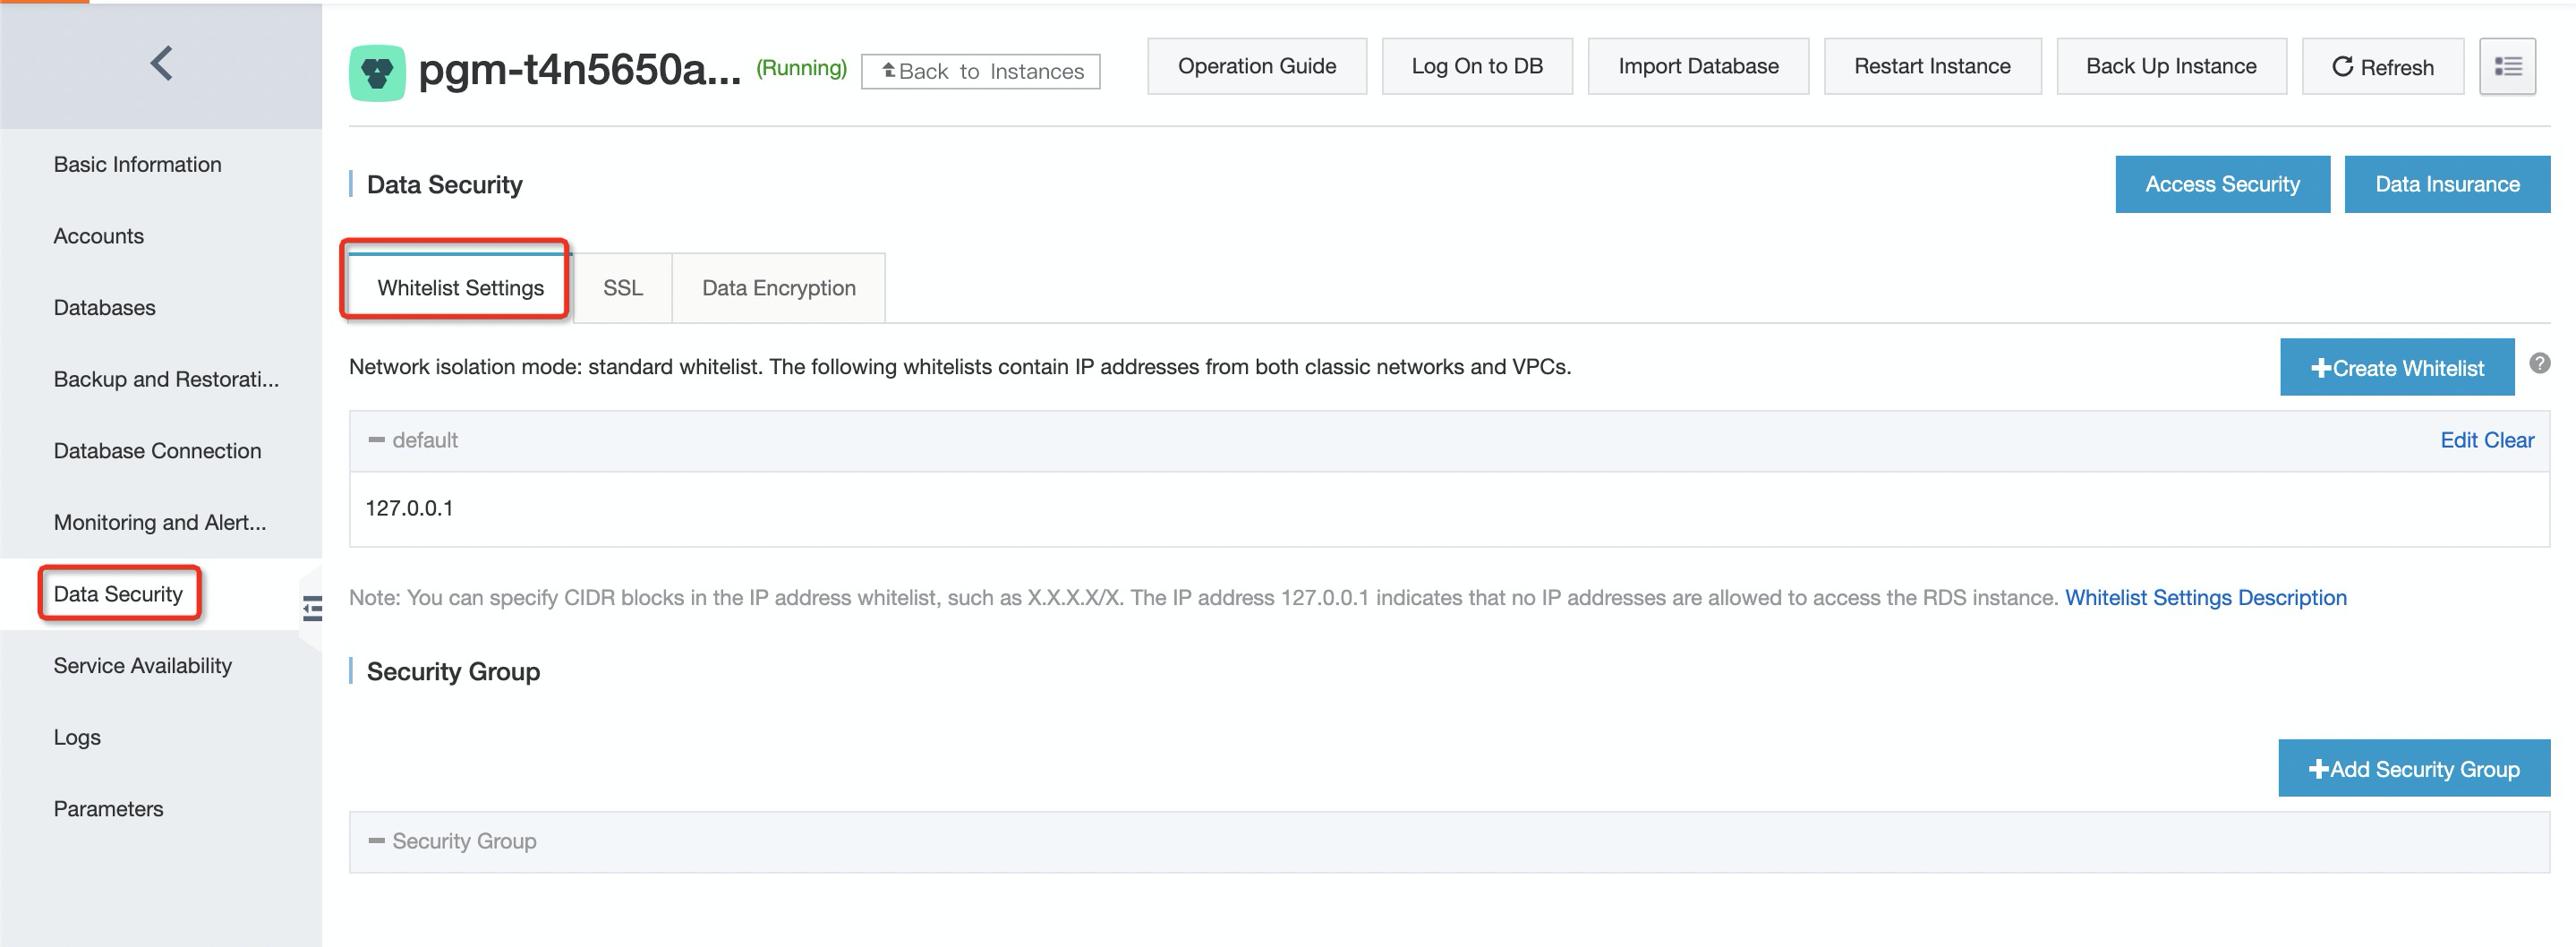
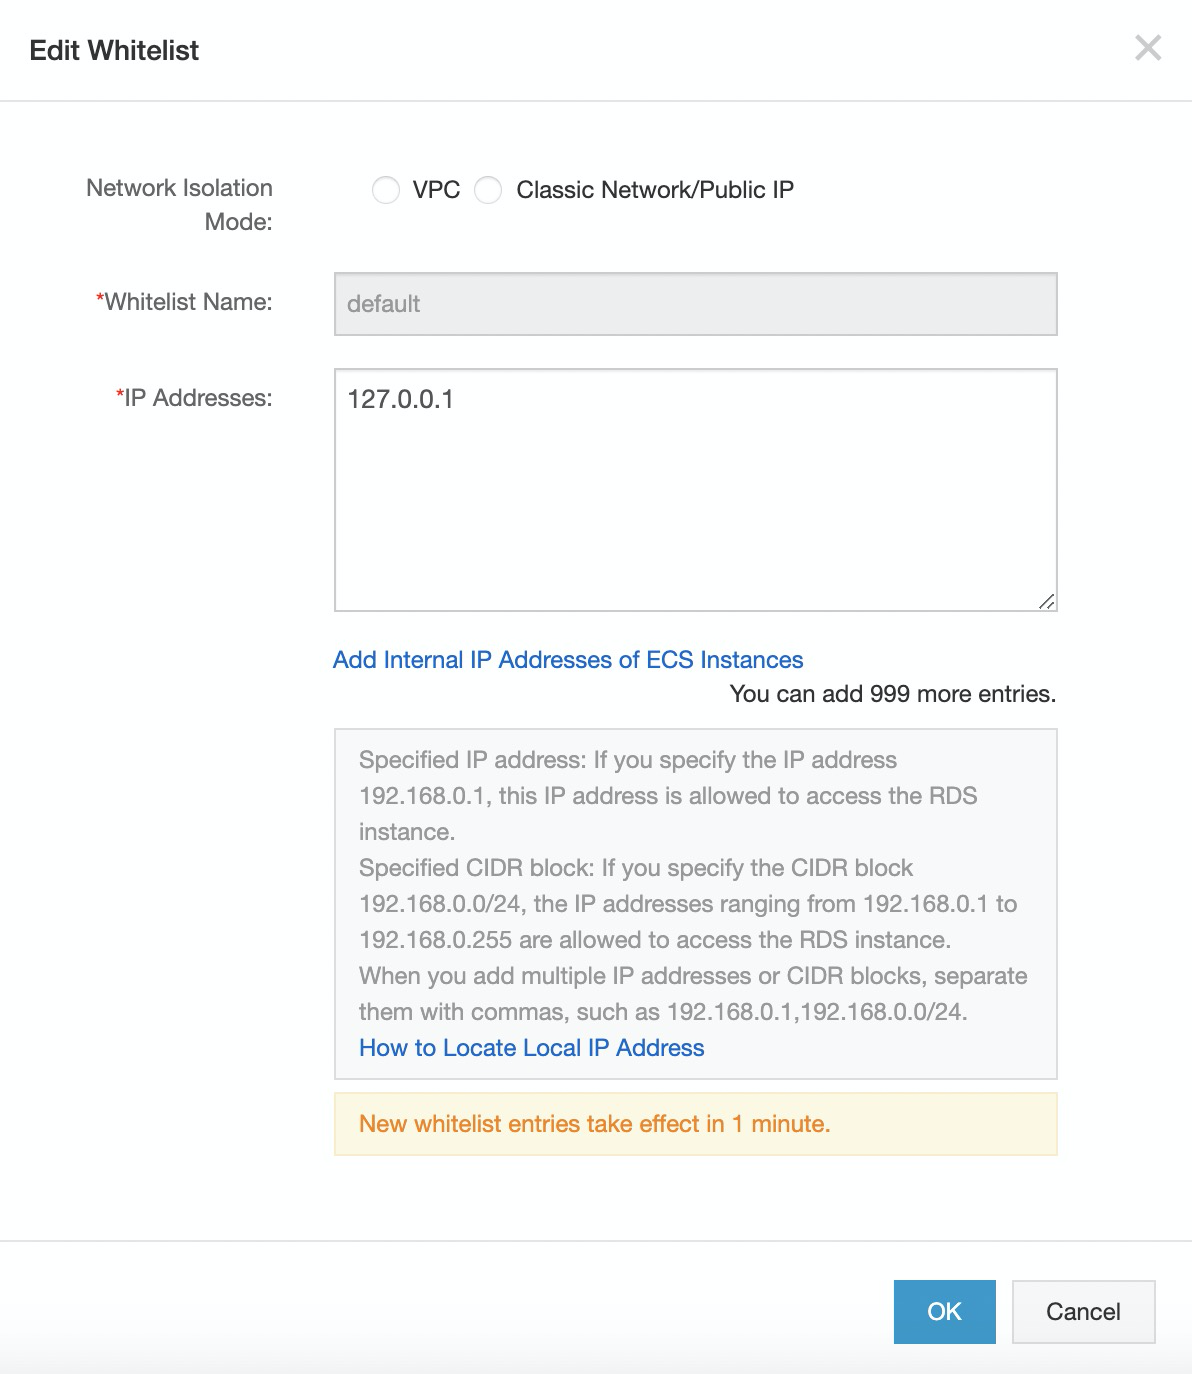
You have now set up your instance on ApsaraDB RDS so it is ready for the migration.
Next, we need to connect the PostgreSQL database.
1. Start your pgAdmin 4 client.
2. Right click Servers, and then select Create > Server, as shown in the following figure:
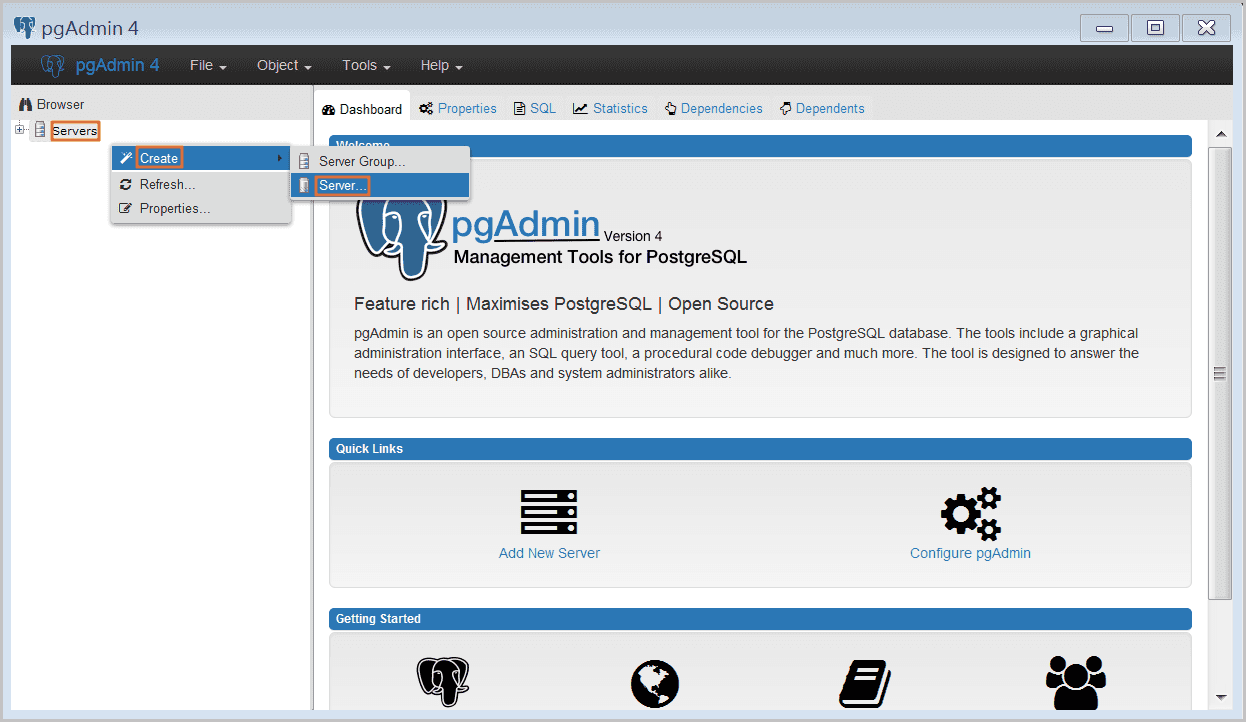
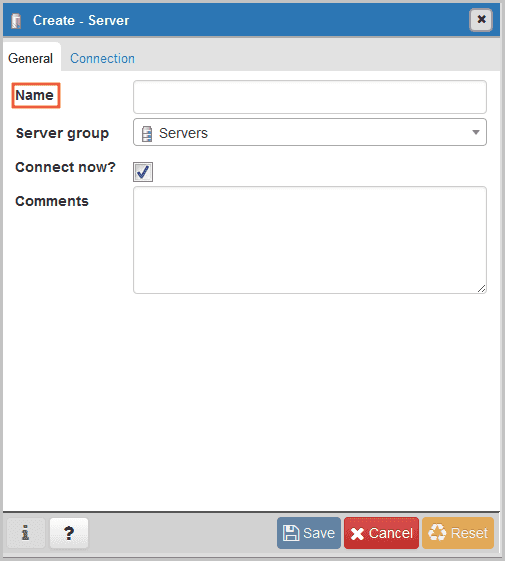
3. On the General tab of Create – Server window, enter a server Name, as shown in the following figure.
4. Select the Connection tab and enter the information of the instance to be connected, as shown in the following figure.
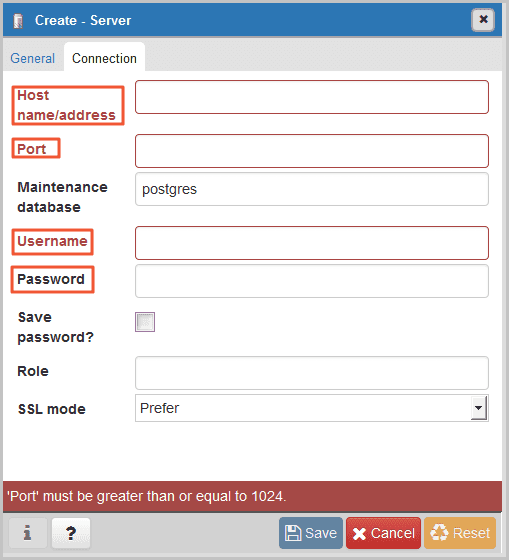
Where the parameters include:

The username and password are the same as the Database account and password you entered in the previous steps.
5. Click Save.
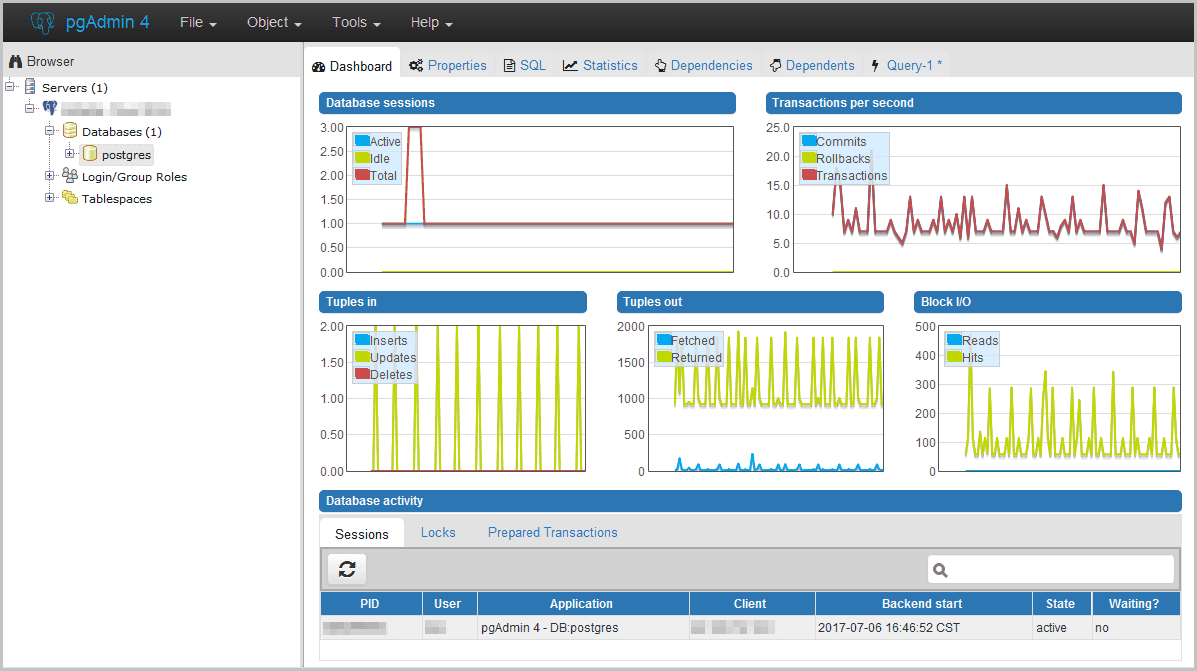
6. If the connection information is correct, select Servers > server name > Databases > postgres, and the following interface appears, which indicates that the connection to RDS instance is successful.
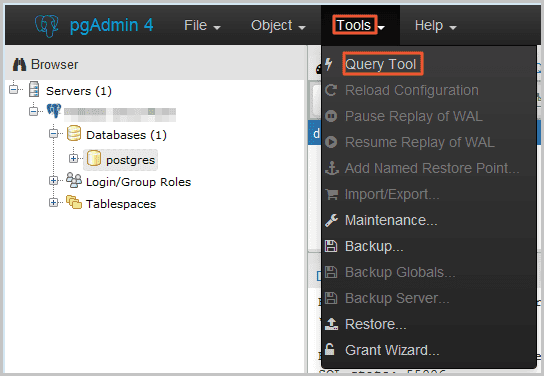
7. Select postgres, and then select Tools > Query Tool, as shown in the following picture.
8. Enter the following command on the Query-1 tab page to create a database, as shown in the following figure.
create database ;
9. Click the Execute/Refresh icon, as shown in the following figure.

10. If the execution is successful, it indicates that the new database is created successfully.
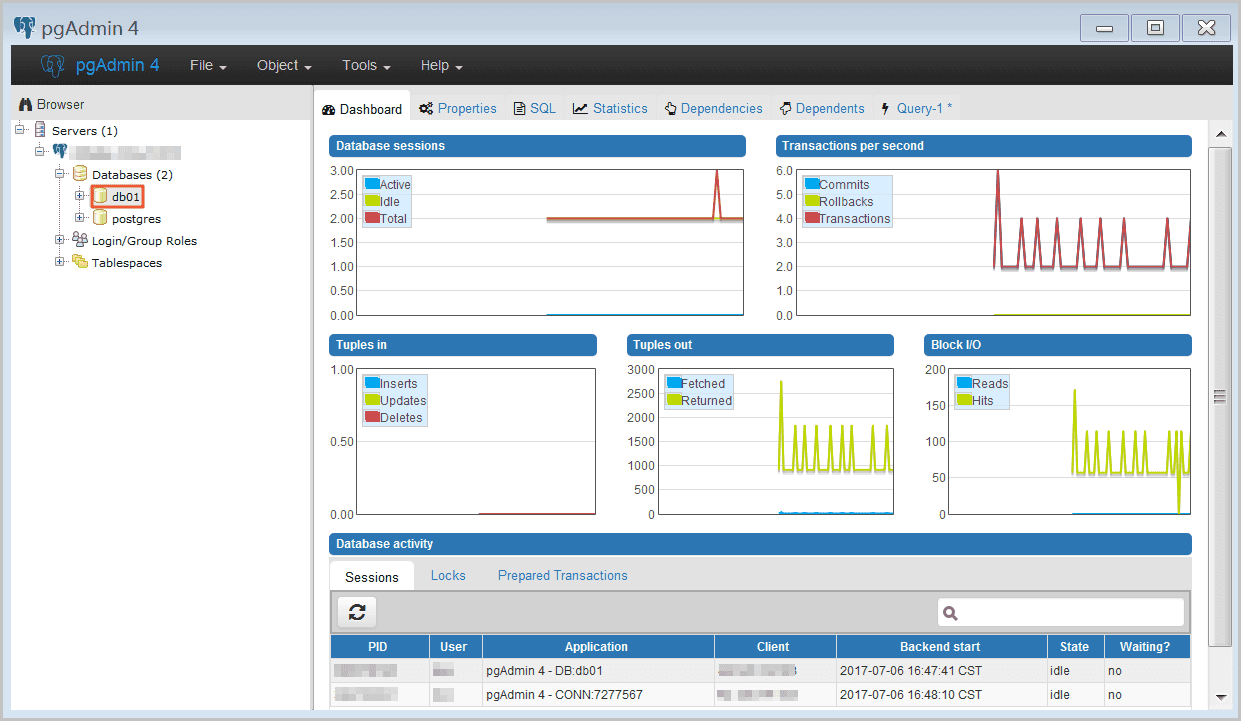
11. Right click Databases and click Refresh, and then you can find the newly created database, as shown in the following figure.
12. Enter the following command on the Query-1 tab page to create an account, as shown in the following figure.
CREATE ROLE "username" CREATEDB CREATEROLE LOGIN ENCRYPTED PASSWORD 'password';
13. Click the Execute/Refresh icon, as shown in the following figure.

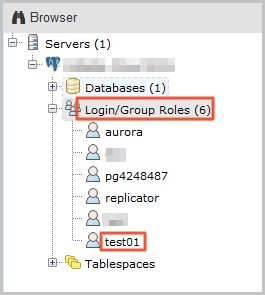
14. If the execution is successful, it indicates that the new account is created successfully. Right click Login/Group Roles and click Refresh, and then you can find the newly created account, as shown in the following figure.
Now, we will learn how to use the psql command to restore the PostgreSQL data backup file to the target RDS instance.
For this portion of the tutorial, you need to use your command prompt software.
We will assume you are using a Windows 10 Operating System.
First, we need to back up your database, by following these steps:
1. Open the command line console on your machine.
2. Navigate to the bin folder of your PostgreSQL installation by typing in the following command:
cd <folder location>3. Hit Enter
4. Run the following command to back up your data
pg_dump -U username -h hostname -p port databasename -f filenameWhere the parameters are as follows:
For example, to use the database account William to back up to the local PostgreSQL database, run the following command:
pg_dump -U William -h localhost -p 3433 pg001 -f pg001.sql5. Go to the bin folder and check that a backup file called pg001.sql has been created.
Now, we need to perform the migration.
Please note, your network stability and data security are improved when data is restored through the RDS intranet. We recommend that you upload the data to the ECS and then restore the data to the target RDS through the intranet. If the data file is too large, compress it before uploading.
This scenario is explained in the following example:
1. Run the following command through the PostgreSQL client to import the data into the RDS.
psql -U username -h hostname -d databasename -p port -f filenameWhere the parameters are described as follows:
psql -U William -h postgresql.rds.aliyuncs.com -d pg001 -p 3433 -f pg001.sql2. In your PostgreSQL client, go to the database and check the data has been successfully migrated from your relational PostgreSQL database to the ApsaraDB for Relational PostgreSQL database on the ApsaraDB for RDS Server.
That's it!
In this tutorial we have shown how to migrate from your relational PostgreSQL database to the ApsaraDB for Relational PostgreSQL database on the ApsaraDB for RDS Server.

2,593 posts | 793 followers
FollowAlibaba Clouder - January 11, 2021
Alibaba Clouder - February 13, 2021
Alibaba Clouder - January 27, 2021
ApsaraDB - June 18, 2021
Alibaba Clouder - June 10, 2019
Alibaba Cloud Indonesia - August 12, 2024

2,593 posts | 793 followers
Follow ApsaraDB RDS for PostgreSQL
An on-demand database hosting service for PostgreSQL with automated monitoring, backup and disaster recovery capabilities
Learn MoreMore Posts by Alibaba Clouder