By Arslan Ud Din Shafiq, Alibaba Cloud Tech Share Author
ImpressPages is an open source and free content management system (CMS). It is based on a (model–view–controller) MVC architecture. ImpressPages is a lightweight, effective and simple CMS, with support for multi-languages by default. You can make the interface by just dragging and dropping.
To install ImpressPages 5.0, follow the steps below:
1.You must have Alibaba Cloud Elastic Compute Service (ECS). If you are new user, Click Here to try the Alibaba Cloud Free Trial. I have used Alibaba Cloud ECS and CentOS 7 for this tutorial.
2.You should setup your server’s hostname.
3.Optional: Secure your server by configuring security groups and activating firewalls. Some of the security products by Alibaba Cloud are for free, such as Server Guard and Anti-DDoS Basic.
1.Login as root user with your root username & password via SSH client (e.g. Putty – You can get Putty from https://www.putty.org ) or VNC console available in your Alibaba Cloud account dashboard.
2.To add a new user with roots privileges, use the following command:
# useradd aareez
where “aareez” can be replaced by any username of your choice.
3.Now set your desired password for your chosen username. In my case, username was “aareez”. When you will enter the following command, you will be prompted to enter a new password.
# passwd aareez
4.Now assign username to sudo user’s group to give root privileges. For this, we will check /etc/sudoers file and see whether sudoers group is enabled or not. For this purpose, we will execute the following command.
# visudo
5.After executing the above command, you will see the following lines in the opened file.

6.Now you will add our username “aareez” to the “wheel” group by executing the following command:
# usermod -aG wheel aareez
After execution of the above command, you can verify the membership of for that group by executing the following command:
# groups aareez
7.Now, log in by using your new username and password. You can switch user by using the following command:
# su – aareez
You can see that you have been logged in from your new account now. If you want to verify this, you can use the command below:
# whoami

8.Before proceeding with installation of any kind of package, use the following command to update your CentOS system. To execute this command, remember to login from non-root user with sudo privileges.
# sudo yum -y update
9.You will be prompted to enter your password. Now type your password and hit Enter key and wait for updating.
Now you have successfully updated your CentOS system. Your next step is to install Apache Web Server.
10.To install nano editor, execute the command below:
# sudo yum install nano
11.To install epel-release, execute the command below:
# sudo yum install epel-release
12.To install the apache web-server, you will need to execute the following command:
# sudo yum -y install httpd
You will be prompted to enter your password. Now type your password and hit Enter key and wait for updating.
13.After installation, you will need to enable apache server to run automatically when you boot your ECS. For that, execute the commands below:
# sudo systemctl enable httpd
# sudo systemctl start httpd
14.To ensure that your DocumentRoot directive is pointing to correct directory, check your Apache configuration file by using the following command:
# sudo nano /etc/httpd/conf/httpd.conf
Note: The configuration for DocumentRoot should look as
# DocumentRoot "/var/www/html"
15.Now open 00-base.conf by executing the following command and search for mod_rewrite to check either this module is loaded correctly or not.
# sudo nano /etc/httpd/conf.modules.d/00-base.conf
If mod_rewrite module is already loaded, you will see the following line.
LoadModule rewrite_module modules/mod_rewrite.so
Semi-colon is used for commenting a line in any Apache module. If the above lines starts with a semi-colon (;), remove the semi-colon and uncomment the line.
16.Now to make mod_rewrite work correctly with your ImpressPages CMS, you will need to edit Apache’s configuration. To open the file for editing, use the command below:
# sudo nano /etc/httpd/conf/httpd.conf
17.Find section <Directory "/var/www/html"> and modify the value for AllOverride as below:
| From | To |
|---|---|
| AllowOverride none | AllowOverride All |
After modification, the section will look like:
<Directory "/var/www/html">
    Options Indexes FollowSymLinks
    AllowOverride All
    Require all granted
</Directory>
18.Now save the changes done by pressing Ctrl+X, then press ‘Y’ and then hit Enter key. Your changes have been saved.
19.To make the changes work correctly, we will need to restart apache. To do so, execute the command below:
# sudo systemctl restart httpd
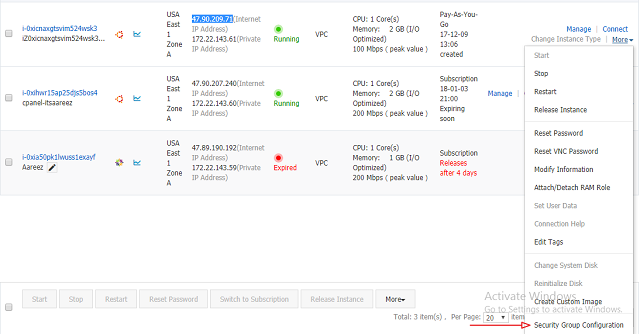
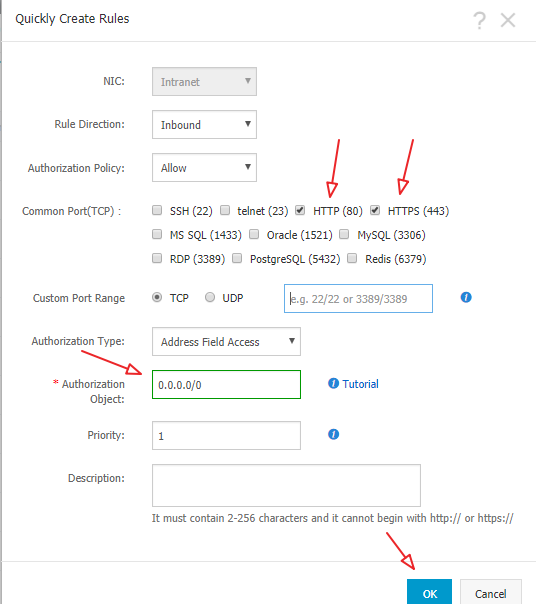
If you have activated firewalls, you will have to define a rule in Alibaba Cloud security group for your cloud server to add exception for port 80/tcp, 443/tcp. You can enable these ports while creating ECS instance. If you have forgotten to unblock these ports, you can follow the procedure below. By default, these ports are blocked by the firewalls.
To do this follow the given instructions in the snapshots:
20.Go to your Elastic Compute Service section. Click on the More button on the ECS you have used for ImpressPages CMS:

21.Click on Configure Rules.
22.Click on Quickly Create Rules.
23.Add the configurations as shown in screenshot below & click OK.

You will have to disable SELinux to avoid any type of permissions related issues for ImpressPages CMS. To do so, first of all, check whether SELinux is enabled or disabled.
24.To check use the following command:
# sudo sestatus

It is disabled by default in Alibaba Cloud ECS. However, if you had made any changes previously to your ECS, you may need to follow this step. If status is disabled, skip this step. Otherwise, open the file using following command:
# sudo nano /etc/selinux/config
25.Make the following change in opened file and save the changed file.
| From | To |
|---|---|
| SELINUX=enforcing | SELINUX=disabled |
Press Ctrl+X, then press ‘Y’ and then hit Enter key to save the changes and close opened file.
After disabling SELinux, you will have to reboot your ECS. Follow the steps below to reboot ECS.
26.To install PHP 7.1 on CentOS, you will need to add an external repository. To do so, run the following command:
# sudo rpm -Uvh https://mirror.webtatic.com/yum/el7/webtatic-release.rpm
27.After adding repository, install PHP 7.1 along with modules required by ImpressPages CMS. Execute the following command to do so:
# sudo yum -y install php71w php71w-gd php71w-mbstring php71w-mysql php71w-xml php71w-common php71w-pdo
After successful installation of PHP modules, you will see the screen as follows:

28.In replacement of MySQL server, CentOS uses MariaDB server by default. To install MariaDB, use the following command:
# sudo yum -y install mariadb-server
Alibaba Cloud Aspara DB for RDS is best alternative, its use is recommended.
29.After successful installation, enable MariaDB server to start automatically when system reboot. To do so, use the following commands:
# sudo systemctl enable mariadb
# sudo systemctl start mariadb
30.Now to secure your MariaDB server, execute the command:
# sudo mysql_secure_installation
The root password will be blank by default, just hit enter button to proceed and select ‘Y’ and choose your password.
31.Use MariaDB shell to login as root user and execute the following command:
# sudo mysql -u root -p
32.Now the command prompt will ask you to enter password for user ‘root’. Enter the password and hit enter key, you will be prompted to MariaDB command prompt.
33.To create the database and user for this database for your ImpressPages CMS, use the following query:
CREATE DATABASE im_db CHARACTER SET utf8 COLLATE utf8_general_ci;
CREATE USER 'im_db'@'localhost' IDENTIFIED BY 'SecurePassword';
GRANT ALL PRIVILEGES ON im_db.* TO 'im_db'@'localhost';
FLUSH PRIVILEGES;
EXIT;
where im_db can be changed to your desired name.
34.To unzip any zip folder, you will require unzip tool. To do so, use the following command:
# sudo yum -y install unzip
35.Then type ‘y’ and hit Enter key.
36.Navigate to cd /var/www/html/
Note: In case, if you get any error like ‘No such directory or file’, then create html directory. To do so, navigate to cd /var/www and execute the following command to create html directory and type cd html and hit enter.
# sudo mkdir html
37.Now use the following command to get ImpressPages CMS package for installation.
# sudo wget http://download.impresspages.org/ImpressPages_5_0_3.zip
If the above command gives any error, or you need to install latest version of ImpressPages CMS, click here to get the link of latest version.
38.To list the files in current directory, use the command:
# ls -la
39.Now unzip the compressed zip folder as listed when executed ls -la command. To do so, use the command:
# sudo unzip ImpressPages_5_0_3.zip
40.Now move the installed directory to /var/www/html by using the command:
# sudo mv ImpressPages/* ImpressPages/.htaccess /var/www/html
41.Change owner of files to avoid permissions issues. Execute command below:
# sudo chown -R apache:apache * .htaccess
42.After performing the above steps, restart Apache using the command:
# sudo systemctl restart httpd
Congratulations! It's now time to access your ImpressPages CMS via IP address.
43.To access ImpressPages CMS, use the IP address of your ECS instead of 47.254.66.175 and write the following address in your browser’s address box and hit enter.
http://47.254.66.175/index.php

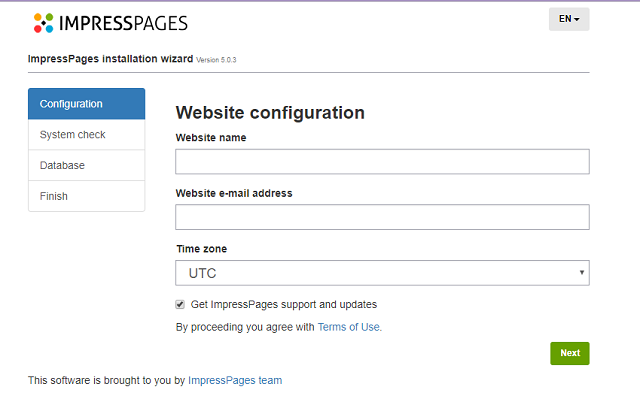
44.You will be redirected to website configuration page, enter the name of your website, the email address of the admin and time zone.
| Web name: | Your website’s name |
| Admin e-mail address: | Your email |
| Time Zone: | Your Time Zone |
The hit Next.
45.Now system check page will be opened, hit Next.
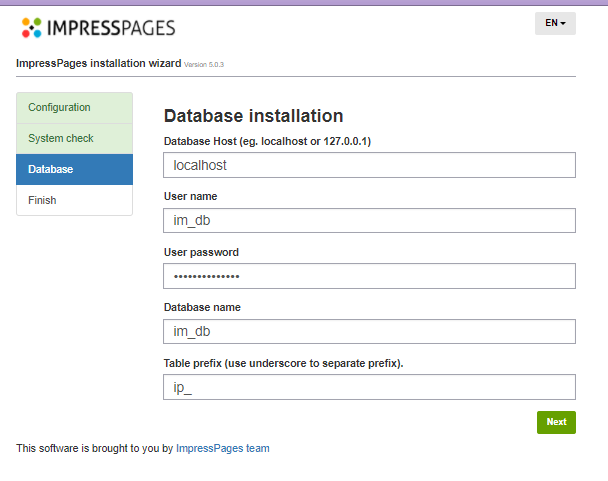
46.After this, you will be redirected to database configuration page. Add the following values as we used in the query above.
| Host | localhost |
| Database Name | im_db |
| Username | im_db |
| Password | SecurePassword |

Then hit Next button.
47.Now you will be redirected to Amin panel automatically. In case, if you are not redirected automatically, you can us the link below and add your IP address of ECS.
http://47.254.66.175/admin.php
48.In case, if you still can’t access admin panel, there can be issue with your .htaccess file. For this purpose, use the command below to open .htaccess in editor:
# sudo nano .htaccess
You will be asked to enter your user’s password. Enter your password and hit Enter key.
49.Try to uncomment the lines below:
Options -Indexes
Options -MultiViews
Press Ctrl+X, then press ‘Y’ and then hit Enter key.
50.Restart your apache server
# sudo systemctl restart httpd

Here you go….The tutorial has been completed. If you have any question or issue, try to write your query in comments. Thanks!


2,593 posts | 792 followers
FollowAlibaba Clouder - April 12, 2019
Alibaba Clouder - April 12, 2019
Alibaba Clouder - April 1, 2019
Alibaba Clouder - April 12, 2019
Alibaba Clouder - April 27, 2018
Alibaba Clouder - May 21, 2018

2,593 posts | 792 followers
Follow ECS(Elastic Compute Service)
Elastic and secure virtual cloud servers to cater all your cloud hosting needs.
Learn More Managed Service for Grafana
Managed Service for Grafana displays a large amount of data in real time to provide an overview of business and O&M monitoring.
Learn More Bastionhost
A unified, efficient, and secure platform that provides cloud-based O&M, access control, and operation audit.
Learn More Elastic Desktop Service
A convenient and secure cloud-based Desktop-as-a-Service (DaaS) solution
Learn MoreMore Posts by Alibaba Clouder
asdadad May 28, 2018 at 7:03 am
Tested