This tutorial explains how to set up email hosting on an Alibaba Cloud server. We walk through all of the steps involved in setting up email hosting, so that you can send and receive email via addresses linked to a domain name that you have already purchased.
To follow this tutorial, you'll need an Alibaba Cloud account. If you don't already have one, head to www.alibabacloud.com and sign up. To help you try out the facilities you'll find a range of free trials there.
Getting a new business or any other venture online is widely understood to mean creating a website for it. There are a number of key steps involved, which can be summarized as follows:
However, creating an online presence for a new venture by building just a website is omitting one key item: what about email? When someone types www.my-new-venture.com into their browser they'll see your website. But if someone sends an email to sales@my-new-venture.com where will the message end up? By default, the answer is generally "nowhere at all". Incoming emails will bounce, which means that the sender will receive an error message saying that their message couldn't be delivered. Similarly, you won't be able to send email from your new domain either.
Until you set up your email, your business is not really fully online. Clearly this is a problem that you need to rectify.
You could, of course, just sign up with a free web-based email service. But it looks unprofessional if your marketing material lists your website as www.my-new-venture.com but your email address is john.smith.6472@some-free-email-provider.com. It would be much better if your email address could be john.smith@my-new-venture.com.
Once your website hosting is up and running, you really need to set up your email hosting too. This will let you send and receive email via your domain name. You can set up as many email accounts (also known as mailboxes) as you want. And you can set separate usernames and passwords for each one, so that different team members or employees can use their company email account without it being visible to anyone else.
One option is to sign up with a commercial email hosting provider. However, this can prove expensive because you typically have to pay a monthly fee for each user's mailbox, and larger mailboxes (capable of holding more messages) are more expensive. But by setting up your own email server you can have as many mailboxes or email accounts as you want, and each can be as large as you wish, so long as your server has sufficient disk space.
As discussed above, web hosting comprises three main components: a domain name, a web server to host the content, and a DNS entry that links the two together. The process starts when someone (anyone, anywhere in the world) types your website's address into their browser. The browser first makes a connection to the worldwide DNS database to look up the IP address of the web server associated with that domain name. Next, the browser makes a connection to that IP address and sends a command to the web server, asking for a specific page. The web server then sends the requested page to the browser and it's displayed on the screen.
Email hosting, in order to be able to receive incoming messages, works in a similar way. When someone sends an email message to john.smith@my-new-venture.com, their email program consults the DNS database to find out the IP address of the email server for my-new-venture.com (which may or not be the same as the web server for the same domain name). The email program then connects to the email server and sends the message, along with details of which of the server's users it is for (John Smith in this case). The email server stores the message. Later, when John wants to read his email, he uses his email program to log in to the email server using his allocated username and password. The server will then display all the incoming messages that have been received for him.
As you can see, the DNS system isn't just for linking domain names with web servers. It also creates the links for email servers, so that they can receive incoming mail for the domain. It works because there are multiple record types. The so-called "A" record (which stands for Address) is how you specify the address of a web server that corresponds to a domain name. Similarly, an "MX" record (which stands for Mail Exchange) specifies the address of the domain's mail server.
If you want your email hosting and web hosting on the same server, you simply set your domain's A record (specifically the A record for www.my-new-venture.com in this case) and MX record to the same IP address. If you want to host your email somewhere else, just change the MX record.
In addition to being able to receive incoming email for your domain, you also need to be able to send mail too. We do this via SMTP, or the Simple Mail Transport Protocol. When you send an email, your email program connects to the SMTP service that your email server is configured to use. You can run your own SMTP service on your mail server, in addition to using the server for receiving incoming mail. Or you can configure the mail server to connect to a third-party SMTP service, and send outgoing messages via that third-party system.
It's generally not a good idea to run your own SMTP service. It takes a long time for the world's anti-spam systems to build up sufficient levels of trust in order to accept messages from a new one. Pointing your email server at a commercial SMTP relay service shortcuts this process and makes it much more likely that mail you send from your domain will be immediately delivered to recipients rather than being flagged as possible spam.
Now that we have covered the basics of how to send and receive email, let's go ahead and set it all up. We'll register a domain name for our new venture and configure the ability for it to send and receive email. We won't create a website for our new venture, but if you want to do this too, you can refer to this tutorial.
We will use the free email server software called hMailServer, which runs under Windows. We first need to create a Windows server instance on Alibaba Cloud to host it. The hMailServer program will handle incoming mail directly (once we've set our domain name's MX record to point to it). Rather than installing SMTP on our Windows server, in order to send messages, we'll point hMailServer at a third-party SMTP service.
To start, we need a domain name for our new venture. Log into your Alibaba Cloud account, head to the domain registration section and search for something suitable. We see that my-new-venture.com is available, so we'll register it to use for this tutorial. You probably already have a domain name for your company.
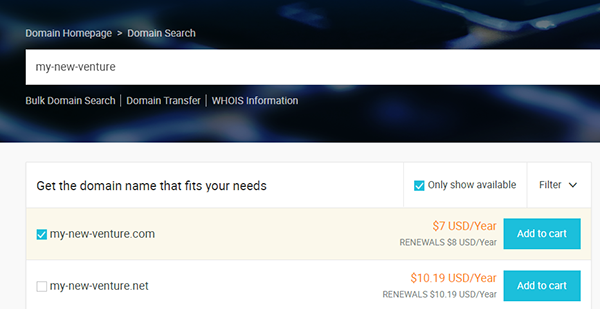
We click to make the payment, and the purchase is successful.
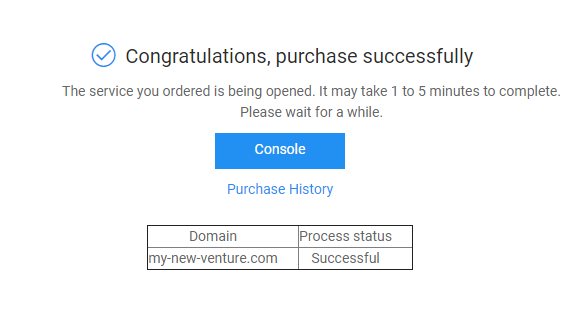
We now own the domain name so we can go ahead and create the ability to send and receive mail for it.
We will be using hMailServer for this project, which requires a Windows server. So, the next step is to create one.
Log into your Alibaba Cloud account, head to the console and the Elastic Compute Service menu, then click on Create Instance.
For simplicity, click on the Basic Purchase button at the top of the screen to choose from a limited but very cost-effective selection of server options, which will suffice for our particular purposes.
We'll choose a server with 2 CPUs, 4GB or RAM and a 40GB disk, in the Frankfurt region.
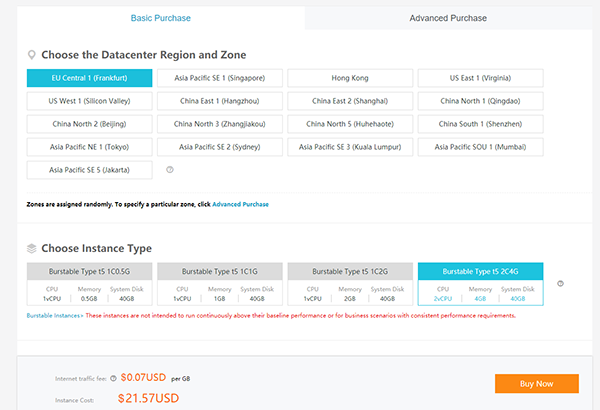
Scroll down and choose the operating system. We will use Windows Server 2016.

Select some bandwidth. Don't leave this figure at zero or your server will not be allocated a public IP address.

For this project we only need the server for one month, so we won't tick the auto-renew box.

Click on Buy Now, check your details, then click on Create Order.
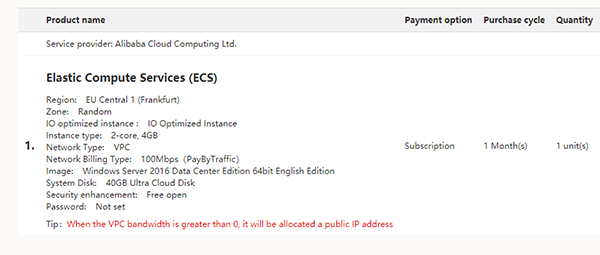
Click on the Pay button that subsequently appears, then return to the console. The status will show on the list of instances as "Starting". After a few minutes the server will be ready and listed as "Running".

Our server is now created and we know its IP address (47.254.155.79 in this example). Before we log in, we will set up the necessary DNS entries for it. We need to give our server a name by which it will be known on the Internet, then we need to tell every other mail server on the Internet that this server is the one which handles email (incoming and outgoing) for our domain. Both of these things are done with DNS.
From the console, under Alibaba Cloud DNS, select the domain name and choose Configure. We'll create an "A" record, and set the address of mail.my-new-venture.com to the correct IP address as follows:
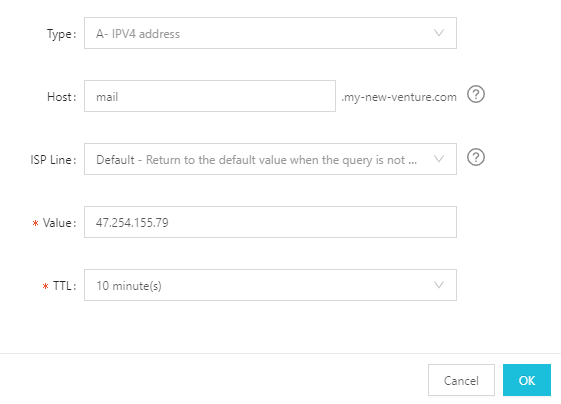
In addition to being accessible on the Internet via its IP address, our new server is now also contactable as mail.my-new-venture.com. Much more friendly!
Now we'll create a Mail Exchange, or MX record, to specify that mail for our domain needs to be delivered to our newly-named mail.my-new-venture.com server. The details are as follows:
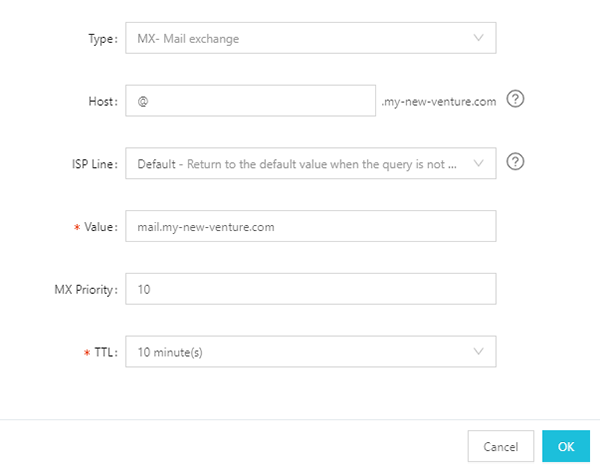
We can now log into the server using its new name. We will also need to configure a few settings on there too.
From the console, under your list of Elastic Compute Service instances, locate the server instance we set up earlier. On the right-hand side of the screen, under the More link, click on Password/Key Pair and then on Reset Password.
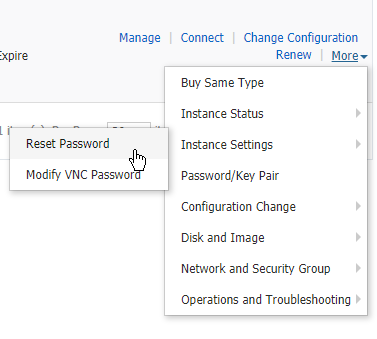
Now choose an Administrator password for your server.
Then, from the More link, click on Instance Status and choose Restart. Wait for the server to show that it's running again.
We can't yet connect remotely via Windows Remote Desktop because the server's default security and firewall settings won't allow it. But we can connect via a browser from the Alibaba Cloud console.
Click on the Connect link to the right-hand side of the instance listing. Make a careful note of the VNC password that is displayed, as it won't be shown to you again.
You should see the server's lock screen, asking you to press Ctrl-Alt-Delete to unlock it. Use the "send remote call" button at the top left-hand corner of your browser to send the key combination, then log in using the Administrator password you chose earlier.
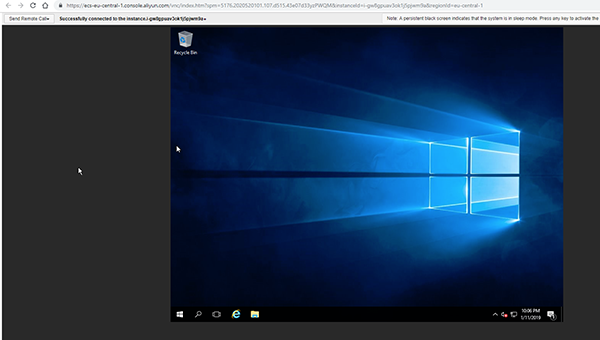
You can continue to log into the server via your browser if you wish. Alternatively, if you prefer to use Windows Remote Desktop from another PC, make sure that you enable remote desktop and that you also create a Windows Firewall rule to permit inbound connections on TCP port 3389.
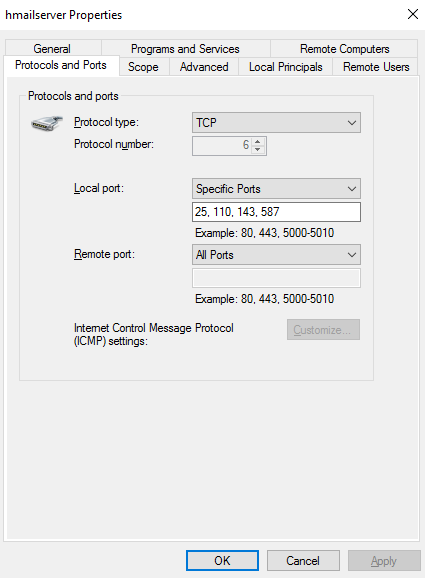
Also, in the Windows Firewall, create rules to allow incoming and outgoing connections on TCP ports 25, 110, 143 and 587. This is important, as our mail server will not work correctly otherwise. We use port 25 to accept incoming mail. Ports 110 and 143 are used by some email programs when connecting to the server. Port 587 is used for sending mail.
You will need to configure the security group for your server too. In the Alibaba Cloud console, click on the Manage link against the server's details, then choose Security Groups, and create a new rule for incoming port 3389. The "Authorization Objects" field lets you specify one or more IP address from which to allow connections. For this tutorial we'll choose 0.0.0.0/0 which permits any IP address, but when you set up a server in a production environment you may prefer a narrower range.
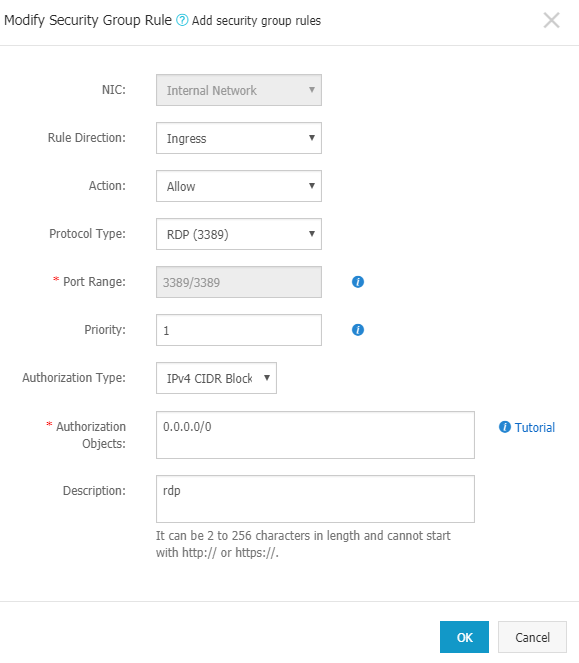
You also need to create security group rules for TCP ports 25, 110, 143 and 587. These are required whether or not you choose to open port 3389.
We can now connect to our Windows server from any other PC via Remote Desktop and will no longer need to use a browser and the Alibaba Cloud console in order to log in. You should be able to connect to the server by specifying its name (mail.my-new-venture.com) rather than its IP address.
Note: If you enter your username and password to log into the server via Remote Desktop but then receive an error message that mentions "CredSSP encryption oracle remediation", edit the Remote Desktop settings on the server and untick the "Allow connections only from computers running Remote Desktop with Network Level Authentication" box.
With our Windows server correctly provisioned, secured and named, let's install hMailServer. Log into the server, either via a browser or Remote Desktop, open a web browser, head to www.hmailserver.com and download the latest version. Then double-click to start the installation.
Accept the default options as you progress through the installation screens.
Choose to install both the server and the administration tools.
Choose to use the built-in database for now. For a production environment you may prefer to use an external database engine that is already installed on the mail server or elsewhere. Alternatively, you could use Alibaba Cloud ApsaraDB RDS, but for the moment we will use the built-in database.
When asked, create an administration password for hMailServer and make a careful note of it.
When installation is finished, run hMailServer Administrator. The first time you do this you'll be asked which database to connect to. Choose the only one that is offered, select "automatically connect on startup", then click Connect.
The mail server admin panel will appear.
To start, click "Add domain". Enter my-new-venture.com and click Save.
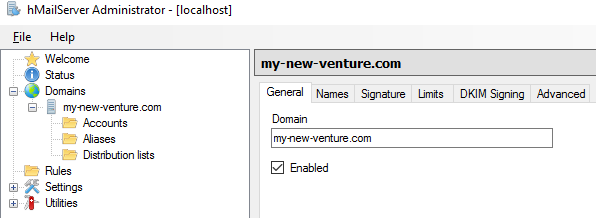
We're now ready to create an actual email account for a user on our domain to receive incoming mail (we'll set up outgoing mail later). On the left hand side of the screen, under the domain name, click on Accounts and then click Add.
On the general tab, we'll create an email address called hello@my-new-venture.com and set its password to "p@ssw0rd".
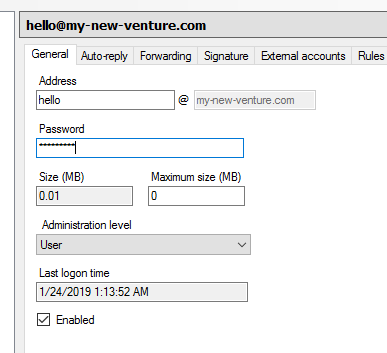
You can give your mailbox a quota if you wish, to avoid the user filling up the server's disk space by omitting to regularly clear out old messages.
On the Advanced tab, set the user's first and last name. We'll choose John Smith. Then click Save.
Open your normal email program or website, and send a message to hello@my-new-venture.com.
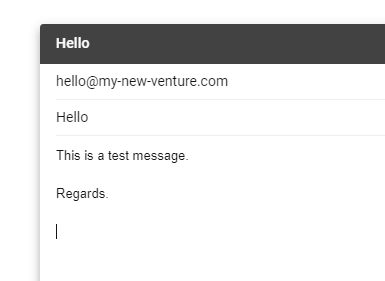
After a moment, check the server.

On Drive C: in program files(x86)hMailServerData a folder called my-new-venture.com has appeared. Within it is a folder called hello. It appears that our new server is successfully accepting incoming mail and has created a folder for the new account. So, let's go ahead and read the message. (If the message fails to arrive, check the security group in your Alibaba Cloud console, and Windows Firewall on the server itself, to ensure that port 25 is open).
For this tutorial we'll use a free email program called Thunderbird to read our email. However, any email client program will work just as well so you can use whichever program you prefer.
If you don't already have it, download the latest version of Thunderbird from www.thunderbird.net and double-click to begin installation, then run it. From the Settings menu, under Account Actions, click on Add Mail Account.
Enter your name, email address (hello@my-new-venture.com) and mailbox password (p@ssw0rd in this case). Thunderbird correctly deduces that it needs to connect to mail.my-new-venture.com to retrieve email. Click on Done, then OK, to complete the setup process.
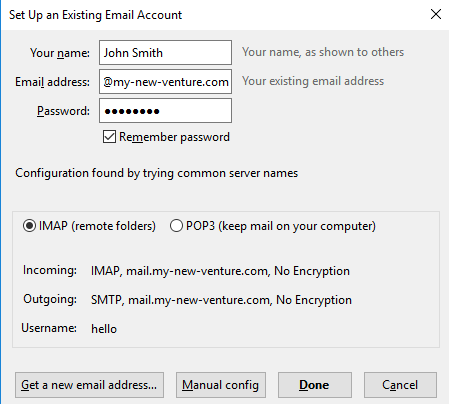
Note that you may receive a warning from Thunderbird that the mail server doesn't use encryption. For the purposes of this tutorial we haven't purchased or installed a security certificate on the server. For production use, you should do so.
Now check your mail, and the message is waiting.
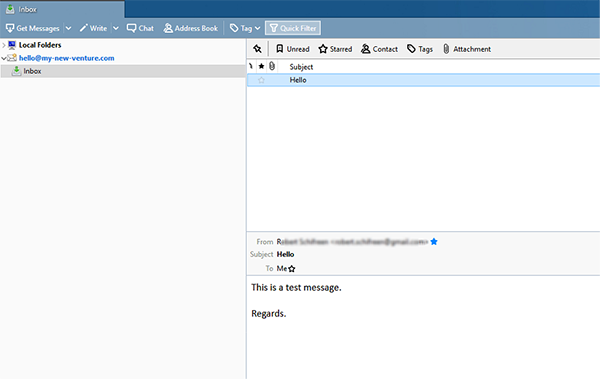
Incoming email is now fully set up and working, so you can go ahead and create email accounts for everyone who needs one.
So far, we have successfully set up a mail server from scratch, with the ability to accept incoming mail for our new domain at my-new-venture.com. We have created one email account (hello@) on the server, and can easily repeat the process to create as many more as we need. Because we're hosting our own incoming email server, creating additional email accounts is free and unlimited.
Now we need to configure the server to be able to send outgoing mail. We do this via a service called SMTP (Simple Mail Transport Protocol), which is the way that mail servers talk to each other across the Internet in order to deliver mail.
Alibaba Cloud offers an SMTP service called DirectMail that is designed for sending bulk messages such as marketing material and newsletters. It is used by customers around the world to send tens of millions of messages every day. However, because it's designed for sending bulk marketing mail, it supports a maximum of 10 sender accounts so it's not suitable for us to use in this instance.
Another option would be to install SMTP on our server, and configure hMailServer to use it. However, setting up your own SMTP service is not recommended because it takes time for a new service to gain sufficient reputation and trust across the Internet. Until this happens, there's a greater chance that messages sent from that service will be marked as probable spam by the mail server on the receiving end.
We will work around both of these issues by signing up with a third-party SMTP relay service. There are plenty of such companies on the Internet who offer such a product, so shop around and find the one that suits you best. For this tutorial we will use SendGrid, which offers a free-forever account that lets you send up to 100 messages per day. If you need more you can upgrade to a paid account.

To use SendGrid's SMTP service, we will sign up for a SendGrid account and then configure the account settings into hMailServer so that it knows to use our account for sending outgoing mail.
We start by creating a SendGrid account, and then clicking on the relevant option to start sending email via the SMTP relay.

We are then asked how we'll be sending mail.
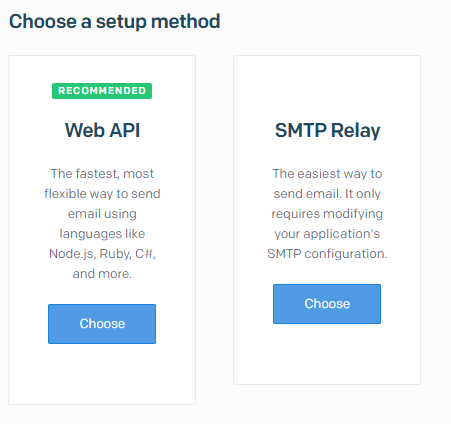
Choose the SMTP Relay option.
Next, you'll be asked to create an API key.

Enter a name for the key and click Create Key.
You can now see the configuration settings that are required to send mail via SendGrid, all ready to type into hMailServer.
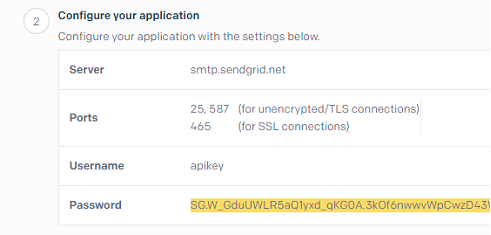
Copy the API key (shown as Password) to the clipboard or another document file and keep it safe. For security reasons, SendGrid won't show it to you again. If you forget it, you can always create another one and update your hMailServer configuration accordingly.
Log out of SendGrid's website and log in to your Windows server. Head to the hMailServer administration panel.
Under Settings, choose Protocols and then SMTP. Click on the "Delivery of e-mail" tab.
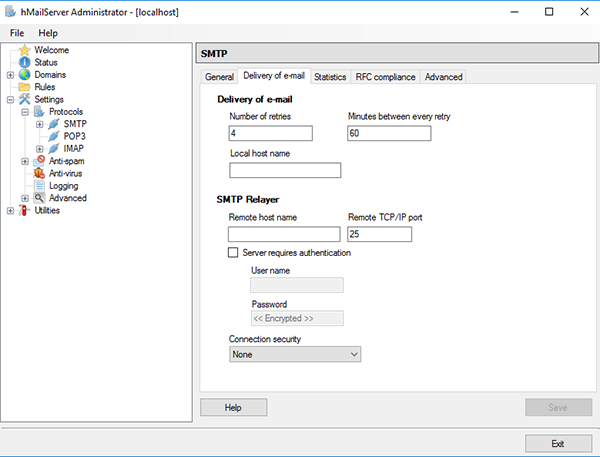
For the local host name, enter my-new-venture.com
Under SMTP Relayer, the remote host name in this instance is smtp.sendgrid.net, as given to us when we created the SendGrid account above.
Set the remote TCP/IP port to 587. Although the default port number is 25, we are unable to use this as Alibaba Cloud prohibits outgoing connections on port 25 for security reasons. As we saw above, SendGrid accepts incoming connections to its SMTP service on port 587, and we previously opened port 587 in both the Windows firewall and the Alibaba Cloud security group in readiness for sending mail.
Tick the "server requires authentication" box. As instructed by SendGrid, enter a username of apikey and enter the full API key as the password. Leave connection security set to None as we're not currently using an encryption certificate on our server.
Click Save.
Note that the SMTP configuration data is a one-off setting for your entire company (any email account ending in @my-new-venture.com in this instance). You don't need to create new outgoing settings for each new mailbox you create.
Now we can try sending email. Return to your email client program (we're using Thunderbird for this tutorial) and create a new message.
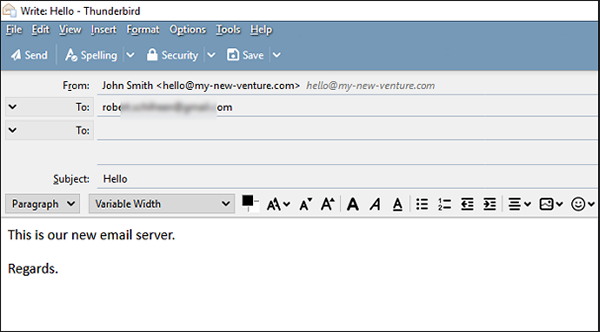
After a few seconds the message is delivered to the recipient.
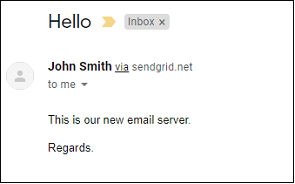
All is now working. We can both send and receive email.
In this tutorial we have set up a Windows cloud server on Alibaba Cloud and used it to host email for our company. We used the free hMailServer program to do this. We set up one mailbox (hello@my-new-venture.com) and can easily set up as many more as required. We verified that the mailbox can accept incoming mail, and we used Thunderbird to read it.
We signed up to a third-party SMTP provider to handle outgoing mail, and configured hMailServer to use this service when sending our email. This is preferable to installing SMTP facilities on our own server, as it increases the likelihood of our outgoing mail being accepted as genuine rather than flagged as spam. In this example we have used SendGrid, but other providers are also available.
To try all this for yourself, just head to www.alibabacloud.com. If you don't already have an account it's free to sign up, and there are lots of free trial offers available that allow you to evaluate most of the services, including creating Windows servers, without incurring any costs.
Alibaba Cloud Launches Tech for Change Initiative for Social Good at MWC19

2,597 posts | 774 followers
FollowAlibaba Clouder - August 15, 2019
Alibaba Clouder - February 10, 2020
Alibaba Clouder - August 31, 2018
Alibaba Clouder - August 2, 2019
Alibaba Clouder - August 2, 2019
Alibaba Cloud Community - November 23, 2021

2,597 posts | 774 followers
Follow DirectMail
A simple and efficient email service to help you send transactional notifications and batch email
Learn More ECS(Elastic Compute Service)
Elastic and secure virtual cloud servers to cater all your cloud hosting needs.
Learn More CDN(Alibaba Cloud CDN)
A scalable and high-performance content delivery service for accelerated distribution of content to users across the globe
Learn MoreMore Posts by Alibaba Clouder