By Alain Francois
When hosting a service offering web access, it is good to have a personal solution you can manage to render the web access. The LEMP stack is one of those solutions. LEMP is the acronym for Linux, Nginx, MySQL, and PHP. It makes a complete server solution for high-performance and dynamic websites. When rendering public web access, you should make it communicate through a secure protocol wrapped with a certificate by enabling the HTTPS protocol. This article explains how to install a LEMP stack service on an Ubuntu 20.04 ECS instance and secure the communication with SSL by configuring Let's Encrypt.
LEMP stack is a group of software that can serve dynamic web pages and web applications written in PHP:
The LEMP stack is one of the most popular kits as the basis for websites.
If you want to create an ECS instance, you need an account. If you don't have an account, you can get a coupon during the Alibaba Cloud March Mega Sale.
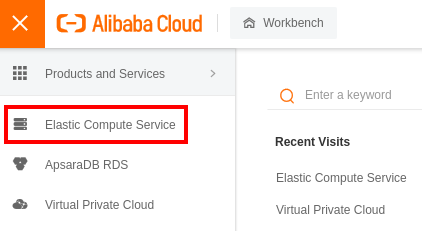
Log in to your Alibaba Cloud account and go to the _Elastic Compute Service_:
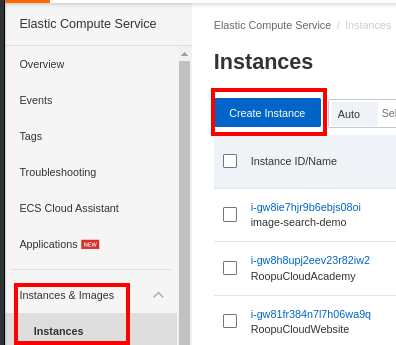
On the left panel, scroll to Instances & Images and select _Instances_. Create a new ECS instance:
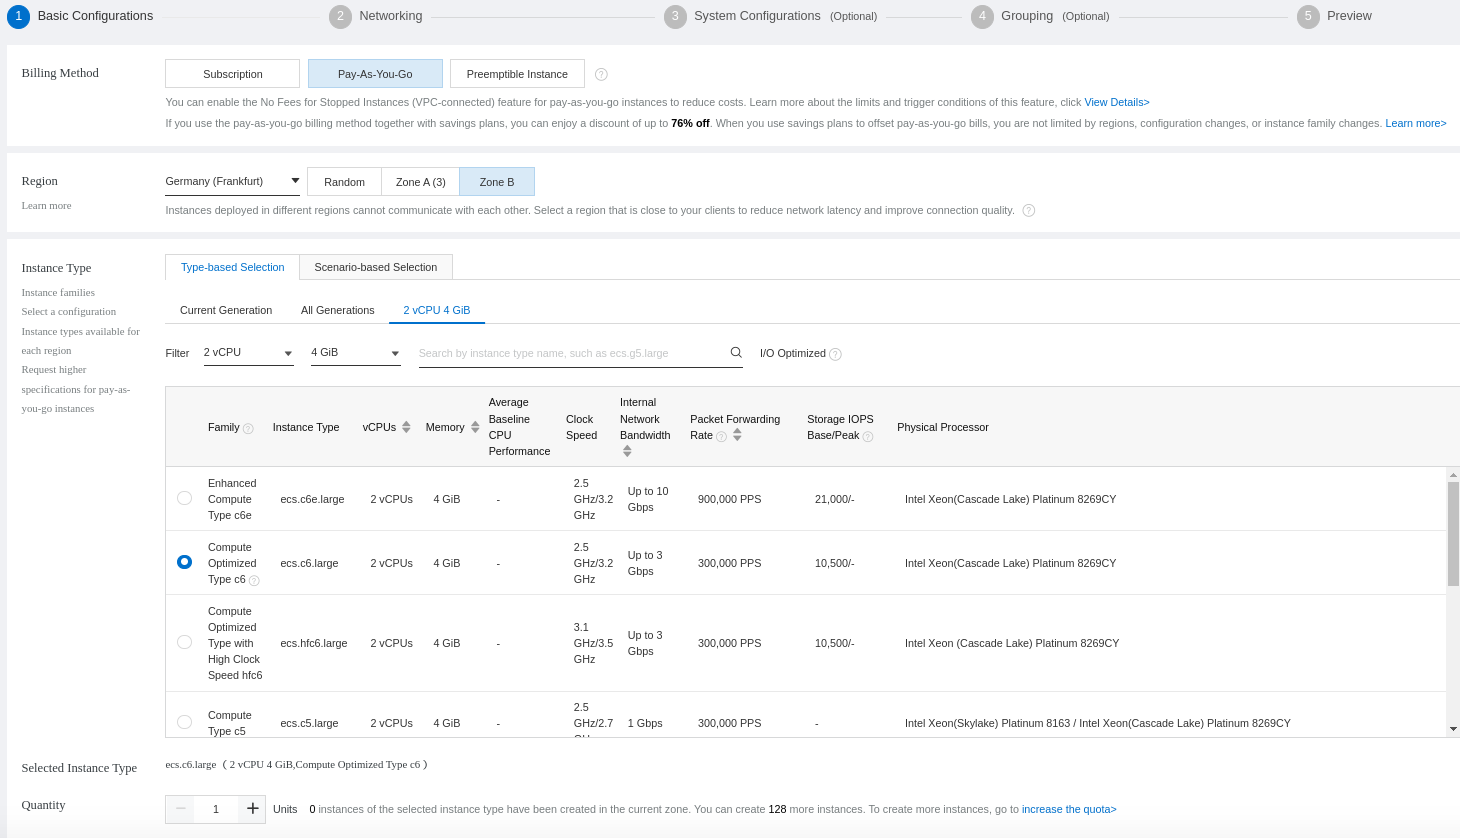
Choose your instance specifications, such as type, CPU, and memory. In our case, will create a Pay-As-You-Go instance with 02 vCPU and 04 GB memory:
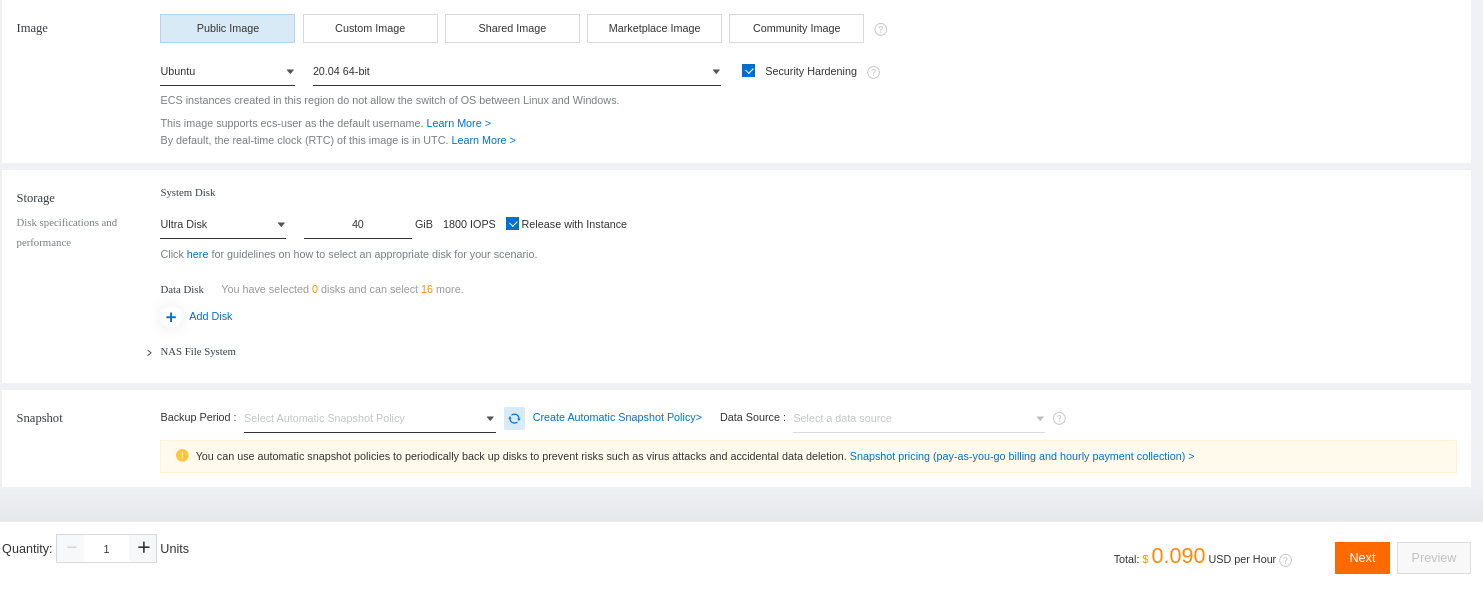
Select Ubuntu 20.04 as the operating system and define the disk size:
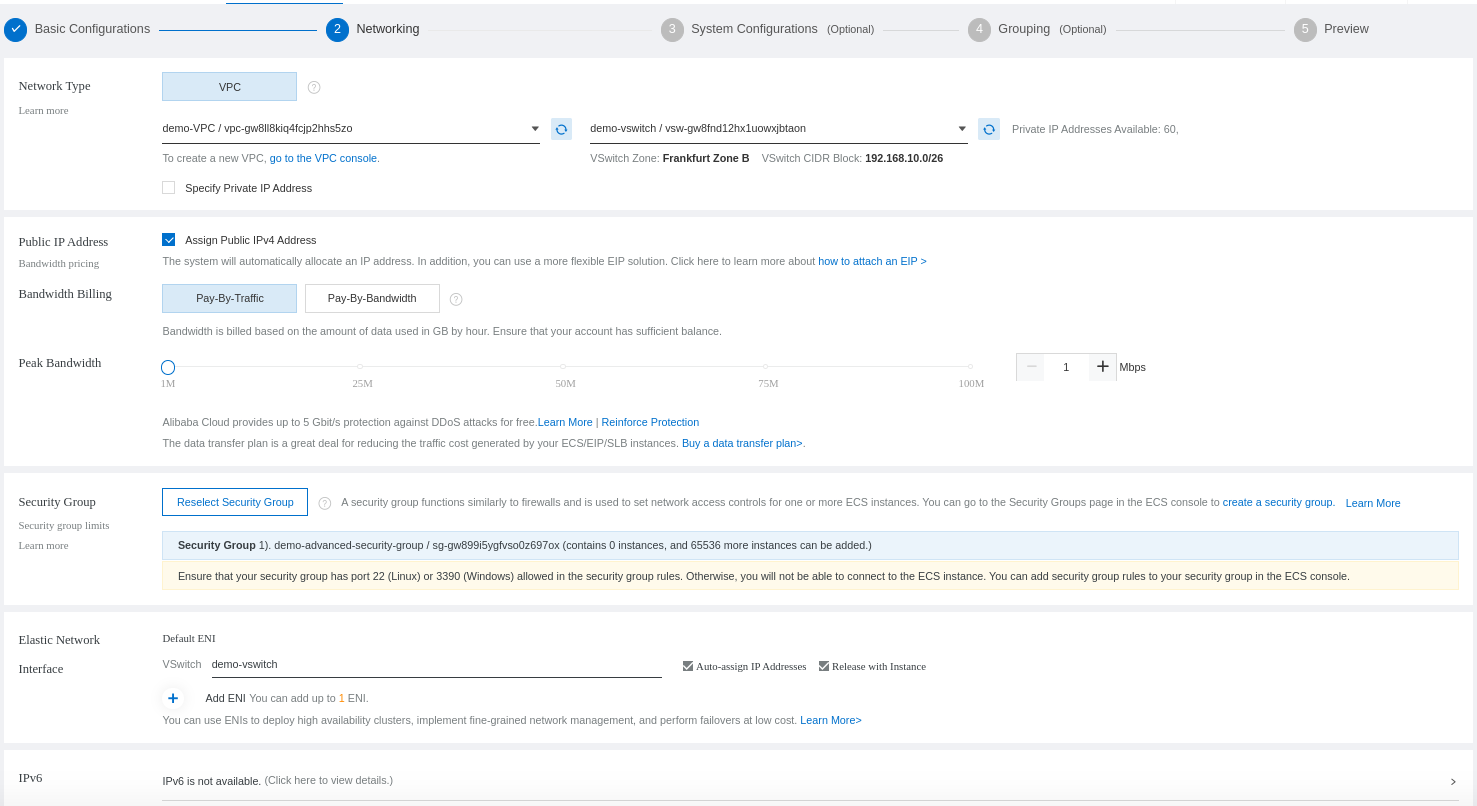
Configure your instance networking. You will have to select the VPC that will be used for your instance and the security group that will be applied to the ECS instances inside the VPC:
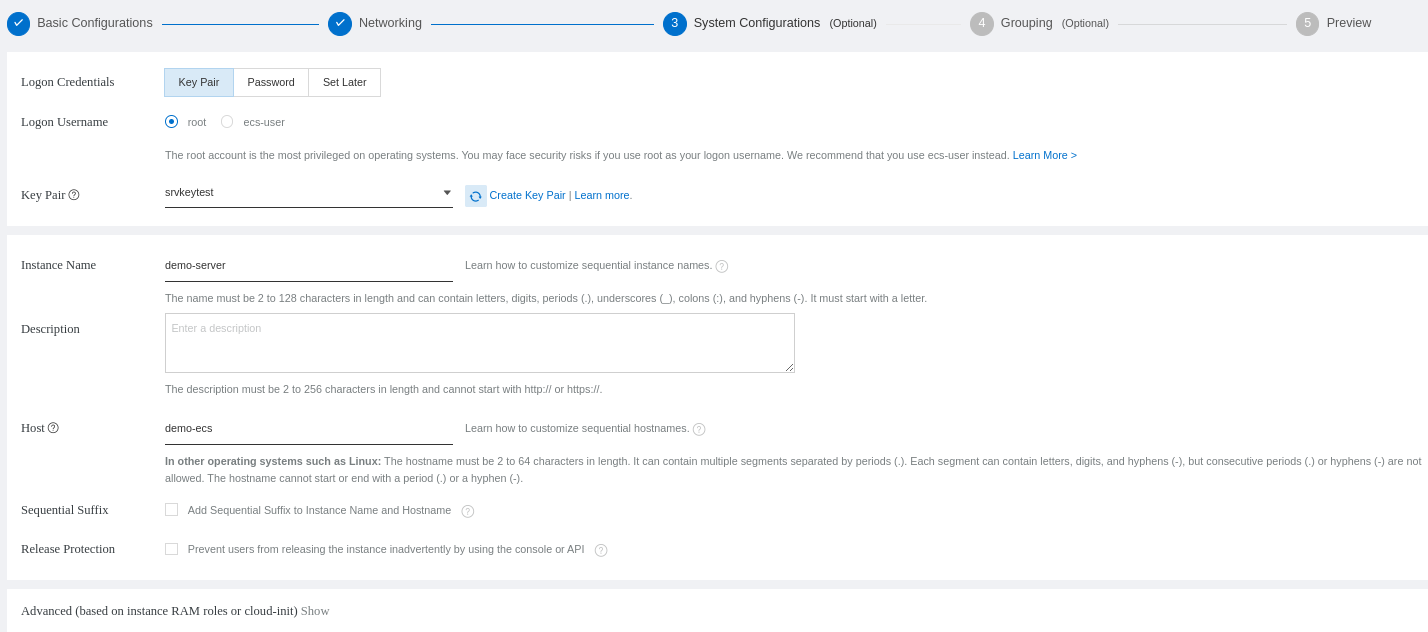
Configure how you will access your ECS (password or public key). In our case, we will select the public key. You can create a new one that will be generated:
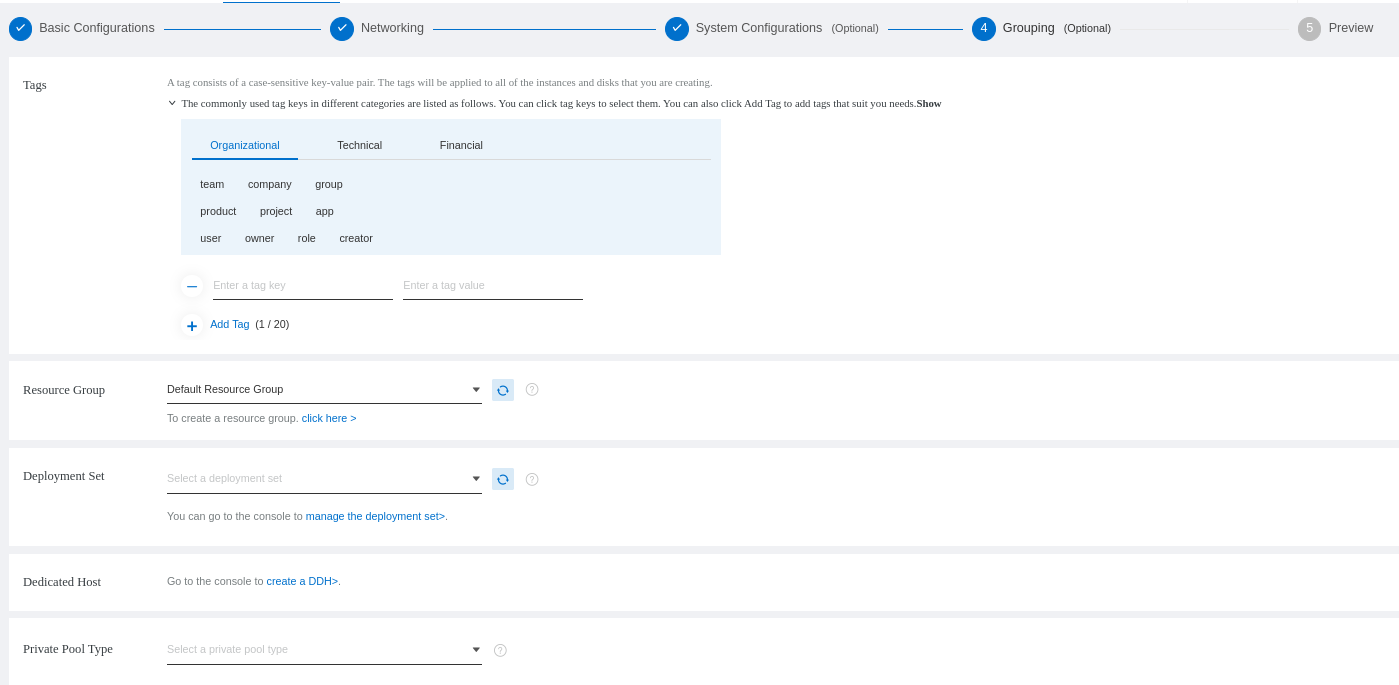
Configure the grouping. You can select the resource group and leave the rest by default:
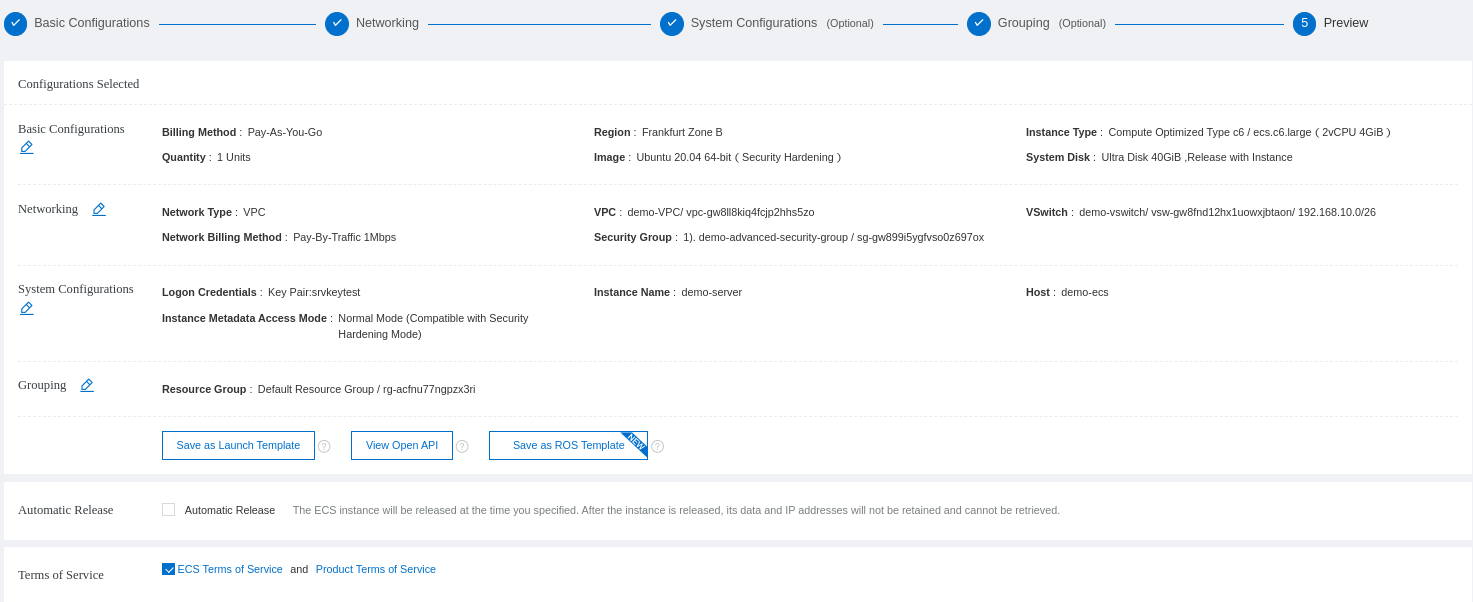
You will see a review of your ECS configuration and order:
You will be asked to return to the console or another page:
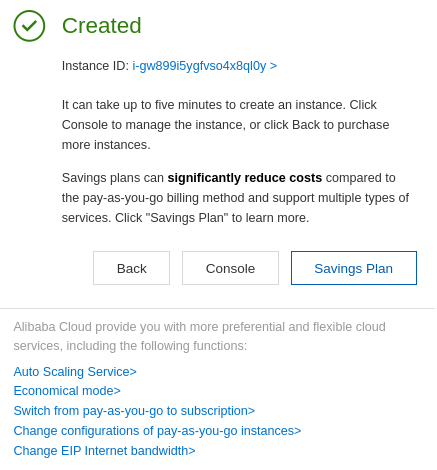
You can return to the list of your ECS instance to see the details of the instance that has been created. Take a look at the public IP you will use for access below:

Access your server to continue with the installation steps. The security group allows ssh access to your access by default.
When ordering a new Linux instance, the first thing to do is to update the package manager cache:
$ sudo apt update
Install Nginx:
$ sudo apt install nginx
Check if the firewall of your instance is opened because it should be closed by default:
$ sudo ufw status
sudo ufw status
Status: inactive
You can list the default application recognized by ufw and open the necessary ports:
$ sudo ufw app list
There you can see 4 application profiles:
Before turning on the firewall, you need to allow SSH and Nginx access. First, make sure to allow ssh access to avoid losing your connection after enabling the firewall:
$ sudo ufw allow OpenSSHIf you want to allow web access for both the HTTP and HTTPS protocol, use the Full profile:
$ sudo ufw allow 'Nginx Full'Restart the firewall:
$ sudo ufw disable && sudo ufw enableYou can check the status of the firewall:
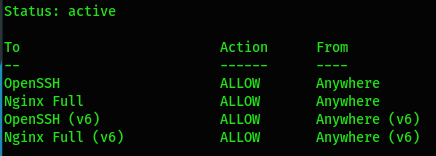
Now that the web access is activated, you can open your web browser and try to check the result with http://IP-SERVER:

Now that Nginx is installed, you will need to install the other elements of the stack.
You need to install the database to store the data for your web service. You will need to install the mysql-server package:
$ sudo apt install mysql-serverAfter the installation, it's important to secure the MySQL configuration by running a script. You will have to define a new password policy, allow (or not) the remote access of the root database user, and the tests information:
$ sudo mysql_secure_installation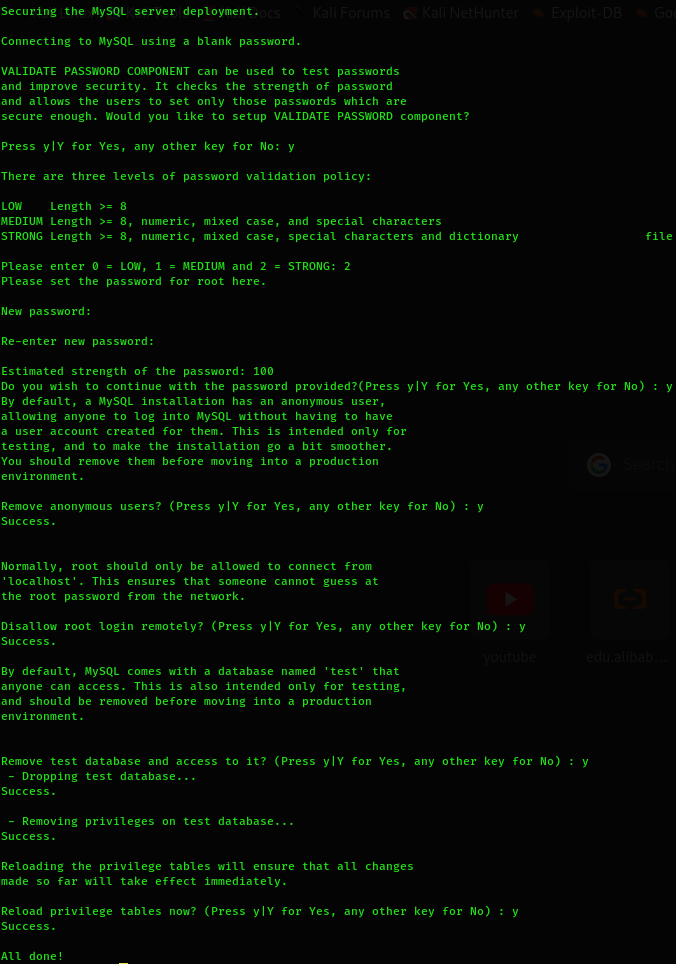
The MySQL password that has been set is not effective for logging on to the database by default because the authentication method for the administrative MySQL user is unix_socket instead of password. This means you cannot use the root administrative database user to connect from your PHP application if you only change the default authentication method to password.
You can connect to the database and create a user to operate on the database when needed:
$ sudo mysqlmysql> CREATE DATABASE demodb;
Query OK, 1 row affected (0.00 sec)mysql> CREATE USER 'demo_user'@'%' IDENTIFIED BY 'USER_DB_PASSWORD';
Query OK, 0 rows affected (0.01 sec)mysql> GRANT ALL PRIVILEGES ON *.* TO 'demo_user'@'%';
Query OK, 0 rows affected (0.00 sec)mysql> FLUSH PRIVILEGES;
Query OK, 0 rows affected (0.00 sec)If you want to change the default authentication method for the root administrative database user, check which authentication method each user uses first:
mysql> SELECT user, authentication_string, plugin, host FROM mysql.user;
You can see the result and change the default authentication method:
mysql> ALTER USER 'root'@'localhost' IDENTIFIED WITH mysql_native_password BY 'ROOT_DB_PASSWORD';
Query OK, 0 rows affected (0.00 sec)The ROOT_DB_PASSWORD should be the one you defined during the mysql_secure_installation process:
mysql> FLUSH PRIVILEGES;
Query OK, 0 rows affected (0.00 sec)Check the result:
mysql> SELECT user, authentication_string, plugin, host FROM mysql.user;Exit the MySQL command:
mysql> exit
bye
Access the database with the new database user just created:
$ sudo mysql -u demo_user -p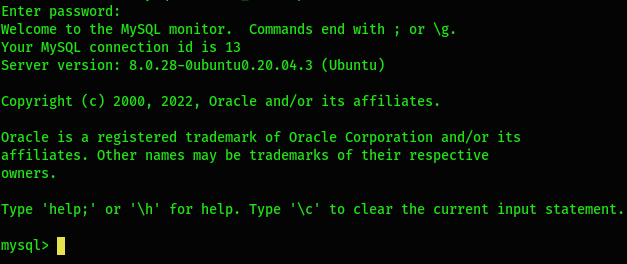
Start the MySQL service:
$ sudo systemctl start mysql.service You also need to enable it at the startup:
$ sudo systemctl enable mysql.service
Synchronizing state of mysql.service with SysV service script with /lib/systemd/systemd-sysv-install.
Executing: /lib/systemd/systemd-sysv-install enable mysql
Check if the service is running:
$ sudo systemctl status mysql.service PHP is a widely-used open-source server-side scripting language for websites and web applications to handle PHP processing:
$ sudo apt install php-fpm php-mysqlYou can check the version of PHP that is installed:
$ php -v
PHP 7.4.3 (cli) (built: Mar  2 2022 15:36:52) ( NTS )
Copyright (c) The PHP Group
Zend Engine v3.4.0, Copyright (c) Zend Technologies
with Zend OPcache v7.4.3, Copyright (c), by Zend TechnologiesYou need to configure Nginx to direct requests to the PHP processor by configuring the server blocks that can be considered virtual hosts. The server block for Nginx configuration is located at /etc/nginx/sites-available/ by default, where you need to create one:
$ sudo vim /etc/nginx/sites-available/web-demo.comserver {
listen 80;
server_name web-demo.com;
root /var/www/html;
index index.html index.htm index.nginx-debian.html index.php;
access_log /var/log/nginx/web-demo.log;
location / {
try_files $uri $uri/ =404;
}
location ~ \.php$ {
include snippets/fastcgi-php.conf;
fastcgi_pass unix:/var/run/php/php7.4-fpm.sock;
}
location ~ /\.ht {
deny all;
}
}You should notice the index directive used to indicate the default extension filename and type to be loaded by default on the root website folder.
You must enable the server block:
$ sudo ln -s /etc/nginx/sites-available/web-demo.com /etc/nginx/sites-enabled/Check if your Nginx configuration is good:
$ sudo nginx -t
nginx: the configuration file /etc/nginx/nginx.conf syntax is ok
nginx: configuration file /etc/nginx/nginx.conf test is successful
You need to create a PHP index file to check the PHP configuration:
$ sudo vim /var/www/html/index.php<?php
phpinfo();
?>You can restart your Nginx service to consider the modifications:
$ sudo systemctl restart nginx.serviceYou can try to access Nginx with the domain name:

You can also try the PHP configuration with http://domain.com/index.php:
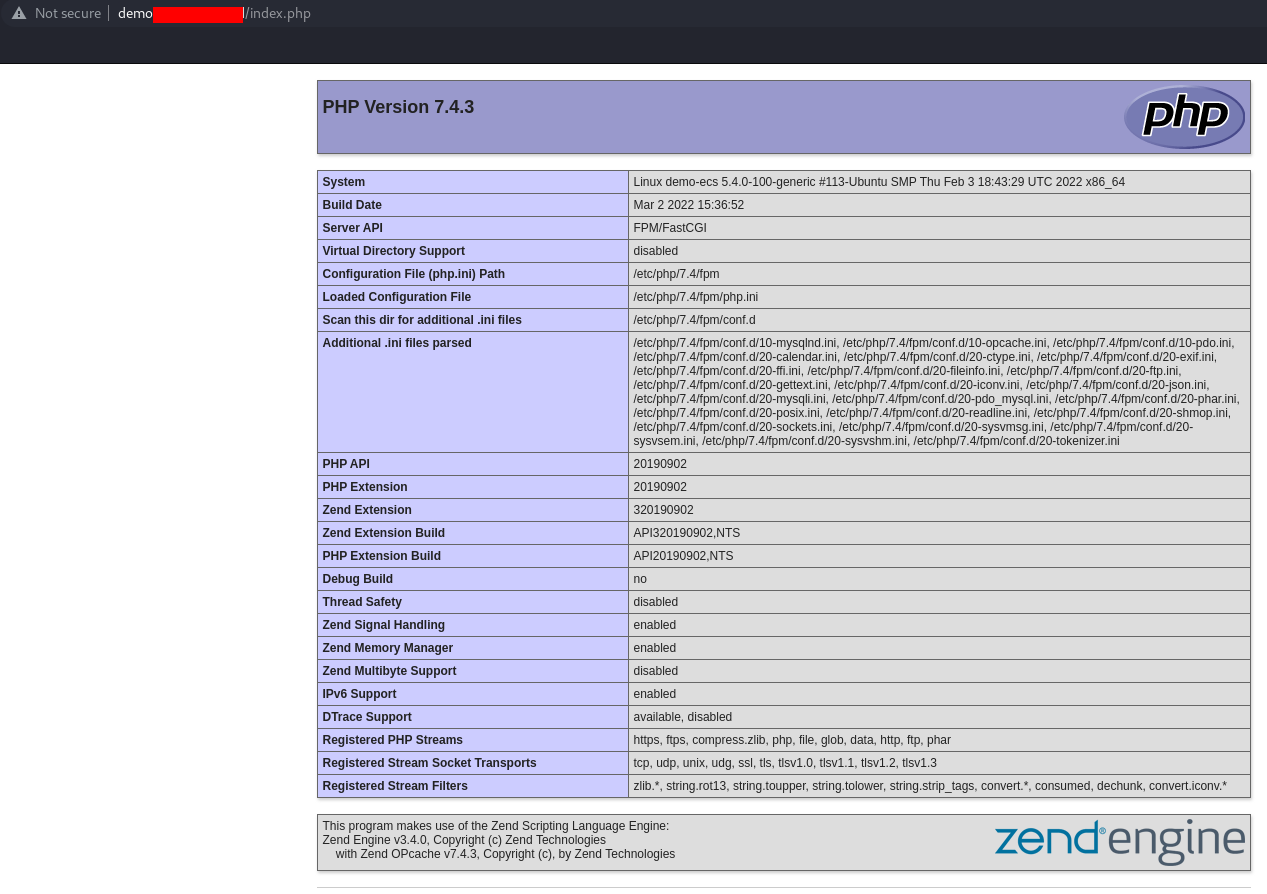
Now that Nginx is fully working with a domain name, it's important to secure the HTTP communication channel with an SSL certificate. We will install Let's Encrypt, which is a Certificate Authority (CA), providing an easy way to obtain and install free TLS/SSL certificates. It provides the certbot command to automate the required steps. Certbot works with Nginx and Apache.
You will have to renew a Let's Encrypt certificate after 90 days. You can make it manually renew for test projects, but it's best to run a script to do it automatically.
You need to install cerbot and the required package for Nginx:
$ sudo apt install certbot python3-certbot-nginx
You should try to generate the certificate for your web domain. Make sure the domain is pointing again to the good server IP. The process will generate the certificate to the virtual host automatically. It will also force the redirection of all the non-secure (HTTP) communications to the secured (HTTPS) ones:
$ sudo certbot --nginx -d web-demo.com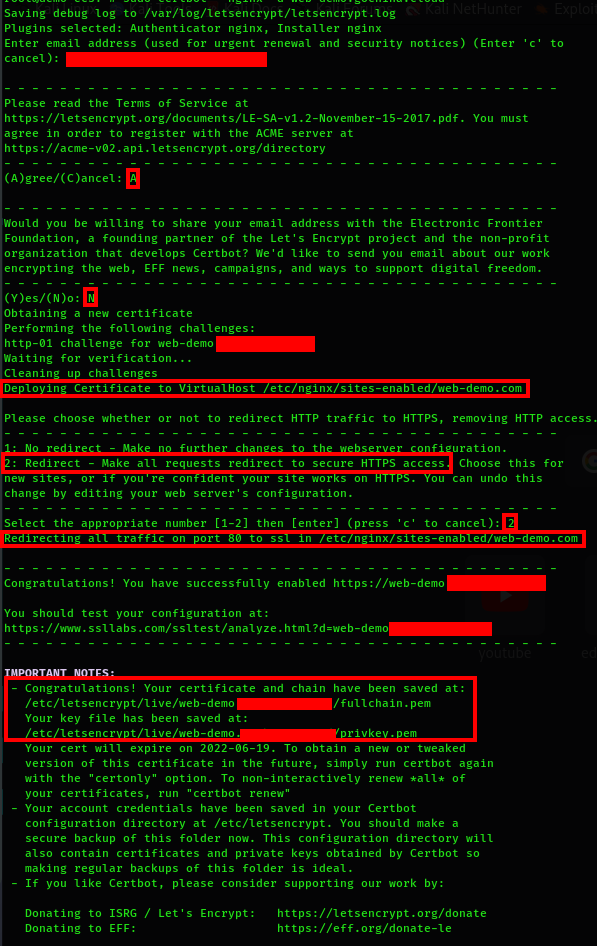
You can take a look at your server block configuration file to see the changes that have been operated for the secure channel:
$ sudo vim /etc/nginx/sites-available/web-demo.com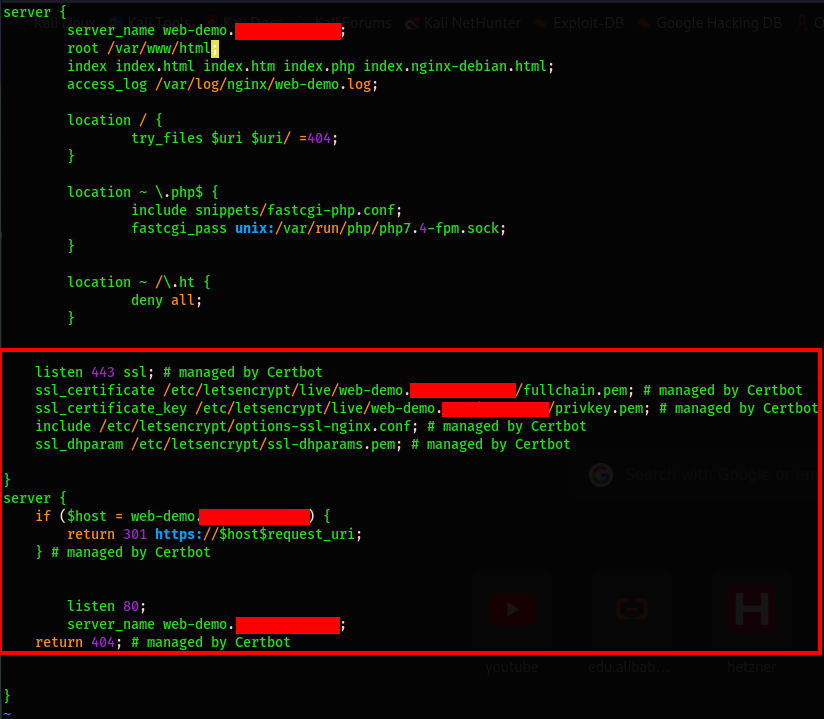
You can access it through the non-secure domain name http://web-demo.com. You will see that it will automatically redirect the traffic to the HTTPS secure channel https://web-demo.com:

Now, you have a fully secured web server configured with Let's Encrypt.
As we have explained, a Let's Encrypt certificate expires after 90 days, and it will be difficult to manually renew it. You can go through a cron job to an existing crontab file that will run the cerbot command automatically.
Open the crontab file of the current user:
$ crontab -eAdd a line that will run the command to a specific period. In our case, we will run it every day at noon quietly without generating an output by using the -- quiet command:
0 12 * * * /usr/bin/certbot renew --quietSave the result and exit the crontab editor.
Now, you know how to use Let's Encrypt to generate an SSL/TLS certificate for a registered domain name to have a simple, secure website up and running within a few minutes.
How to Install SonarQube and PostgreSQL with Docker on Alibaba Cloud ECS Instance
Hosting a Static Website Using Alibaba Cloud Object Storage Service (OSS)

1,319 posts | 463 followers
FollowAlibaba Cloud Community - March 25, 2022
Alibaba Cloud Community - March 31, 2022
Arman Ali - June 1, 2021
Alibaba Clouder - December 6, 2017
Alibaba Cloud Community - March 23, 2022
Alibaba Cloud Community - March 31, 2022

1,319 posts | 463 followers
Follow Web Hosting Solution
Explore Web Hosting solutions that can power your personal website or empower your online business.
Learn More AnalyticDB for MySQL
AnalyticDB for MySQL is a real-time data warehousing service that can process petabytes of data with high concurrency and low latency.
Learn More Security Center
A unified security management system that identifies, analyzes, and notifies you of security threats in real time
Learn More Web Hosting
Explore how our Web Hosting solutions help small and medium sized companies power their websites and online businesses.
Learn MoreMore Posts by Alibaba Cloud Community