By Alain Francois
When working on a development project, some developers need several days and a lot of effort to complete their tasks. Jenkins was developed to facilitate the continuous integration of Java applications, but it evolved to orchestrate the entire software delivery pipeline for the most popular languages and technologies used by developers today. This guide explains how to install Jenkins using Docker and how to secure web access with Let's Encrypt.
Jenkins is an open-source tool that offers a simple way to set up continuous integration and continuous delivery environment for almost any combination of languages and source code repositories. Nowadays, it is used to integrate various DevOps stages, making it easier for developers to integrate changes to the project as they can build and test the software projects continuously.
With Jenkins, the code is built and tested as soon as a developer commits the code. If the build is successful, it will deploy the source code into the test server and notify the deployment team. If the build fails, Jenkins will notify the errors to the developer team. Since it can build and test the code many times a day, it's easy to detect the cause of the failed build.
You need an account to create an ECS instance. If you don't have an account yet, you can get a coupon to create one during the Alibaba Cloud March Mega Sale.
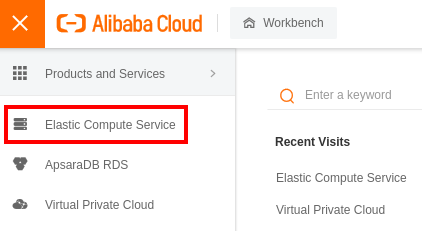
Log into your Alibaba Cloud account and go to the Elastic Compute Service:
On the left panel, scroll to Instances & Images and select Instances to create a new ECS instance:
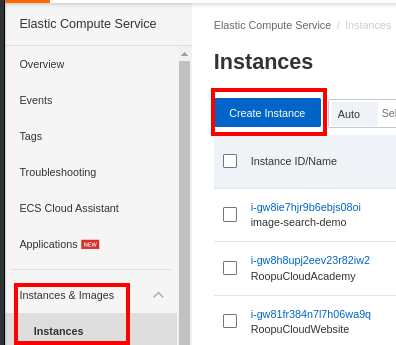
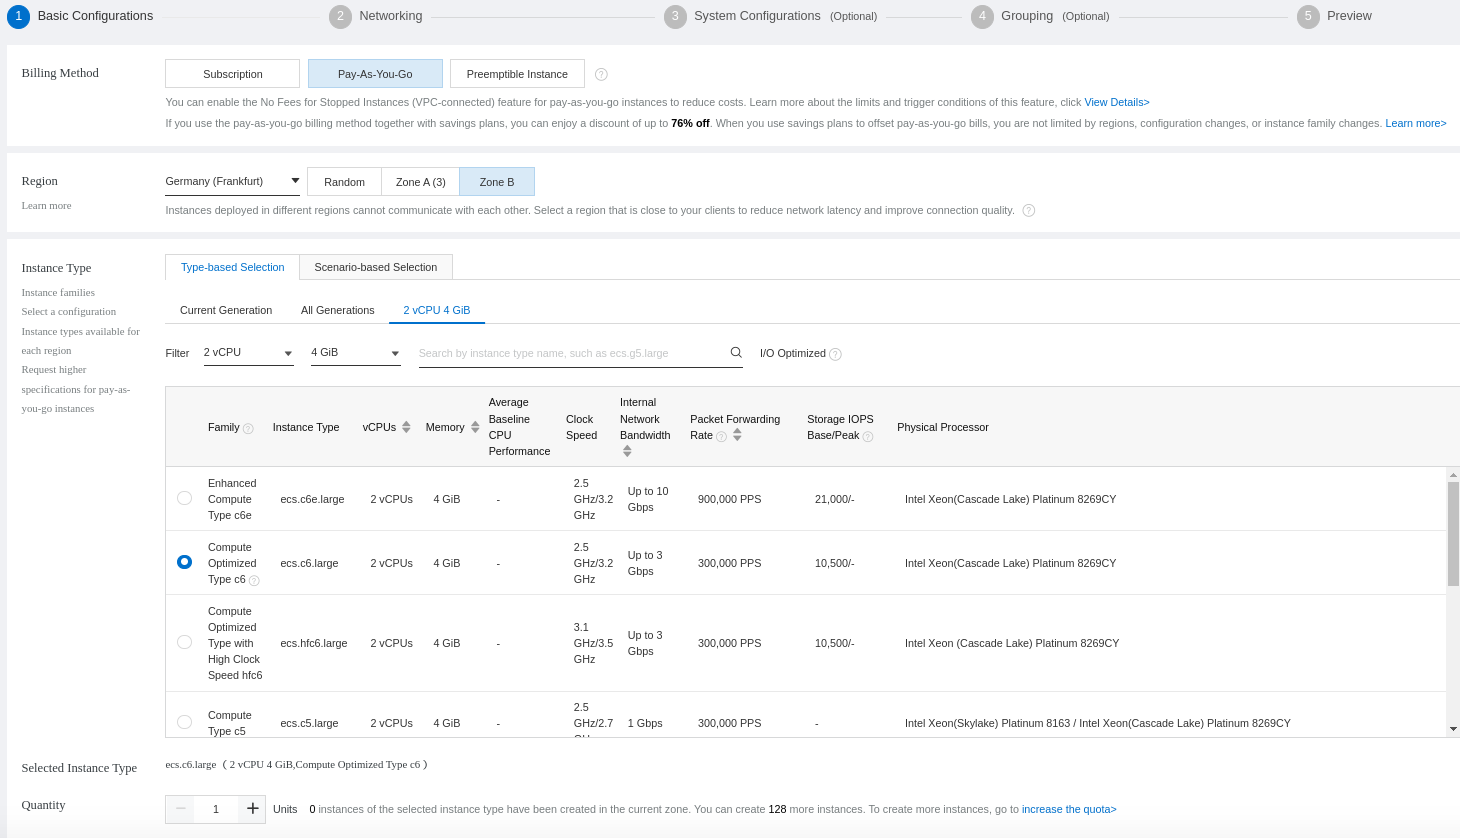
Before you start, we recommend using a Linux ECS instance with root privileges and a minimum of 4GB RAM and 2vCPU cores for basic comfortable operations. We will create a Pay-As-You-Go instance with 2 vCPU and 4 GB memory:
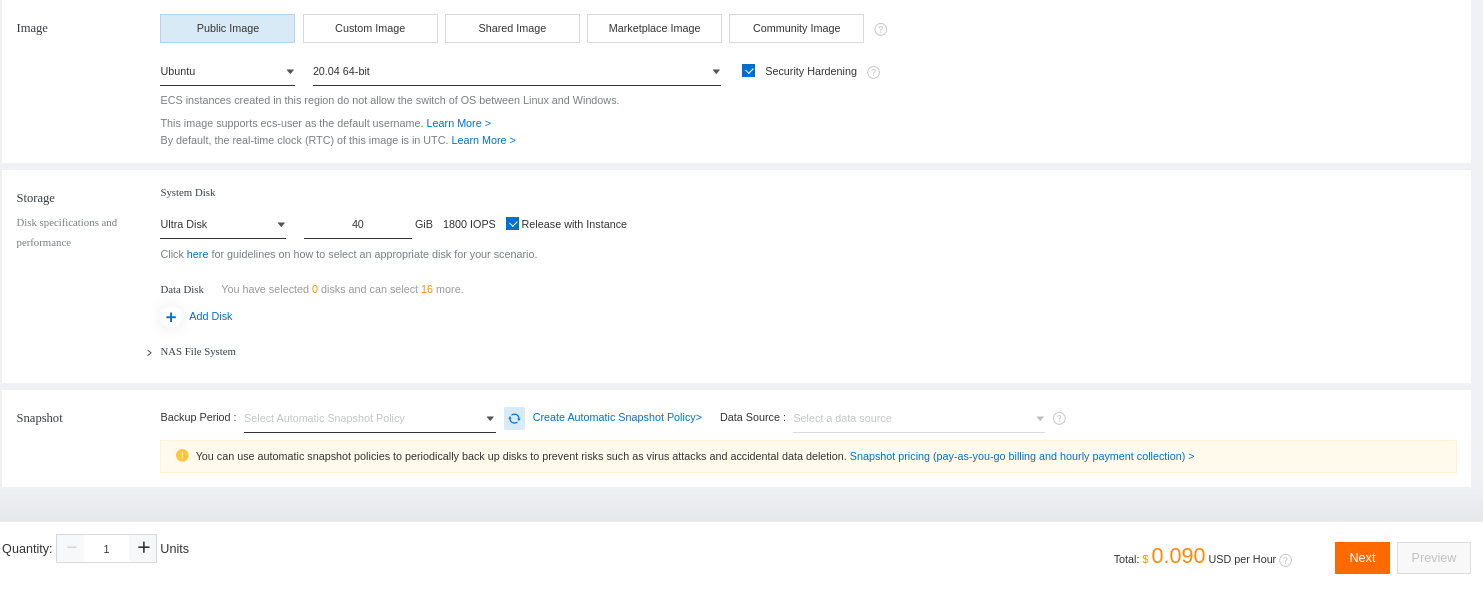
Select the operating system and define the disk size:
Select the VPC that will be used for your instance and tick it to assign a public IP:
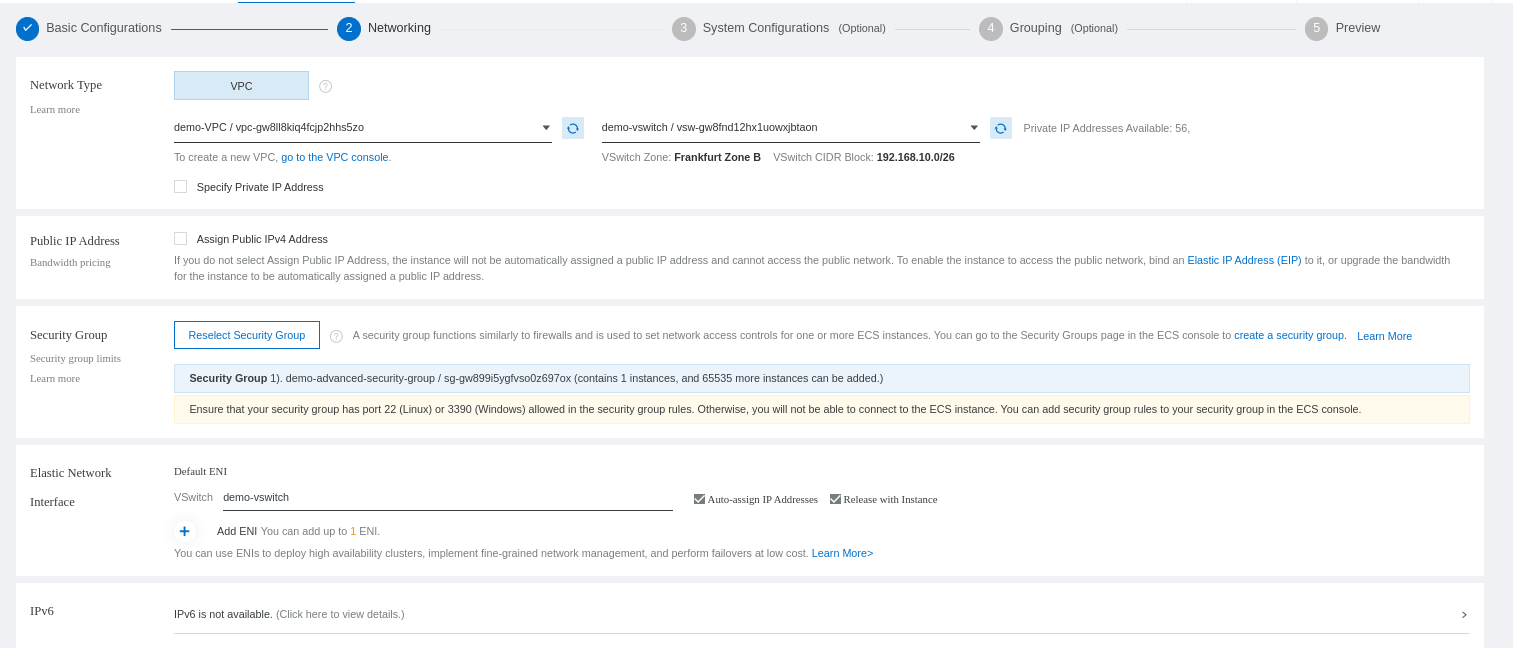
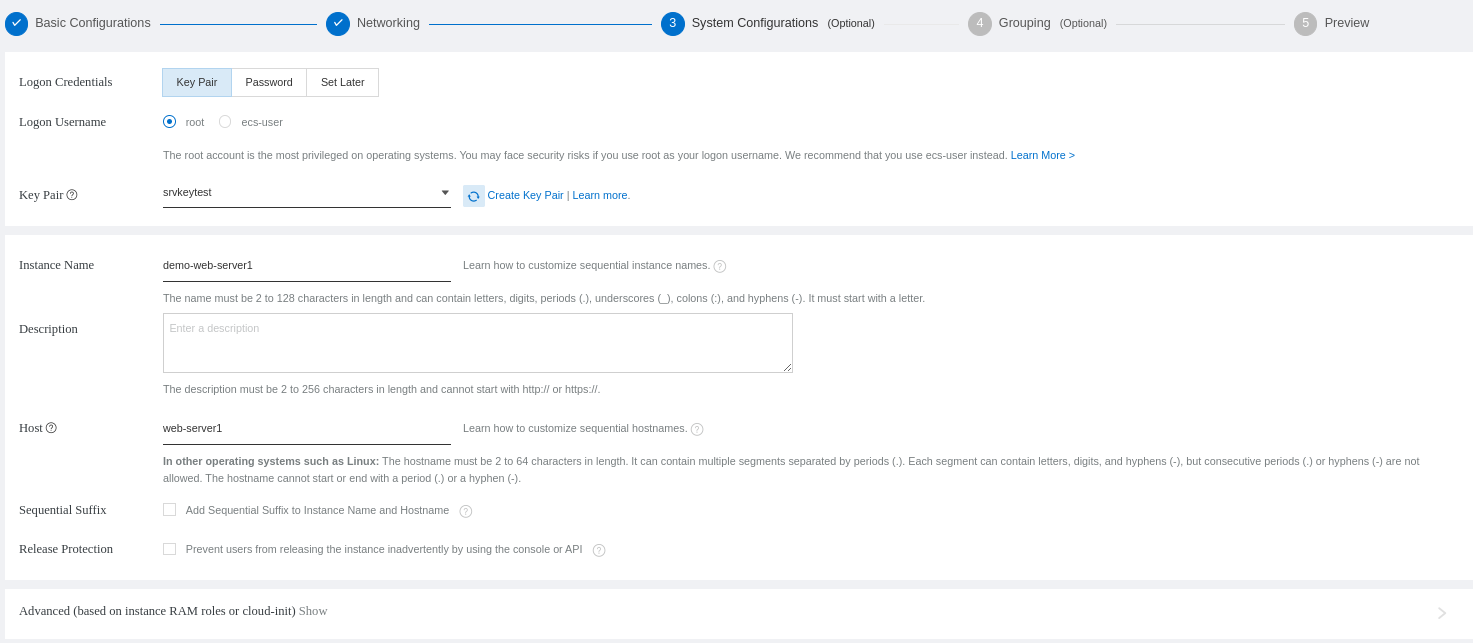
Configure if you will access your ECS with a password or a public key:
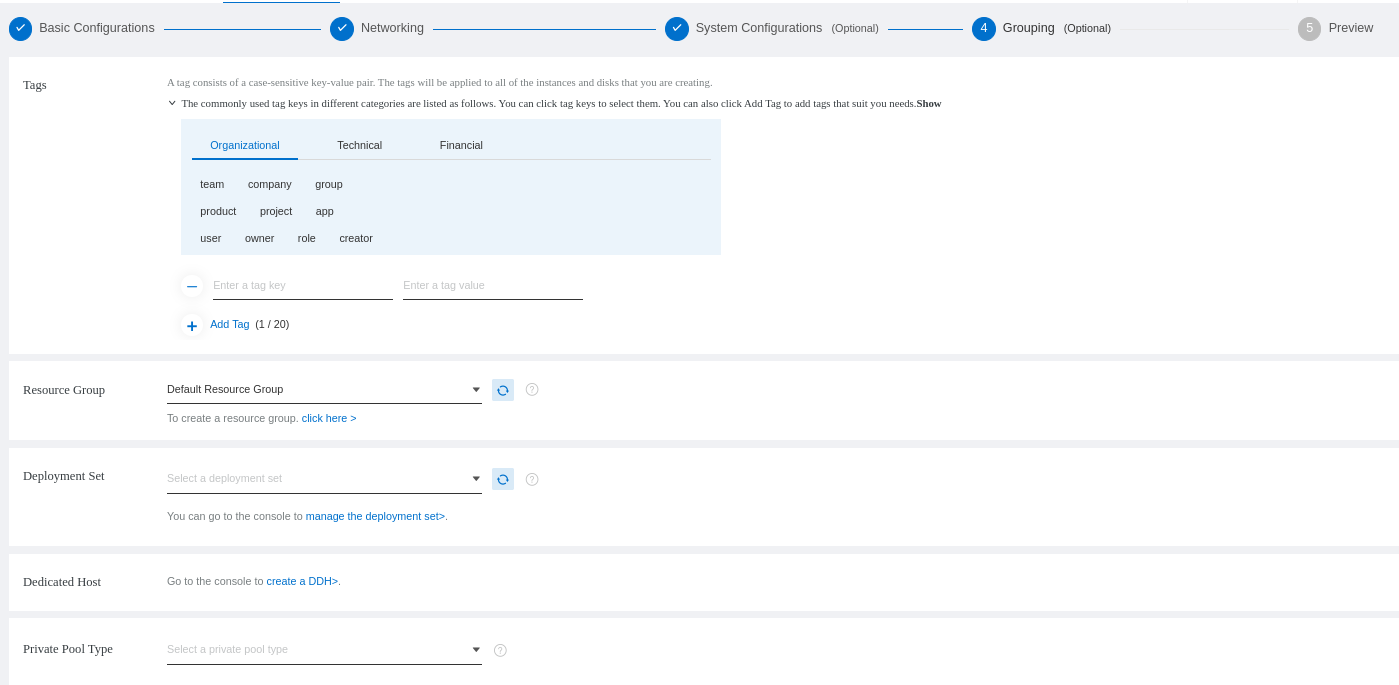
In the next step, you can select the default resource group:
You will see a review of your ECS configuration and confirm your order. Now, you can see your new instance. Notice the public IP for the remote access later:

Access your server and make sure to update the system package manager first:
$ sudo apt update
Since it is a fresh server, you need to make sure to allow SSH access to prevent connection loss after enabling the firewall:
$ sudo ufw allow OpenSSHRestart the firewall for the changes to be effective:
$ sudo ufw disable && sudo ufw enableYou need to install Docker next. We will show you the procedure on a Debian-based system.
Update the cache of the server and set up the repository over HTTPS:
$ sudo apt update && sudo apt install ca-certificates curl gnupg lsb-releaseAdd the official Docker GPG key:
$ curl -fsSL https://download.docker.com/linux/debian/gpg | sudo gpg --dearmor -o /usr/share/keyrings/docker-archive-keyring.gpgSet the stable repository of Docker regarding if your operating system is Ubuntu 20.04 or Debian 9.9:
On Ubuntu 20.04:
$ echo "deb [arch=$(dpkg --print-architecture) signed-by=/usr/share/keyrings/docker-archive-keyring.gpg] https://download.docker.com/linux/ubuntu $(lsb_release -cs) stable" | sudo tee /etc/apt/sources.list.d/docker.list > /dev/nullOn Debian 9.9:
$ echo "deb [arch=$(dpkg --print-architecture) signed-by=/usr/share/keyrings/docker-archive-keyring.gpg] https://download.docker.com/linux/debian $(lsb_release -cs) stable" | sudo tee /etc/apt/sources.list.d/docker.list > /dev/nullYou need to update the cache again:
$ sudo apt updateFinally, you can install Docker Engine:
$ sudo apt install docker-ce docker-ce-cli containerd.io
You will need to run the Docker command with the sudo privileges by default. If you want to avoid doing that, you need to add the name of the user that will operate the Docker command to the Docker group:
$ sudo usermod -aG docker franckIf you are connected with that user, you need to disconnect and reconnect to the server for the changes to take effect. We need to enable Docker at the startup if the server has to be rebooted:
$ sudo systemctl enable docker Start the service, just in case:
$ sudo systemctl start docker Then, you can try to run a Docker command without sudo:
$ docker ps
CONTAINER ID   IMAGE     COMMAND   CREATED   STATUS    PORTS     NAMES
Now that the firewall is up and Docker installed, you can continue with the different container services.
Now that Docker is running, we can look at some Jenkins repositories on the Docker Hub:
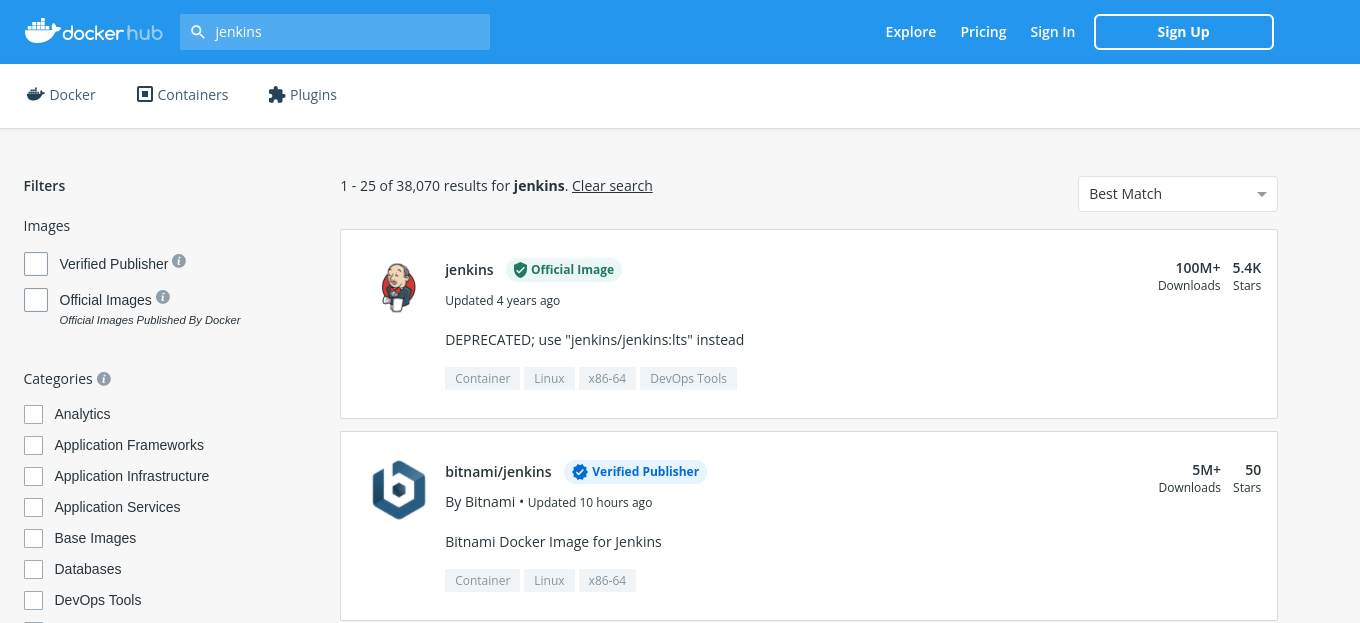
As you can see, the official Jenkins repository when writing this article was last updated four years ago. It means the available images are not considering the recent Log4Shell CVE security. In our case, we will consider the second repository of Jenkins packaged by bitnami. We will pull the latest version of Jenkins bitnami (for Log4Shell CVE consideration):
$ docker pull bitnami/jenkins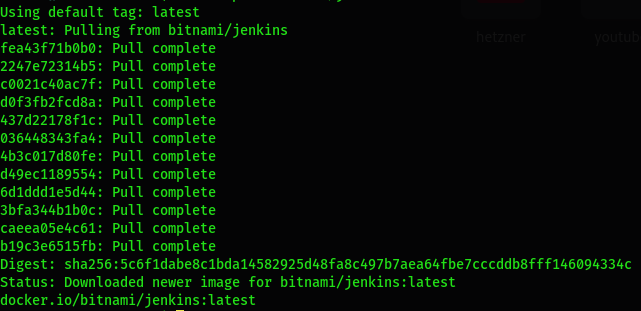
Now, we need to use the command to run Jenkins. Before using our command, make sure you have bound your domain name to the public IP of your ECS because we will configure Nginx for domain access in the next step. We will use some environment variables to set some values and persistent volume to store the data on the host:
JENKINS_USERNAME: Jenkins admin username for dashboard access. If you don't set one, the default value is user.JENKINS_PASSWORD: Jenkins admin password. If not set, the default value is bitnami.$ docker run -d --name jenkins-demo \
-v /opt/volume/jenkins-demo:/bitnami/jenkins \
-p 8080:8080 \
-e VIRTUAL_HOST=jenkins-demo.com \
-e VIRTUAL_PORT=8080 \
-e JENKINS_USERNAME='jenkins' \
-e JENKINS_PASSWORD='JENKINS_PASSWORD' \
-u root \
bitnami/jenkins:latestNote: The -p 8080:8080 will help check if we can access the Jenkins page via IP:PORT before the configuration with Nginx. You need to open port 8080 on your firewall and the Security Group of your ECS instance. You can follow our guide on the VPC and Security Group.
Check if the container is running:
$ docker ps
CONTAINER ID   IMAGE                    COMMAND                  CREATED         STATUS         PORTS                                                            NAMES
897f1c0bb863   bitnami/jenkins:latest   "/opt/bitnami/script…"   5 seconds ago   Up 5 seconds   8443/tcp, 0.0.0.0:8080->8080/tcp, :::8080->8080/tcp, 50000/tcp   jenkins-demo
Open your browser and try to access the page http://IP:8080:
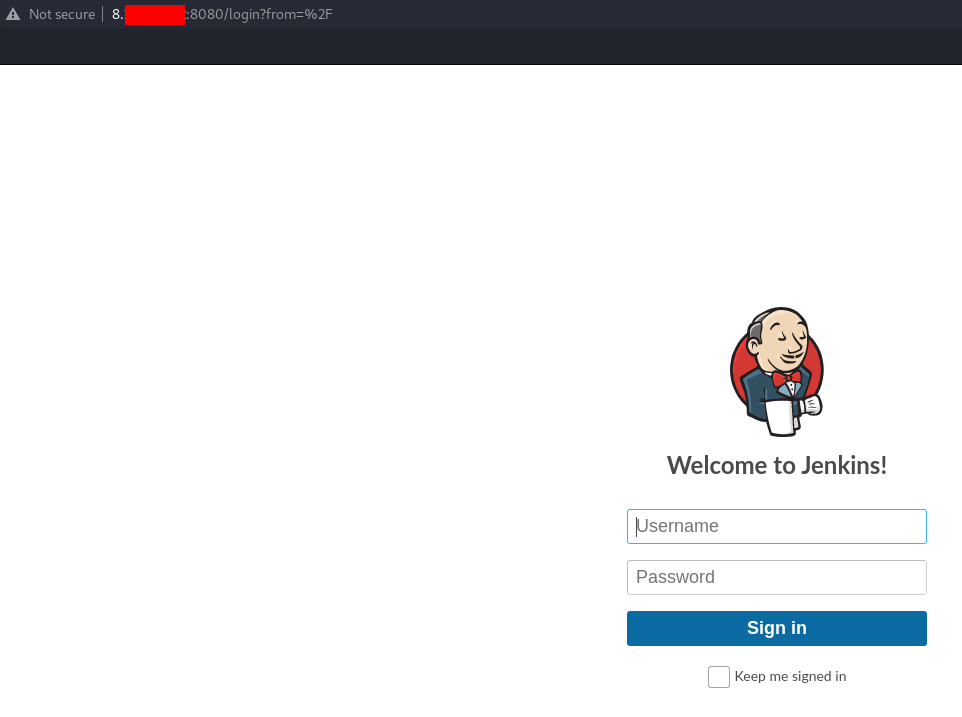
Now, we need to install Nginx for a domain name access.
Now that Docker is working fine, let's update the system package manager and install Nginx:
$ sudo apt update && sudo apt install nginx
You need to list the default application recognized by ufw to allow the appropriate application (or protocol):
$ sudo ufw app list
We will authorize the profile Nginx Full to allow web access for both the HTTP and HTTPS protocols:
$ sudo ufw allow 'Nginx Full'Restart the firewall:
$ sudo ufw disable && sudo ufw enableNow we need to create an Nginx virtual host configuration for Jenkins located at /etc/nginx/sites-available/ :
$ sudo vim /etc/nginx/sites-available/jenkins-demo.comserver {
listen 80;
server_name jenkins-demo.com;
access_log /var/log/nginx/jenkinsaccess.demo.log;
error_log /var/log/nginx/jenkinserror.demo.log;
proxy_buffers 16 64k;
proxy_buffer_size 128k;
location / {
proxy_pass http://127.0.0.1:8080;
proxy_next_upstream error timeout invalid_header http_500 http_502 http_503 http_504;
proxy_redirect off;
proxy_set_header Host $host;
proxy_set_header X-Real-IP $remote_addr;
proxy_set_header X-Forwarded-For $proxy_add_x_forwarded_for;
proxy_set_header X-Forwarded-Proto http;
}
}You must enable the server block:
$ sudo ln -s /etc/nginx/sites-available/jenkins-demo.com /etc/nginx/sites-enabled/Check the configuration file:
$ sudo nginx -t
nginx: the configuration file /etc/nginx/nginx.conf syntax is ok
nginx: configuration file /etc/nginx/nginx.conf test is successful
Restart the Nginx service:
$ sudo systemctl restart nginxNow you can try to access your service with the domain name http://web-domain.com:
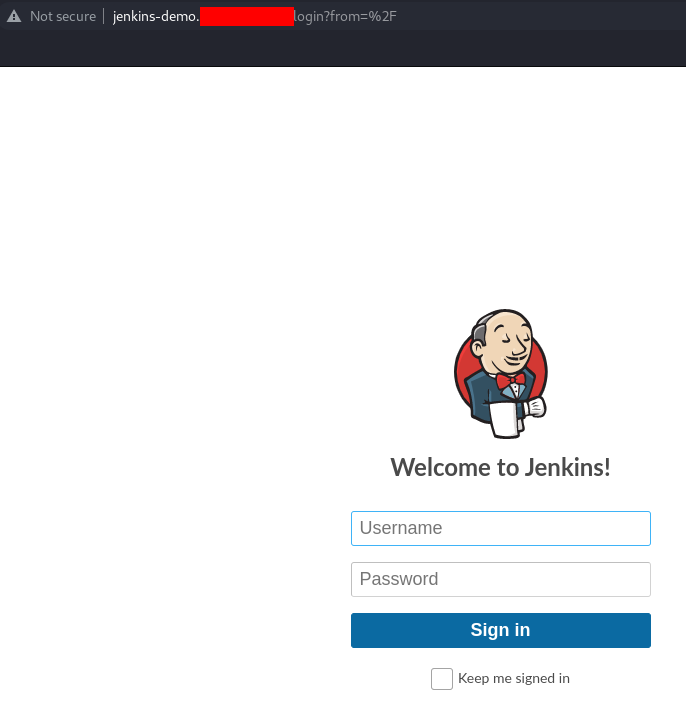
Now we must secure the access with Let's Encrypt.
Let's Encrypt uses the certbot tool to install and configure the certificate. You need to install it with the required package for Nginx:
$ sudo apt install certbot python3-certbot-nginx
You should try to generate the certificate for your web domain. Since you have already bound the domain name to the public IP of the instance, the process will generate the certificate to the virtual host automatically, and it will also force the redirection of all the non-secure HTTP communications to the secured HTTPS:
$ sudo certbot --nginx -d jenkins-demo.com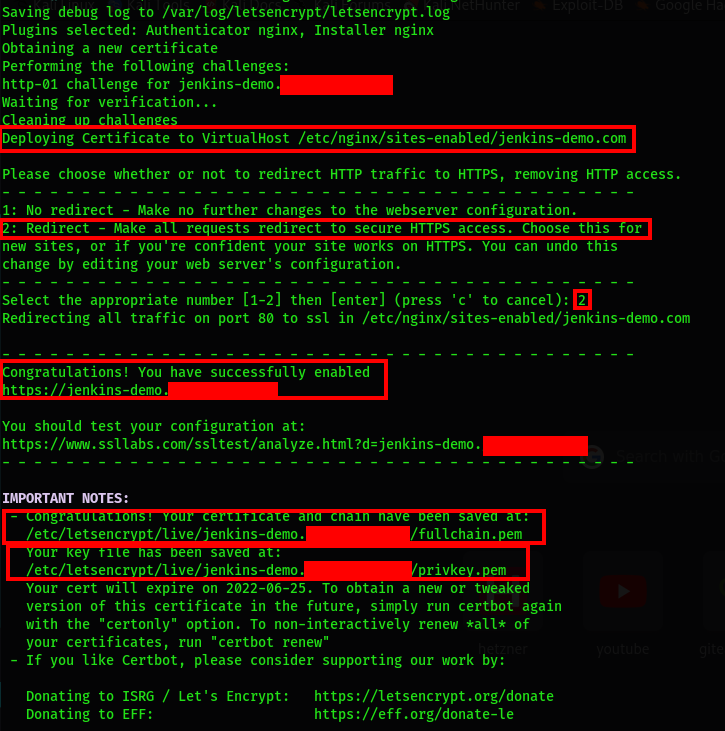
As you can see, your web configuration file has been modified to integrate the certificate automatically. We have also selected to automatically redirect HTTP to HTTPS traffic. You can look at your server block configuration file to see the changes:
$ sudo vim /etc/nginx/sites-available/jenkins-demo.com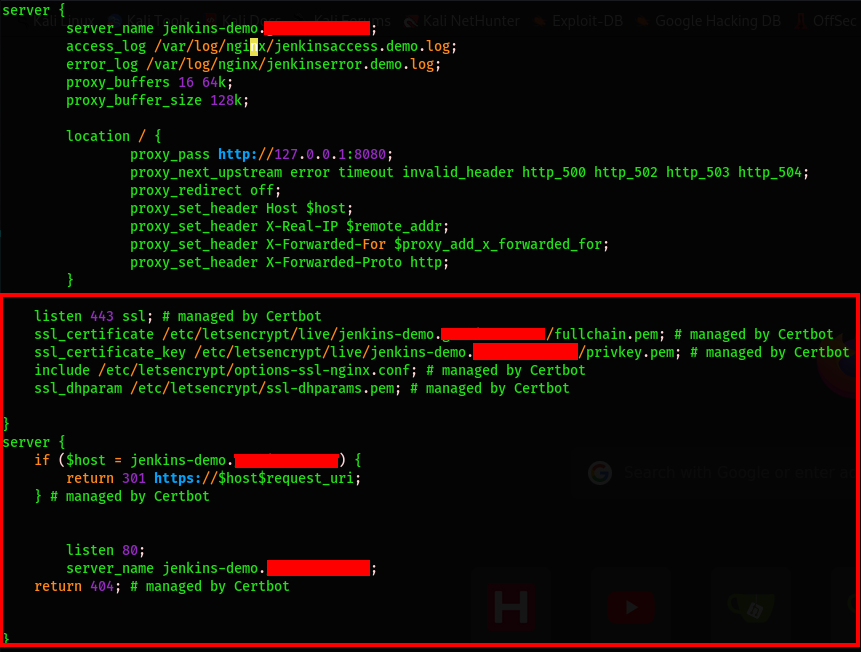
Now, you need to restart the Nginx server:
$ sudo systemctl restart nginxTry to access Jenkins through the non-secure domain name http://jenkins-demo.com. You will see that it will automatically redirect the traffic to the HTTPS secure channel https://jenkins-demo.com:
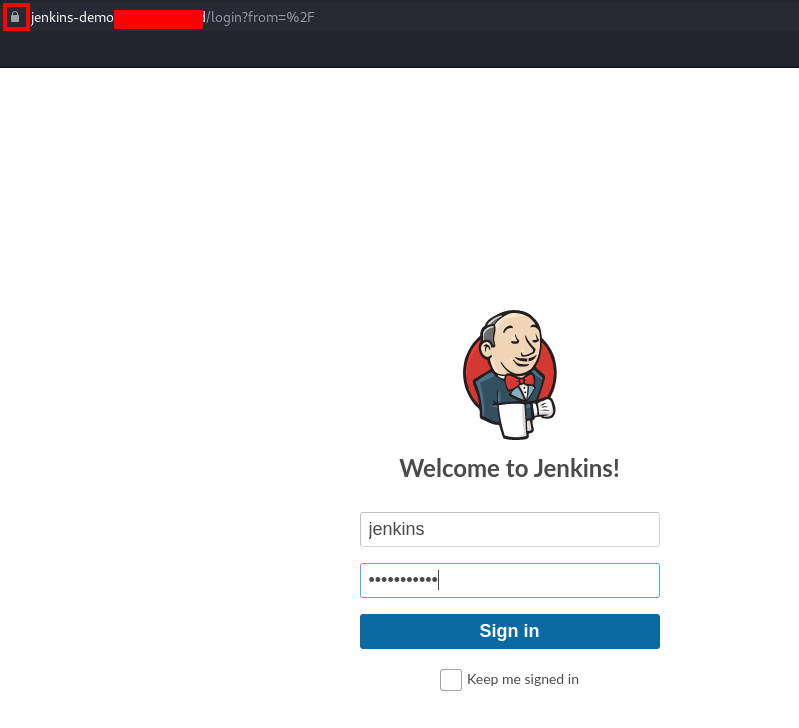
You can access your dashboard with the credentials set when running the Jenkins container:
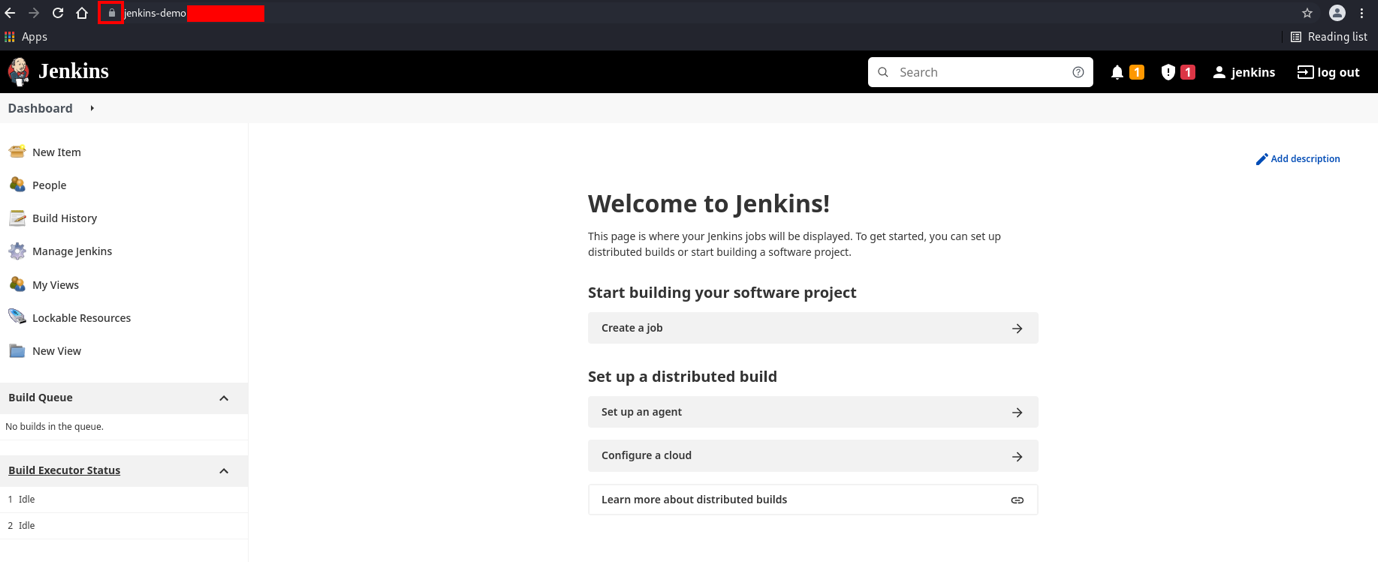
You can now start to create a project and set up your Jenkins.
We have completed the installation of Jenkins with Docker by securing the communication with Let's Encrypt. Since we need to access our service through a domain name, we need to install a reverse proxy to use Nginx.
How to Attach an Elastic IP on Your Alibaba Cloud ECS Instance
How to Monitor Alibaba Cloud ECS Instances with CloudMonitor

1,105 posts | 327 followers
FollowAlibaba Cloud Community - April 1, 2022
Alibaba Clouder - May 29, 2018
Alibaba Cloud Community - March 23, 2022
Alibaba Clouder - April 12, 2019
Alibaba Clouder - April 23, 2019
Alex - February 14, 2020

1,105 posts | 327 followers
Follow DevOps Solution
Accelerate software development and delivery by integrating DevOps with the cloud
Learn More Alibaba Cloud Flow
An enterprise-level continuous delivery tool.
Learn More ECS(Elastic Compute Service)
Elastic and secure virtual cloud servers to cater all your cloud hosting needs.
Learn More Managed Service for Prometheus
Multi-source metrics are aggregated to monitor the status of your business and services in real time.
Learn MoreMore Posts by Alibaba Cloud Community