By Hitesh Jethva, Alibaba Cloud Tech Share Author
Icinga 2 is a free, open source and powerful network resource monitoring software application which checks the availability of your resources from the network, notifies users of outages and generates performance data for reporting. You can monitor network services (SMTP, POP3, HTTP, NNTP, ping) host resources (CPU load, disk usage) and network components (switches, routers, temperature and humidity sensors) using Icinga 2. It is very similar to Nagios system monitoring application. You can easily integrate Icinga 2 with Nagios plugins. Icinga 2 comes with beautiful and a user friendly web interface to monitor large, complex environments across multiple locations.
Icinga 2 comes with a wide range of features, some of them are listed below:
• Supports Graphite and InfluxDB natively.
• Send notification via e-mail and text message, when a problem occurs.
• Customizable plugins that allows you to easily develop your own service checks.
• Provides Icinga Classic UI and Icinga Web interface for visualization of host and service status, network maps, reports, logs, etc.
• Support extra add-ons like, PNP4Nagios, NagiosGrapher and InGraph for performance graphing.
In this tutorial, we will learn how to install and configure Icinga 2 and Icinga web 2 in Ubuntu 16.04 server. We will also learn how to setup icinga2 to monitor remote hosts services.
• Alibaba Cloud Instance for Icinga Server with Ubuntu 16.04 installed.
• Alibaba Cloud Instance for Icinga Client with Ubuntu 16.04 installed.
• Static IP address 192.168.0.103 is configured on Icinga Server Instance.
• Static IP address 192.168.0.104 is configured on Icinga Client Instance.
• Domain name with proper DNS records configured.
• Root account access via SSH service.
Before starting, update your system repositories and software packages with the latest version with the following command:
apt-get update -y
apt-get upgrade -y
Next, you will need to setup your system hostname. You can do this with the following command:
hostnamectl set-hostname icingaserverNext, you can verify the system hostname using the following command:
hostnamectlNext, reboot the server instance to apply all the updates with the following command:
rebootIcinga 2 runs on web server, so you will need to install Apache server, MariaDB and PHP language with all required PHP modules in your system. You can install all the packages by just running the following command:
apt-get install apache2 libapache2-mod-php7.0 mariadb-server mariadb-client php7.0 php7.0-xml php7.0-pgsql php7.0-opcache php7.0-xml php7.0-ldap php7.0-cli php7.0-gd php7.0-intl php7.0-readline php7.0-mbstring php7.0-json php7.0-curl php7.0-mysql -yOnce all the required packages are installed, start the Apache and MariaDB service and enable them to start on boot time using the following command:
systemctl start apache2
systemctl enable apache2
systemctl start mysql
systemctl enable mysql
Next, enable Apache rewrite module to redirect HTTP connections to HTTPS using the following command:
a2enmod rewriteNext, you will need to set timezone that matches your system geographical location. You can do this by editing php.ini file:
nano /etc/php/7.0/apache2/php.iniChange the following line:
date.timezone = Asia/KolkataSave and close the file when you are finished, then restart Apache service to apply the changes:
systemctl restart apache2By default, the latest version of the Icinga is not available in Ubuntu 16.04 default repository. So you will need to add a software repository for Icinga.
First, download and add the Icinga package signing key using the following command:
curl -sSL https://packages.icinga.com/icinga.key | sudo apt-key add -Next, add the Icinga repository to the APT configuration file:
nano /etc/apt/sources.list.d/icinga.listAdd the following line at the end of the file:
deb https://packages.icinga.com/ubuntu icinga-xenial mainSave and close the file, then update the repository with the following command:
apt-get update -yOnce repository is updated, install Icinga2 and Icinga web 2 using the following command:
apt-get install icinga2 icingaweb2 icinga2-ido-mysql -yDuring the installation, you will be asked a series of question to setup the application. Answer each question as shown below:
Enable Icinga 2's ido-mysql feature? YES
Configure database for icinga2-ido-mysql with dbconfig-common? NO
Next, you will need to enable the ido-mysql and command feature in Icinga 2. You can do this using the following command:
icinga2 feature enable ido-mysql
icinga2 feature enable command
Finally, restart the Icinga2 service and enable it to start on boot time with the following command:
systemctl restart icinga2
systemctl enable icinga2Before starting, you will need to secure MariaDB database. You can do this by running the mysql_secure_installation script:
mysql_secure_installationThis script will change MySQL root password, remove anonymous users, disable remote root logins and delete the test database as shown below:
Change the root password? [Y/n] n
Remove anonymous users? [Y/n] y
Disallow root login remotely? [Y/n] y
Remove test database and access to it? [Y/n] y
Reload privilege tables now? [Y/n] y
Once MariaDB is secured, log in to MariaDB shell and create the database, Database user with a strong password for Icinga2 IDO using the following command:
mysql -u root -p

MariaDB [(none)]> CREATE DATABASE icinga2;
MariaDB [(none)]> GRANT ALL PRIVILEGES on icinga2.* to 'icinga2'@'localhost' identified by 'strongpassword';
MariaDB [(none)]> FLUSH PRIVILEGES;
MariaDB [(none)]> exit;
Next, you will also need to create the database, Database user with a strong password for Icinga web 2. You can do this using the following command:
MariaDB [(none)]> CREATE DATABASE icingaweb2db;
MariaDB [(none)]> GRANT ALL PRIVILEGES on icingaweb2db.* to 'icingaweb2'@'localhost' identified by 'strongpassword';
MariaDB [(none)]> FLUSH PRIVILEGES;
MariaDB [(none)]> exit;
Next, you will need to import the Icinga 2 IDO schema to the Icinga2 database. You can do this using the following command:
mysql -u root icinga2 -p < /usr/share/icinga2-ido-mysql/schema/mysql.sqlNext, you will need to edit Icinga2 MySQL IDO configuration file and update the database credentials manually. You can do this by editing /etc/icinga2/features-enabled/ido-mysql.conf file:
nano /etc/icinga2/features-enabled/ido-mysql.confChange the file as shown below:
user = "icinga2",
password = "strongpassword",
host = "localhost",
database = "icinga2"
Save and close the file, then restart the Icinga2 service to apply the changes:
systemctl restart icinga2By default, the UFW firewall is disabled on a newly installed Ubuntu 16.04 server instance. You can enable the UFW firewall using the following command:
ufw enable Next, allow Apache port 80, 443 and 5665 using the following command:
ufw allow 80
ufw allow 443
ufw allow 5665
ufw reloadIcinga Web 2 is the web interface for Icinga 2 that can be used to monitor your infrastructure for issues and check the health of your hosts and services.
Before accessing Icinga web 2 interface, you will need to create a setup token that authorizes us to use the web setup tool. You can create this using the following command:
icingacli setup token createYou should see the following output:
The newly generated setup token is: 4630c2921fca4da8Copy the above token, then open your web browser and type the URL http://your-domain.com/icingaweb2 or http://your-server-ip/icingaweb2, you will be redirected to the Icinga web 2 setup wizard as shown below:
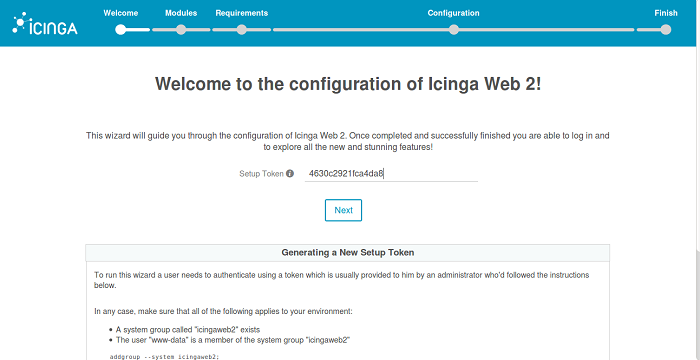
Now, paste the token which you have copy earlier in Setup Token field, then click on the Next button to begin the process:
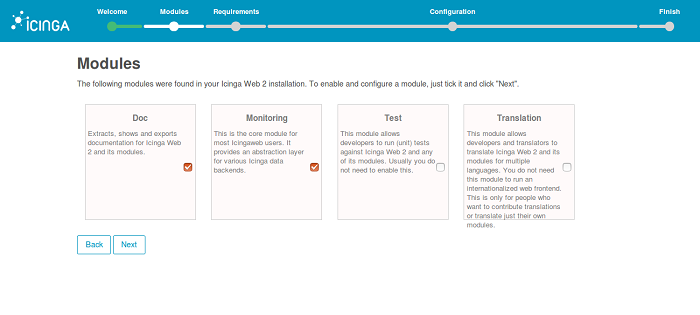
Here, you will need to choose the modules which you want to enable. Enable Doc and Monitoring modules, then click on the Next button, you should see the following page:
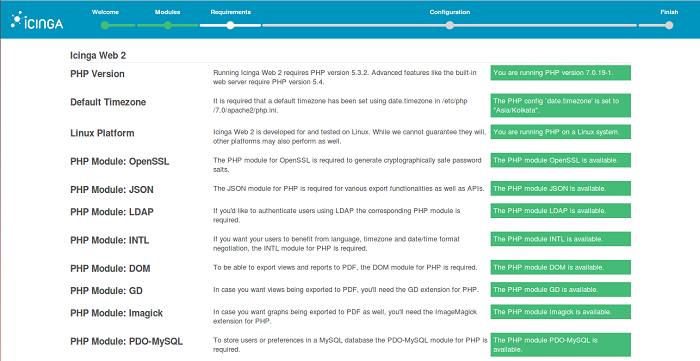
Here, Icinga2 will check your system requirements. Make sure all the required PHP modules are installed, then click on the Next button, you should see the following page:
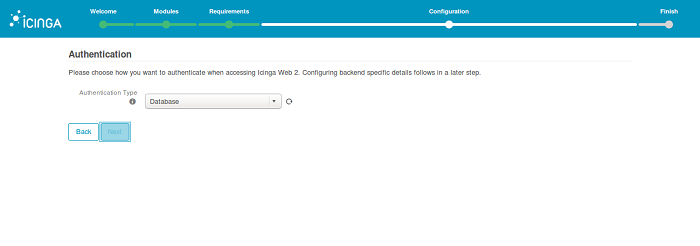
Here, you will need to choose the authentication mechanism to access the Icinga web 2. Select Authentication Type = Database and click on the Next button, you should see the following page:
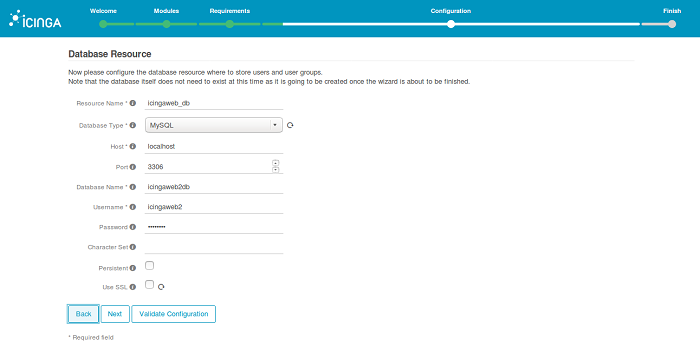
Here, enter database credentials for Icinga web 2 like, Database name, Username and Password, then click on the Next button, you should see the following page:
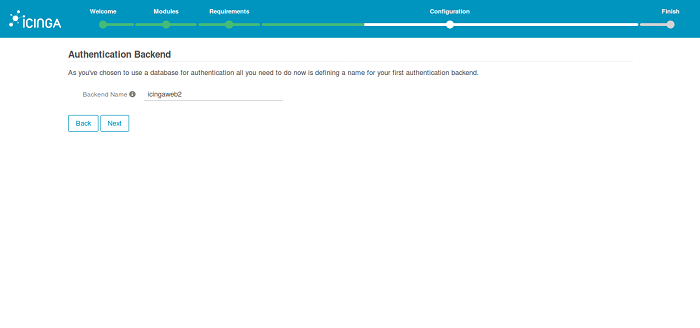
Next, define a name for database authentication backed and click on the Next button, you should see the following page:
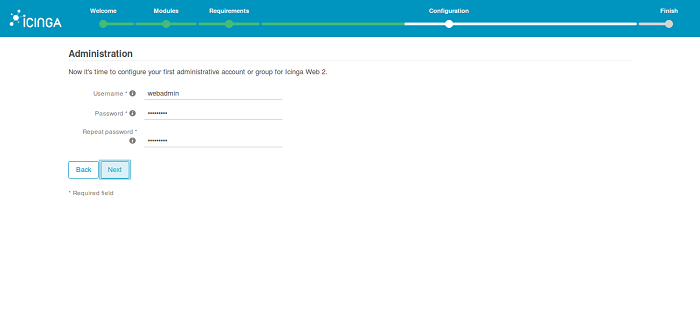
Here, enter your admin account credential to log in to Icinga2 web interface, then click on the Next button, you should see the following page:
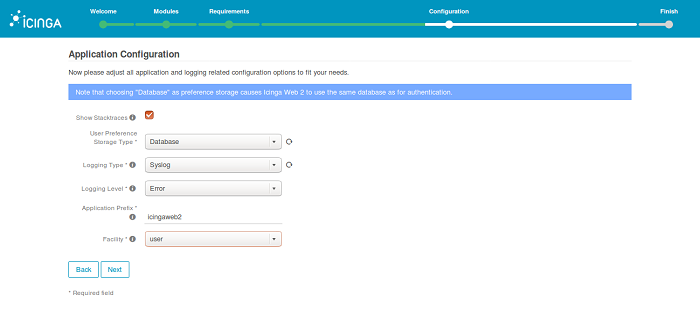
Here, provide Icinga2 application and logging information and click on the Next button, you should see the following page:
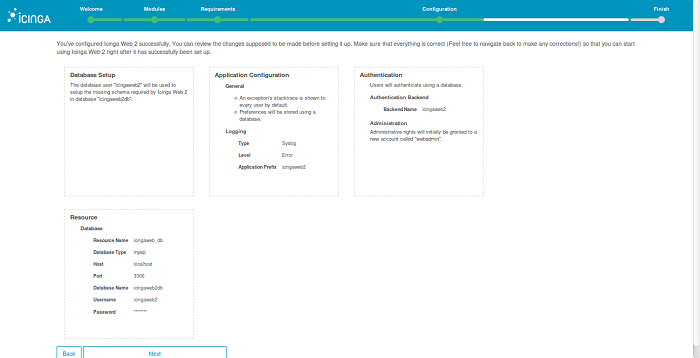
Now, review all the settings and click on the Next button, you should see the following page:

Here, click on the Next button to start the configuration process:
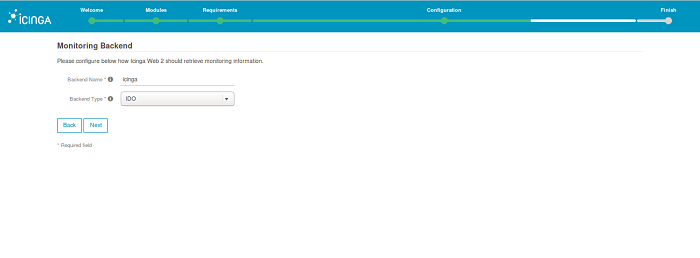
Here, enter Icinga web 2 Backend name and Backend type, then click on the Next button, you should see the following page:
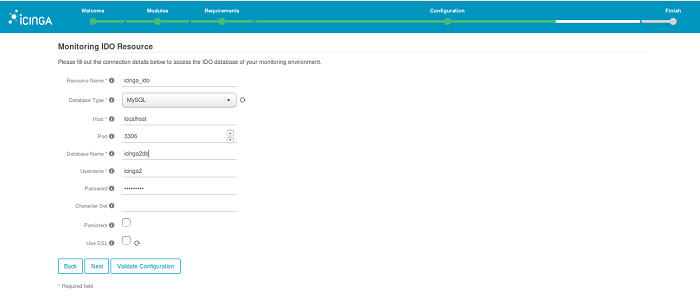
Here, enter your Icinga2 IDO database credentials and click on the Next button, you should see the following page:
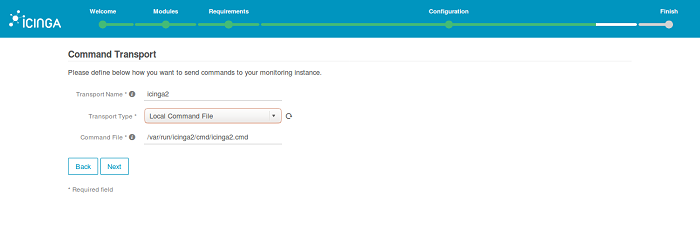
Now, just click on the Next button to continue the setup process. You should see the following page:

Here, continue with the default values provided by Icinga2 and click on the Next button, you should see the following page:
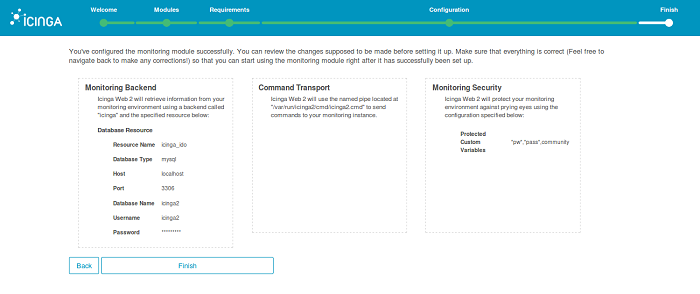
Here, review all the configurations made so far and click on the Finish button to complete the installation process. Once installation has been successfully setup, you should see the following page:
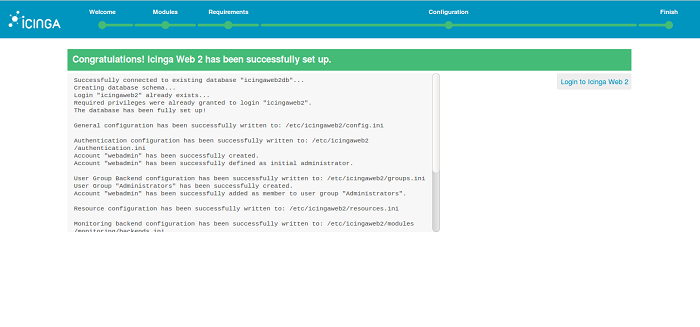
Now, click on the Login to icinga web 2 button, you should see the following page:

Here, enter your admin account credentials which you have created earlier and click on the Login button, you should see the Icinga web 2 dashboard as below:
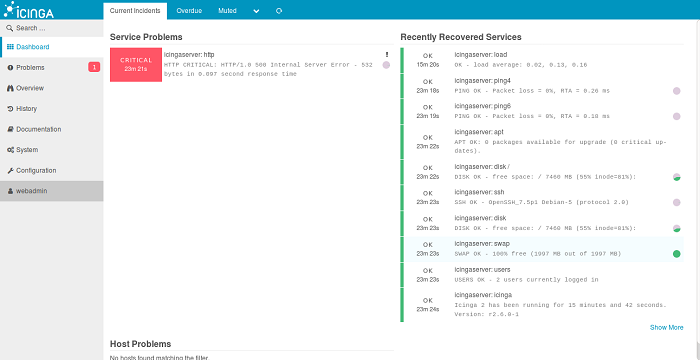
Icinga web 2 is now configured, it's time to setup and make an Icinga2 server node as master for monitoring. You can do this by running the following command:
icinga2 node wizardDuring the setup process, you will be asked several questions, answer all the questions as shown below:
Welcome to the Icinga 2 Setup Wizard!

We'll guide you through all required configuration details.

Please specify if this is a satellite setup ('n' installs a master setup) [Y/n]: n
Starting the Master setup routine...
Please specify the common name (CN) [icingaserver]:
Checking for existing certificates for common name 'icingaserver'...
Certificates not yet generated. Running 'api setup' now.
information/cli: Generating new CA.
information/base: Writing private key to '/var/lib/icinga2/ca/ca.key'.
information/base: Writing X509 certificate to '/var/lib/icinga2/ca/ca.crt'.
information/cli: Generating new CSR in '/etc/icinga2/pki/icingaserver.csr'.
information/base: Writing private key to '/etc/icinga2/pki/icingaserver.key'.
information/base: Writing certificate signing request to '/etc/icinga2/pki/icingaserver.csr'.
information/cli: Signing CSR with CA and writing certificate to '/etc/icinga2/pki/icingaserver.crt'.
information/pki: Writing certificate to file '/etc/icinga2/pki/icingaserver.crt'.
information/cli: Copying CA certificate to '/etc/icinga2/pki/ca.crt'.
Generating master configuration for Icinga 2.
information/cli: Adding new ApiUser 'root' in '/etc/icinga2/conf.d/api-users.conf'.
information/cli: Enabling the 'api' feature.
Enabling feature api. Make sure to restart Icinga 2 for these changes to take effect.
information/cli: Dumping config items to file '/etc/icinga2/zones.conf'.
information/cli: Created backup file '/etc/icinga2/zones.conf.orig'.
Please specify the API bind host/port (optional):
Bind Host []:
Bind Port []:
information/cli: Created backup file '/etc/icinga2/features-available/api.conf.orig'.
information/cli: Updating constants.conf.
information/cli: Created backup file '/etc/icinga2/constants.conf.orig'.
information/cli: Updating constants file '/etc/icinga2/constants.conf'.
information/cli: Updating constants file '/etc/icinga2/constants.conf'.
information/cli: Updating constants file '/etc/icinga2/constants.conf'.
Done.

Now restart your Icinga 2 daemon to finish the installation!
Next, restart Icinga2 service apply master node configuration:
systemctl icinga2 restartNext, Icinga 2 master node also requires a valid ticket from clients, so you will need to generate the ticket for Icinga 2 client node.
You can generate the same using the following command:
icinga2 pki ticket --cn 'icingaclient'You should see the following output:
582f9fda5c5823440e63ea0f083d105b81237b37Before starting, you will need to install Icinga 2 and the Nagios plugins on your client node. First, download and add the Icinga package signing key using the following command:
curl -sSL https://packages.icinga.com/icinga.key | sudo apt-key add -Next, add the Icinga repository to the APT configuration file:
nano /etc/apt/sources.listAdd the following line at the end of the file:
deb https://packages.icinga.com/ubuntu icinga-xenial mainSave and close the file, then update the repository with the following command:
apt-get update -yOnce repository is updated, install Icinga2 and Nagios plugins using the following command:
apt-get install icinga2 nagios-plugins -yNext, start the Icinga 2 service and enable it to start on boot time with the following command:
systemctl start icinga2
systemctl enable icinga2
Next, run the Icinga 2 node wizard on Client node as shown below:
icinga2 node wizardAnswer all the questions as shown below:
Welcome to the Icinga 2 Setup Wizard!

We will guide you through all required configuration details.

Please specify if this is a satellite/client setup ('n' installs a master setup) [Y/n]: Y

Starting the Client/Satellite setup routine...

Please specify the common name (CN) [icingaclient]:

Please specify the parent endpoint(s) (master or satellite) where this node should connect to:
Master/Satellite Common Name (CN from your master/satellite node): icingaserver

Do you want to establish a connection to the parent node from this node? [Y/n]: Y
Please specify the master/satellite connection information:
Master/Satellite endpoint host (IP address or FQDN): 192.168.0.103
Master/Satellite endpoint port [5665]: 5665

Add more master/satellite endpoints? [y/N]: N
Parent certificate information:

 Subject:     CN = icingaserver
 Issuer:      CN = Icinga CA
 Valid From:  Dec 29 15:13:35 2017 GMT
 Valid Until: Dec 25 15:13:35 2032 GMT
 Fingerprint: 53 5A BC BE 57 D3 1B F7 D0 A4 D7 F2 F4 2A 44 2F 64 53 D7 A0

Is this information correct? [y/N]: y

Please specify the request ticket generated on your Icinga 2 master (optional).
 (Hint: # icinga2 pki ticket --cn 'icingaclient'): 582f9fda5c5823440e63ea0f083d105b81237b37

Please specify the API bind host/port (optional):
Bind Host []:
Bind Port []:

Accept config from parent node? [y/N]: y
Accept commands from parent node? [y/N]: y

Reconfiguring Icinga...
Disabling feature notification. Make sure to restart Icinga 2 for these changes to take effect.
Enabling feature api. Make sure to restart Icinga 2 for these changes to take effect.

Done.

Now restart your Icinga 2 daemon to finish the installation!
Now, restart the Icinga2 server to apply all the configuration:
systemctl restart icinga2Now, Icinga 2 master and client node are connected. You will also need to setup zone file on Icinga 2 master node to define client which you want to monitor.
Switch back to master node and create a zone directory:
nano mkdir /etc/icinga2/zones.d/icingaclientNext, create a service file and host file using the following command:
nano /etc/icinga2/zones.d/icingaclient/service.confAdd the following lines:
apply Service "load" {
  import "generic-service"
  check_command = "load"
  command_endpoint = host.vars.client_endpoint
  assign where host.vars.client_endpoint
}

apply Service "procs" {
  import "generic-service"
  check_command = "procs"
  command_endpoint = host.vars.client_endpoint
  assign where host.vars.client_endpoint
}
Save the file, then create a host file:
nano /etc/icinga2/zones.d/icingaclient/icingaclient.confAdd the following lines:
object Zone "icingaclient" {
  endpoints = [ "icingaclient" ]
  parent = "icingaserver"
}

object Endpoint "icingaclient" {
  host = "192.168.0.104"
}

object Host "icingaclient" {
  import "generic-host"
  address = "192.168.0.104"
  vars.os = "Linux"
  vars.notification["mail"] = {
    groups = [ "icingaadmins" ]
  }
  vars.client_endpoint = name
}
Make sure the hostname and IP address match with client node. Save the file and restart Icinga 2 service using the following command:
systemctl restart icinga2Now, open the Icinga web 2 interface and click on the Overview > Hosts tab, you should see the newly added client node.
Congratulations! you have successfully install and configured Icinga2 server and Icinga web 2 on Ubuntu 16.04 server. You can now easily monitor your entire infrastructure from central location using Icinga web interface. For more information refer Icinga documentation page at https://www.icinga.com/docs/.
Red Hat Enterprise Linux Now Globally Available on Alibaba Cloud

2,598 posts | 770 followers
FollowAlibaba Clouder - January 4, 2019
Alibaba Clouder - May 7, 2019
Alibaba Clouder - June 13, 2019
Alibaba Clouder - September 30, 2017
Alibaba Clouder - June 13, 2019
Alibaba Clouder - September 6, 2018

2,598 posts | 770 followers
Follow Managed Service for Prometheus
Multi-source metrics are aggregated to monitor the status of your business and services in real time.
Learn More Application Real-Time Monitoring Service
Build business monitoring capabilities with real time response based on frontend monitoring, application monitoring, and custom business monitoring capabilities
Learn More Container Service for Kubernetes
Alibaba Cloud Container Service for Kubernetes is a fully managed cloud container management service that supports native Kubernetes and integrates with other Alibaba Cloud products.
Learn More ACK One
Provides a control plane to allow users to manage Kubernetes clusters that run based on different infrastructure resources
Learn MoreMore Posts by Alibaba Clouder
Start building with 50+ products and up to 12 months usage for Elastic Compute Service
Get Started for Free Get Started for Free