By Hitesh Jethva, Alibaba Cloud Tech Share Author. Tech Share is Alibaba Cloud’s incentive program to encourage the sharing of technical knowledge and best practices within the cloud community.
LibreNMS is a free and open source auto-discovering network monitoring tool for servers and network hardware. It supports wide range of network hardware and operating systems including Cisco, Linux, Juniper, Foundry, Windows, Brocade and many more. LibreNMS discover your network using OSPF, BGP, SNMP, CDP, FDP, LLDP and ARP protocols. LibreNMS comes with a lot of useful features including, Auto discovery, Email alert, Automatic Updates, iOS and Android App, Billing system and many more.
In this tutorial, we will install and configure LibreNMS on Ubuntu 16.04 with an Alibaba Cloud Elastic Compute Service (ECS) instance.
First, log in to your https://ecs.console.aliyun.com">Alibaba Cloud ECS Console. Create a new ECS instance, choosing Ubuntu 16.04 as the operating system with at least 2GB RAM. Connect to your ECS instance and log in as the root user.
Once you are logged into your Ubuntu 16.04 instance, run the following command to update your base system with the latest available packages.
apt-get update -yLibreNMS runs on the web server, written in PHP and uses MariaDB for database. So you will need to install Apache, PHP and MariaDB to your system.
First, install Apache and MariaDB by running the following command:
apt-get install apache2 mariadb-server -yOnce the installation is completed, start Apache and MariaDB service and enable them to start on boot:
systemctl start apache2
systemctl start mysql
systemctl enable apache2
systemctl enable mysql
By default, the latest version of PHP is not available in Ubuntu 16.04 default repository. So you will need to add the repository for that. You can add it by running the following command:
apt-get install software-properties-common -y
add-apt-repository ppa:ondrej/php
Next, update the repository and install PHP along with all the libraries by running the following command:
apt-get install libapache2-mod-php7.1 php7.1-cli php7.1-mysql php7.1-gd php7.1-snmp php-pear php7.1-curl snmp graphviz php7.1-mcrypt php7.1-json fping imagemagick whois mtr-tiny nmap python-mysqldb snmpd php-net-ipv4 php-net-ipv6 rrdtool git -yOnce all the packages are installed, enable required PHP modules with the following command:
phpenmod mcrypt
a2enmod php7.1
a2dismod mpm_event
a2enmod mpm_prefork
Next, you will also set Time Zone in php.ini file:
nano /etc/php/7.1/cli/php.iniMake the following changes:
date.time = Asia/KolkataSave and close the file.
By default, MariaDB installation is not secured. So you will need to secure it first. You can secure it by running the following script:
mysql_secure_installationAnswer all the questions as shown below:
Change the password for root ? N
Remove anonymous users? Y
Disallow root login remotely? Y
Remove test database and access to it? Y
Reload privilege tables now? Y
Once the MariaDB is secured, login to MariaDB shell using the following command:
mysql -u root -pEnter your root password, then create a database and user for LibreNMS:
MariaDB [(none)]> CREATE DATABASE librenmsdb;
MariaDB [(none)]> CREATE USER 'librenmsuser'@'localhost' IDENTIFIED BY 'password';
Next, grant all privileges to the LibreNMS user:
MariaDB [(none)]> GRANT ALL PRIVILEGES ON librenmsdb.* TO 'librenmsuser'@'localhost';Next, flush the privileges and exit from the MariaDB shell:
MariaDB [(none)]> FLUSH PRIVILEGES;
MariaDB [(none)]> exit;First, add new user with name librenms and make a member of the www-data group:
useradd librenms -d /opt/librenms -M -r
usermod -a -G librenms www-data
Next, change the directory to the /opt and download the latest version of LibreNMS using the following command:
cd /opt/
git clone https://github.com/librenms/librenms.git librenms
Next, change the directory to the librenms and install all required dependencies by running the following command:
./scripts/composer_wrapper.php install --no-devNext, give proper permissions to the librenms directory:
chown -R librenms:librenms /opt/librenms/
chmod -R 755 /opt/librenmsNext, you will need to create an apache virtual host file for LibreNMS. You can do this with the following command:
nano /etc/apache2/sites-available/librenms.confAdd the following lines:
<VirtualHost *:80>
  DocumentRoot /opt/librenms/html/
  ServerName example.com
  CustomLog /opt/librenms/logs/access_log combined
  ErrorLog /opt/librenms/logs/error_log
  AllowEncodedSlashes NoDecode
  <Directory "/opt/librenms/html/">
    Require all granted
    AllowOverride All
    Options FollowSymLinks MultiViews
  </Directory>
</VirtualHost>
Save and close the file, then enable virtual host and apache rewrite module with the following command:
a2ensite librenms.conf
a2enmod rewrite
Finally, restart the Apache service to apply all the changes:
systemctl restart apache2Open your web browser and type the URL http://example.com, you will be redirected to the following page:
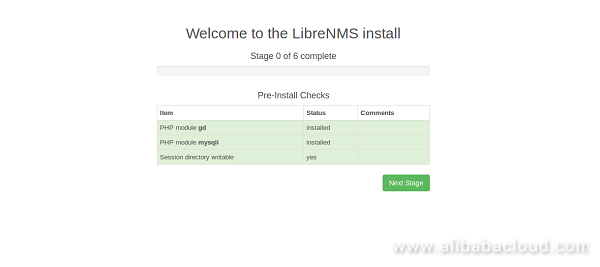
Make sure all the status is green, then click on the Next Stage button. You should see the following page:
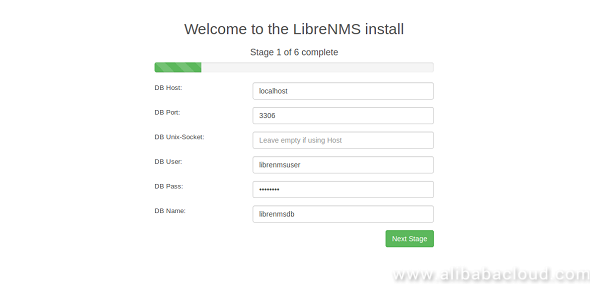
Provide your database details, then click on the Next Stage button, you should see the following page:
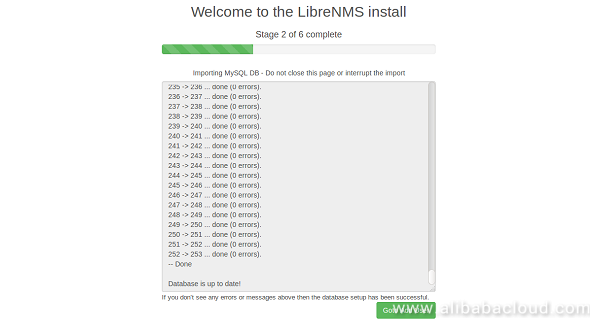
Now, click on the Goto Add User button, you should see the following page:
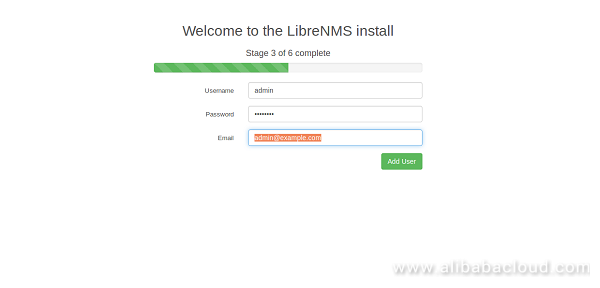
Now, provide admin username, password and email address as you wish, then click on the Add User button. Once the user added successfully, you should see the following page:
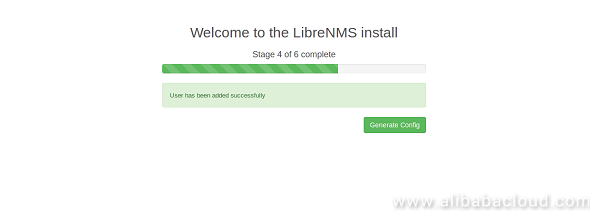
Now, click on the Generate Config button, you should see the following page:
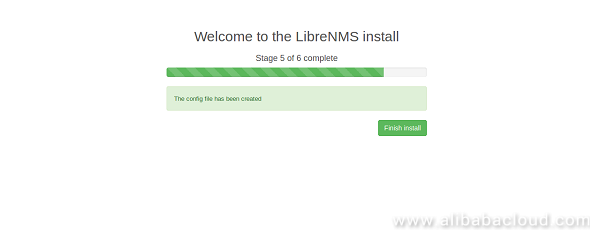
Now, click on the Finish install button, you should see the following page:
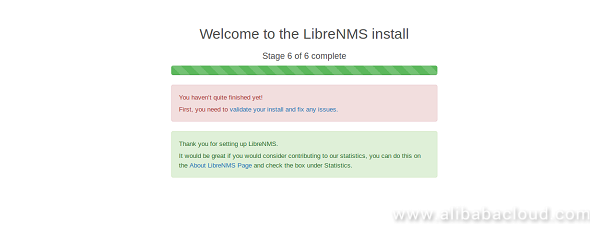
Now, click on "validate your install and fix any issues", you will be redirected to the following page:
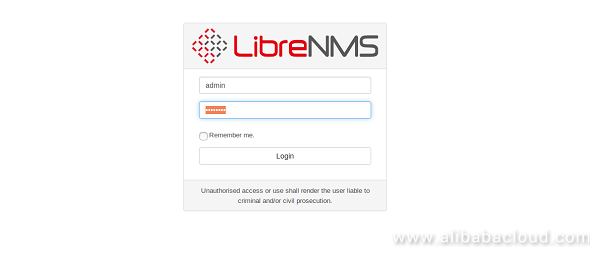
Here, provide your admin login details, then click on the Login button, you should see the following page:
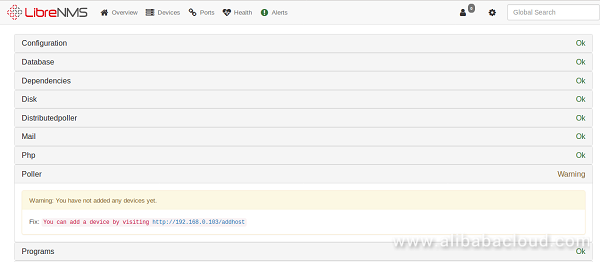
Next, you will also need to configure Crontab and Logrotate for LibreNMS. so that automatic discovery and polling for newly added devices can happen automatically. First, change the directory to the librenms:
cd /opt/librenmsCopy the sample configuration file for crontab and logrotate with the following command:
cp librenms.nonroot.cron /etc/cron.d/librenms
cp misc/librenms.logrotate /etc/logrotate.d/librenms
Next, restart cron and logrotate using the following command:
systemctl restart cron
logrotate -f /etc/logrotate.conf
Now, validate the configuration by running the following command:
/opt/librenms/validate.phpIf everything is ok, you should see the following output:
====================================
Component | Version
--------- | -------
LibreNMS  | 1.41-13-g447ae69
DB Schema | 253
PHP       | 7.1.18-1+ubuntu16.04.1+deb.sury.org+1
MySQL     | 10.0.34-MariaDB-0ubuntu0.16.04.1
RRDTool   | 1.5.5
SNMP      | NET-SNMP 5.7.3
====================================

[OK]    Composer Version: 1.6.5
[OK]    Dependencies up-to-date.
[OK]    Database connection successful
[OK]    Database schema correct
Congratulations! You have successfully installed LibreNMS on Ubuntu 16.04 server. You can now add server and network devices to LibreNMS and monitor it from the central location.
Cloud Enterprise Network provides a hybrid and distributed global network, ideal for enterprise users with high demand on network coverage. Cloud Enterprise Network can be used to facilitate communication between VPC to VPC and VPC to IDC. With its stable transmission and next-generation network environment, the network provides high transmission speed and low latency for end-users.
Breakthroughs in Matching and Recommendation Algorithms by Alibaba

2,593 posts | 792 followers
FollowAlibaba Clouder - May 16, 2019
Alibaba Clouder - May 20, 2019
Alibaba Clouder - May 17, 2019
Alibaba Clouder - May 17, 2019
Alibaba Clouder - February 13, 2018
Alibaba Clouder - April 23, 2019

2,593 posts | 792 followers
Follow ECS(Elastic Compute Service)
Elastic and secure virtual cloud servers to cater all your cloud hosting needs.
Learn More VPC
VPC
A virtual private cloud service that provides an isolated cloud network to operate resources in a secure environment.
Learn MoreMore Posts by Alibaba Clouder