By Alex, Alibaba Cloud Community Blog author.
For many years now, TeamViewer has been one of the most reliable ways to connect computers remotely, transfer files between them and even share screens. It holds a wide acceptance in the industry due to its highly favorable learning curve.
Being a cross-platform application, TeamViewer has variations for Windows, Mac, and Linux as well. Depending on intended uses, there is a free as well as a premium version for personal and commercial uses respectively. Before proceeding to more detailed experiments, let us see some of the features that TeamViewer offers.
TeamViewer is rich in features that facilitate remote management. Following is the list of its key features:
TeamViewer uses the same Virtual Network Computing (VNC) technology or method that allows connecting to remote servers from a desktop computer. VNC is quite popular with system administrators since it allows the management of remote machines similar to working with a desktop computer. It communicates commands that are input by a user to the remote computers via the internet.
Installing TeamViewer allows easy access to the server for file transfers and other tasks. The premium option has far more significant features. It is possible to access TeamViewer from both text-based and GUI-based consoles. On that note, let's proceed with the next section of the tutorial.
The following are the essential requirements for this tutorial:
This tutorial employs a Gnome desktop environment as it is quite easy to configure and install. However, in the case of minimal computing resources, consider LightDM. This tutorial doesn't cover the LightDM installation.
Let's begin with installing Gnome, a desktop environment for Ubuntu server. By default, the Ubuntu server does not have a pre-installed desktop environment but there are numerous options available.
Run the following command.
sudo apt-get update
sudo apt-get upgrade
Now, install Universe and Multiverse by running the commands given below.
sudo add-apt-repository universe
sudo add-apt-repository multiverse
Next, install Tasksel by executing the following command.
sudo install taskselOpen Tasksel using the command below.
sudo taskselTasksel lists several packages for installation. For the desktop environments, refer to the following 6 options to choose from:
For this tutorial, select the Gnome package. Scroll down and press the 'Space' button on Ubuntu desktop. Press 'Enter' to install and the desktop environment in the system. In addition, it installs other dependencies such as session managers as well in the system. Therefore, there's no need to further install a session manager.
Run the command below to restart the server.
systemctl reboot -iTo ensure that the firewall accepts TeamViewer connection, the server requires some additional configurations. To implement configurations, first, open the new User Datagram Protocol (UDP) and Transmission Control Protocol (TCP) on port 5938 for connections. Usually, it is not recommended to use the normal HTTP or HTTPS connections i.e. port 80 or port 443 as it may cause problems related to speed.
Run the command below to enable the UFW. Just use y and ENTER if a system prompts with a warning.
sudo ufw enableExecute the following command in case the system is already running UFW.
sudo ufw allow 5938/udp
sudo ufw allow 5938/tcp
Now check the status using the command below.
sudo ufw statusThe snippet below shows the output for the preceding command.
Status: active

To                         Action      From
--                         ------      ----
OpenSSH                    ALLOW       Anywhere
5938                       ALLOW       Anywhere
5938/udp                   ALLOW       Anywhere
5938/tcp                   ALLOW       Anywhere
OpenSSH (v6)               ALLOW       Anywhere (v6)
5938 (v6)                  ALLOW       Anywhere (v6)
5938/udp (v6)              ALLOW       Anywhere (v6)
5938/tcp (v6)              ALLOW       Anywhere (v6)
Next, run the commands below to reload UFW rules (use y and ENTER if a system prompts any warning).
sudo ufw disable
sudo ufw enableThe CSF setup needs only one additional requirement that entails editing the configuration files and including the ports under the TCP_IN and UDP_IN tags and restarting the firewall. The usual practice involves using WinSCP to access configuration files and editing the same in the chosen editor.
sudo nano /etc/csf/csf.conf
# Allow incoming TCP ports
TCP_IN = "5938"
# Allow outgoing TCP ports
TCP_OUT = "5938"
# Allow incoming UDP ports
UDP_IN = "5938"
# To allow outgoing traceroute add 33434:33523 to this list
UDP_OUT = "5938"
Run the following command to implement the configuration.
sudo csf -rAfter opening ports 5938 on TCP and UDP for the TeamViewer program in the preceding step, restart the server to get the settings in effect. This helps to initialize the desktop environment and the session manager on the next server restart. Run the command below to restart.
shutdown -r nowSo far, so good. Now, let's get ready to install TeamViewer on the server instance in the next step.
Before going ahead with the installation process, configure TeamViewer host on the system, and download the files from the source as shown below.
sudo wget https://download.teamviewer.com/download/linux/teamviewer-host_amd64.debNext, install TeamViewer by running the command below. Take note that at times, you may have to provide an accurate path to the package.
sudo dpkg --install ./teamviewer-host_amd64.debIn case of any error resulting from the preceding command, run the command given below.
sudo apt-get install -fExecuting the above command fixes any missing dependencies and allows the 'install' command to run. Rerun the following command.
sudo dpkg --install ./teamviewer-host_amd64.debLet the installation process run without any interruptions until it is complete. Now assuming that the TeamViewer installs successfully, run the command below to make necessary configurations for using TeamViewer.
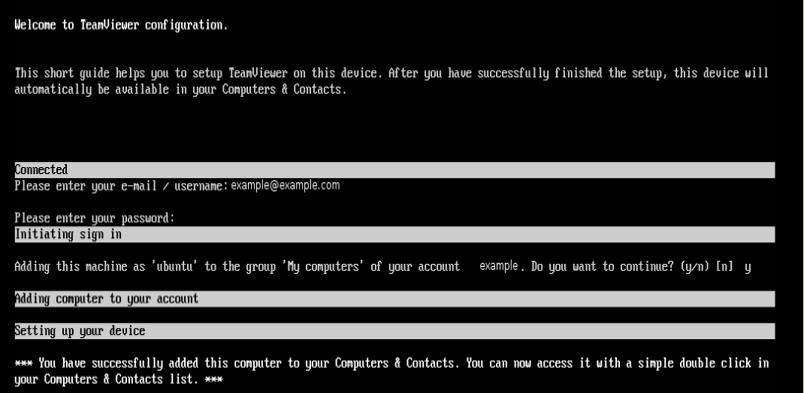
sudo teamviewer setupAccept the terms of service after running the command and enter the login credential for the account. Check email for a verification link, and a request to allow login from the new system, in particular the ECS instance. It is a security measure to prevent unauthorized access to the TeamViewer account.
After necessary approval, log in from the command line input by providing the credentials again. Follow any additional steps that TeamViewer proposes, such as setting up the server as a safe machine under the TeamViewer account. In case there is any error so far, recheck ports configuration or internet connection and rerun the following command.
sudo teamviewer setupThe following screen appears afterward.

Usually, the password doesn't appear on the interface while typing and thus requires more attention to avoid any mistake. Alternatively, copy the password and then click the right-hand button of the mouse or touchpad to paste and proceed.
If the login error still persists, it's time to improvise. Run the command below to obtain an ID for TeamViewer installation.
sudo teamviewer infoCopy the TeamViewer ID somewhere and then run the command below to set a password for the installation.
sudo teamviewer passwd YOUR_PASSDEnsure to replace YOUR_PASSD with a new password.
Logging in TeamViewer host using the email and password implies a quick connection to the server at this point. To use the TeamViewer remote connection, access the login page of TeamViewer online or using the desktop client. The server must be listed as one of the computers. Selecting the server and TeamViewer connects you to it remotely.
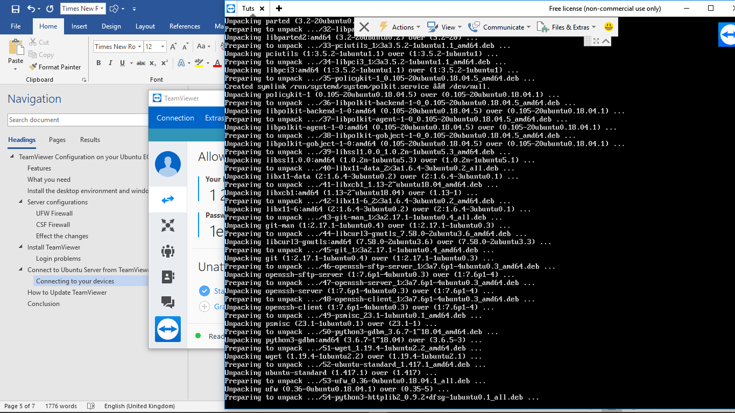
If you did not manage to login using your email, then you already have a TeamViewer ID and a password. Open TeamViewer client on the desktop and supply the Partner ID and password to connect to a remote server. Considering the successful installation of both, the desktop environment and window session manager earlier, you'll see an interface like the one shown below after logging in to the TeamViewer.

In case a user doesn't install a desktop environment, the following screen shows up. It is recommended to install a desktop environment for getting a clean desktop as above.

Congratulations! With this, the TeamViewer host is successfully installed and configured for ECS instance running Ubuntu 18.04. Take note that there is not much difference when working with Ubuntu 16.04. Alibaba Cloud is one of the most reliable cloud technology providers. Continuous collaboration with technology partners as well as the integration of third-party software is making it even more reliable. Alibaba Cloud is the fastest-growing cloud services provider in the market.
Easily update TeamViewer by running the commands below.
sudo apt update & upgradeBy default, TeamViewer adds a new file to help the system initiate updates easily in /etc/apt/sources.list.d/teamviewer.list. Alternatively, run the below commands.
sudo apt update
sudo apt upgradeTeamViewer is one of the most popular remote connection technologies available. It helps people work together with ease and security. This tutorial guides to install TeamViewer on an Alibaba Cloud ECS instance running on Ubuntu to enable remote access to the server. Usually, the 256-bit AES encryption secures the connection from any device to the server. Another striking factor here is that TeamViewer provides smartphone apps to help you make remote access and diagnosis of your server. Remote access is so revolutionary that it makes you feel sitting right next to your remote computer. Try it today!
Don't have an Alibaba Cloud account? Sign up for an account and try over 40 products for free worth up to $1200. Get Started with Alibaba Cloud to learn more.
An Introduction to Logrotate: Manage Log Files on Alibaba Cloud
Dassie - March 1, 2023
Dikky Ryan Pratama - May 9, 2023
Sajid Qureshi - August 8, 2018
Alibaba Clouder - February 14, 2020
Alibaba Clouder - March 13, 2019
Data Geek - August 7, 2024
 Container Service for Kubernetes
Alibaba Cloud Container Service for Kubernetes is a fully managed cloud container management service that supports native Kubernetes and integrates with other Alibaba Cloud products.
Learn More ECS(Elastic Compute Service)
Elastic and secure virtual cloud servers to cater all your cloud hosting needs.
Learn More MaxCompute
Conduct large-scale data warehousing with MaxCompute
Learn More OSS(Object Storage Service)
An encrypted and secure cloud storage service which stores, processes and accesses massive amounts of data from anywhere in the world
Learn MoreMore Posts by Alex