By Priyankaa Arunachalam, Alibaba Cloud Tech Share Author. Tech Share is Alibaba Cloud's incentive program to encourage the sharing of technical knowledge and best practices within the cloud community.
In the previous article, we have covered about different data sources and discussed the most suitable data format to ingest the data into our big data environment.
In this article, we will take a dive deep into HDFS, the storage part of Hadoop which is one of the world’s most reliable storage system. The distributed storage and replication of data is the major feature of HDFS which makes it a fault-tolerant storage system. The features which make HDFS suitable for large datasets to run on commodity hardware are Fault tolerance, High availability, reliability and scalability.
We covered the master slave model and the types of nodes in our previous article with Alibaba Cloud Object Storage Service (OSS) and E-MapReduce. Let’s look directly on how data is stored in HDFS. Remember the mantra “write-once-read-many”, as a file once created and written to HDFS cannot be edited. It can only be read and processed using another tool like Spark and then you can write back the file to HDFS.
Let's assume you need to write a huge file to HDFS. The file will not be directly written into HDFS. It will be broken into small pieces known as blocks. The default block size is 128 MB which can also be increased based on the requirements. HDFS is known for its distributed storage. Thus, these blocks are distributed among different nodes of the cluster. This makes it easy for MapReduce to process the data in parallel. And as a result, Hadoop ends up with distributed storage and distributed processing which makes it efficient in its own way. Now the stored blocks are replicated to other data nodes until the replication factor mentioned is satisfied. The default replication factor is three. HDFS makes sure to replicate the blocks among two nodes of a cluster in one rack and the other node in another rack. This can help improve the fault tolerance that even if the entire rack goes down, there will be high availability since the replica is present in another rack too.
You should be familiar with some basic Hadoop commands which will be the basis of the entire cycle. The Hadoop HDFS commands are similar to the Linux environment, hence just prefix the commands with ‘hadoop fs’
Here are some commands that we'll be using in this article:
Hadoop fs –ls, mkdir, cat, copyFromLocal, moveFromLocal, cp, mv, put, get, chmod
We will use these commands one by one at various situations which gives a clear understanding of their usage.
Let’s switch user to Hadoop by su hadoop. Once done list the contents under user by using
$ hadoop fs –ls /user
There are only two directories named hadoop and hive under user. So let’s create a new directory named ‘demo’ by using
$ hadoop fs –mkdir /user/demoThis directory can be used further, to place our ingested and processed files.
When it comes to importing data from a relational database management system (RDBMS) such as MySQL or Oracle into the HDFS, an open source tool called Sqoop is used. Sqoop uses MapReduce to import and export data. With Sqoop, you can
Other than this, Sqoop also supports additional import targets like importing records to HBase and Accumulo. This article focuses on importing data from various databases to HDFS which is primary for a big data play. Import to Hive and HBase will be covered in the later articles.
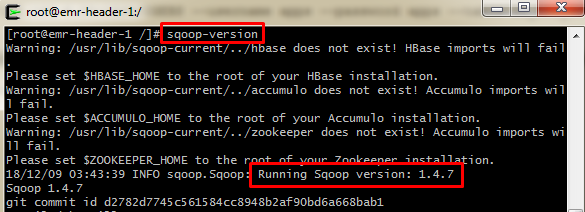
You no need to install Sqoop separately, as E-MapReduce comes with Sqoop integrated since version 1.3.Lets precheck before using it. Give sqoop-version. This shows you a message that sqoop is up and running and the version of sqoop will be displayed as per our command.
Two important functions to look at!
To work with these two functions, there are some pre-requisites.
Namenode Location
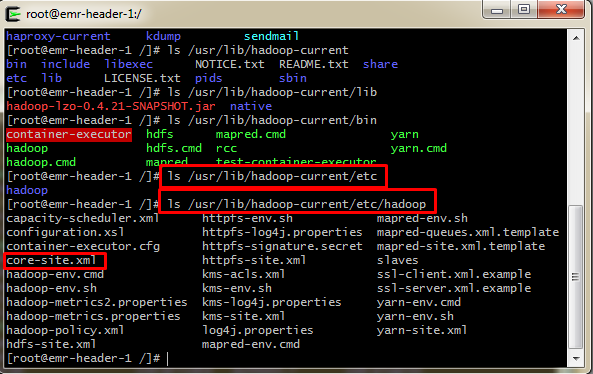
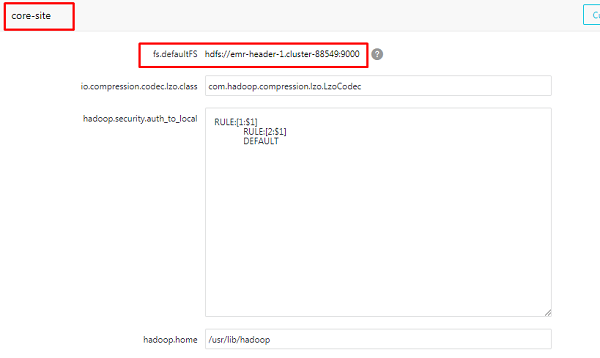
We will be in need of Namenode location to read and write files to HDFS. The core-site.xml file has the details of where the Namenode runs in the cluster, I/O settings, etc. There are two ways to get this. Either on premise or Cloud, the usual method is to obtain this from ‘core-site.xml’ file which comprises of all configuration details. This can be done by navigating to the file location as shown in the screenshots below.
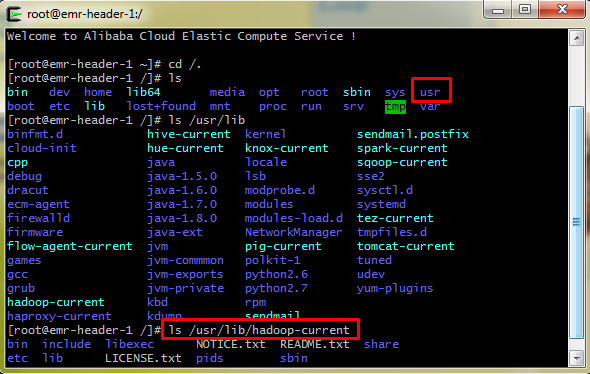
Use ls /usr/lib/Hadoop-current/etc/Hadoop to list the various configuration files of HDFS, MapReduce and Yarn. This path slightly varies based on the providers like Cloudera. From the files listed, you can notice some major files like hdfs-site.xml and core-site.xml file.
But Alibaba Cloud provides a user-friendly UI which reduces the effort of finding configuration files and changing various settings using Linux commands which might be tough for beginners.
Now let’s navigate to the cluster we created. Move to Clusters and Services under Cluster Management tab. You can see the services in action. Click on HDFS

On the following screen navigate to ‘Configuration’ and here you can view all the configuration files which we found using Linux commands. Now changing the configurations becomes easier right!
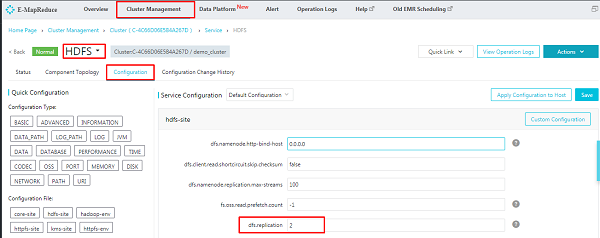
In the above image, you can see the replication factor which is under hdfs-site.xml. Let’s navigate to core-site.xml and note the Namenode location as follows
Drivers and Connectors
If the needed drivers are not shipped by Sqoop by default, then download them and save to the /usr/lib/sqoop-current/lib. The below points will explain this in detail.
Mostly sqoop runs in the master node, but if you have configured it to run on any of the worker nodes, then install the JDBC drivers only on the machine where Sqoop runs. It’s not necessary to install them on all hosts of your multi-node cluster.
1. Assume your data resides in Oracle Database. Accept the license agreement and download the JDBC Driver for Oracle from the below link, as it will not be available in the default drivers
http://www.oracle.com/technetwork/database/enterprise-edition/jdbc-112010-090769.html
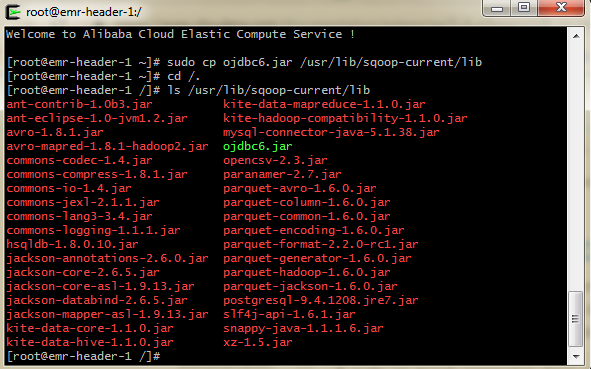
Download the JDBC driver which is compatible with your database version and copy it to the Sqoop library as shown below
$ sudo cp ojdbc6.jar /usr/lib/sqoop-current/libsudo gives you superuser privileges and cp copies the file to the mentioned path.
Now list the contents in the path to make sure whether the file is copied
There are three formats for connecting with the Oracle server
--connect jdbc:oracle:thin:@OracleServer:OraclePort:OracleSID
--connect jdbc:oracle:thin:@//OracleServer:OraclePort/OracleService
--connect jdbc:oracle:thin:@TNSName
2. Assume your data is in MySQL. This latest version of EMR comes with MySQL connector embedded (if you can see the MySQL connector in previous screenshot)
3. Assume your data is in Microsoft SQL server, then download the Microsoft SQL Server JDBC driver from the below link and copy this to Sqoop library similarly
https://www.microsoft.com/en-us/download/details.aspx?displaylang=en&id=11774
$ sudo cp sqljdbc_6.0.81_enu.tar.gz /usr/lib/sqoop-current/libYou can import data in one of two file formats: Either delimited text or Sequence Files.
The default import format is Delimited text. You can also specify directly in the command by using the --as-textfile which is readily supported for further manipulation by other tools like Hive. Sequence Files are binary format files that store individual records in custom record-specific data types. Use –as-sequence file in this case.
Sqoop imports data in parallel. To perform the import you can specify the number of map tasks (which is number of parallel process) by using –m. When performing parallel imports, a splitting column is required by which it can split the workload. By default, this splitting column will be the primary key column (if present) in a table .If the values for the primary key are not uniformly distributed, then it results in unbalanced tasks. Hence, explicitly choose a different column with the --split-by argument.
Now, I have loaded the sheet tripadvisor_merged into the Oracle Database which I am using.
I need to move this to HDFS and hence I downloaded and moved the necessary jar file to the mentioned path as discussed in previous steps.
Before performing import or export, let’s try evaluating a query as follows
sqoop eval --connect jdbc:oracle:thin:@182.156.193.194:1556:ORCL --username xxx--password xxx --query "SELECT * FROM TRIP_ADVISOR LIMIT 3"where
Host: 182.156.193.194
Port: 1556
SID: ORCL
If the query is successful, the output table will be displayed in the terminal. Now it’s all set to import the data
sqoop import --connect jdbc:oracle:thin:@182.156.193.194:1556:ORCL --username xxx --P --table TRIP_ADVISOR --target-dir hdfs://emr-header-1.cluster-88549:9000/user/demo/sqoop -m1 To specify the count of map task, we can use - - m option followed by a numeric number.
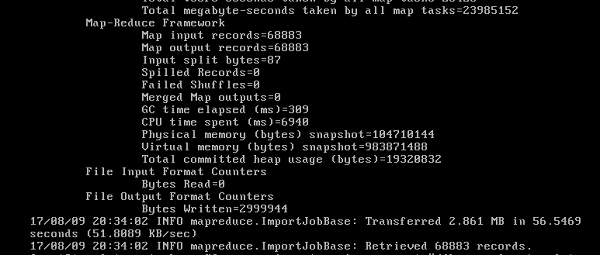
When we execute the above command only one map task will get executed.
If you list the directory, you will find only one output file as Part-m-00000. If the output directory is not specified, then sqoop creates a directory with the name of table which you have uploaded in HDFS and divide the data into part-m-00000, part-m-00001 so on.
Here we are importing the entire table. You can also import specific records by using ‘where’ clause. We can also list the databases, list the tables and import all tables present in a database by various sqoop commands.
1. Issue: Missing driver or use of incorrect driver name of the respective jdbc class
For example, could not load db driver class: oracle.jdbc.OracleDriver
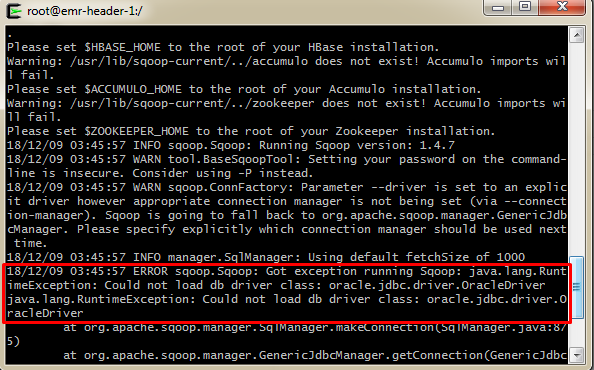
Solution: Place the odbc6.jar in the correct path /usr/lib/sqoop/lib and retry. If the jar file is not recognized, then restart Sqoop server and try again. You can also manually specify the driver in the command using --driver option in sqoop command like given below
sqoop import --connect jdbc:oracle:thin:@192.168.6.23:1526:xxx --username xxx --P –table xxx --target-dir hdfs://emr-header-1.cluster-88549:9000/user/demo/sqoop -m1 --driver oracle.jdbc.driver.OracleDriverSimilarly for MySQL use --driver com.mysql.jdbc.Driver
2. Issue: The network adapter could not establish the connection
Solution: The connection refused error may occur due to following scenarios:
So it is better to confirm the oracle host, port and the firewall restriction in between, at the initial stage. This can be easily checked by using telnet
3. Issue: Incorrect approach of giving password or username of the Database
For example, WARN tool.BaseSqoopTool: Setting your password on the command-line is insecure. Consider using -P instead
Solution: You will receive this message when you mention the password explicitly in the command using –password. Instead try using –P in the command which allows you to enter the password at runtime which is more secure.
In the next article, we will discuss about Spark for big data and show you how to set it up on Alibaba Cloud.
“Some of the best theorizing comes after collecting data because then you become aware of another reality.” Robert J. Shiller

2,598 posts | 769 followers
FollowAlibaba Clouder - September 26, 2019
Alibaba Clouder - April 8, 2019
Alibaba Clouder - September 2, 2019
Alibaba Clouder - April 4, 2019
Alibaba Clouder - April 8, 2019
Alibaba Clouder - April 4, 2019

2,598 posts | 769 followers
Follow E-MapReduce Service
A Big Data service that uses Apache Hadoop and Spark to process and analyze data
Learn More MaxCompute
Conduct large-scale data warehousing with MaxCompute
Learn More ECS(Elastic Compute Service)
Elastic and secure virtual cloud servers to cater all your cloud hosting needs.
Learn MoreMore Posts by Alibaba Clouder