You can access the tutorial artifact including deployment script (Terraform), related source code, sample data and instruction guidance from the github project.
More tutorial around Alibaba Cloud Database, please refer to this link.
Apache ShardingSphere is an open-source ecosystem consisted of a set of distributed database solutions, including 3 independent products, JDBC, Proxy & Sidecar (Planning). They all provide functions of data scale out, distributed transaction and distributed governance, applicable in a variety of situations such as Java isomorphism, heterogeneous language and cloud native.
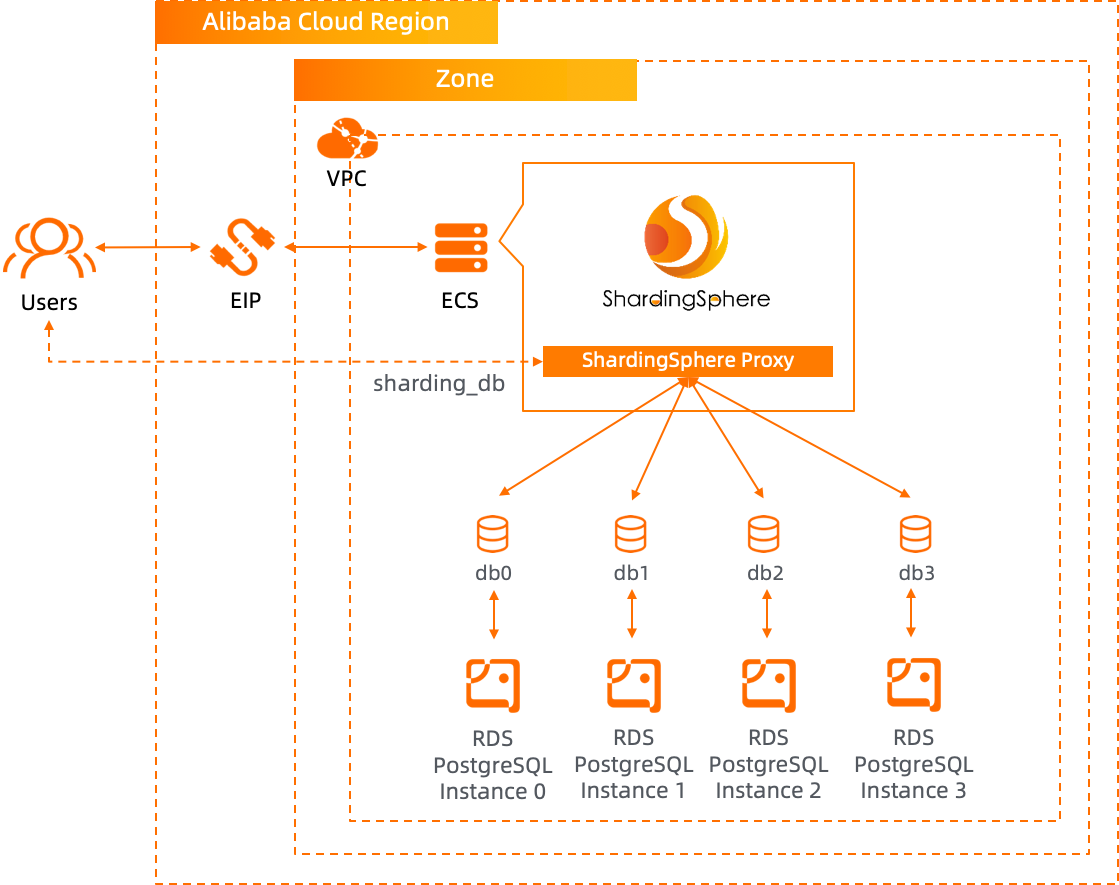
In this solution tutorial, let's see how to deploy sharding service with Apache ShardingSphere Proxy on RDS for PostgreSQL on Alibaba Cloud.
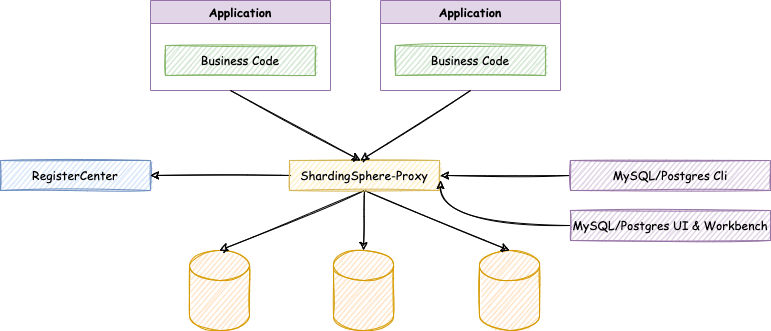
ShardingSphere proxy logical diagram:
Deployment architecture of this tutorial:
Step 1. Use Terraform to provision ECS and RDS for PostgreSQL database on Alibaba Cloud
Step 2. Install and deploy ShardingSphere proxy on ECS
Step 3. Verify the deployment and sharding service
If you are the 1st time to use Terraform, please refer to terraform templates to learn how to install and use the Terraform on different operating systems.
Run the terraform script to initialize the resources (in this tutorial, we use 4 RDS for PostgreSQL instances as the physical databases under the sharding service layer, so ECS and RDS for PostgreSQL are included in the Terraform script). Please specify the necessary information and region to deploy.

After the Terraform script execution finished, the ECS instance and RDS for PostgreSQL information are listed as below.
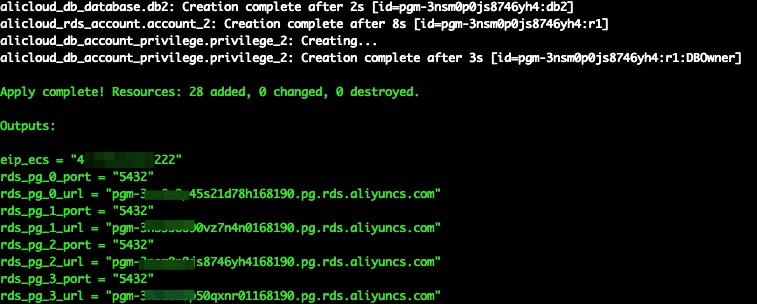
eip_ecs: The public EIP of the ECS for parse server hostrds_pg_0_port: The RDS for PostgreSQL database instance 0 service portrds_pg_0_url: The RDS for PostgreSQL database instance 0 connection URLrds_pg_1_port: The RDS for PostgreSQL database instance 1 service portrds_pg_1_url: The RDS for PostgreSQL database instance 1 connection URLrds_pg_2_port: The RDS for PostgreSQL database instance 2 service portrds_pg_2_url: The RDS for PostgreSQL database instance 2 connection URLrds_pg_3_port: The RDS for PostgreSQL database instance 3 service portrds_pg_3_url: The RDS for PostgreSQL database instance 3 connection URLPlease log on to ECS with ECS EIP. By default, the password is N1cetest, which is preset in the terraform provision script in Step 1. If you've already changed it, please update accordingly.
ssh root@<ECS_EIP>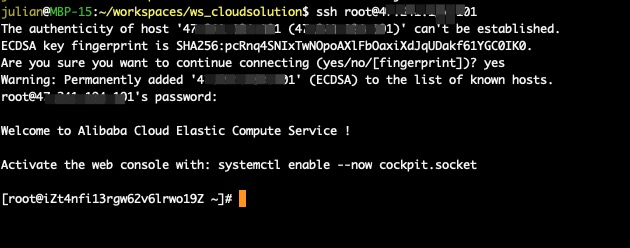
Java 8 and PostgreSQL client had already been installed automatically in the resource null_resource in Terraform scrip in Step 1.
Execute the following commands to download and unzip the ShardingSphere proxy. In this tutorial, I am using the apache-shardingsphere-5.0.0.
cd ~
wget https://dlcdn.apache.org/shardingsphere/5.0.0/apache-shardingsphere-5.0.0-shardingsphere-proxy-bin.tar.gz
tar -xzvf apache-shardingsphere-5.0.0-shardingsphere-proxy-bin.tar.gz
Execute the following commands to backup the original configuration file server.yaml and config-sharding.yaml.
cd ~/apache-shardingsphere-5.0.0-shardingsphere-proxy-bin/conf
mv server.yaml server.yaml_backup
mv config-sharding.yaml config-sharding.yaml_backup
Download the server.yaml and config-sharding.yaml from this tutorial github project. I've predefined the sharding mapping logic and all related routing configuration in the config-sharding.yaml. For details, please check carefully with this file.
cd ~/apache-shardingsphere-5.0.0-shardingsphere-proxy-bin/conf
wget https://raw.githubusercontent.com/alibabacloud-howto/opensource_with_apsaradb/main/apache-shardingsphere-postgresql/server.yaml
wget https://raw.githubusercontent.com/alibabacloud-howto/opensource_with_apsaradb/main/apache-shardingsphere-postgresql/config-sharding.yaml
Now, edit the downloaded config-sharding.yaml with RDS for PostgreSQL instances connection information accordingly. All 4 RDS for PostgreSQL instances connection information are in Step 1.
vim ~/apache-shardingsphere-5.0.0-shardingsphere-proxy-bin/conf/config-sharding.yaml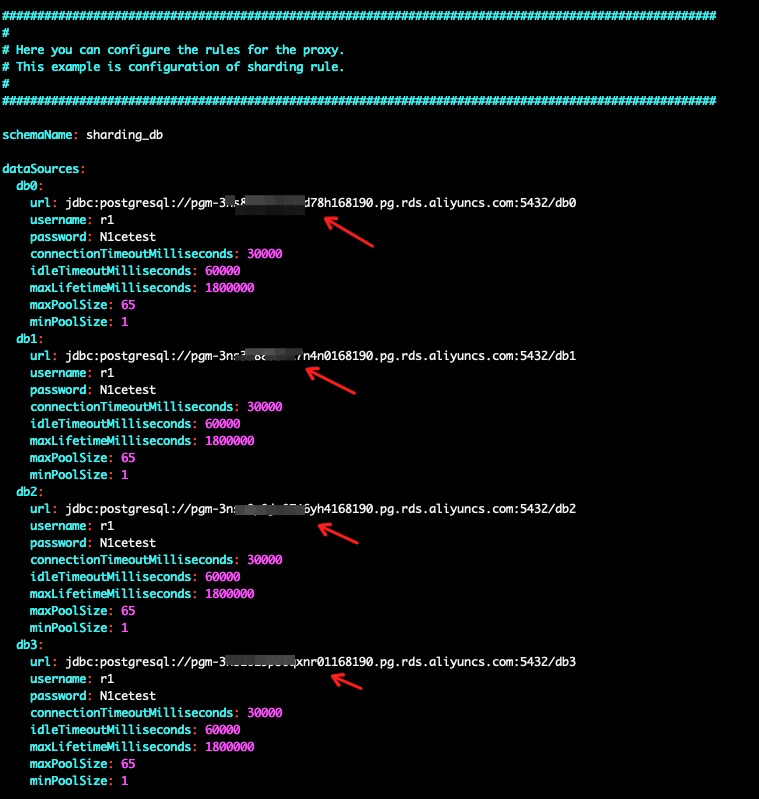
Now, the configuration finished, execute the following commands to start the ShardingSphere proxy. Let's use the port 8001 as the service port of the ShardingSphere proxy. By default, the ShardingSphere proxy uses 3307 as the service port.
cd ~/apache-shardingsphere-5.0.0-shardingsphere-proxy-bin/bin/
./start.sh 8001
Execute the following command to verify the proxy log. If you have see the following message ShardingSphere-Proxy start success, then the proxy started successfully.
less ~/apache-shardingsphere-5.0.0-shardingsphere-proxy-bin/logs/stdout.log 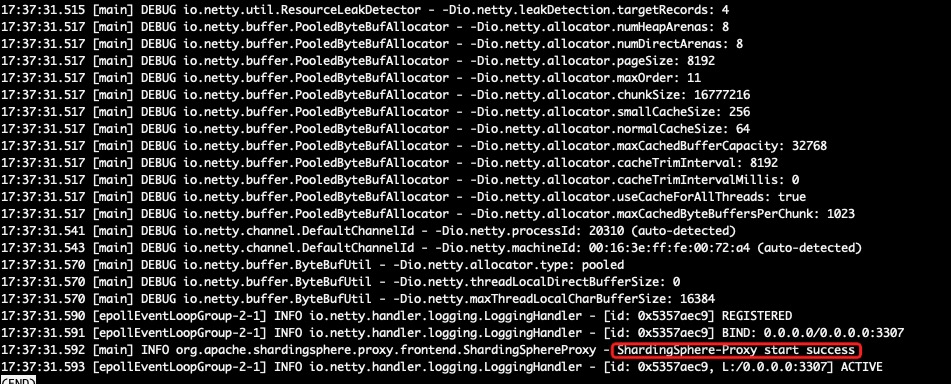
If you want to stop the proxy, please execute the following command.
sh ~/apache-shardingsphere-5.0.0-shardingsphere-proxy-bin/bin/stop.shNow, let's verify the ShardingSphere proxy. Execute the commands to connect to the sharding proxy, execute the CREATE TABLE DDL commands, insert some records and verify the data. The password used for ShardingSphere proxy is predefine as N1cetest in https://github.com/alibabacloud-howto/opensource_with_apsaradb/blob/main/apache-shardingsphere-postgresql/server.yaml
psql -h 127.0.0.1 -p 8001 -U r1 sharding_dbcreate table t_order(order_id int8 primary key, user_id int8, info text, c1 int, crt_time timestamp);
create table t_order_item(order_item_id int8 primary key, order_id int8, user_id int8, info text, c1 int, c2 int, c3 int, c4 int, c5 int, crt_time timestamp);
insert into t_order (user_id, info, c1, crt_time) values (0,'a',1,now());
insert into t_order (user_id, info, c1, crt_time) values (1,'b',2,now());
insert into t_order (user_id, info, c1, crt_time) values (2,'c',3,now());
insert into t_order (user_id, info, c1, crt_time) values (3,'d',4,now());
insert into t_order (user_id, info, c1, crt_time) values (4,'e',5,now());
insert into t_order (user_id, info, c1, crt_time) values (5,'f',6,now());
insert into t_order (user_id, info, c1, crt_time) values (6,'g',7,now());
insert into t_order (user_id, info, c1, crt_time) values (7,'h',8,now());
select * from t_order;
select * from t_order where user_id=1;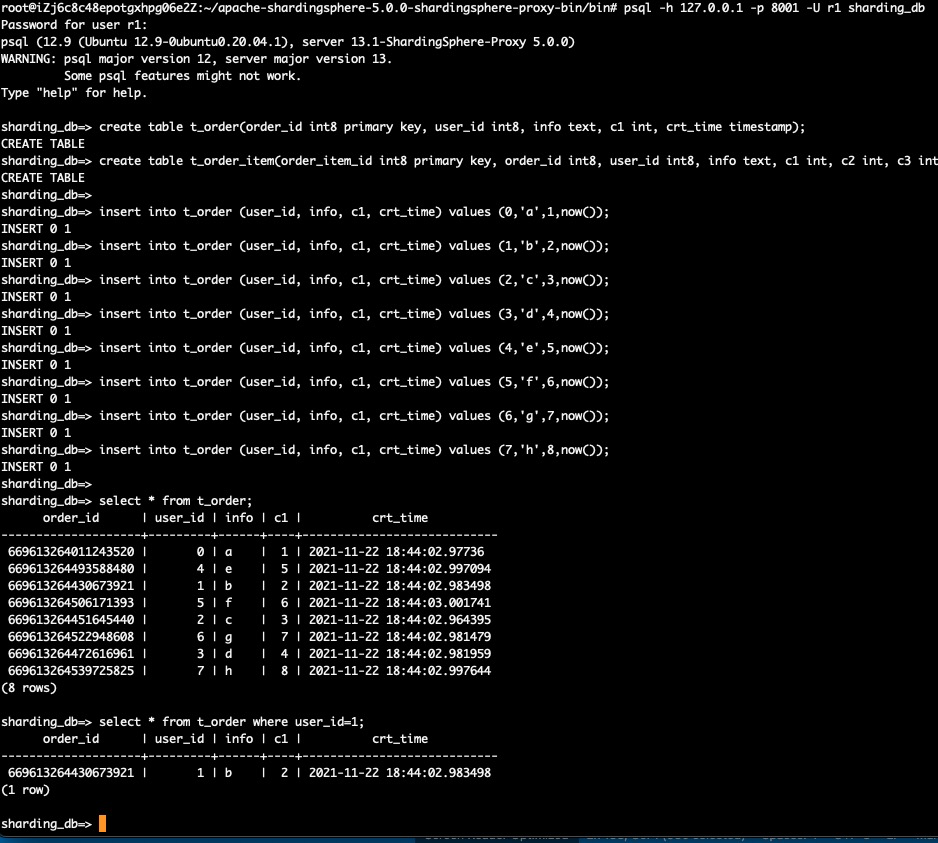
This shows the sharding service works perfectly. And let's connect to the physical RDS for PostgreSQL database directly to view the data records distribution in these 4 RDS for PostgreSQL database instances. Please remember to use the RDS for PostgreSQL database instance connection string to replace <RDS_PG_INSTANCE_0_URL>, <RDS_PG_INSTANCE_1_URL>, <RDS_PG_INSTANCE_2_URL> and <RDS_PG_INSTANCE_3_URL>. The password used for RDS for PostgreSQL database is predefine as N1cetest in https://github.com/alibabacloud-howto/opensource_with_apsaradb/blob/main/apache-shardingsphere-postgresql/deployment/terraform/main.tf
psql -h <RDS_PG_INSTANCE_0_URL> -p 5432 -U r1 db0

select tablename from pg_tables where schemaname='public';
select * from t_order_0;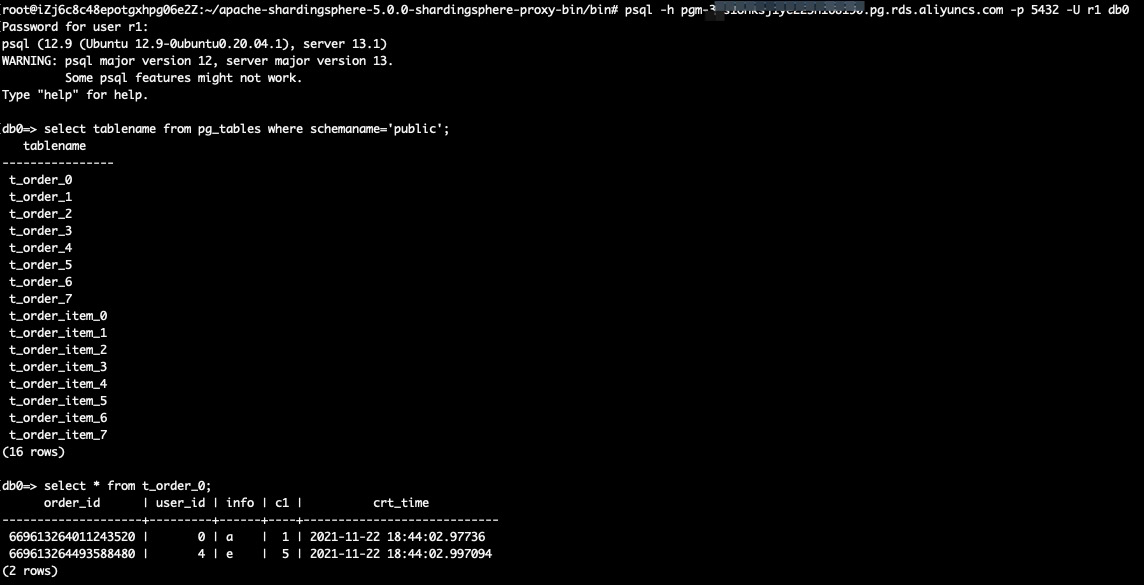
Similar with db1, db2 and db3.
psql -h <RDS_PG_INSTANCE_1_URL> -p 5432 -U r1 db1

select tablename from pg_tables where schemaname='public';
select * from t_order_1;
psql -h <RDS_PG_INSTANCE_2_URL> -p 5432 -U r1 db2
select tablename from pg_tables where schemaname='public';
select * from t_order_0;psql -h <RDS_PG_INSTANCE_3_URL> -p 5432 -U r1 db3
select tablename from pg_tables where schemaname='public';
select * from t_order_1;Deploy Sharding Service with Apache ShardingSphere Proxy on RDS for MySQL
The Basic Use of RDS (Part 1): Connect ApsaraDB RDS for MySQL Single Instance
ApsaraDB - November 21, 2022
digoal - August 4, 2021
Alibaba Cloud Serverless - November 10, 2022
digoal - April 22, 2021
Alibaba Cloud Native Community - January 5, 2023
digoal - February 20, 2020
 ApsaraDB RDS for PostgreSQL
An on-demand database hosting service for PostgreSQL with automated monitoring, backup and disaster recovery capabilities
Learn More PolarDB for PostgreSQL
Alibaba Cloud PolarDB for PostgreSQL is an in-house relational database service 100% compatible with PostgreSQL and highly compatible with the Oracle syntax.
Learn More AnalyticDB for PostgreSQL
An online MPP warehousing service based on the Greenplum Database open source program
Learn More Message Queue for Apache Kafka
A fully-managed Apache Kafka service to help you quickly build data pipelines for your big data analytics.
Learn MoreMore Posts by ApsaraDB