This is a tutorial on how to run the open-source project Azkaban on Alibaba Cloud with ApsaraDB (Alibaba Cloud Database). We also show a simple data preparation and migration task deployed and run in Azkaban to demo a data preparation and migration workflow between two databases.
You can access the tutorial artifact, including the deployment script (Terraform), related source code, sample data, and instruction guidance from the Github project.
Please refer to this link for more tutorials related to Alibaba Cloud Database.
Azkaban is a batch workflow job scheduler created at LinkedIn to run Hadoop and database jobs. Azkaban resolves the ordering through job dependencies and provides an easy-to-use web user interface to maintain and track your workflows.
After version 3.0, Azkaban provides two modes: the stand-alone solo-server mode and distributed multiple-executor mode reference.
To enhance the database's high availability behind the Azkaban, we will show the steps of deployment working with Alibaba Cloud Database RDS MySQL for Azkaban multiple executor mode. (In this tutorial, we use only one ECS to host one Azkaban web server and one Azkaban executor server.)
Azkaban supports MySQL as the backend database. You can use one of the following databases on Alibaba Cloud:
In this tutorial, we will show the case of using RDS MySQL high availability edition for more stable production purposes.
Deployment Architecture:
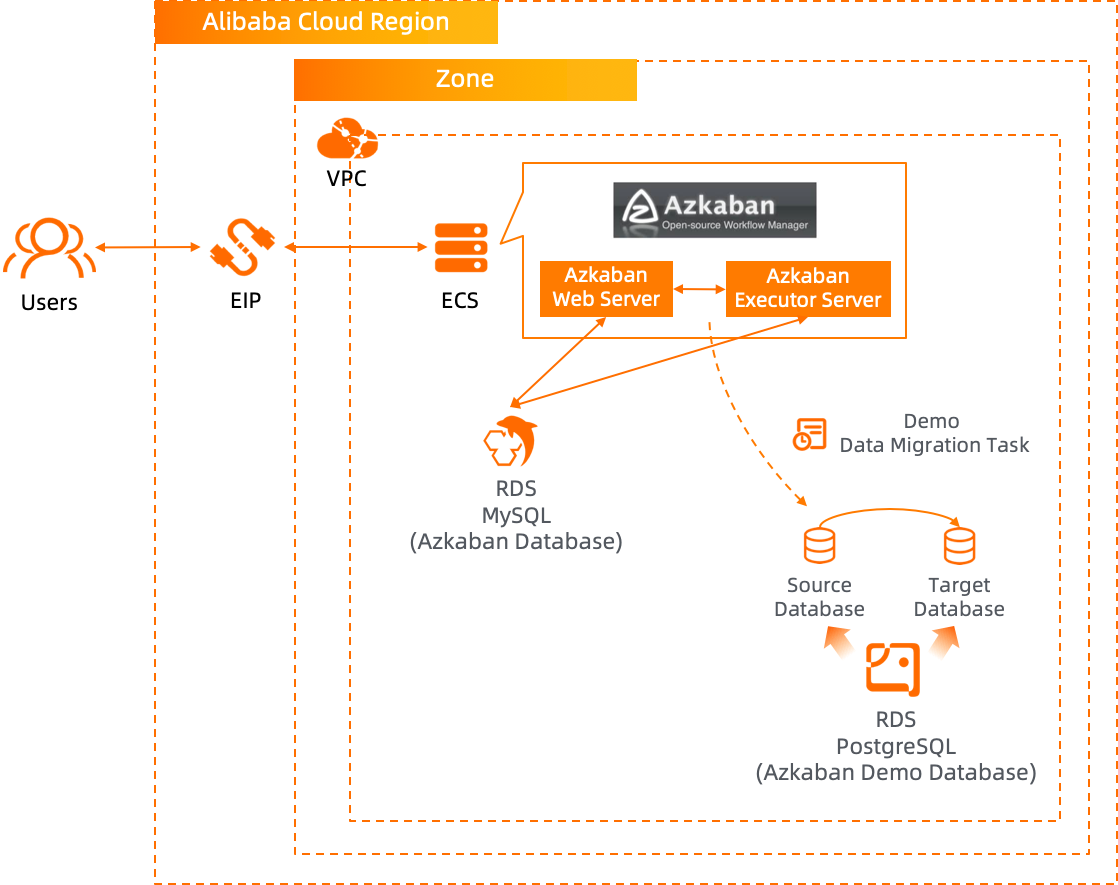
Run the Terraform script to initialize the resources. (In this tutorial, we use RDS MySQL as the backend database of Azkaban and RDS PostgreSQL as the demo database showing the data preparation and migration via Azkaban task. This way, ECS, RDS MySQL, and RDS PostgreSQL instances are included in the Terraform script.) Please specify the necessary information and region to deploy:

After the Terraform script execution is finished, the ECS, RDS MySQL, and RDS PostgreSQL instances information are listed below:

eip_ecs: The public EIP of the ECS for Azkaban installation hostrds_mysql_url: The connection URL of the backend RDS MySQL database for Azkabanrds_pg_url_azkaban_demo_database: The connection URL of the demo RDS PostgreSQL database using Azkabanrds_pg_port_azkaban_demo_database: The connection Port of the demo RDS PostgreSQL database using Azkaban; it is 1921 for RDS PostgreSQL by defaultPlease log on to ECS with ECS EIP:
ssh root@<ECS_EIP>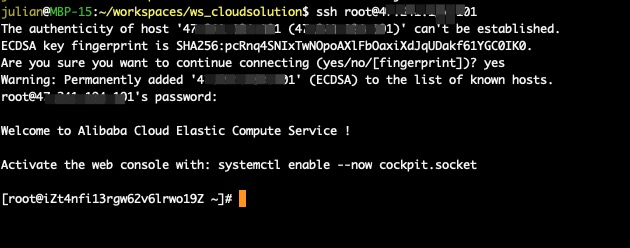
Execute the following commands to install gcc, JDK 8, Git, MySQL client, python3, python module psycopg2, and PostgreSQL client on the ECS:
yum install -y gcc-c++*
yum install -y java-1.8.0-openjdk-devel.x86_64
yum install -y git
yum install -y mysql.x86_64

yum install -y python39
yum install -y postgresql-devel
pip3 install psycopg2

cd ~
wget http://mirror.centos.org/centos/8/AppStream/x86_64/os/Packages/compat-openssl10-1.0.2o-3.el8.x86_64.rpm
rpm -i compat-openssl10-1.0.2o-3.el8.x86_64.rpm
wget http://docs-aliyun.cn-hangzhou.oss.aliyun-inc.com/assets/attach/181125/cn_zh/1598426198114/adbpg_client_package.el7.x86_64.tar.gz
tar -xzvf adbpg_client_package.el7.x86_64.tar.gz
Execute the following commands to download and build the Azkaban project:
cd ~
git clone https://github.com/azkaban/azkaban.git
cd ~/azkaban
./gradlew clean
./gradlew build installDist -x test
Execute the following commands to build module azkaban-db:
cd ~/azkaban/azkaban-db; ../gradlew build installDist -x testExecute the following commands to create all the tables needed for Azkaban on RDS MySQL. Please replace <rds_mysql_url> with the provisioned RDS MySQL connection string:
cd ~/azkaban/azkaban-db/build/distributions
unzip azkaban-db-*.zip
mysql -h<rds_mysql_url> -P3306 -uazkaban -pN1cetest azkaban < ~/azkaban/azkaban-db/build/distributions/azkaban-db-*/create-all-sql-*.sql
Connect to RDS MySQL again and execute show tables to view the created tables for Azkaban:
mysql -hrm-3nssusij8bbe3a9c3.mysql.rds.aliyuncs.com -P3306 -uazkaban -pN1cetest azkaban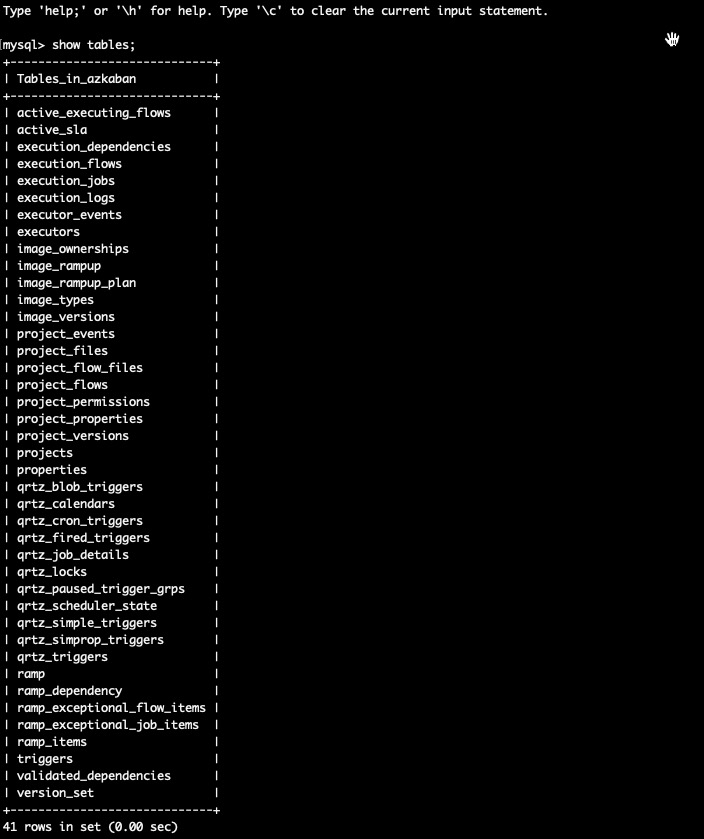
Execute the following commands to build module azkaban-exec-server, which is the Azkaban Executor Server:
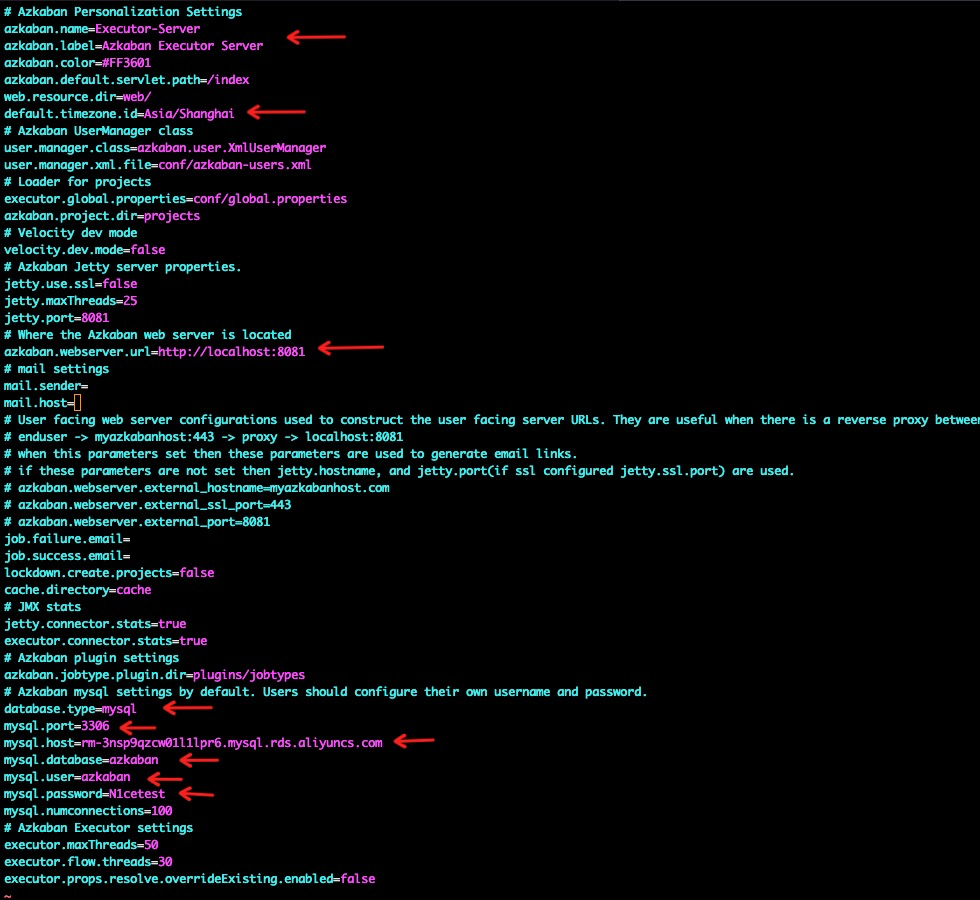
cd ~/azkaban/azkaban-exec-server; ../gradlew build installDist -x testEdit the azkaban.properties file to modify the properties of executor server accordingly:
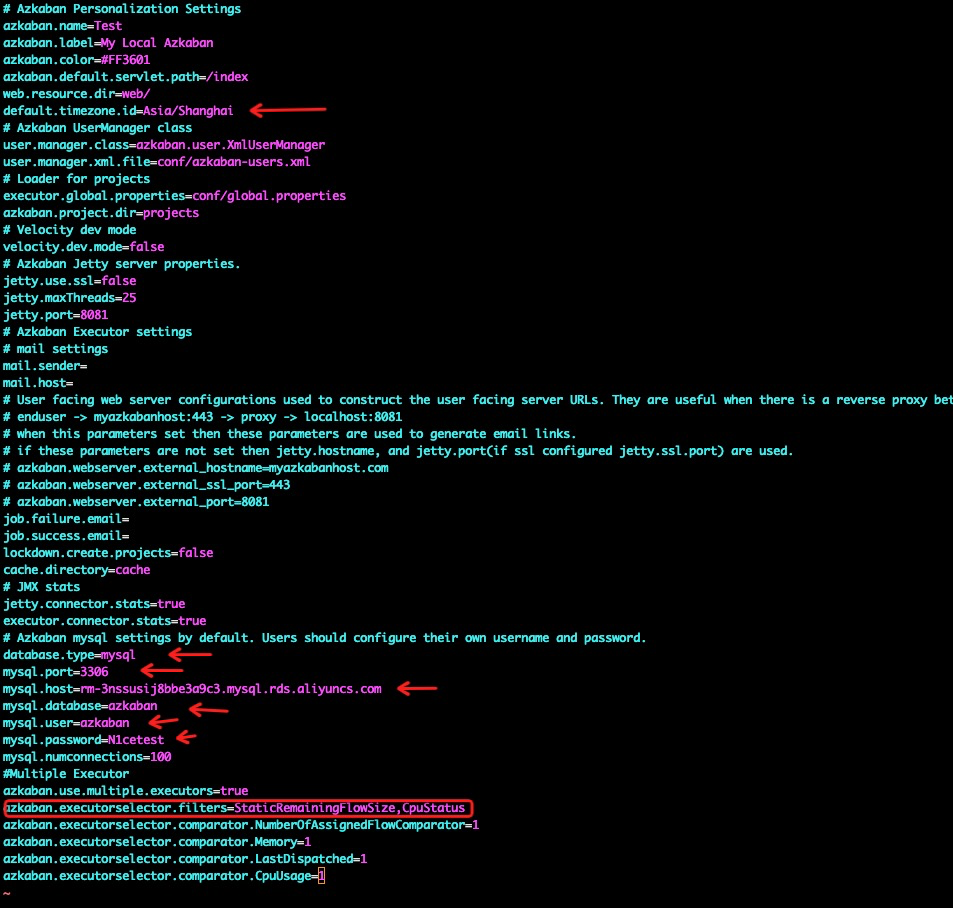
vim ~/azkaban/azkaban-exec-server/build/install/azkaban-exec-server/conf/azkaban.propertiesPlease refer to this link for the property default.timezone.id. Since we are located in China, use Asia/Shanghai. Please modify according to your location:
Execute the following commands to build module azkaban-web-server, which is the Azkaban Web Server:
cd ~/azkaban/azkaban-web-server; ../gradlew build installDist -x testEdit the azkaban.properties file to modify the properties of web server accordingly:
vim ~/azkaban/azkaban-web-server/build/install/azkaban-web-server/conf/azkaban.propertiesPlease Pay Attention:
azkaban.executorselector.filters=StaticRemainingFlowSize,MinimumFreeMemory,CpuStatus must be replaced with azkaban.executorselector.filters=StaticRemainingFlowSize,CpuStatus to remove the parameter MinimumFreeMemory.
The web server will check whether the free memory of the executor host will be greater than 6G. If it is of less than 6G, the web server will not hand over the task to the executor host for execution. Since we use entry-level ECS with small memory less than 6G in our tutorial, we need to remove this parameter to make the task work.
Azkaban web server user account is configured within the following file. Later, we will use the username azkaban and password azkaban to log on to the Azkaban web console.
vim ~/azkaban/azkaban-web-server/build/install/azkaban-web-server/conf/azkaban-users.xmlNow, execute the following commands to start the Azkaban executor server:
cd ~/azkaban/azkaban-exec-server/build/install/azkaban-exec-server
./bin/start-exec.sh
curl -G "localhost:$(<./executor.port)/executor?action=activate" && echoExecute the following commands to start the Azkaban web server:
cd ~/azkaban/azkaban-web-server/build/install/azkaban-web-server
./bin/start-web.sh
Now, a multi-executor Azkaban instance is ready for use. Open a web browser and check this address: http://<ECS_EIP>:8081/. We are all set to log in to the Azkaban web console with username azkaban and password azkaban.
Azkaban relies on job files in a package to deploy and run the workflow. I've prepared a demo project with scripts, SQL files, and job files on this project's Github page.
On the local computer, check out the project to local from Github. Please make sure you have the Git installed on your local computer.
git clone https://github.com/alibabacloud-howto/opensource_with_apsaradb.git
cd opensource_with_apsaradb/azkaban/project-demo
ls -l
We can see the demo Azkaban project files:
_1_prepare_source_db.py: Python script to prepare tables and data in source demo database northwind_source on RDS PostgreSQL_2_prepare_target_db.py: Python script to prepare tables and data in target demo database northwind_target on RDS PostgreSQL_3_data_migration.py: Python script to migrate data of two tables products and orders from source database northwind_source to target database northwind_target
job1_prepare_source_db.job: Azkaban job to call _1_prepare_source_db.py
job2_prepare_target_db.job: Azkaban job to call _2_prepare_target_db.py
job3_data_migration.job: Azkaban job to call _3_data_migration.py, which depends on job1_prepare_source_db.job and job2_prepare_target_db.job to execute beforehandnorthwind_data_source.sql: DML to insert data to source demo database northwind_source
northwind_data_target.sql: DML to insert data to target demo database northwind_target
northwind_ddl.sql: DDL to create tables on the source demo database northwind_source and target demo database northwind_target

Edit the Azkaban project files accordingly to connect to the target RDS PostgreSQL demo database:
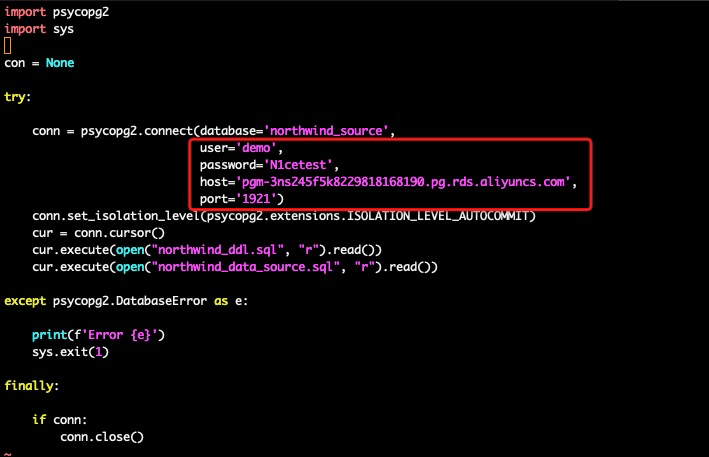
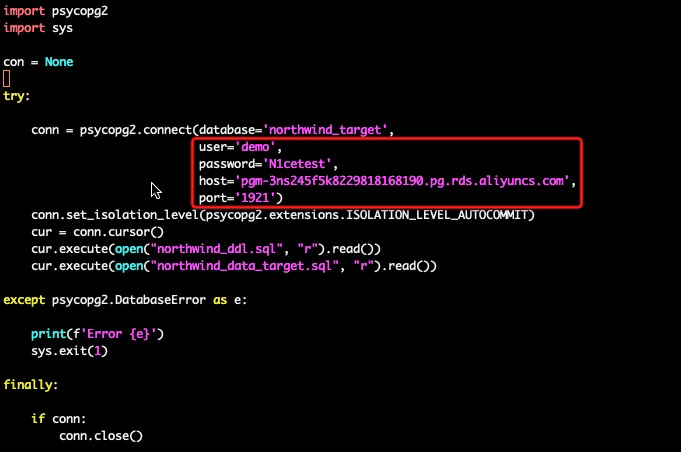
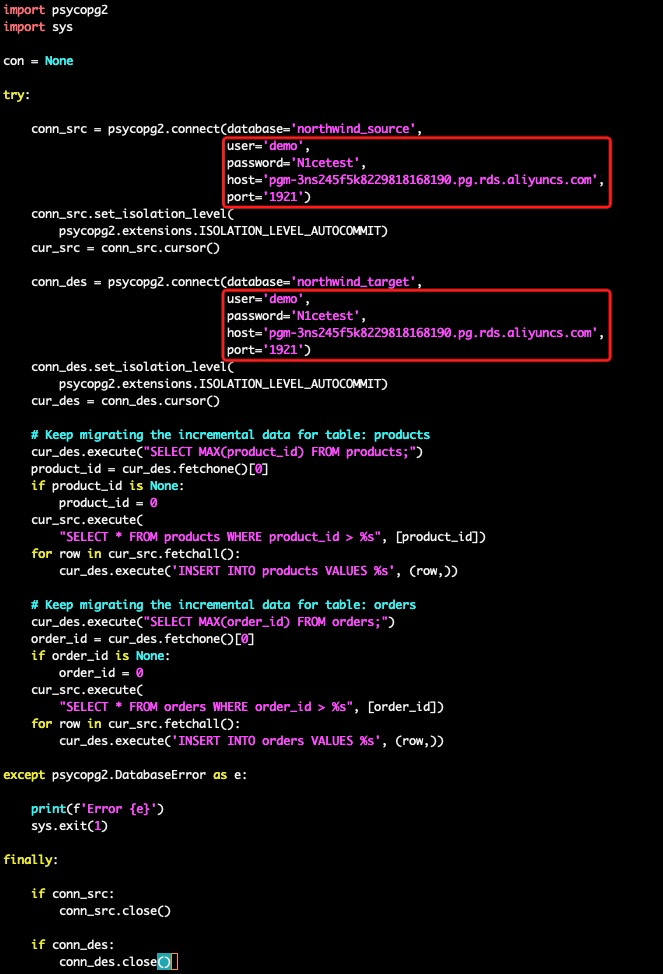
Execute the following command to package all the project files into a zip package:
zip -q -r project_demo_northwind.zip *
Open a web browser and check out this address: http://<ECS_EIP>:8081/. We are all set to log in to the Azkaban web console with username azkaban and password azkaban:
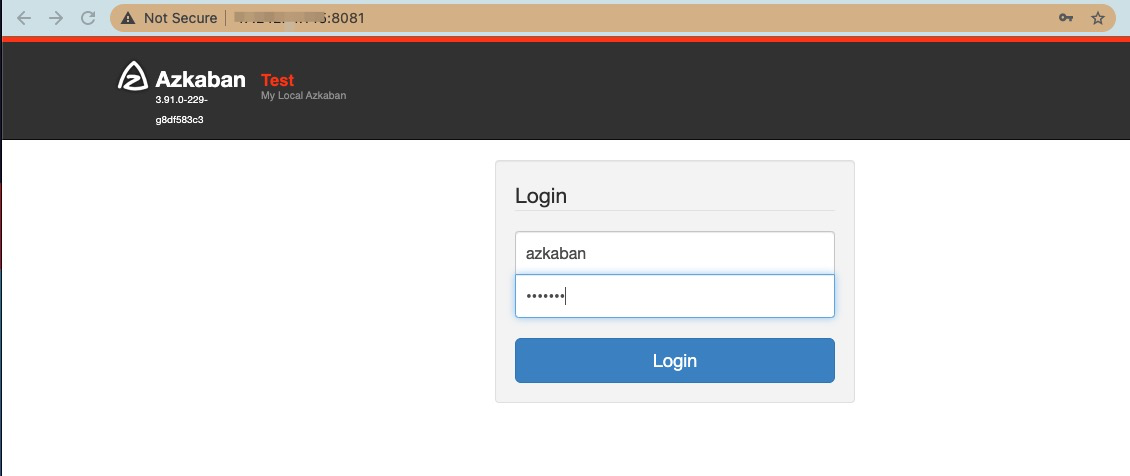
Create an Azkaban project:

Upload the project zip file packaged in Step 3:
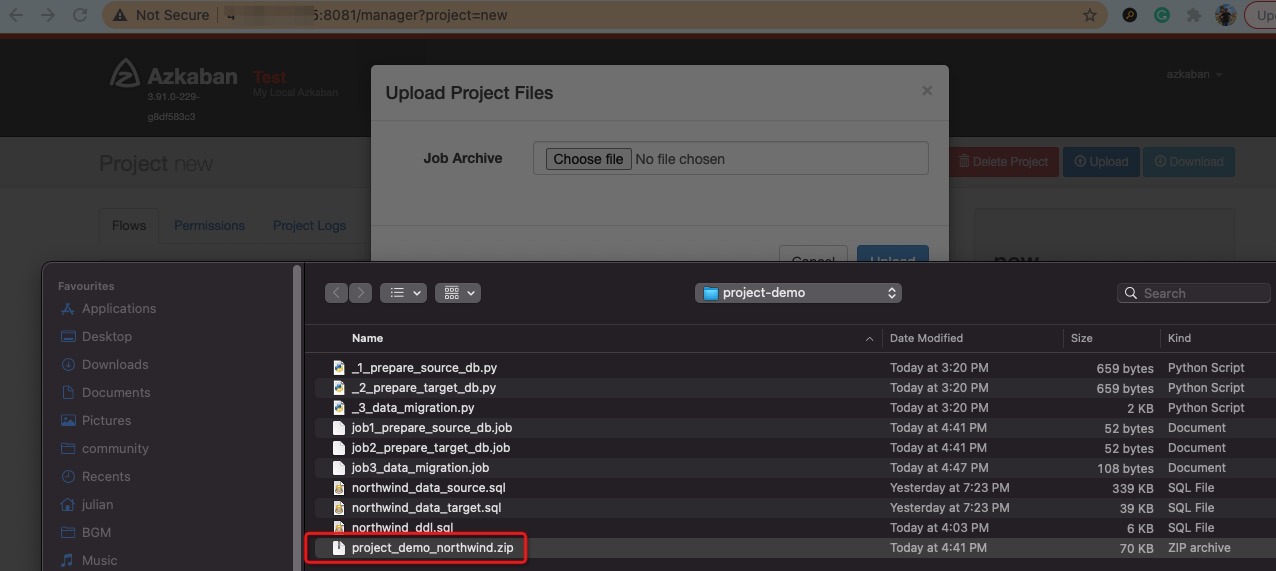
Then, we can see the job flow:
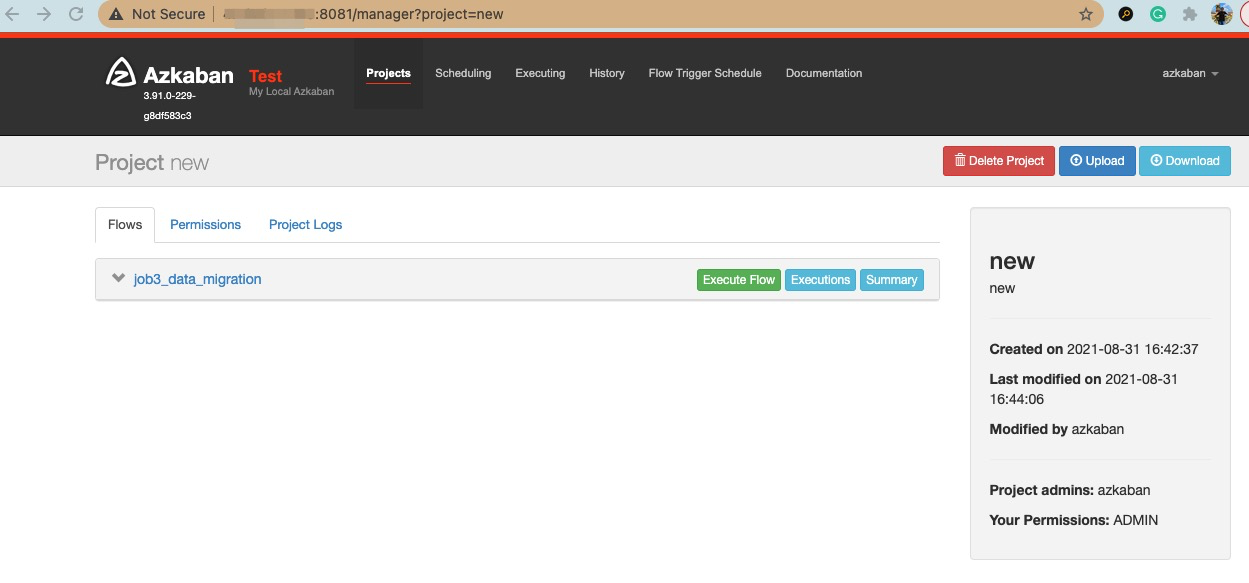
Click the job entry to see the whole job graph of the workflow:

Then, click the Schedule / Execute Flow and click Execute:
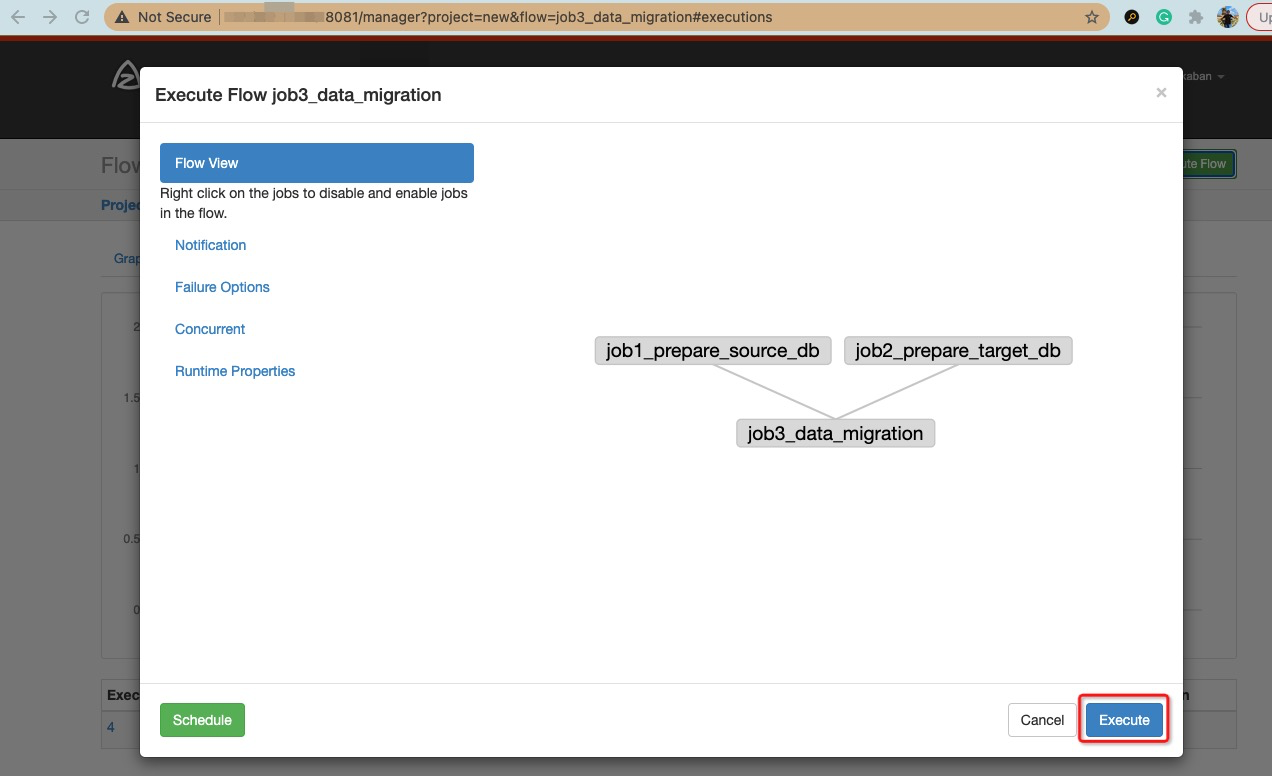
When the workflow execution finishes, we can see the green-colored job graph:
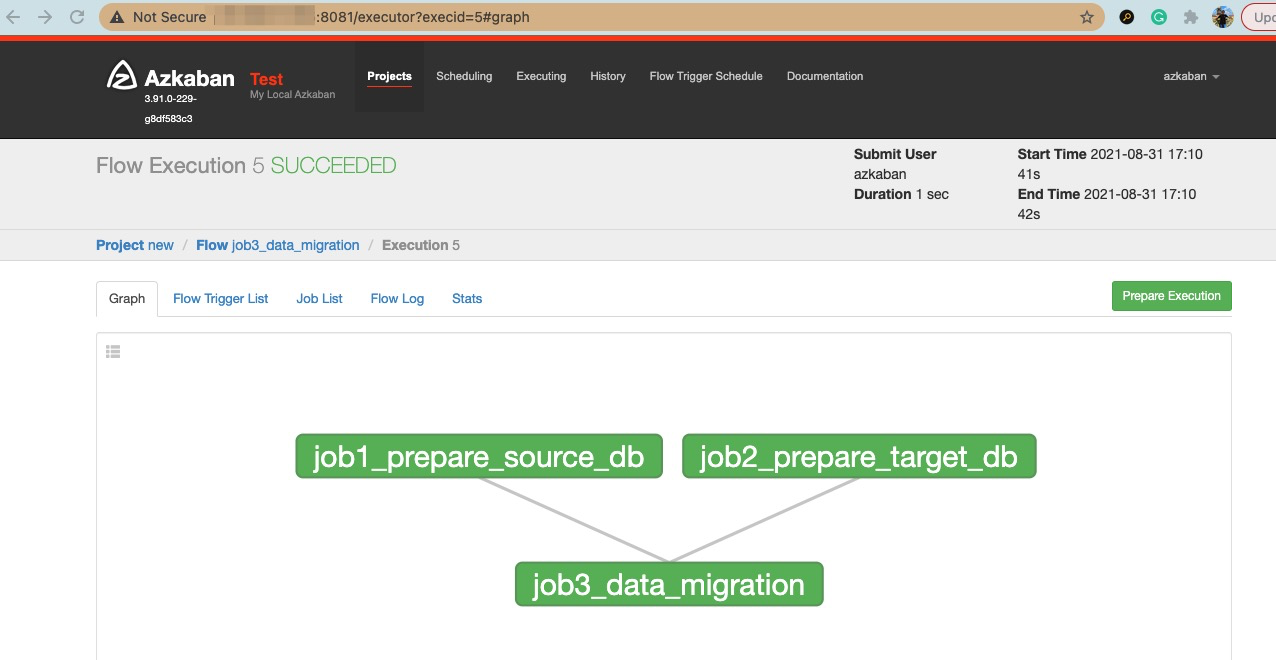
Click the Job List tab. We can see the execution status of the three jobs from this demo workflow:

Now, let's connect to the demo RDS PostgreSQL source and target databases to verify the data.
Execute the following commands to connect to the source database northwind_source and check the data in the tables' products and orders. Please replace <rds_pg_url_azkaban_demo_database> with the RDS PostgreSQL connection string:
cd ~/adbpg_client_package/bin
./psql -h<rds_pg_url_azkaban_demo_database> -p1921 -Udemo northwind_source
select tablename from pg_tables where schemaname='public';
select count(*) from products;
select count(*) from orders;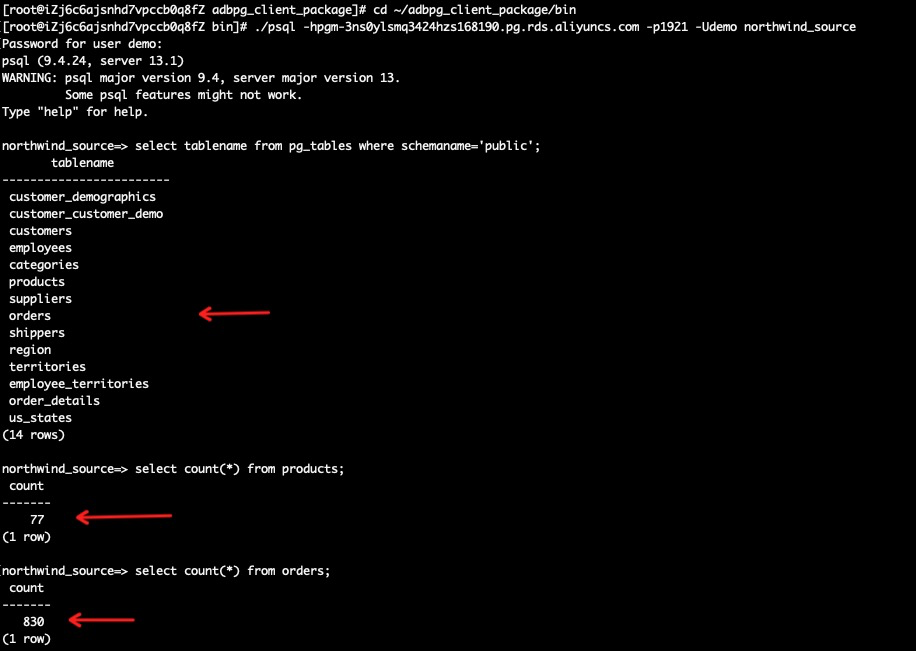
Execute the following commands to connect to the target database northwind_target and check the data in tables' products and orders. Please replace <rds_pg_url_azkaban_demo_database> with the RDS PostgreSQL connection string:
cd ~/adbpg_client_package/bin
./psql -h<rds_pg_url_azkaban_demo_database> -p1921 -Udemo northwind_target
select tablename from pg_tables where schemaname='public';
select count(*) from products;
select count(*) from orders;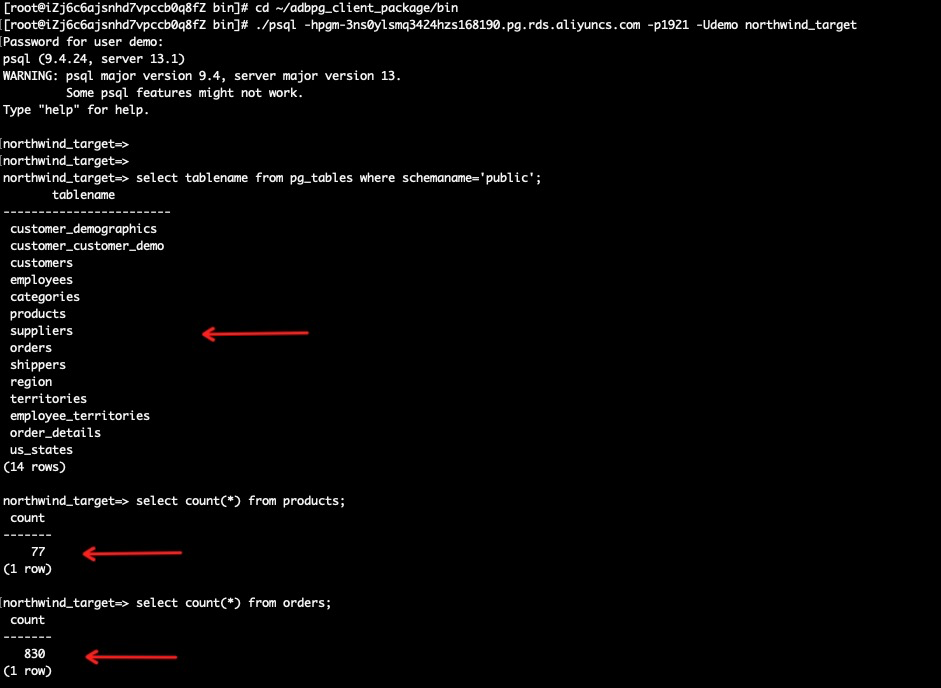
Alibaba Clouder - July 31, 2019
Alibaba Cloud Community - March 21, 2022
ApsaraDB - October 14, 2021
Alibaba Cloud MaxCompute - December 22, 2021
Alibaba Clouder - April 4, 2019
Alibaba Cloud_Academy - September 26, 2023
 PolarDB for PostgreSQL
Alibaba Cloud PolarDB for PostgreSQL is an in-house relational database service 100% compatible with PostgreSQL and highly compatible with the Oracle syntax.
Learn More PolarDB for Xscale
Alibaba Cloud PolarDB for Xscale (PolarDB-X) is a cloud-native high-performance distributed database service independently developed by Alibaba Cloud.
Learn More PolarDB for MySQL
Alibaba Cloud PolarDB for MySQL is a cloud-native relational database service 100% compatible with MySQL.
Learn More ApsaraDB for OceanBase
A financial-grade distributed relational database that features high stability, high scalability, and high performance.
Learn MoreMore Posts by ApsaraDB