By Cheng Hequn
Let's first see the APIs available in Flink to better understand the Table API.
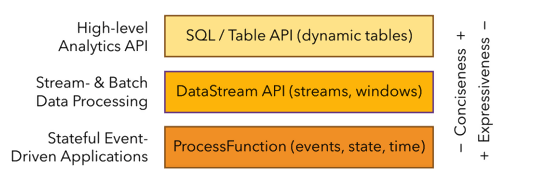
Flink provides three API layers with different levels of use and expressiveness. The expressiveness increases from top to bottom. Since the ProcessFunction is the underlying API layer, it has the strongest expressiveness and is often used for complex functions such as state and timer.
Compared to the ProcessFunction, the DataStream API is further encapsulated and provides many standard operator semantics such as window operators, tumble, slide, and session. The Table API and SQL at the top layer are the easiest API and have many important features.
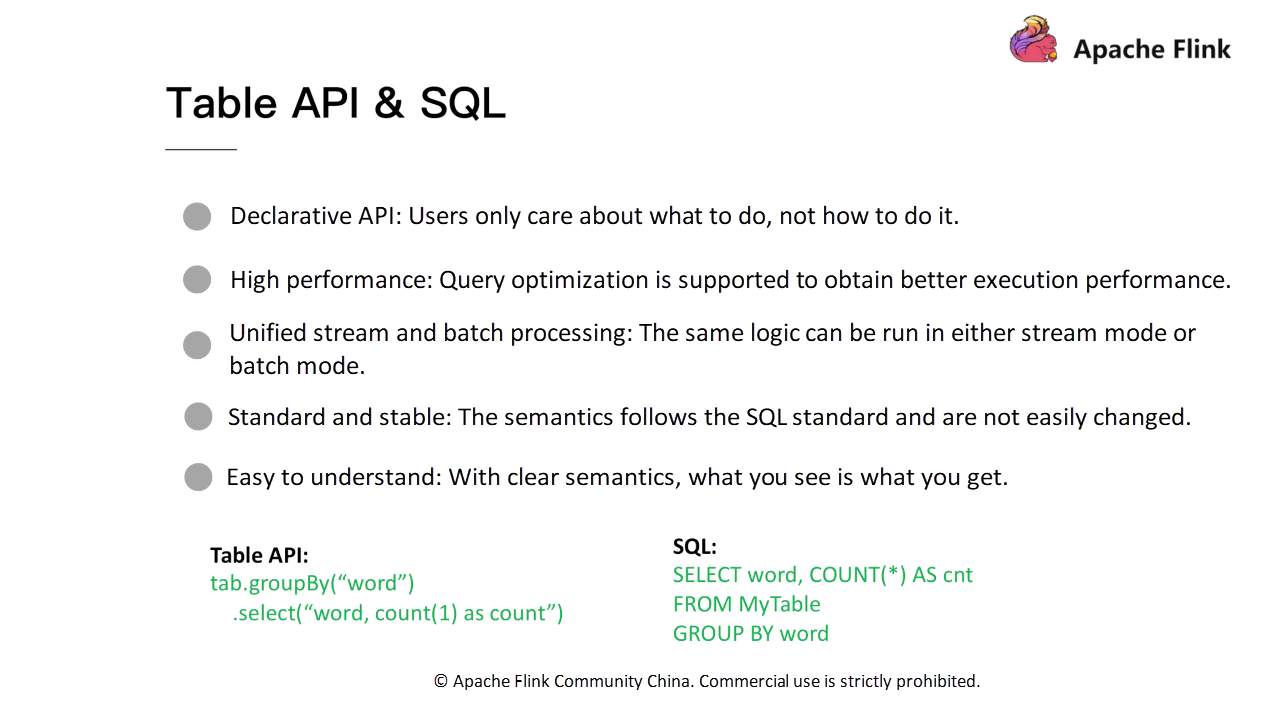
(1) Declarative API. Table API or SQL is a declarative API. Users only need to consider what to do, not how to do it. For example, for the WordCount example in the figure, users only need to consider the dimension and type of aggregation without having to consider the implementation of the bottom layer.
(2) High performance. An optimizer is provided at the bottom layer of the Table API and SQL to optimize the query. For example, if you write two Count operations in the WordCount example, the optimizer identifies and avoids repeated computation. Only one Count operation is retained during computation, and the same value is output twice to achieve better performance.
(3) Unified stream and batch processing. As shown in the preceding figure, the API does not distinguish between stream processing or batch processing. Reuse the same query for stream and batch processing to avoid developing two sets of code for business development.
(4) Standard and stable. Table API and SQL follow SQL standards and do not change easily. The advantage of a relatively stable API is that you do not need to consider the API compatibility.
(5) Easy to understand. With clear semantics, what you see is what you get.
The previous section describes the common features between the Table API and SQL. However, this section mainly describes the features of the Table API.
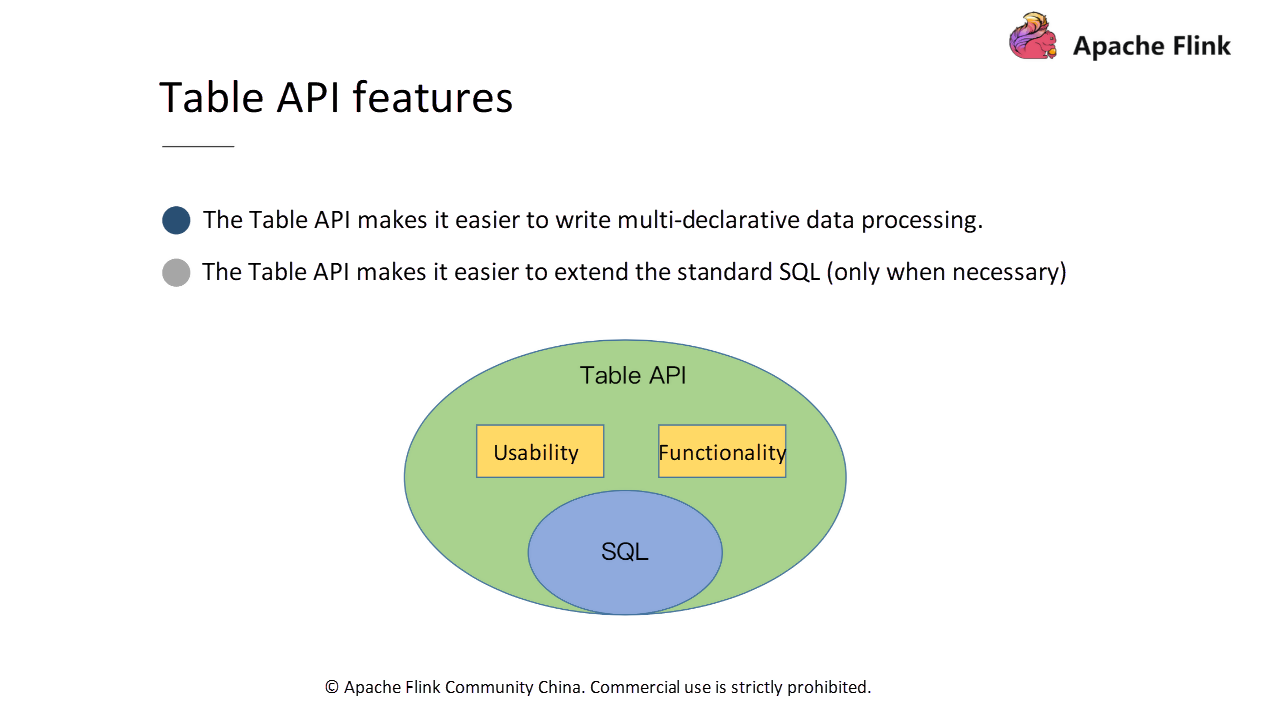
First, the Table API makes it easier to write multi-declarative data processing. But what does this mean? For example, if you have a table (tab) and need to perform filtering operations and then output the results into the result table, the corresponding implementation is tab.where("a < 10").inertInto("resultTable1"). Also, there's a need to perform some other filtering operations and then output the results.
The implementation is tab.where("a > 100").insertInto("resultTable2"). Using the Table API to write the implementation is simple and convenient, and you can implement the function using two-line codes.
Second, the Table API is an API of Flink itself. This makes it easier to extend standard SQL. Consider the semantics, atomicity, and orthogonality of the API while extending the SQL and add it only when necessary. Consider the Table API as a superset of SQL.
The Table API has the same operations as SQL. However, extend and improve SQL's ease of use and functionality.
Let's look at how to use the Table API for programming. This section starts with a WordCount example to give you a general understanding of the Table API programming. It further introduces the operation of the Table API: how to obtain a table, how to output a table, and how to perform query operation on the table.
The following is a complete WordCount example for batch processing written in Java. Besides, WordCount examples in Scala and stream processing are also available and uploaded to GitHub. Download and try to run or modify them.
import org.apache.flink.api.common.typeinfo.Types;
import org.apache.flink.api.java.ExecutionEnvironment;
import org.apache.flink.table.api.Table;
import org.apache.flink.table.api.java.BatchTableEnvironment;
import org.apache.flink.table.descriptors.FileSystem;
import org.apache.flink.table.descriptors.OldCsv;
import org.apache.flink.table.descriptors.Schema;
import org.apache.flink.types.Row;

public class JavaBatchWordCount {   // line:10

    public static void main(String[] args) throws Exception {
        ExecutionEnvironment env = ExecutionEnvironment.getExecutionEnvironment();
        BatchTableEnvironment tEnv = BatchTableEnvironment.create(env);

        String path = JavaBatchWordCount.class.getClassLoader().getResource("words.txt").getPath();
        tEnv.connect(new FileSystem().path(path))
            .withFormat(new OldCsv().field("word", Types.STRING).lineDelimiter("\n"))
            .withSchema(new Schema().field("word", Types.STRING))
            .registerTableSource("fileSource");  // line:20

        Table result = tEnv.scan("fileSource")
            .groupBy("word")
            .select("word, count(1) as count");

        tEnv.toDataSet(result, Row.class).print();
    }
}
Now, let's take a look at this WordCount example. Lines 13 and 14 are the initialization of the environment. First, obtain the execution environment through the getExecutionEnvironment method of the ExecutionEnvironment, and then obtain the corresponding table environment through the Create operation of BatchTableEnvironment.
After obtaining the environment, register TableSource and TableSink, or perform other operations.
Note that both the ExecutionEnvironment and BatchTableEnvironment correspond to the Java environment. For Scala programs, you require an environment for Scala. This is also a problem that beginners may encounter at the beginning because environments are diverse and confusing. The following figure summarizes the differences between these environments.
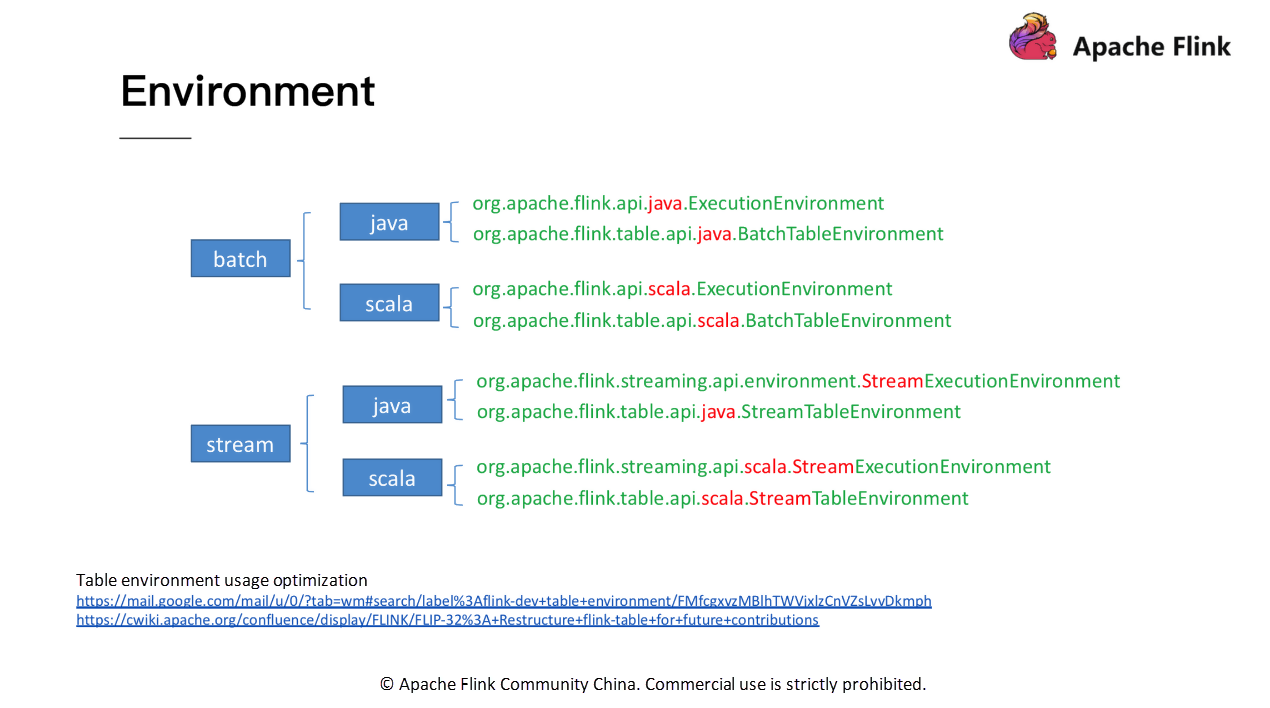
Classify the environments from batch/stream and Java/Scala. Pay special attention to the use of these environments and do not import them incorrectly. On the issue of the environment, the community has had some discussions. For more information, refer to the link at the bottom of the figure above.
Let's go back to the previous WordCount example. After obtaining the environment, the second thing is to register the corresponding TableSource.
tEnv.connect(new FileSystem().path(path))
    .withFormat(new OldCsv().field("word", Types.STRING).lineDelimiter("\n"))
    .withSchema(new Schema().field("word", Types.STRING))
    .registerTableSource("fileSource");
It is also very convenient to use. First, to read a file, specify the path of the file. Then, describe the file content format (for example, it is a CSV file) and specify the line delimiter. Also specify the Schema corresponding to the file (for example, only one list of words), and the type is String. Finally, register the TableSource with the environment.
Table result = tEnv.scan("fileSource")
    .groupBy("word")
    .select("word, count(1) as count");

tEnv.toDataSet(result, Row.class).print();
By scanning the registered TableSource, obtain a table object and perform related operations, such as GroupBy and Count. Finally, the table can be output as a dataset. The above is a complete WordCount example for the Table API. It involves obtaining a table, operating on the table, and outputting the table.
The following sections describe how to obtain, output, and operate on a table.
To obtain the table, divide it into two steps. The first step is to register the corresponding TableSource. The second step is to call the Scan method of tableEnvironment to obtain a table object.
Three methods are available to register the TableSource. Either register it through the table descriptor, the user-defined table source, or a DataStream.
The following figure shows the specific registration methods:
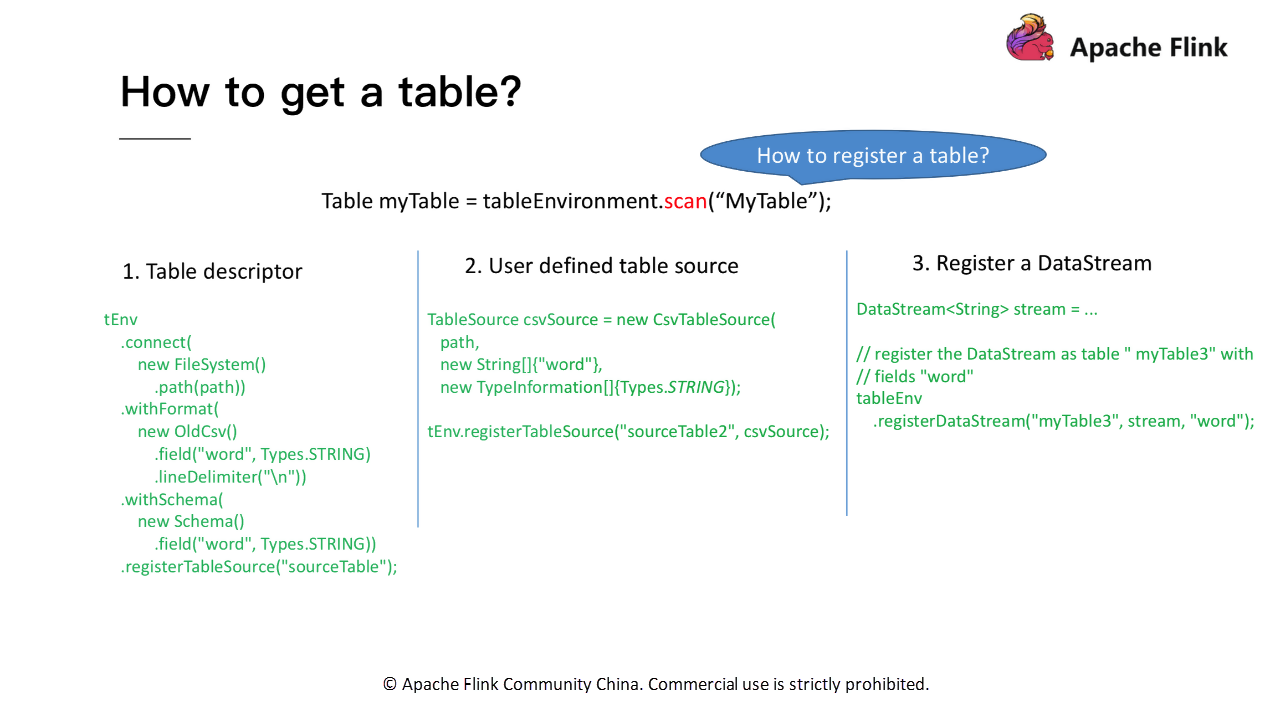
Three similar methods are also available to output a table: through the table descriptor, the user-defined table sink, or output it to a DataStream as shown in the following figure:
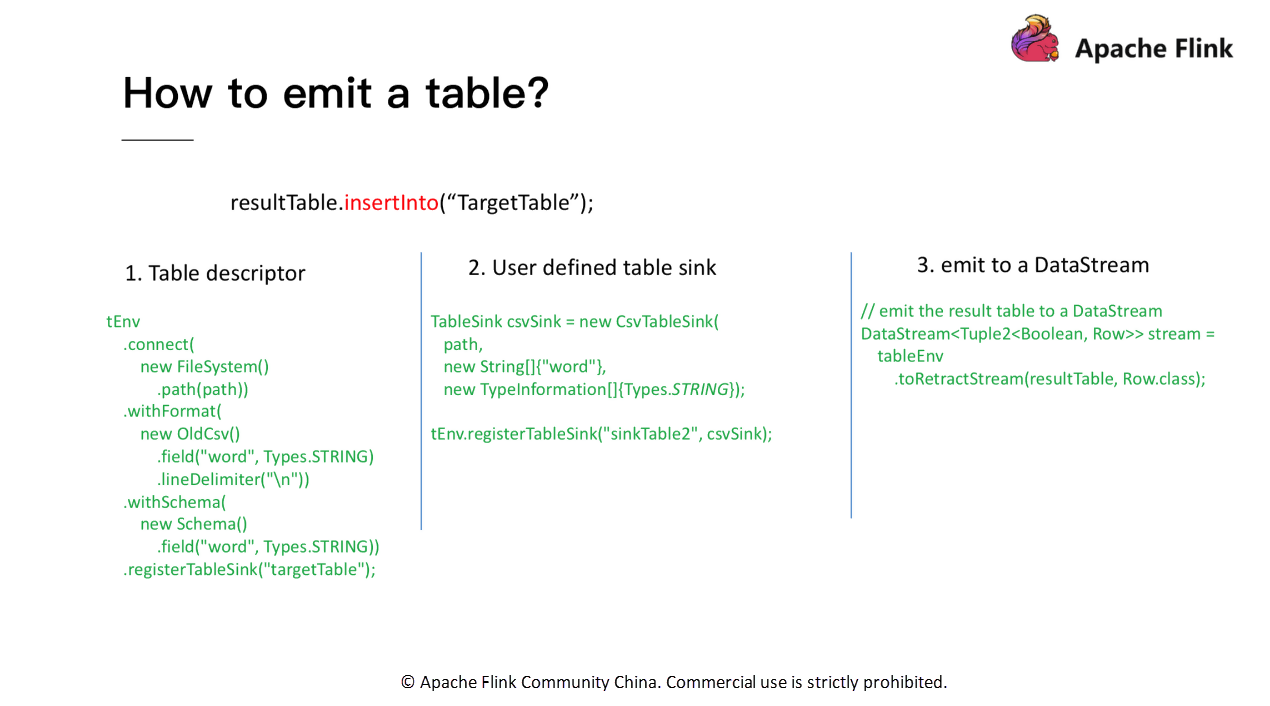
Sections 2 and 3 describe how to obtain and output a table. This section mainly describes how to operate the table. We can perform many operations on a table, such as projection operations (select, filter, and where), aggregate operations (groupBy, and flatAggregate), and join operations. Let's take a specific example to describe the conversion process for operations on the table:
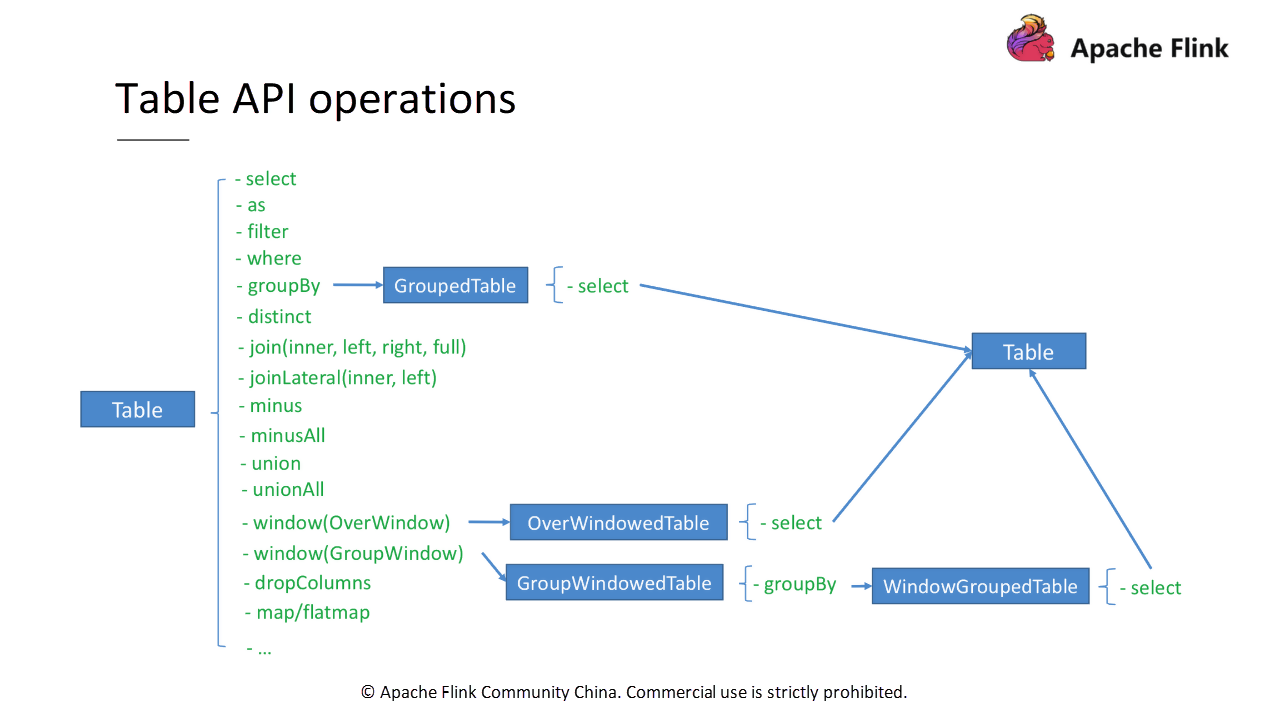
As shown in the preceding figure, after we obtain a table, calling groupBy returns a GroupedTable. Only the select method is available on the GroupedTable. Calling the select method on the GroupedTable returns a table. After obtaining the table, call methods on the table.
The procedures for other tables, such as the OverWindowedTable in the figure, are similar. Note that various types of tables are introduced to ensure the validity and convenience of the API. For example, after groupBy, only the select operation is meaningful and can be directly clicked in the editor.
As mentioned earlier, the Table API is referred to as a superset of SQL. We can also classify the operations on the table into three types according to the following figure:
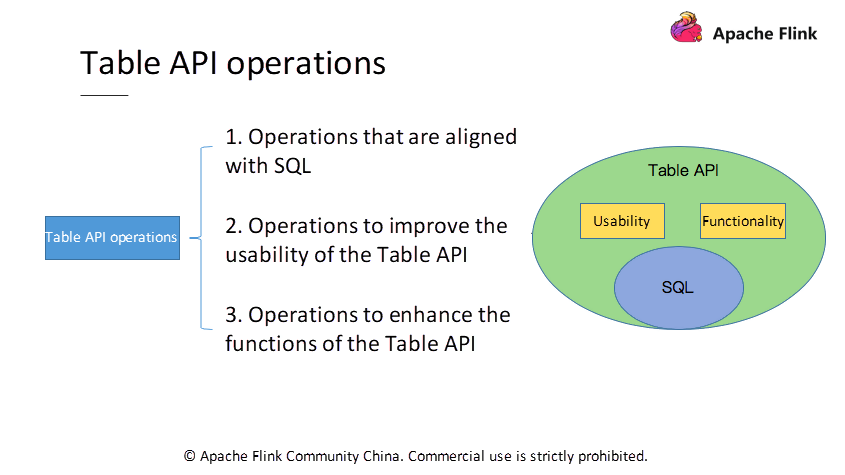
Operations aligned with SQL are the first type, such as select, filter, and join. The second type is operations that improve the usability of the Table API, and the third is operations that enhance the functions of the Table API. The first type of operations is relatively easy to understand because they are similar to SQL. Check the official documentation for specific methods as these operations are not described in detail here. The following sections focus on the last two types of operations, which are also unique to the Table API.
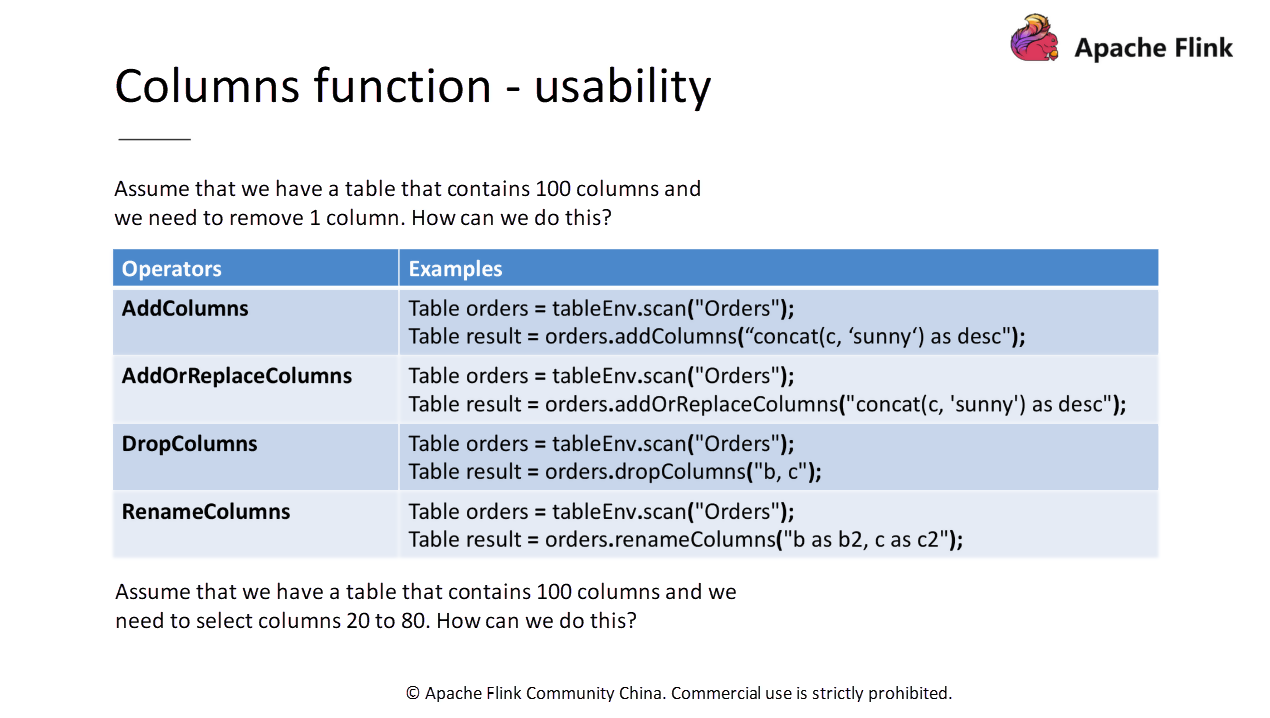
Let's start with the problem. Assume that we have a large table that contains 100 columns and you need to remove 1 column. How will you write the SQL statement?
Select the remaining 99 columns! This is a taxing operation for users. To solve this problem, Use a dropColumns method to write and remove the specific column.
Also, we introduce the addColumns, add OrReplaceColumns, and renameColumns methods, as shown in the following figure:
Now, let's consider another problem.
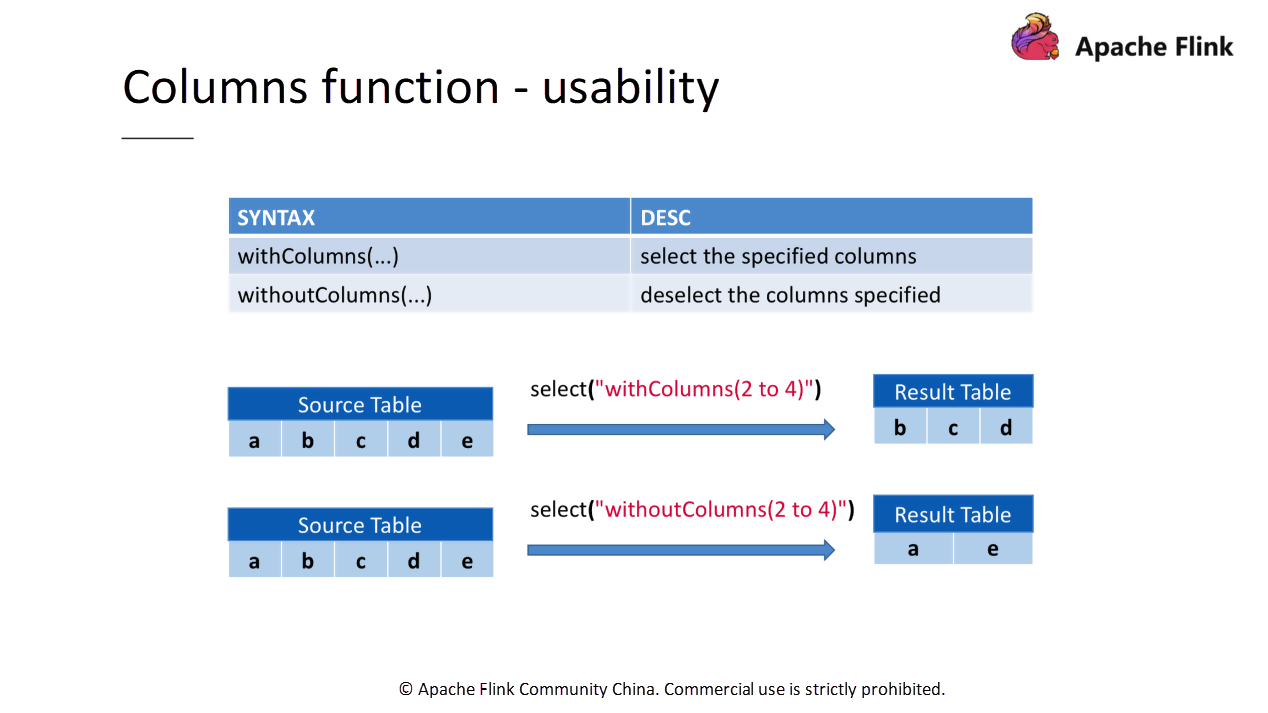
Assume that we still have a table with 100 columns, but, this time, we need to choose columns 20 to 80. How can we do this?
To solve this problem, we introduce withColumns and withoutColumns methods. Write a table.select("withColumns(20 to 80)").
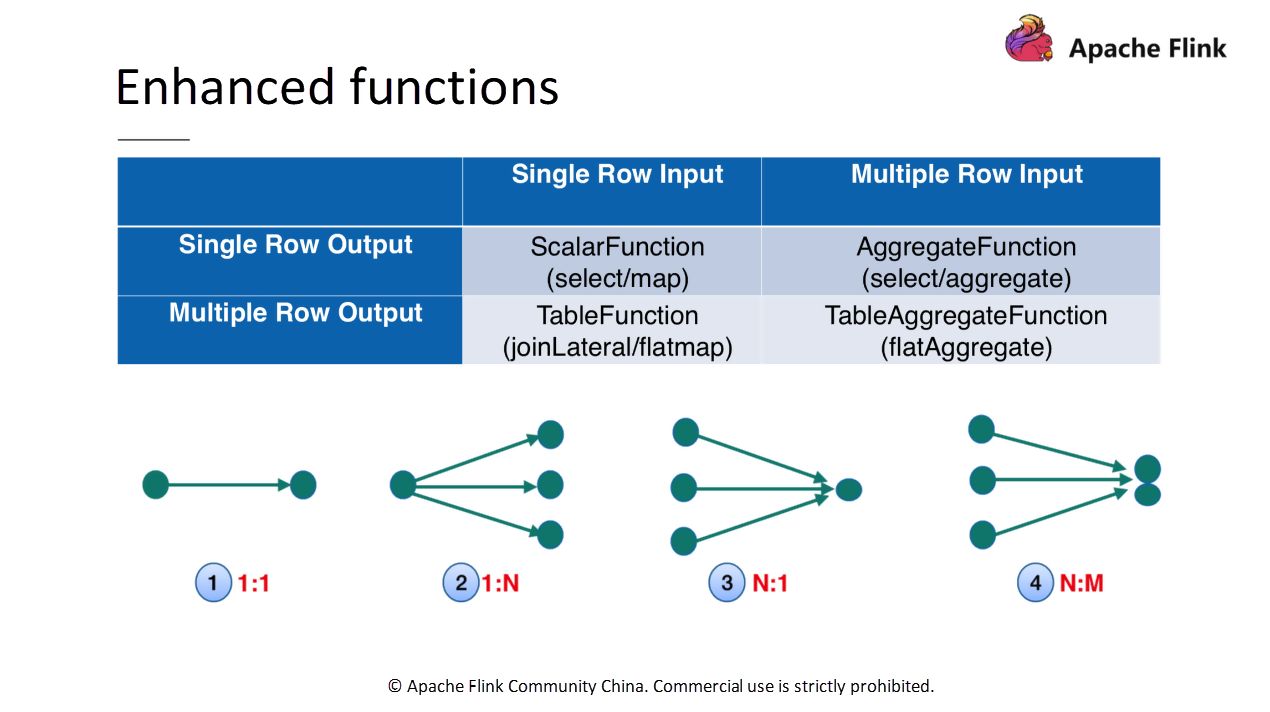
This section describes the functions and usage of the TableAggregateFunction. Before moving ahead with the TableAggregateFunction, first let's have a look at three types of UDFs in Flink:
Classify these UDFs from the input and output dimensions. As shown in the following figure, the ScalarFunction is to input one row and output another row, the TableFunction is to input one row and output multiple rows, and the AggregateFunction is to input multiple rows and output one row.
To make the semantics more complete, the Table API added the TableAggregateFunction, which receives and outputs multiple rows.
After adding theTableAggregateFunction, extend the functions of the Table API. To some extent, use it to implement user-defined operators. For example, we can use TableAggregateFunction to implement TopN.
The TableAggregateFunction is easy to use. The following figure shows the method signature and usage.
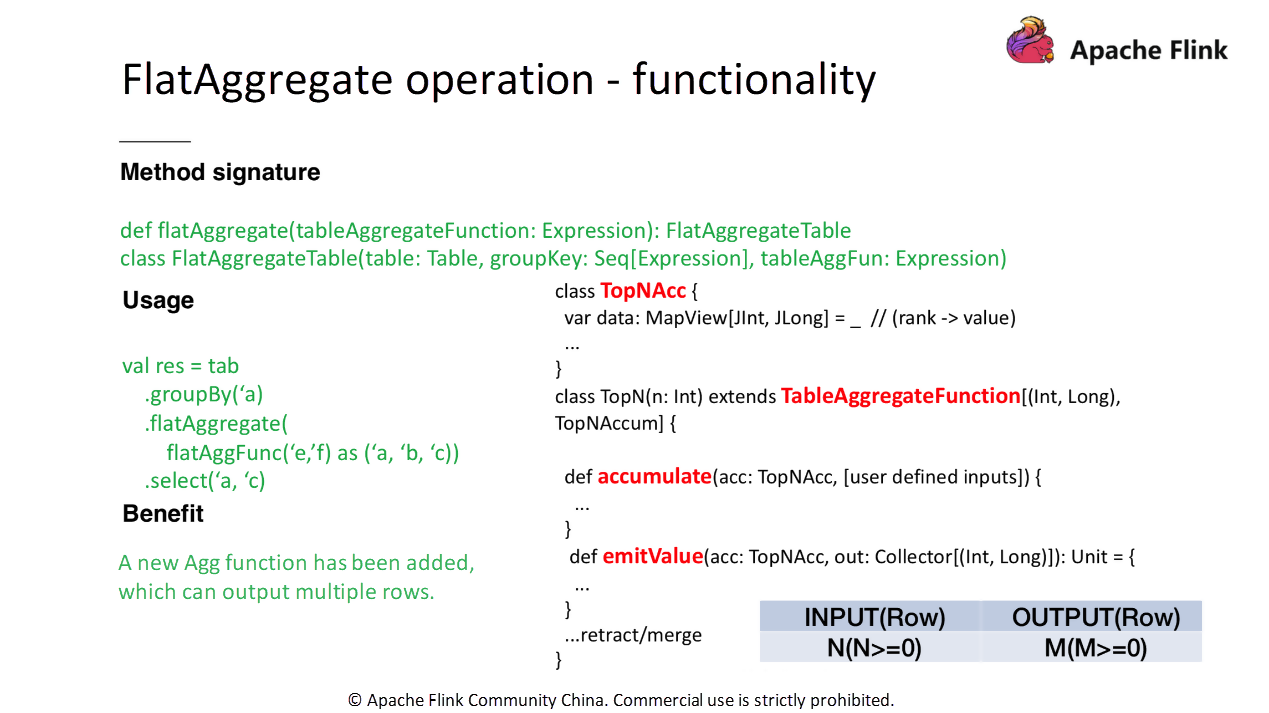
In terms of usage, call the table.flatAggregate(), and then pass in a TableAggregateFunction situation. Inherit TableAggregateFunction to implement UDFs. When inheriting TableAggregateFunction, you must first define an Accumulator to access states.
Besides, the user-defined TableAggregateFunction needs to implement the accumulated and emitValue methods. The accumulate method processes input data, while the emitValue method outputs results based on the state in the accumulator.
Finally, let's take a look at the recent developments of Table API.
1) Flip-29
This is mainly the enhancement of the functions and usability of the Table API. For example, the operations related to columns just introduced, and the TableAggregateFunction.
The corresponding JIRA issue in the community is - https://issues.apache.org/jira/browse/FLINK-10972
2) Python Table API
This adds Python language support to the Table API. It's good news for Python users.
The corresponding JIRA issue in the community is - https://issues.apache.org/jira/browse/FLINK-12308
3) Interactive Programming
A cache operator is provided on the table. Perform the cache operation to cache the result of the table and perform other operations on the result.
The corresponding JIRA issue in the community is - https://issues.apache.org/jira/browse/FLINK-11199
4) Iterative Processing
The table supports an iterator operator that is used for iterative computing. For example, you can use it to perform 100 iterations or specify a convergence condition. It is widely used in the field of machine learning. The corresponding JIRA issue in the community is https://issues.apache.org/jira/browse/FLINK-11199
Apache Flink Fundamentals: State Management and Fault Tolerance

206 posts | 56 followers
FollowApache Flink Community China - January 9, 2020
Apache Flink Community China - January 9, 2020
Apache Flink Community China - January 9, 2020
Apache Flink Community China - January 9, 2020
Apache Flink Community China - September 27, 2020
Apache Flink Community China - December 25, 2019

206 posts | 56 followers
Follow Realtime Compute for Apache Flink
Realtime Compute for Apache Flink offers a highly integrated platform for real-time data processing, which optimizes the computing of Apache Flink.
Learn More Message Queue for Apache Kafka
A fully-managed Apache Kafka service to help you quickly build data pipelines for your big data analytics.
Learn More ApsaraDB for SelectDB
A cloud-native real-time data warehouse based on Apache Doris, providing high-performance and easy-to-use data analysis services.
Learn More ApsaraMQ for RocketMQ
ApsaraMQ for RocketMQ is a distributed message queue service that supports reliable message-based asynchronous communication among microservices, distributed systems, and serverless applications.
Learn MoreMore Posts by Apache Flink Community