
By Jeff Cleverley, Alibaba Cloud Tech Share Author
In Part 1 of this series about Caching solutions for WordPress on the Alibaba Cloud we set up server monitor and ran some load testing on the server to take performance benchmarks for our server prior to enabling any caching.
We then set up a Redis server on our Alibaba instance and configured it to work as an Object cache for our WordPress site, this reduced the database queries that are one of the biggest performance bottlenecks for WordPress.
The other major performance bottleneck for WordPress is caused by processing PHP, therefore in order to further improve the performance of our site, we need to reduce the amount of PHP that our web server has to process.
This is where page caching comes in.
Object caching can seriously improve your WordPress site's performance by optimizing the process of querying the database, but there is still a lot of overhead when serving a page request since the server is required to process PHP.
This overhead is caused by WordPress and PHP needing to build the requested HTML page on every single page load. We can reduce this drain on server resources by caching the HTML version of the requested page once it has been built, then on the next request for this page we simply serve the cached HTML page and can avoid hitting WordPress or PHP altogether.
This type of static page caching is especially useful on sites where the content for each page rarely updates.
There are different options available for static page caching however, so first let's consider our options.
Varnish Cache is a well respected web application accelerator also knowns as a caching HTTP reverse proxy. Basically, you install it in front of any server (in our case NGINX) that speaks HTTP and it will cache the returned contents of any page requests.
It is really, really fast.
The reason I have chosen to use NGINX FastCGI caching over Varnish caching in this series is because Varnish doesn't support the HTTPS protocol, and NGINX FastCGI caching is approximately as fast.
Our WordPress site has been configured to use a Let's Encrypt SSL to benefit from the advantages of HTTP2 that are only available via HTTPS. Therefore, to use Varnish cache we would need an HTTP terminator sitting in front of it to intercept and decrypt HTTPS page requests on port 443 before passing them to the Varnish cache. We could use NGINX for this purpose, but we must ask whether this increased complexity is worthwhile.
Here are two diagrams that clearly illustrate why I chose to forgo Varnish caching for NGINX FastCGI caching:
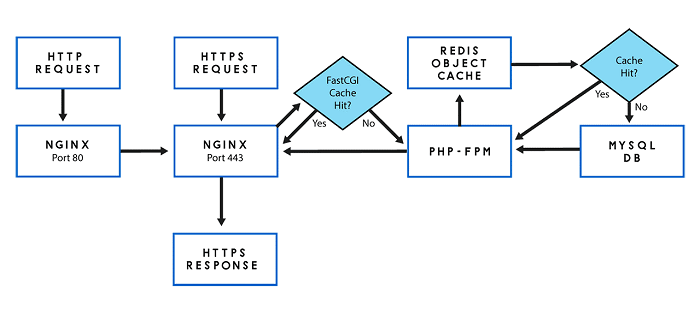
<NGINX FastCGI Caching and Redis – Server architecture>
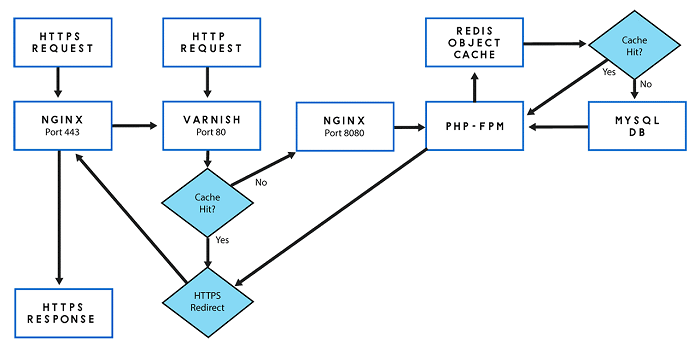
<NGINX, Varnish Caching and Redis – Server architecture>
You can clearly see the increased complexity. Adding another component to our stack introduces another possible potential point of failure and increases the administrative and configuration burden.
Another alternative to using NGINX FastCGI caching is to employ the use of one of the many WordPress static caching plugins.
The most famous of these, WP Super Cache, is created by Automattic themselves. This plugin will generate static html files from your dynamic WordPress site, and cache them in a WordPress directory. When a visitor visits your site, your server will serve that file instead of processing the comparatively heavier and more expensive WordPress PHP scripts.
Plugins such as these have a variety of settings. When configured in a more advanced way, they can offer similar improvements by bypassing PHP altogether. However, this advanced configuration relies on an Apache Module, since our stack utilizes the more performant NGINX web server we would need to use non-standard configurations that are more difficult to debug.
The simpler configuration, that is recommended by the plugin, actually serves the static HTML files by PHP, something we wish to avoid.
In addition, these plugins require PHP and WordPress to be running for any pages to be served. One of the benefits of NGINX FastCGI caching is that it is possible to configure it to continue to serve pages even if PHP (and therefore WordPress) crashes.
The above reasons are why I choose to utilize NGINX FastCGI caching.
To set this up we will need to make a few changes to our NGINX server block. We are currently using the default virtual host file, so we should open the default configuration file:
sudo nano /etc/nginx/sites-available/default
In this configuration file enter the following lines above and outside the server{ } block:
fastcgi_cache_path /var/run/nginx-fastcgi-cache levels=1:2 keys_zone=FASTCGICACHE:100m inactive=60m;
fastcgi_cache_key "$scheme$request_method$host$request_uri";
fastcgi_cache_use_stale error timeout invalid_header http_500;
fastcgi_ignore_headers Cache-Control Expires Set-Cookie;
The fastcgi_cache_path directive specifies the location of the cache, it's size, key_zone name, subdirectory levels, and the inactive timer.
The location of the cache can be anywhere on the hard disk, however if you want to benefit from the cache being read from Memory then you should choose a location that is loaded into RAM. I chose the /var/run folder in Ubuntu because it is mounted as tmpfs (in RAM).
The fastcgi_cache_key directive instructs the FastCGI module on how to generate key names. It specifies how the cache filenames will be hashed, NGINX encrypts an accessed file with MD5 based on this directive.
The fastcgi_cache_use_stale directive is what makes NGINX caching so robust. This tells NGINX to continue to serve old (stale) cached versions of a page even if PHP (and therefore WordPress) crashes. This is something that is not possible with WordPress caching plugins.
The fastcgi_ignore_headers directive disables processing of certain response header fields from the FastCGI server, more details can be found here.
Now we need to instruct NGINX to skip the cache for certain pages that shouldn't be cached, enter the following about the first location block.
set $skip_cache 0;

# POST requests and urls with a query string should always go to PHP
if ($request_method = POST) {
    set $skip_cache 1;
}

if ($query_string != "") {
    set $skip_cache 1;
}

# Don't cache uris containing the following segments
if ($request_uri ~* "/wp-admin/|/xmlrpc.php|wp-.*.php|/feed/|index.php|sitemap(_index)?.xml") {
    set $skip_cache 1;
}

# Don't use the cache for logged in users or recent commenters
if ($http_cookie ~* "comment_author|wordpress_[a-f0-9]+|wp-postpass|wordpress_no_cache|wordpress_logged_in") {
    set $skip_cache 1;
}
These directives will instruct NGINX not to cache certain pages, POST requests, urls with a query string, logged in users and a few others.
Next enter the following directives within the PHP location block:
fastcgi_cache_bypass $skip_cache;
fastcgi_no_cache $skip_cache;
fastcgi_cache FASTCGICACHE;
fastcgi_cache_valid 60m;
add_header X-FastCGI-Cache $upstream_cache_status;
The fastcgi_cache_bypass directive defines conditions under which the response will not be taken from cache, while the fascgi_no_cache directive defines the conditions under which the response will not be saved to cache.
Make sure the fastcgi_cache directive matches the key_zone set before the server block earlier.
The fastcgi_cache_valid directive allows you to specify the cache duration, I have set it to the default 60m, this is a good starting point, but you can adjust it as you see fit.
Lastly, the add_header directive adds an extra header to the server responses so that you can easily check to determine whether a request is being served from the cache or not.
Your default NGINX hosts file should now look like the following:
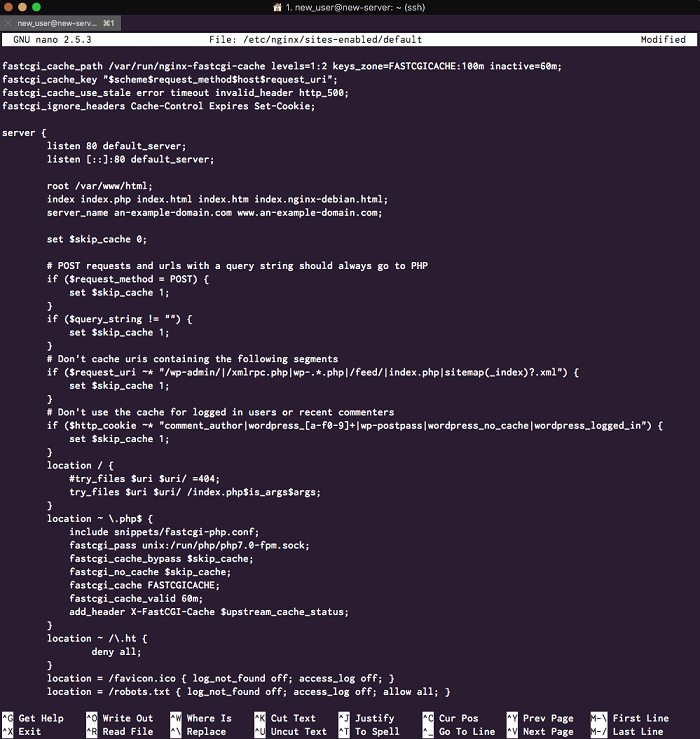
<NGINX default - caching enabled>
Once you have saved and exited the file don't forge to check that your NGINX configuration file is syntax error free with the following command:
sudo nginx -t
Assuming everything is okay, restart the NGINX server.
sudo service nginx restart
The last thing we need to do is install a WordPress NGINX caching plugin to automatically purge the FastCGI cache whenever your WordPress site content changes. There are several of these plugins to choose from, but we will go with another plugin by Till Krüss, NGINX Cache plugin.
Search for this plugin in the repository, install and activate it:
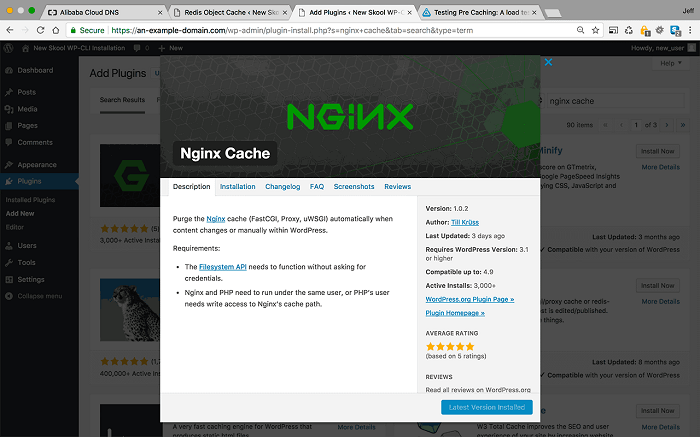
<NGINX Cache Plugin>
Once you have activated it, navigate to its settings page and enter the cache zone path that we specified in the NGINX hosts file earlier.
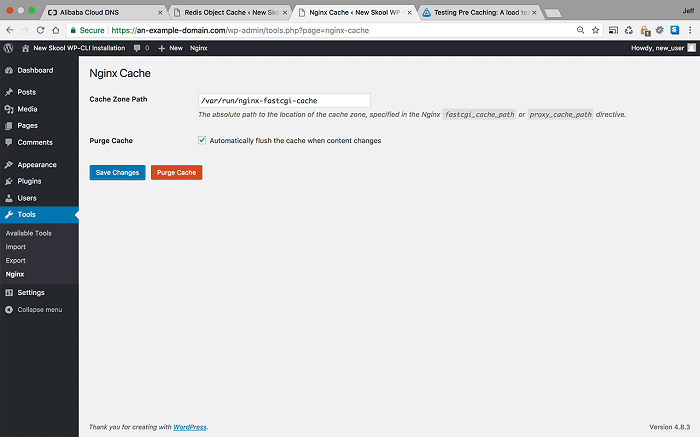
<NGINX Cache Plugin Settings – Enter the cache zone path>
As you can see, you can also purge the entire cache from this plugins settings.
Now we need to visit our site and view the headers to check to see if NGINX caching is working.
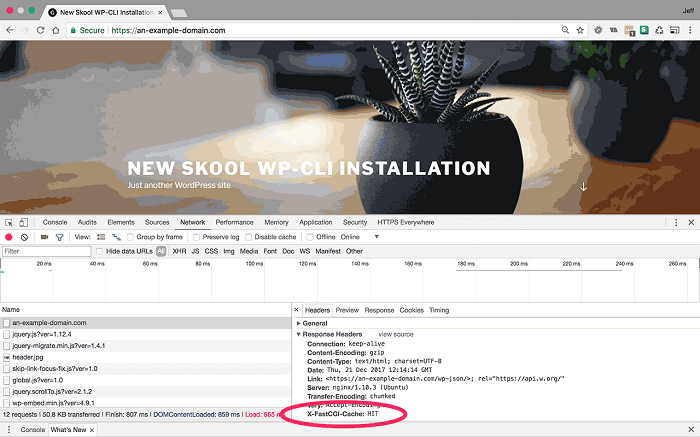
<Check the page load response headers>
As you can see, in the response headers there is now an extra parameter for nginx-fastcgi-caching. This parameter can return one of three values:
•HIT - The page is being returned from the NGINX FastCGI cache
•MISS - The page wasn't cached and was returned by PHP-FPM (refreshing the page should return either a HIT or a BYPASS)
•BYPASS - The page has been cached but the cached version wasn't served. This occurs when it is a page that we have specified to bypass the cache, such as an admin page, or when a user is logged in.
If you see this additional parameter and any of these returned values, then you know that NGINX FastCGI caching is working properly.
Now that we have both our Redis object caching and NGINX FastCGI static page caching enabled, it's time to return to our load testing and sever monitoring.
Log back into your New Relic Infrastructure dashboard and Loader.io to begin load testing and monitoring.
1000 users per minute with caching enabled
Since we know that without caching our server CPU only really began to become stressed at 1000 users per minute, let's begin our load testing at that setting.
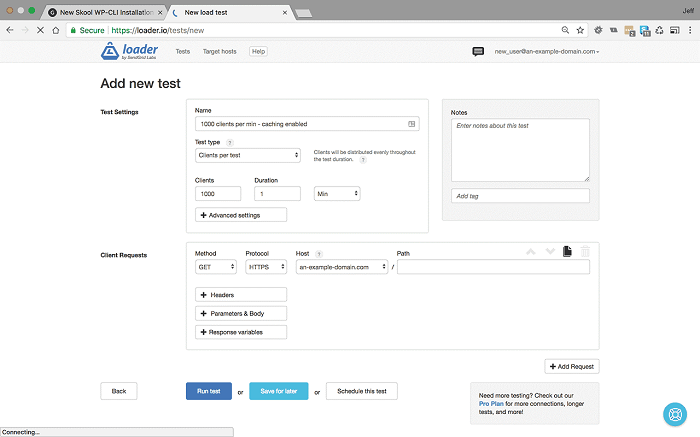
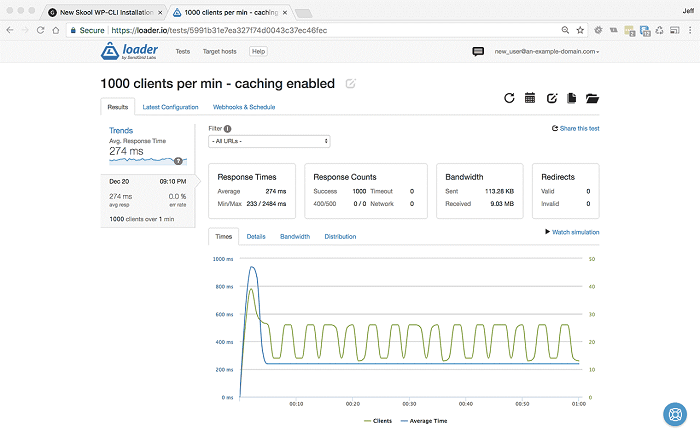
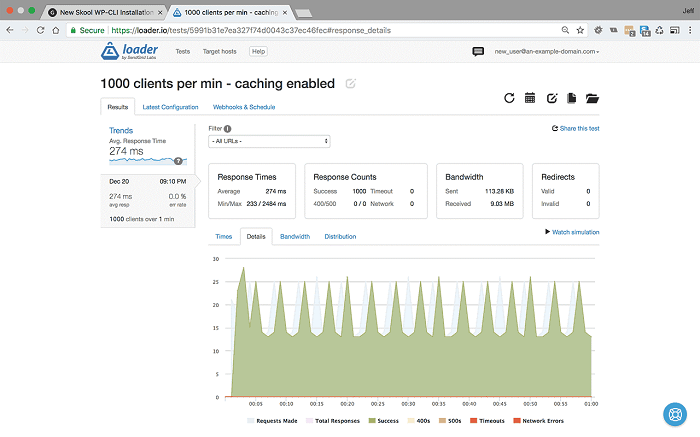
<1000 users per minute for 1 minute with caching enabled – Settings & Results>
As we can see at 1000 users per minute we have reduced our response time from 338ms to 274ms, that is a great start, but let's look at the CPU usage in New Relic:
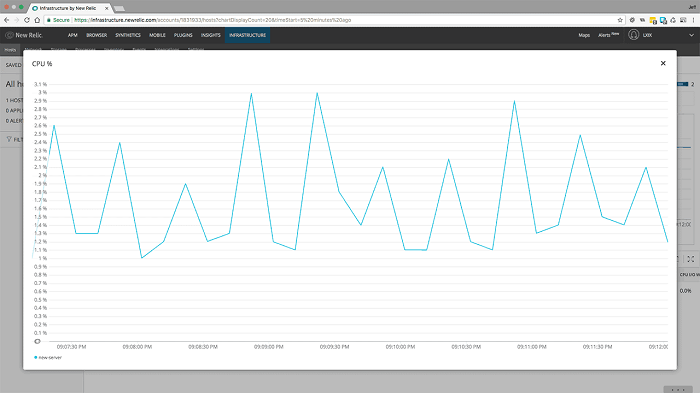
<1000 users per minute for 1 minute with caching enabled - CPU usage>
Here we can see the real benefit of caching. Without caching our CPU usage was spiking at 24%, but now we have caching enabled you can see that CPU usage remains stable at 2-3%. That is an incredible difference.
5000 users per minute with caching enabled.
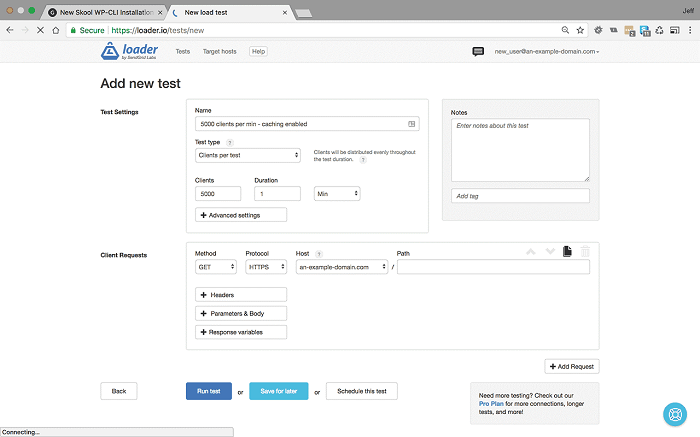
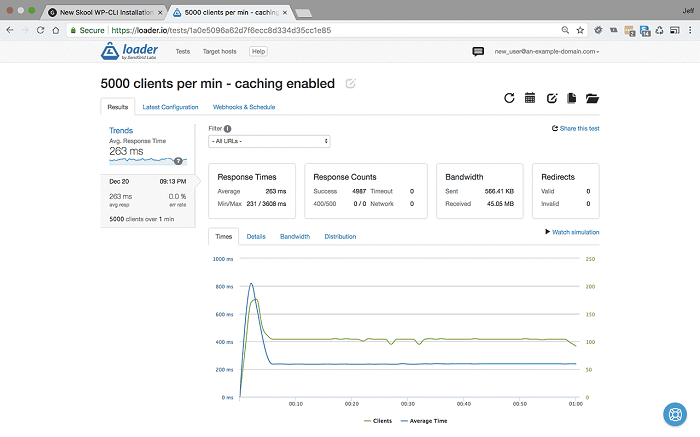
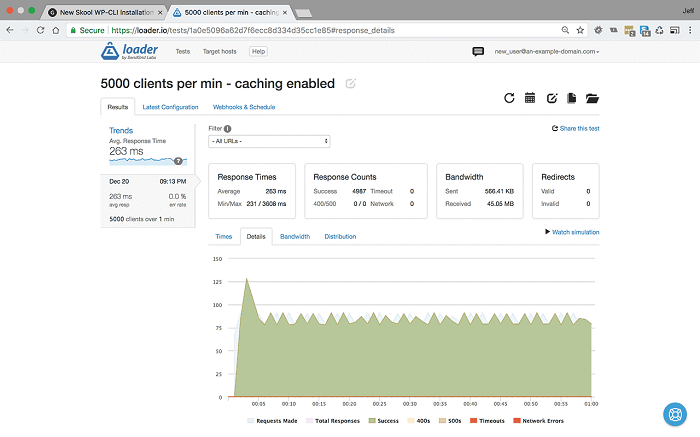
<5000 users per minute for 1 minute with caching enabled – Settings & Results >
At 5000 users per minute without caching, our response time had dropped to 1715ms and we had started to show http 500 errors. But as you can see, with caching our average response time remains steady, in this test it actually decreased to 263ms and we are still serving 100% responses.
Let's see what picture CPU usage paints
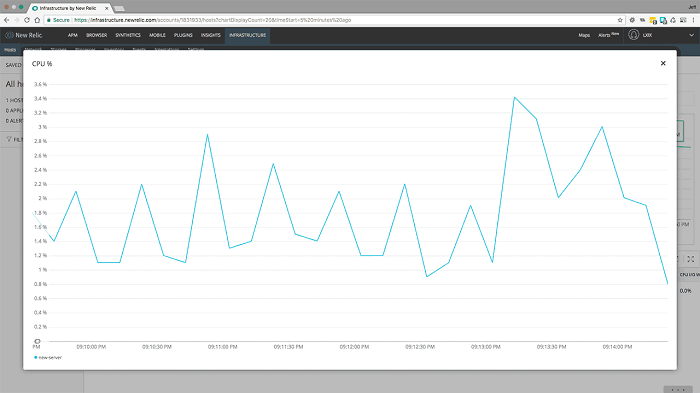
<5000 users per minute for 1 minute with caching enabled - CPU usage >
The same story here. Our CPU usage between 1000 users and 5000 users has hardly changed. It shows a slight increase up to about 3.5%.
Remember, without caching our server was previously running at 100%.
We previously benchmarked at 7500 users per minute, but let's push the server a little harder and see what happens…
10000 users per minute with caching enabled.
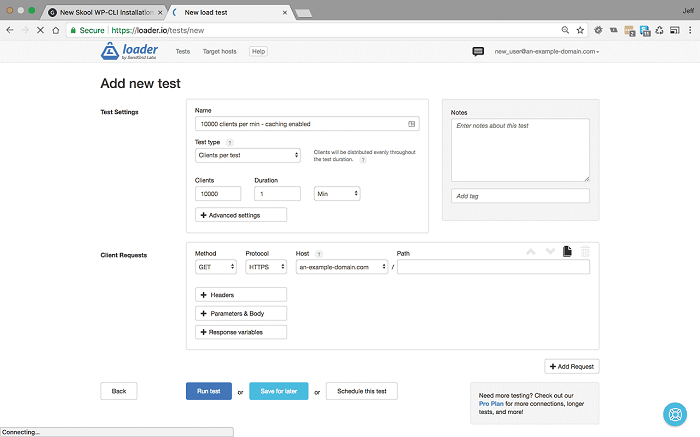
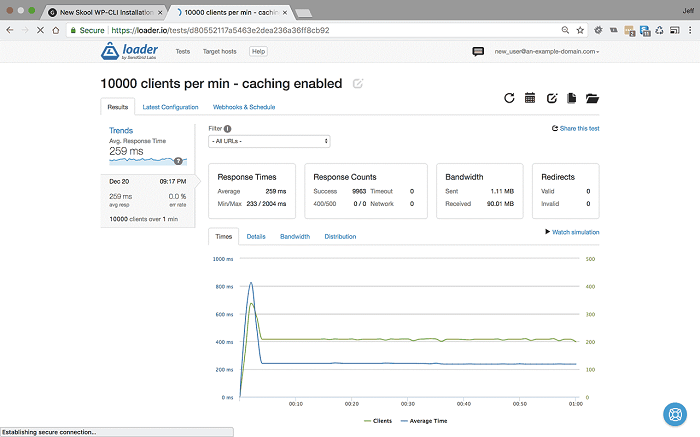
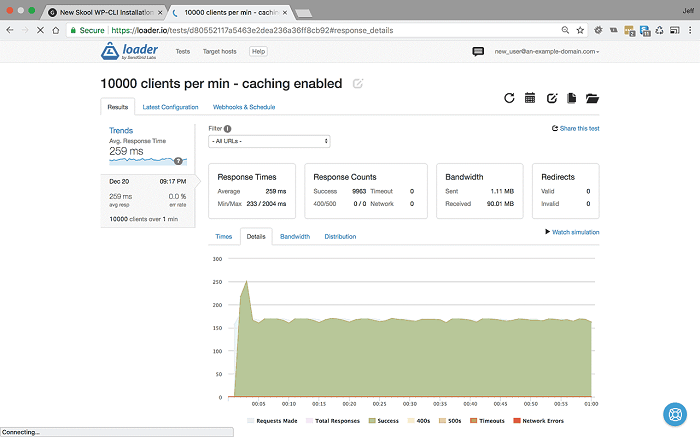
<10000 users per minute for 1 minute with caching enabled – Settings & Results >
It was at these heavy loads that our server previously buckled without caching, returning a 35% error rate. Now that caching is enabled, you can see that even at 10000 users per minute our server is not breaking a sweat, average response times are 259ms and a 0% error rate.
On to CPU usage:
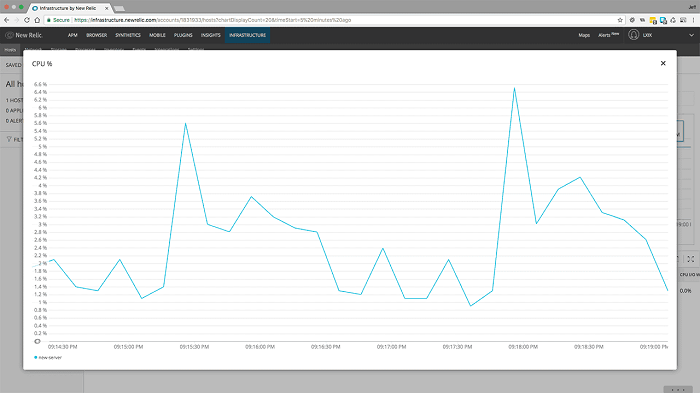
<10000 users per minute for 1 minute with caching enabled - CPU usage >
Our CPU usage has now spiked to about 6%, which is still well within the margins of optimum performance.
If we want to push the server harder, we need to move onto users per second.
500 users per second for one minute with caching enabled
That works out at 30000 visitors per minute, or 1.8 million visitors per hour - on a $5USD a month Alibaba server.
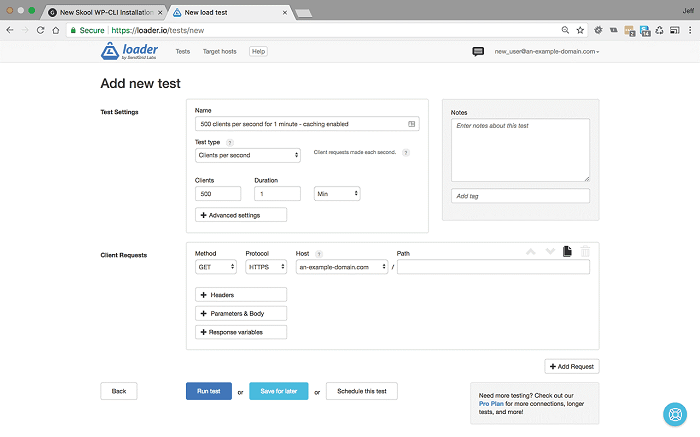
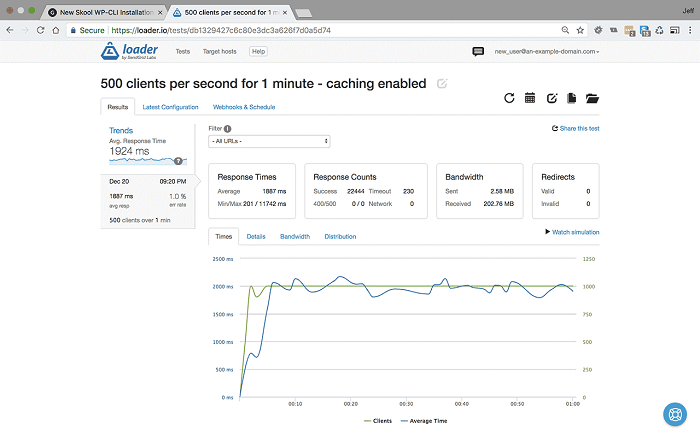
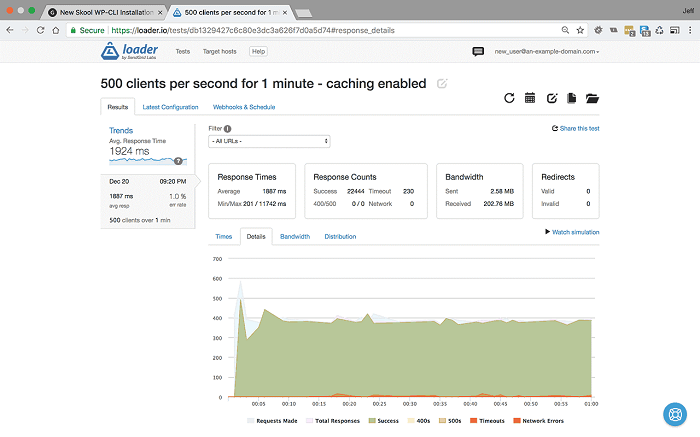
<500 users per second for 1 minute with caching enabled – Settings & Results>
We can see that at 500 users per second for one minute the site is starting to slow down. Average response time is down to 1887ms, and it is showing 1% error rate, mostly from timeouts, which would suggest that the bottleneck is I/O rather than server performance.
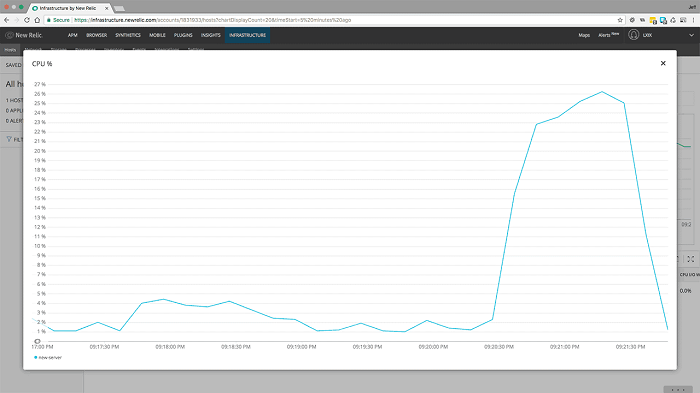
<500 users per second for 1 minute with caching enabled - CPU usage >
Here we can see that CPU usage has peaked at about 27%. This is still within a performant range, which adds weight to the errors being an I/O issue.
We have come this far, so we may as well push the boat a little further while we are here…
1000 users per second for one minute with caching enabled
(60000 visitors per minute, or 3.6 million visitors per hour!)
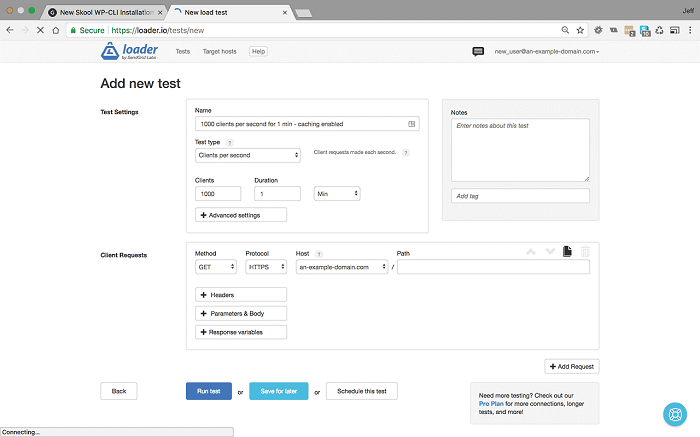
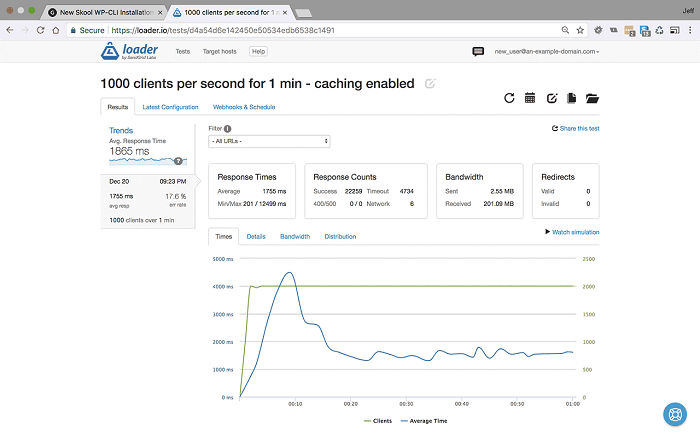
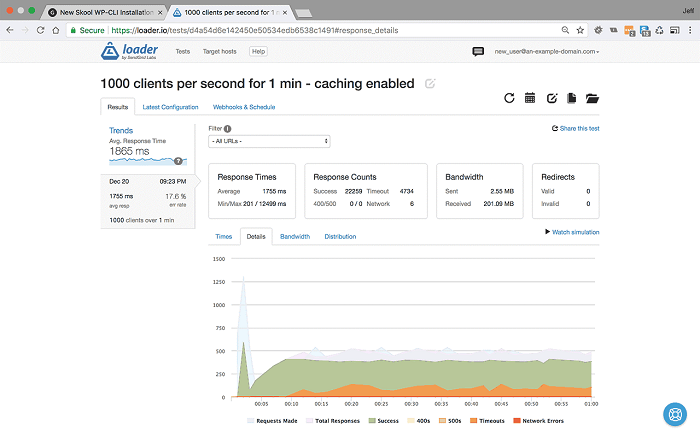
<1000 users per second for 1 minute with caching enabled – Settings & Results >
We can see that the average response time actually remains stable at about 1755ms, but our error rate has increased to 17.6%, mostly due to timeouts.
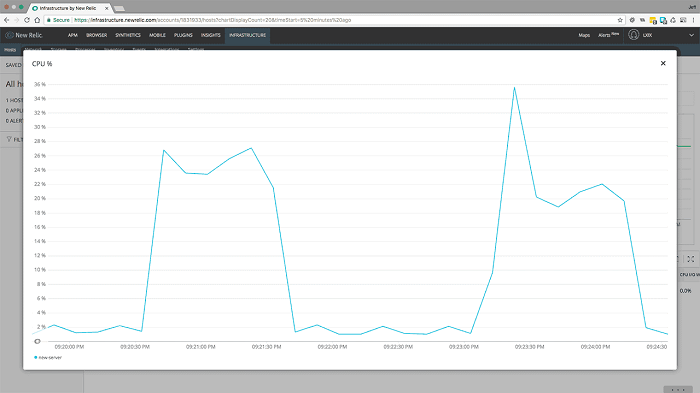
<1000 users per second CPU - caching enabled>
Interestingly our CPU usage spikes to about 36% before dropping back and plateauing at a similar usage to 500 users per minute.
Let's take a look at our server's CPU usage showing results for the server without caching, and with caching enabled:
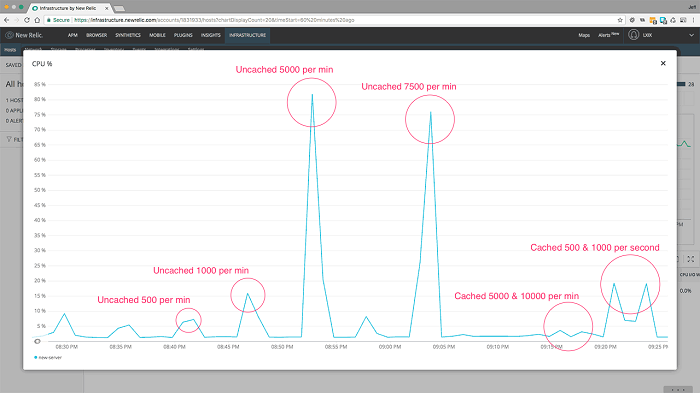
<CPU usage showing both all results for comparison. >
The data speaks for itself. Our small $5USD a month Alibaba server performed admirably well without caching, but once we enable object and page caching it is a rock solid solution that could serve many millions of page visits per day without breaking a sweat.

2,593 posts | 793 followers
FollowAlibaba Clouder - July 8, 2020
Alibaba Clouder - April 25, 2018
Alibaba Clouder - August 15, 2018
Alibaba Clouder - January 2, 2018
Alibaba Clouder - August 15, 2018
Alibaba Clouder - April 24, 2018

2,593 posts | 793 followers
Follow Media Solution
An array of powerful multimedia services providing massive cloud storage and efficient content delivery for a smooth and rich user experience.
Learn More Online Education Solution
This solution enables you to rapidly build cost-effective platforms to bring the best education to the world anytime and anywhere.
Learn More Forex Solution
Alibaba Cloud provides the necessary compliance, security, resilience and scalability capabilities needed for Forex companies to operate effectively on a global scale.
Learn MoreMore Posts by Alibaba Clouder
5183715672677647 April 27, 2020 at 11:18 am
If i'm using Joomla, just skip this code?