Application Real-Time Monitoring Service (ARMS) allows you to turn on or turn off the switches of an ARMS agent to enable or disable specific features, or configure a sampling policy on the Custom Configuration tab of the Application Settings page.
For information about how to use the ARMS API to configure the preceding settings, see SaveTraceAppConfig.
Prerequisites
The ARMS agent is installed for your application. For more information, see Application Monitoring overview.
Procedure
Log on to the ARMS console. In the left-side navigation pane, choose .
On the Application List page, select a region in the top navigation bar and click the name of the application that you want to manage.
NoteIf the
 icon is displayed in the Language column, the application is connected to Application Monitoring. If a hyphen (-) is displayed, the application is connected to Managed Service for OpenTelemetry.
 In the left-side navigation pane, click Application Settings. On the page that appears, click the Custom Configuration tab.
Set the parameters as required and click Save in the lower part of the page.
Trace sampling settings
In the Invocation Trace Sampling Settings section, turn on or turn off Enable Sampling.
Sampling rate settings
ARMS Pro Edition
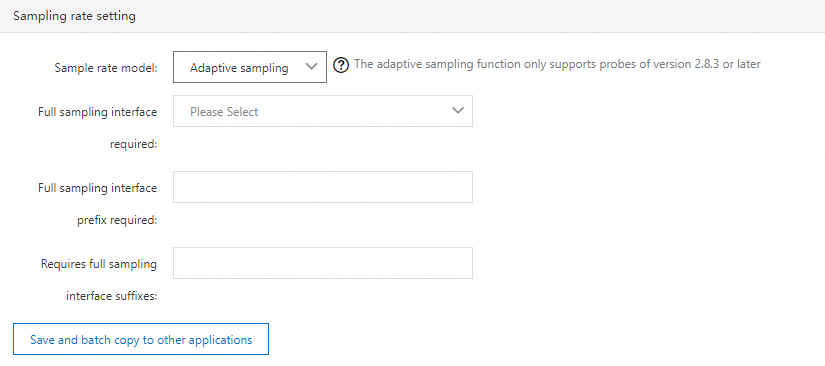
In the Sample rate setting section, you can specify the sampling policy and sampling interface for traces. For more information, see Select a trace sampling mode for the ARMS agent earlier than V3.2.8.
Fixed sampling rate: Enter a value in the Sampling Rate Settings field. For example, 10 indicates that the sampling rate is 10%.
Adaptive sampling: Enter the prefix or suffix of the interface used for sampling.
Trace sampling settings prevail over throttling settings.
ARMS Basic Edition
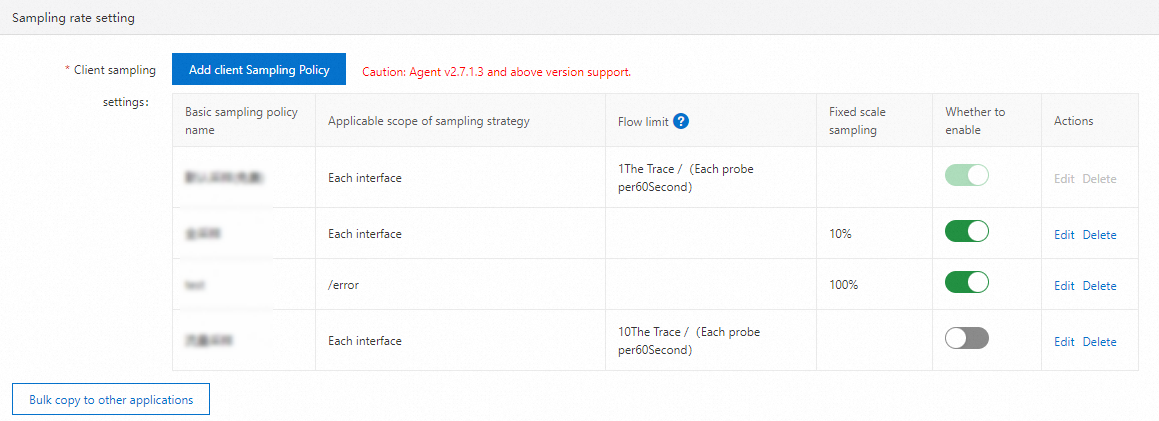
ARMS Basic Edition supports client sampling policies. You are charged based on the number of lines of data collected. By default, each ARMS agent collects one trace per minute for each interface in your account free of charge. You can also click Add Client Sampling Policy to add a custom sampling policy.
Parameter | Description |
Sampling Policy Name | The name of the sampling policy. |
Sampling type and Sampling value |
|
Applicable interface | The range of interfaces to which the sampling policy applies. Valid values: Each interface or Specify Interface. If you select Specify Interface, you must enter an interface name. Note If you select Specify Interface, you can enter only one interface name. If you want to specify multiple interfaces, you must set a sampling policy for each interface. |
After you set a sampling policy, you can specify whether to enable the policy in the console. If multiple sampling policies are enabled, the policies take effect in the following order: default sampling (free of charge) > traffic limit (a specified interface) > fixed ratio sampling (a specified interface) > traffic limit (all interfaces) > fixed ratio sampling (all interfaces). You can also modify the settings of a sampling policy or delete a sampling policy.
Agent switches and log level
In the Agent Switch Settings section, you can turn on or off the switch of the ARMS agent and the switches of different plug-ins, and configure the log level.
The modifications to the ARMS agent and log level take effect immediately without the need to restart the application. If the switch of the ARMS agent is turned off, ARMS cannot monitor the application. Proceed with caution. To make the modification to each plug-in switch take effect, you must manually restart the application.

Threshold settings
In the Threshold Settings section, you can configure the thresholds of slow SQL queries, interface response time, and throttling.
Trace sampling settings prevail over throttling settings.

Advanced settings
In the Advanced Settings section, you can configure advanced settings, including the interfaces that you want to exclude and the maximum length of a method stack.
Invalid Interface Invocation Filtering: Enter the interfaces whose statistics you do not want to view. After the modification is saved, the specified interfaces are hidden on the Interface Invocation page.
Method stack maximum length: Specify the maximum length of a method stack. Default value: 128. Maximum value: 400. The value indicates the number of entries.
Stack depth to distinguish same exception: Specify the stack depth that is used to distinguish exceptions of the same type. Generally, this parameter is set to the call depth of the first difference.
Collect the maximum length of SQL: Specify the maximum length of a SQL statement. Default value: 1024. Valid values: 256 to 4096. The value indicates the number of characters.
Collect SQL Bindings: Specify whether to capture the variable value bound to the PrepareStatement parameter. The modification takes effect immediately without the need to restart the application. Currently, this parameter can be set only when the variable value is set for the PrepareStatement parameter.
Raw SQL: Specify whether to perform operations other than truncation on SQL statements.
Whitelist: Specify the exceptions that are not displayed in the charts on the application details page and Exception Analysis tab.
Error Code Filter: By default, all HTTP status codes greater than 400 are counted as errors. To ignore specific HTTP status codes greater than 400, you can specify them in value.
Trace Storage: Specify whether to use the new storage format that sorts traces by time. By default, this switch is turned on.
Inner Callstack Reduce: Specify whether to simplify duplicated calls such as for loops. The modification takes effect immediately without the need to restart the application.
Max Length of Input Parameters: Specify the maximum length of an input parameter value. Default value: 512. Maximum value: 2048. The value indicates the number of characters.
Quantile Statistics: Specify whether to enable quantile statistics.
NoteA quantile is a value that splits the probability distribution of a random variable into multiple equal parts. Common quantiles include medians, quartiles, and percentiles.
RabbitMQ Custom Consumer: Specify the class name of a custom consumer or the name of the class that contains an anonymous internal consumer. Then, you can view the trace of the customer. You can specify multiple class names and separate them with commas (,).
Custom Kafka Consumption Method: Specify a custom consumption method to view the trace and metric data when you consume messages by using native Kafka SDKs.
Automatically Propagate Context when Kafka Sends Messages: Multiple headers are automatically added with Kafka messages to associate delivery traces with consumption traces. To enable the option, make sure that the Kafka version is v0.11.0 or later. Otherwise, message delivery errors may occur.
Thread pool, connection pool monitoring: You can monitor the thread pool and connection pool metrics of frameworks such as Apache Tomcat, Apache Dubbo, and High-speed Service Framework (HSF). You must restart the application to apply the modification.
Automatic pass-through asynchronous: When an asynchronous task is submitted by using the thread pool, the asynchronous context is automatically passed through.
Asynchronous transparent transmission scan package name: You can add a scan package for asynchronous pass-through to the configurations of your application to monitor asynchronous tasks. After a Runnable object, a Callable object, or a Supplier object is created, the corresponding method in the scan package for asynchronous pass-through automatically captures the trace context of the current thread. Then, when threads are used in asynchronous mode, the method passes the captured trace context to the threads. The version of the ARMS agent must be v2.7.1.3 or later.
TraceId is returned in the request: Specify whether to return the
eagleeye-traceidfield in the response headers for HTTP requests.Memory optimization switch: If application dimensions are divergent, recording rules of the ARMS agent may cause some objects to overflow into the old generation, causing slow memory growth in the old generation. You can mitigate this issue by enabling memory optimization The version of the ARMS agent must be V2.9.0 or later.
Thread settings
In the Thread settings section, you can turn on or turn off the switches of Thread analysis master and Thread analysis method stack. You can also specify Slow call listen trigger threshold.
Only Application Monitoring Pro Edition supports this feature.

Listening is triggered when the response time of a service call exceeds the specified Slow call listen trigger threshold and lasts until the call ends or the time consumed exceeds 15 seconds. The default threshold is 2,000 milliseconds. We recommend that you set the threshold to the 99th percentile of the call response time. For example, if 100 calls are sorted in ascending order by response time, the amount of time consumed by the 99th call is the 99th percentile.
Application logs association
In the Log Collect Configuration section, configure the log sources that you want to associate with the application. For more information, see Log analysis.
Only Application Monitoring Pro Edition supports this feature.

URL convergence rules
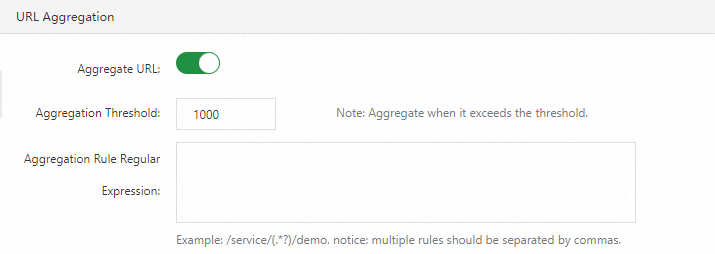
In the URL Aggregation section, you can enable or disable the convergence feature. You can also set the convergence threshold and convergence rules. URL convergence means that similar URLs are displayed together as a single object. For example, URLs prefixed with /service/demo/ are displayed as an object. The convergence threshold is the minimum number of URLs required to trigger URL convergence. For example, if the threshold is set to 100, URLs are converged only when 100 URLs meet the regular expression of the rules.
Configure Arthas monitoring
In the Arthas monitoring section, you can enable or disable the Arthas diagnostics feature. You can also specify the IP addresses on which you want to perform Arthas diagnostics. For more information, see Arthas diagnostics.
Only Application Monitoring Pro Edition supports this feature.

Continuous profiling
In the Continuous profiling section, you can turn on or turn off the main switch and the switches for CPU hotspot, memory hotspot, and code hotspot. You can also specify IP addresses or CIDR blocks for continuous profiling to take effect. For more information, see Use the continuous profiling feature. 
Tracing protocol settings
In the Tracing Protocol Settings section, you can select a tracing protocol based on your business requirement. For more information about the tracing protocols supported by ARMS, see Supported tracing protocols.

By default, when a call arrives, the ARMS agent checks for the header of a specific protocol in the order of EagleEye, OpenTelemetry, SkyWalking, Jaeger, and Zipkin. If a protocol header is detected, the agent restores the trace context based on the protocol and subsequent downstream calls will include the detected protocol header. If no protocol header is detected, the EagleEye protocol is used by default.
In this section, you can specify a protocol to be prioritized. After you save the settings, ARMS preferentially checks for the header of the specified protocol. For example, with the following configuration, the ARMS agent checks for the protocol header in the order of Jaeger, EagleEye, OpenTelemetry, SkyWalking, and Zipkin.

You can also choose to use one protocol exclusively. For example, with the following configuration, when a call arrives, the ARMS agent only checks for the Jaeger header. If no Jaeger header is found, the agent does not check for other protocol headers but generates a new trace context.

Information desensitization
In the Information desensitization section, configure a rule to desensitize JVM system parameters, Kubernetes YAML configurations, method input parameters, Arthas environment variables, and system variables during data collection. Each element in the rule represents a case-insensitive regular expression. For example, password indicates the regular expression .*password.*. Separate the elements with commas (,).
When the ARMS agent collects data, the agent desensitizes the data based on the key. If a key matches a regular expression, the corresponding value is desensitized. As shown in the following figure, if you specify licenseKey in the rule, the value of -Darms.licenseKey key is desensitized.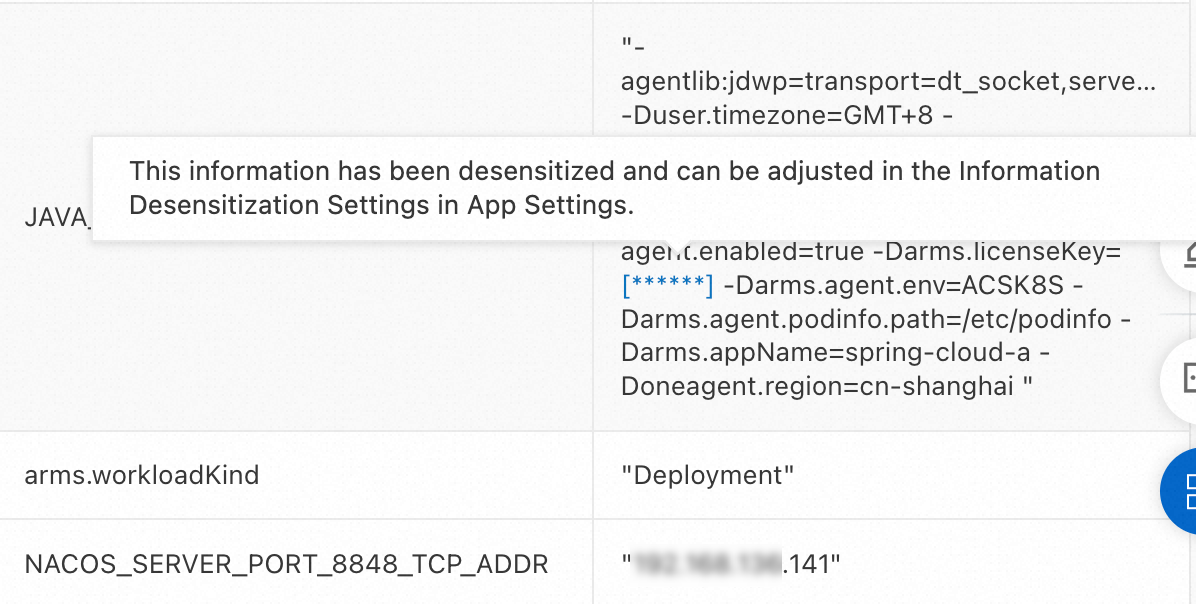
Synchronize application settings to other applications
You can synchronize the settings of an application to other applications.
Synchronize a single configuration item to other applications
In the section of the configuration item, click Save and batch copy to other applications.
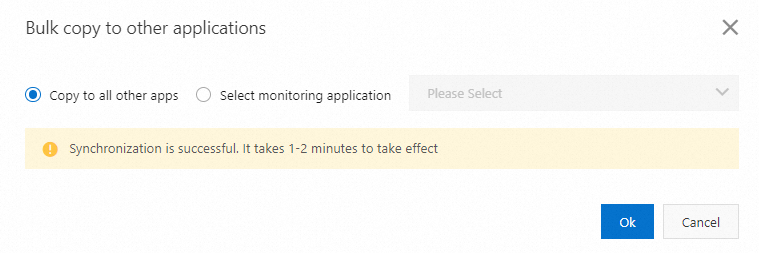
In the dialog box that appears, select a specific application or all other applications and click Ok.
Synchronize all configuration items to other applications
In the lower part of the page, click Save and batch copy to other applications.
In the dialog box that appears, select a specific application or all other applications and click Ok.

Globally apply application settings
You can globally apply the specified application settings. If you create a new application, these settings are used by default.
In the lower part of the page, click Save the current application Settings to the global default Settings.
In the message that appears, click Ok.