Adaptive bitrate streaming packages specified audio and video streams into a single file. This allows a player to automatically select the stream that best suits the current network bandwidth. This topic describes how to transcode a video into an adaptive bitrate stream.
What is adaptive bitrate streaming
Adaptive bitrate streaming packages multiple audio and video streams into a single file. This file contains information about each stream, such as its bitrate and resolution. Unlike traditional single-bitrate playback, adaptive bitrate streaming allows a player to select the stream that best suits the current network bandwidth and device. This improves the playback experience.
The most common output formats for adaptive bitrate streaming are HLS and DASH. ApsaraVideo VOD currently supports only HLS for adaptive bitrate streaming.
Demonstration

How to use
Transcode using the console
Step 1: Create an adaptive bitrate transcoding template group
First, create an adaptive bitrate transcoding template group to use when you start a transcoding job.
For more information, see Transcoding templates.
Step 2 (Optional): Create a workflow and associate the transcoding template group
Orchestrate media processing tasks, such as transcoding, review, and snapshot capture, in a workflow. After you upload a media file or trigger media processing, the workflow automatically processes the file according to the predefined sequence of tasks.
Create a workflow, add a media transcoding node, and associate the adaptive bitrate transcoding template group that you created in the previous step. For more information, see Manage workflows.
Step 3: Start transcoding
Use the adaptive bitrate transcoding template group or workflow that you created to transcode a video. You can trigger transcoding during or after you upload the media.
Automatically trigger transcoding during upload
Log on to the ApsaraVideo VOD console.
In the navigation pane on the left, choose Media Files > Audio/Video, and then click Upload Audio/Video.
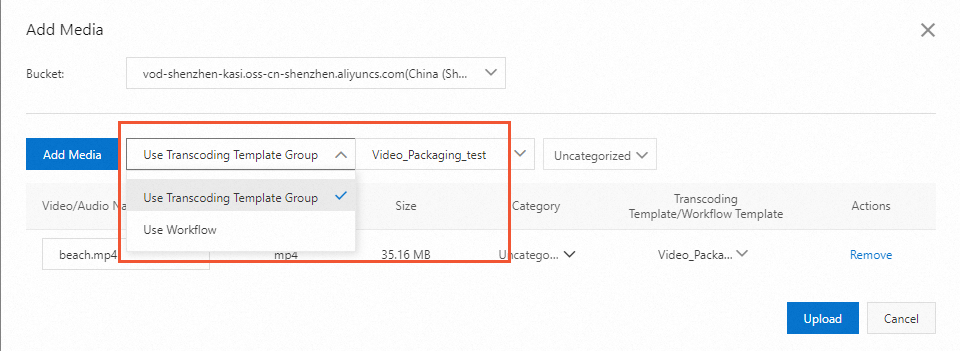
Click Add Audio/Video. Set parameters such as the upload method and storage address. Select Use Transcoding Template Group or Use Workflow, and then specify the adaptive bitrate transcoding template group or workflow that you created.
For more information about supported upload formats and parameter descriptions, see Upload media assets in the console.

Add the audio or video files to upload and click Upload.
Initiate transcoding after upload
This operation is often used to re-transcode existing videos, apply standard encryption, or overwrite watermark parameters.
Log on to the ApsaraVideo VOD console.
In the navigation pane on the left, choose Media Files > Audio/Video.
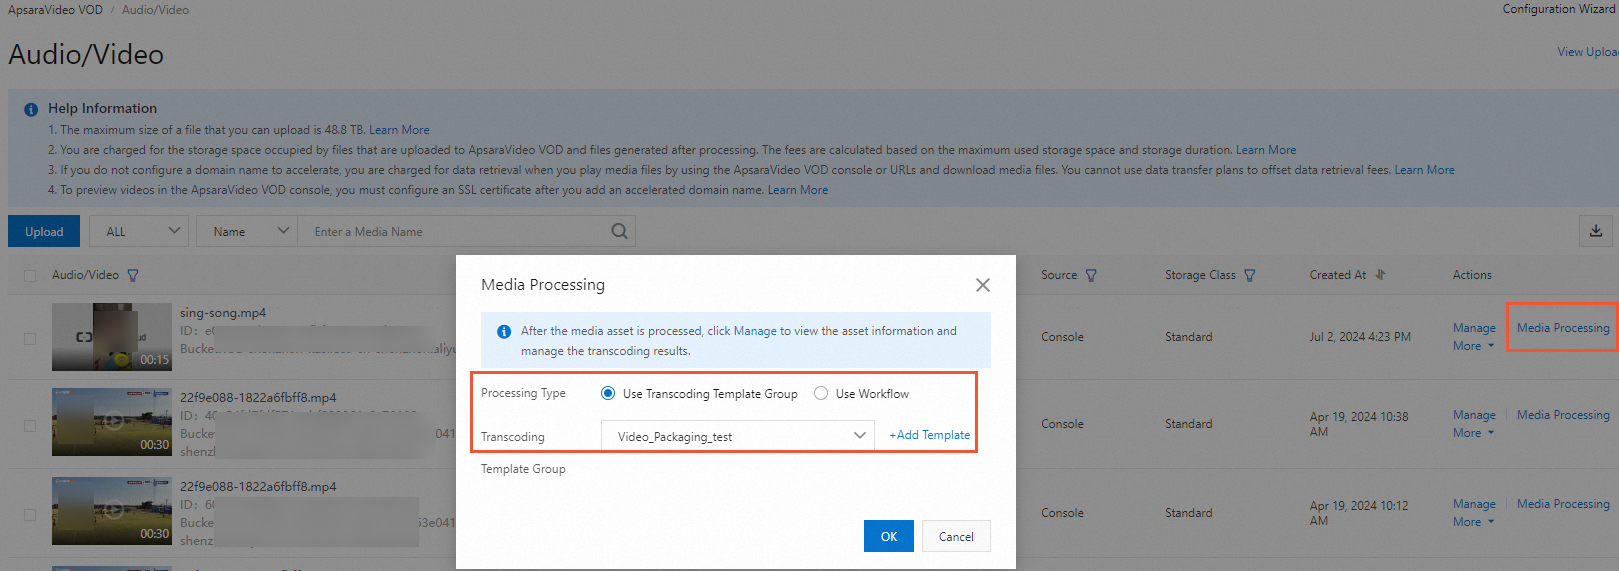
On the Audio/Video page, find the audio or video file to transcode and click Processing in the Actions column.
Select Use Transcoding Template Group or Use Workflow. Then, specify the adaptive bitrate transcoding template group or workflow that you created.

Click OK.
Step 4: View the transcoding result
After you start a transcoding job, you can view its status and the URL of the output video in one of two ways. You can then obtain the video URL and use ApsaraVideo Player or a third-party player for playback.
If you have not configured an accelerated domain name in ApsaraVideo VOD, playing or downloading the video from its URL incurs storage outbound traffic fees. For more information, see Billing for outbound traffic from storage.
Method 1: View in the console
Log on to the ApsaraVideo VOD console.
In the navigation pane on the left, choose Media Files > Audio/Video.
On the Audio/Video page, view the status of the audio or video file.
A status of Normal indicates that the transcoding is complete. For descriptions of other statuses, see Status: Video Status.
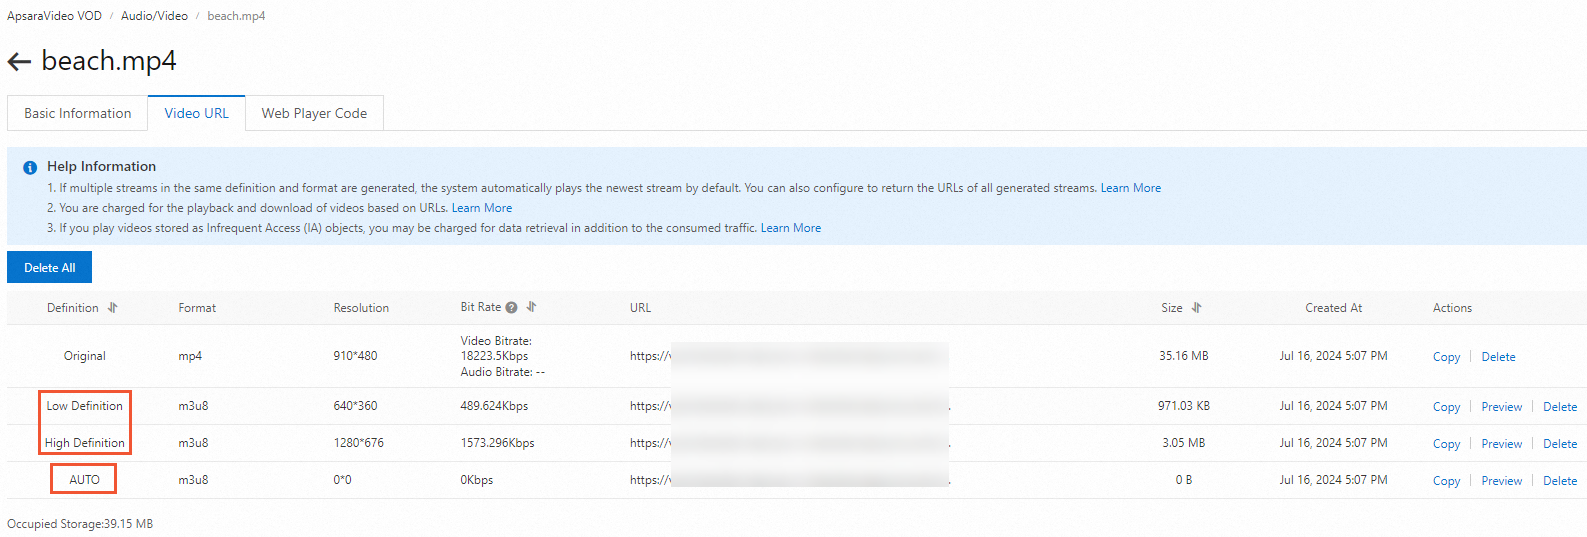
In the Actions column of the transcoded audio or video file, click Manage to go to the Video URL tab.
For a successfully transcoded audio or video file, the system generates one adaptive stream and multiple transcoded streams, along with their corresponding video URLs.

Method 2: Use event notifications
ApsaraVideo VOD supports event notifications through HTTP and MNS callbacks. After you configure event notifications, ApsaraVideo VOD sends you a notification when a media file is processed, for example, when it is uploaded or transcoded. You can obtain the status of the transcoding job and the URL of the output video from the callback results. For more information, see Event notifications.
The following events are related to transcoding:
Transcode using OpenAPI
Usage notes
To call API operations, see ApsaraVideo VOD API overview. We recommend that you use the Alibaba Cloud online command-line tool OpenAPI Explorer to test API operations. In OpenAPI Explorer, you can run ApsaraVideo VOD API operations without needing to calculate signatures. After an operation is successful, OpenAPI Explorer dynamically generates sample code for different SDKs.
Step 1: Create an adaptive bitrate transcoding template group
First, create an adaptive bitrate transcoding template group to use when you start a transcoding job.
Call the AddTranscodeTemplateGroup operation and configure the packaging template using the
TranscodeTemplateparameter.This section describes only the configuration parameters that are specific to packaging templates. For more information, see TranscodeTemplate: Transcoding template configuration.
Step 2: (Optional) Create a workflow and associate the transcoding template group
Orchestrate media processing tasks, such as transcoding, review, and snapshot capture, in a workflow. After you upload a media file or trigger media processing, the workflow automatically processes the file according to the predefined sequence of tasks.
Currently, you can create workflows only in the ApsaraVideo VOD console. For more information, see Manage workflows.
Step 3: Start transcoding
Use the transcoding template group or workflow that you created to transcode a video. You can trigger transcoding during or after you upload the media.
Automatically trigger transcoding during upload
The CreateUploadVideo operation is used only to obtain an upload URL and credential and create basic media asset information. It does not upload the file. You must implement the upload logic. For a complete example of how to upload a file by calling an API operation, see Upload media assets by calling ApsaraVideo VOD API operations.
When you call the CreateUploadVideo or UploadMediaByURL operation to upload an audio or video file, specify the transcoding template group ID in the
TemplateGroupIdparameter or the workflow ID in theWorkflowIdparameter. After the file is uploaded, ApsaraVideo VOD automatically starts a transcoding job based on the specified template group or workflow.
Initiating transcoding after upload
This operation is often used to re-transcode existing videos, apply standard encryption, or overwrite watermark parameters.
Call the SubmitTranscodeJobs operation and specify the transcoding template group ID in the
TemplateGroupIdparameter. Alternatively, call the SubmitWorkflowJob operation and specify the workflow ID in theWorkflowIdparameter. ApsaraVideo VOD then immediately transcodes the audio or video file based on the specified transcoding template group or workflow.
Step 4: View the transcoding result
After you start a transcoding job, you can view its status and the URL of the output video in one of two ways. You can then obtain the video URL and use ApsaraVideo Player or a third-party player for playback.
If you have not configured an accelerated domain name in ApsaraVideo VOD, playing or downloading the video from its URL incurs storage outbound traffic fees. For more information, see Billing for outbound traffic from storage.
Method 1: Query by calling an API operation
When you call the SubmitTranscodeJobs operation to submit a transcoding job, the operation returns the transcoding job ID TranscodeTaskId. You can then call the GetTranscodeTask operation to query the execution status of the job and the URL of the output video.
Method 2: Use event notifications
ApsaraVideo VOD supports event notifications through HTTP and MNS callbacks. You can configure event notifications so that ApsaraVideo VOD sends you a notification when a media file is processed, for example, when a file is uploaded or transcoded. You can obtain the status of the transcoding job and the URL of the output video from the callback results. For more information, see Event notifications.
The following events are related to transcoding:
What to do next
After you configure the adaptive streaming feature for your player, you can use the transcoded adaptive video stream for playback. This allows the player to adaptively switch the video definition based on network conditions or to manually switch the definition and subtitles.
For information about how to configure the adaptive streaming feature in the ApsaraVideo Player SDK, see the following topics:
ApsaraVideo Player SDK for Android: Adaptively switch video definitions based on network conditions
ApsaraVideo Player SDK for iOS: Adaptively switch video definitions based on network conditions
ApsaraVideo Player SDK for Web: Adaptive HLS streaming based on network conditions