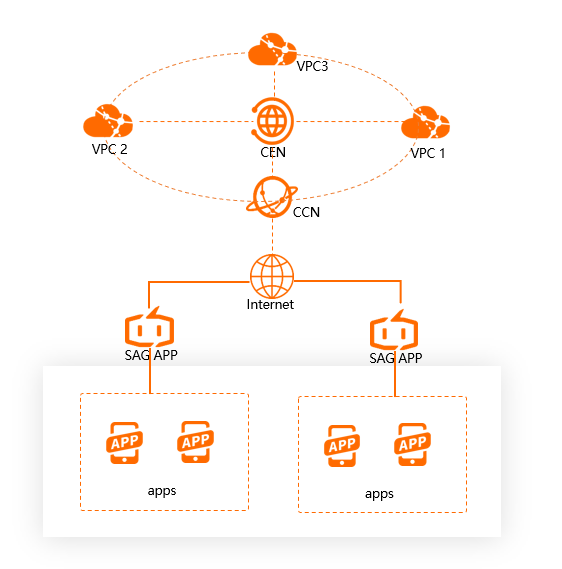
This topic describes how to configure a Smart Access Gateway (SAG) app instance.
Background information
The following scenario is used as an example. A company has deployed application services on Alibaba Cloud in the China (Shanghai) region. The employees access resources on Alibaba Cloud from the private network of the company. As the company develops, employees that work off-site need to remotely access resources on Alibaba Cloud. To meet such requirements, the company chooses to use the SAG app to enable the employees to quickly and securely connect to the company private network. This solution allows the employees to remotely access resources on Alibaba Cloud at any time.

Procedure

Step 1: Purchase an SAG app instance
You must purchase an SAG app instance before you can use the features of the SAG app. After you purchase an SAG app instance, you can use it to manage networks and client accounts.
Log on to the SAG console.
In the top navigation bar, select the region where the SAG app instance is deployed.
In the left-side navigation pane, choose .
On the SAG App Instances page, click Create SAG App, set the following parameters, click Buy Now, and then complete the payment.
Parameter
Description
Region
Select the region where the SAG app is used. China (Shanghai) is selected in this example.
Number of Client Accounts
Specify the number of client accounts that can be created for the SAG app. Typically, each employee who needs to log on to the SAG app requires one client account. The default value 10 is used in this example.
NoteYou can select 5 to 1,000 client accounts. Client accounts are billed based on a tiered pricing strategy. For more information, see Billing rules for SAG app instances.
Data Plan Per Account
The amount of free data usage allocated to each client account per month. The data plan cannot be shared among different client accounts. The data plan remains effective only in the month. The default value 5 GB is used in this example.
Billing Method When Billing Plan is Exhausted
If the data plan of a client account is exhausted, you are charged for data transfer overages based on the pay-by-data-transfer metering method. Pay-As-You-Go is selected in this example.
Duration
Select a subscription duration for the data plan. SAG supports monthly subscriptions and auto renewal. 1 Month is selected in this example.
Resource Group
Select a resource group for the SAG app instance. In this example, Default Resource Group is selected.
Step 2: Configure networks
After you purchase an SAG app instance, you must complete network settings for the SAG app instance. In this step, you must configure the private CIDR blocks of the clients and associate the SAG app instance with a CCN instance.
CCN is an important component of SAG. After an SAG app instance is associated with a CCN instance, all clients associated with the SAG app instance can communicate with gateway devices associated with the CCN instance. For more information about CCN, see Introduction to CCN.
On the Smart Access Gateway App page, find the SAG app instance that you want to manage and click Quick Configuration in the Actions column.
In the Network Configuration dialog box, set the following parameters.
Parameter
Description
Instance Name/ID
The name and ID of the SAG app instance are displayed.
Resource Group
Select the resource group to which the SAG app instance belongs.
CCN
Use one of the following methods to associate the SAG app instance with a CCN instance: Create CCN is selected in this example.
Existing CCN: If you have already created CCN instances, you can select an existing CCN instance from the drop-down list.
Create CCN: If you have not created a CCN instance, enter an instance name. The system then creates a CCN instance in the current area and automatically associates the CCN instance with the SAG app instance.
Standby and Active DNS
Optional. The active and standby DNS servers that the SAG app uses to connect to the private network. After you configure the DNS servers, the system automatically synchronizes the DNS settings with the SAG app. This parameter is ignored in this example.
NoteIf the SAG app uses PrivateZone to connect to Alibaba Cloud, set the DNS server addresses to 100.100.2.136 and 100.100.2.138. For more information about PrivateZone, see What is Alibaba Cloud DNS PrivateZone?
For Android and macOS, you must use the SAG app 2.1.1 or later versions to configure DNS servers. For more information, see Install the SAG app.
Private CIDR Block
Specify the private CIDR blocks that the clients use to connect to Alibaba Cloud. When a client connects to Alibaba Cloud, an IP address within the specified CIDR block is assigned to the client. Make sure that the private CIDR blocks do not overlap with each other. 192.168.10.0/24 is used in this example.
You can click Add Private CIDR Block to add more private CIDR blocks. You can add at most five private CIDR blocks.
Step 3: Configure a CEN instance (optional)
You can associate the CCN instance with a CEN instance. This way, networks attached to the CCN instance can communicate with resources associated with the CEN instance. For more information about CEN, see What is CEN?
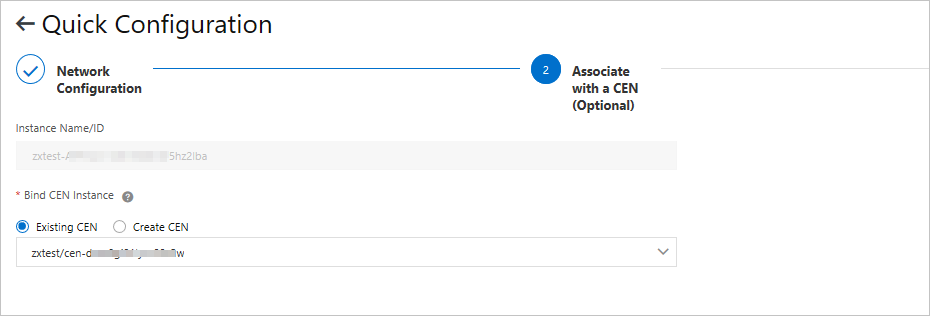
Click Associate with a CEN (Optional) to associate the CCN instance with a CEN instance.
This step is optional. If you do not need to associate the CCN instance with a CEN instance, click Skip.
You can select one of the following options to associate the CCN instance with a CEN instance to enable communication between the clients and cloud resources. Existing CEN is selected in this example.

Instance Name/ID: The name and ID of the CCN instance are displayed.
Existing CEN: If you have created CEN instances, you can select an existing CEN instance from the drop-down list.
Create CEN: If you have not created a CEN instance, enter an instance name. The system then creates a CEN instance and automatically associates it with the CCN instance.
Step 4: Create a client account
After you complete the network settings, you can create client accounts to allow users to log on to the SAG app and access the private network.
Click Next: Create a client account to create a client account and click Create.
Parameter | Description |
Username | Enter a username for the client account. Note
|
Email Address | Enter the email address of the user. The username and password are sent to the specified email address. |
Static IP |
|
Set Maximum Bandwidth | Specify a maximum bandwidth value for the client account. The default value is used in this example. You can set the maximum bandwidth to 1 to 20,000 Kbit/s. The maximum bandwidth is set to 2,000 Kbit/s by default. |
Set Password | Set the password that is used to log on to the SAG app. |
Maximum Bandwidth for Application Acceleration | Enter a maximum bandwidth value for application acceleration. Unit: Kbit/s. Configuration notes
|
Step 5: Connect the client to Alibaba Cloud
After you create the client account, you must download and install the SAG app on your mobile terminal. The SAG app allows terminals to access resources on Alibaba Cloud through private networks.
After you create the client account, click Download Now to go to the page that provides instructions on how to download and install the SAG app. For more information, see Install the SAG app.
After you download and install the SAG app on your terminal, you can log on to the SAG app with your username and password, and then connect to the private network. This allows you to access resources on Alibaba Cloud. For more information, see Connect to Alibaba Cloud.