PolarDB allows you to upgrade an ApsaraDB RDS for MySQL instance to a PolarDB for MySQL cluster. A PolarDB for MySQL cluster is automatically created and data is then synchronized to the cluster. The PolarDB cluster uses the accounts, databases, IP address whitelist, and required parameters of the ApsaraDB RDS for MySQL instance.
The upgrade process includes the following operations:
The upgrade feature supports two methods: physical migration (physical replication) and logical migration (data synchronization over DTS). They are different in the following ways. For more information, see Comparison between physical migration and logical migration.
Physical migration: is used only for upgrading an ApsaraDB RDS for MySQL 5.6 or 5.7 instance of High-availability Edition that uses local SSDs to create a PolarDB for MySQL cluster of the same MySQL version.
Logical migration: is used for upgrading an ApsaraDB RDS for MySQL instance of other specifications to a PolarDB for MySQL cluster of the same or different MySQL versions.
For more information, see specific operations.
Pre-checks
(Optional) Check the whitelist configurations: If the whitelist configurations of the primary RDS instance and read-only RDS instance are different, you need to merge the whitelist configurations of the read-only RDS instance into those of the primary RDS instance. This ensures that the whitelist configurations of the read-only RDS instance are automatically synchronized to the destination PolarDB cluster.
The following operations are only for logical migration:
Step 1: Select the Migrate from RDS method to create a destination PolarDB cluster: On the PolarDB cluster buy page, select Migrate from RDS for the Creation Method parameter, specify the source ApsaraDB RDS instance version, and create a destination PolarDB cluster.
(Optional) Step 2: Add endpoints: You can select the Switch with Endpoints (Connection Changes Not Required) option when you switch over services from the source ApsaraDB RDS for MySQL instance to the destination PolarDB cluster. This way, the endpoints between the source ApsaraDB RDS for MySQL instance and the destination PolarDB cluster are automatically interchanged during the switchover. After the switchover, you can connect to the destination PolarDB cluster without the need to modify the connection configurations of your application. You can interchange endpoints only if the source ApsaraDB RDS for MySQL instance and the destination PolarDB cluster have the endpoints.
Step 3: Switch over services: After the switchover, the read/write states of the source ApsaraDB RDS for PostgreSQL instance and the destination PolarDB cluster are interchanged. The read/write state of the source ApsaraDB RDS for PostgreSQL instance is changed to Read Only, and the read/write state of the destination PolarDB cluster is changed to Read and Write. The replication direction is also changed. Incremental data is synchronized from the destination PolarDB cluster to the source ApsaraDB RDS for PostgreSQL instance.
(Optional) Step 4: Switch over DTS tasks: If the source instance is involved in a DTS task (not a one-click migration task), you can modify the source or destination database of the DTS task for a smooth switchover.
Step 5: Complete the migration: If the data is migrated and you no longer use data synchronization, you can complete the upgrade process.
(Optional) Release or unsubscribe from an ApsaraDB RDS instance: After data is migrated from the source ApsaraDB RDS instance to the PolarDB cluster, you can release or unsubscribe from the instance if services run on the cluster as expected and the instance is no longer required.
If data errors occur after the switchover is complete, you can perform the (Optional) Roll back the migration operation. This allows you to restore the database and data to the original state before the switchover is performed. You can then perform the (Optional) Cancel migration operation to restore the status before the migration.
Prechecks
Check whether the service-linked role for PolarDB is created (required only for logical migration)
If you have completed migration evaluation and confirmed that no related issues exist, you can skip this check. For more information about migration evaluation, see Migration evaluation.
Before you use the logical migration (data synchronization over DTS) method to perform an upgrade, check whether the service-linked role for PolarDB has been created and whether Data Transmission Service (DTS) has been authorized to access Alibaba Cloud resources. For more information, see Authorize DTS to access Alibaba Cloud resources.
Log on to the Roles page in the Resource Access Management (RAM) console.
Check whether a service-linked role named AliyunServiceRoleForPolarDB already exists in the list as shown in the following figure.

If the service-linked role exists in the list, skip this check.
If the service-linked role does not exist in the list, continue this check.
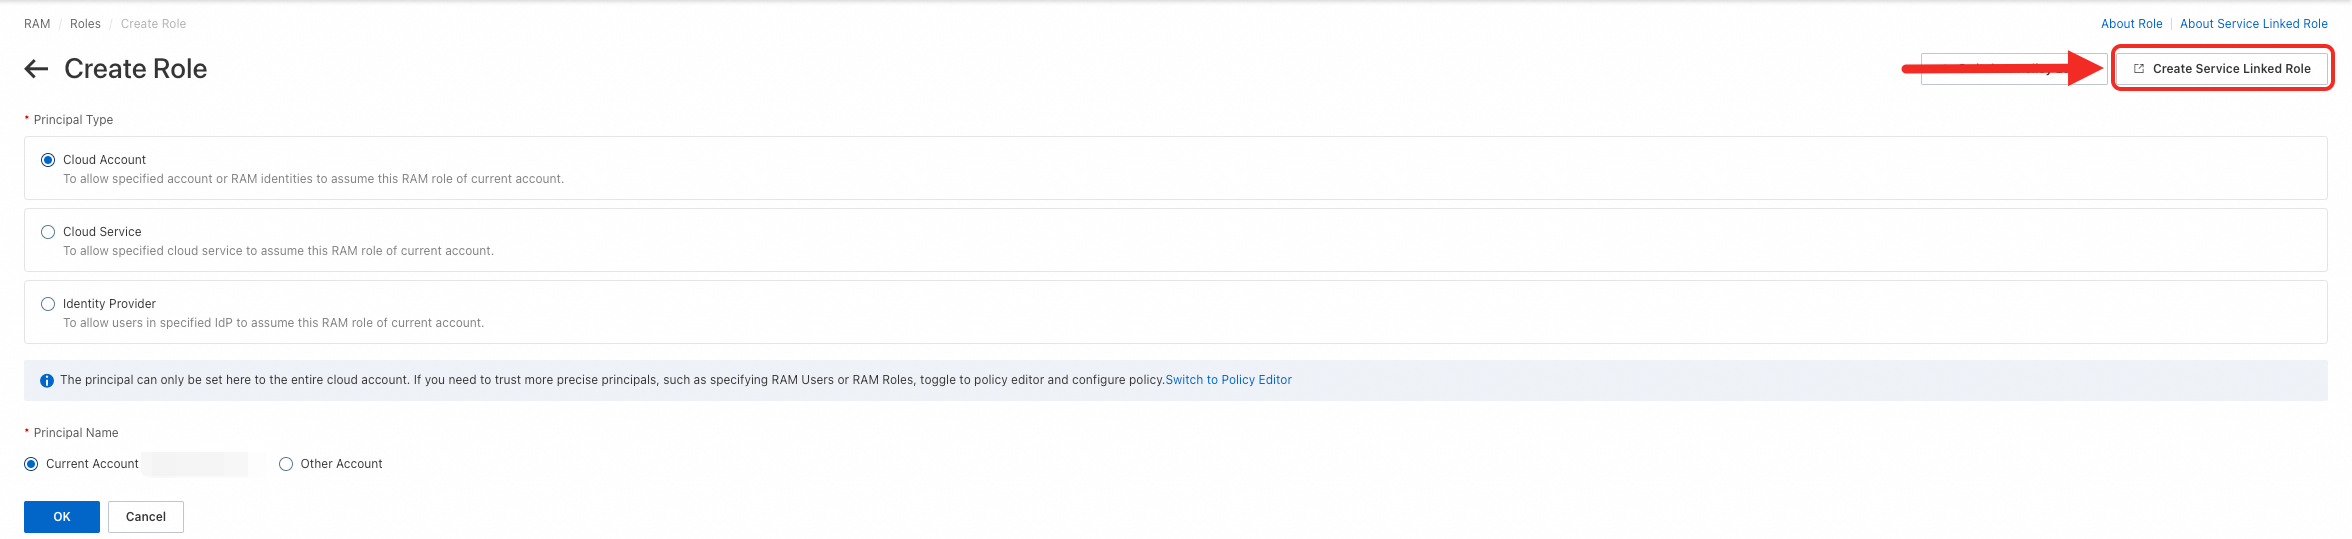
In the upper-left corner, click Create Role. On the Create Role page, click Create Service Linked Role in the upper-right corner.
On the Create Service Linked Role page, select ApsaraDB for POLARDB from the Select Service drop-down list. Click Create Service Linked Role.

Only how to check authorization results and fast authorization method are described here. For more information, see Authorize DTS to access Alibaba Cloud resources.
Check authorization results
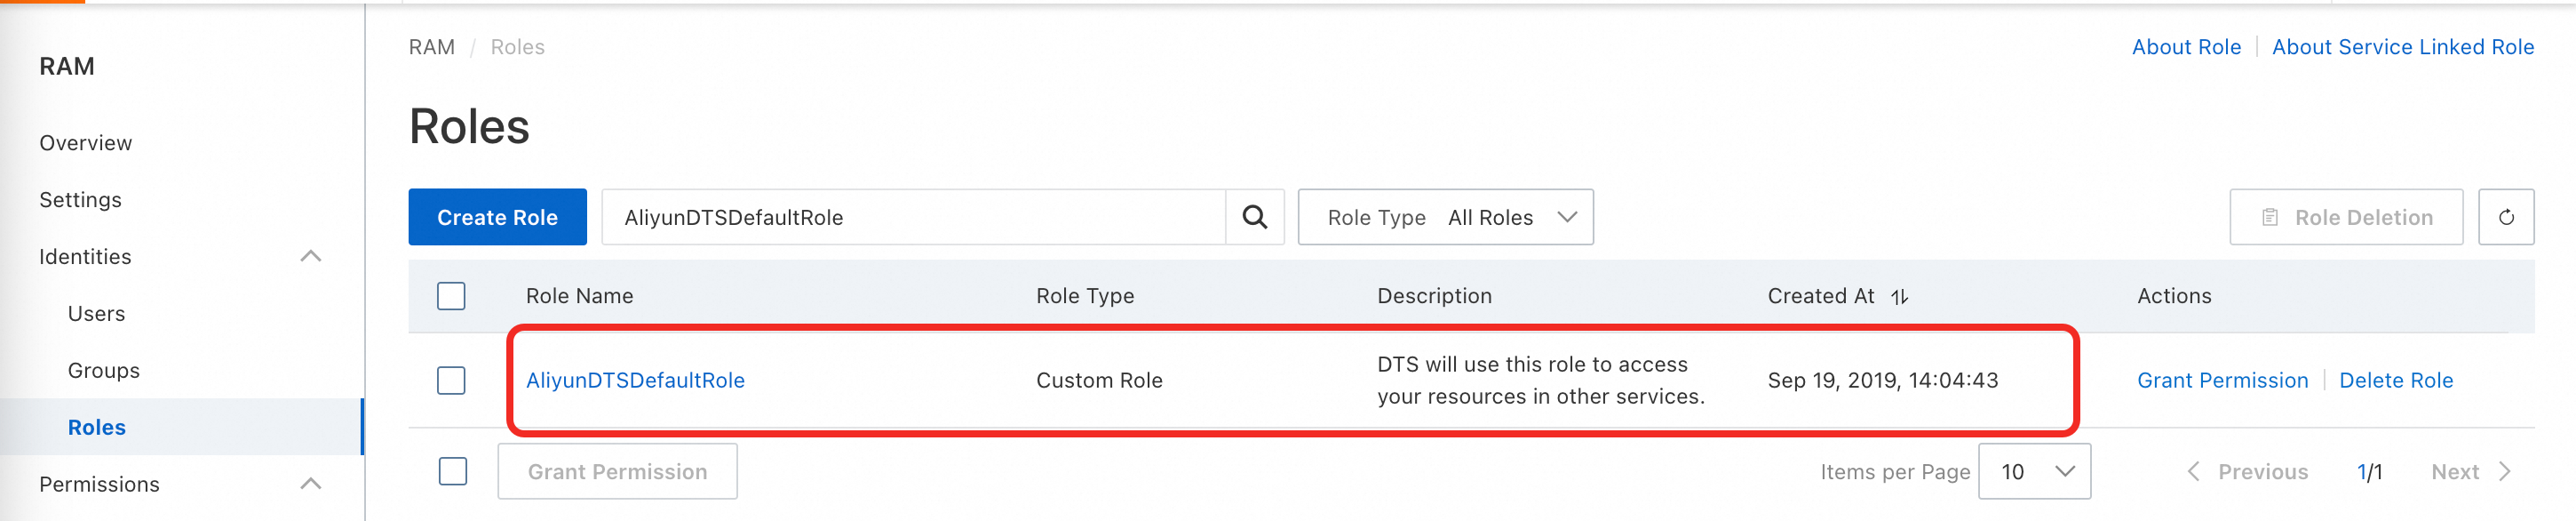
Log on to the Roles page in the Resource Access Management (RAM) console.
Check whether a service-linked role named AliyunDTSDefaultRole already exists in the list as shown in the following figure.
If the service-linked role does not exist in the list, perform operations in Fast authorization.
If the service-linked role exists in the list, perform the subsequent operations to check its permissions.
Click the AliyunDTSDefaultRole role name and view the details.
If the AliyunDTSDefaultRole role meets all the following requirements, it is properly authorized.
The AliyunDTSRolePolicy policy is displayed on the Permissions tab.

dts.aliyuncs.comis displayed on the Trust Policy tab.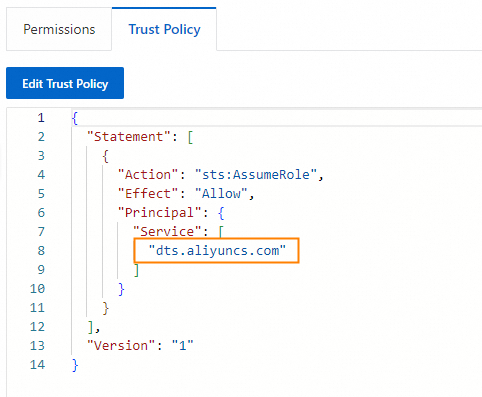
If the AliyunDTSDefaultRole role meets the preceding requirements, it is not authorized. You can delete the AliyunDTSDefaultRole role and perform authorization again.
Fast authorization
Log on to the Roles page in the Resource Access Management (RAM) console. In the Authorize Access to Cloud Resources diaglog box, click Authorize.
NoteIf the "Cloud resource access authorization successful" mesage is displayed, it is authorized.
For more information about authorzation, see Authorize DTS to access Alibaba Cloud resources.
Remove extra system accounts from the source ApsaraDB RDS instance (required only for logical migration)
If you have completed migration evaluation and no exceptions occur, skip the precheck. For more information about migration evaluation, see Migration evaluation.
To ensure compatibility between ApsaraDB RDS for MySQL and PolarDB in terms of the system account structure and to prevent the system accounts of the destination PolarDB cluster from being overwritten during migration, make sure that the root and aliyun_root accounts do not exist in the source ApsaraDB for RDS instance at the same time. Before you initiate the migration process, we recommend that you remove extra system accounts from the source ApsaraDB for RDS instance.
The following table lists the correct system account name for each version of ApsaraDB RDS for MySQL.
ApsaraDB RDS for MySQL version | Correct system account name |
RDS MySQL 5.6 | root |
RDS MySQL 5.7 | aliyun_root |
RDS MySQL 8.0 | aliyun_root |
Apart from the corresponding system account for each version mentioned in the preceding table, all other system accounts must be removed. For example, aliyun_root is correct in RDS MySQL 5.7. If you create root in the console, you must remove it. Before you remove root, confirm that it is not used in your business.
Extra system accounts may have been created by users or inherited from the source version during a version upgrade. In some scenarios, specific accounts may not be visible in the console.
The following example shows how to remove extra system accounts from an ApsaraDB RDS for MySQL 5.6 instance:
Use a privileged account to connect to the database.
Find all root and aliyun_root system accounts.
SELECT * FROM mysql.user WHERE `user` IN ('root', 'aliyun_root');Remove extra system accounts. The correct system account name of ApsaraDB RDS for MySQL 5.6 is root. Therefore, you must remove the aliyun_root account.
DELETE FROM mysql.user WHERE `user` = 'aliyun_root' LIMIT n;
(Optional) Check the whitelist configurations
If the whitelists of the primary and read-only nodes of the source ApsaraDB RDS for MySQL instance are different, you must add the whitelists of the read-only nodes to the whitelists of the primary node in advance to ensure that the whitelists of the read-only nodes can be synchronized to the destination PolarDB cluster.
Step 1: Select the Migrate from RDS method to create a destination PolarDB cluster
In this step, create a PolarDB cluster that contains the same data as the source ApsaraDB RDS for MySQL instance. Incremental data is synchronized from the source ApsaraDB RDS for MySQL instance to the PolarDB cluster in real time.
Before you begin the migration process, we recommend that you complete migration evaluation. For more information about migration evaluation, see Migration evaluation.
Before you begin the migration process, make sure that the storage space available in the PolarDB cluster is greater than the storage space used by the source ApsaraDB RDS instance.
If you use DTS to migrate data, DTS uses the read and write resources of the source and destination databases during initial full data synchronization. This may increase the loads on the database servers. You can enable throttling for data migration. For more information, see Enable throttling for data migration.
Log on to the PolarDB console. In the left-navigation page, click Clusters. On the Clusters page, click Create Cluster to go to the PolarDB buy page.
Set Billing Method to Subscription, Pay-as-you-go, or Serverless.
Subscription: You must pay upfront for compute nodes when you create a cluster. Storage is billed based on actual hourly usage, and fees are deducted from your account on an hourly basis.
Pay-as-you-go: An upfront payment is not required. You are charged fees for the compute nodes and the amount of storage that is consumed by your data. These fees are deducted from your account on an hourly basis.
Serverless: An upfront payment is not required. Resources such as compute nodes, storage space, and PolarProxy dynamically scales based on the actual demand. You are charged fees based on the actual usage of these scaled resources.
Configure the parameters. The following table describes the parameters.
NoteFor information about the parameters that are not described in the following table, see Purchase a cluster.
Parameter
Description
Creation Method
Select Migrate from RDS.
NoteThe PolarDB cluster is in the read-only mode before the migration and switchover. By default, binary logging is enabled for the cluster.
Region
The region where the source ApsaraDB RDS for MySQL instance is deployed.
NoteThe destination PolarDB cluster must be also deployed in this region.
RDS Engine Type
The database engine of the source ApsaraDB RDS instance. The default value of this parameter is MySQL and cannot be changed.
RDS Engine Version
The database engine version of the source ApsaraDB RDS for MySQL instance. Valid values: 5.6, 5.7, and 8.0.
Source RDS Instance
The source ApsaraDB RDS for MySQL instance. The available source ApsaraDB RDS for MySQL instances exclude read-only instances.
Database Engine
The database engine version of the destination PolarDB cluster. You can select the same version as the source ApsaraDB RDS for MySQL instance or a different version.
Node Specification
The node specifications of the cluster. You can specify node specifications based on your business requirements. We recommend that you select specifications that are the same as or higher than the specifications of the source ApsaraDB RDS for MySQL instance. For more information about PolarDB node specifications, see Compute node specifications of PolarDB for MySQL Enterprise Edition.
Storage Engine
PolarDB supports the following storage engines: InnoDB and InnoDB & X-Engine.
InnoDB :InnoDB storage engine.
InnoDB & X-Engine:: deploys InnoDB and X-Engine. If you select this option, you can specify the X-Engine memory usage ratio. For more information, see X-Engine.
In the upper-right corner of the page, check the cluster configuration and configure the Duration, Quantity, and Auto-renewal parameters. The Duration parameter is available only for subscription clusters.
Read and select terms of service. Click Confirm Order.
On the Purchase page, confirm the order and the payment method, and click Purchase.
NoteAfter you complete the payment, wait for 10 to 15 minutes. Then, you can view the new cluster on the Clusters page.
If specific nodes in the cluster are in the Creating state, the cluster is still being created and is unavailable. The cluster is only available when the cluster is in the Running state.
Make sure that you select the region where the cluster is deployed. Otherwise, you cannot view the cluster.
After the cluster is created, log on to the PolarDB console and click the cluster ID to go to the Basic Information page of the cluster.
In the RDS Migration section of the Basic Information page, check the Replication Latency value of the destination PolarDB cluster. If the value is smaller than 60 seconds, you can perform the operations in Step 3: Switch over services.
 Note
NoteDo not migrate or upgrade an instance that has a two-way DTS data synchronization task in progress. Data inconsistency may occur.
After the cluster is created, the system starts migrating data from the source ApsaraDB RDS for MySQL instance to the cluster. You must perform the operations in Step 5: Complete the migration within 30 days after the cluster is created. Otherwise, the migration task is automatically disabled after the 30-day period.
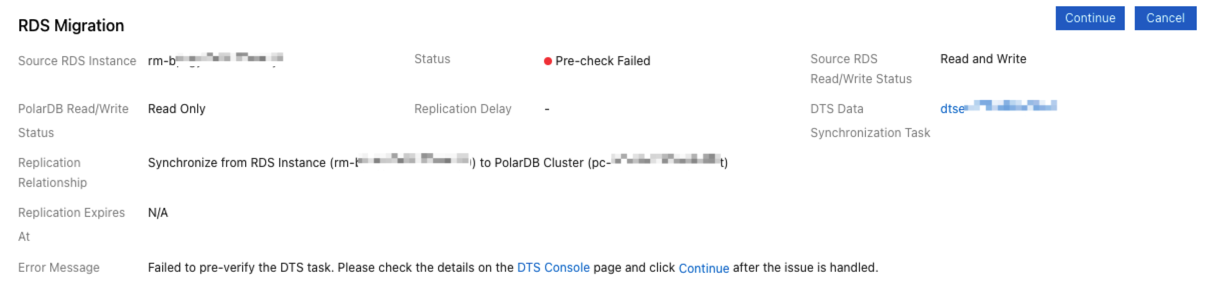
If the logical migration method is used and the Status value displayed in the RDS Migration section is Precheck Failed after the PolarDB cluster is created, follow the instructions in the error message to troubleshoot the issue.

For example, if a trigger is created in the source ApsaraDB RDS for MySQL instance, the precheck fails and the "The RDS instance has a trigger." error message is reported. You can delete the trigger and then click Continue Migration. Alternatively, you can click Cancel Migration and then manually create a data synchronization task in the DTS console. For more information, see Configure a data synchronization task for a source database that contains a trigger.
You can click Cancel Migration in this step. For information about the impacts, see FAQ.
(Optional) Step 2: Add endpoints
You can select the Switch with Endpoints (Connection Changes Not Required) option when you switch over services from the source ApsaraDB RDS for MySQL instance to the destination PolarDB cluster. This way, the endpoints between the source ApsaraDB RDS for MySQL instance and the destination PolarDB cluster are automatically interchanged during the switchover. After the switchover, you can connect to the destination PolarDB cluster without the need to modify the connection configurations of your application. You can interchange endpoints only if the source ApsaraDB RDS for MySQL instance and the destination PolarDB cluster have the endpoints. By default, the destination PolarDB cluster has only a private primary endpoint and a private cluster endpoint. If the source ApsaraDB RDS for MySQL instance has more endpoints, you must create the corresponding endpoints for the destination PolarDB cluster if you want to interchange the endpoints. For information about how to create endpoints for a PolarDB cluster, see Manage endpoints. For information about how to create endpoints for an ApsaraDB RDS for MySQL instance, see Configure endpoints for an RDS instance.
If you did not create the required endpoints before the switchover, you can add the endpoints after the switchover. To add the endpoints after the switchover, wait until the destination PolarDB cluster enters the running state. You can also configure endpoint settings and cluster parameters and add read-only nodes based on your business requirements.
To interchange private endpoints, make sure that the source ApsaraDB RDS for MySQL instance and the destination PolarDB cluster belong to the same virtual private cloud (VPC). Otherwise, you cannot connect to the original services after the switchover.
Step 3: Switch over services
If the Replication Latency value of the destination PolarDB cluster is smaller than 60 seconds, you can perform the switchover operation.
Log on to the PolarDB console.
Find the destination cluster and click the cluster ID.
In the RDS Migration section of the Basic Information page, click Switch Over.
 Note
NoteIn most cases, 5 minutes are required for the system to compete the switchover.
After the switchover, the read/write status of the source ApsaraDB RDS for MySQL instance and the destination PolarDB cluster are interchanged. The read/write status of the source ApsaraDB RDS for MySQL instance is changed to Read-only, and the read/write status of the PolarDB cluster is changed to Read and Write. The replication direction is also changed. In this case, incremental data is synchronized from the PolarDB cluster to the ApsaraDB RDS for MySQL instance.
In the Switches the business over to the new database dialog box, select Switch with Endpoints (Connection Changes Not Required) or Switch without Endpoints (Connection Changes Required).

Switch with Endpoints (Connection Changes Not Required)
If you select Switch with Endpoints (Connection Changes Not Required), the system interchanges the endpoints between the ApsaraDB RDS for MySQL instance and the PolarDB cluster. You do not need to modify the configurations of your application to connect to the PolarDB cluster.
ImportantBefore you select Switch with Endpoints (Connection Changes Not Required), make sure that you read notes for switchover with endpoints.
Then, click OK. In the message that appears, click Confirm.
Switch without Endpoints (Connection Changes Required)
Select Switch without Endpoints (Connection Changes Required) in the dialog box.
Then, click OK. In the message that appears, click Confirm.
Refresh the page. If PolarDB Read/Write Status changes to Read and Write, change the database endpoint in your applications at the earliest opportunity.
NoteIf data errors occur after the switchover is complete, you can roll back the switchover. This allows you to restore the database and data to the original state before the switchover is performed. For more information, see Roll back the migration. You can then select Cancel Migration to restore the status before the migration.
(Optional) Step 4: Switch over DTS tasks
If the source instance is not involved in a DTS task (not a one-click migration task), the Business DTS Task Database Endpoint Switchover button is not displayed in the console. Skip this step.
If the source instance is involved in a DTS task (not a one-click migration task), you can modify the source or destination database of the DTS task for a smooth switchover. For more information about how this feature works and usage notes, see ModifyDtsJobEndpoint.
During schema migration and full data migration, do not execute DDL statements to change the schemas of databases or tables. Otherwise, the data migration task fails.
Log on to the PolarDB console.
Find the destination cluster and click the cluster ID.
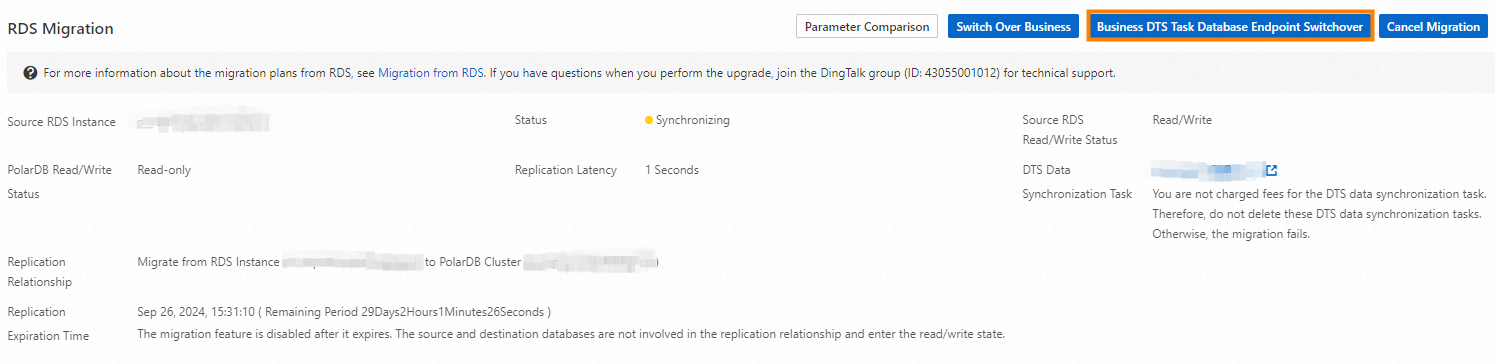
In the RDS Migration section of the Basic Information page, click Business DTS Task Database Endpoint Switchover.
In the Business DTS Task Database Endpoint Switchover dialog box, select Source Instance DTS Task (Forward Switchover) or Destination Instance DTS Task (Switchover Rollback).
ImportantBefore the switchover, check the status of the DTS synchronization tasks of the source ApsaraDB RDS for MySQL instance and the destination PolarDB cluster. For more information, see DescribeDtsJobDetail.
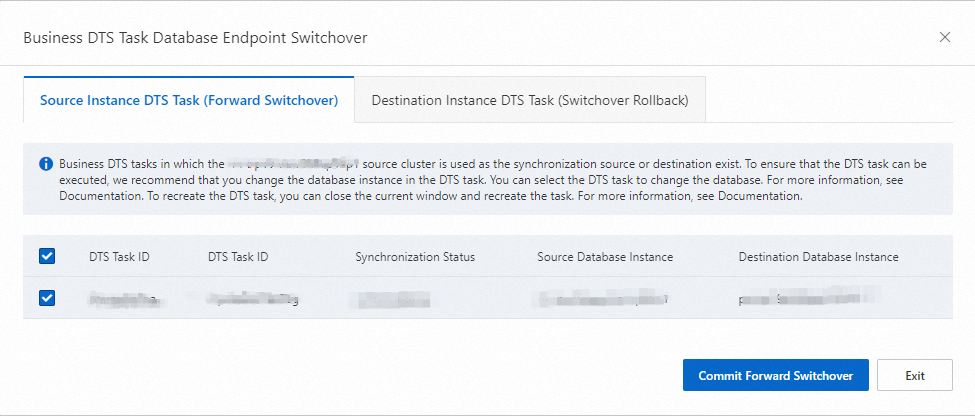
To select Source Instance DTS Task (Forward Switchover), perform the following operations:
Select the DTS task of the source ApsaraDB RDS for MySQL instance.
Click Commit Forward Switchover.
To select Destination Instance DTS Task (Switchover Rollback), perform the following operations:
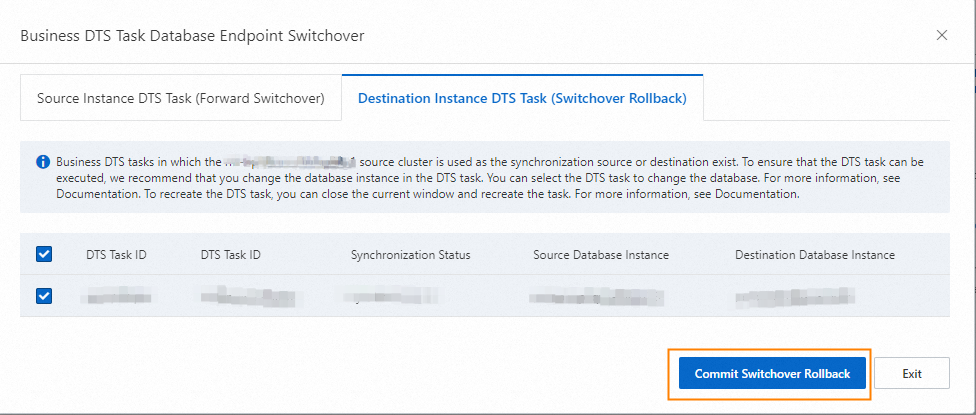
Select the DTS task of the destination PolarDB cluster.
Click Commit Switchover Rollback.
After you switch over services in step 3, you can select the Source Instance DTS Task (Forward Switchover) option to switch over a DTS task from the source ApsaraDB RDS for MySQL instance to the destination PolarDB cluster. The DTS task cannot be a one-click migration task. You can perform this operation after you switch over services in step 3 but before you complete the migration in step 5.
After you roll back the migration, you can select the Destination Instance DTS Task (Switchover Rollback) option to switch over a DTS task from the destination PolarDB cluster to the source ApsaraDB RDS for MySQL instance. The DTS task cannot be a one-click migration task. You can perform the operation after you roll back the migration but before you cancel the migration.
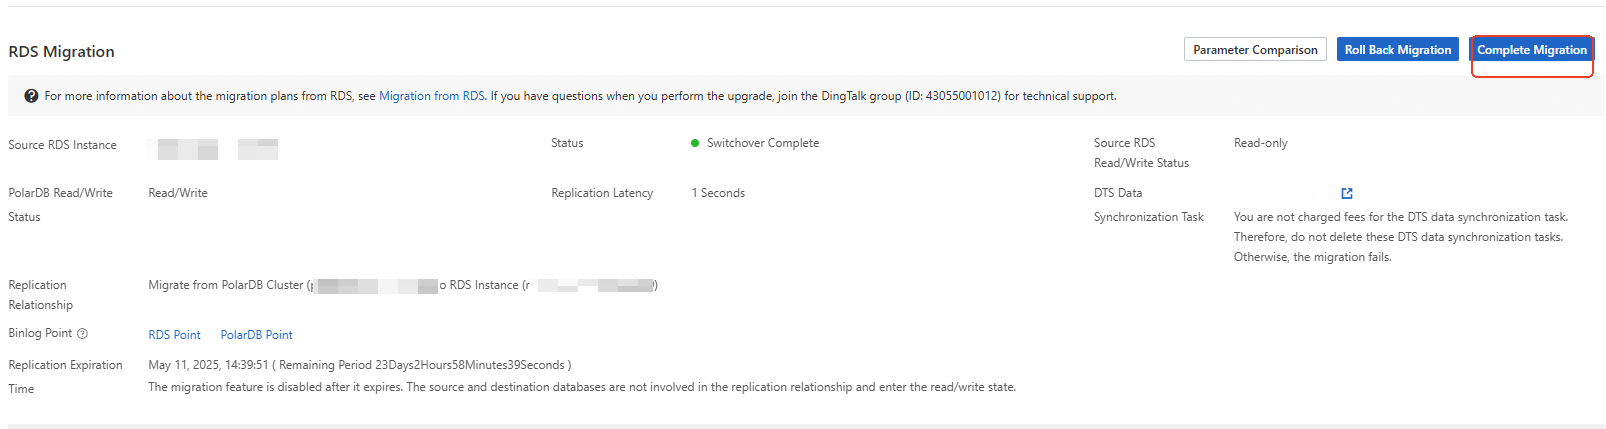
Step 5: Complete the migration
After you complete the operations described in the Step 1: Select the Migrate from RDS method to create a destination PolarDB cluster section, you must click Complete Migration within 30 days.
Before you complete the migration by clicking Complete Migration, make sure that data migration is complete and that the synchronization task is no longer used. This operation terminates data replication from the source ApsaraDB RDS for MySQL instance to the PolarDB cluster if physical migration is used, and deletes the data synchronization task if logical migration is used.
This operation interrupts data synchronization between the PolarDB cluster and the ApsaraDB RDS for MySQL instance. Therefore, the Cancel Migration option is no longer available. We recommend that you perform this operation after you use the PolarDB cluster for a period of time and make sure that the cluster is normal.
Log on to the PolarDB console..
Find the cluster and click the cluster ID.
In the RDS Migration section of the Basic Information page, click Complete Migration. In the dialog box that appears, click OK.
 Note
NoteAfter you click OK, the system stops data synchronization within approximately 2 minutes. During this process, the migration status is Disable Synchronization. Wait until the migration is complete.
In the Complete Migration dialog box, you can specify whether to disable the binary logging feature for the PolarDB cluster. If you disable the binary logging feature, write performance can be slightly improved. The PolarDB cluster automatically restarts after you disable the binary logging feature for the new configuration to take effect.
If you no longer need the source ApsaraDB RDS instance, you can release or unsubscribe from the instance. For more information, see the "(Optional) Release or unsubscribe from an ApsaraDB RDS instance" section of this topic.
If you want to perform operations such as renewal or configuration changes on the source ApsaraDB RDS instance, click Complete Migration first.
(Optional) Release or unsubscribe from an ApsaraDB RDS instance
After data is migrated from the source ApsaraDB RDS instance to the PolarDB cluster, you can release or unsubscribe from the instance if services run on the cluster as expected and the instance is no longer required.
You can unsubscribe from ApsaraDB RDS instances that use the subscription billing method. For more information, see Unsubscribe from a subscription primary RDS instance.
Release ApsaraDB RDS instances that use the pay-as-you-go billing method at the earliest opportunity to save RDS resources. For more information, see Release or unsubscribe from an ApsaraDB RDS for MySQL instance.
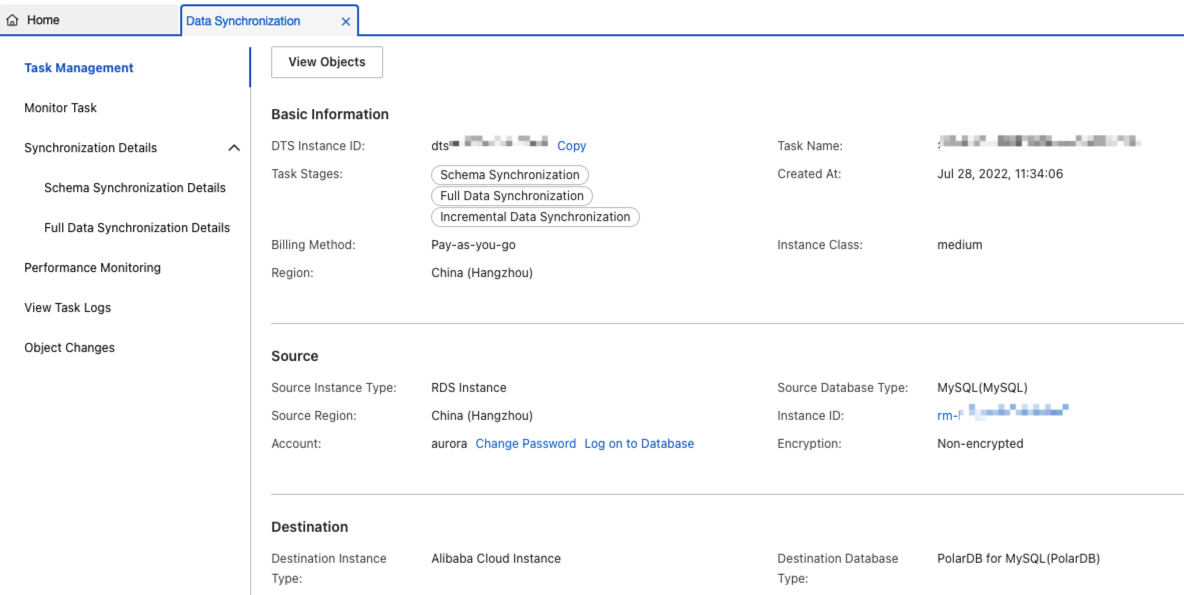
(Optional) View the details of a data synchronization task (available only for logical migration)
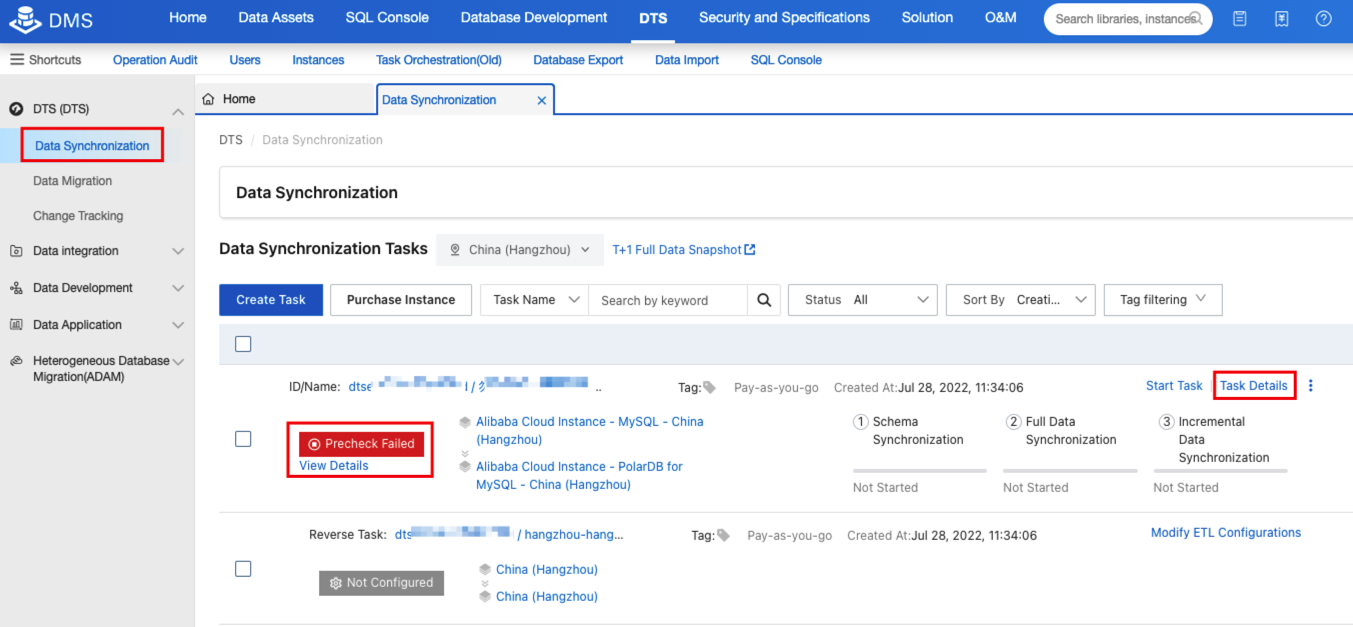
During the process of upgrade by using logical migration, if you encounter migration errors (such as a precheck failure) or other exceptions (such as high replication delay), you can go to the details page of the data synchronization task to view specific information about the task.
Log on to the PolarDB console.
Find the target cluster and click its ID.
In the RDS Migration section of the Basic Information page, click the name of DTS Data Synchronization Task to go to the data synchronization task list in the DTS console.
Find the data synchronization task. You can view precheck failure details, data synchronization task details, and data synchronization task logs.
During the migration process, if you want to adjust the synchronization objects of the synchronization task, you can click Reselect Objects. For example, the source ApsaraDB RDS for MySQL instance may have new databases that also need to be included in the synchronization task.
