This topic describes how to obtain the access token to access Drive and Photo Service by using a JSON Web Token (JWT) application.
Overview of a JWT application
In this topic, a JWT application is a custom application that uses the JWT mechanism for identity authentication.
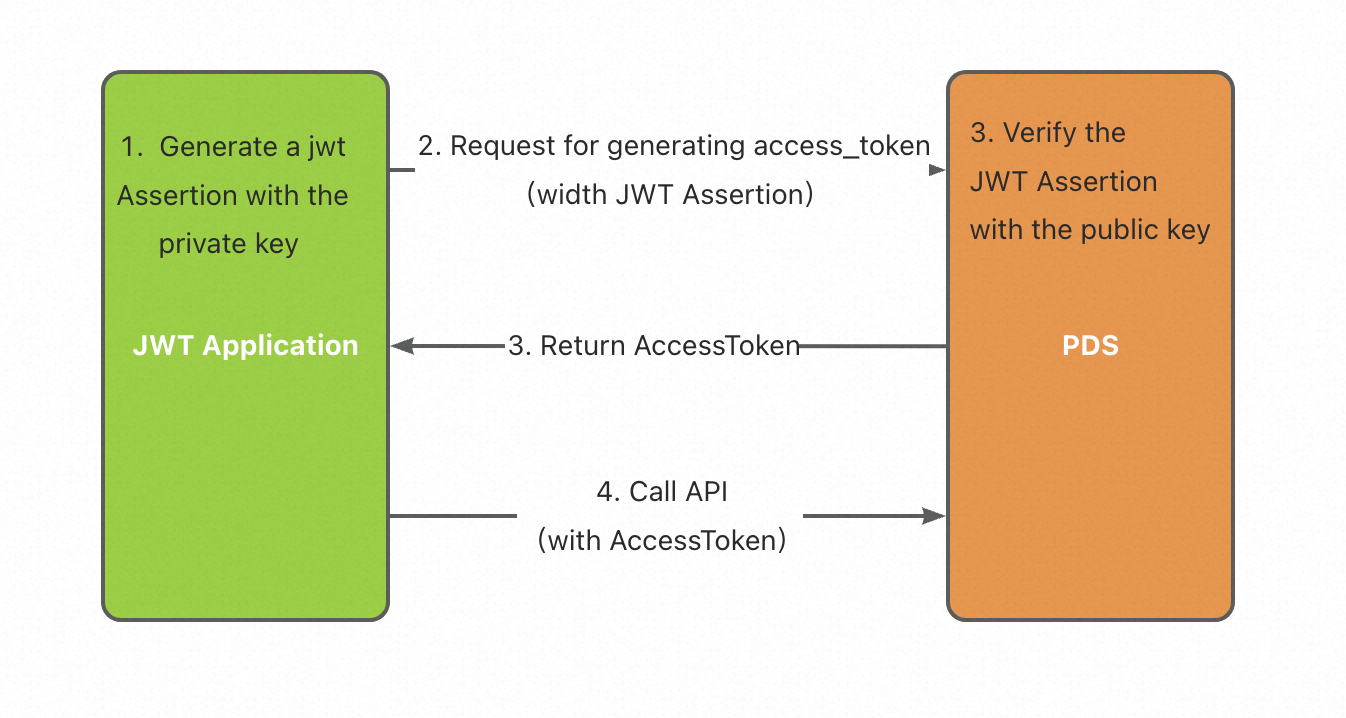
A JWT assertion is generated after you use a private key to sign data on the JWT application server. The JWT assertion is used as a credential to access Drive and Photo Service in which a public key is configured.
Scenarios
An enterprise has an internal software system, including an independent account system. The enterprise wants internal users to use the internal logon page to log on to and use Drive and Photo Service.
An enterprise has a logon portal that uses an independent account system. The enterprise wants to associate the logon portal with Drive and Photo Service to build a cloud storage system that can be accessed from the independent account system.
How it works
Create a custom domain and a JWT application in the Drive and Photo Service console.
Use the Rivest–Shamir–Adleman (RSA) algorithm to create a public key and a private key. Save the public key on the Drive and Photo Service server and the private key on the JWT application server.
After you encode data and sign the data by using the private key on the JWT application server, a JWT assertion is generated. Then, the JWT assertion is sent to Drive and Photo Service.
After Drive and Photo Service uses the public key to verify that the JWT assertion is valid, Drive and Photo Service returns an access token to the JWT application server. The JWT application server can then use the access token to call API operations of Drive and Photo Service.
Procedure
1. Configure a key pair
1.1 Create a domain or select an existing domain
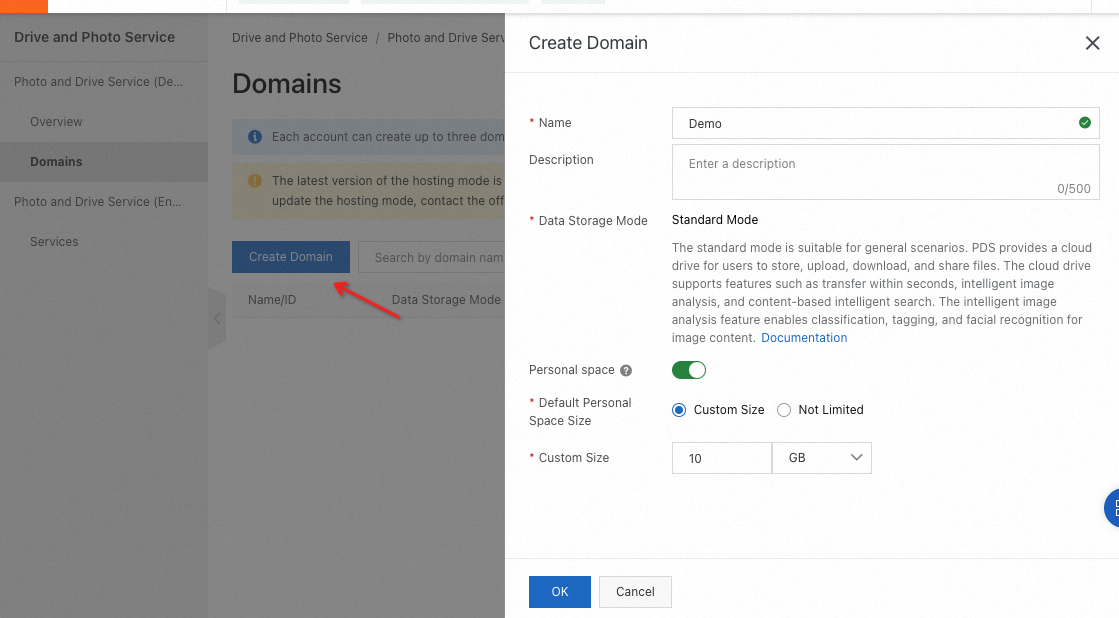
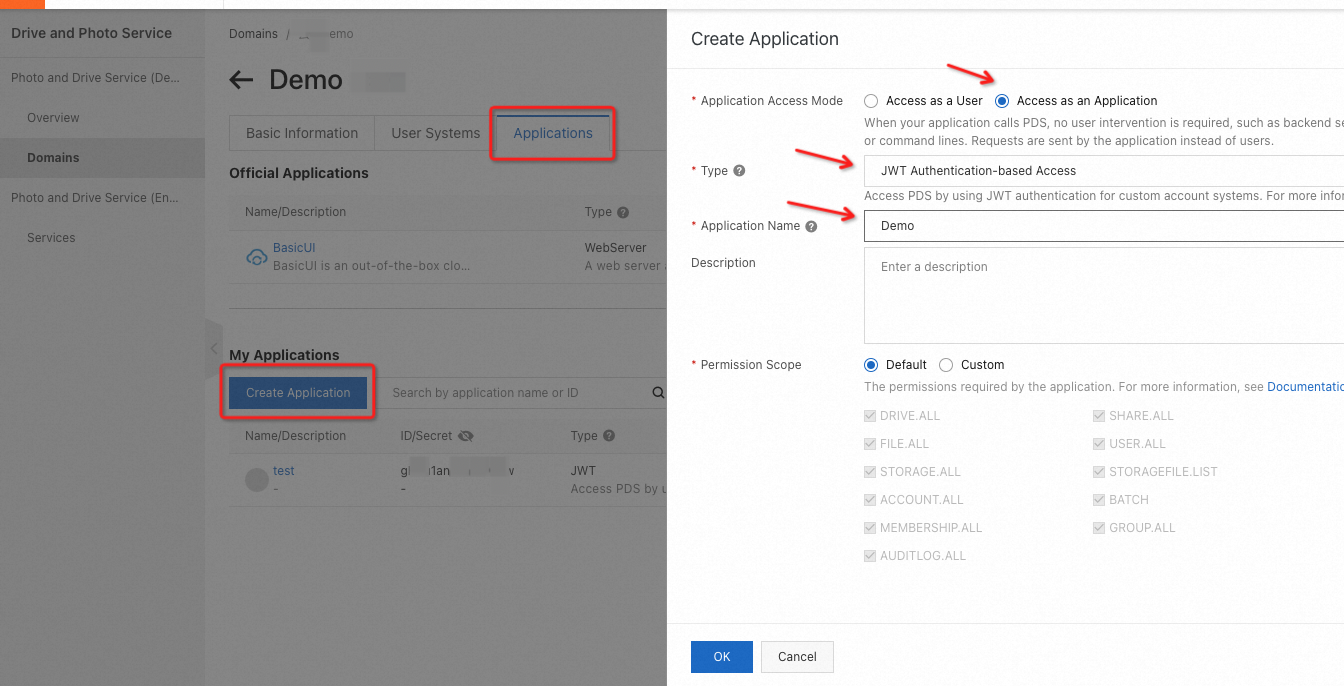
1.2 Create an application or select an existing application
Click the name of a domain to go to the details page. On the page that appears, click the Applications tab. On the Applications tab, create a JWT application or select an existing JWT application.
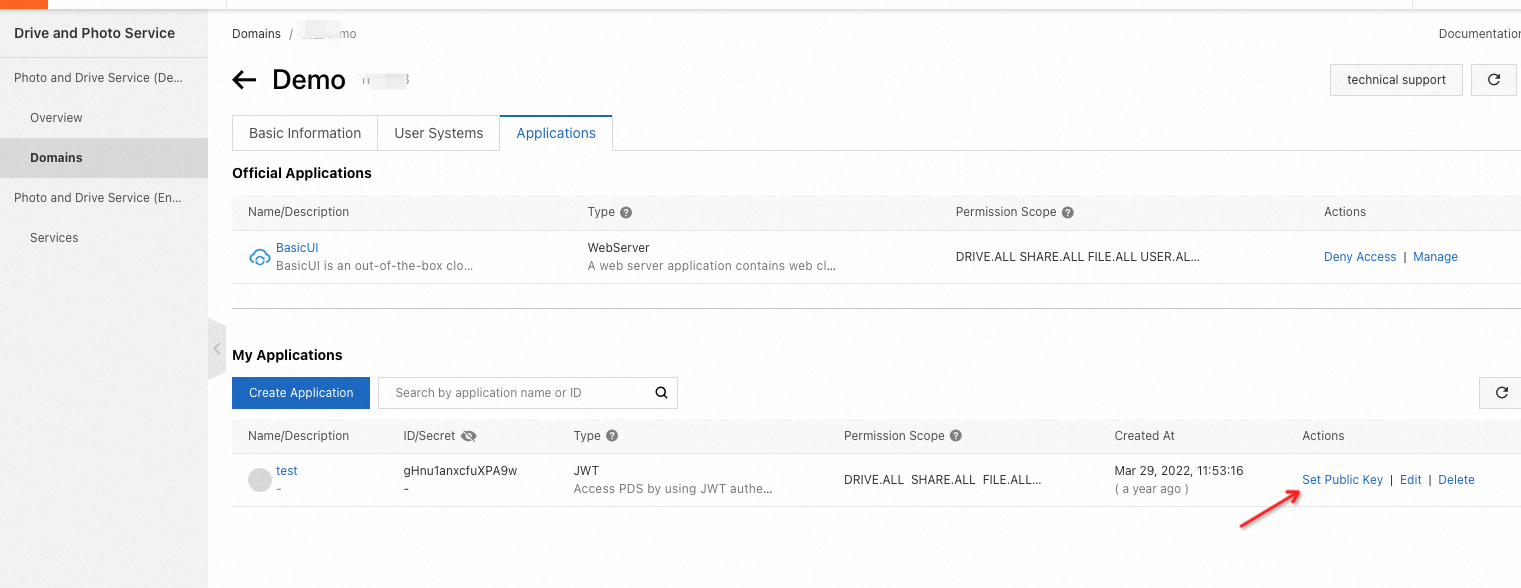
1.3 Set a public key
Find the JWT application that you want to manage and click Set Public Key in the Actions column.
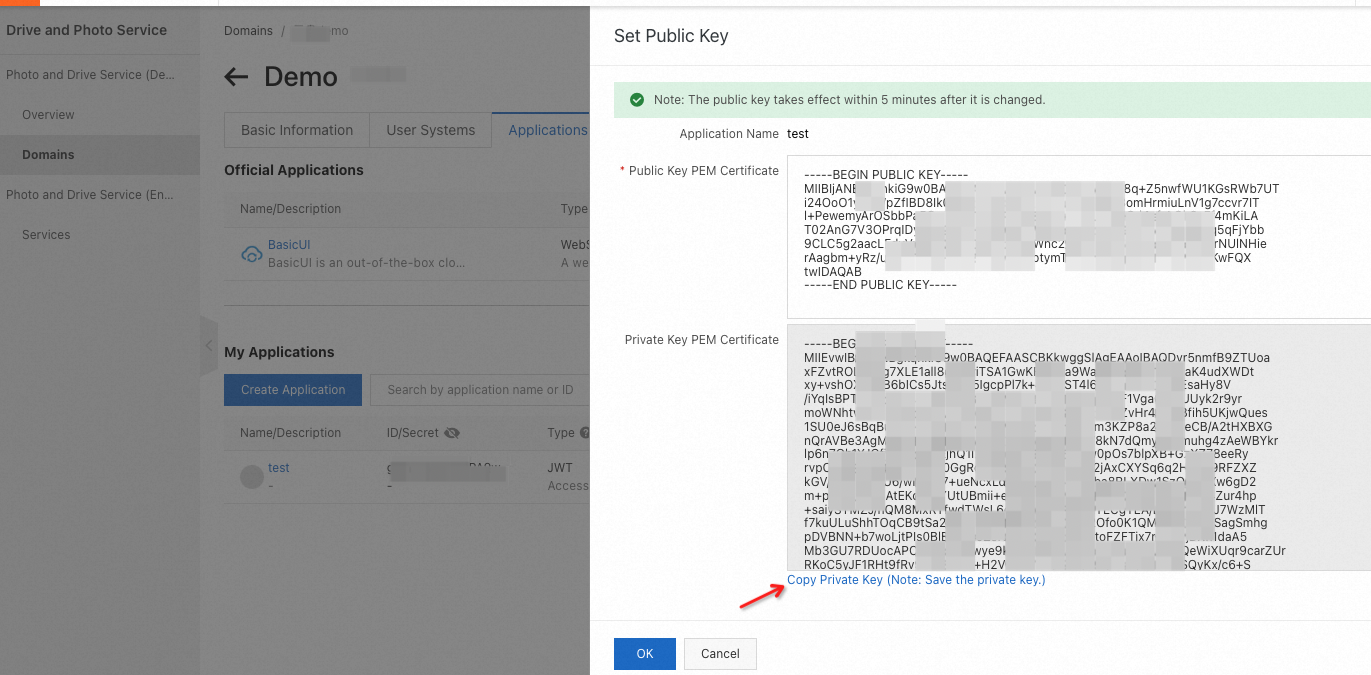
Generate a public-private key pair.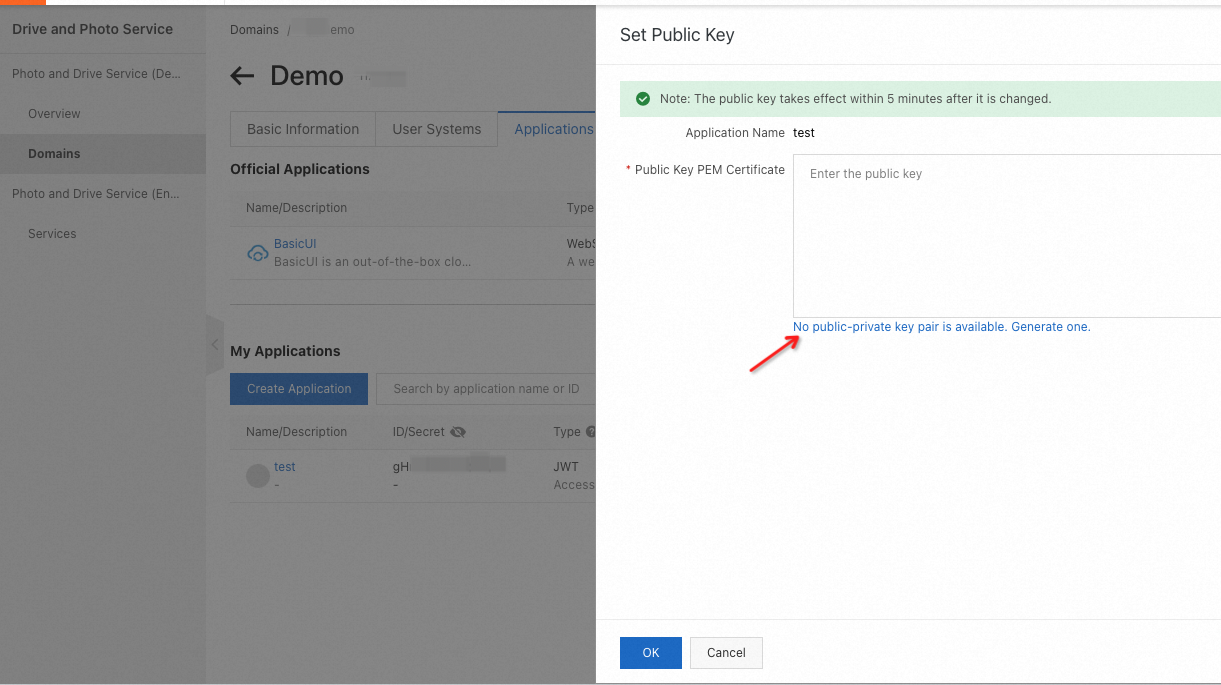
After the key pair is generated, copy the private key and keep it secret. Click OK.
2. Obtain an access token
2.1 Obtain a JWT assertion from the JWT application server
After you encode data and use the private key that you copy to sign the data based on the specified encryption algorithm on the JWT application server, a JWT assertion is generated. The following Node.js sample code shows how to obtain a JWT assertion:
const JWT = require('jsonwebtoken');
function signAssertion({ domain_id, client_id, user_id, privateKeyPEM }) {
var now_sec = parseInt(Date.now() / 1000);
var opt = {
iss: client_id,
sub: user_id,
sub_type: "user",
aud: domain_id,
jti: Math.random().toString(36).substring(2),
exp: now_sec + 60,
auto_create: false,
};
return JWT.sign(opt, privateKeyPEM, {
algorithm: "RS256",
});
}
opt parameters
Parameter | Required | Type | Description |
Parameter | Required | Type | Description |
iss | Yes | String | The ID of the JWT application. |
sub | Yes | String | The ID of a user or a domain. |
sub_type (an extended field) | Yes | String | The type of the account. Valid values: user and service. A value of user indicates that the sub parameter is set to the ID of a user, and the access token for a regular user is issued in the next step. A value of service indicates that the sub parameter is set to the ID of a domain, and the access token for a service account is issued in the next step, which allows the service account to access Drive and Photo Service as a super administrator. |
aud | Yes | String | The ID of a domain. |
jti | Yes | String | The unique identifier of the JWT assertion. The identifier must be 16 to 128 bytes in length. We recommend that you set this parameter to a UUID. |
exp | Yes | Integer | The expiration time of the JWT assertion. Specify this parameter in the UNIX timestamp format. Unit: seconds. The validity period of the JWT assertion cannot exceed 15 minutes. We recommend that you set this parameter to five minutes after the current time in case the time on the client is inconsistent with that on the server. |
iat | No | Integer | The time when the JWT assertion is issued and before which the JWT assertion cannot be used. Specify this parameter in the UNIX timestamp format. Unit: seconds. Example: 1577682075. |
nbf | No | Integer | The effective time of the JWT assertion. Specify this parameter in the UNIX timestamp format. Unit: seconds. By default, if you do not specify this parameter, the current time is used. The validity period of the JWT assertion cannot exceed 15 minutes. We recommend that you set this parameter to five minutes before the current time or do not specify this parameter in case the client time is inconsistent with the server time. |
auto_create (an extended field) | No | Boolean | Specifies whether to automatically create a user if the user that you specify does not exist. By default, the system does not automatically create a user. |
For more information about the third-party libraries and encryption algorithms of JWT, visit the JWT official website.
2.2 Exchange the JWT assertion for an access token
The following sample code shows how to call an Authorize operation to exchange the JWT assertion for an access token:
POST /v2/oauth/token
Content-Type: application/x-www-form-urlencoded

grant_type=urn:ietf:params:oauth:grant-type:jwt-bearer&client_id=${APP_ID}&assertion=xxxxxxxxxx
Note
Note: Set the Content-Type header to application/x-www-form-urlencoded and specify the request parameters in the request body.
Request parameters
Parameter | Required | Type | Description |
Parameter | Required | Type | Description |
grant_type | Yes | String | The type of the authorization. Set the value to urn:ietf:params:oauth:grant-type:jwt-bearer. |
client_id | Yes | String | The ID of the application. |
assertion | Yes | String | The JWT assertion generated in the previous step. |
Example of an access token in JSON format:
{
  "access_token": "eyJh****eQdnUTsEk4",
  "refresh_token": "kL***Lt",
  "expires_in": 7200,
  "token_type": "Bearer"
}
After the JWT application server obtains the access token, the access token is sent to the JWT web server. The JWT web server can use the access token to call the API operations of Drive and Photo Service and access the resources stored in Drive and Photo Service.
2.3 Refresh the access token
The access token obtained by using the JWT application is valid only for two hours. After the access token expires, you can perform Steps 2.1 and 2.2 to obtain a new access token. You can also call an API operation of Drive and Photo Service to refresh the access token within seven days. After seven days, you must follow Steps 2.1 and 2.2 to obtain a new access token.
The following sample code shows how to call an Authorize operation to refresh the access token:
POST /v2/oauth/token
Content-Type: application/x-www-form-urlencoded

client_id=${APPID}&refresh_token=${access_token}&grant_type=refresh_token&redirect_uri=${REDIRECT_URI}
Parameter | Required | Type | Description |
Parameter | Required | Type | Description |
client_id | Yes | String | The ID of the application. |
refresh_token | Yes | String | The access token that has expired. |
grant_type | Yes | String | The type of the authorization. Set the value to refresh_token. |
redirect_uri | Yes | String | The redirect URI that you configure for your application. |
(Optional) 3. Use the basic UI of Drive and Photo Service
If you do not want to develop a user interface (UI) and the basic UI provided by Drive and Photo Service can meet your business requirements, you can use the basic UI.
Method 1:
Use the window.open() method to open the basic UI and use the postMessage() method to pass the access token.
Example:
const endpoint = `https://${domain_id}.apps.aliyunpds.com`
const url = `${endpoint}/accesstoken?origin=${location.origin}`
var win = window.open(url)
window.addEventListener('message', onMessage, false)
async function onMessage(e) {
if (e.data.code == 'token' && e.data.message == 'ready') {
var result = await getToken();
win.postMessage({
code: 'token',
message: result
}, endpoint || '*')
window.removeEventListener('message', onMessage)
}
}
Method 2:
Use an iframe to embed the basic UI and use the postMessage() method to pass the access token.
Example:
const endpoint = `https://${domain_id}.apps.aliyunpds.com`
const iframeURL = `${endponit}/accesstoken?origin=${location.origin}`
Example in HTML:
<iframe id="ifr" src="iframeURL"></iframe>
window.addEventListener('message', onMessage)
async function onMessage(e) {
if (e.data.code == 'token' && e.data.message == 'ready') {
var result = await getToken();
document.getElementById('ifr').contentWindow.postMessage({
code: 'token',
message: result
}, endpoint || '*')
window.removeEventListener('message', onMessage)
}
}
Note
Note: To use Method 2, you must configure the origin of the host page in the security settings of the basic UI.
For example, if the URL of a host page is https://example.com/a.html, the origin of the host page is https://example.com. In this case, enter example.com, as shown in the following figure.

Method 3:
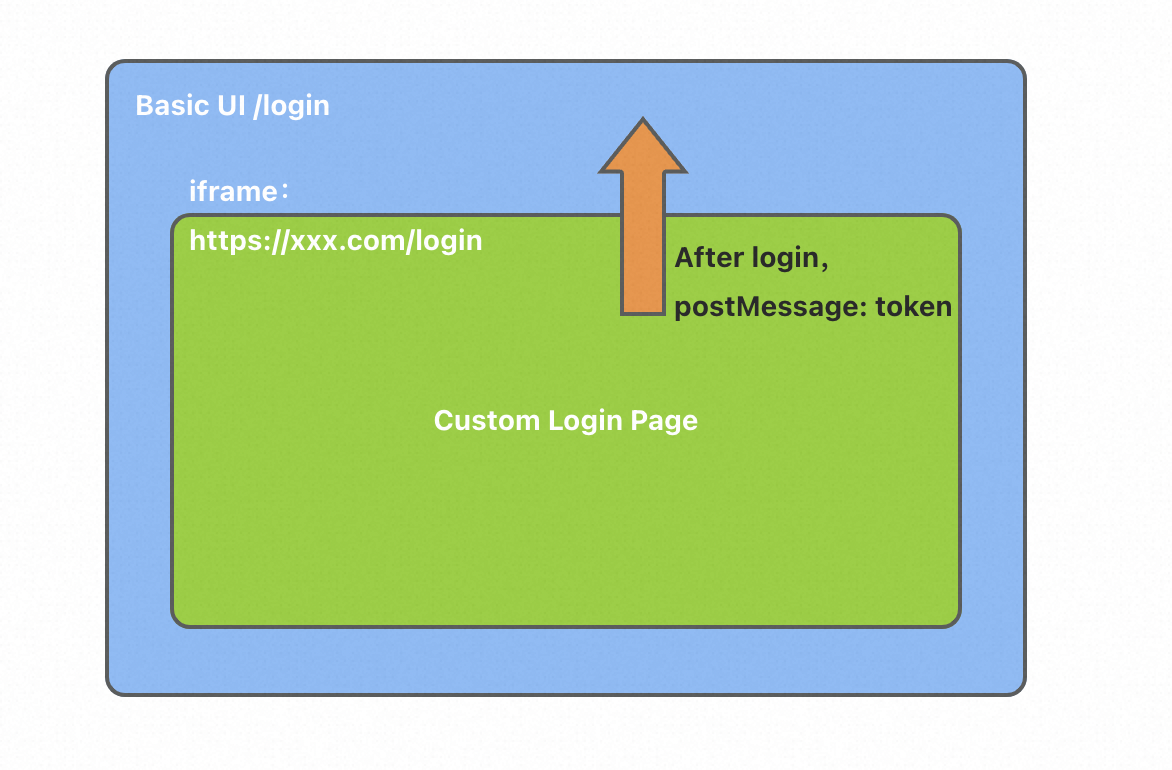
Use an iframe to embed the basic UI on a custom logon page.
Specify the URL of the custom logon page and the ID of the JWT application. Then, the access token can be automatically refreshed in the basic UI.

After a logon request is sent, the system displays the custom logon page rather than the default logon page of the basic UI.
After the user logs on to the system, the basic UI passes the access token to the custom logon page by using the postMessage() method.
if(parent!=self){
  let origin = ''
  parent.postMessage({
    code: 'token',
    message: {
       access_token: 'xxxx',
       refresh_token: 'xxxx',
       ...
    }
  }, endpoint || "*")
}
Appendix 1: Sample code in Node.js
The following sample code shows how to obtain an access token by using a JWT application and how to refresh the access token:
const fs = require('fs')
const JWT = require('jsonwebtoken');
const axios = require('axios')
const DOMAIN_ID = ''
const APP_ID = ''
const USER_ID = ''
const PRIVATE_KEY_PEM = ''
const PRE = `https://${domain_id}.api.aliyunpds.com`
async function init() {
try {
var params = {
domain_id: DOMAIN_ID,
client_id: APP_ID,
user_id: USER_ID,
privateKeyPEM: PRIVATE_KEY_PEM,
};
var assertion = signAssertion(params)
var obj = await getToken(assertion)
return obj.data
} catch (e) {
if (e.response) {
console.log(e.response.status)
console.log(e.response.headers)
console.log(e.response.data)
} else {
console.error(e)
}
}
}
function signAssertion({ domain_id, client_id, user_id, privateKeyPEM }) {
var now_sec = parseInt(Date.now()/1000)
var opt = {
iss: client_id,
sub: user_id,
sub_type: 'user',
aud: domain_id,
jti: Math.random().toString(36).substring(2),
exp: now_sec + 300,
auto_create: true,
};
return JWT.sign(opt, privateKeyPEM, {
algorithm: 'RS256'
});
}
async function getToken(assertion) {
return await axios({
method: 'post',
url: PRE + '/v2/oauth/token',
headers: {
'Content-Type': 'application/x-www-form-urlencoded'
},
data: params({
grant_type: 'urn:ietf:params:oauth:grant-type:jwt-bearer',
client_id: APP_ID,
assertion
})
})
}
async function refreshToken(refresh_token) {
return await axios({
method: 'post',
url: PRE + '/v2/oauth/token',
headers: {
'Content-Type': 'application/x-www-form-urlencoded'
},
data: params({
grant_type: 'refresh_token',
client_id: APP_ID,
refresh_token,
})
})
}
function params(m){
const params = new URLSearchParams();
for(var k in m){
params.append(k, m[k]);
}
return params;
}
;(async ()=>{
let result = await init()
console.log(result)
refreshToken(result.refreshToken)
})();
Appendix 2: Structure of an access token
Example:
{
  access_token: 'eyJhbG.....g7M0p28',
  refresh_token: '62f1acc.......9b781f3',
  expires_in: 7200,
  token_type: 'Bearer',
  ......
}
 Elastic Compute Service (ECS)
 Container Compute Service (ACS)


