This topic describes how to access Drive and Photo Service (PDS) from a web server application by using OAuth 2.0.
Introduction to OAuth 2.0
OAuth 2.0 lets you authorize a third-party service to obtain your resource information without revealing your account password.
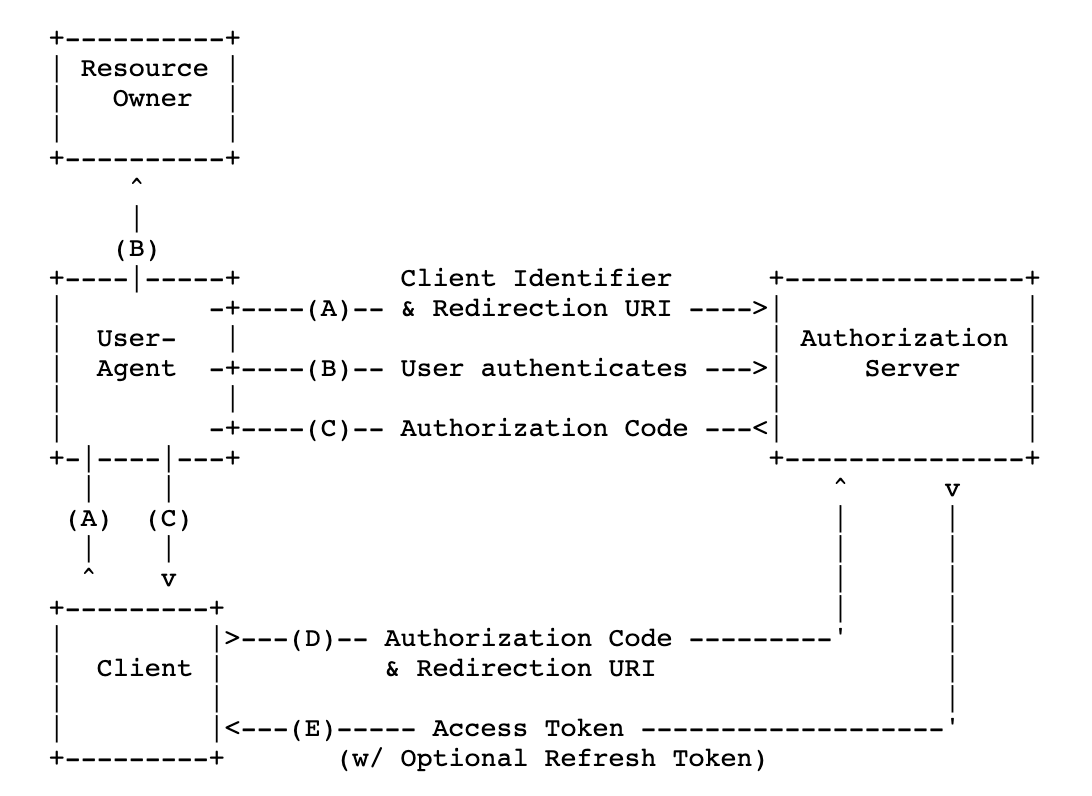
OAuth 2.0 supports the following authorization methods: Authorization Code, Implicit, Resource Owner Password Credentials, and Client Credentials. The Authorization Code method provides the highest security level. In this topic, the Authorization Code method is used.
The following figure shows the authorization process of OAuth 2.0 by using the Authorization Code method.
Access process for a web server application
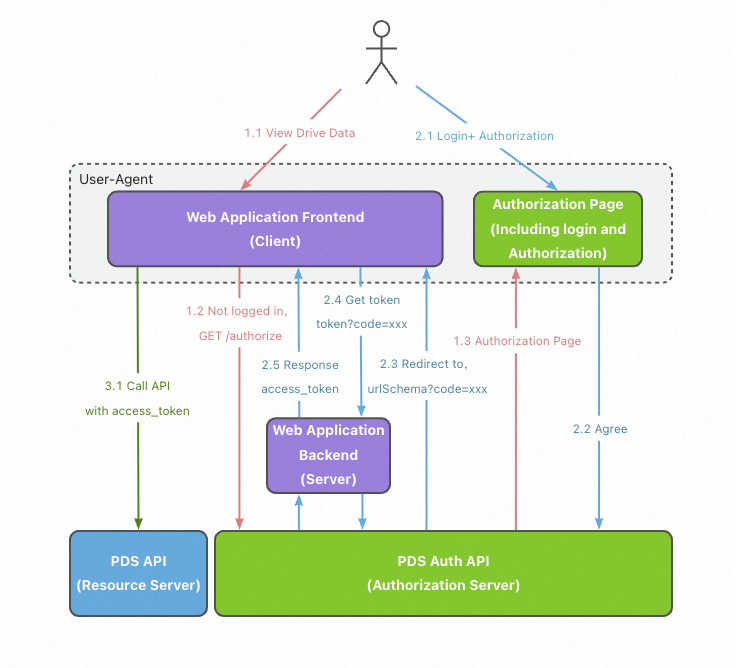
Process:
Logon and authorization
A user accesses the web server application. The web server application redirects the access request to the authentication server. The user is asked to determine whether to authorize the web server application.
Obtaining an access token
If the user agrees to authorize the web server application, the authorization server redirects the access request to the redirection URI that is specified by the application and generates an authorization code.
After receiving the authorization code, the web server application requests an access token from the authentication server. This way, the user obtains the access token.
Accessing the resources
The user uses the access token to access the PDS API on the frontend of the web server application.
Prerequisites
A service that supports OAuth 2.0 is ready.
PDS Developer Edition is activated. For more information, see Get started with PDS.
Procedure
Step 1: Obtain the ID and secret of an application
Log on to the PDS console. In the left-side navigation pane, choose Drive and Photo Service (Developer Edition) > Domains.
Find the domain that you want to use and click Details in the Actions column.
Create an application.
NoteIf no application is available, create an application before you perform subsequent operations.
On the domain details page, click the Applications tab and then click Create Application.
In the panel that appears, specify the parameters and click OK.
For the Type parameter, select WebServer (Web Server Application).
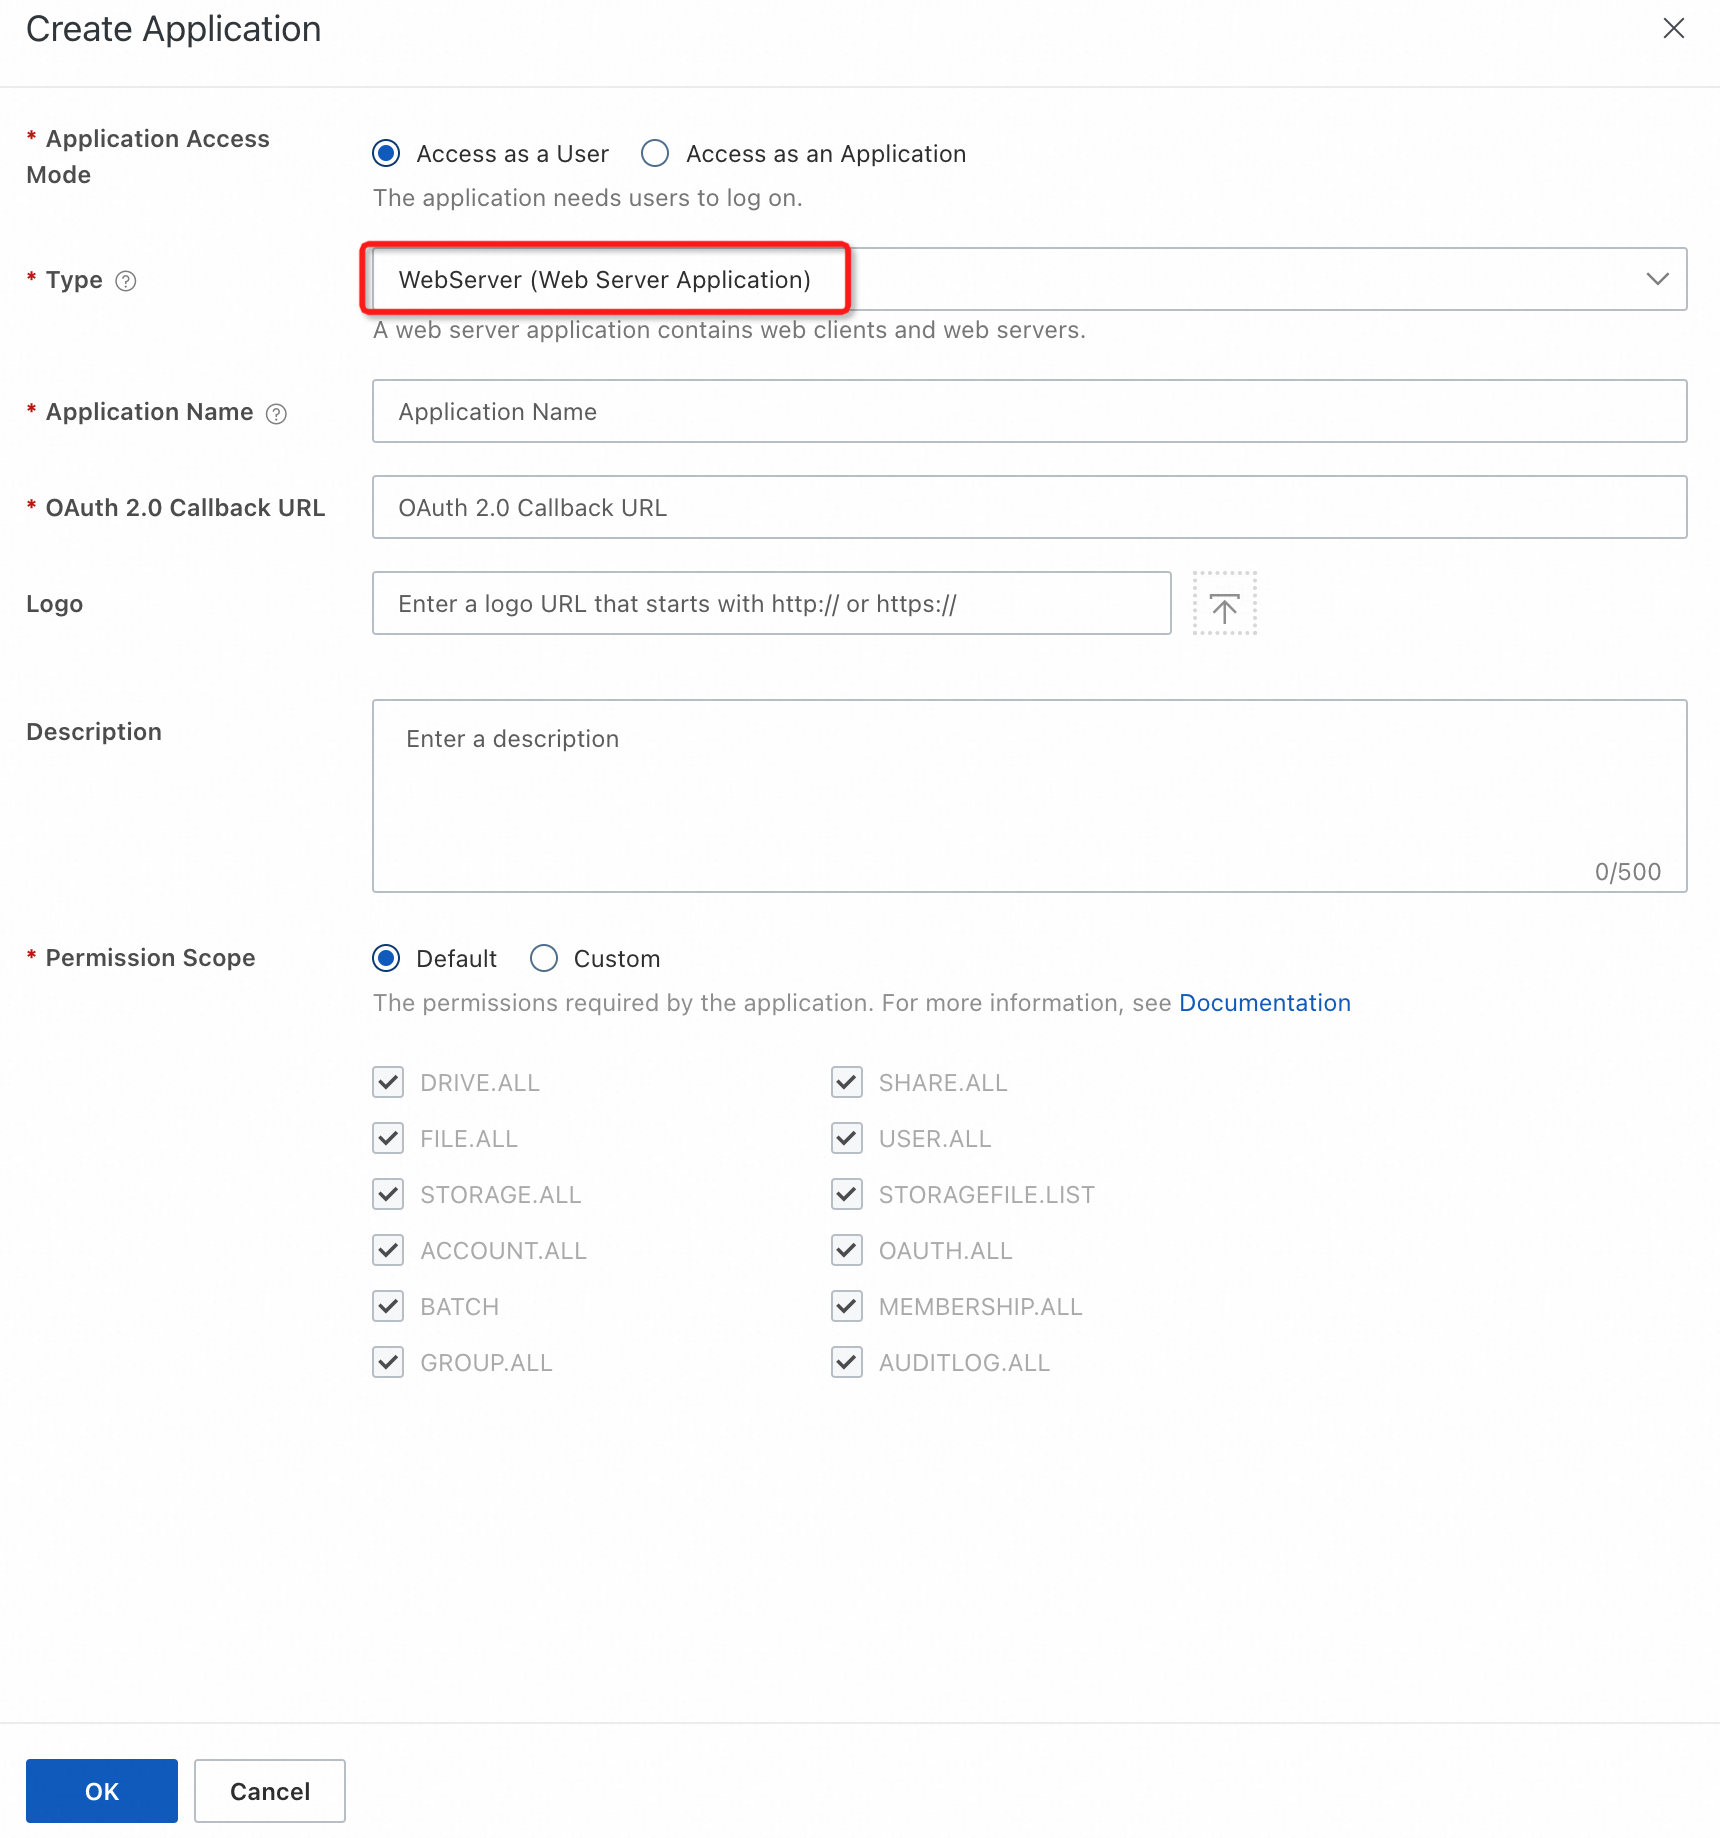
In the application list, view the ID (client_id) and Secret (client_secret) of the application that you created.
ImportantYou must keep the secret confidential.
Step 2: Authorize OAuth 2.0-based logon
Configure the authorization parameters
If a user who has not completed authorization accesses your web server application by using a browser, your application must build a request for authorization. The request includes the client_id of your application and the scopes of permissions. The request is sent from the user to the PDS authorization server, which lets the user grant the required permissions to your application.
Sample request:
GET /v2/oauth/authorize?client_id=<ID>&redirect_uri=<redirect_uri>&login_type=<login_type>&scope=<scope>&response_type=code&state=[state] HTTP/1.1
Host: {domainId}.api.aliyunpds.com
The following table describes the request parameters:
Parameter
Required
Description
client_id
Yes
The application
ID. For information about how to obtain the ID, see Obtain the ID and secret of an application.redirect_uri
Yes
The callback URL, which is the URL to which the request is redirected upon authorization. Example:
https://example.com/callback.After the authorization is successful, the user request is redirected to the URL. The URL carries a one-off verification code, such as
https://example.com/callback?code=xxxx.NoteMake sure that the callback URL matches the OAuth 2.0 callback URL that you specified when you created the application.
scope
No
The scopes that specify the permissions on actions required by your application. The scopes are a subset of the ones that you specified when you created the application and are displayed on the consent page. For more information, see Scopes.
NoteThe permissions represented by the access token are the intersection of the permissions of the user and the permissions that the scopes specify.
response_type
Yes
The response type. Set the value to
code.state
No, but recommended
The state. If the request carries this parameter, the authentication server sends the request back in the same state to prevent Cross Site Request Forgery (CSRF) attacks. Example:
https://example.com/callback?code=xxxx&state=abc.login_type
Yes
The logon option. Valid values:
default: provides a comprehensive logon page that supports mobile number logon and other logon methods.
phone: mobile number logon.
ding: logon with DingTalk.
ldap: logon based on lightweight directory access protocol (LDAP) or Active Directory (AD).
wx: logon with a WeChat account.
ram: logon as a Resource Access Management (RAM) user.
lark: logon with Lark.
saml: logon with a third-party account based on a Security Assertion Markup Language (SAML) protocol.
hide_consent
No
Specifies whether to skip the user authorization page for subsequent logon attempts after the first successful logon. Valid values:
true (default): The authorization page is not displayed. Users proceed right to the next step.
false: The authorization page is displayed.
lang
No
The language in which the page is displayed. Valid values:
zh_CN (default): Simplified Chinese
en_US: English
Consent page
On the consent page, the user can decide whether to grant the permissions to the application. If the user refuses to grant the permissions, the process ends. If the user agrees to grant the permissions, the PDS authorization server redirects the user request to the
redirection URIthat is specified in Step 2.1. Example:https://example.com/callback?code=xxxx&state=abc.Exchange the authorization code for an access token
A web server application contains two parts: frontend and backend. You must configure the redirection URL, such as
https://example.com/callback, on the frontend. After receiving the parameter?code=xxx, the frontend parses the code and pass it to the backend. The backend uses the following method to obtain an access token and returns it to the frontend.Sample request:
POST /v2/oauth/token HTTP/1.1
Host: {domainId}.api.aliyunpds.com
Content-Type: application/x-www-form-urlencoded

code=xxx\
&client_id=your_app_id\
&client_secret=your_app_secret\
&redirect_uri=https://example.com/callback\
&grant_type=authorization_code
Parameter
Required
Description
code
Yes
The one-off authorization
code.client_id
Yes
The application
ID. For information about how to obtain the ID, see Obtain the ID and secret of an application.client_secret
Yes
The
secretthat was generated when you created the application.redirect_uri
Yes
The callback URL, which is the URL to which the request is redirected upon authorization. Example:
https://example.com/callback.NoteMake sure that the callback URL matches the OAuth 2.0 callback URL that you specified when you created the application.
grant_type
Yes
The grant type. Set the value to
authorization_code, which indicates the Authorization Code method.Sample response:
HTTP/1.1 200 OK
Content-Type: application/json

{
  "access_token":"Aiasd76*****",
  "expires_time":"2019-11-11T10:10:10.009Z",
  "expire_in": 7200,
  "token_type":"Bearer",
  "refresh_token":"LSLKdk*******"
}
Parameter
Position
Type
Required
Description
access_token
body
string
Yes
The generated
access token, which is valid for two hours.refresh_token
body
string
Yes
The refresh token that is used to refresh the
access token. In most cases, the validity period of a refresh token is seven days.expires_time
body
string
Yes
The expiration time of the
access token.expire_in
body
long
Yes
The validity period of the
access token. Unit: seconds. Default value: 7200.token_type
body
string
Yes
The token type. The value is
Bearer.Call the PDS API
The web frontend can use the
access tokento call the API operations of PDS. Theaccess tokenmust be included in theAuthorizationheader of API requests.For more information, see Calling methods.
Refresh the access token
Sample request:
POST /v2/oauth/token HTTP/1.1
Host: {domainId}.api.aliyunpds.com
Content-Type: application/x-www-form-urlencoded

refresh_token=xxx\
&client_id=xxx\
&client_secret=xxx\
&grant_type=refresh_token
The following table describes the request parameters:
Parameter | Required | Description |
refresh_token | Yes | The refresh token that is returned when you exchange the authorization code for the access token. |
client_id | Yes | The application |
grant_type | Yes | The grant type. Set the value to |
client_secret | Yes | The secret of the application, which is used to authenticate the application. |
Sample response:
HTTP/1.1 200 OK
Content-Type: application/json

{
  "access_token":"xxxxxxxxx",
  "refresh_token": "xxxxx",
  "expires_in":7200,
  "expire_time":"2019-11-11T10:10:10.009Z",
  "token_type":"Bearer"
}
Parameter | Position | Type | Required | Description |
access_token | body | string | Yes | The generated |
refresh_token | body | string | Yes | The refresh token that is used to refresh the |
expires_time | body | string | Yes | The expiration time of the |
expire_in | body | long | Yes | The validity period of the |
token_type | body | string | Yes | The token type. The value is |
FAQ
References
For information about how to call API operations of PDS Developer Edition, see Calling methods.
For information about how to access PDS from a mobile or desktop application by using OAuth 2.0, see OAuth 2.0 access for mobile and desktop applications.
For information about how to access PDS from a web browser application by using OAuth 2.0, see OAuth 2.0 access for web browser applications.