Designer lets you create custom Python scripts. You can use the Python Script component to install dependency packages and run custom Python functions. This topic describes how to configure the Python Script component and provides usage examples.
Background information
The Python Script component is in the Custom Templates folder of Designer.
Prerequisites
You must grant the required permissions for Deep Learning Containers (DLC). For more information, see Product dependencies and authorizations: DLC.
The Python Script component depends on DLC as its underlying computing resource. You must associate a DLC computing resource with your Workspace. For more information, see Workspace Management.
The Python Script component depends on Object Storage Service (OSS) to store code. You must create an OSS Bucket. For more information, see Create a bucket.
ImportantThe OSS bucket must be in the same region as Designer and DLC.
Assign the Algorithm Developer role to the RAM User who will use this component. For more information, see Manage Workspace Members. If the RAM User also needs to use MaxCompute as a data source, you must also assign the MaxCompute Developer role.
Configure the component in the UI
Input stub
The Python Script component has four input ports. Each port can connect to data from an OSS path or a MaxCompute table.
OSS path input
The system mounts input from an upstream component's OSS path to the node where the Python script runs. The system automatically passes the mounted file path to the Python script as an argument. This is configured automatically. The argument format is
python main.py --input1 /ml/input/data/input1, where--input1represents the OSS path connected to the first input port. In your Python script, you can access the mounted files by reading from the local path/ml/input/data/input1.MaxCompute table input
MaxCompute table input is not mounted. Instead, the system passes the table information as a URI to the Python script as an argument. This is configured automatically. The argument format is
python main.py --input1 odps://some-project-name/tables/table, where--input1represents the MaxCompute table connected to the first input port. For inputs in the MaxCompute URI format, you can use theparse_odps_urlfunction provided in the component's code template to parse metadata such as the project name, table name, and partition. For more information, see Usage examples.
Output ports
The Python Script component has four output ports: two for OSS paths (Output Port 1 and Output Port 2) and two for MaxCompute tables (Table Output Port 1 and Table Output Port 2).
OSS path output
The OSS path specified for the The system automatically mounts the OSS path that you configure for the Job Output Path parameter on the Code config tab to
/ml/output/. The component's output ports OSS Output Port 1 and OSS Output Port 2 correspond to the subdirectories/ml/output/output1and/ml/output/output2, respectively. In your script, you can write files to these directories as if they were local paths. You can then pass this data to downstream components.MaxCompute table output
If the current Workspace is configured with a MaxCompute project, the system automatically passes a temporary table URI to the Python script, for example:
python main.py --output3 odps://<some-project-name>/tables/<output-table-name>. You can use PyODPS to create the table specified in the URI, write the processed data to it, and then pass the table to downstream components. For more information, see the following examples.
Component parameters
Script Settings
Parameter
Description
Task Output Path
Select an OSS path for the task output.
The system mounts the configured OSS directory to the
/ml/output/path of the job container. The system persists data written to the/ml/output/path to the corresponding OSS directory.The component's output ports OSS Output Port 1 and OSS Output Port 2 correspond to the subdirectories
output1andoutput2under the/ml/output/path. When you connect an OSS output port to a downstream component, that component receives data from the corresponding subdirectory.
Set Code Source
(Select one)
Submit in Editor
Python Code: Select the OSS path where the code is saved. Code written in the editor is saved to this path. The Python code file defaults to
main.py.ImportantBefore clicking Save for the first time, make sure that no file with the same name exists in the specified path to prevent the file from being overwritten.
Python Code Editor: The editor provides example code by default. For more information, see Usage examples. You can write code directly in the editor.
Specify Git Configuration
Git repository: The URL of the Git repository.
Code Branch: The code branch. The default value is master.
Code Commit: The commit ID takes precedence over the branch. If you specify this parameter, the branch setting does not take effect.
Git Username: Required to access a private repository.
Git Access Token: Required to access a private repository. For more information, see Appendix: Obtain a token for a GitHub account.
Select Code Configuration
Select Code Configuration: Select a created Code Build. For more information, see Code Configuration.
Code Branch: The code branch. Default value is master.
Code Commit: The commit ID takes precedence over the branch. If you specify this parameter, the branch setting does not take effect.
Select a file or folder from OSS
In OSS Path, select the path where the code is uploaded.
Execution Command
Enter the command that you want to run, such as
python main.py.NoteThe system automatically generates the command based on the script name and the connections of the component's input and output ports. You do not need to configure this parameter manually.
Advanced Options
Third-party Dependency Libraries: In the text box, you can install third-party libraries. The format is the same as a Python
requirements.txtfile. The system automatically installs these libraries before the node runs.cycler==0.10.0 # via matplotlib kiwisolver==1.2.0 # via matplotlib matplotlib==3.2.1 numpy==1.18.5 pandas==1.0.4 pyparsing==2.4.7 # via matplotlib python-dateutil==2.8.1 # via matplotlib, pandas pytz==2020.1 # via pandas scipy==1.4.1 # via seabornEnable Fault Tolerance Monitoring: If you select this parameter, a text box for Error Monitoring appears. In the text box, you can add parameters to specify the content for error monitoring.
Execution Settings
Parameter
Description
Select Resource Group
You can select a public DLC Resource Group::
If you select a public resource group, set the Select Machine Instance Type parameter. You can select CPU or GPU machine instances. The default value is ecs.c6.large.
This defaults to the DLC native resource group in the current Workspace.
VPC Configuration
Select a Virtual Private Cloud (VPC) to mount.
Security Group
Select a security group to mount.
Advanced Options
If you select this parameter, you can configure the following parameters:
Instance Count: Specify the number of instances based on your business requirements. Default value: 1.
Job Image URI: The default value is the open source XGBoost 1.6.0. To use a deep learning framework, you must change the image.
Job Type: Modify this parameter only if your code is designed for distributed execution. Valid values:
XGBoost/LightGBM Job
TensorFlow Job
PyTorch Job
MPI Job
Usage examples
Default code template
The Python script component provides the following default code template.
import os
import argparse
import json

""" Example code for the Python V2 component. """

# Default MaxCompute execution environment in the current Workspace, including the MaxCompute project name and endpoint.
# Injected into the job's execution environment only when a MaxCompute project exists in the current Workspace.
# Example: {"endpoint": "http://service.cn.maxcompute.aliyun-inc.com/api", "odpsProject": "lq_test_mc_project"}.
ENV_JOB_MAX_COMPUTE_EXECUTION = "JOB_MAX_COMPUTE_EXECUTION"


def init_odps():
    from odps import ODPS

    # Information about the default MaxCompute project in the current Workspace.
    mc_execution = json.loads(os.environ[ENV_JOB_MAX_COMPUTE_EXECUTION])
    o = ODPS(
        access_id="<YourAccessKeyId>",
        secret_access_key="<YourAccessKeySecret>",
        # Select the endpoint based on the Region where your project is located, for example: http://service.cn-shanghai.maxcompute.aliyun-inc.com/api.
        endpoint=mc_execution["endpoint"],
        project=mc_execution["odpsProject"],
    )
    return o


def parse_odps_url(table_uri):
    from urllib import parse

    parsed = parse.urlparse(table_uri)
    project_name = parsed.hostname
    r = parsed.path.split("/", 2)
    table_name = r[2]
    if len(r) > 3:
        partition = r[3]
    else:
        partition = None
    return project_name, table_name, partition


def parse_args():
    parser = argparse.ArgumentParser(description="PythonV2 component script example.")
    parser.add_argument("--input1", type=str, default=None, help="Component input port 1.")
    parser.add_argument("--input2", type=str, default=None, help="Component input port 2.")
    parser.add_argument("--input3", type=str, default=None, help="Component input port 3.")
    parser.add_argument("--input4", type=str, default=None, help="Component input port 4.")
    parser.add_argument("--output1", type=str, default=None, help="Output OSS port 1.")
    parser.add_argument("--output2", type=str, default=None, help="Output OSS port 2.")
    parser.add_argument("--output3", type=str, default=None, help="Output MaxComputeTable 1.")
    parser.add_argument("--output4", type=str, default=None, help="Output MaxComputeTable 2.")
    args, _ = parser.parse_known_args()
    return args


def write_table_example(args):
    # Example: Copy data from a public PAI table by running an SQL statement and use it as the temporary table specified for Table Output Port 1.
    output_table_uri = args.output3
    o = init_odps()
    project_name, table_name, partition = parse_odps_url(output_table_uri)
    o.run_sql(f"create table {project_name}.{table_name} as select * from pai_online_project.heart_disease_prediction;")


def write_output1(args):
    # Example: Write the result data to the mounted OSS path (a subdirectory of OSS Output Port 1). The result can then be passed to downstream components.
    output_path = args.output1
    os.makedirs(output_path, exist_ok=True)
    p = os.path.join(output_path, "result.text")
    with open(p, "w") as f:
        f.write("TestAccuracy=0.88")


if __name__ == "__main__":
    args = parse_args()
    print("Input1={}".format(args.input1))
    print("Output1={}".format(args.output1))

    # write_table_example(args)
    # write_output1(args)
Function descriptions:
init_odps(): Initializes an ODPS instance to read MaxCompute table data. You must provide your AccessKeyId and AccessKeySecret. For more information about how to obtain an AccessKey, see Obtain an AccessKey.parse_odps_url(table_uri): Parses the URI of an input MaxCompute table and returns the project name, table name, and partition. Thetable_uriformat isodps://${your_projectname}/tables/${table_name}/${pt_1}/${pt_2}/. For example, inodps://test/tables/iris/pa=1/pb=1,pa=1/pb=1is a multi-level partition.parse_args(): Parses the arguments passed to the script. Input and output data are passed to the script as command-line arguments.
Example 1: Use the Python Script component in series with other components
This example modifies the heart disease prediction template to show how to connect the Python script component with other Machine Learning Designer components. 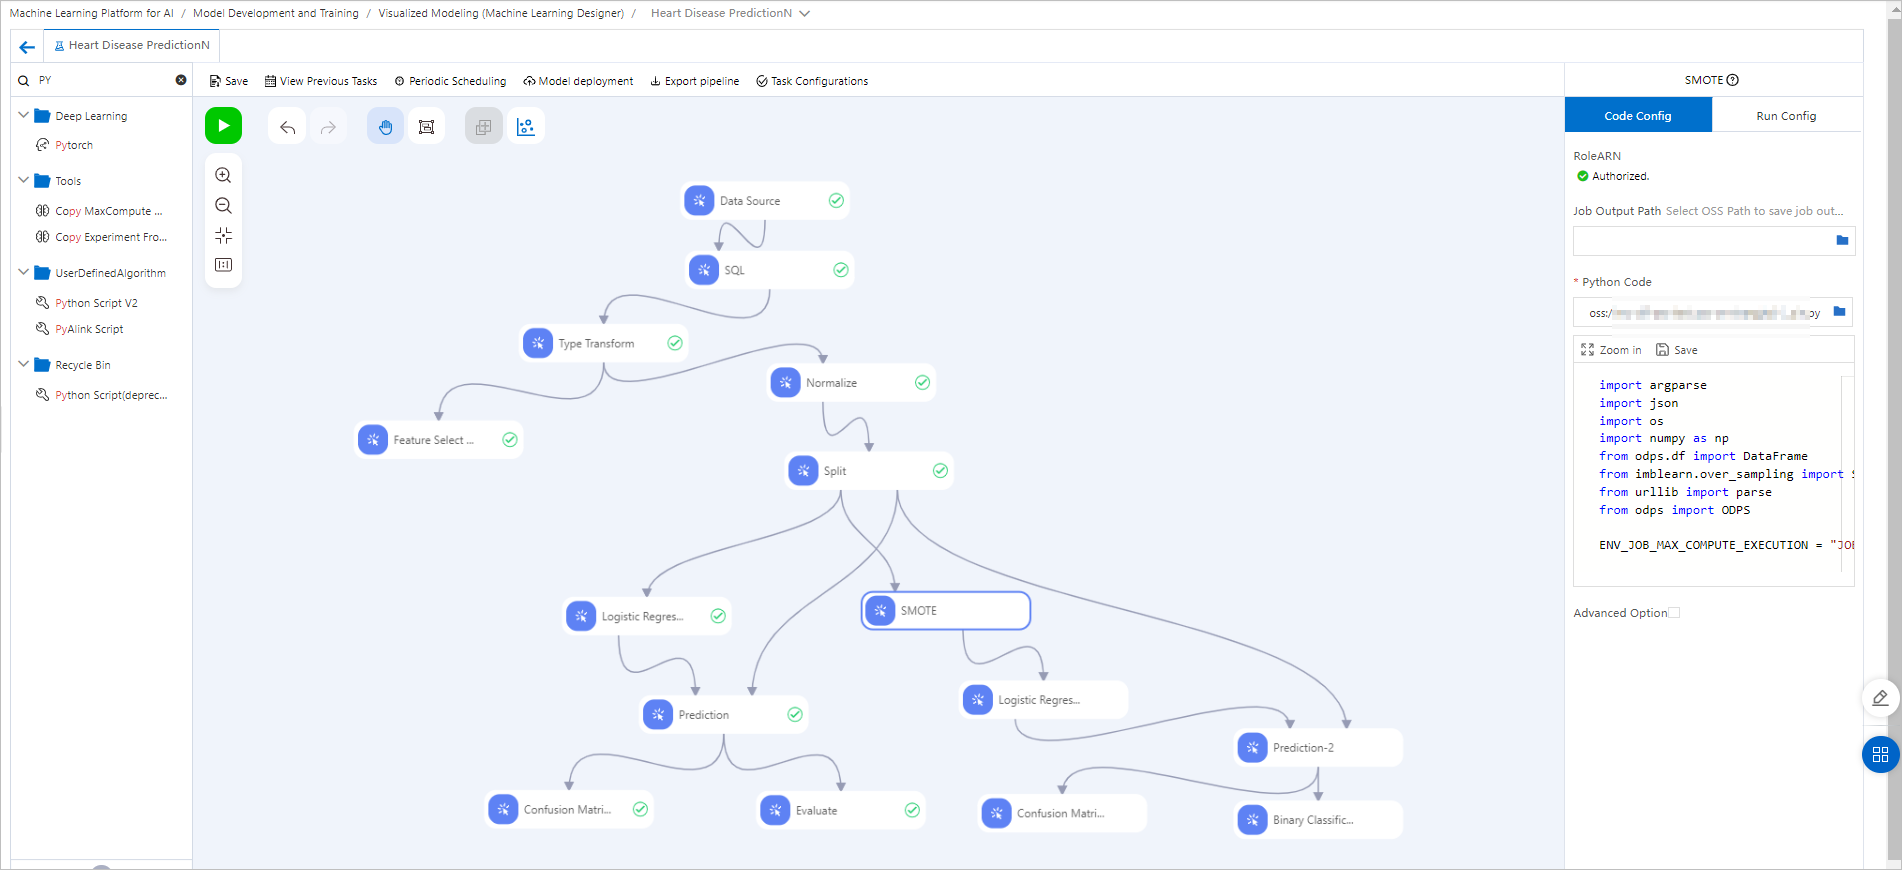 Pipeline configuration:
Create a heart disease prediction pipeline and go to the pipeline designer. For more information, see Heart disease prediction.
Drag the Python Script component to the canvas, rename it to SMOTE, and configure the following code.
ImportantThe
imblearnlibrary is not included in the default image. You must configureimblearnin the Third-party Dependencies field on the Code config tab of the component. The library is automatically installed before the node runs.import argparse import json import os from odps.df import DataFrame from imblearn.over_sampling import SMOTE from urllib import parse from odps import ODPS ENV_JOB_MAX_COMPUTE_EXECUTION = "JOB_MAX_COMPUTE_EXECUTION" def init_odps(): # Information about the default MaxCompute project in the current Workspace. mc_execution = json.loads(os.environ[ENV_JOB_MAX_COMPUTE_EXECUTION]) o = ODPS( access_id="<YourAccessKeyId>", secret_access_key="<YourAccessKeySecret>", # Select the endpoint based on the Region where your project is located, for example: http://service.cn-shanghai.maxcompute.aliyun-inc.com/api. endpoint=mc_execution["endpoint"], project=mc_execution["odpsProject"], ) return o def get_max_compute_table(table_uri, odps): parsed = parse.urlparse(table_uri) project_name = parsed.hostname table_name = parsed.path.split('/')[2] table = odps.get_table(project_name + "." + table_name) return table def run(): parser = argparse.ArgumentParser(description='PythonV2 component script example.') parser.add_argument( '--input1', type=str, default=None, help='Component input port 1.' ) parser.add_argument( '--output3', type=str, default=None, help='Component input port 1.' ) args, _ = parser.parse_known_args() print('Input1={}'.format(args.input1)) print('output3={}'.format(args.output3)) o = init_odps() imbalanced_table = get_max_compute_table(args.input1, o) df = DataFrame(imbalanced_table).to_pandas() sm = SMOTE(random_state=2) X_train_res, y_train_res = sm.fit_resample(df, df['ifhealth'].ravel()) new_table = o.create_table(get_max_compute_table(args.output3, o).name, imbalanced_table.schema, if_not_exists=True) with new_table.open_writer() as writer: writer.write(X_train_res.values.tolist()) if __name__ == '__main__': run()You must replace
<YourAccessKeyId>and<YourAccessKeySecret>with your own AccessKey ID and AccessKey secret. For more information about how to obtain an AccessKey, see Obtain an AccessKey.Connect the SMOTE component downstream of the Split component. This step applies the classic SMOTE algorithm to oversample the training data from the Split component. This synthesizes new samples for the minority class in the training set to mitigate class imbalance.
Connect the new data from the SMOTE component to the Logistic Regression for Binary Classification component for training.
Connect the trained Model to the same prediction data and evaluation components as the Model in the left branch for a side-by-side comparison. After the components run successfully, click the
 icon to go to the visualization page and view the final evaluation results.
Example 2: Orchestrate DLC Jobs with Machine Learning Designer
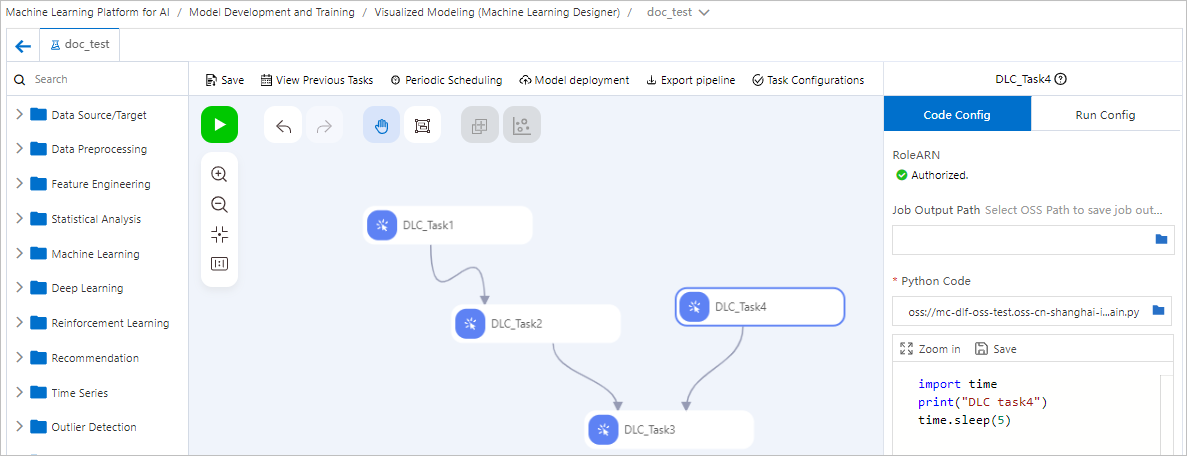
You can connect multiple custom Python script components in Machine Learning Designer to orchestrate a pipeline of DLC jobs and enable periodic scheduling. The following figure shows an example that starts four DLC Jobs in the sequence of a directed acyclic graph (DAG).
If the execution code of a DLC job does not need to read data from upstream nodes or pass data to downstream nodes, the connections between nodes represent only the execution dependency and sequence.
 You can then deploy the entire pipeline developed in Machine Learning Designer to DataWorks with a single click for periodic scheduling. For more information, see Use DataWorks for offline scheduling of Designer workflows.
Example 3: Pass Global Variables to a Python Script component
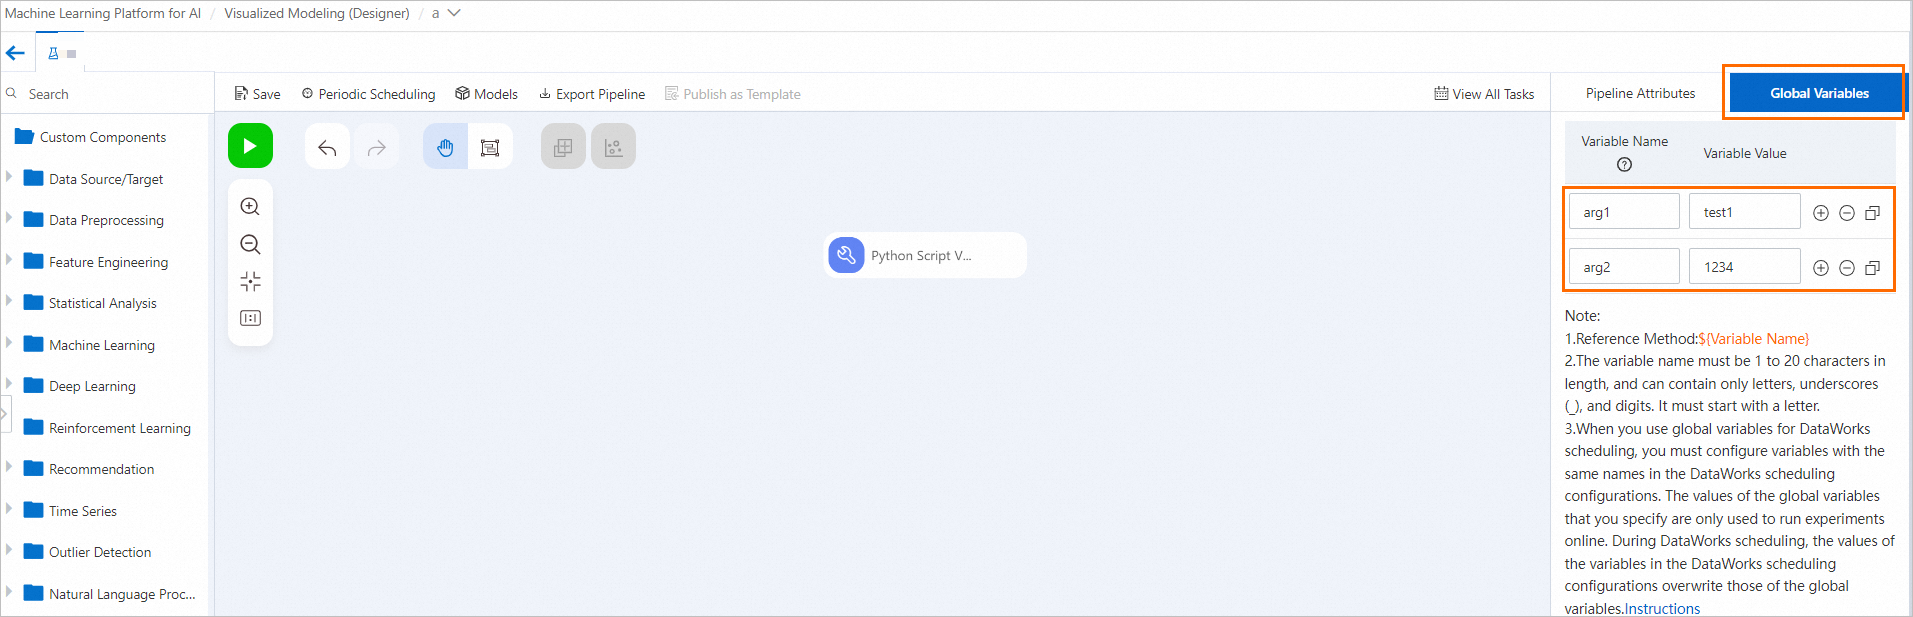
Configure a global variable.
On the Machine Learning Designer pipeline page, click the blank canvas and configure a Global Variables tab on the right.
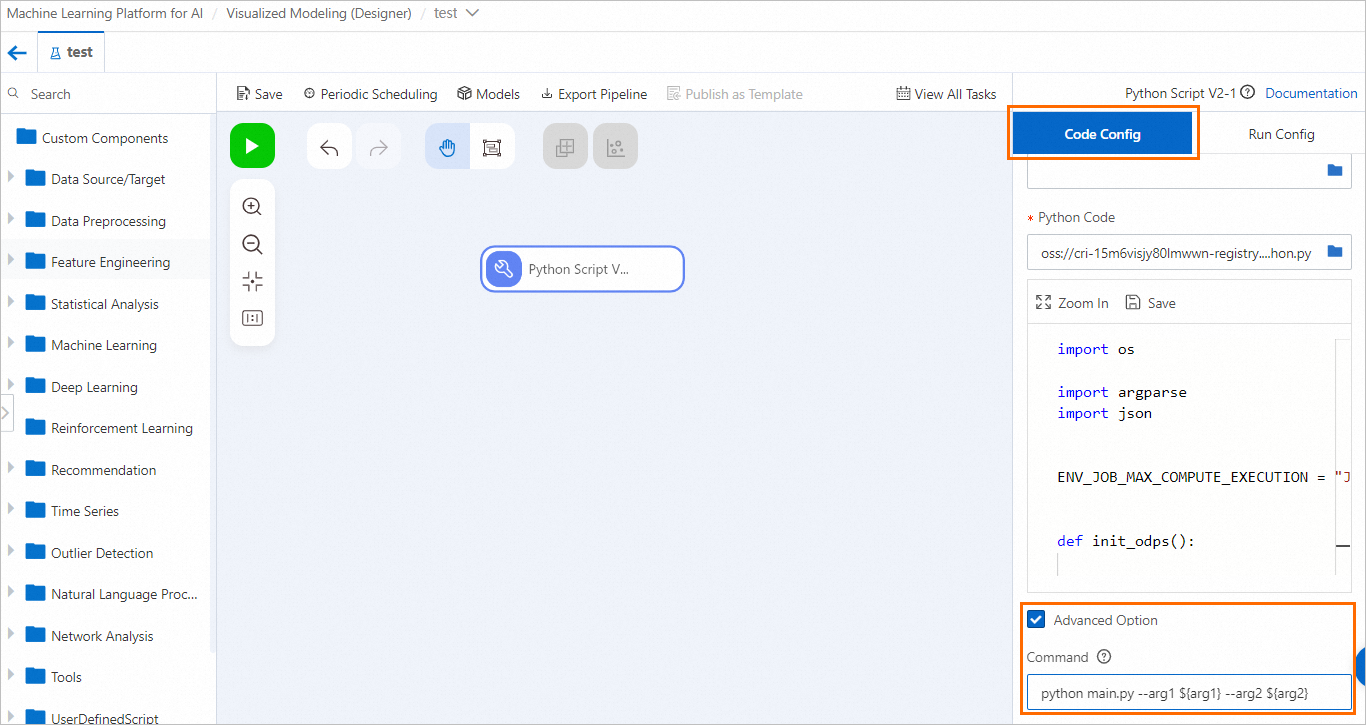
Use one of the following methods to pass the configured Global Variable to the Python Script component.
Click the Python Script component. On the Code config tab, select Advanced Option and configure the Global Variable as an input parameter in the Command field.
Modify the Python code to parse the arguments using
argparser.The following code is an updated example based on the Global Variable configured in Step 1. You must update the code according to your actual Global Variable configuration. You can then replace the code in the code editor on the Code config tab of the Python Script component.
import os

import argparse
import json

"""
Python V2 component sample code
"""

ENV_JOB_MAX_COMPUTE_EXECUTION = "JOB_MAX_COMPUTE_EXECUTION"


def init_odps():

    from odps import ODPS

    mc_execution = json.loads(os.environ[ENV_JOB_MAX_COMPUTE_EXECUTION])

    o = ODPS(
        access_id="<YourAccessKeyId>",
        secret_access_key="<YourAccessKeySecret>",
        endpoint=mc_execution["endpoint"],
        project=mc_execution["odpsProject"],
    )
    return o


def parse_odps_url(table_uri):
    from urllib import parse

    parsed = parse.urlparse(table_uri)
    project_name = parsed.hostname
    r = parsed.path.split("/", 2)
    table_name = r[2]
    if len(r) > 3:
        partition = r[3]
    else:
        partition = None
    return project_name, table_name, partition


def parse_args():
    parser = argparse.ArgumentParser(description="PythonV2 component script example.")

    parser.add_argument("--input1", type=str, default=None, help="Component input port 1.")
    parser.add_argument("--input2", type=str, default=None, help="Component input port 2.")
    parser.add_argument("--input3", type=str, default=None, help="Component input port 3.")
    parser.add_argument("--input4", type=str, default=None, help="Component input port 4.")

    parser.add_argument("--output1", type=str, default=None, help="Output OSS port 1.")
    parser.add_argument("--output2", type=str, default=None, help="Output OSS port 2.")
    parser.add_argument("--output3", type=str, default=None, help="Output MaxComputeTable 1.")
    parser.add_argument("--output4", type=str, default=None, help="Output MaxComputeTable 2.")
    # Add code based on the configured global variables.
    parser.add_argument("--arg1", type=str, default=None, help="Argument 1.")
    parser.add_argument("--arg2", type=int, default=None, help="Argument 2.")
    args, _ = parser.parse_known_args()
    return args


def write_table_example(args):

    output_table_uri = args.output3

    o = init_odps()
    project_name, table_name, partition = parse_odps_url(output_table_uri)
    o.run_sql(f"create table {project_name}.{table_name} as select * from pai_online_project.heart_disease_prediction;")


def write_output1(args):
    output_path = args.output1

    os.makedirs(output_path, exist_ok=True)
    p = os.path.join(output_path, "result.text")
    with open(p, "w") as f:
        f.write("TestAccuracy=0.88")


if __name__ == "__main__":
    args = parse_args()

    print("Input1={}".format(args.input1))
    print("Output1={}".format(args.output1))
    # Add code based on the configured global variables.
    print("Argument1={}".format(args.arg1))
    print("Argument2={}".format(args.arg2))
    # write_table_example(args)
    # write_output1(args)