This topic describes how to build an infrastructure environment for edge nodes.ENS You can learn about how to create virtual private clouds (VPCs) and vSwitches on an edge node, how to create computing instances, how to use Edge Load Balancer (ELB) to distribute traffic, and how to use SNAT and edge IP addresses (EIPs) for traffic proxy.ENS Cloud Architect Design Tools (CADT) is available in this deployment solution.
Prerequisites
An Alibaba Cloud account is created and real-name verification is completed. You can log on to the Alibaba Cloud console and go to the Account Center page to check whether real-name verification has been completed.
Procedure
Activate ENS
Activate the service
Go to the ENS homepage, click Contact Sales, fill in the ENS Enquiry Form, and submit. You can also contact your business manager to activate ENS.
Configure resources
Contact your account manager to configure necessary resources and edge nodes before sales.
Grant RAM users permissions
An Alibaba Cloud account has access permissions on all API operations. We recommend that you use a Resource Access Management (RAM) user to call specific API operations or perform routine O&M.
Log on to the RAM console.
In the left-side navigation pane, choose .
On the Users page, click Create User.
On the Create User page, specify the Logon Name and Display Name parameters, and set the Access Mode parameter to Console Access.
Click OK.
After you create a RAM user, record the logon name and password of the RAM user. When you call API operations, you must use the RAM user to log on to OpenAPI Explorer.
Grant the required permissions to the RAM user.
Access the RAM user list.
On the Users page, find the RAM user and click Add Permissions in the Actions column.
Enter
ENSin the search box and select the AliyunENSFullAccess and AliyunCADTFullAccess policies.
Click Grant permissions.
Create a VPC and a vSwitch
You can specify the internal CIDR block and vSwitch to create a VPC and a vSwitch based on the network planning.
Log on to the ENS console.
In the left-side navigation pane, choose .
On the Networks page, click Create Network.
On the Create Network page, configure the Network and vSwitch sections.
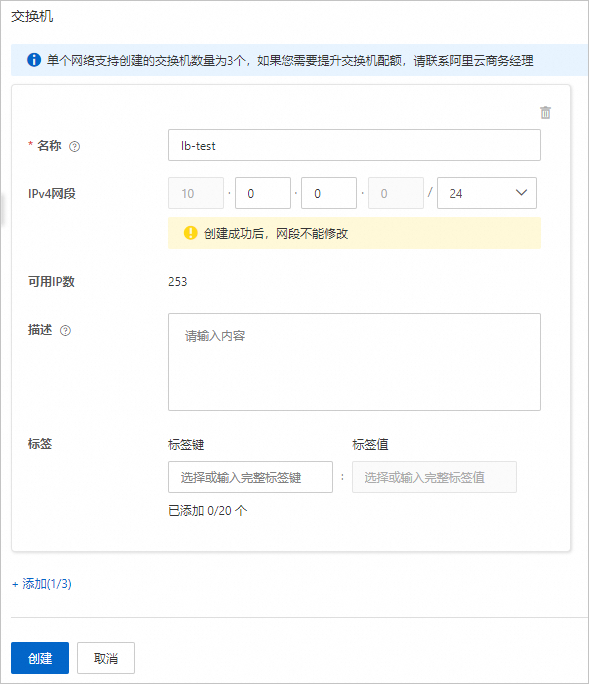

Confirm the information and click Create.
Create an ENS instance
Log on to the ENS console.
In the left-side navigation pane, choose .
On the Instances page, click Create Instance. For more information, see Create an instance.
NoteWhen you create an instance, select the network and vSwitch created in the preceding steps.

After you complete the payment, you can view the instance on the Instances page.
Use an ELB instance to distribute traffic
Create an edge load balancer (ELB) instance.
NoteWhen you create an ELB instance, make sure that it is in the same region as the created ENS instance.
Log on to the ENS console.
In the left-side navigation pane, choose .
On the CLB page, click Create Instance.

Configure the parameters and click Confirm.
On the CLB page, view the created ELB instance and make sure that the ELB instance is in the Running state.

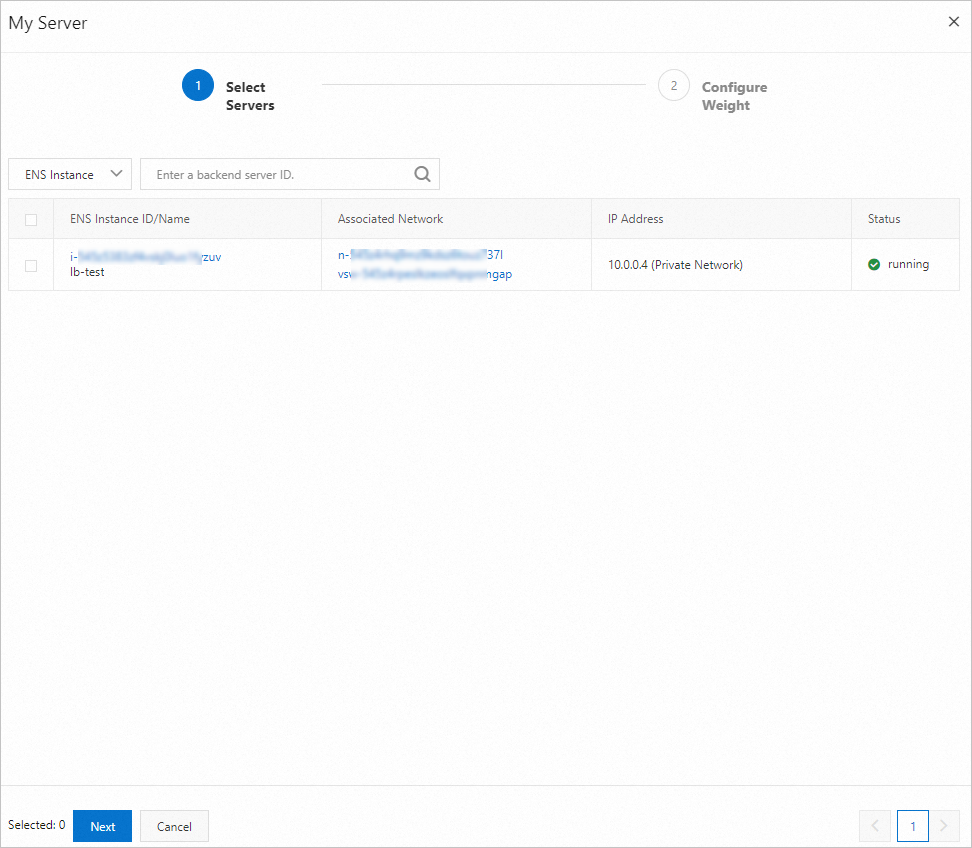
Configure a backend server for the ELB instance.
On the CLB page, find the ELB instance that you want to manage and click Add Backend Server in the Actions column.
On the Default Server Group tab, click Add, configure the parameters, and then click Next.
Configure the weight for the backend server and click Add.
NoteAn ENS instance that has a higher weight receives more requests.
Associate an edge EIP with the ELB instance. For more information, see Associate an EIP.
On the CLB page, choose
 > Associate Public IP Address in the Actions column.
 In the dialog box that appears, select the edge EIP that you created and click OK. If you have not created an EIP, create one. For more information, see Create and manage edge EIPs.
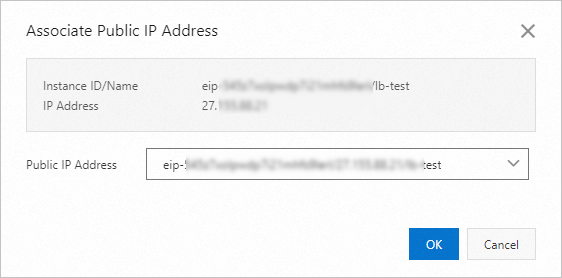
If a public IP address is displayed in the Service Address column of the ELB instance, the edge EIP is associated.

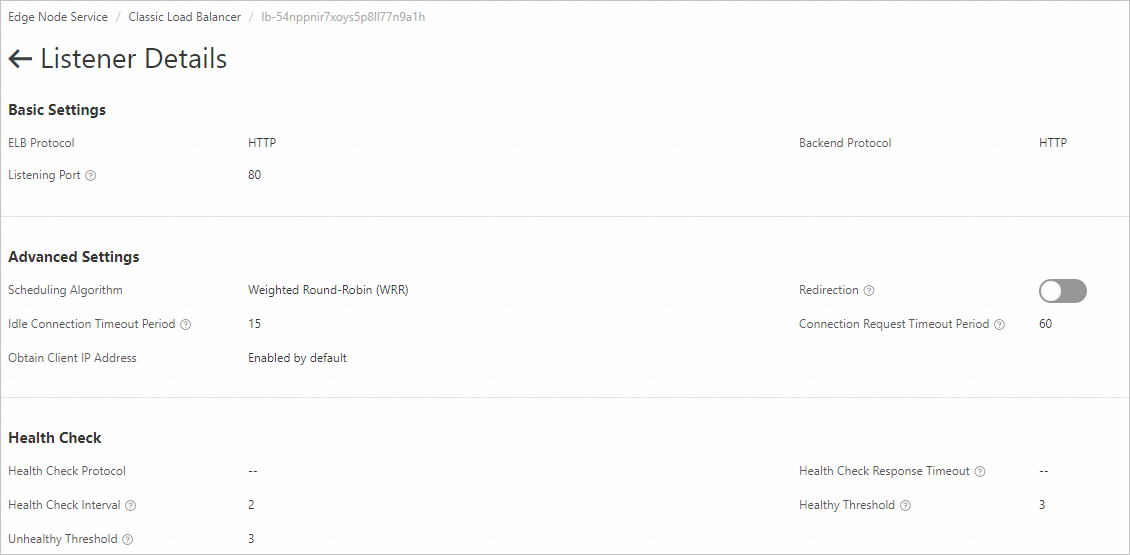
Configure a listener for the ELB instance. For more information, see Configure a listener.
On the CLB page, click Listener Configuration in the Actions section.
On the Listener tab, click Add Listener.
In the Basic Information step, configure the parameters and click Next.
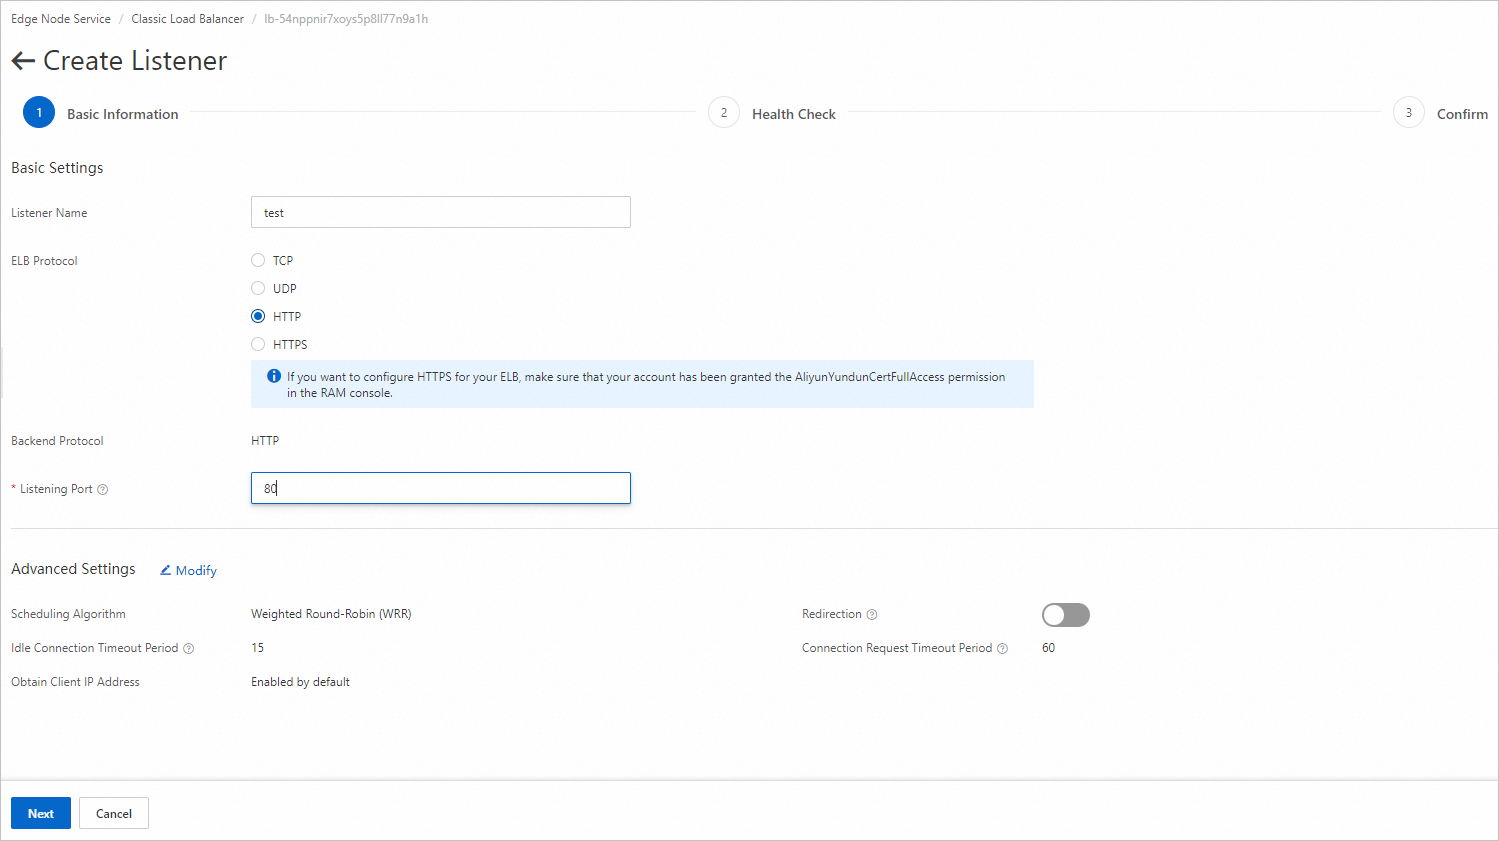
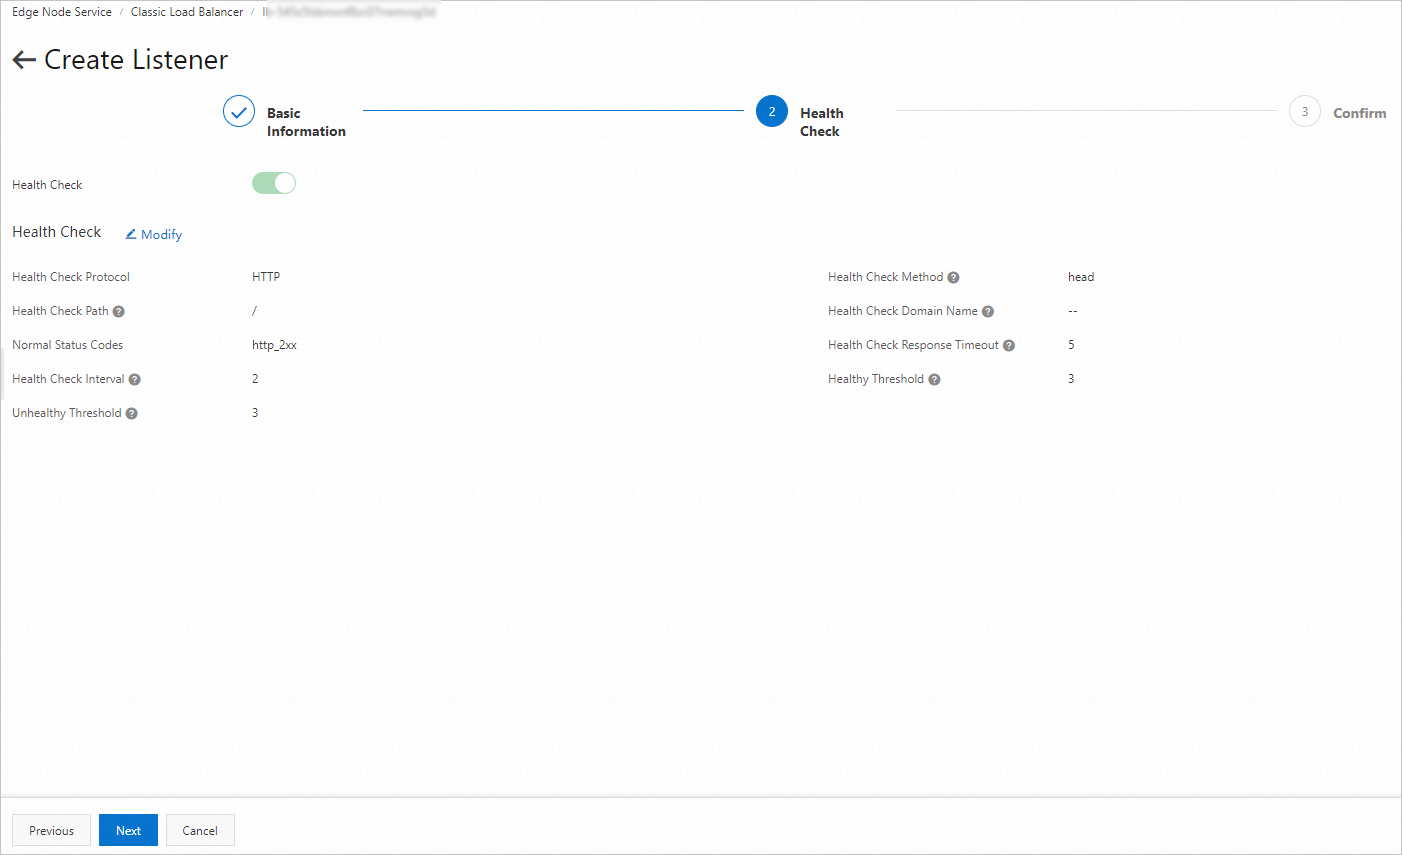
In the Health Check step, configure the health check parameters and click Next.
In the Confirm step, confirm the information and click Create.
Verify that Internet traffic can be distributed to the ENS instance by the ENS.
Prepare the Go environment.
Update the system package list and install Go.
# Update the package list for Debian- or Ubuntu-based OSs. Skip this command for other distributions.
sudo apt-get update

# Use the package management tool to install Go.
# For Debian- or Ubuntu-based OSs:
sudo apt-get install golang
# For Red Hat or CentOS-based OSs:
sudo yum install golang
Verify the installation.
go version

# The system displays information similar to the following content:
go version go1.18.3 linux/amd64
Configure environment variables:
Edit the
~/.profileor~/.bashrcfile and add the path of Go to thePATHenvironment variable.echo 'export PATH=$PATH:/usr/local/go/bin' >> ~/.profile source ~/.profile # Or echo 'export PATH=$PATH:/usr/local/go/bin' >> ~/.bashrc source ~/.bashrcCreate a working directory.
We recommend creating a working directory for better organization of your Go projects. Example:
~/go.mkdir -p ~/go/{bin,src,pkg} echo 'export GOPATH=~/go' >> ~/.profile echo 'export PATH=$PATH:$GOPATH/bin' >> ~/.profile source ~/.profile # Or echo 'export GOPATH=~/go' >> ~/.bashrc echo 'export PATH=$PATH:$GOPATH/bin' >> ~/.bashrc source ~/.bashrc
Deploy a simple web service on the ENS instance. You can access the service through local port 8080 and obtain a response.
package main

import (
    "fmt"
    "net/http"
)

func helloHandler(w http.ResponseWriter, r *http.Request) {
    fmt.Fprintf(w, "Hello\n")
}

func main() {
    http.HandleFunc("/", helloHandler)
    fmt.Println("Starting server on :8080")
    if err := http.ListenAndServe(":8080", nil); err != nil {
        fmt.Println(err)
    }
}
Run the following command to compile the preceding code and run it in the background.
go build -o webserver main.go
nohup ./webserver &
Access the service through the local port 8080 port to verify that the service is running as expected.
curl http://127.0.0.1:8080/
Deploy Nginx on the ENS instance and modify the Nginx configurations.
Install and start Nginx. In this example, CentOS is used as an example.
sudo yum install epel-release
sudo yum install nginx

sudo systemctl start nginx
Edit nginx.conf to forward requests to different service addresses to different service ports. In most cases, the configuration file locates in /etc/nginx/nginx.conf or /etc/nginx/sites-available/default.
According to the previous configuration, the listening port and the backend server listening port of the ELB instance are both 80.
Add the following segment to nginx.conf so that the backend server listens to requests from the EIP associated with the ELB instance to port 80 and forwards the requests to the local port 8080.
server {
    listen 80; # Listen to port 80.
    server_name your_domain_or_ip; # Replace your_domain_or_ip with your domain name or IP address.

    location / {
        proxy_pass http://127.0.0.1:8080; # Forward the request to the local port 8080.
        proxy_set_header Host $host;
        proxy_set_header X-Real-IP $remote_addr;
        proxy_set_header X-Forwarded-For $proxy_add_x_forwarded_for;
        proxy_set_header X-Forwarded-Proto $scheme;
    }
}
Verify that the modified configuration is syntactically correct.
sudo nginx -t

# If the following content is returned, the syntax verification is passed.
nginx: the configuration file /etc/nginx/nginx.conf syntax is ok
nginx: configuration file /etc/nginx/nginx.conf test is successful
Restart Nginx for the updated configuration to take effect.
sudo systemctl reload nginx
Run the
curlcommand to access<EIP>:80over Internet to verify whether the service can be accessed.
Use a NAT gateway to allow an ENS instance to access the Internet
Create a NAT gateway. For more information, see Create and manage edge NAT gateways.
In the left-side navigation pane, choose .
On the NAT Gateways page, click Create NAT Gateway to create a NAT gateway on the same node as the ELB instance.
Associate an edge EIP to the NAT gateway. Then, the edge EIP is used to access the Internet, which corresponds to the SNAT entry, and is used to be accessed from the Internet, which corresponds to the DNAT entry.
Associate an EIP with the NAT gateway.
In the Actions column, choose
 > Associate Public IP Address.
 In the dialog box that appears, select the edge EIP and click OK.
 Note
NoteBefore you associate a public IP address, make sure that you have created an edge EIP on the same node.
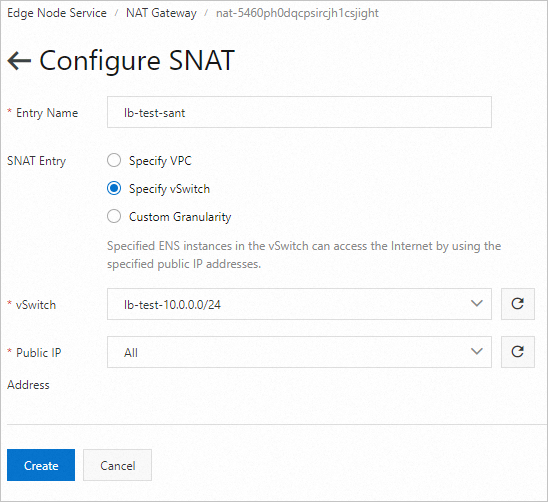
Configure a SNAT entry for the NAT gateway.
In the Actions column, choose
> Configure SNAT. On the Configure SNAT page, configure the parameters and click OK.
Verify that the NAT gateway can be used to access the Internet.
Run the dig command.
 Note
NoteDo not run the ping command to test the connectivity. Using the ping command to access the Internet may fail if you do not perform additional configurations. Reasons:
ENS security groups contain different inbound rules by default. If an instance is added to a security group and no allow rules are configured for the instance, the response packet of the ping command is blocked.
NAT gateways of ENS do not provide the session persistence feature for the ICMP protocol.