You can use Remote Desktop Connection, also known as Microsoft Terminal Services Client (MSTSC), which is a built-in Windows tool, on an on-premises Windows computer to connect to a Windows Elastic Compute Service (ECS) instance and upload files to the instance. You can also use Windows App, a remote connection tool suitable for macOS, on an on-premises macOS computer to connect to a Windows ECS instance and upload files to the instance. This topic describes how to use Remote Desktop Connection or Windows App on an on-premises Windows or macOS computer to upload files to a Windows ECS instance.
Tools
Remote Desktop Connection on an on-premises Windows computer
Remote Desktop Connection is a built-in Windows tool for uploading files from an on-premises Windows computer to a Windows ECS instance.
Limits
On-premises operating system
Instance network configuration
File size
Transfer speed
Maximum number of files
On-premises operating system
Instance network configuration
File size
Transfer speed
Maximum number of files
Windows
The Windows ECS instance is associated with a static public IP address (public IP address that is automatically assigned) or an elastic IP address (EIP).
None
None
None
Windows App on an on-premises macOS computer
Windows App is a remote connection tool developed by Microsoft for Windows. After you download and install Windows App on an on-premises macOS computer, you can use Windows App to transfer files to a Windows ECS instance.
Limits
On-premises operating system
Instance network configuration
File size
Transfer speed
Maximum number of files
On-premises operating system
Instance network configuration
File size
Transfer speed
Maximum number of files
macOS
The Windows ECS instance is associated with a static public IP address or an EIP.
None
None
None
Preparations
Check the status of a Windows ECS instance. The operations described in this topic can be performed on a Windows ECS instance only if the instance is in the Running state.
Obtain the public IP address of the Windows ECS instance. The public IP address of the Windows ECS instance is required to connect to the instance and perform the operations described in this topic.
Check the security groups of the Windows ECS instance. Before you can use Remote Desktop Connection or Windows App to transfer files to the Windows ECS instance, check that the Remote Desktop Protocol (RDP) port is open in a security group of the instance. The default RDP port is port 3389.
Use Remote Desktop Connection to transfer files between an on-premises Windows computer and a Windows ECS instance
If your on-premises computer runs Windows, you can use Remote Desktop Connection to connect to a Windows ECS instance and upload files to the instance.
If you want to upload a large file or a large number of files to a Windows ECS instance, compress the files into a compressed package and then upload the package to the instance. This improves transfer efficiency. For more information, see Compress and upload files.
Step 1: Use Remote Desktop Connection to connect to a Windows ECS instance and redirect an on-premises drive
Press Windows logo key+R to open the Run dialog box. Enter
mstscand press the Enter key to start Remote Desktop Connection.In the Remote Desktop Connection dialog box, perform the following steps to connect to a Windows ECS instance:
Click Show Options.

On the General tab, configure the following parameters:
Computer: Enter the static public IP address or EIP of the Windows ECS instance.
User name: Enter a username. The default username is Administrator.
On the Local Resources tab, select Clipboard and click More.
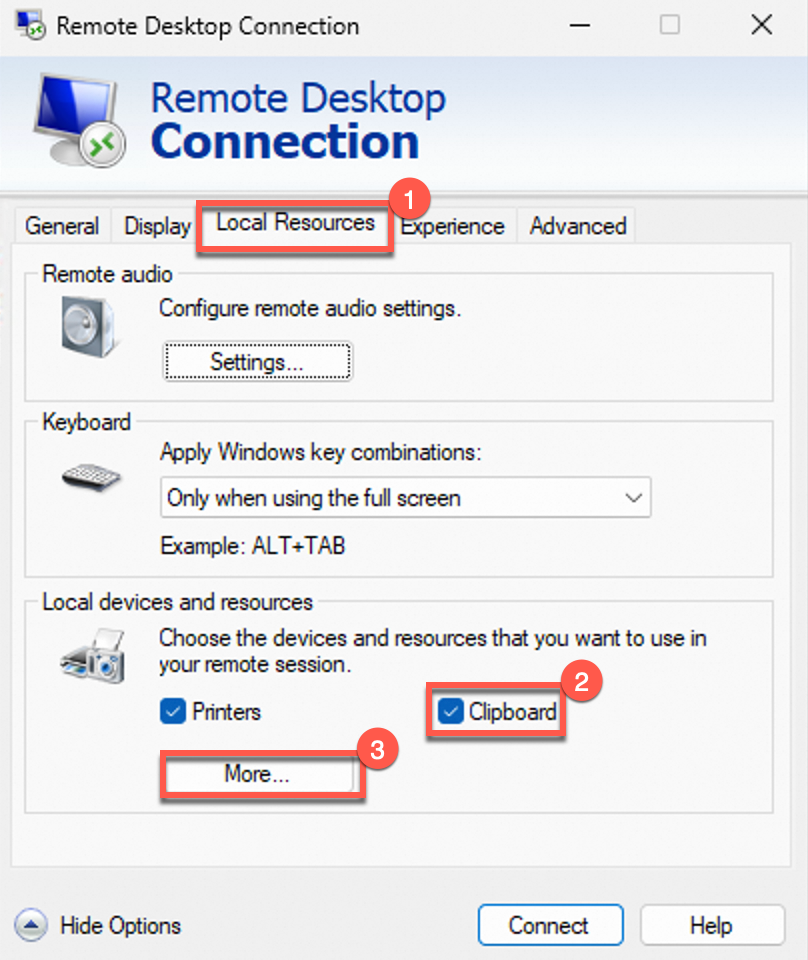
Select the disk under Drives on which the file that you want to upload is stored, and click OK.

Click Connect to connect to the Windows ECS instance. The desktop of the instance is displayed.
Step 2: Upload or download a file
After you connect to the Windows ECS instance, you can find the redirected drive of your on-premises computer in This Computer on the instance. Double-click the redirected drive to access the disk on your on-premises computer. Then, you can move files between the on-premises disk and a directory on the instance to upload or download files between the instance and your on-premises computer.
Double-click the redirected drive on the Windows ECS instance to access the disk on your on-premises computer

Upload a file from your on-premises computer to the Windows ECS instance
To upload a file from your on-premises computer to the Windows ECS instance, press Ctrl+C and Ctrl+V to copy the file from your on-premises computer to the Windows ECS instance.
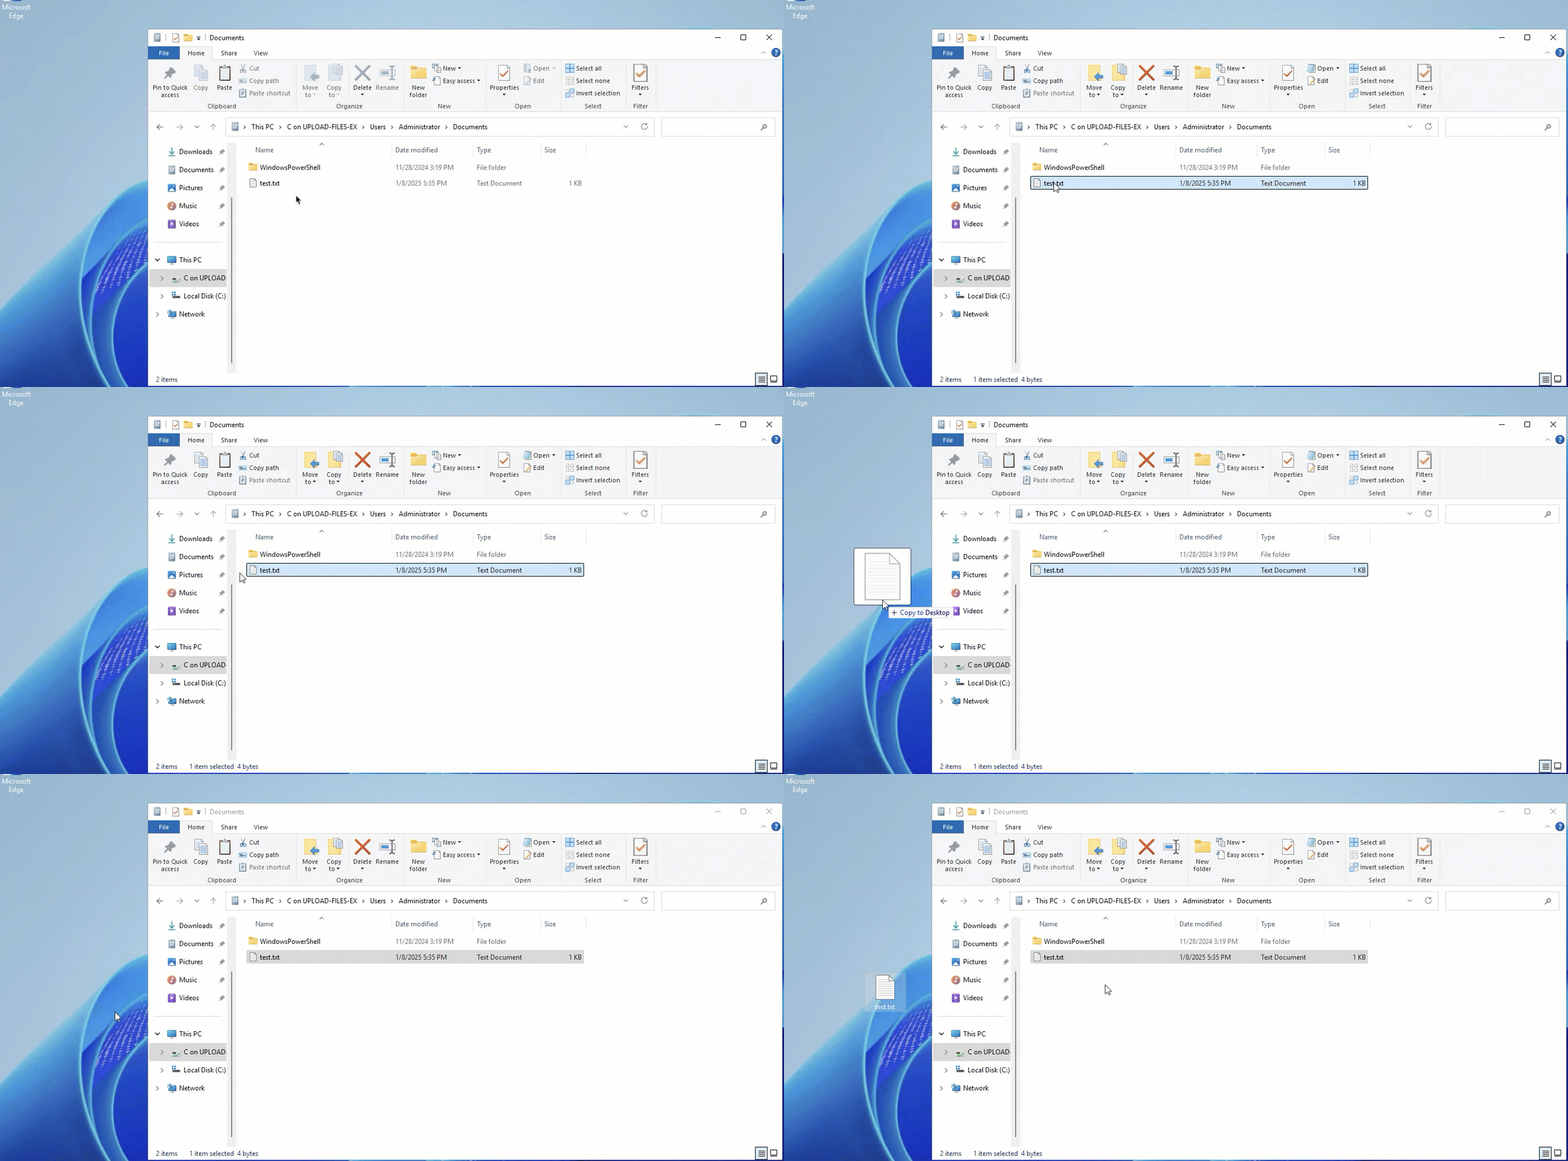
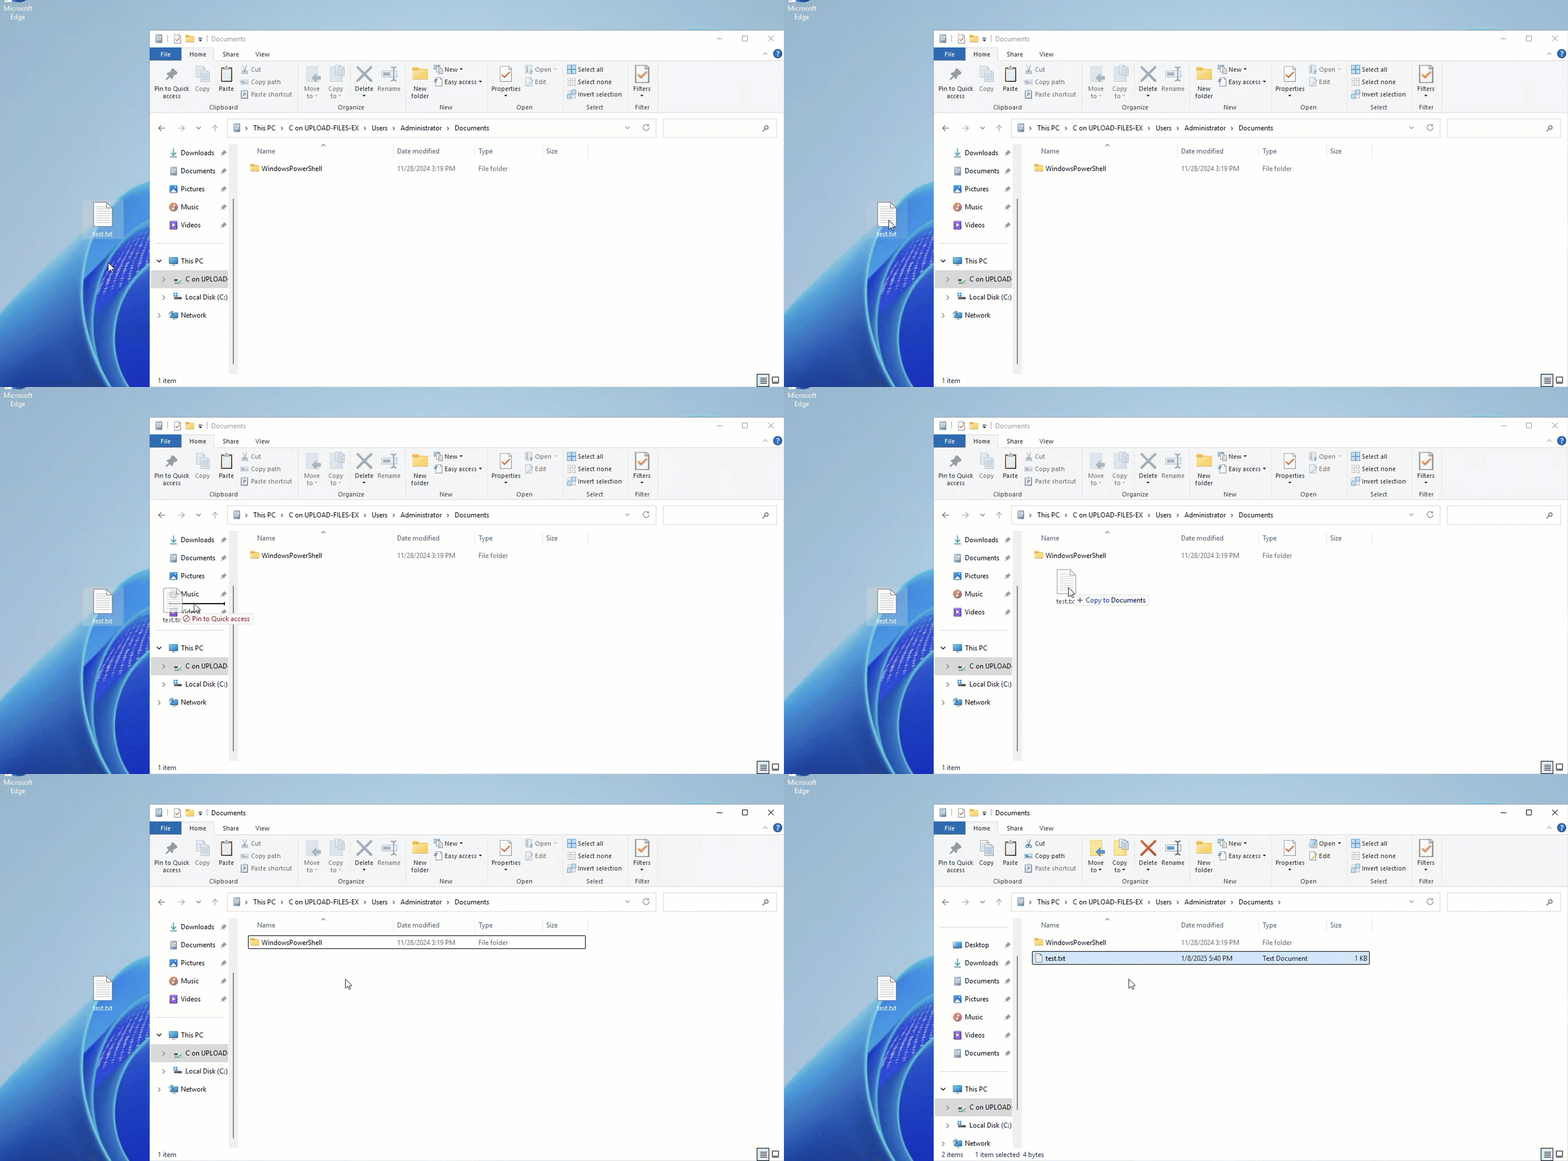
Download a file from the Windows ECS instance to your on-premises computer
To download a file from the Windows ECS instance to your on-premises computer, press Ctrl+C and Ctrl+V to copy the file from the Windows ECS instance to your on-premises computer.
Use Windows App to transfer files between an on-premises macOS computer and a Windows ECS instance
If your on-premises computer runs macOS, you can use Windows App to connect to a Windows ECS instance and transfer files to the instance. To transfer files by using Windows App on an on-premises macOS computer, perform the following steps.
If you want to upload a large file or a large number of files to a Windows ECS instance, you can compress the files into a compressed package and upload the package to the instance. This improves transfer efficiency. For more information, see Compress and upload files.
Step 1: Download and install Windows App
Click Windows App to download and install Windows App from the Mac App Store.
Step 2: Connect to a Windows ECS instance
Start Windows App and choose in the upper-right corner.
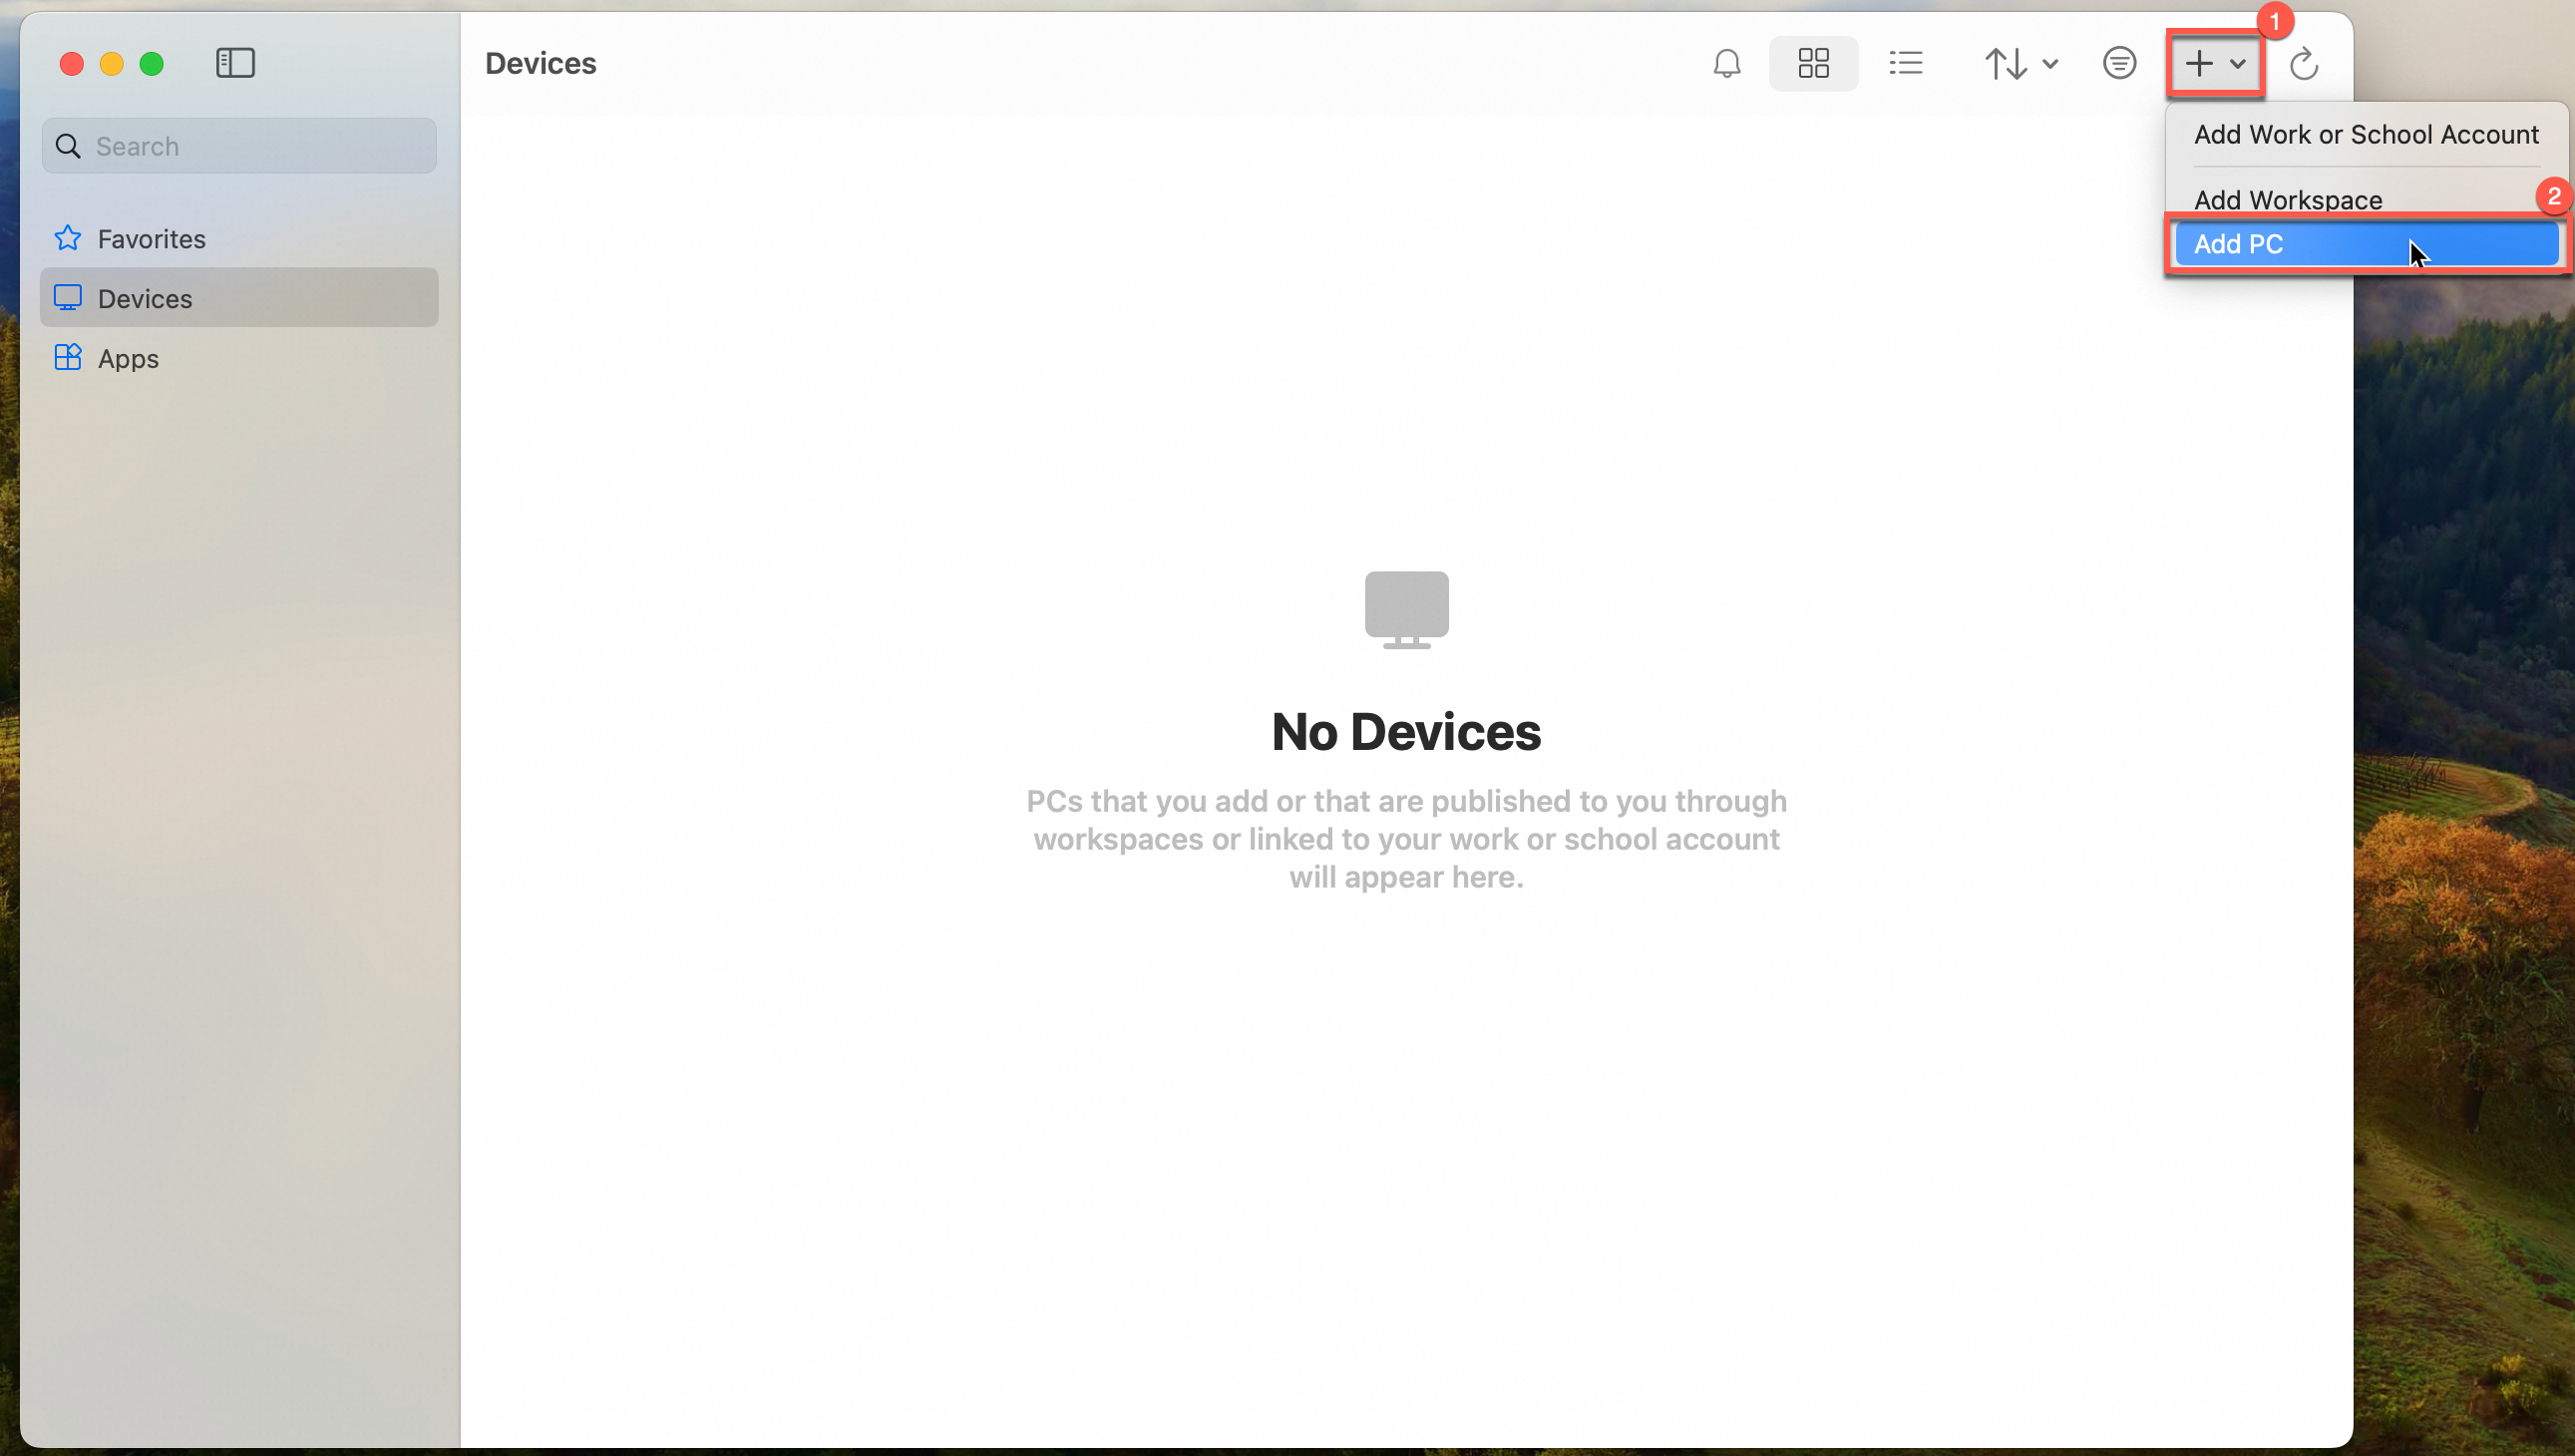
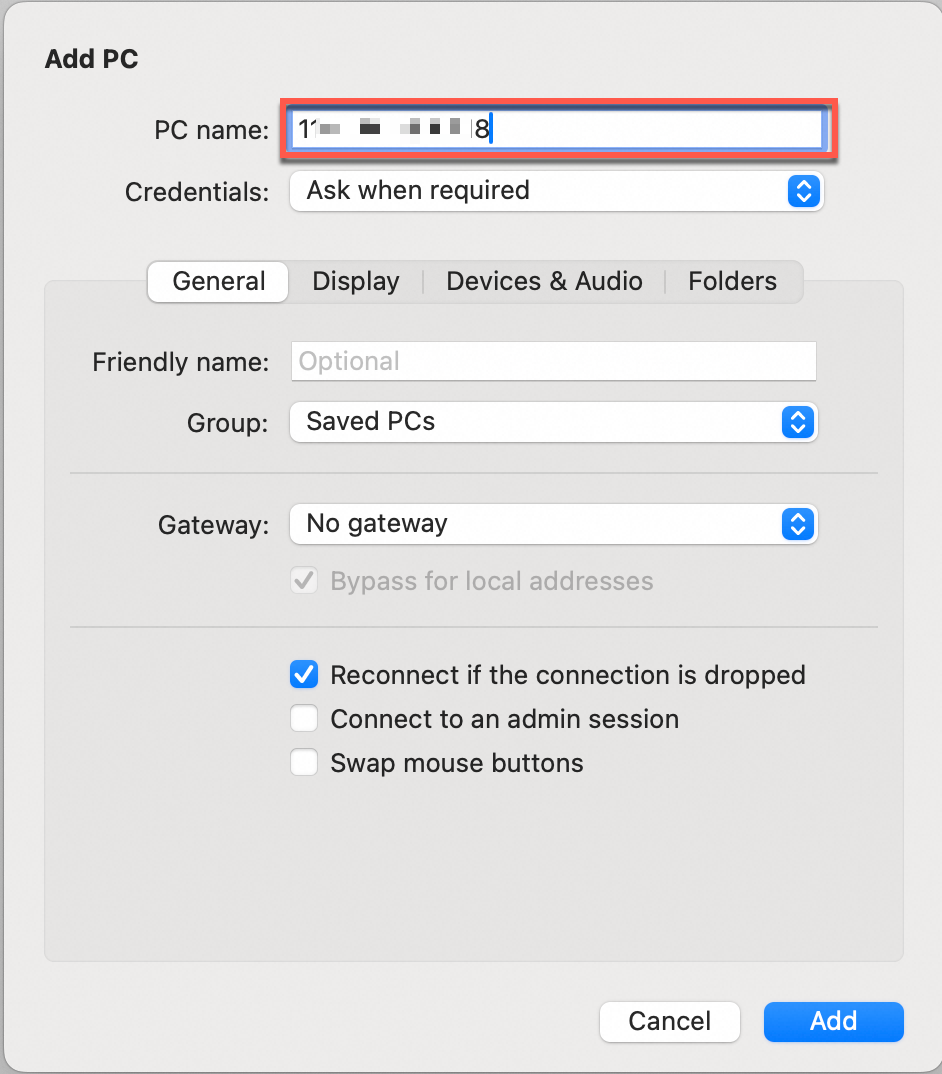
On the Add PC page, enter the public IP address of the Windows ECS instance to which you want to connect.
Redirect a folder on your on-premises computer.
If you redirect a folder on your on-premises computer to the Windows ECS instance to which you want to connect, you share the folder with the instance. This allows you to access files in the folder on the instance. Perform the following steps:
Click the Folders tab, select Redirect folders, click the
 icon, and then follow the on-screen instructions to add a folder that you want to redirect. The redirected folder appears in the folder list, as shown in the following figure.
 In this example, the folder that contains the macOS documents, which is
/Users/<username>/Documents, is used.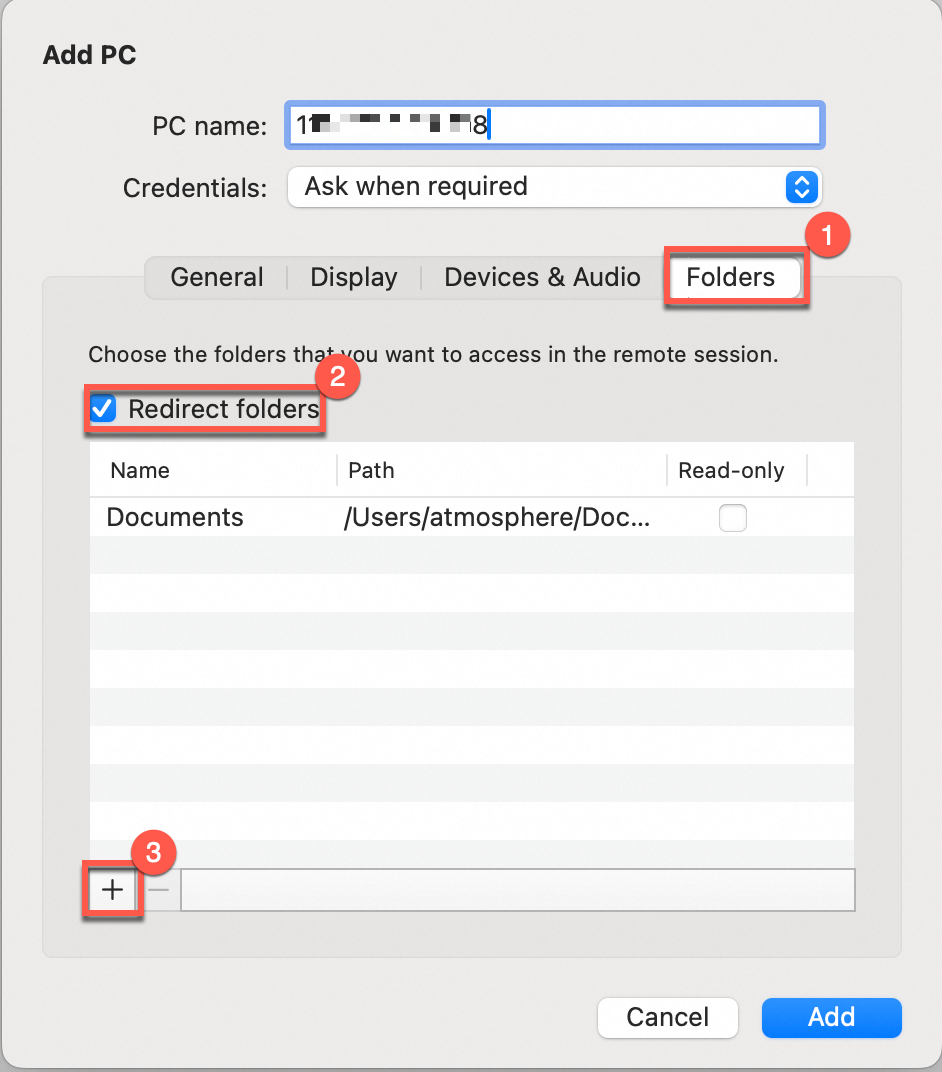
Click Add.
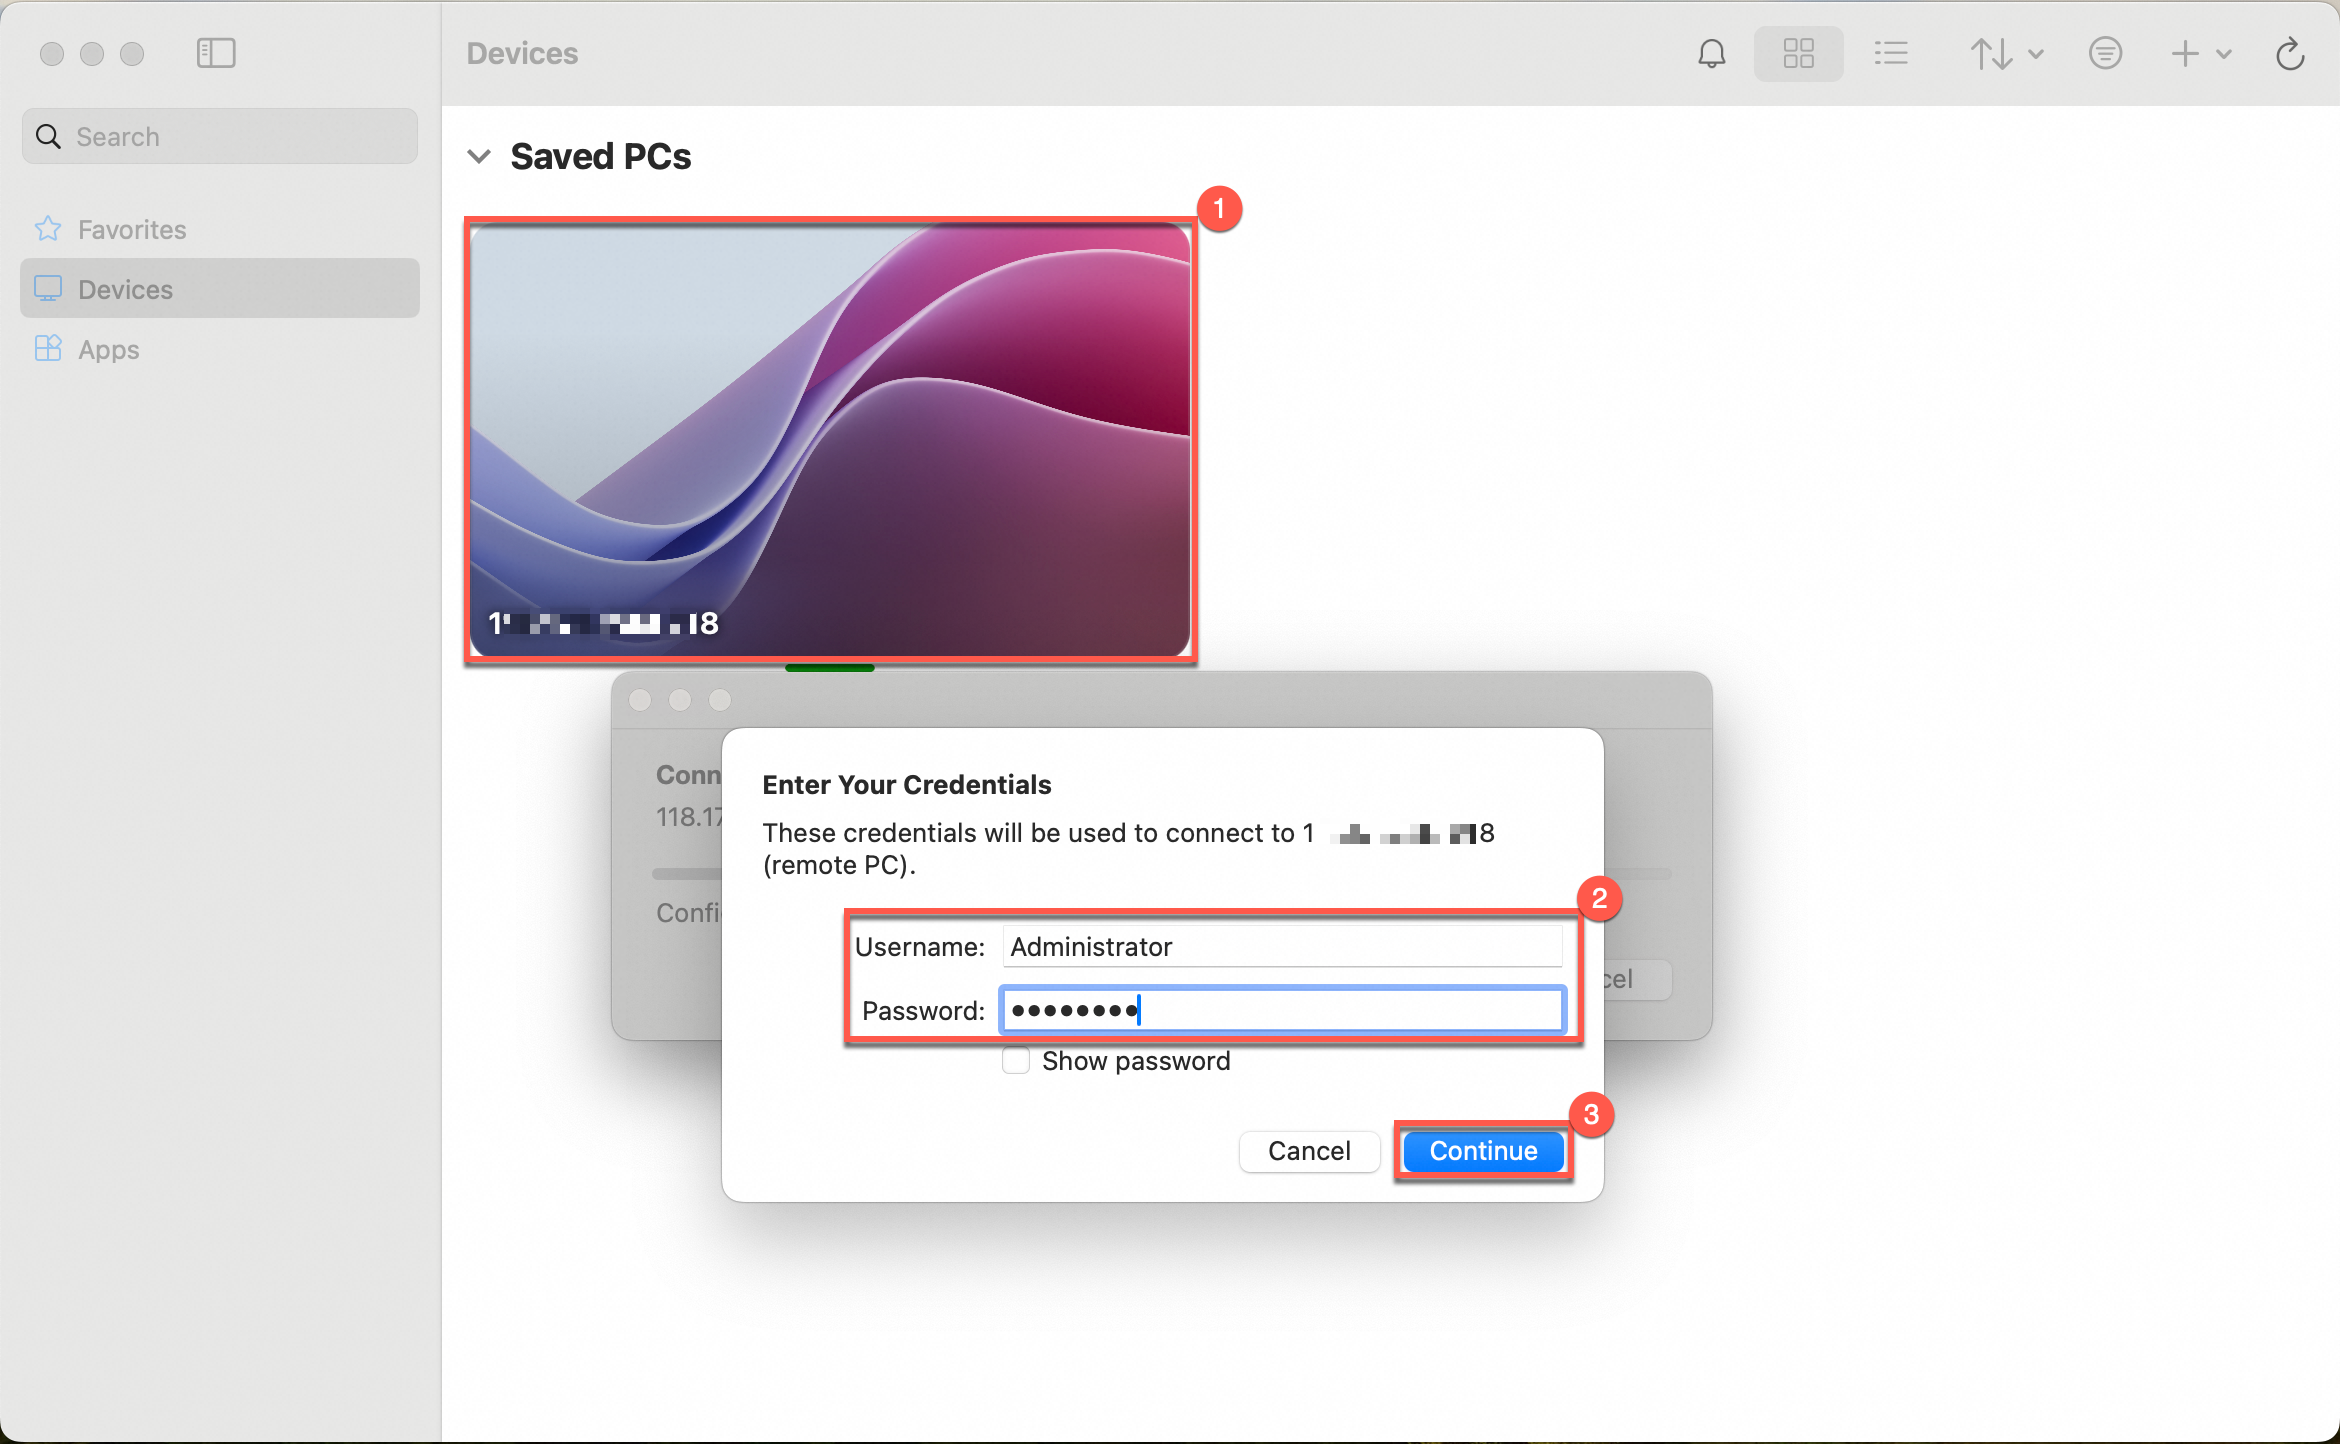
On the Devices page, find the Windows ECS instance that you added in the previous step and double-click the instance. In the dialog box that appears, configure the Username and Password parameters and click Continue to connect to the instance. After the instance is connected, the desktop of the instance appears.
Step 3: Upload or download a file
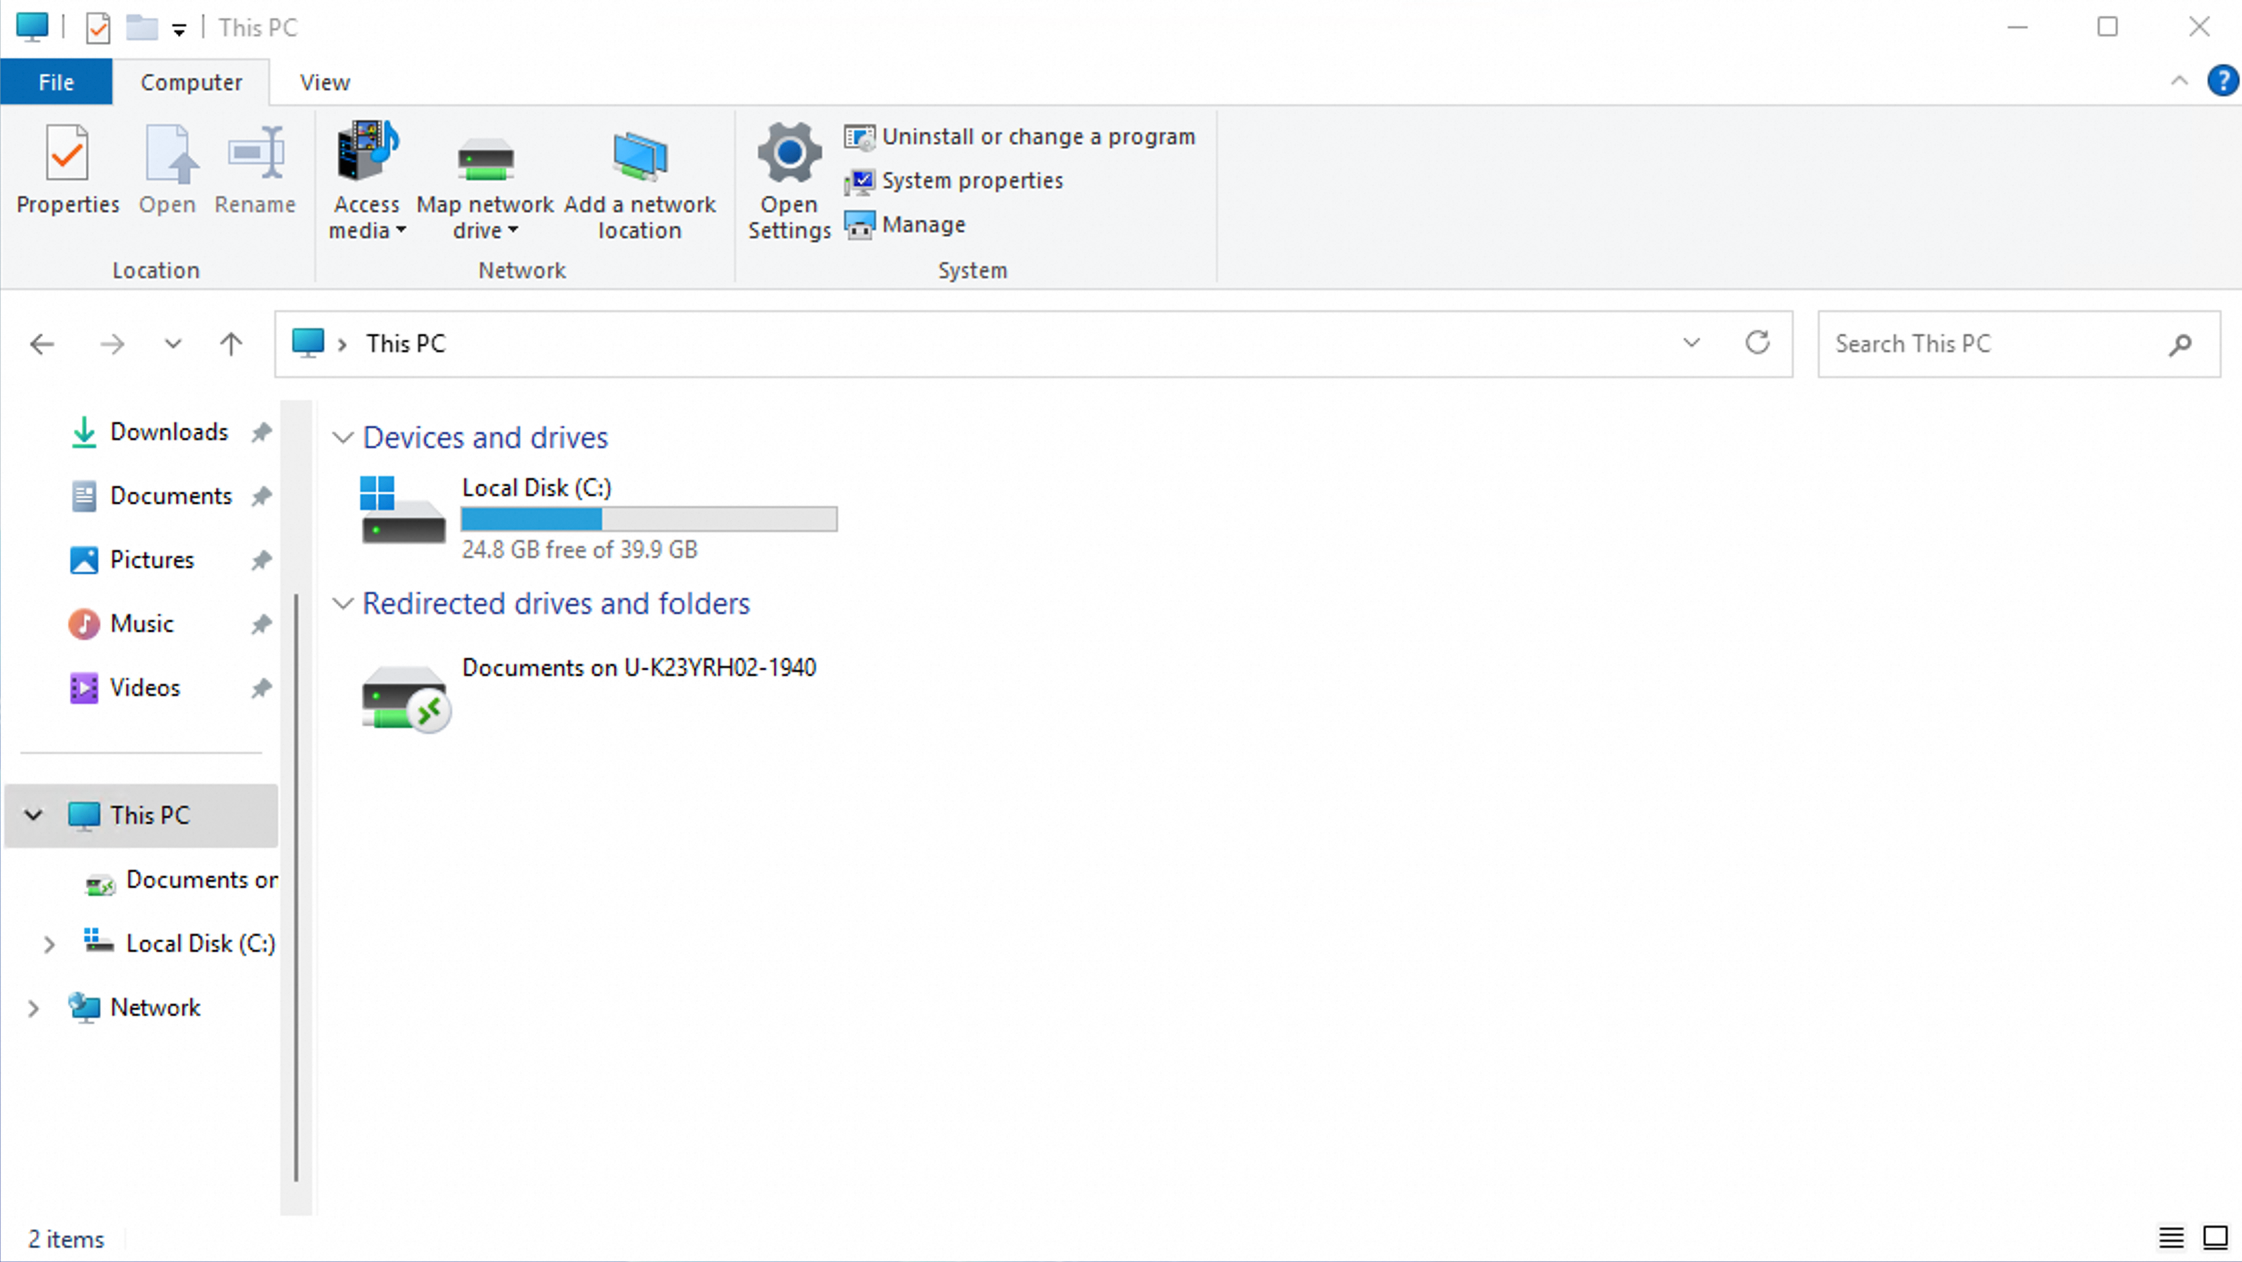
After you connect to the Windows ECS instance, you can find the redirected folder of your on-premises computer in This Computer on the instance. Double-click the redirected folder to access the folder on your on-premises computer. Then, you can move files between the on-premises folder and a directory on the instance to upload or download files between the instance and your on-premises computer.
Double-click the redirected folder on the Windows ECS instance to access the folder on your on-premises computer
Upload a file from your on-premises computer to the Windows ECS instance
To upload a file from your on-premises computer to the Windows ECS instance, press Ctrl+C and Ctrl+V to copy the file from your on-premises computer to the Windows ECS instance.
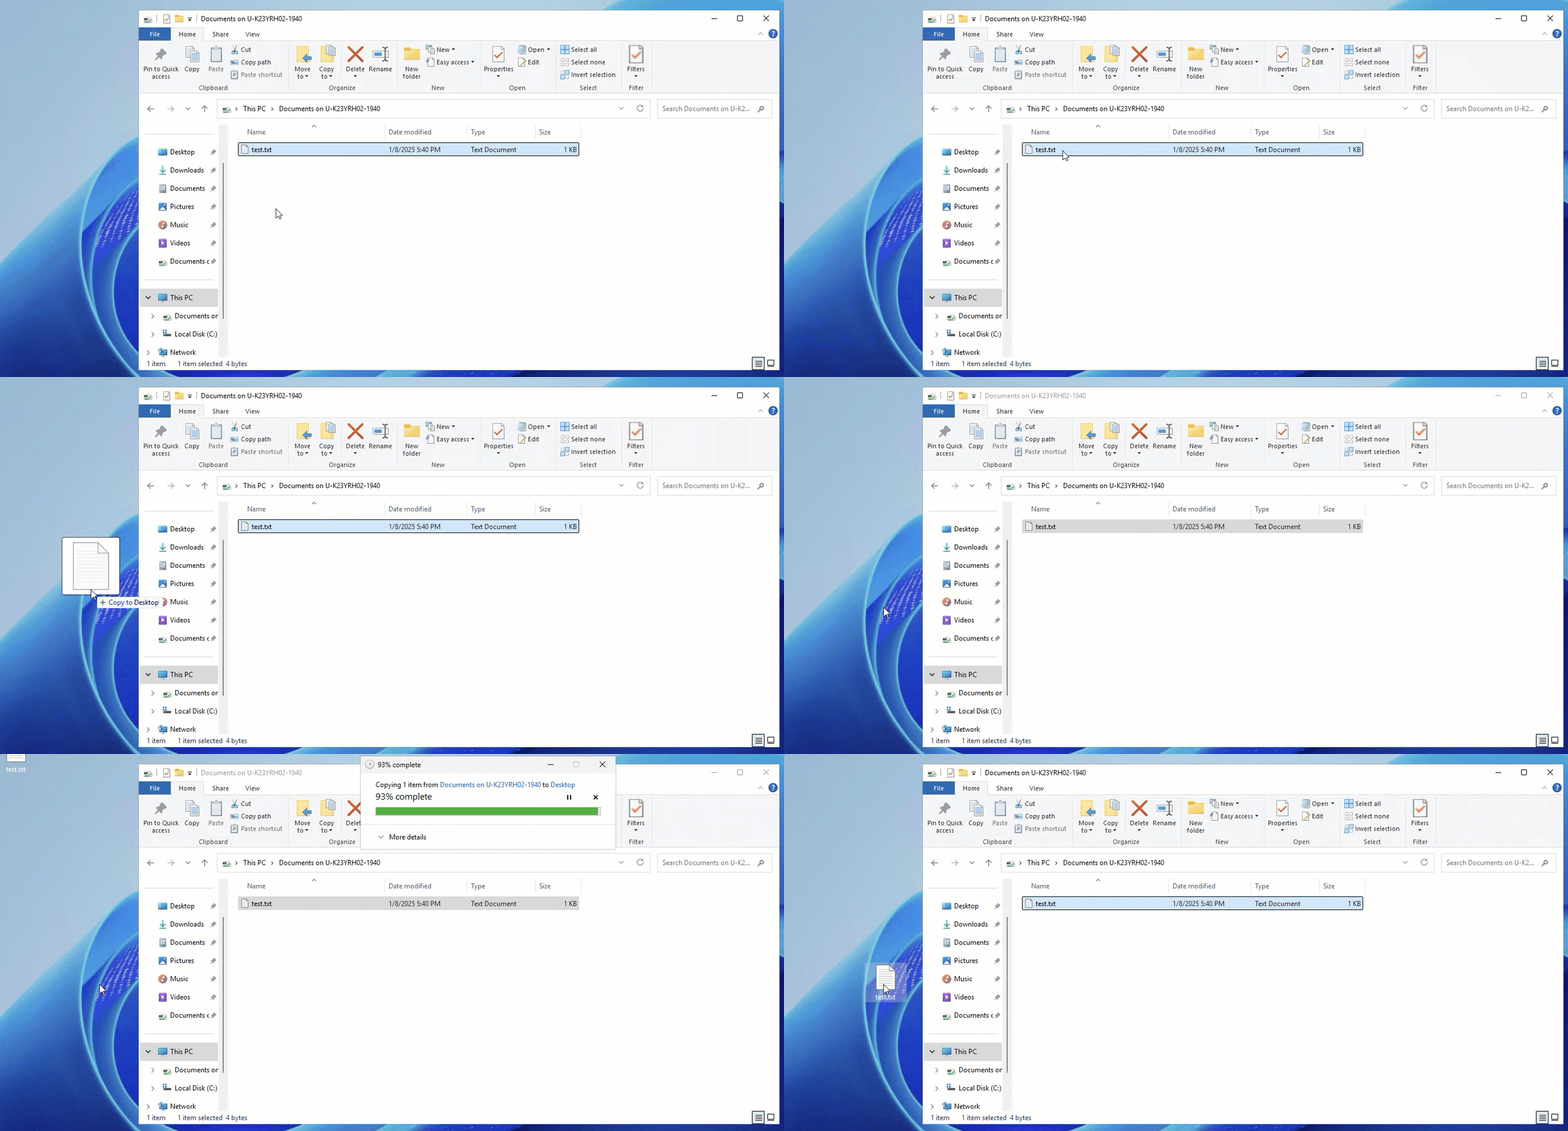
After the operation is complete, the file is uploaded to the Windows ECS instance.
Download a file from the Windows ECS instance to your on-premises computer
To download a file from the Windows ECS instance to your on-premises computer, press Ctrl+C and Ctrl+V to copy the file from the Windows ECS instance to your on-premises computer.
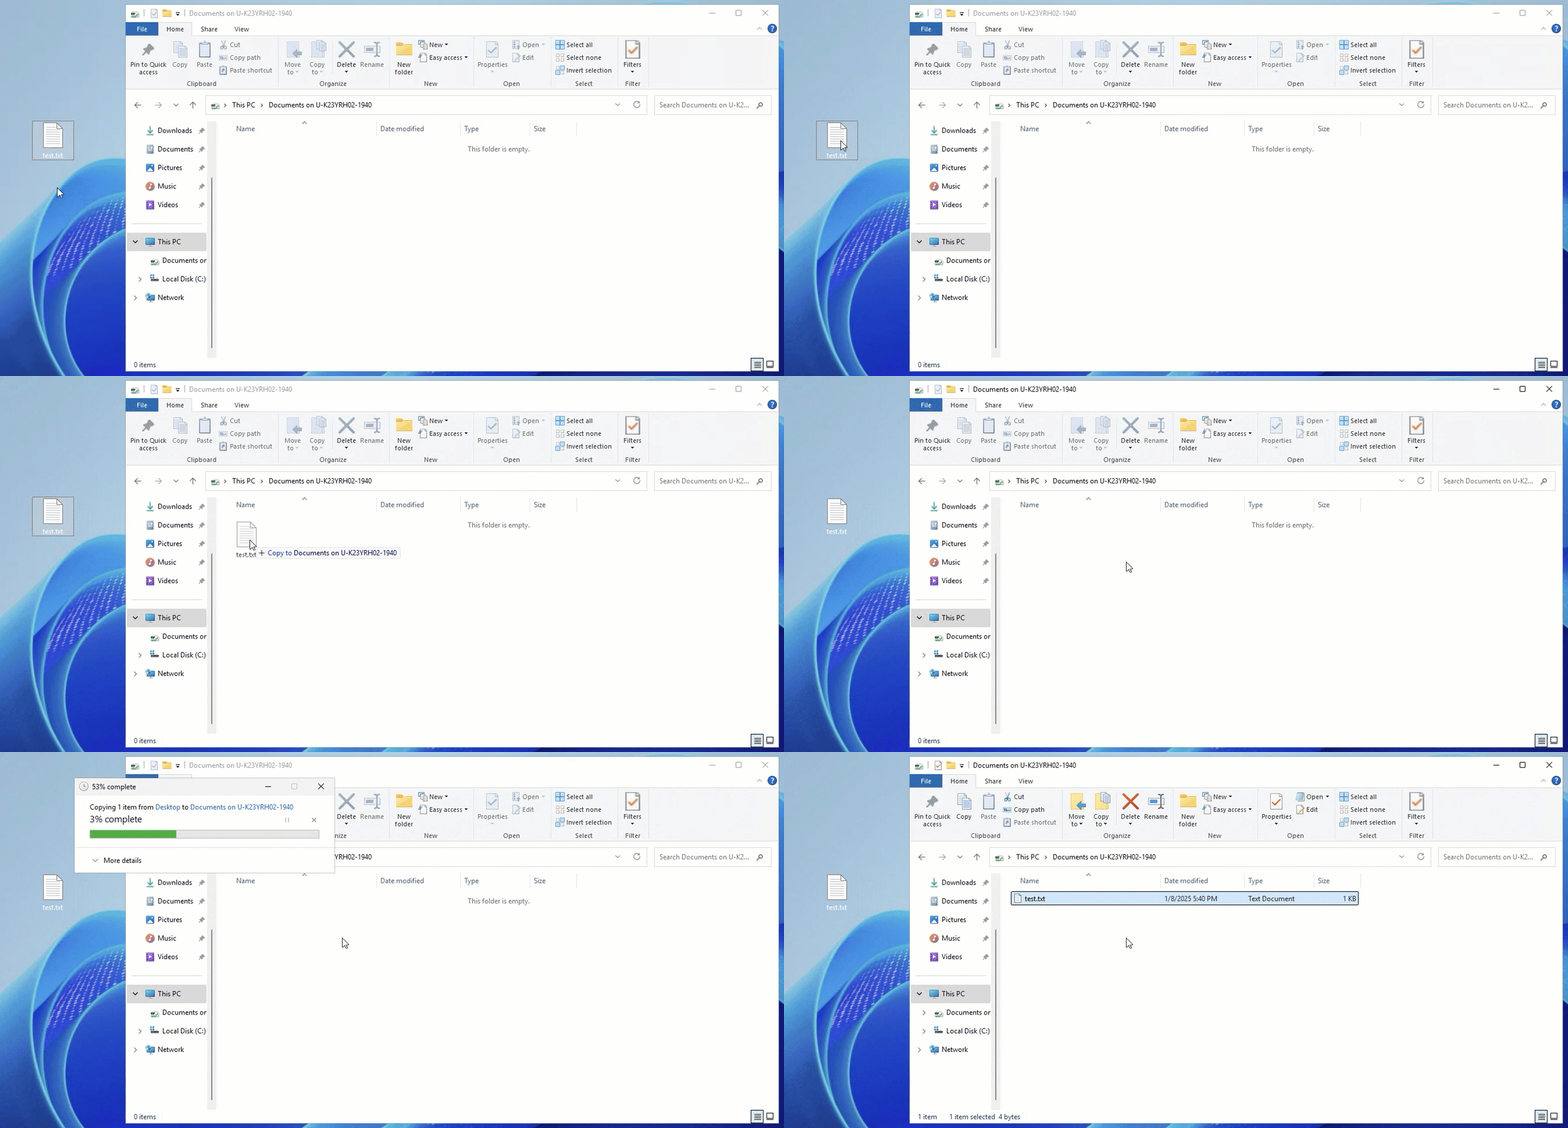
After the operation is complete, you can find the downloaded file in the redirected folder on your on-premises computer.
References
After you upload files to a Windows ECS instance, you can back up the files. For more information, see Create a snapshot.
You can use Object Storage Service (OSS) to store and manage files. For more information, see Get started by using the OSS console.


