DataWorks provides Oracle nodes that you can use to develop and periodically schedule Oracle tasks and integrate Oracle tasks with other types of tasks. This topic describes how to use an Oracle node to develop tasks.
Background information
Oracle is a relational database management system (RDBMS) for storing and processing data. It provides you with reliable, efficient, and secure data management and analysis services. For more information, see Oracle.
Prerequisites
A workflow is created.
Development operations in different types of compute engines are performed based on workflows in DataStudio. Therefore, before you create a node, you must create a workflow. For more information, see Create a workflow.
An Oracle data source is added.
You must add your Oracle database to DataWorks as an Oracle data source before you can use the data source to access data in the database. For more information, see Oracle data source.
NoteYou can create Oracle nodes based on only Oracle data sources that are added to DataWorks in Java Database Connectivity (JDBC) connection string mode.
(Required if you use a RAM user to develop tasks) The RAM user is added to the DataWorks workspace as a member and is assigned the Develop or Workspace Administrator role. The Workspace Administrator role has more permissions than necessary. Exercise caution when you assign the Workspace Administrator role. For more information about how to add a member and assign roles to the member, see Add workspace members and assign roles to them.
Limits
This type of node is supported in the following regions: China (Hangzhou), China (Shanghai), China (Beijing), China (Shenzhen), China (Chengdu), China (Hong Kong), Singapore, Malaysia (Kuala Lumpur), Germany (Frankfurt), US (Silicon Valley), and US (Virginia).
Step 1: Create an Oracle node
Go to the DataStudio page.
Log on to the DataWorks console. In the top navigation bar, select the desired region. In the left-side navigation pane, choose . On the page that appears, select the desired workspace from the drop-down list and click Go to Data Development.
In the Scheduled Workflow pane of the DataStudio page, find the desired workflow, right-click the workflow name, and then choose .
In the Create Node dialog box, configure the Name parameter and click Confirm. Then, you can use the node to develop tasks and configure task scheduling properties.
Step 2: Develop an Oracle task
(Optional) Select an Oracle data source
If you have added multiple Oracle data sources to the desired workspace, you must select a data source on the configuration tab of the Oracle node before you can use the node to develop tasks. If you have added only one Oracle data source to the desired workspace, the data source is used to develop tasks by default.
You can create Oracle nodes based on only Oracle data sources that are added to DataWorks in Java Database Connectivity (JDBC) connection string mode.
Develop SQL code: Simple example
In the code editor on the configuration tab of the Oracle node, write task code. The following sample code provides an example on how to query basic information about all tables on which you have access permissions:
SELECT * FROM ALL_TABLES;Develop SQL code: Use scheduling parameters
DataWorks provides scheduling parameters whose values are dynamically replaced in the code of a task based on the configurations of the scheduling parameters in periodic scheduling scenarios. You can define variables in the task code in the ${Variable} format and assign values to the variables in the Scheduling Parameter section of the Properties tab. For information about the supported formats of scheduling parameters and how to configure scheduling parameters, see Supported formats of scheduling parameters and Configure and use scheduling parameters.
In the following sample code, the value of the scheduling parameter a is $[add_months(yyyymm,-1)], which indicates the previous month. You can run the following code to query the owners, names, and creation dates of tables that are created from the previous month to the current day.
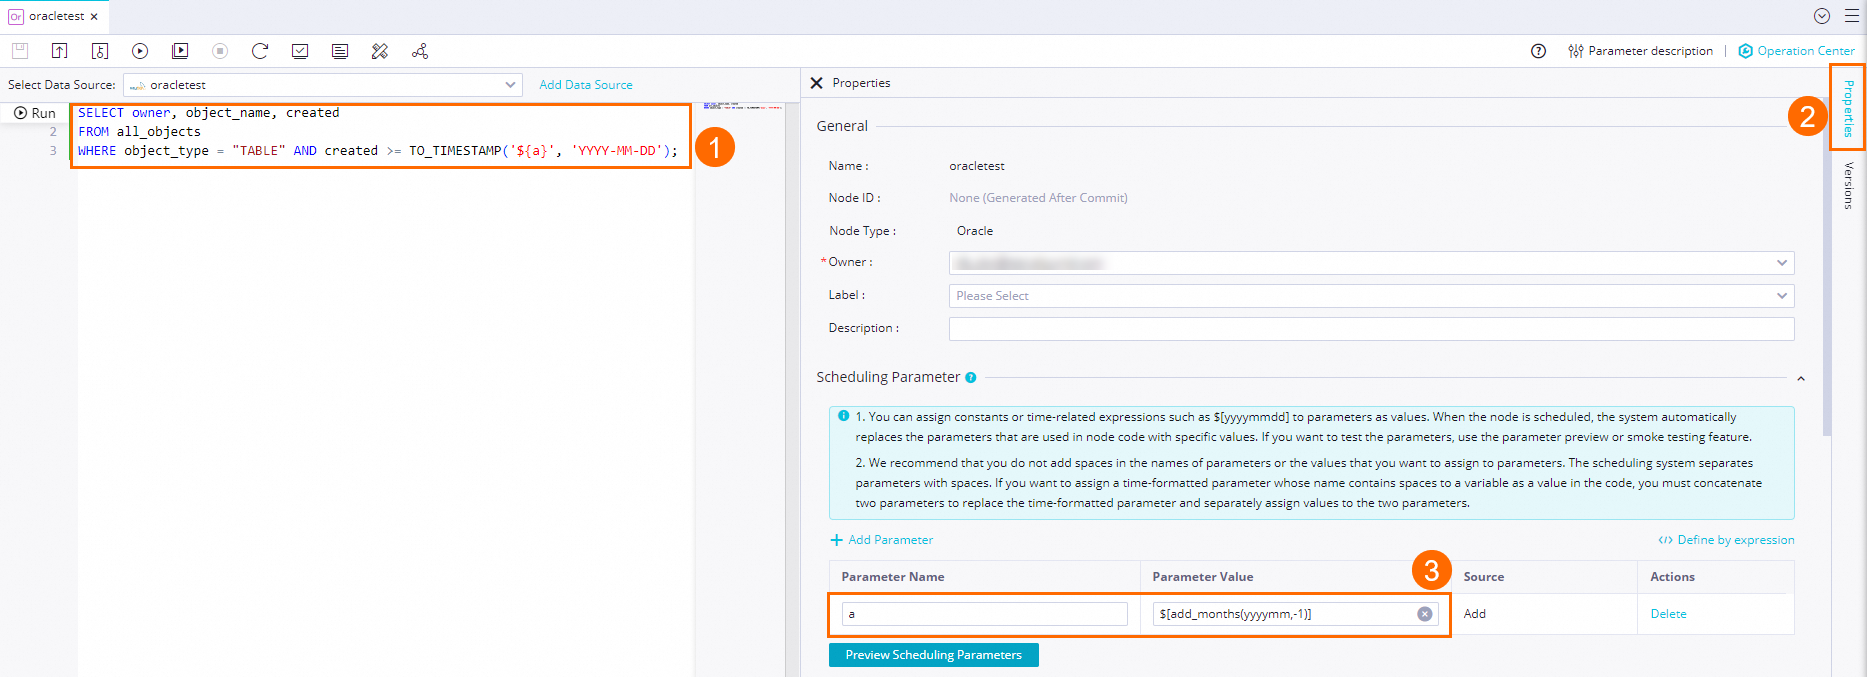
SELECT owner, object_name, created
FROM all_objects
WHERE object_type = 'TABLE' AND created >= TO_TIMESTAMP('${a}', 'YYYY-MM-DD');
Step 3: Configure task scheduling properties
If you want the system to periodically run a task on the node, you can click Properties in the right-side navigation pane on the configuration tab of the node to configure task scheduling properties based on your business requirements. For more information, see Overview.
You must configure the Rerun and Parent Nodes parameters on the Properties tab before you commit the task.
Step 4: Debug task code
You can perform the following operations to check whether the task is configured as expected based on your business requirements:
Optional. Select a resource group and assign custom parameters to variables.
Click the
 icon in the top toolbar of the configuration tab of the node. In the Parameters dialog box, select a resource group for scheduling that you want to use to debug and run task code.
 If you use scheduling parameters in your task code, assign the scheduling parameters to variables as values in the task code for debugging. For more information about the value assignment logic of scheduling parameters, see Debugging procedure.
Save and run task code.
In the top toolbar, click the
 icon to save task code. Then, click the
  icon to run task code.
 Optional. Perform smoke testing.
When you commit the node or after you commit the node, you can perform smoke testing on the node in the development environment to check whether the node is run as expected. For more information, see Perform smoke testing.
Step 5: Commit and deploy the task
After a task on a node is configured, you must commit and deploy the task. After you commit and deploy the task, the system runs the task on a regular basis based on scheduling configurations.
Click the
icon in the top toolbar to save the task. Click the
 icon in the top toolbar to commit a task on the node.
 In the Submit dialog box, configure the Change description parameter. Then, determine whether to review task code after you commit the task based on your business requirements.
NoteYou must configure the Rerun and Parent Nodes parameters on the Properties tab before you commit the task.
You can use the code review feature to ensure the code quality of tasks and prevent task execution errors caused by invalid task code. If you enable the code review feature, the node code that is committed can be deployed only after the node code passes the code review. For more information, see Code review.
If you use a workspace in standard mode, you must deploy the task in the production environment after you commit the task. To deploy a task on a node, click Deploy in the upper-right corner of the configuration tab of the node. For more information, see Deploy tasks.
What to do next
Task O&M: After you commit and deploy the task, the task is periodically run based on the scheduling configurations. You can click Operation Center in the upper-right corner of the configuration tab of the corresponding node to go to Operation Center and view the scheduling status of the task. For more information, see View and manage auto triggered tasks.