After you purchase and configure an exclusive resource group, you can use the resource group to run tasks in a workspace. This topic describes how to change the resource groups used by tasks and how to change the workspace with which a resource group is associated.
Background information
To change the workspace with which a resource group is associated, you must disassociate the resource group from the workspace and associate the resource group with another workspace. For information about how to disassociate a resource group from a workspace, see Disassociate a resource group from a workspace.
If you want to disassociate a resource group from a workspace but the resource group is being used by deployed tasks in the workspace, you must change the resource group used by the tasks and then disassociate the resource group from the workspace.
After you change the resource group used by a task in the development environment, you can deploy the task to the production environment to change the resource group used by the task in the production environment.
On the Scheduling Settings tab of the Settings page in the DataWorks console, you can configure a default resource group for scheduling and a default resource group for Data Integration for tasks in a workspace. For more information, see Configure scheduling settings.
Precautions
You can change the resource group used by an auto triggered task. After you change the resource group used by an auto triggered task on a day, instances that are generated for the task after the change are run on the new resource group. Instances that are generated for the task before the change on the day are still run on the original resource group. If you want to run the instances that are generated before the change on the day on the new resource group, use one of the following solutions:
Solution 1: Preferentially ensure the data output on the day
You can freeze the instances that are generated before the change on the day, and backfill data for the auto triggered task after the change. Then, the system generates data backfill instances for the auto triggered task based on the latest configurations.
Solution 2: Replace the instances that are generated before the change on the day
After you change the resource group for the auto triggered task, you can configure the immediate instance generation feature for the auto triggered task. This way, the system immediately generates new instances for the auto triggered task based on the latest scheduling properties of the task, and uses the new instances to replace the instances that are generated before the change on the day but are not run. Then, the new instances will be run on the new resource group.
Change the resource groups for Data Integration used by synchronization tasks
After a resource group for Data Integration is created, you can refer to the instructions provided in this section to change the resource groups used by tasks to the new resource group.
Change the resource groups for Data Integration used by synchronization tasks on the Data Integration page
Go to the Data Integration page.
Log on to the DataWorks console. In the top navigation bar, select the desired region. In the left-side navigation pane, choose . On the page that appears, select the desired workspace from the drop-down list and click Go to Data Integration.
In the left-side navigation pane of the Data Integration page, click Synchronization Task. In the Nodes section of the Data Integration page, find the synchronization task for which you want to change the resource group for Data Integration, click More in the Actions column, and then select Modify Configuration. On the configuration page of the synchronization task, change the resource group used by the synchronization task.

Change the resource groups for Data Integration used by synchronization tasks on the DataStudio page
If you change the resource group used by a task in DataStudio, the change is not synchronized to the production environment. You must deploy the task to the production environment for the change to take effect in the production environment. For more information, see Deploy nodes.
Go to the DataStudio page.
Log on to the DataWorks console. In the top navigation bar, select the desired region. In the left-side navigation pane, choose . On the page that appears, select the desired workspace from the drop-down list and click Go to Data Development.
Change the resource groups for Data Integration used by synchronization tasks.
Batch synchronization tasks
Change the resource group for Data Integration used by a single taskChange the resource groups for Data Integration used by multiple tasks at a timeIn the Scheduled Workflow pane of the DataStudio page, find the batch synchronization task for which you want to change the resource group for Data Integration and double-click the task name to go to the configuration tab of the task.
In the Configure Network Connections and Resource Group step, click More in the card in which you can select a resource group. Set the Recommended Resource Groups parameter to Exclusive Resource Group and then select an exclusive resource group that you want to use from the drop-down list.
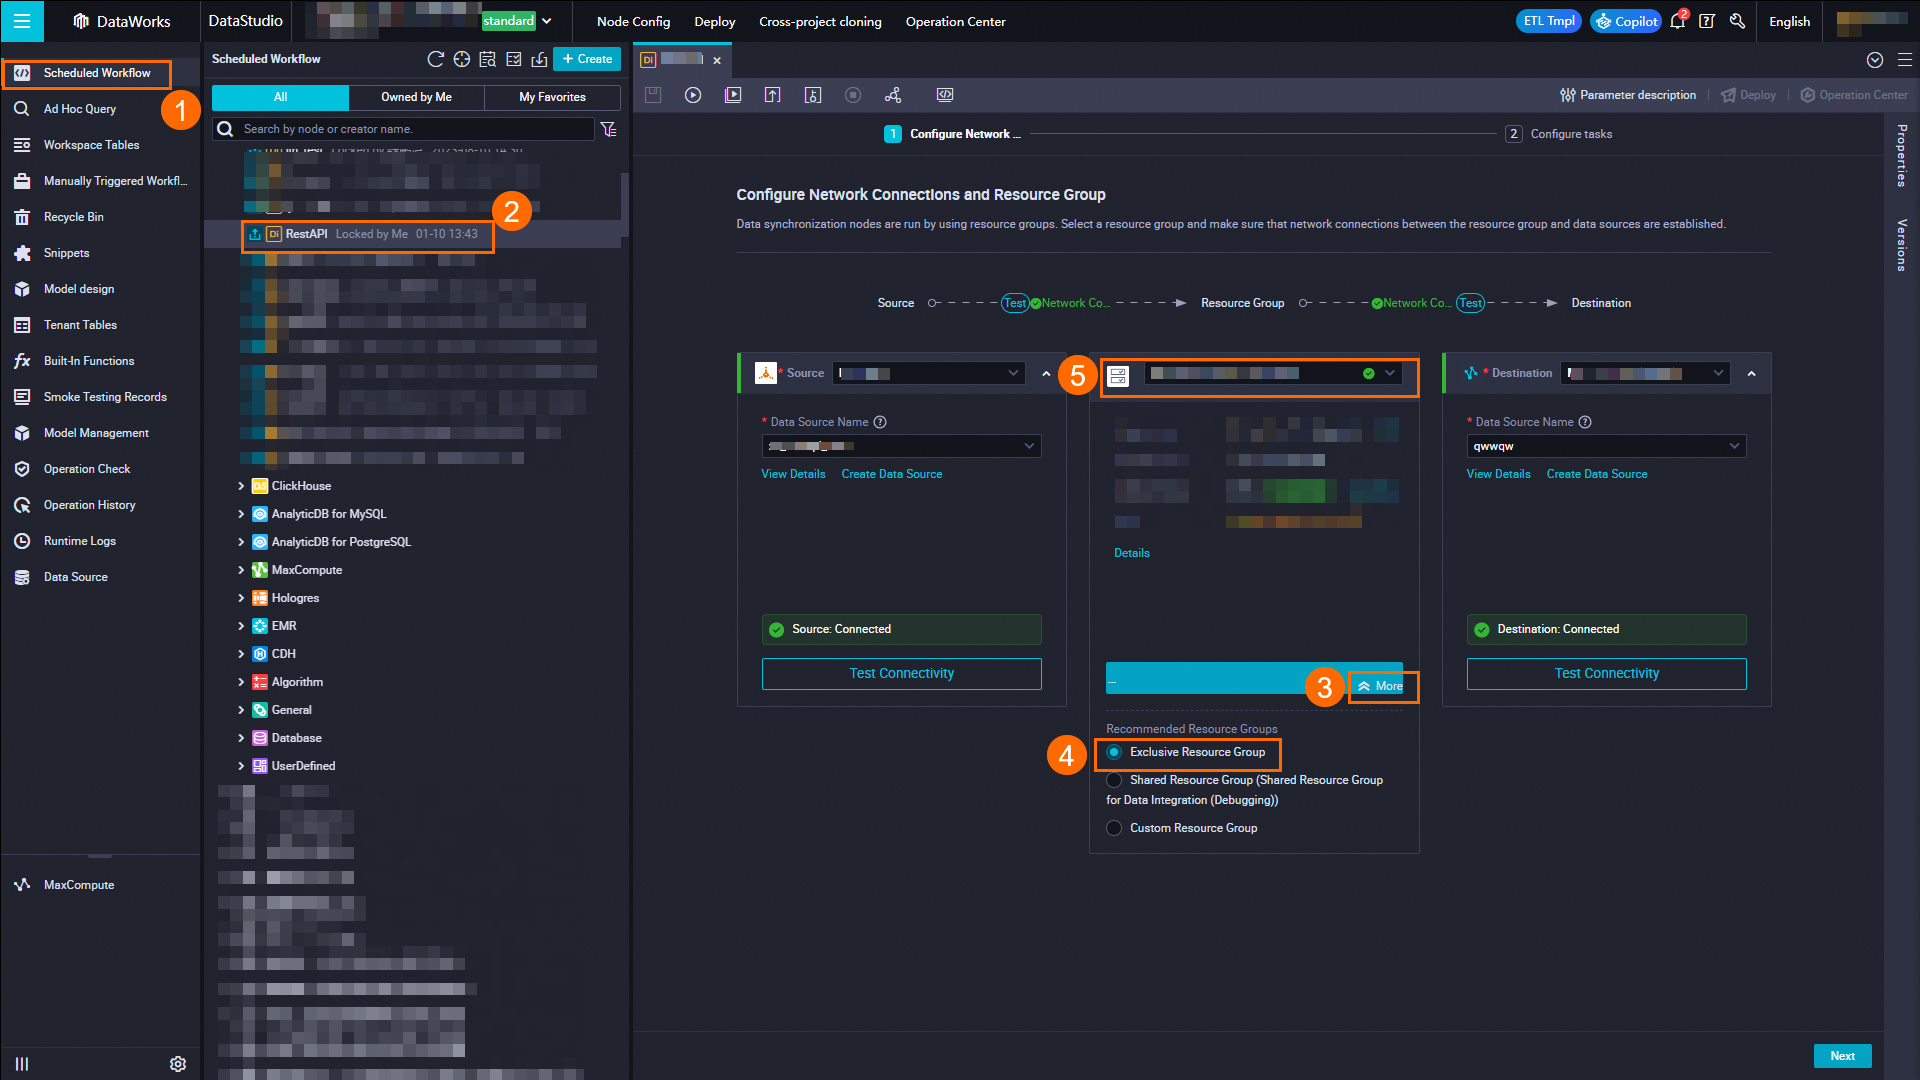
Save and run the task. After the task is successfully run, commit the task.
In the Scheduled Workflow pane of the DataStudio page, click the
 icon to go to the Batch Operation-Data Development tab.
 On the Batch Operation-Data Development tab, set the Node Type parameter to Offline synchronization. Select the batch synchronization tasks for which you want to change the resource groups for Data Integration at a time, click More in the lower part of the tab, and then select Change Resource Group for Data Integration.
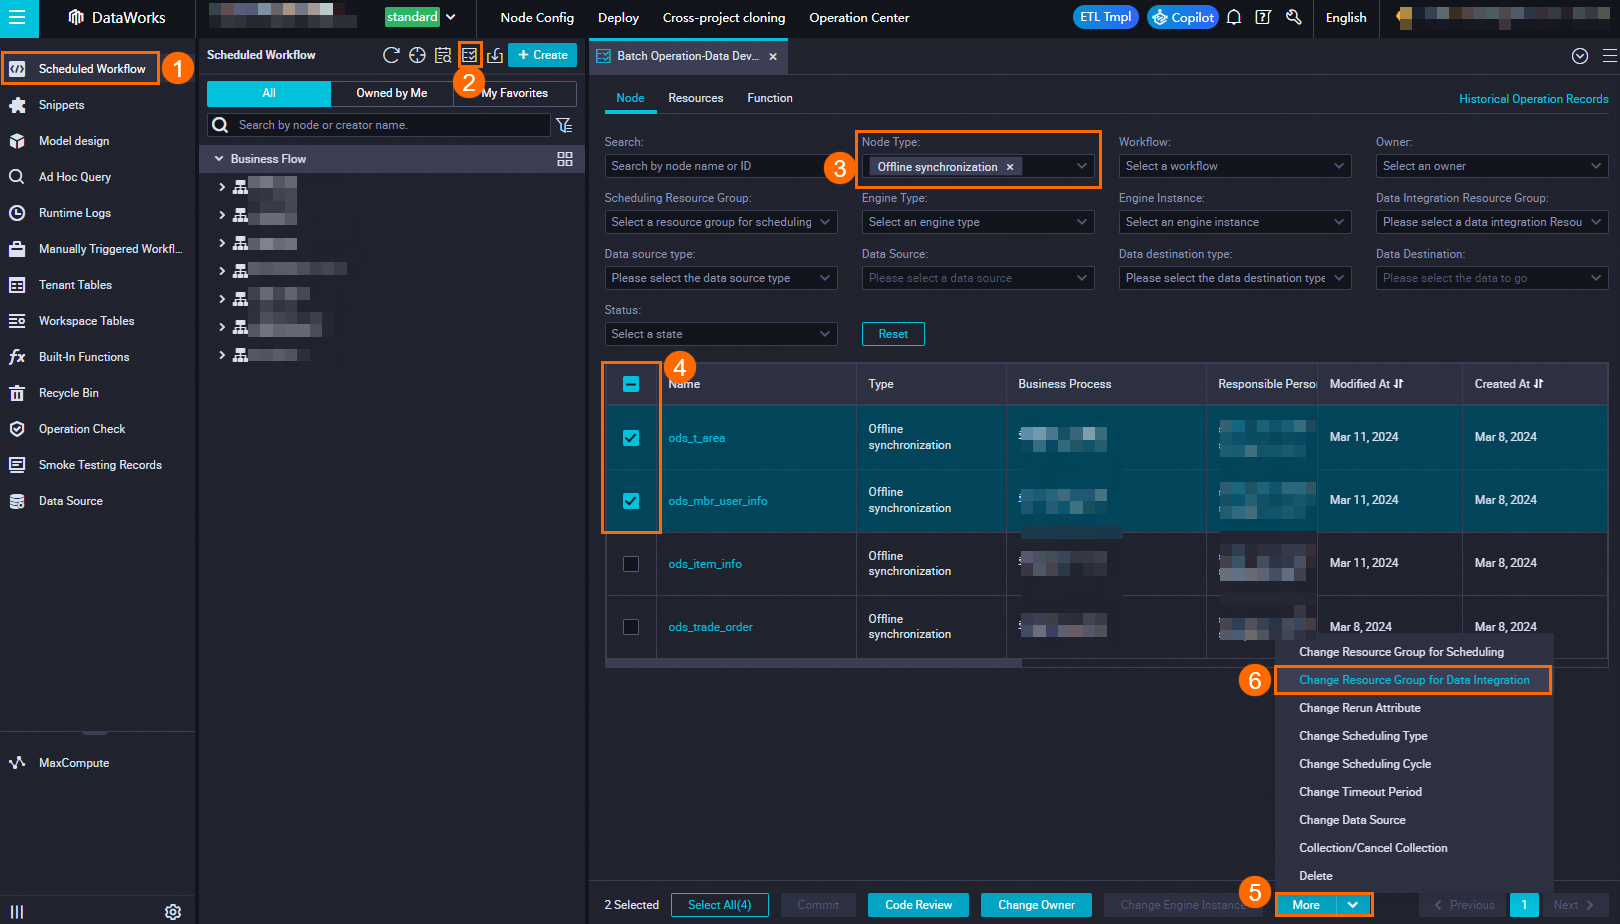
In the Change Resource Group for Data Integration dialog box, select the resource group that you want to use from the Select Resource Group for Scheduling drop-down list, select the I have been aware of the risk and confirm the change check box, and then click OK.
On the Batch Operation-Data Development tab, select the batch synchronization tasks for which you have changed the resource groups for Data Integration at a time, and click Commit in the lower part of the tab.
Real-time synchronization tasks
Change the resource group for Data Integration used by a single taskChange the resource groups for Data Integration used by multiple tasks at a timeIn the Scheduled Workflow pane of the DataStudio page, find the real-time synchronization task for which you want to change the resource group for Data Integration and double-click the task name to go to the configuration tab of the task.
In the right-side navigation pane of the configuration tab, click Basic Configurations. On the Basic Configurations tab, select the resource group that you want to use from the Resource Group drop-down list.
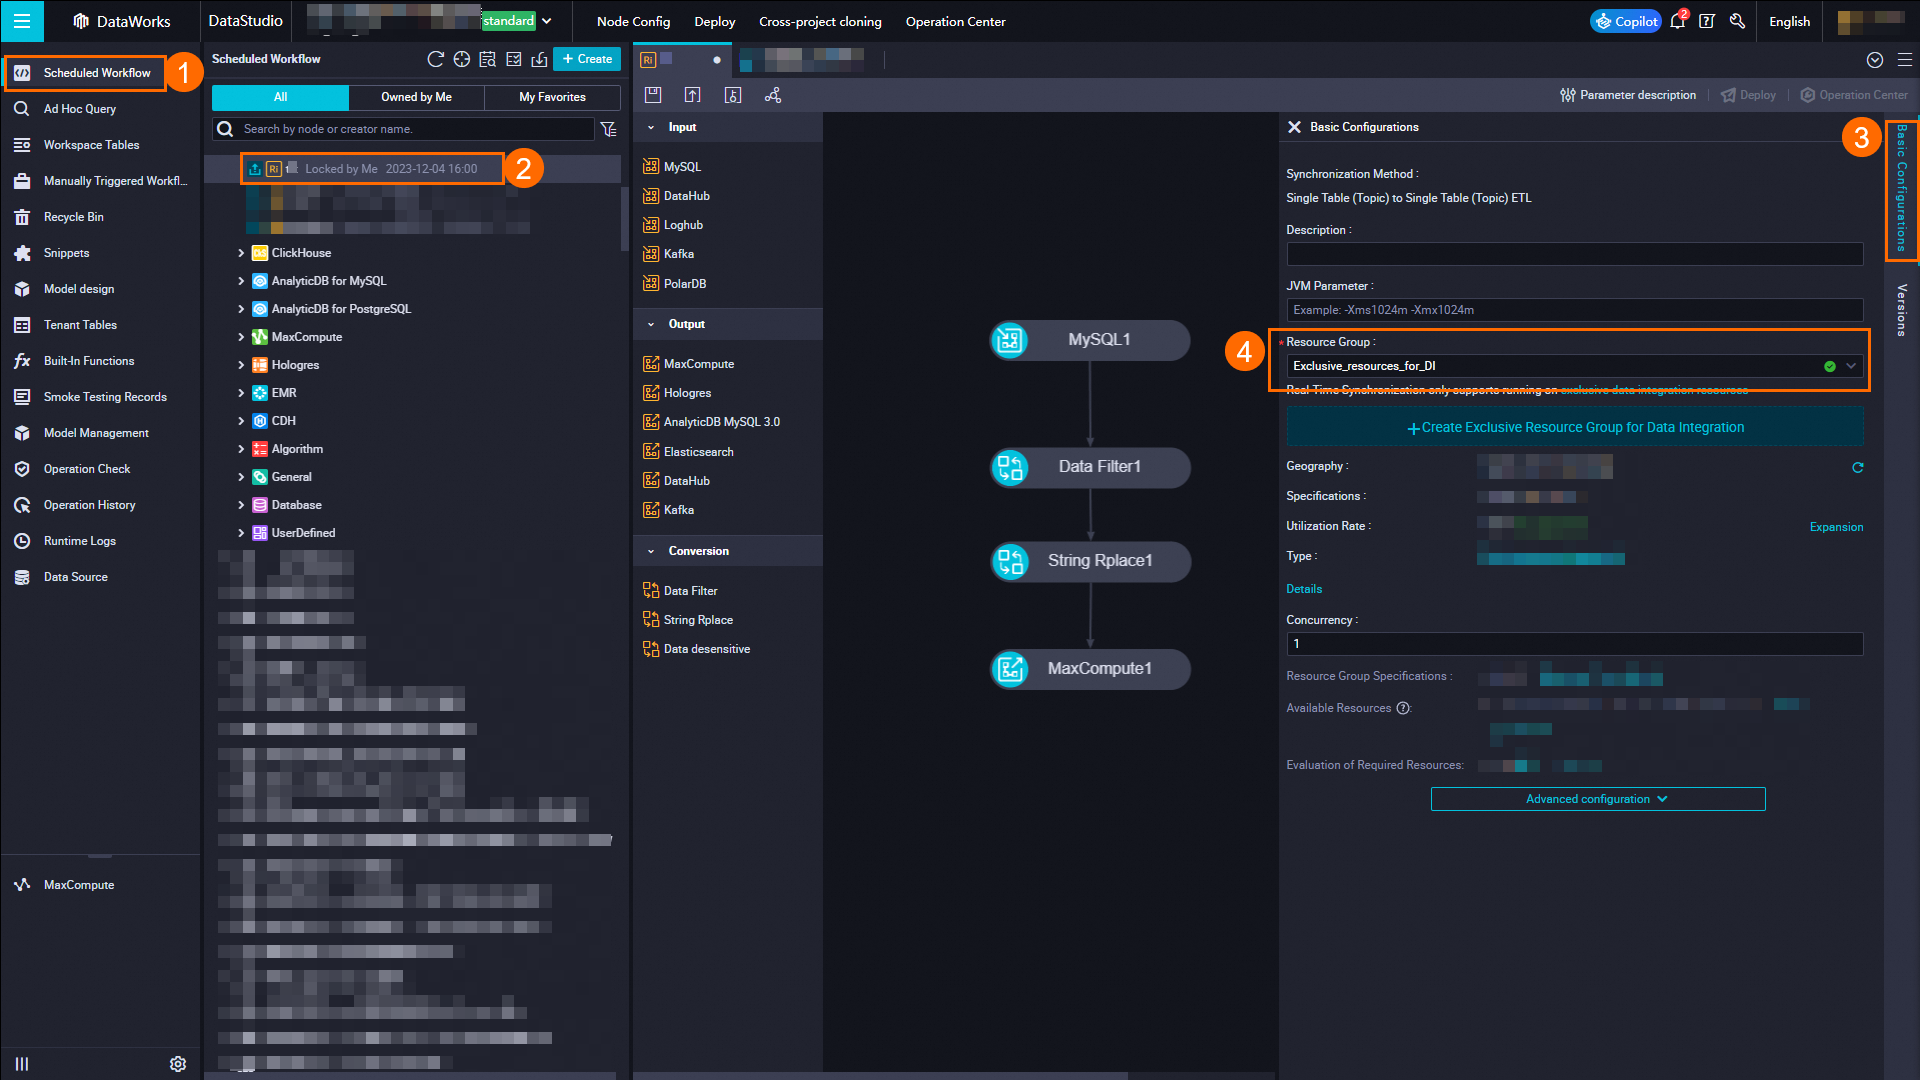
Save and commit the real-time synchronization task.
In the Scheduled Workflow pane of the DataStudio page, click the
 icon to go to the Batch Operation-Data Development tab.
 On the Batch Operation-Data Development tab, set the Node Type parameter to Real-time Synchronization. Select the real-time synchronization tasks for which you want to change the resource groups for Data Integration at a time, click More in the lower part of the tab, and then select Change Resource Group for Data Integration.
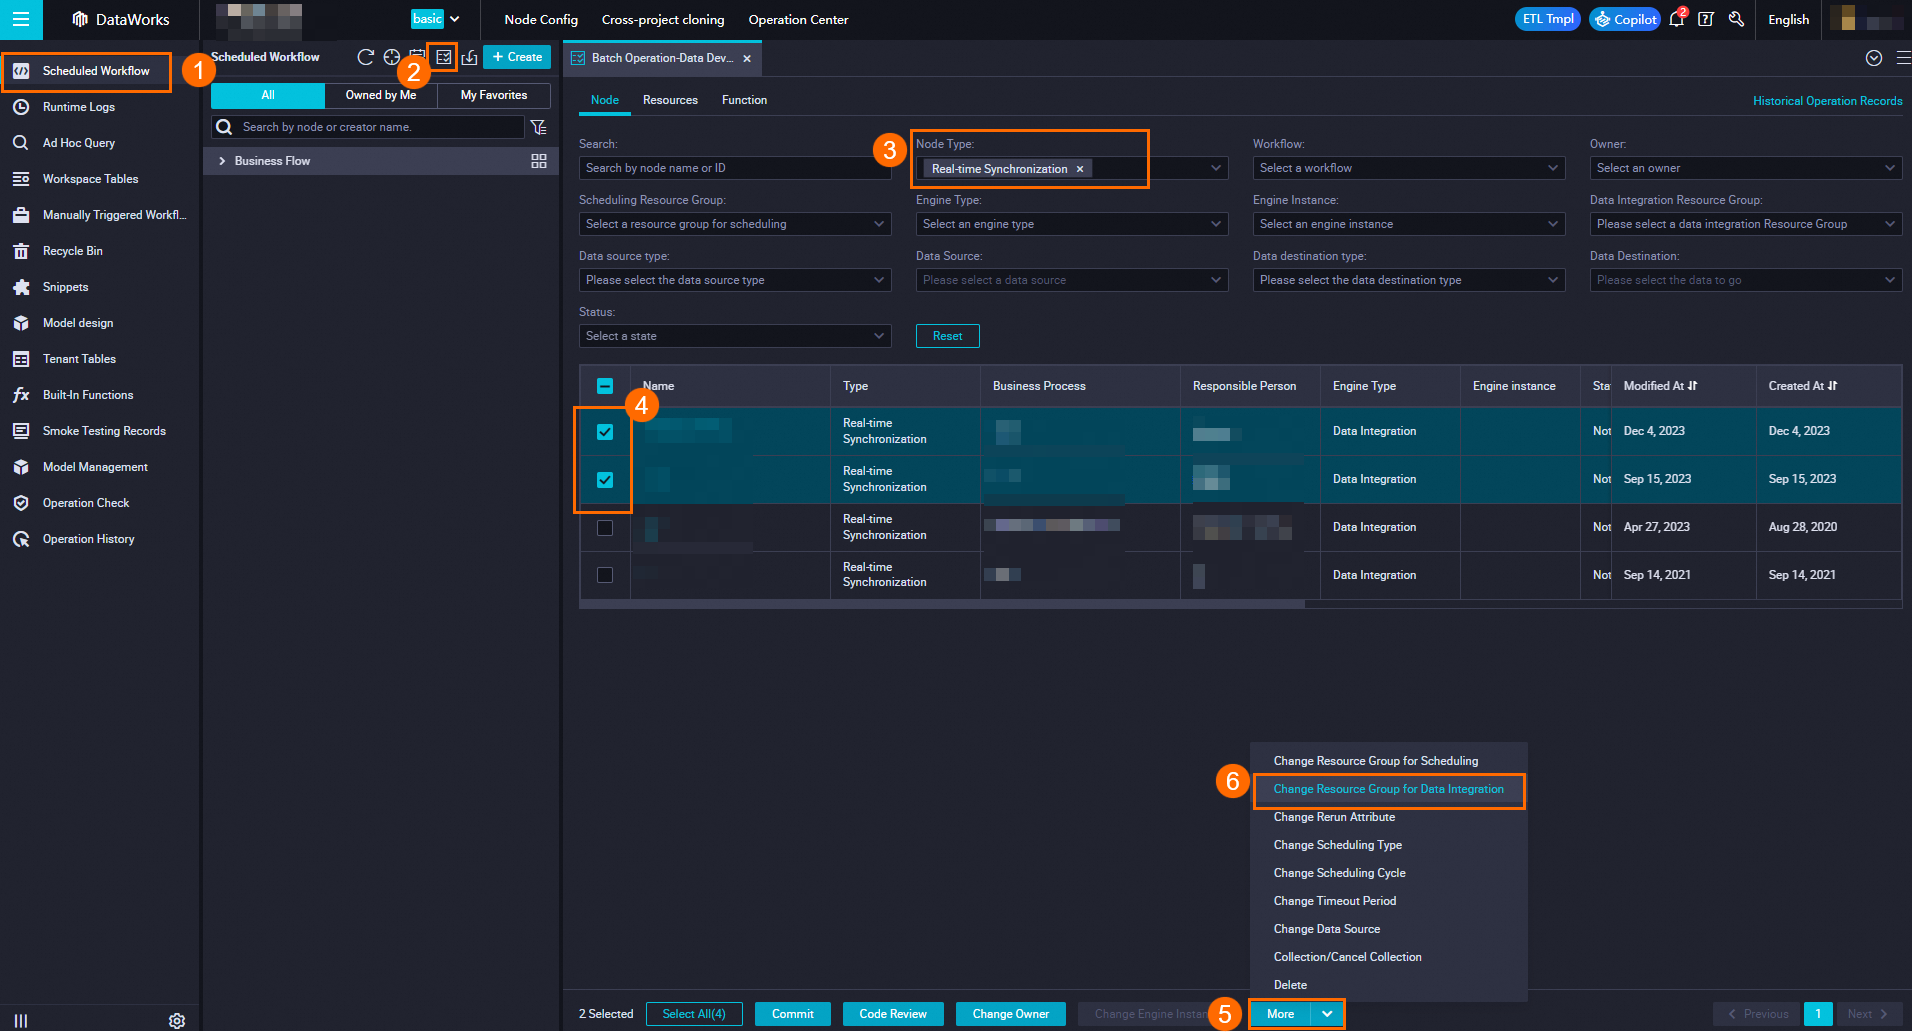
In the Change Resource Group for Data Integration dialog box, select the resource group that you want to use from the Select Resource Group for Scheduling drop-down list, select the I have been aware of the risk and confirm the change check box, and then click OK.
On the Batch Operation-Data Development tab, select the real-time synchronization tasks for which you have changed the resource groups for Data Integration at a time, and click Commit in the lower part of the tab.
Change the resource groups for Data Integration used by batch synchronization tasks on the Operation Center page
You can change the resource groups used in the development environment and production environment for tasks in Operation Center. You can switch to the required environment in the upper part of the Operation Center page and then perform the following steps to change the resource groups.
Go to the Operation Center page.
Log on to the DataWorks console. In the top navigation bar, select the desired region. In the left-side navigation pane, choose . On the page that appears, select the desired workspace from the drop-down list and click Go to Operation Center.
Change the resource groups for Data Integration used by multiple batch synchronization tasks at a time.
You cannot change the resource groups for Data Integration used by real-time synchronization tasks in Operation Center. To perform the change, go to the Data Integration or DataStudio page. For more information, see the Change the resource groups for Data Integration used by synchronization tasks on the Data Integration page and Change the resource groups for Data Integration used by synchronization tasks on the DataStudio page sections in this topic.
In the left-side navigation pane of the Operation Center page, choose .
On the Cycle Task page, set the Node Type parameter to Offline synchronization, select the batch synchronization tasks for which you want to change the resource groups for Data Integration at a time, and then click Freeze in the lower part of the page.
In the lower part of the Cycle Task page, click Actions and select Modify Data Integration Resource Group.
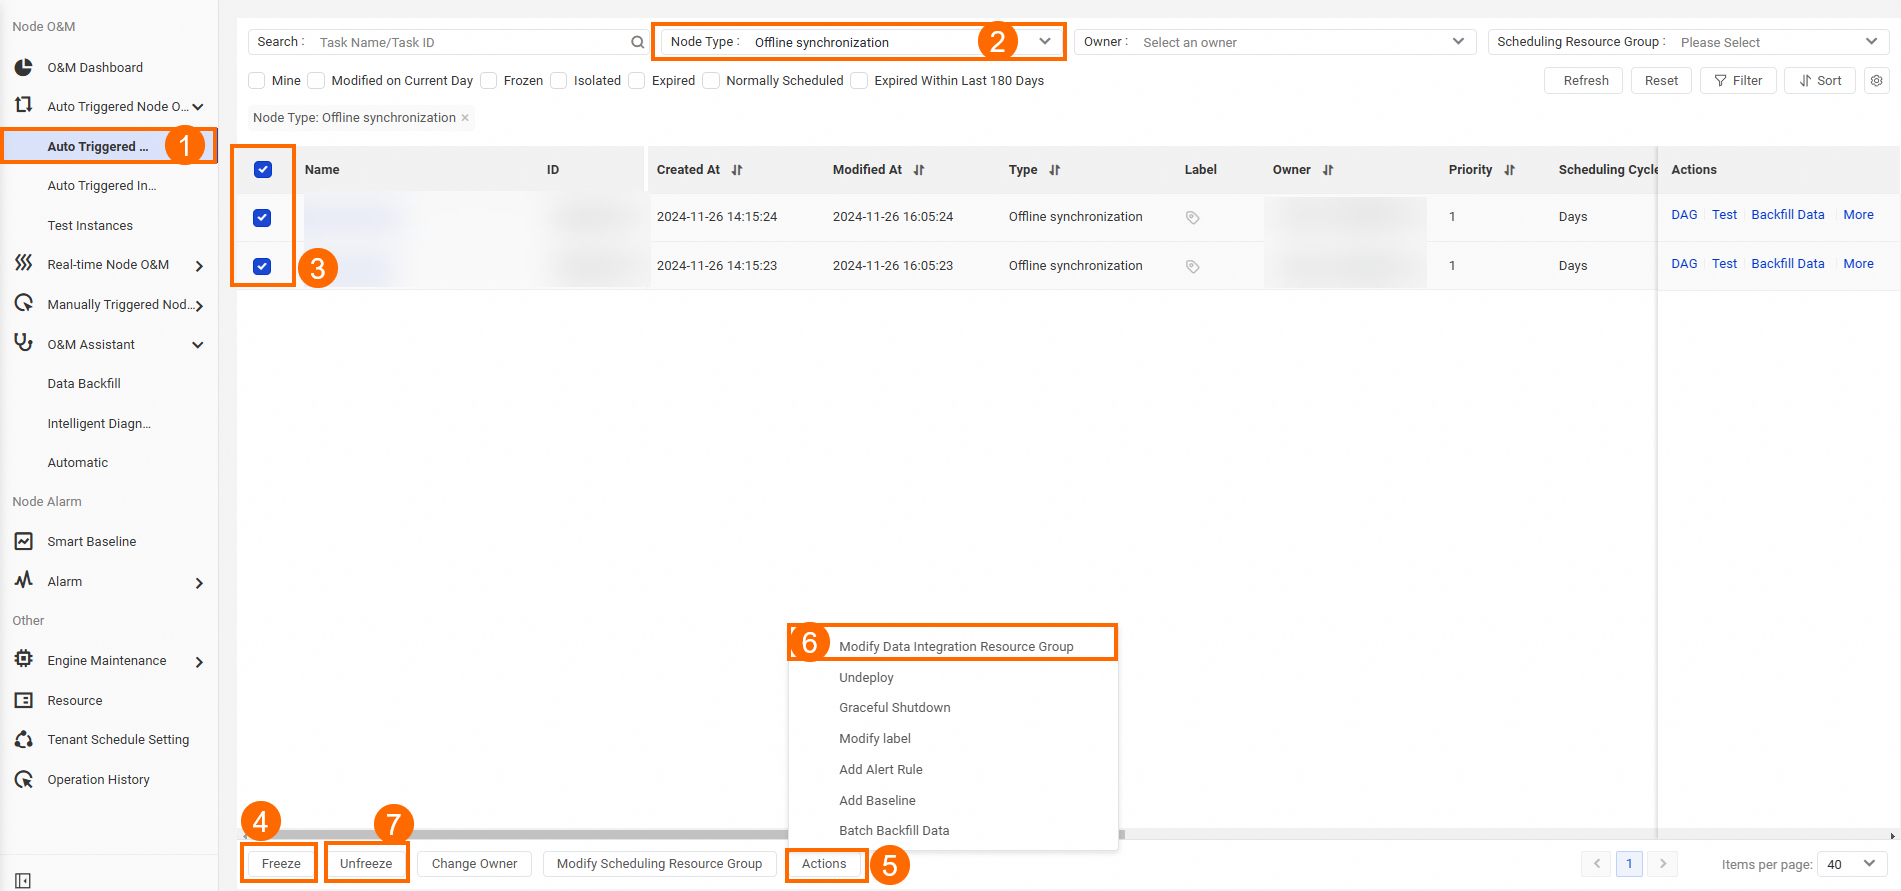
In the Modify Data Integration Resource Group dialog box, select the resource group that you want to use from the New Resource Group drop-down list and click OK.
On the Cycle Task page, select the batch synchronization tasks for which you have changed the resource groups for Data Integration at a time, and click Unfreeze in the lower part of the page.
Change the resource groups for scheduling used by tasks
Change the resource groups for scheduling used by tasks on the DataStudio page
If you change the resource group used by a task in DataStudio, the change is not synchronized to the production environment. You must deploy the task to the production environment for the change to take effect in the production environment. For more information, see Deploy nodes.
Go to the DataStudio page.
Log on to the DataWorks console. In the top navigation bar, select the desired region. In the left-side navigation pane, choose . On the page that appears, select the desired workspace from the drop-down list and click Go to Data Development.
Change the resource groups for scheduling used by tasks.
Change the resource group for scheduling used to debug a task
In the Scheduled Workflow pane of the DataStudio page, find the task for which you want to change the resource group for scheduling and double-click the task name to go to the configuration tab of the task.
Click the Run with Parameters icon in the top toolbar. In the Parameters dialog box, change the resource group for scheduling used to debug the code of the task.
Change the resource groups for scheduling used to schedule tasks
Change the resource group for scheduling used by a single taskChange the resource groups for scheduling used by multiple tasks at a timeIn the Scheduled Workflow pane of the DataStudio page, find the task for which you want to change the resource group for scheduling and double-click the task name to go to the configuration tab of the task.
In the right-side navigation pane of the configuration tab, click Properties. In the Resource Group section of the Properties tab, select the resource group for scheduling that you want to use from the Resource Group drop-down list.
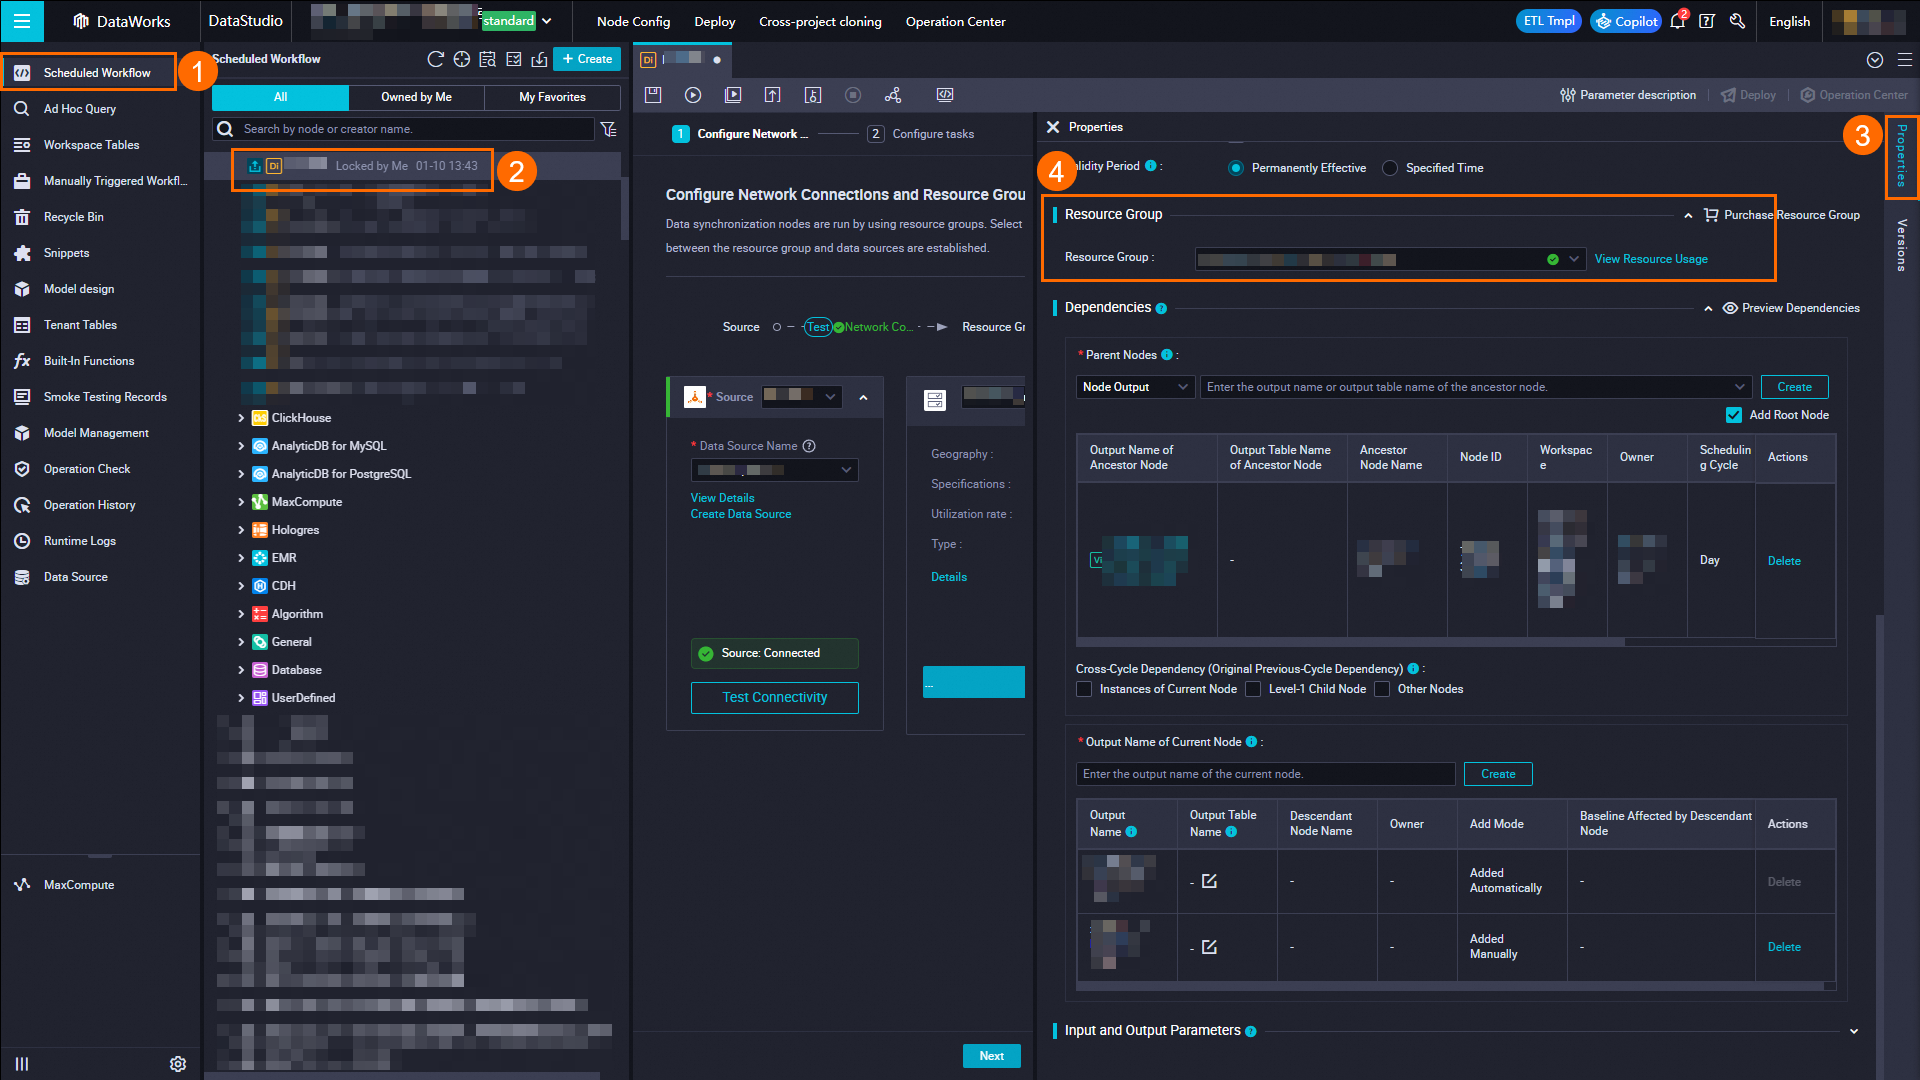
Save and run the task. After the task is successfully run, commit the task.
In the Scheduled Workflow pane of the DataStudio page, click the
 icon to go to the Batch Operation-Data Development tab.
 On the Batch Operation-Data Development tab, find the tasks for which you want to change the resources groups for scheduling at a time, click More in the lower part of the tab, and then select Change Resource Group for Scheduling.
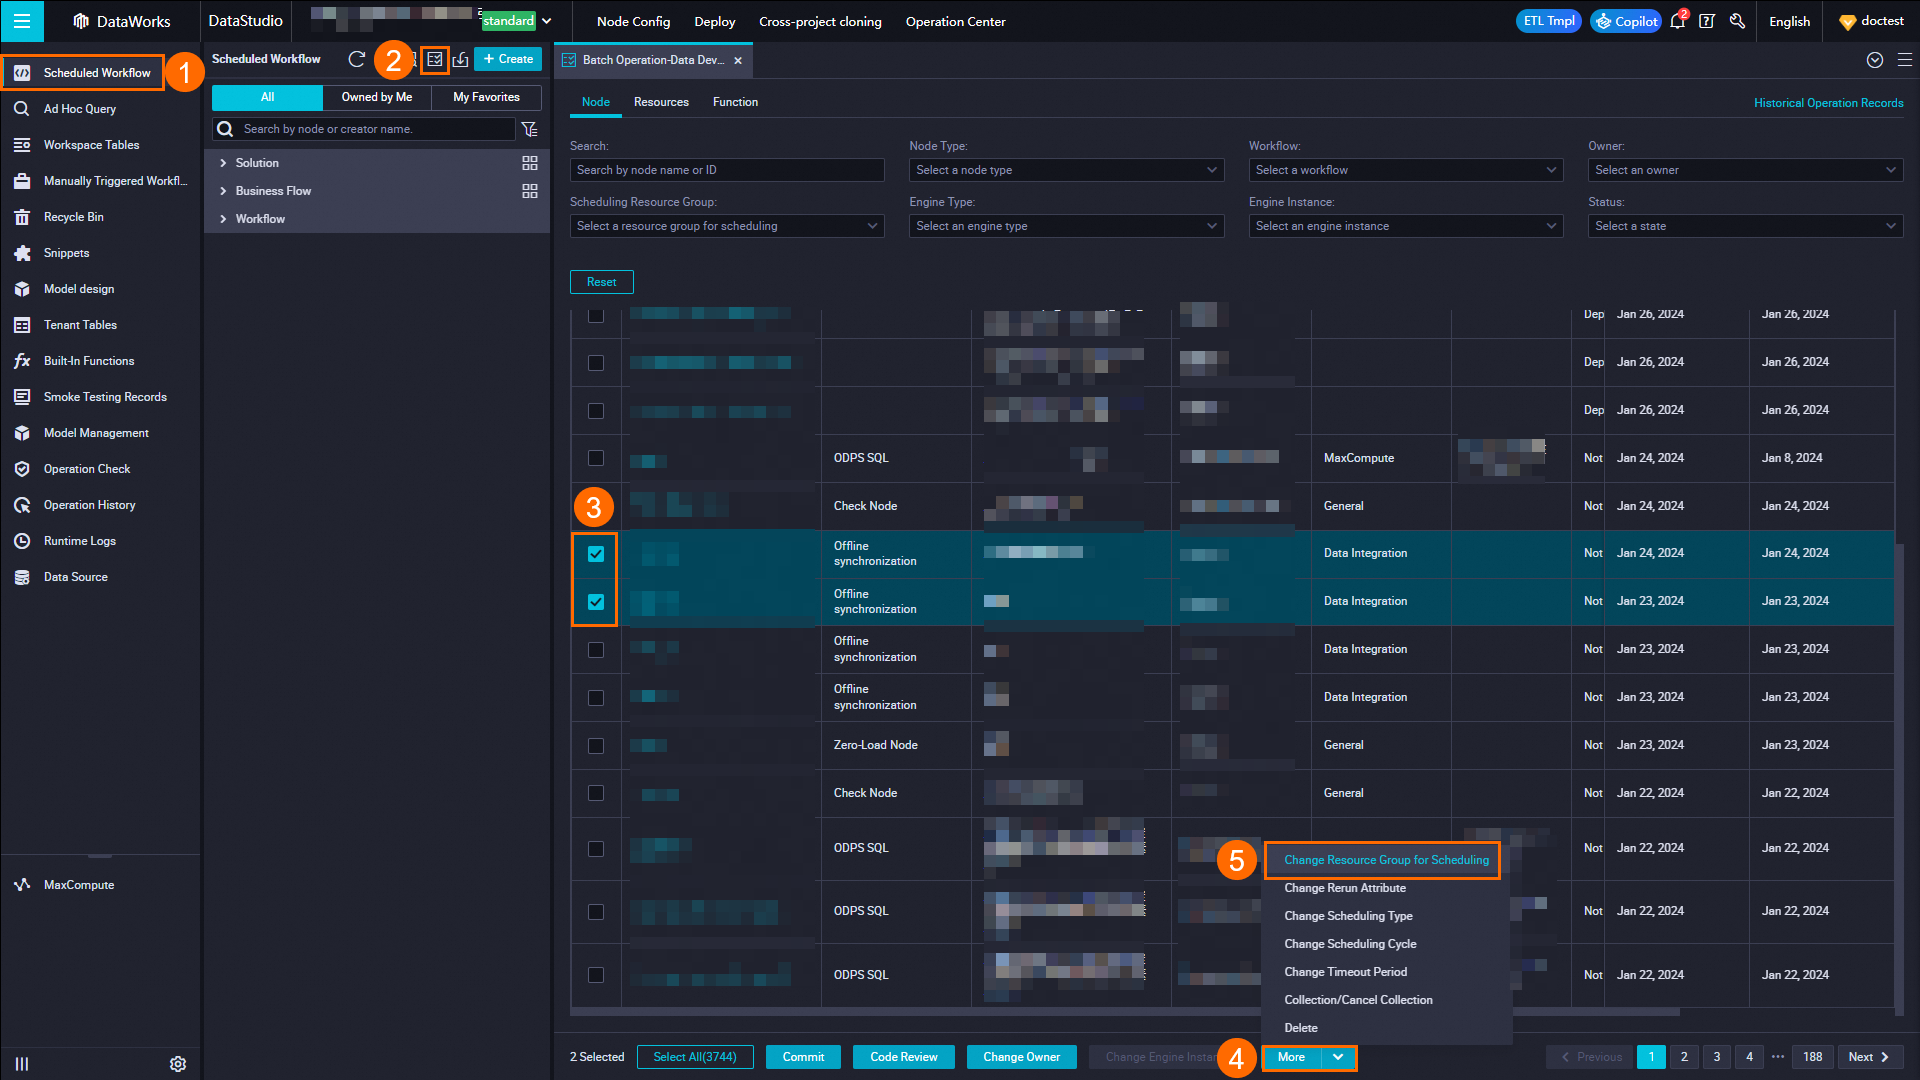
In the Change Resource Group for Scheduling dialog box, select the resource group that you want to use from the Select Resource Group for Scheduling drop-down list, select the I have been aware of the risk and confirm the change check box, and then click OK.
On the Batch Operation-Data Development tab, select the tasks for which you have changed the resource groups for scheduling at a time, and click Commit in the lower part of the tab.
Change the resource groups for scheduling used by tasks on the Operation Center page
You can change the resource groups used in the development environment and production environment for tasks in Operation Center. You can switch to the required environment in the upper part of the Operation Center page and then perform the following steps to change the resource groups.
Go to the Operation Center page.
Log on to the DataWorks console. In the top navigation bar, select the desired region. In the left-side navigation pane, choose . On the page that appears, select the desired workspace from the drop-down list and click Go to Operation Center.
Change the resource groups for scheduling used by multiple auto triggered tasks at a time.
In the left-side navigation pane of the Operation Center page, choose .
On the Cycle Task page, select the auto triggered tasks for which you want to change the resource groups for scheduling at a time, and click Freeze in the lower part of the page.
Click Modify Scheduling Resource Group in the lower part of the page.
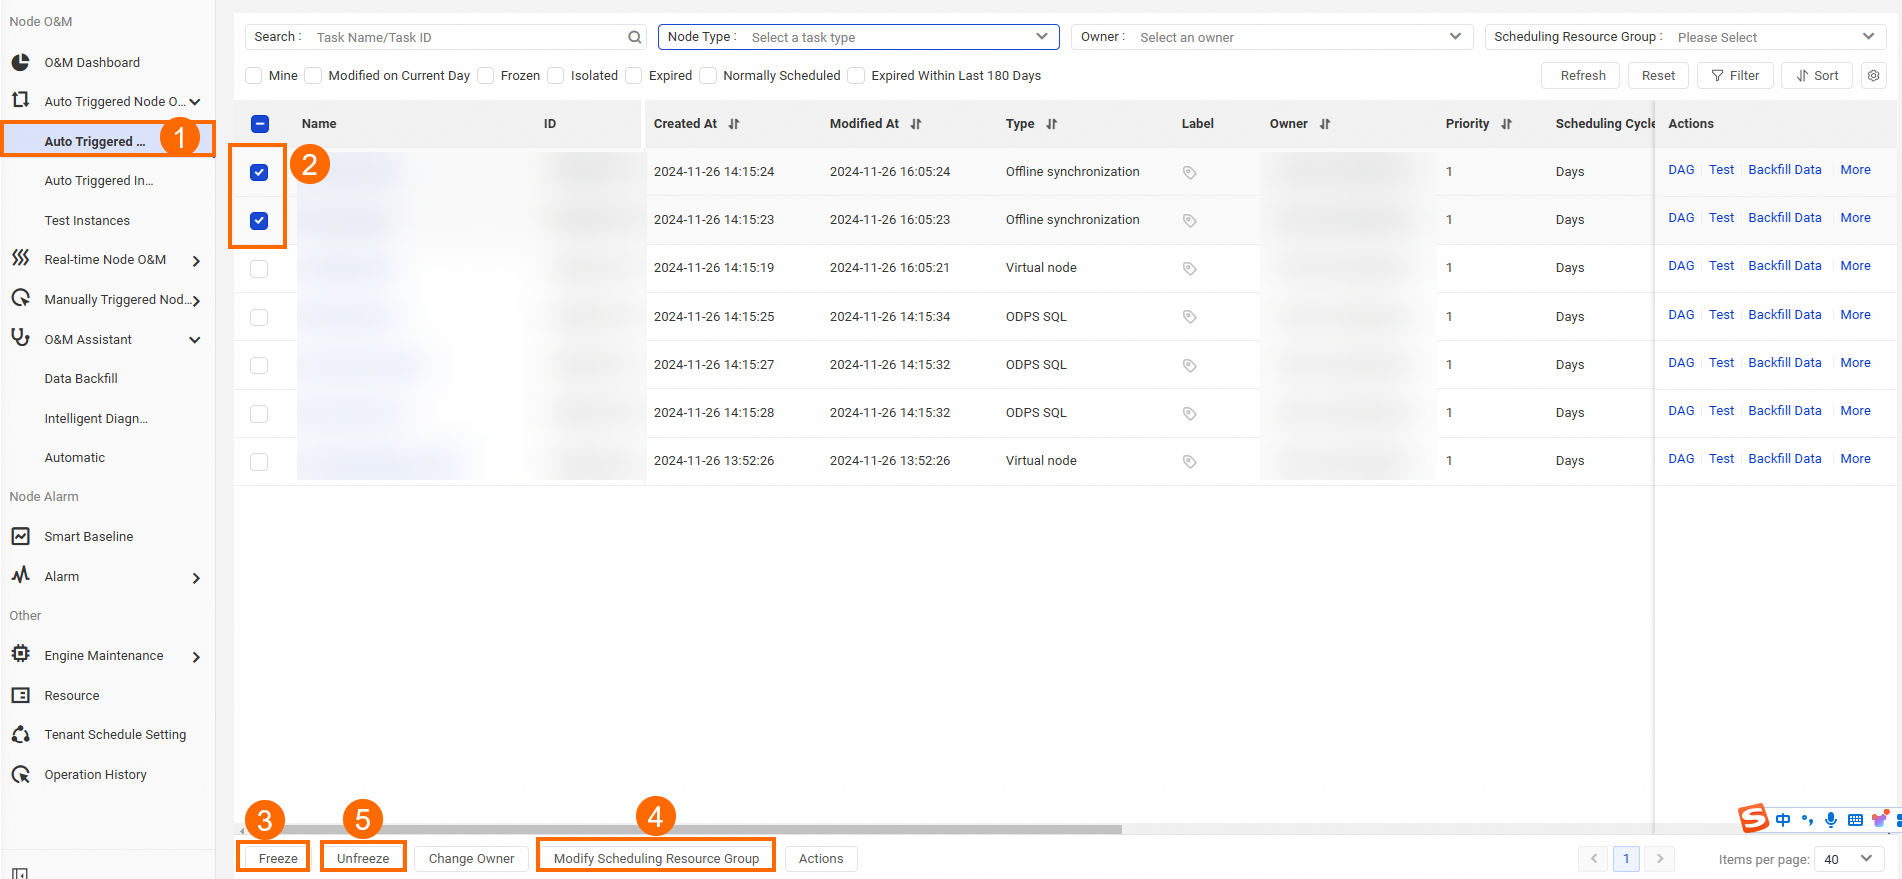
In the Modify Scheduling Resource Group dialog box, select the resource group that you want to use from the New Resource Group drop-down list and click OK.
On the Cycle Task page, select the tasks for which you have changed the resource groups for scheduling at a time, and click Unfreeze in the lower part of the page.
Change the resource groups for DataService Studio used by APIs
Go to the DataService Studio page.
Log on to the DataWorks console. In the top navigation bar, select the desired region. In the left-side navigation pane, choose . On the page that appears, select the desired workspace from the drop-down list and click Go to DataService Studio.
Change the resource groups for DataService Studio used by APIs.
Change the resource group for DataService Studio used by a single APIChange the resource groups for DataService Studio used by multiple APIs at a timeIn the Service Development pane of the DataService Studio page, find the API for which you want to change the resource group for DataService Studio and double-click the API name to go to the configuration tab of the API. In the right-side navigation pane of the configuration tab, click Resource Group. In the Resource Group Type section of the Resource Group tab, set the Scheme parameter to Exclusive Resource Group for DataService Studio and select a resource group of the new version from the Exclusive Resource Group for DataService Studio drop-down list.
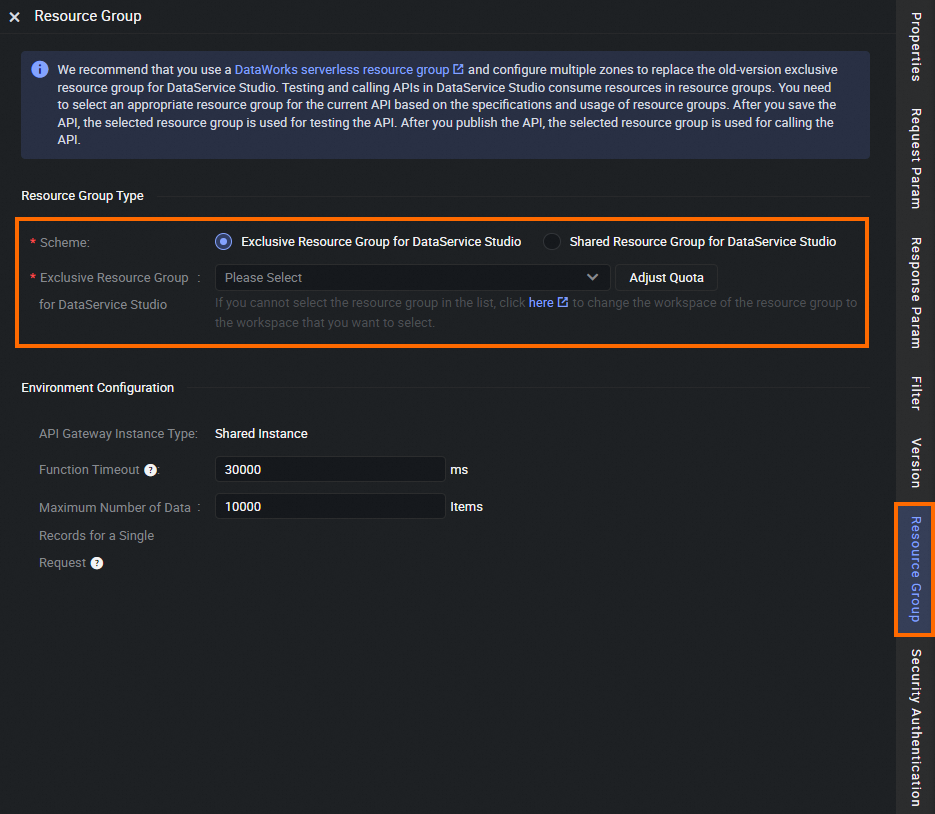
Save and test the API. If the test is successful, commit the API.
In the Service Development pane of the DataService Studio page, click the
 icon. On the Batch Operation tab, select the APIs for which you want to change the resource groups for DataService Studio at a time, and click Change Resource Group in the lower part of the tab.
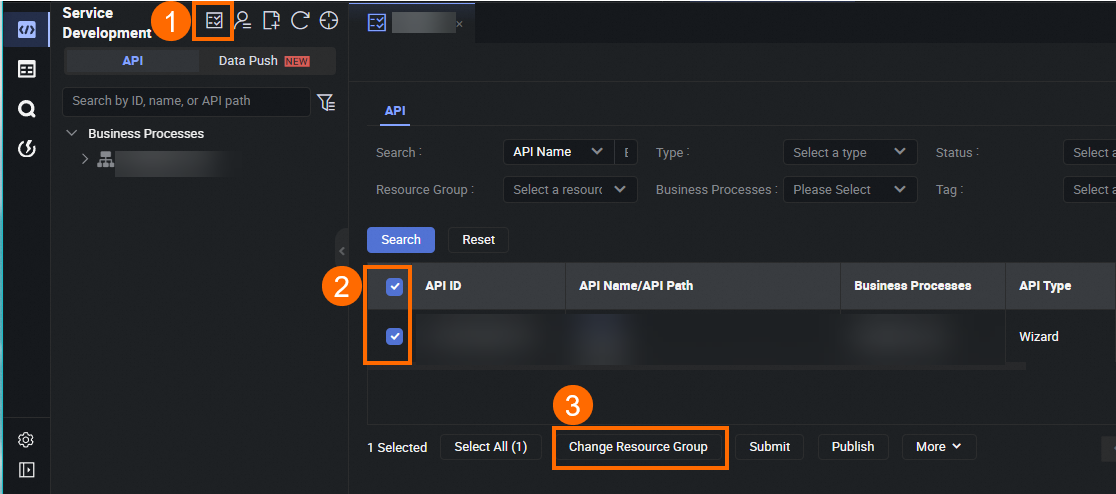
In the Change Resource Group dialog box, select a resource group of the new version from the Resource Group for DataService Studio drop-down list and click OK.
If Successful is displayed in the Result column of the selected APIs in the View Result step, click Close.
On the Batch Operation tab, set the Resource Group parameter to the name of the resource group of the new version and click Search. The APIs for which the resource group of the new version is used are displayed.
In the lower part of the Batch Operation tab, click Submit. If the submission is successful, click Publish to publish the APIs.
Appendix: Disassociate a resource group from a workspace
If an exclusive resource group is not being used by deployed tasks in a workspace, you can directly disassociate the resource group from the workspace on the Exclusive Resource Groups tab of the Resource Groups page in the DataWorks console.
If a resource group is being used by deployed tasks in a workspace, you cannot directly disassociate the resource group from the workspace. In this case, you must change the resource group for the tasks and use another resource group to run the tasks. Then, you can disassociate the resource group from the workspace.
Log on to the DataWorks console.
In the left-side navigation pane, click Resource Group. In the top navigation bar, select the region in which the desired resource group resides.
On the Resource Group page, find the desired resource group and click Change Workspace in the Actions column. In the Modify home workspace dialog box, find the workspace from which you want to disassociate the resource group and click Unbind.


