Database migration is a complex and risky process that directly affects business stability and continuity. The compatibility and performance of destination databases have always been a major concern for users who need to migrate databases. Any compatibility issues or performance bottlenecks may result in migration failures and even cause business interruption and data loss. To effectively assess migration risks and ensure smooth migration, the traffic playback technology came into being. It provides an instrumental solution that allows users to perform comprehensive compatibility and performance tests on destination databases before migration. This minimizes potential risks. This topic describes the key role that the traffic playback feature of Cloud Migration Hub plays during database migration. This topic also describes how to use the traffic playback feature. Traffic playback is not a simple database stress test, but a complete playback of real business traffic in the production environment. It simulates real business scenarios to comprehensively verify the performance and compatibility of destination databases. This is fundamentally different from traditional stress tests, which are based on preset scripts. The stress tests cannot fully cover the complexity and diversity of real business scenarios, which can easily lead to deviations in test results. The traffic playback technology can accurately reproduce the operational state of the production environment, so as to evaluate the performance and compatibility of destination databases in a more effective manner.
1. Use the traffic playback feature
The process of using the traffic playback feature includes the following steps:
Step 1: collect data. You need to select an appropriate tool to capture and record the read and write requests sent to your source database in the production environment. Exercise caution in this step to prevent excessive impacts on the production environment. Common data collection tools include database proxies, network packet capture tools, and the audit feature of databases. Make sure that the collected data include key information such as complete SQL statements, parameters, and execution time. The key information is used as the input of traffic playback. Data must be collected and formatted in a way that is compatible with the traffic playback tool used in subsequent steps. You must mask sensitive information to ensure data security.
Step 2: preprocess data. You need to preprocess the collected data, such as removing redundant information, optimizing data formats, and performing data masking if required. Data preprocessing involves operations such as data cleansing, data conversion, and data sampling, which help improve the traffic playback efficiency and reduce the load on the destination database. You may need to modify SQL statements based on the characteristics of the destination database to ensure that the statements can be executed as expected in the destination database.
Step 3: perform traffic playback. The preprocessed data is imported to the traffic playback tool for playback. The traffic playback tool simulates real business traffic and performs concurrent access to the destination database to evaluate the performance and compatibility of the database. During this process, the system monitors key metrics such as CPU utilization, memory usage, and I/O performance of the destination database, and records the error information and exceptions reported during playback. The traffic playback tool allows you to customize settings such as the playback speed and concurrency level to simulate different business scenarios.
Step 4: analyze results. After traffic playback is complete, you can analyze result data to evaluate the performance and compatibility of the destination database. For example, you can analyze metrics such as the database response time, throughput, error rate, and resource utilization. This helps identify potential performance bottlenecks and compatibility issues, which provide a basis for optimizing the database migration solution. In addition, you need to analyze the error information reported during playback, find out the root cause, and take corresponding measures to resolve the errors.
Step 5: generate a report. You can generate a detailed traffic playback report to summarize the test results and offer suggestions for improvement. Make sure that the report contains information such as the test environment configurations, test data summary, performance metrics, and error information to provide an important reference for database migration decisions.
You can use the traffic playback feature by following the preceding steps to effectively evaluate the compatibility and performance of your destination database, reduce migration risks, and ensure smooth database migration. The feature provides reliable analysis statistics for database migration projects. This helps enterprises smoothly migrate databases with minimal business interruption and at a lower cost. Proper use of traffic playback tools can effectively improve the success rates of database migration projects.
2. Comparison between new and old versions of traffic playback
To improve user experience of traffic playback, Cloud Migration Hub provides the new version of traffic playback while retaining the old version. You can switch between the pages for the new and old versions of traffic playback. You can use the new version of traffic playback only if the following requirements are met:
Databases deployed on Alibaba Cloud are used as destination databases. If you want to use the Comparison of results playback type, make sure that your source database is connected to the virtual private cloud (VPC) in which the destination database is deployed.
A traffic playback agent is deployed on an Elastic Compute Service (ECS) instance that is automatically created by Cloud Migration Hub. The ECS instance uses the following specifications: 4 cores, 8 GB of memory, and a 100-GB system disk. Make sure that the specifications meet your business requirements. You can calculate playback pressure by multiplying the number of ECS instances by single-instance pressure. If you need to increase playback pressure, you can click Expansion in the Instance Overview section on the details page of your playback schedule to increase the number of ECS instances.
The files containing the collected SQL traffic data are stored in Object Storage Service (OSS). This type of file is referred to as SQL files. In the new version, SQL files are automatically downloaded from OSS to the /home/ directory of ECS instances that are used. If the size of an SQL file exceeds 20 GB, we recommend that you use the old version of traffic playback.
If the preceding requirements are not met or you want to deploy a traffic playback agent on a custom server, we recommend that you go to the page for the old version of traffic playback.
3. New version of traffic playback
Prerequisites:
The page for the new version of traffic playback is displayed.
The production traffic of your data source is captured. You can select a capturing method based on the data source. After traffic data is collected, you must convert the data to the required JSON format for traffic playback. For more information about the JSON format, see the replay_sql_example.json file.
The JSON file required for traffic playback is uploaded to an OSS bucket. Make sure that the bucket resides in the same region as the destination database. This type of file is referred to as a playback file.
The overall process of using the traffic playback feature consists of two steps: create a playback schedule and create a playback task in the playback schedule. A playback schedule can contain multiple playback tasks. To use the feature, log on to the Cloud Migration Hub console. In the left-side navigation pane, choose . On the page that appears, click Go to the new edition in the upper-right corner.

3.1 Create a playback schedule
Log on to the Cloud Migration Hub console. In the left-side navigation pane, choose . On the page that appears, click New Playback Schedule.

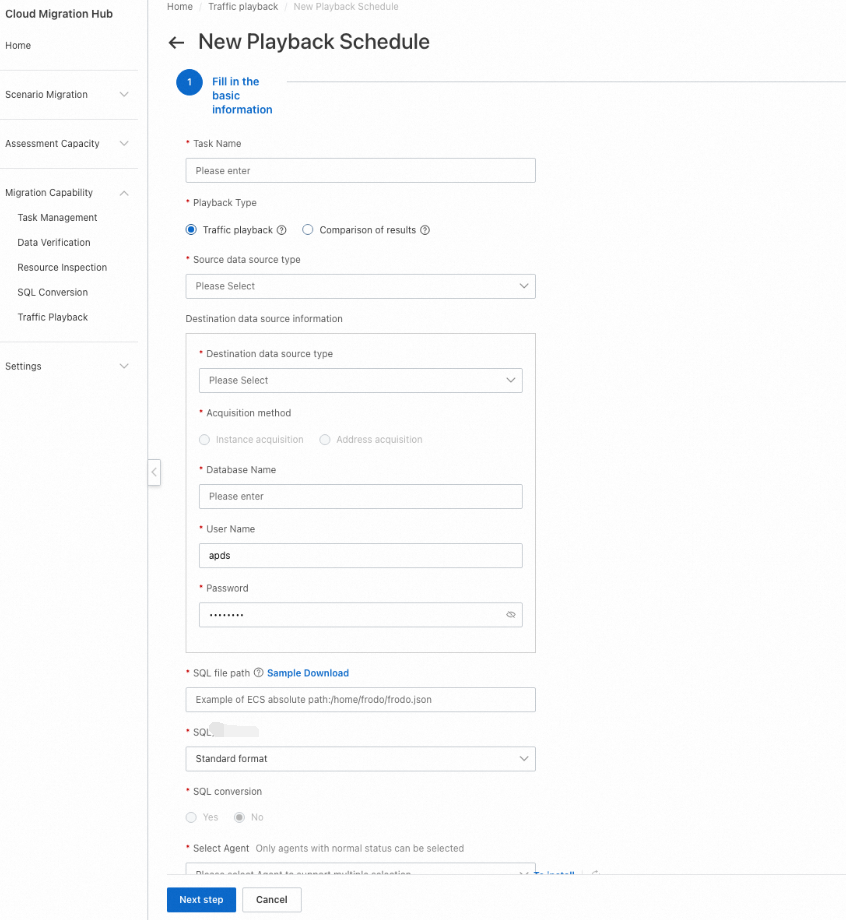
Step 1: Configure basic information
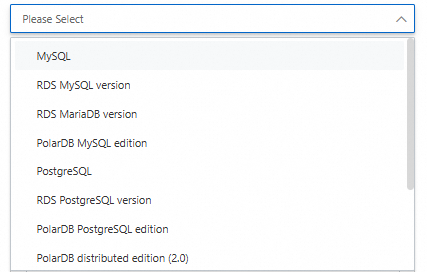
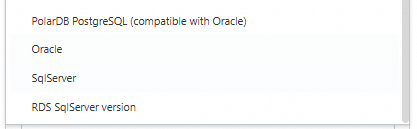
When you create a playback schedule, you can set the Playback Type parameter to Traffic playback or Comparison of results. If you set the parameter to Traffic playback, the system executes SQL statements in the playback file on the data destination and checks whether the execution is successful. If you set the parameter to Comparison of results, the system executes the SQL statements on both the data source and destination, compares the execution results, and displays details about discrepancies found during the comparison.
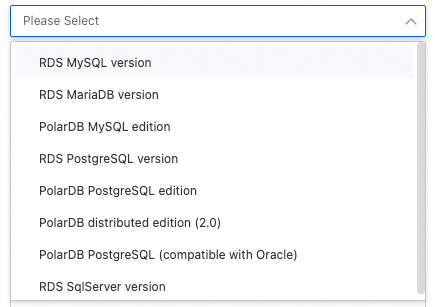
The following figure shows the supported types of source and destination databases.
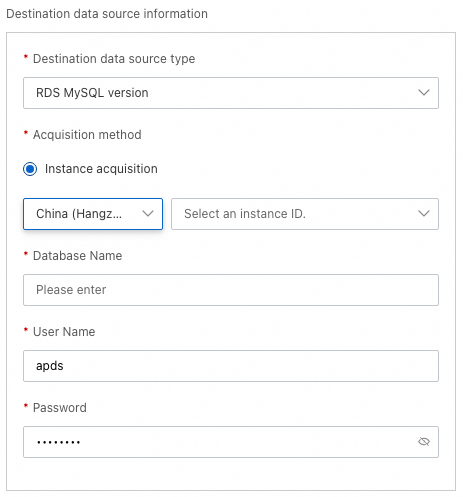
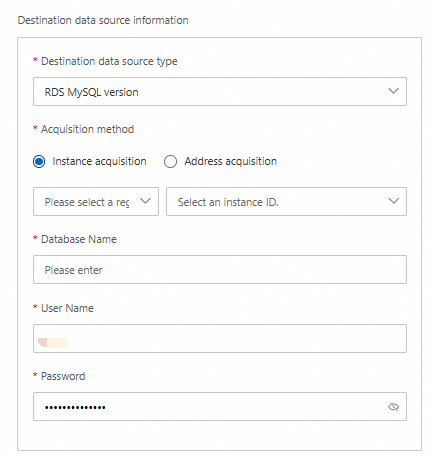
You can set the Acquisition method parameter only to Instance acquisition. This parameter specifies the method to obtain information about the source and destination databases. You must specify the region and ID of your instance, the name of your database, and the username and password used to log on to your database.
You can select a format for the playback file.
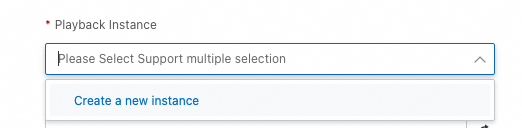
You can set the Playback Instance parameter to an ECS instance on which a traffic playback agent is deployed. This type of ECS instance is referred to as a playback instance. Make sure that the instance is connected to the destination database. If no playback instance is available, click Create a new instance in the drop-down list. If playback instances are available, select an existing instance from the drop-down list.
Cloud Migration Hub automatically creates an ECS instance whose network type is VPC. By default, the instance uses the following specifications: 4 cores, 8 GB of memory, and a 100-GB system disk. You are charged for the instance. If the specifications do not meet your business requirements or you want to deploy a traffic playback agent on a different server, you can switch to the old version of traffic playback.
Cloud Migration Hub automatically creates an ECS instance that resides in the region, zone, and VPC of the destination database. If you want to use the Comparison of results playback type, you must manually connect the source database to the playback instance.
If you click Create a new instance, Cloud Migration Hub automatically creates only one ECS instance. If you need more playback instances, click Expansion on the details page of your playback schedule.
You can set the Playback file Bucket address parameter to the OSS bucket that stores the playback file. If no bucket is displayed in the drop-down list, click Create a Bucket.

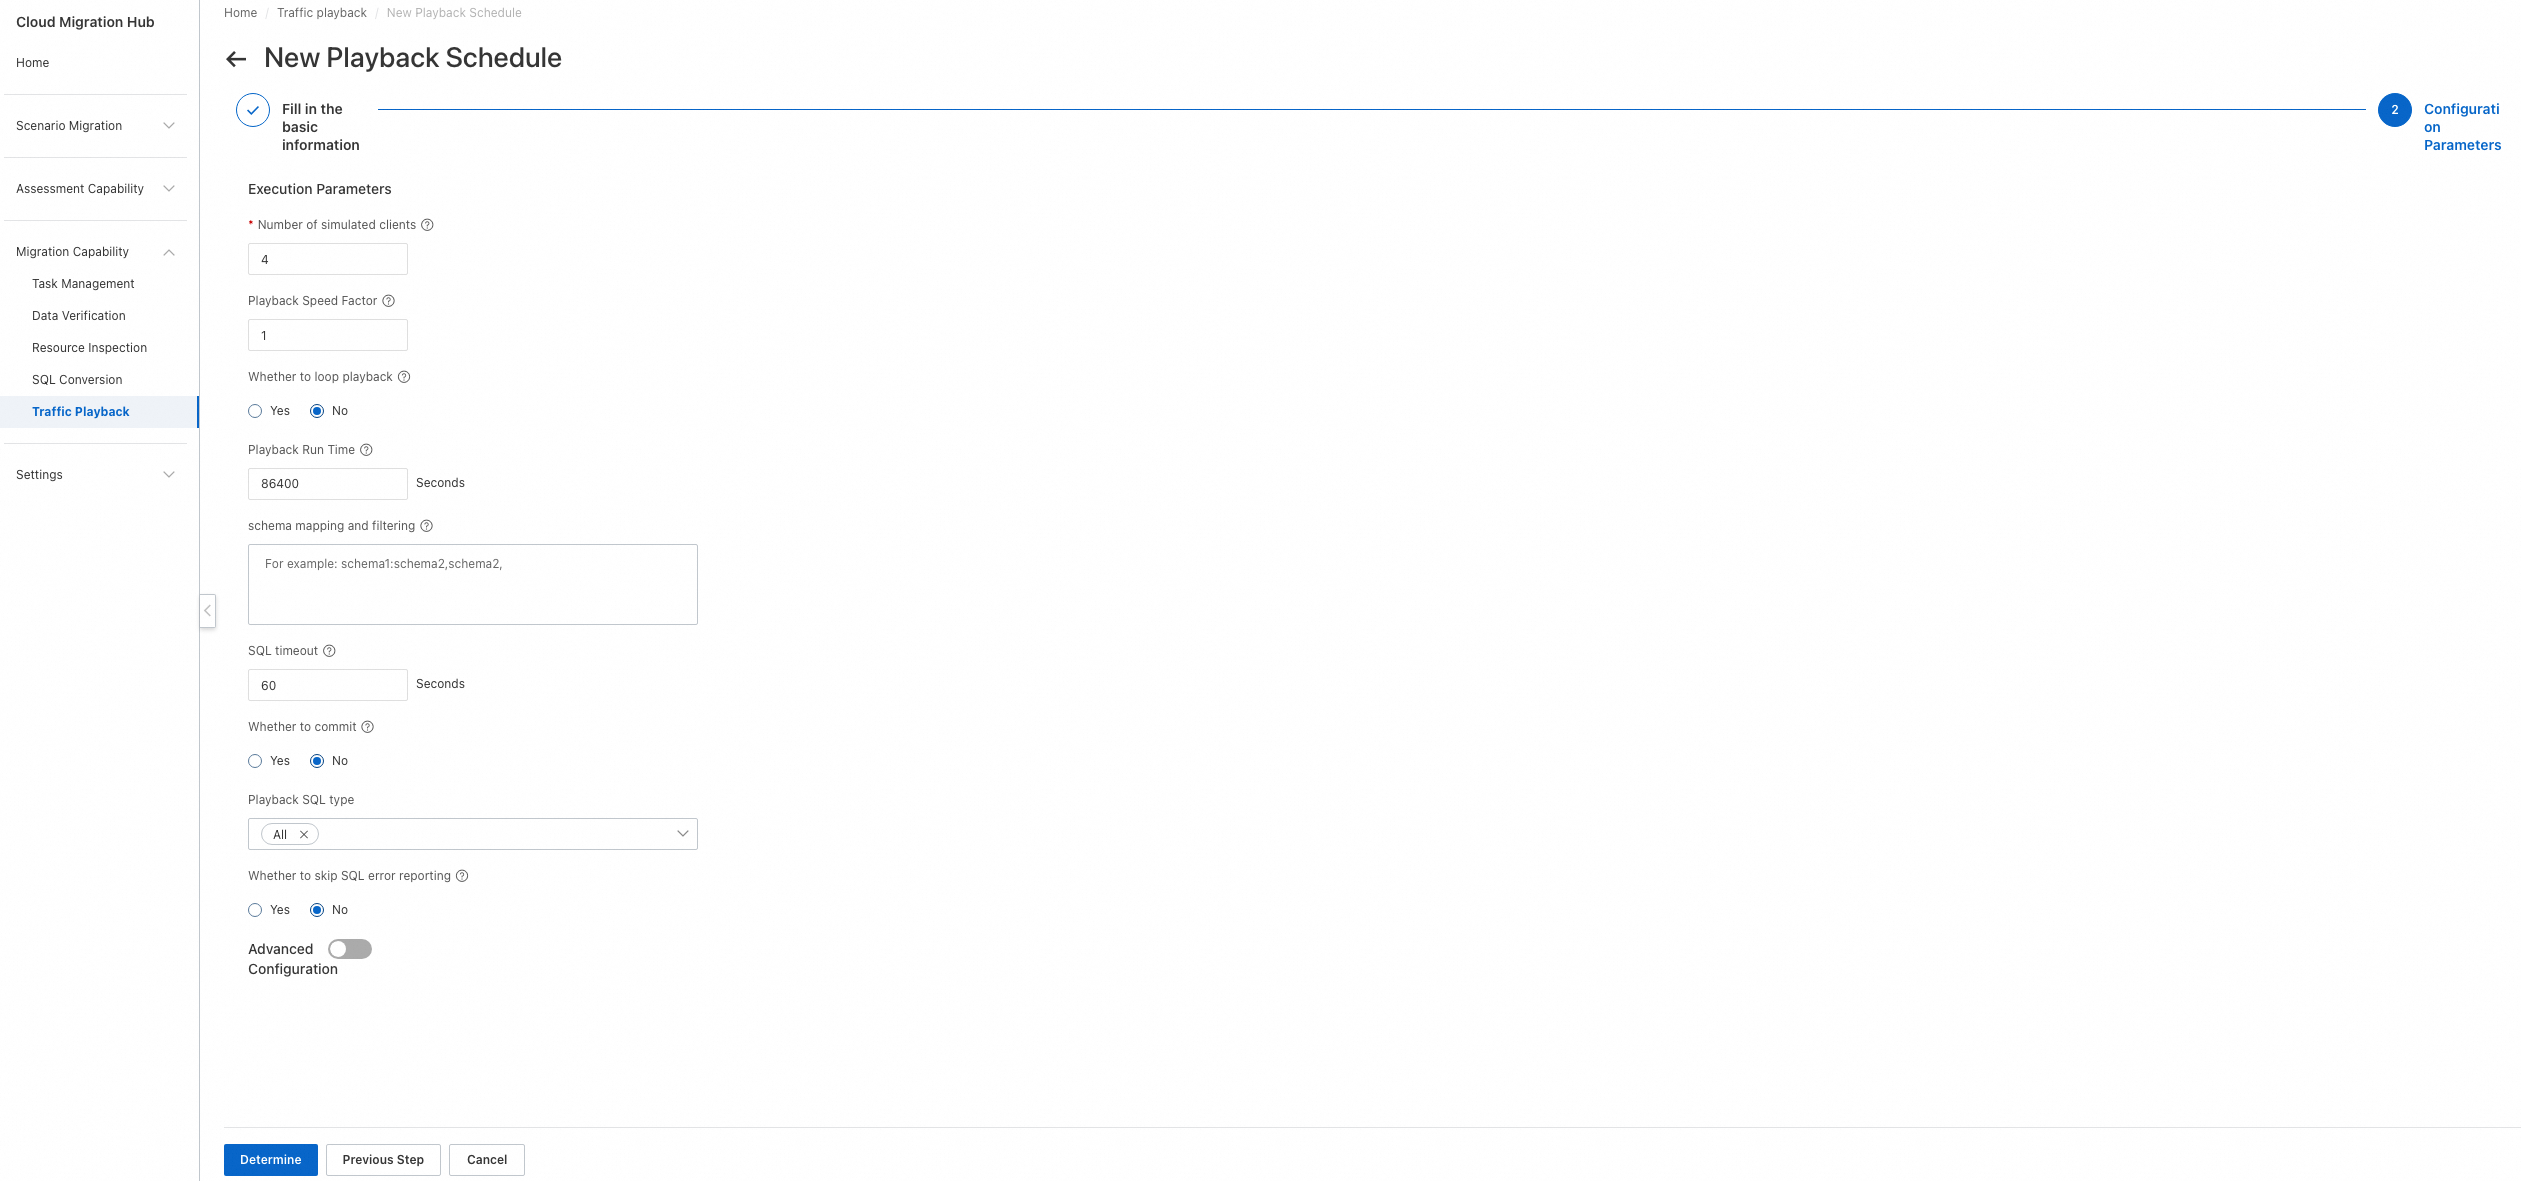
Step 2: Configure parameters
Number of simulated clients: the number of concurrent threads for playback. A higher value specifies a higher degree of concurrency.
Playback Speed Factor: the factor for the playback speed. A higher value specifies a faster speed. For example, a value of 1 specifies no speed boost, a value of 2 specifies twice the original speed, and a value of 10 specifies ten times the original speed.
3.2 View a playback schedule
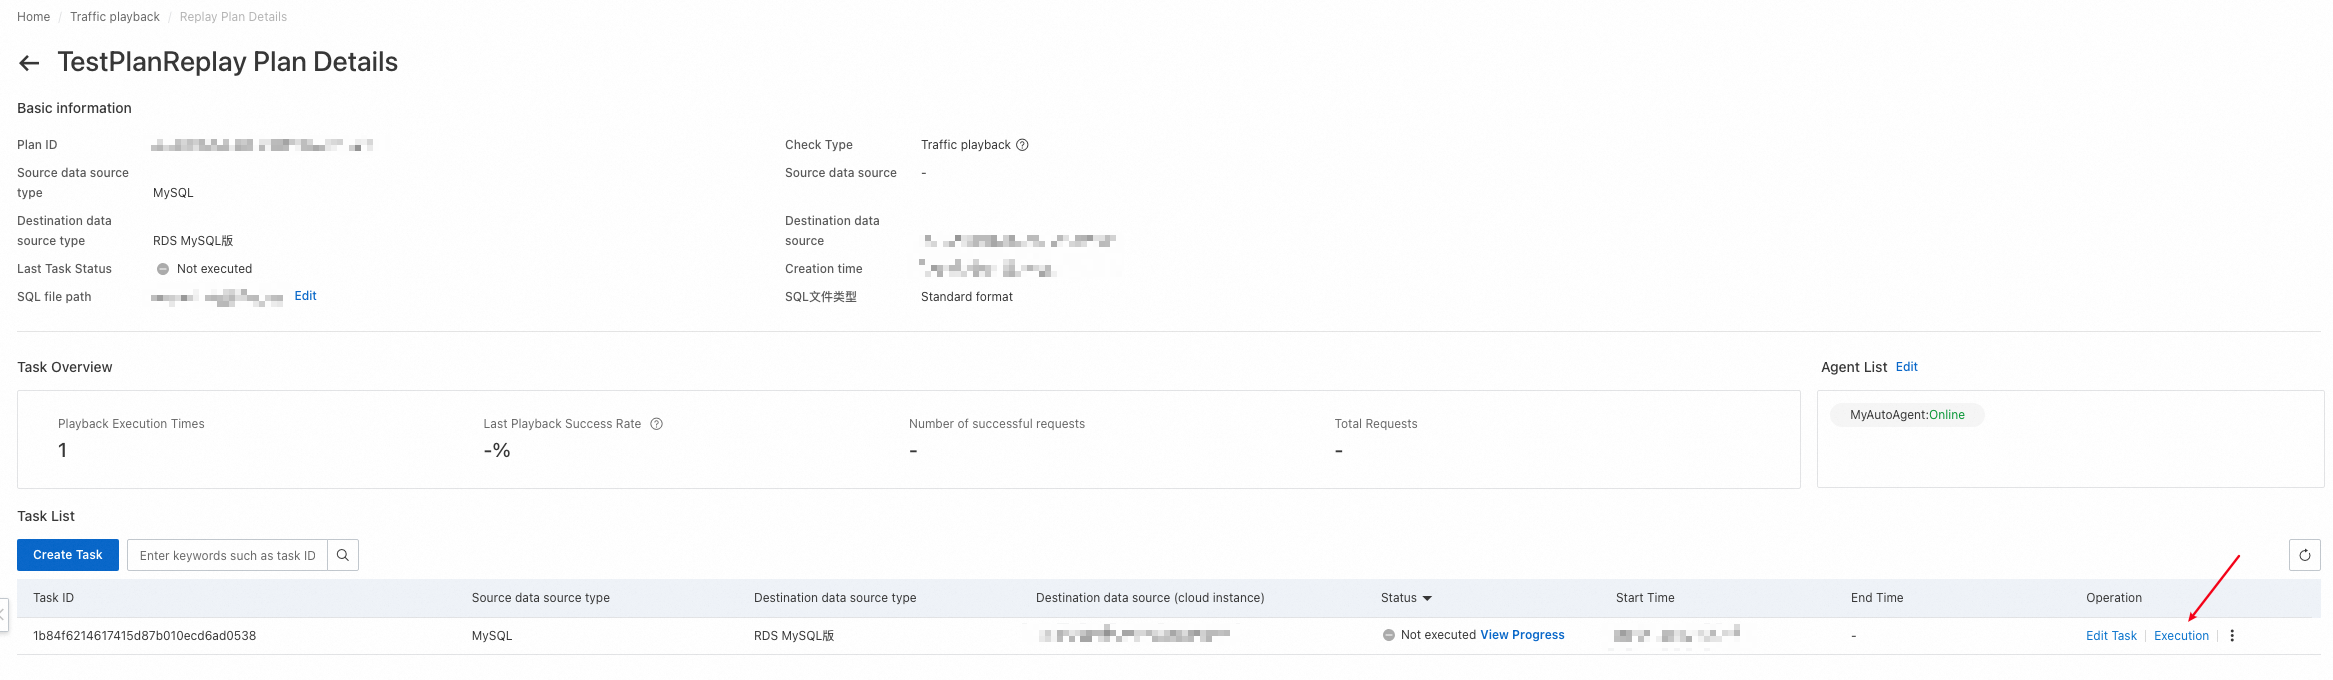
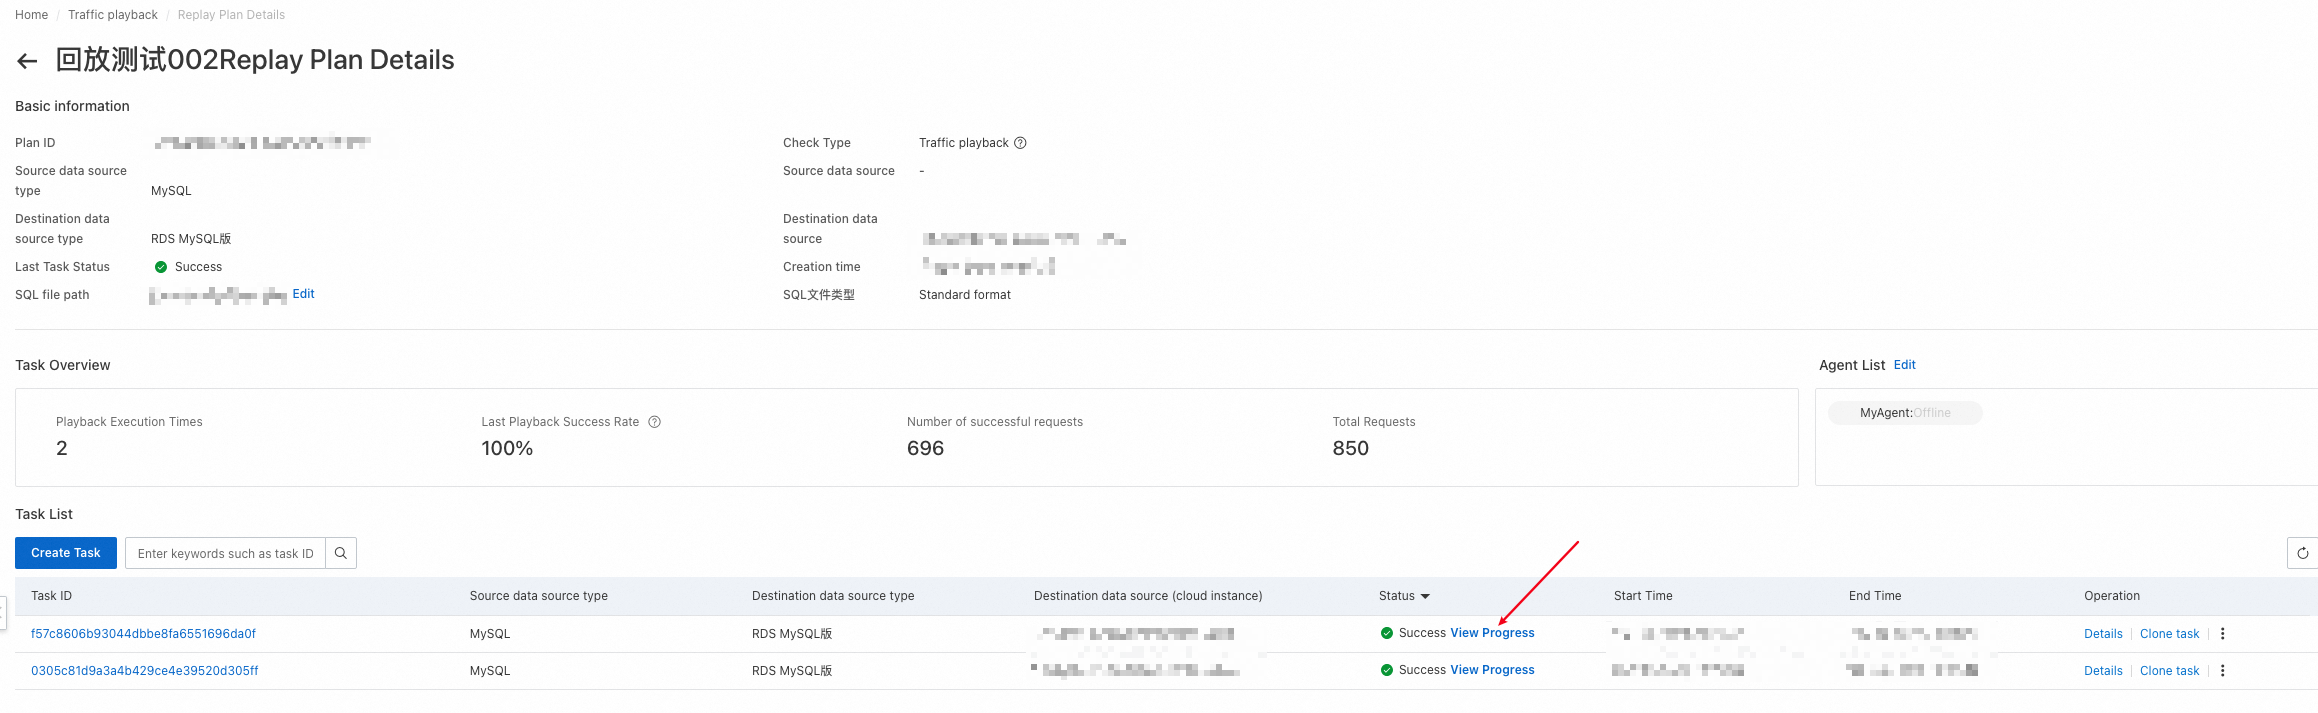
After a playback schedule is created, it appears on the Traffic playback page. You can view all playback schedules that are created within your account on this page. You can click the name of a playback schedule or Details in the Operation column to go to the details page of the playback schedule. On the page for the new version, you can only view the details of playback schedules that are created in the new version. On the page for the old version, you can only view the details of playback schedules that are created in the old version.

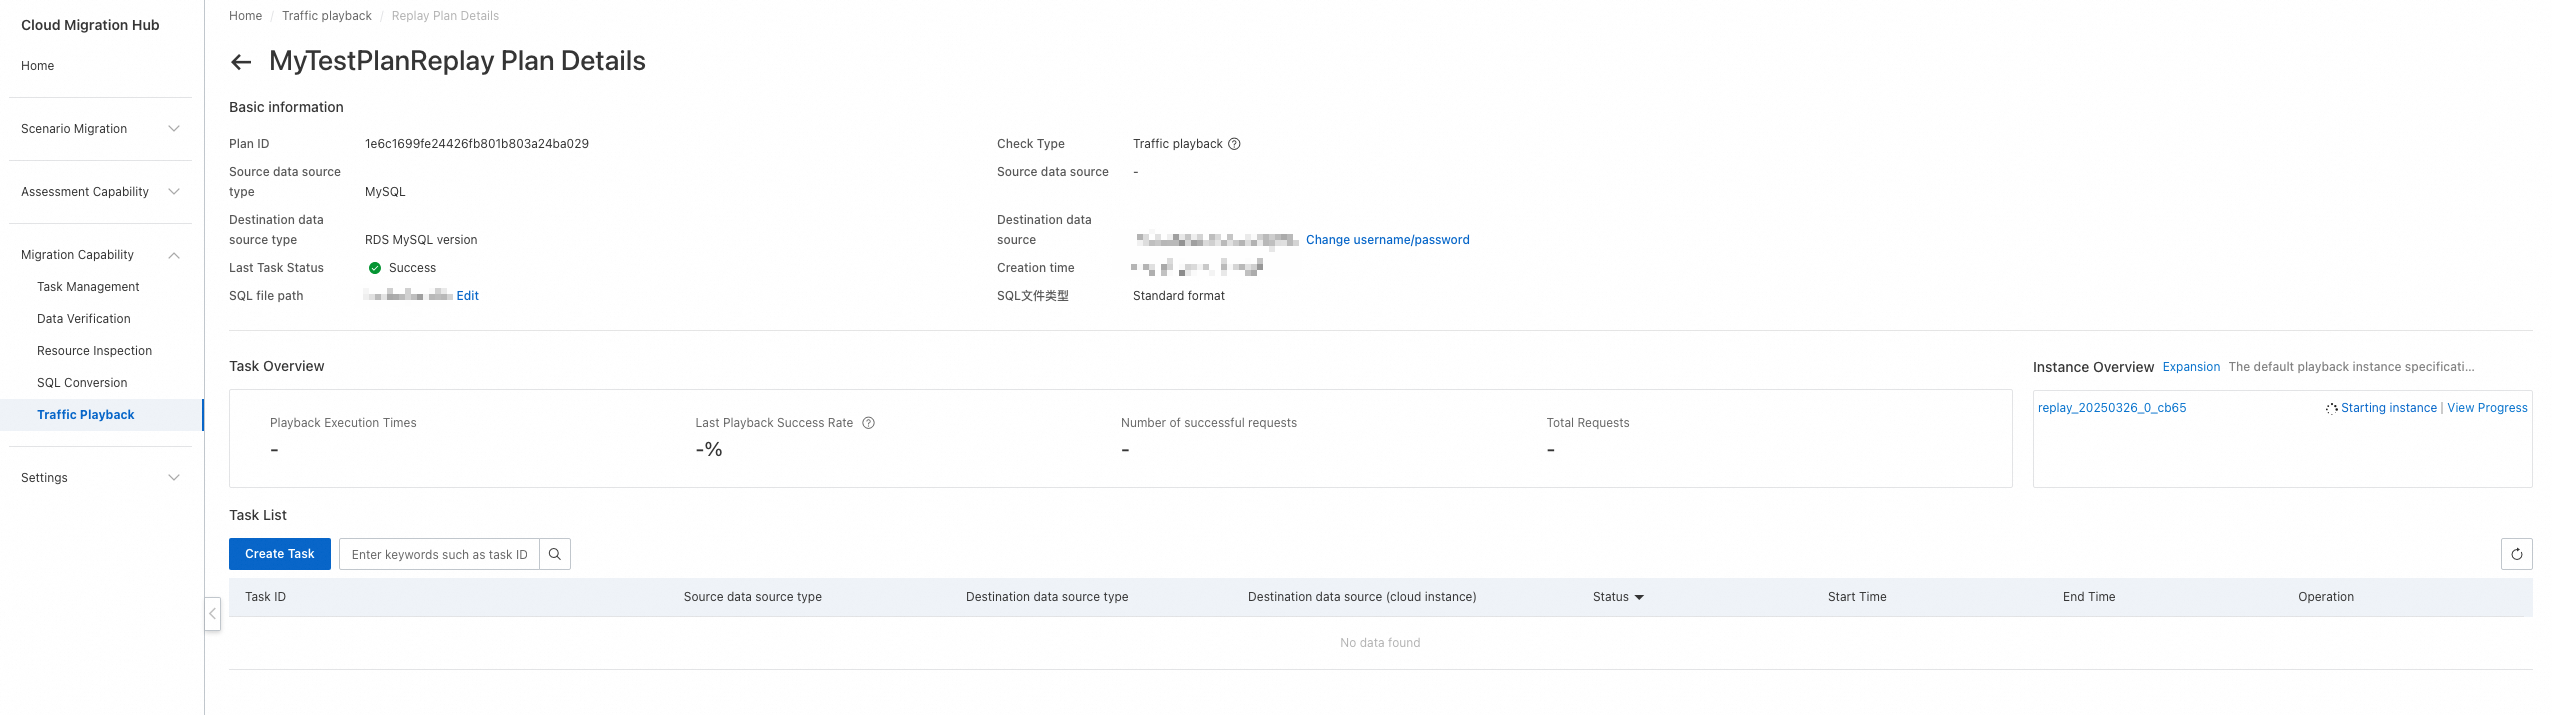
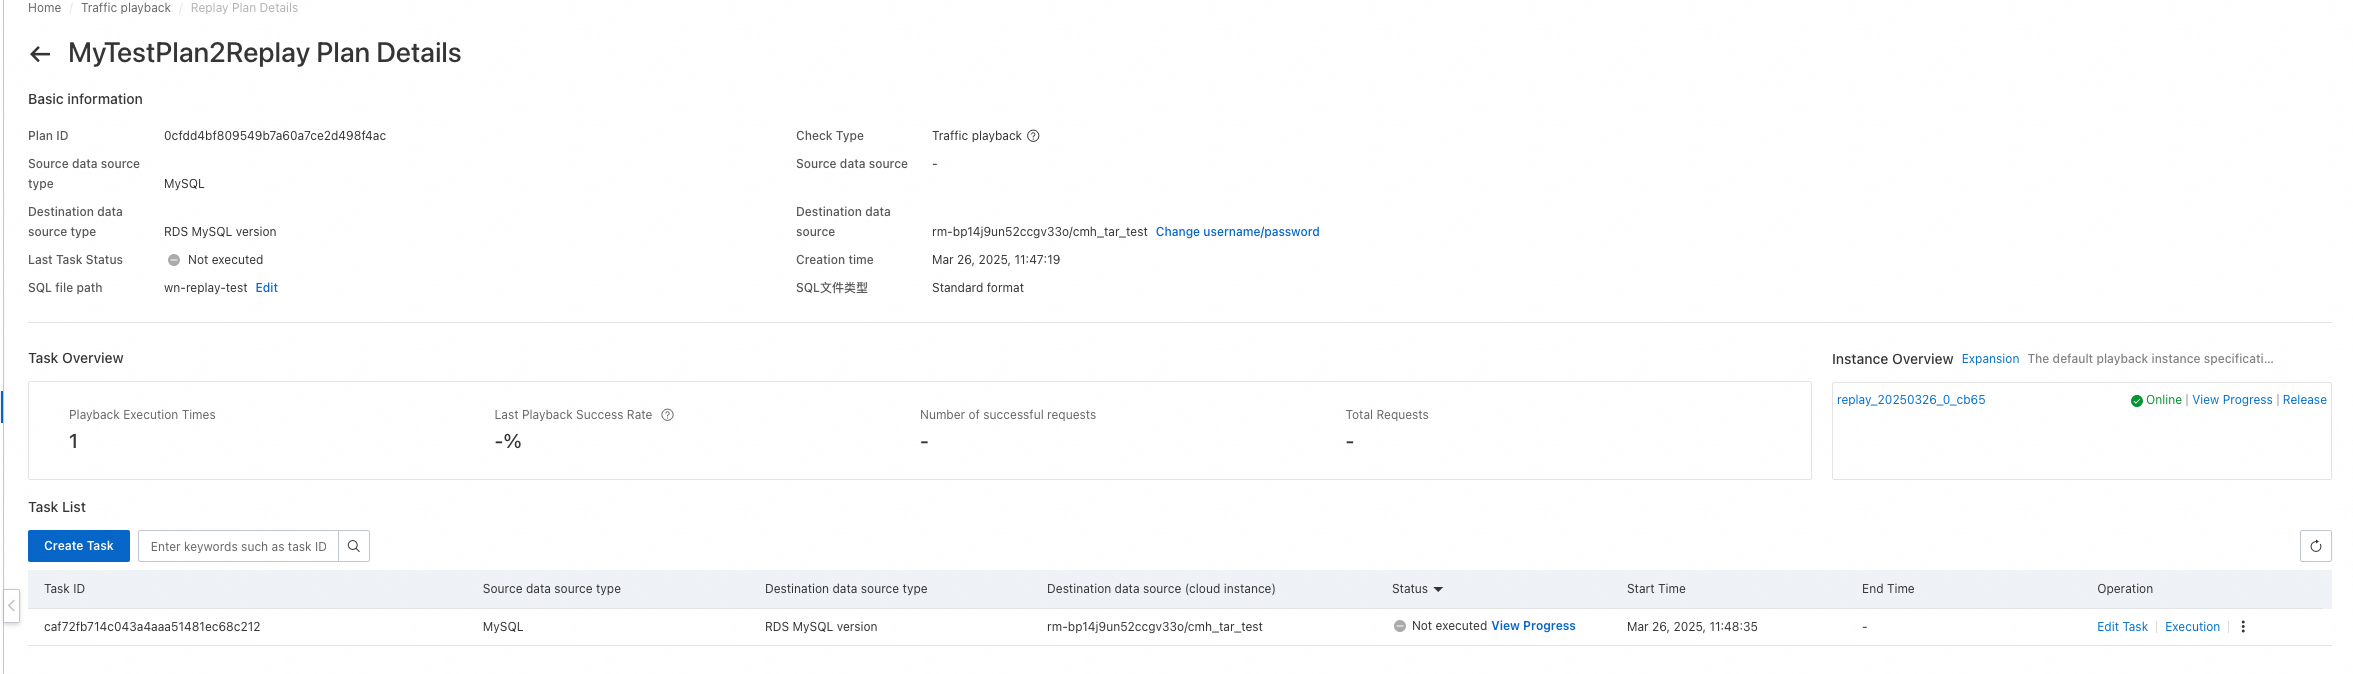
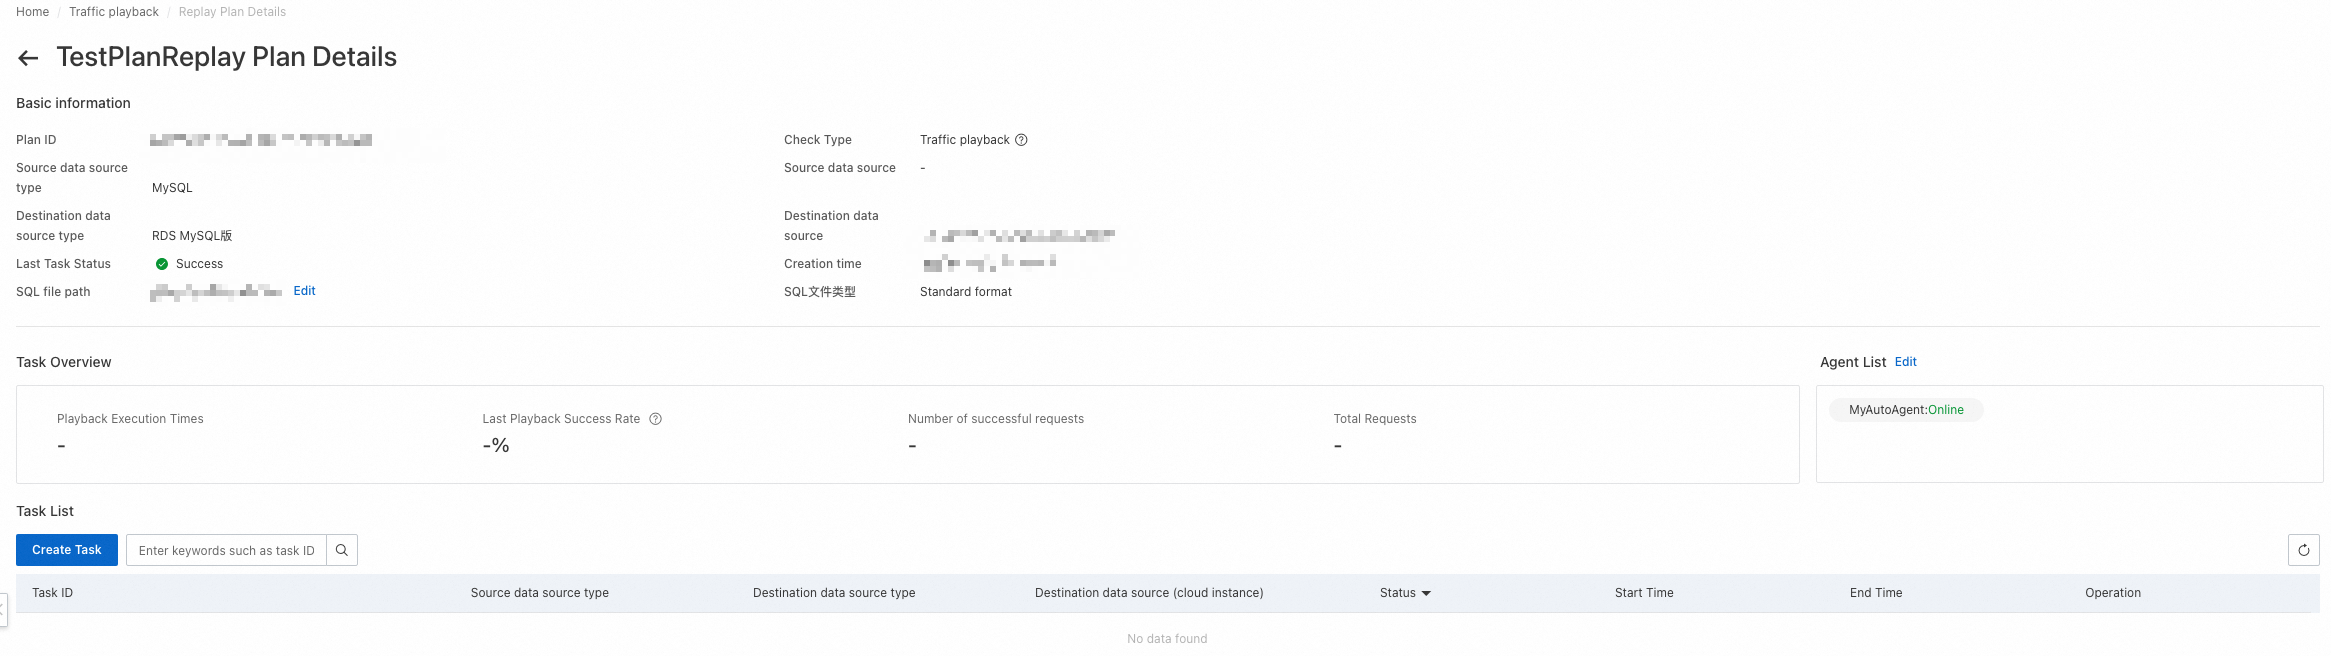
Basic information: displays information such as the schedule ID, source and destination database types, status of the last playback task, time when the schedule was created, and path to the SQL file.
Task Overview: displays the overall information about all playback tasks in the playback schedule, including the number of executed playback tasks, success rate of the last playback task, number of successful requests, total number of requests, and associated playback instances.
Task List: displays all playback tasks in the playback schedule.
3.3 View playback instances
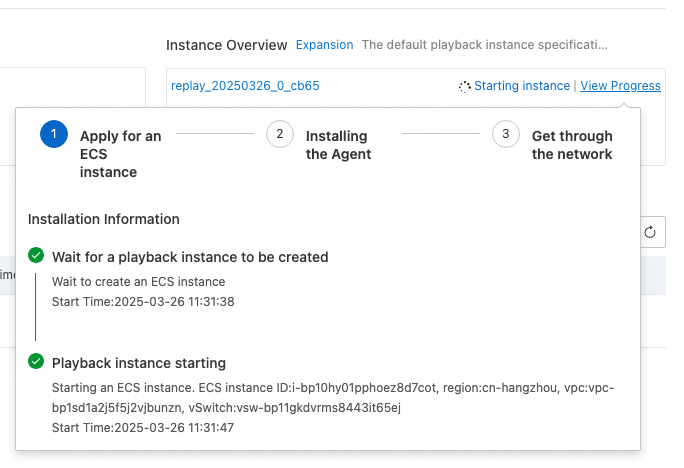
After a playback schedule is created, you can view the associated playback instances on the details page of the schedule, including the instance that is automatically created and existing playback instances that are selected. You can click View Progress for each instance to view the progress of instance deployment.
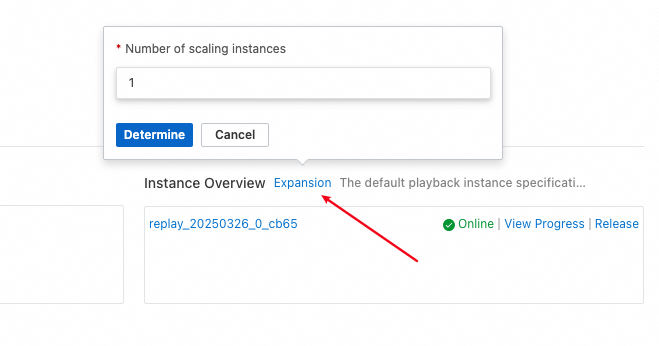
If you want to associate more playback instances with a playback schedule, click Expansion in the Instance Overview section. In the popover that appears, enter the number of playback instances that you want to add. Cloud Migration Hub automatically creates the required playback instances and associates the instances with the schedule.
If you no longer use a playback instance in a playback schedule, click Release in the Instance Overview section to disassociate the instance from the schedule.
If a playback instance is used by the current and other playback schedules, the instance is disassociated but not deleted after you click Release. If a playback instance is used only by the current playback schedule, the instance is disassociated and deleted.
If you want to log on to a playback instance, click the name of the instance. You are redirected to the details page of the instance in the ECS console. On the Instance Details tab, go to the Other Information section and find the Description parameter to obtain the password for logon.
3.4 Create a playback task
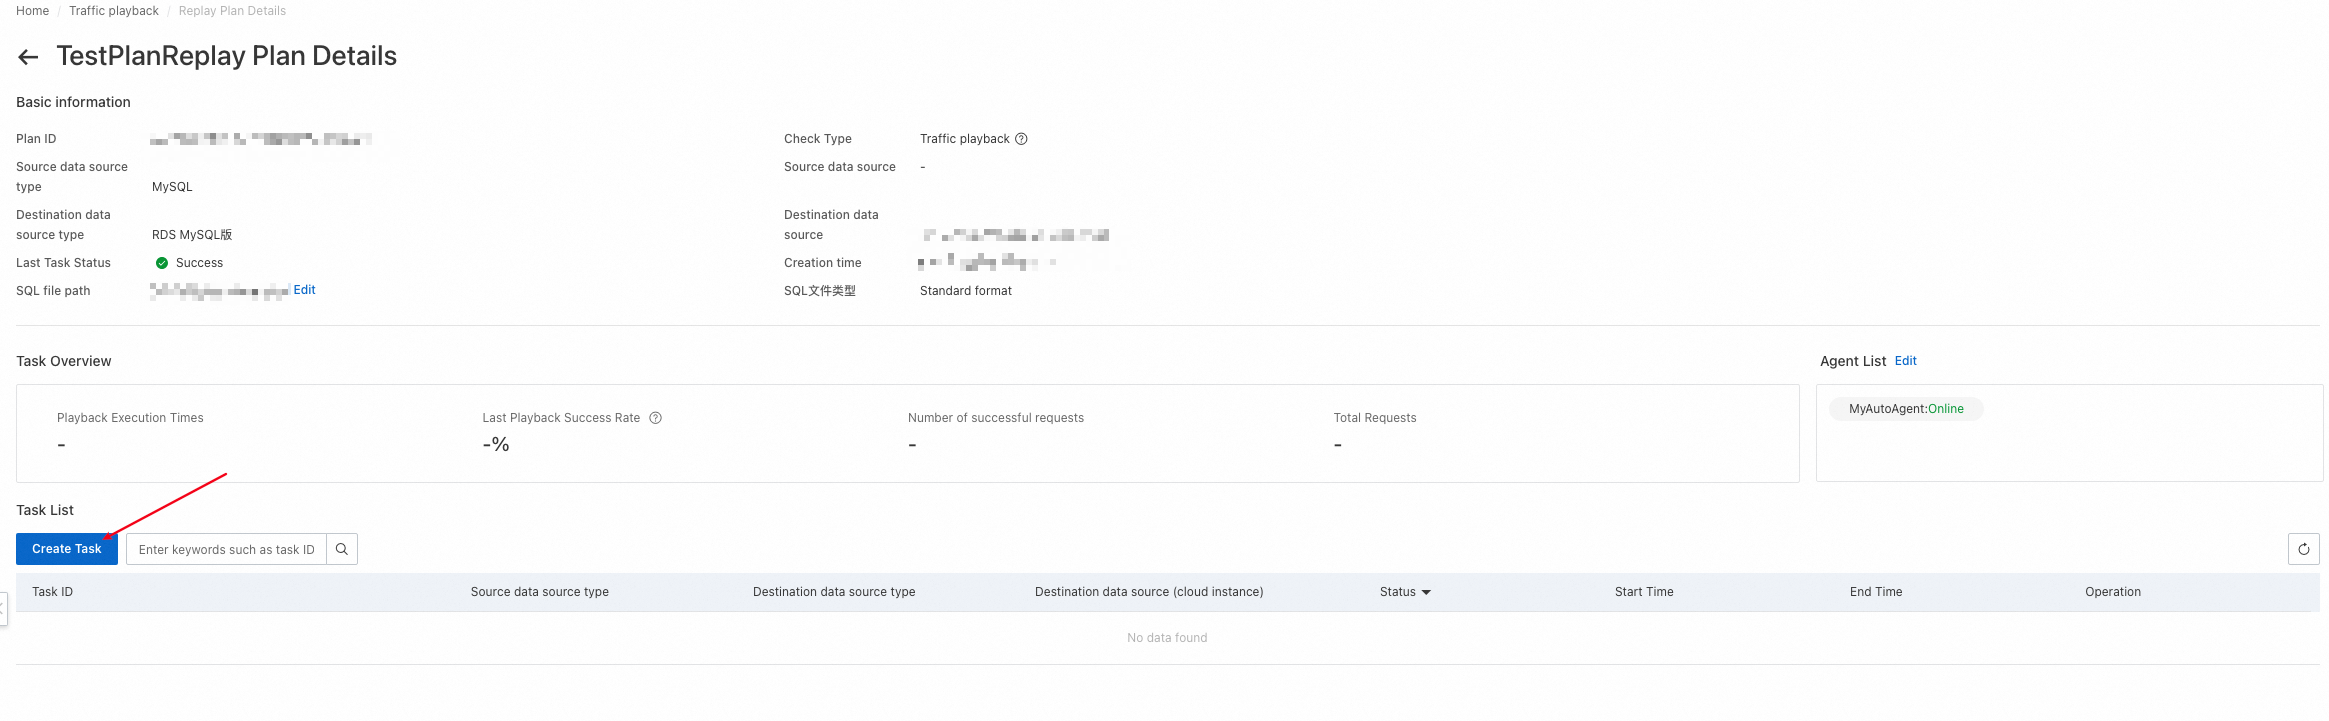
After you create a playback schedule, you can create a playback task on the details page of the playback schedule.
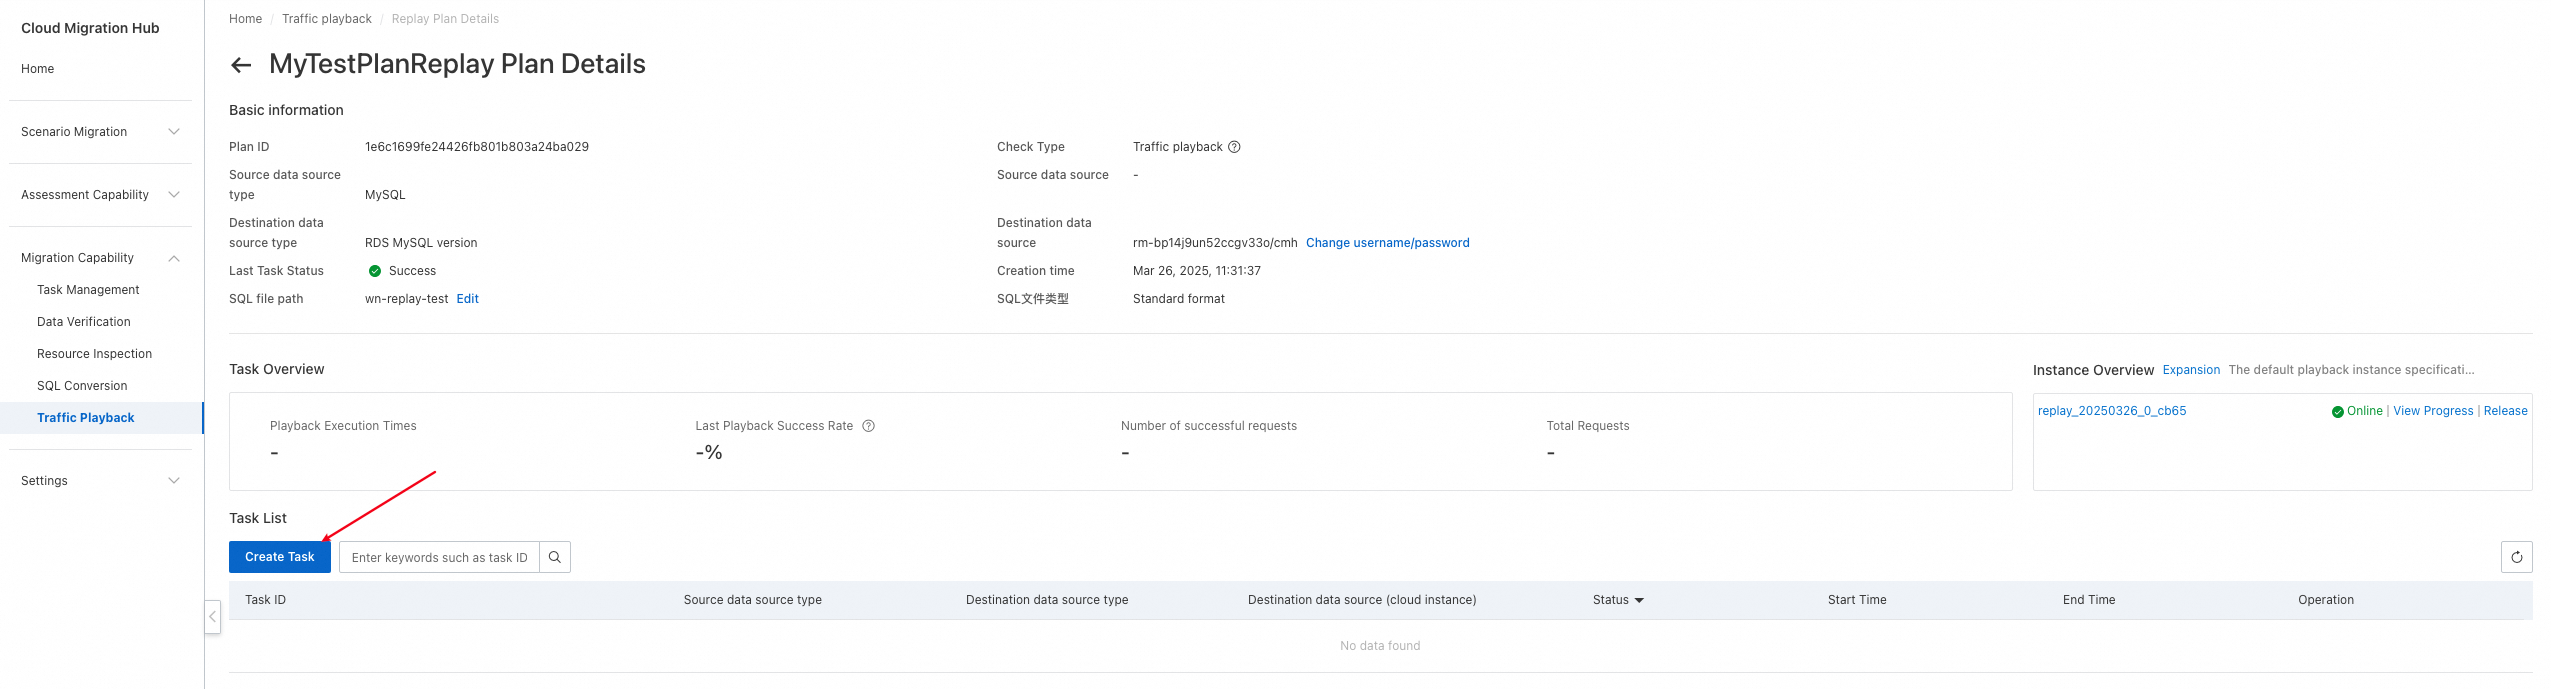
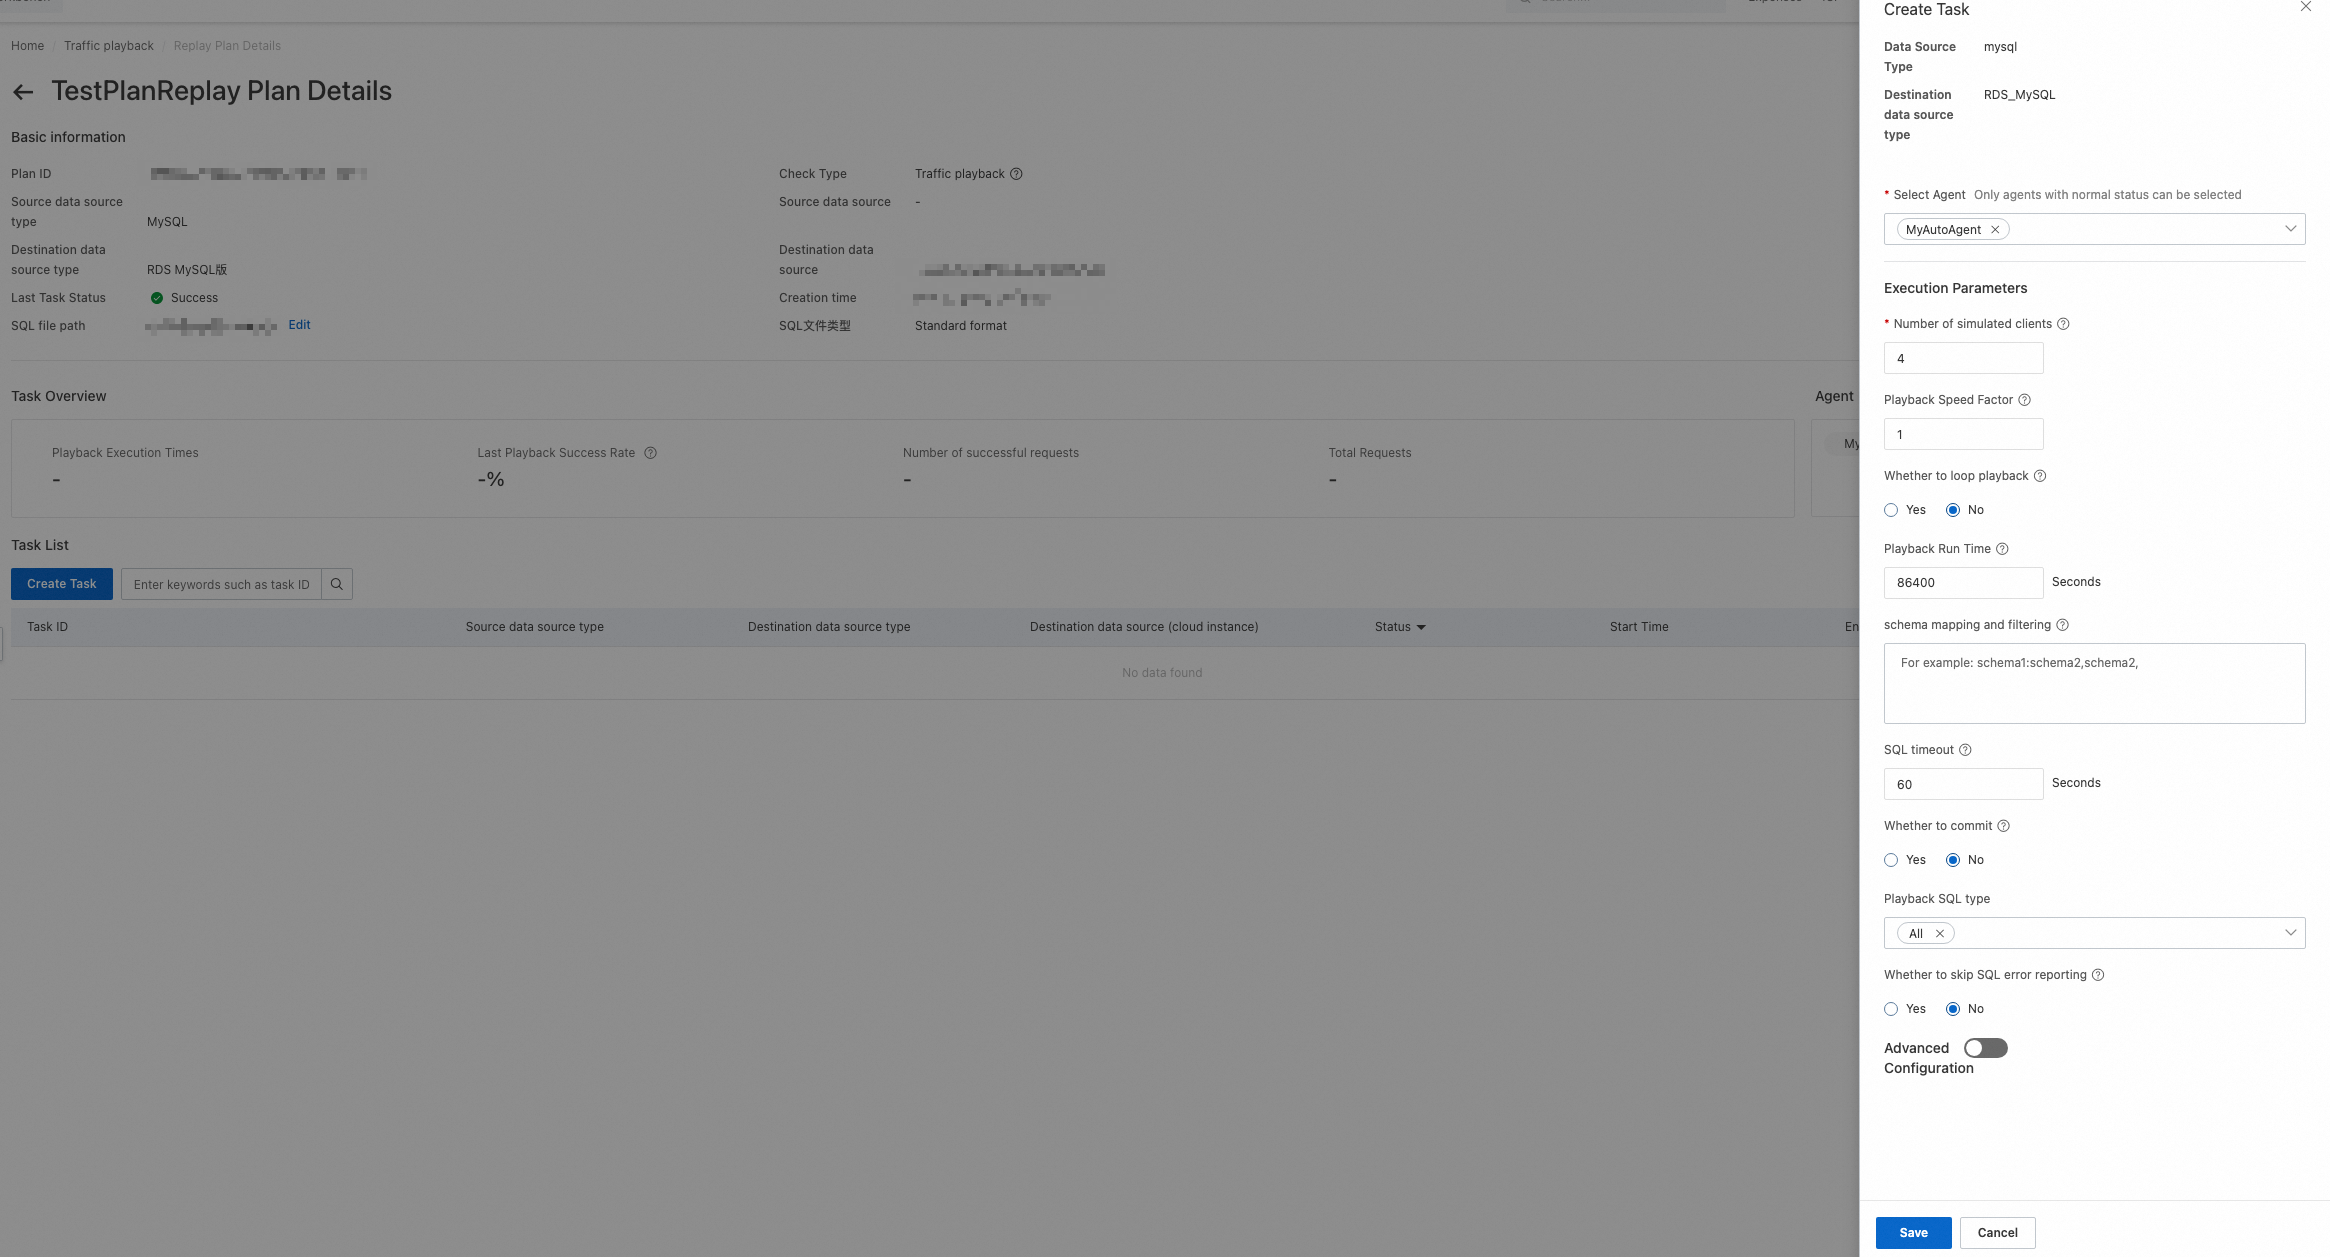
You can click Create Task to create a playback task. After a playback task is created, it is not immediately executed. You need to click Execution to execute the task. Therefore, you can create a playback task without executing it during your test. The following list describes the key parameters:
Select Playback Instance: Select a playback instance that is in a normal state.
Playback file: Select the playback file that is uploaded to the associated OSS bucket of your playback schedule. Each time a playback task is created, the file is downloaded to the specified playback instance.
Number of simulated clients: Specify the number of concurrent threads for playback.
Playback Speed Factor: Specify a factor for the playback speed. Valid values are 1, 2, and 10. A value of 1 specifies no speed boost, a value of 2 specifies twice the original speed, and a value of 10 specifies ten times the original speed.
Whether to loop playback: Specify whether to enable loop playback. If loop playback is enabled, the Playback Speed Factor parameter does not take effect, and playback is performed under the maximum pressure. After loop playback is enabled, playback stops when the period specified by the Playback Run Time parameter elapses. During loop playback, repeated errors may be reported for SQL statements that write data, such as the INSERT and UPDATE statements. We recommend that you execute only Data Query Language (DQL) statements during playback.
Playback Run Time: Specify a playback period. Unit: seconds. After the period elapses, playback automatically stops.
schema mapping and filtering: Specify the mapping relationship of schemas. For example, schema1:schema2,schema2 indicates that playback is performed on schema1 and schema2 and schema1 is mapped to schema2.
SQL timeout: Specify a timeout period for executing an SQL statement.
Whether to commit: Specify whether to commit transactions. By default, the traffic playback tool frodo enables transactions to play back traffic. After an SQL statement is executed, it is rolled back, and the related transaction is not committed. If you need to commit transactions, set this parameter to Yes.
Whether to skip SQL error reporting: Specify whether to skip the SQL statements that have the same fingerprint as an SQL statement with errors reported. The default value is No.

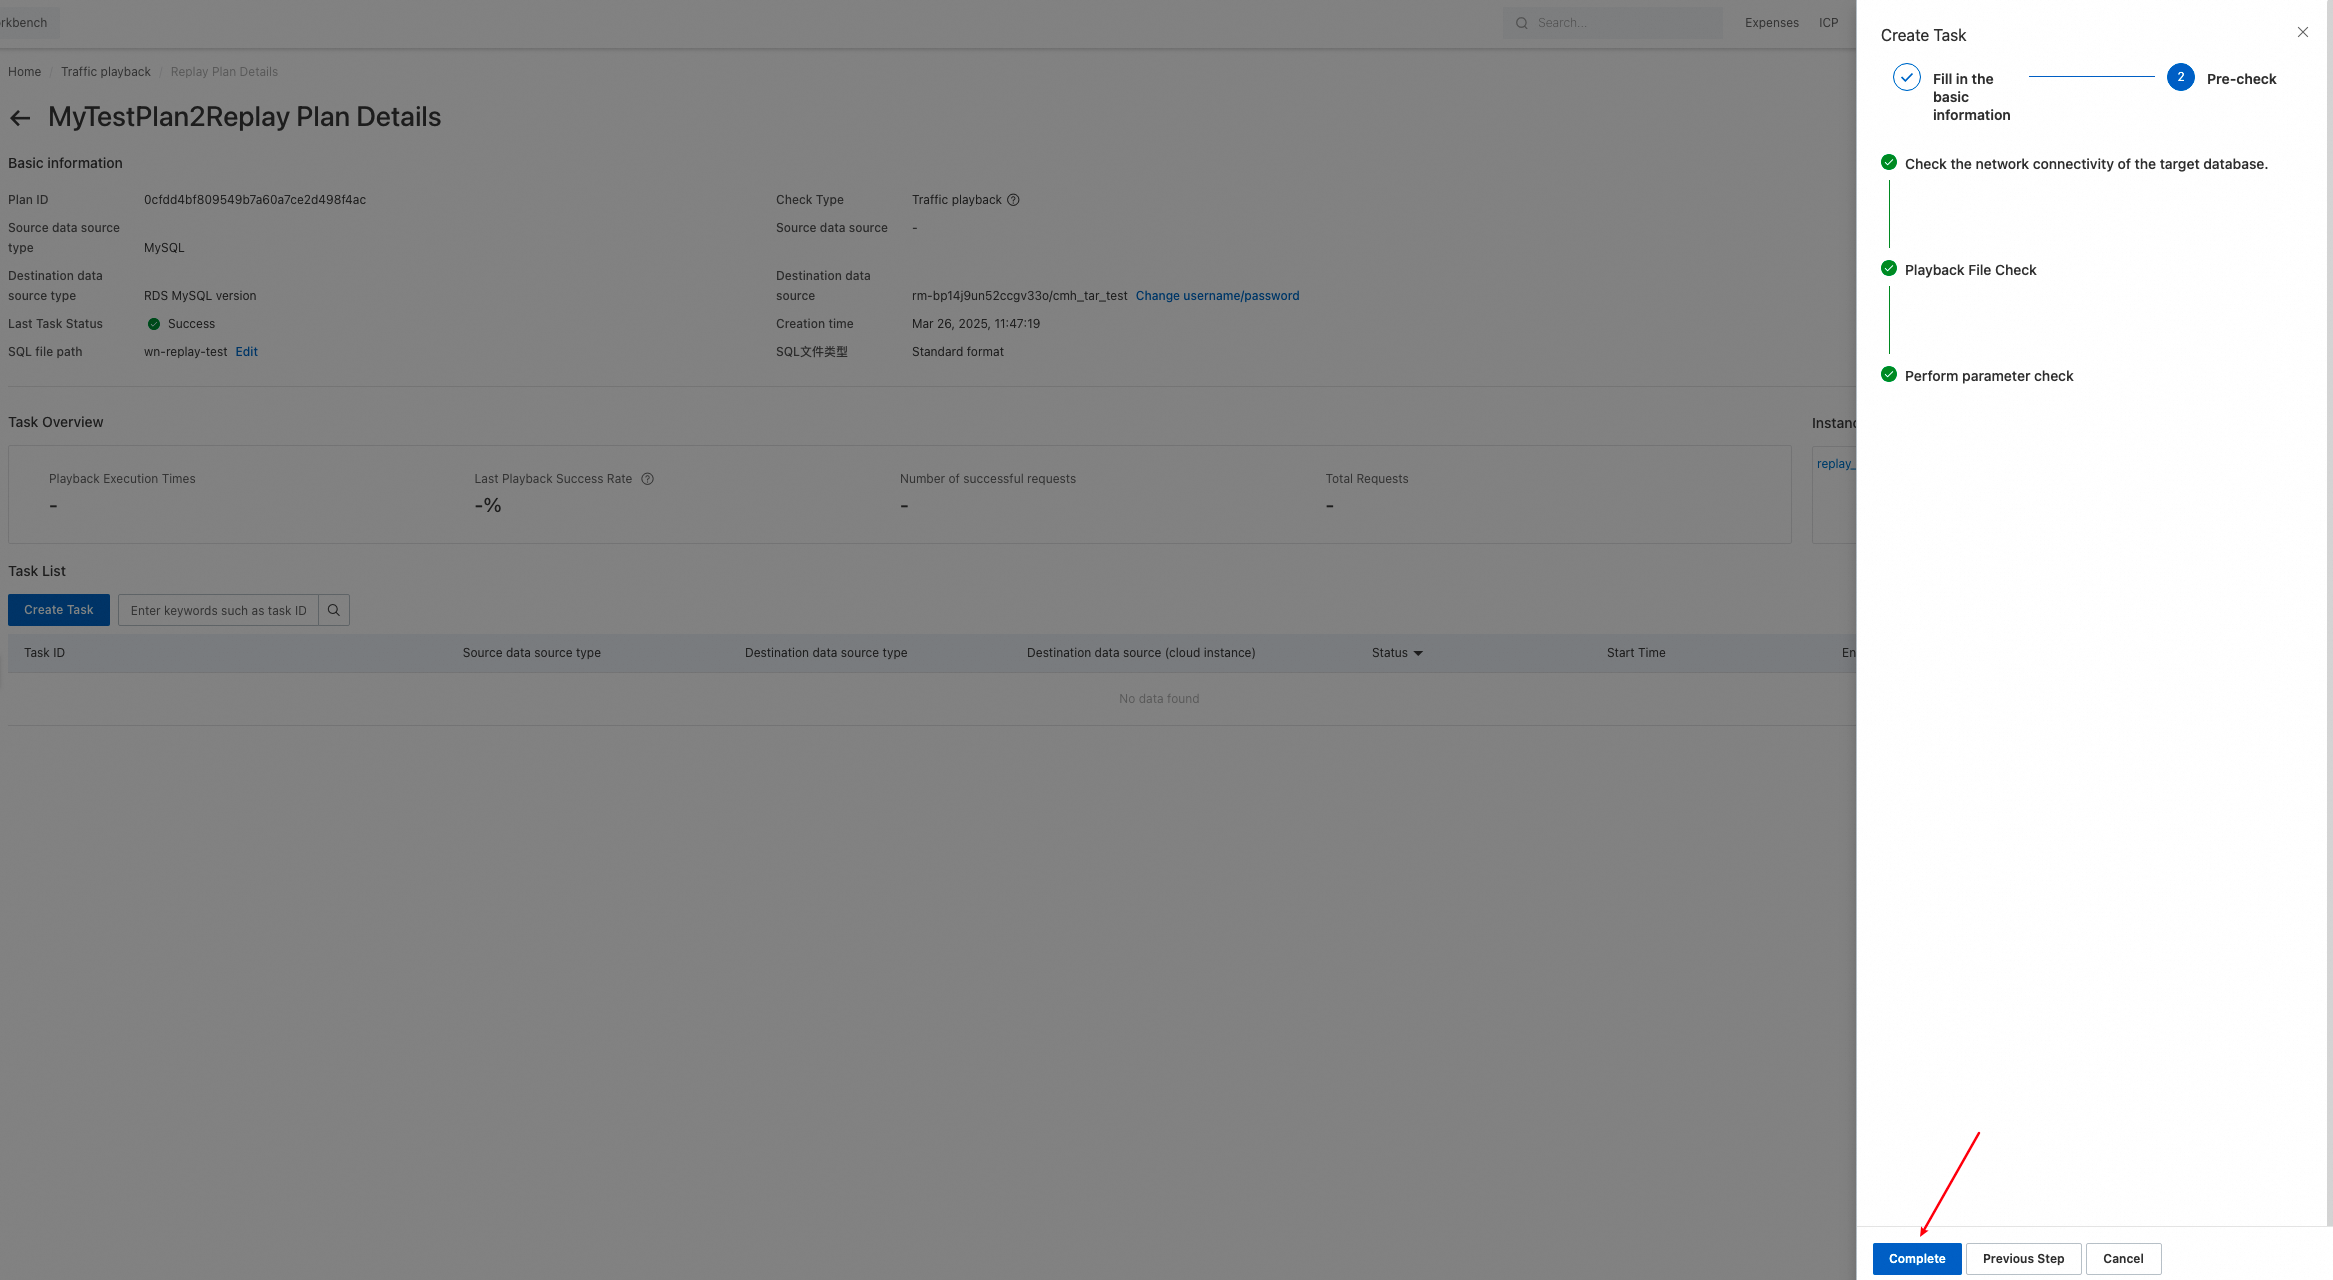
Click Next step to go to the Pre-check step. If the system detects items that fail the pre-check, the creation of the playback task is blocked. You must resolve the errors and perform the pre-check again. If an alert is reported during the pre-check, the creation is not blocked.
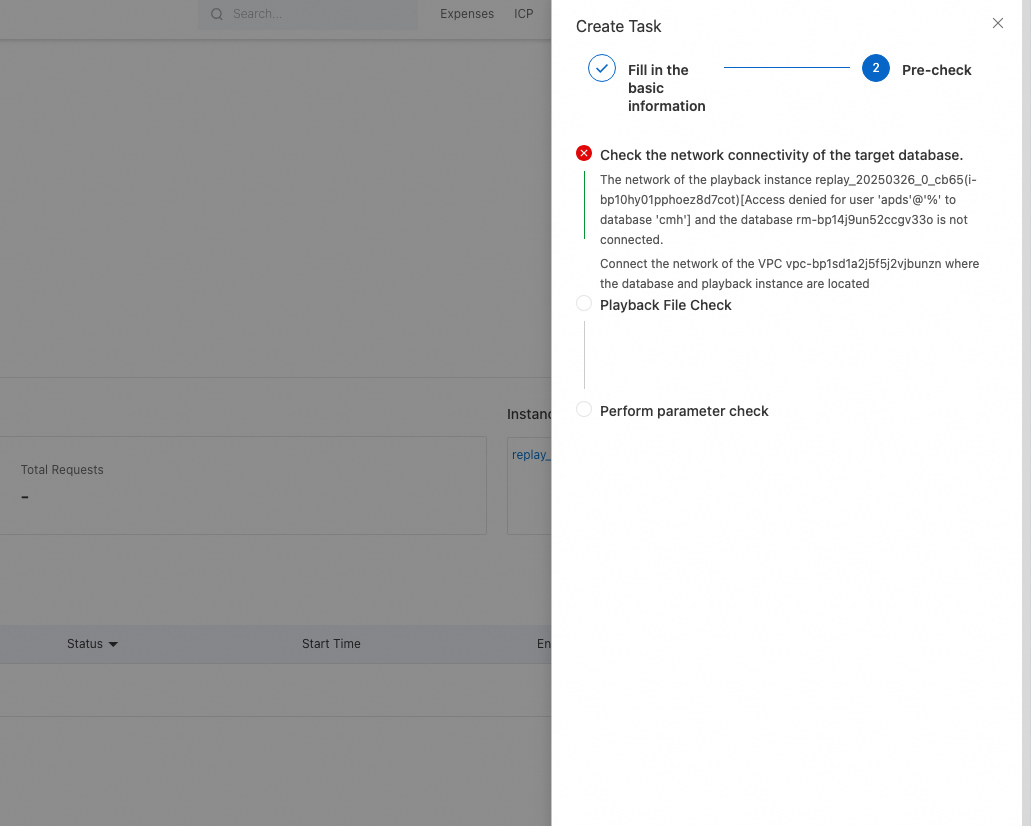
After the pre-check is passed, click Complete. For more information about how to run and view a playback task, see the descriptions in the old version of traffic playback.
4. Old version of traffic playback
4.1 Apply for and view a license
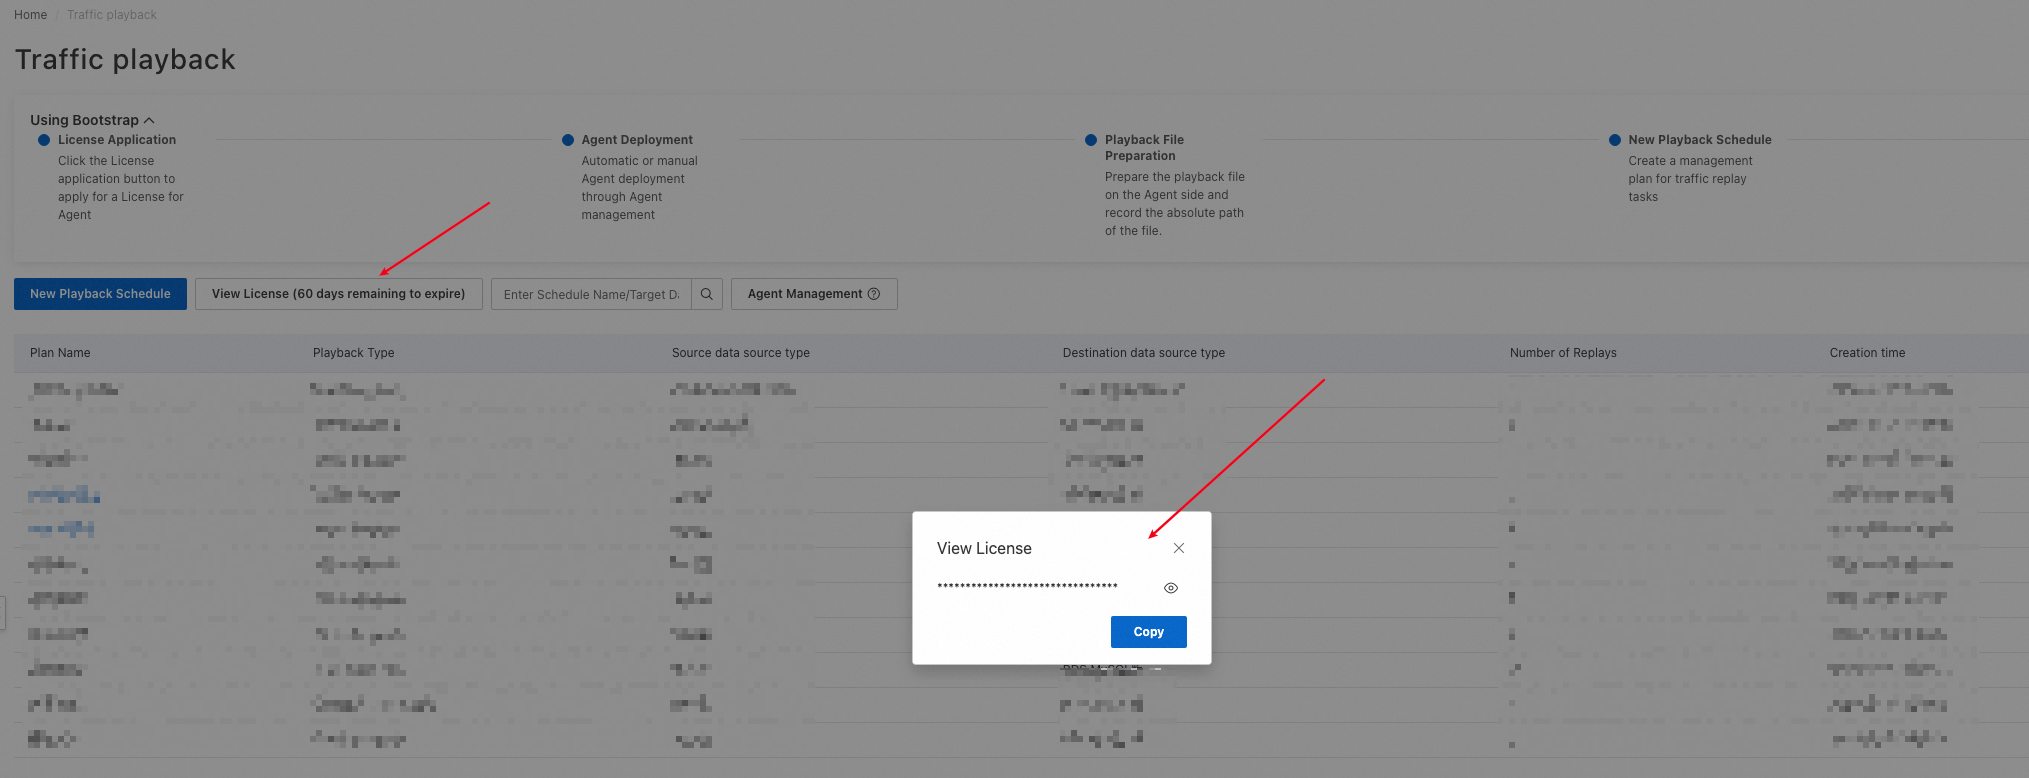
Log on to the Cloud Migration Hub console. In the left-side navigation pane, choose Migration Capability > Traffic Playback. If this is your first time to use the traffic playback feature, you can view a usage guide on the page that appears. The first step is to click Apply for a License. Then, a license is automatically generated. The license is used to protect traffic playback agents and prevent the agents from being abused. You are not charged for the license, agents, or traffic playback. However, you are charged for purchasing ECS instances to deploy agents.

After you apply for a license, you can view the validity period of the license, which is three calendar months by default. You can also click View License to copy the content of the license.
4.2 Manage traffic playback agents
After you apply for a license, you must deploy a traffic playback agent. To deploy an agent, you must prepare one or more ECS instances. You can determine the number of ECS instances based on your business requirements.
Recommended specifications of an ECS instance: 8 CPU cores and 16 GB of memory or higher.
Recommended operating system: CentOS or Alibaba Cloud Linux.
Network requirements: The ECS instance is connected to the data source.
Other requirements: Java is installed on the ECS instance before an agent is deployed.
Deployment description:
If you want to deploy an agent on an Alibaba Cloud ECS instance with Cloud Assistant installed, we recommend that you deploy the agent by using the automatic method. By default, Cloud Assistant is installed on Alibaba Cloud ECS instances.
If you want to deploy an agent on a third-party cloud server that is connected to an Alibaba Cloud VPC or on an Alibaba Cloud ECS instance on which Cloud Assistant is not installed or fails to be installed due to specific reasons, we recommend that you deploy the agent by using the manual - private network method.
If you want to deploy an agent on a third-party cloud server that is not connected to Alibaba Cloud VPCs and uses a public IP address, we recommend that you deploy the agent by using the manual - public network method.
The following sections describe the three types of deployment methods.
4.2.1 Automatic
This method is supported only in the China (Hangzhou) and China (Shanghai) regions. If you want to use the method in other regions, contact online after-sales.
Take note of the following information:
You can use this method only if you use Alibaba Cloud ECS instances.
You must activate PrivateLink before you deploy an agent.
After the required ECS instance is prepared, click Agent Management.
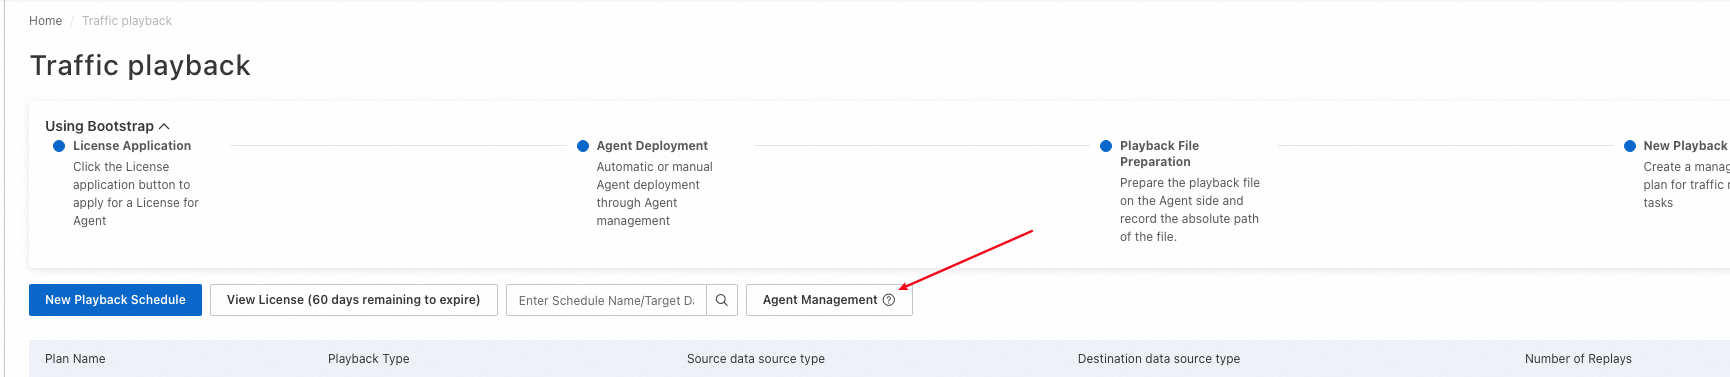
In the panel that appears, click Agent Installation.

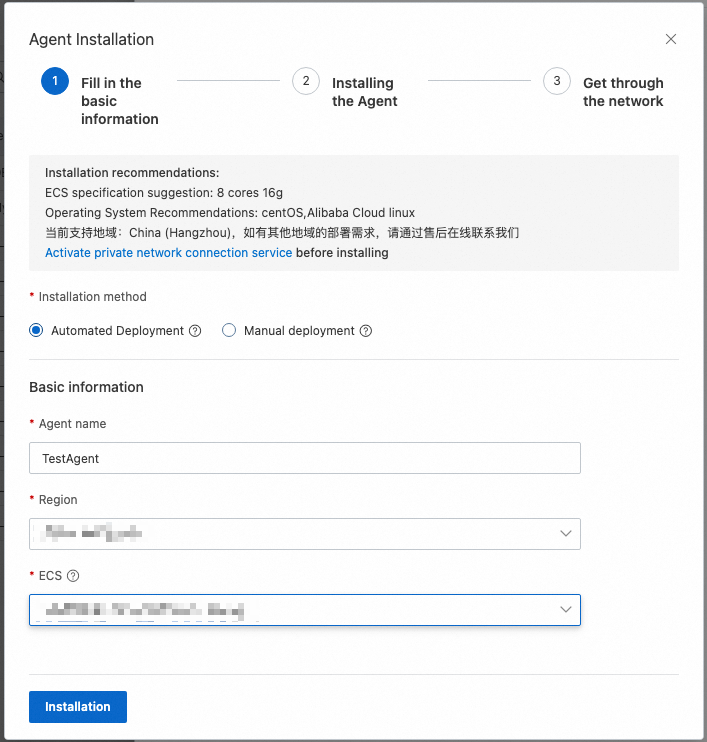
In the dialog box that appears, set the Installation method parameter to Automated Deployment, enter an agent name, select the region in which you want to deploy the agent and the ECS instance on which you want to install the agent, and then click Installation.
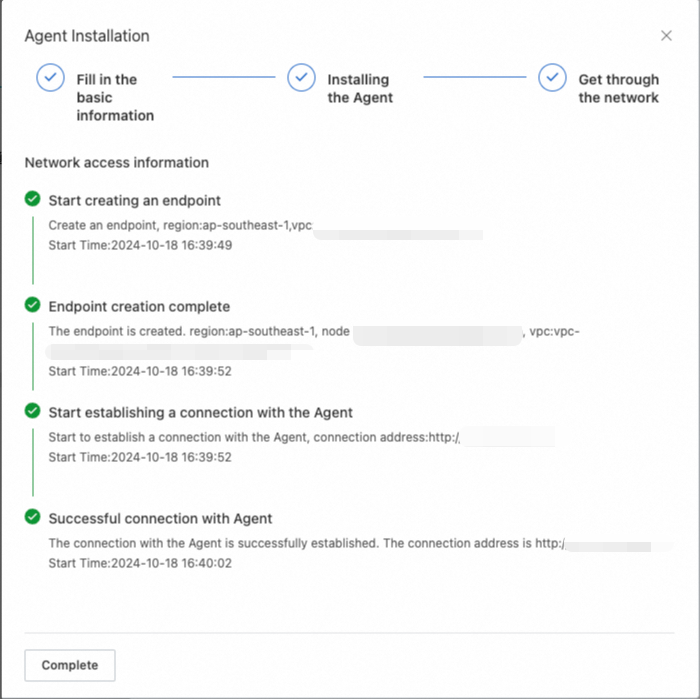
During the deployment process, you can view the deployment progress of the agent.
After the agent is deployed, you can view the agent in the agent list.

4.2.2 Manual
4.2.2.1 Manual - public network
To use this method, make sure that your ECS instance is accessible over the Internet and Cloud Migration Hub can connect to the instance.
Take note of the following information:
You can use Alibaba Cloud ECS instances, cloud servers from third-party cloud service providers, and servers in data centers. Make sure that Cloud Migration Hub can access your servers over the Internet.
After the required ECS instance is prepared, click Agent Management.
In the panel that appears, click Agent Installation.
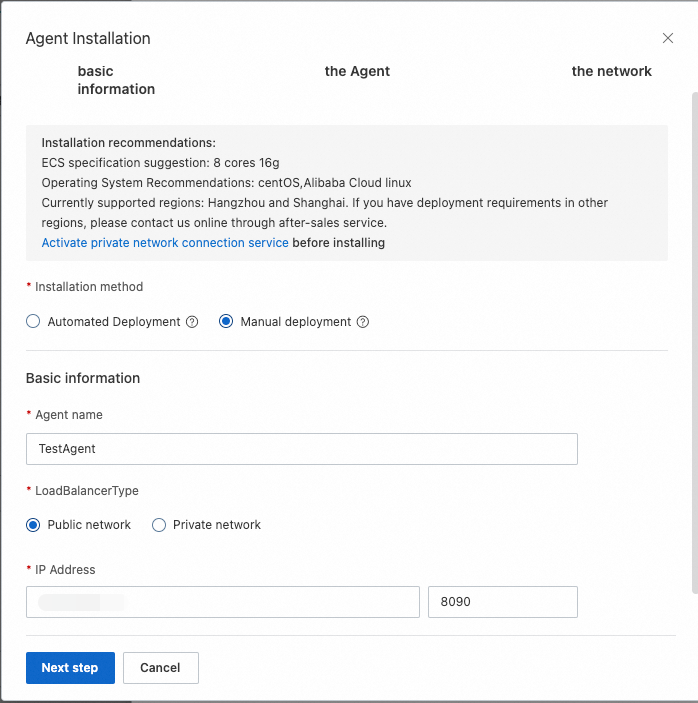
In the dialog box that appears, set the Installation method parameter to Manual deployment, enter an agent name, set the LoadBalancerType parameter to Public network, enter an IP address and a port number, and then click Next step.
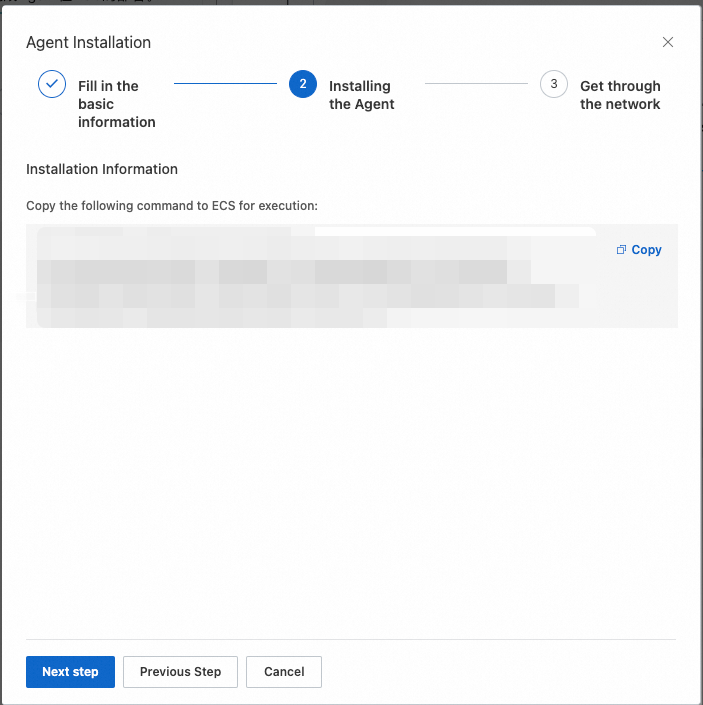
In the Installing the Agent step, an installation command is displayed. Click Copy to copy the command and then run the command on the ECS instance to install the agent.
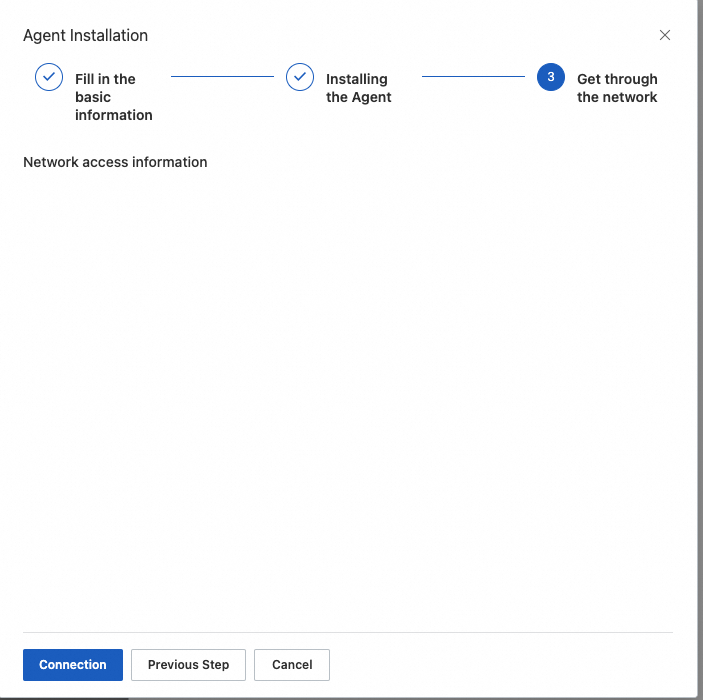
After the agent is installed, click Next step. In the Get through the network step, click Connection to connect to the agent.
You can view the connection progress online.
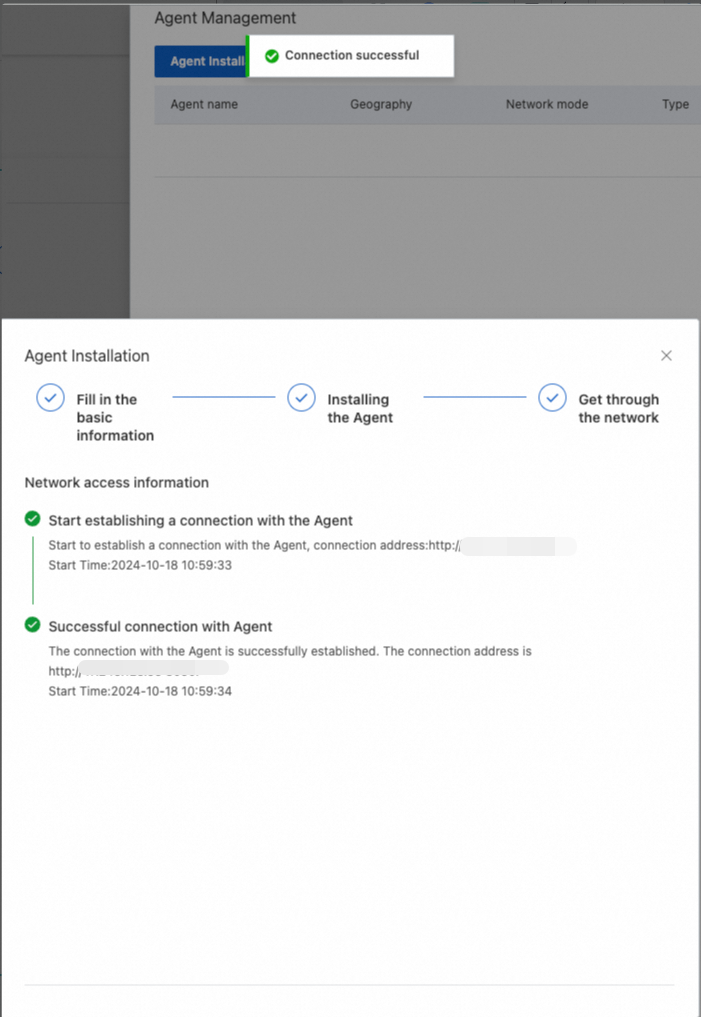
After the agent is deployed, you can view the agent in the agent list.
4.2.2.2 Manual - private network
This method is supported only in the China (Hangzhou) and China (Shanghai) regions. If you want to use the method in other regions, contact online after-sales.
Take note of the following information:
You can use Alibaba Cloud ECS instances or third-party cloud servers. Make sure that your servers are connected to Alibaba Cloud VPCs.
You must activate PrivateLink before you deploy an agent.
After the required ECS instance is prepared, click Agent Management.
In the panel that appears, click Agent Installation.
In the dialog box that appears, set the Installation method parameter to Manual deployment, enter an agent name, set the LoadBalancerType parameter to Private network, select a region and a VPC, enter an IP address and a port number, and then click Next step.
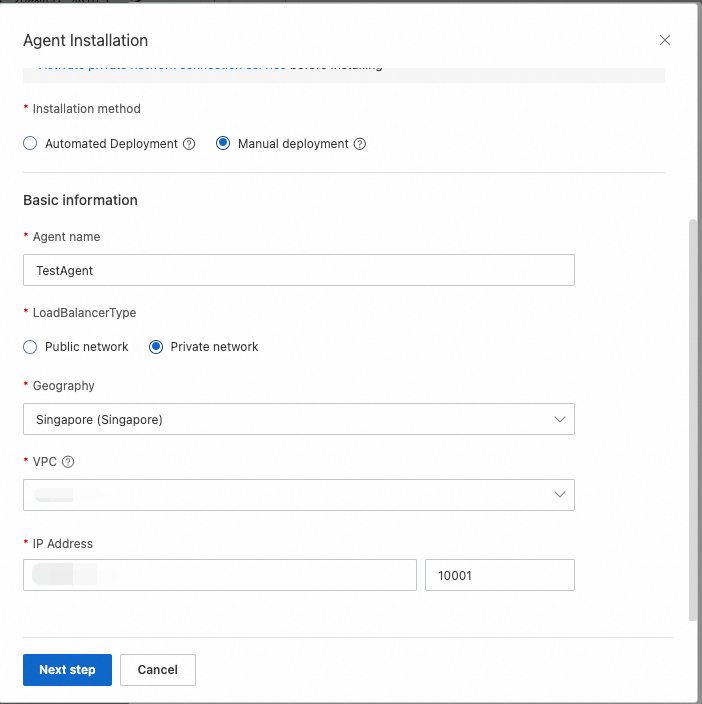
In the Installing the Agent step, an installation command is displayed. Click Copy to copy the command and then run the command on the ECS instance to install the agent.
After the agent is installed, click Next step. In the Get through the network step, click Connection to connect to the agent.
You can view the connection progress online.
After the agent is deployed, you can view the agent in the agent list.
4.2.3 Agent management operations
4.2.3.1 Stop
If you deploy an agent by using the automatic method and the agent is in the Online state, you can click Stop to stop the agent.

After the agent is stopped, the agent stops running on the related ECS instance, and the status of the agent changes to Stop in the agent list. If a traffic playback task uses an agent in the Stop state, you cannot run the task.

4.2.3.2 Start
If an agent is in the Stop state, you can click Start to start the agent.

After the agent is started, the status of the agent changes to Online.
4.2.3.3 Delete
If you no longer require an agent, you can click Delete to delete the agent in the agent list. Before you can delete an agent, you must unbind the agent from the related playback schedules.
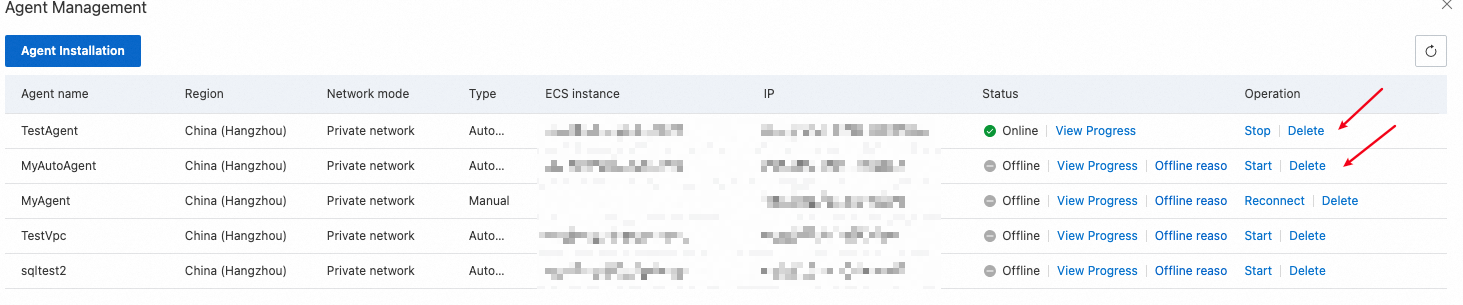
4.2.3.4 Reconnect
If an agent is manually deployed and is disconnected, the status of the agent changes to Offline. You can click Reconnect to establish a new connection between Cloud Migration Hub and the agent.

After the connection is established, the status of the agent changes to Online.
4.3 Create a playback schedule
4.3.1 Create a playback schedule
Prerequisites
A traffic playback agent is installed.
The production traffic of your data source is captured. You can select a capturing method based on the data source. After traffic data is collected, you must convert the data to the required JSON format for traffic playback. For more information about the JSON format, see the replay_sql_example.json file.
The JSON file required for traffic playback is uploaded to the ECS instance on which the agent is installed.
After a traffic playback agent is installed, you can create a playback schedule. The overall process consists of two steps: create a playback schedule and create a playback task in the playback schedule. A playback schedule can contain multiple playback tasks.
Log on to the Cloud Migration Hub console. In the left-side navigation pane, choose Migration Capability > Traffic Playback. On the page that appears, click New Playback Schedule.

Step 1: Configure basic information
When you create a playback schedule, you can set the Playback Type parameter to Traffic playback or Comparison of results. If you set the parameter to Traffic playback, the system executes SQL statements in the playback file on the data destination and checks whether the execution is successful. If you set the parameter to Comparison of results, the system executes the SQL statements on both the data source and destination, compares the execution results, and displays details about discrepancies found during the comparison.
The following figure shows the supported types of source and destination databases.
You can set the Acquisition method parameter to Instance acquisition or Address acquisition. This parameter specifies the method to obtain information about the source and destination databases. Some types of databases do not support Instance acquisition. If you set the parameter to Instance acquisition, you must specify the region and ID of your instance, the name of your database, and the username and password used to log on to your database. If you set the parameter to Address acquisition, you must specify the required IP address and port, the name of your database, and the username and password used to log on to your database.
In the SQL file path field, you must enter the absolute path to the playback file uploaded to the ECS instance on which the agent is installed.
Then, select a format for the playback file.
You can select only an agent that is in a normal state, and you must pass the connectivity test. After the playback schedule is created, you can create and run a playback task as expected.
Step 2: Configure parameters
Number of simulated clients: the number of concurrent threads for playback. A higher value specifies a higher degree of concurrency.
Playback Speed Factor: the factor for the playback speed. A higher value specifies a faster speed. For example, a value of 1 specifies no speed boost, a value of 2 specifies twice the original speed, and a value of 10 specifies ten times the original speed.

4.3.2 View a playback schedule
After a playback schedule is created, it appears on the Traffic playback page. You can view all playback schedules that are created within your account on this page. You can click the name of a playback schedule or Details in the Operation column to go to the details page of the playback schedule.

Basic information: displays information such as the schedule ID, source and destination database types, status of the last playback task, time when the schedule was created, and path to the SQL file.
Task Overview: displays the overall information about all playback tasks in the playback schedule, including the number of executed playback tasks, success rate of the last playback task, number of successful requests, total number of requests, and agents associated with the playback schedule.
Task List: displays all playback tasks in the playback schedule.
4.3.3 Create a playback task
After you create a playback schedule, you can create a playback task on the details page of the playback schedule.
You can click Create Task to create a playback task. After a playback task is created, it is not immediately executed. You need to click Execution to execute the task. Therefore, you can create a playback task without executing it during your test. The following list describes the key parameters:
Select Agent: Select an agent that is in a normal state.
Number of simulated clients: Specify the number of concurrent threads for playback.
Playback Speed Factor: Specify a factor for the playback speed. Valid values are 1, 2, and 10. A value of 1 specifies no speed boost, a value of 2 specifies twice the original speed, and a value of 10 specifies ten times the original speed.
Whether to loop playback: Specify whether to enable loop playback. If loop playback is enabled, the Playback Speed Factor parameter does not take effect, and playback is performed under the maximum pressure. After loop playback is enabled, playback stops when the period specified by the Playback Run Time parameter elapses. During loop playback, repeated errors may be reported for SQL statements that write data, such as the INSERT and UPDATE statements. We recommend that you execute only Data Query Language (DQL) statements during playback.
Playback Run Time: Specify a playback period. Unit: seconds. After the period elapses, playback automatically stops.
schema mapping and filtering: Specify the mapping relationship of schemas. For example, schema1:schema2,schema2 indicates that playback is performed on schema1 and schema2 and schema1 is mapped to schema2.
SQL timeout: Specify a timeout period for executing an SQL statement.
Whether to commit: Specify whether to commit transactions. By default, the traffic playback tool frodo enables transactions to play back traffic. After an SQL statement is executed, it is rolled back, and the related transaction is not committed. If you need to commit transactions, set this parameter to Yes.
Whether to skip SQL error reporting: Specify whether to skip the SQL statements that have the same fingerprint as an SQL statement with errors reported. The default value is No.
After the playback task is created, click Execution in the Operation column to execute the task.
4.3.4 View the progress of a playback task
After a playback task is created, you can click View Progress in the Status column to view the progress of the task.
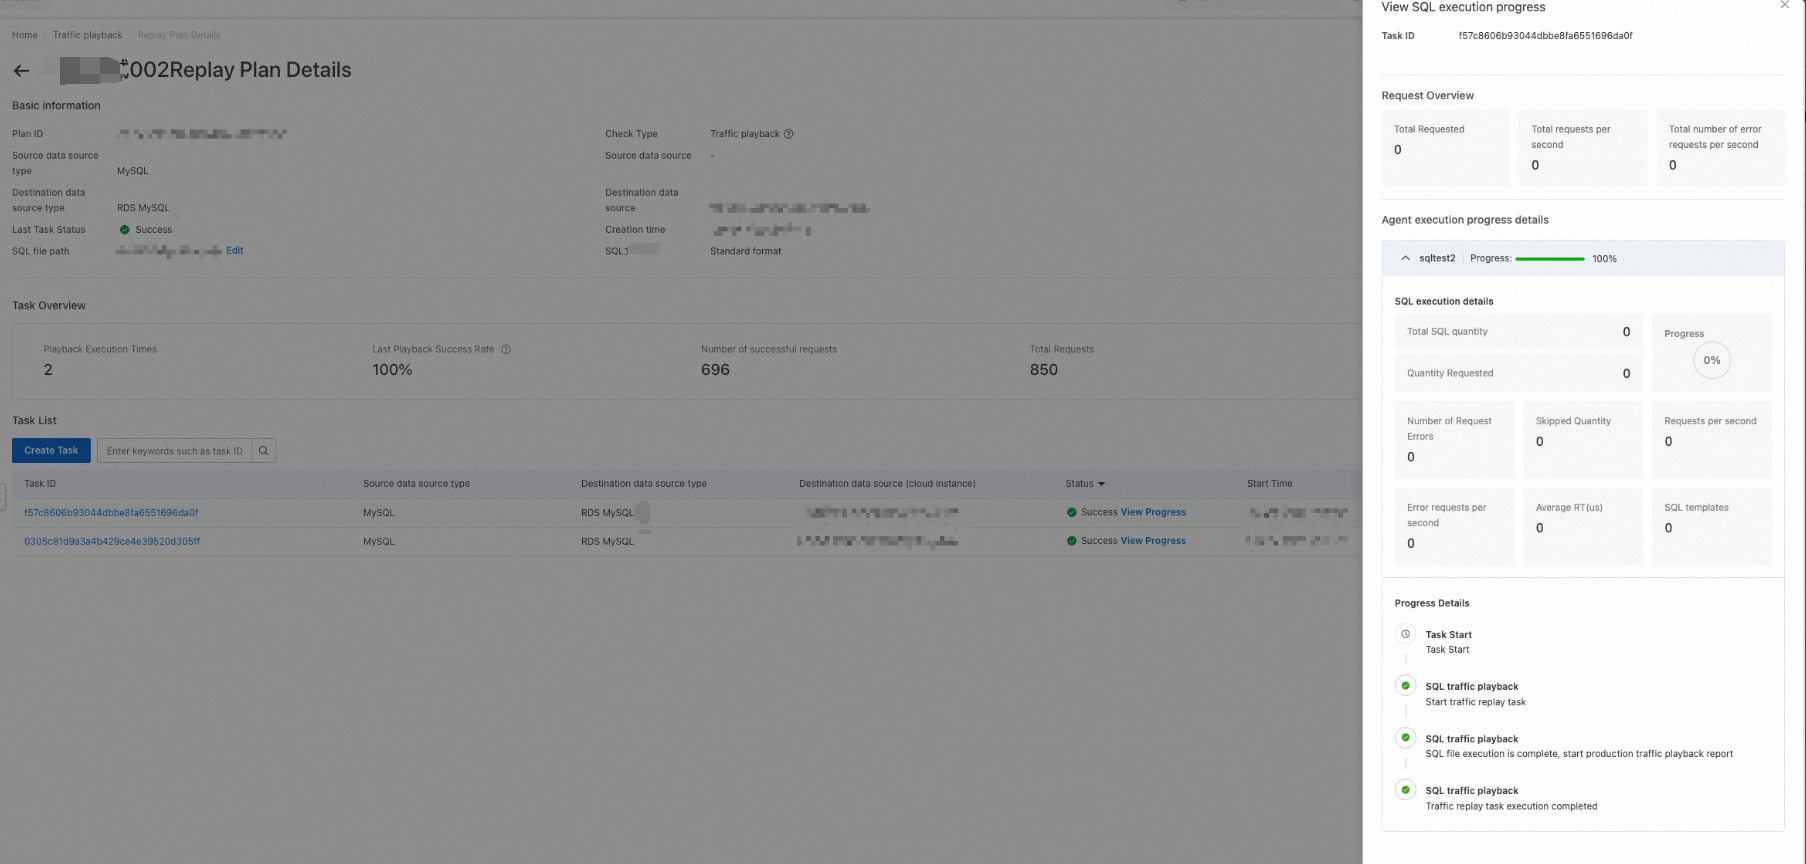
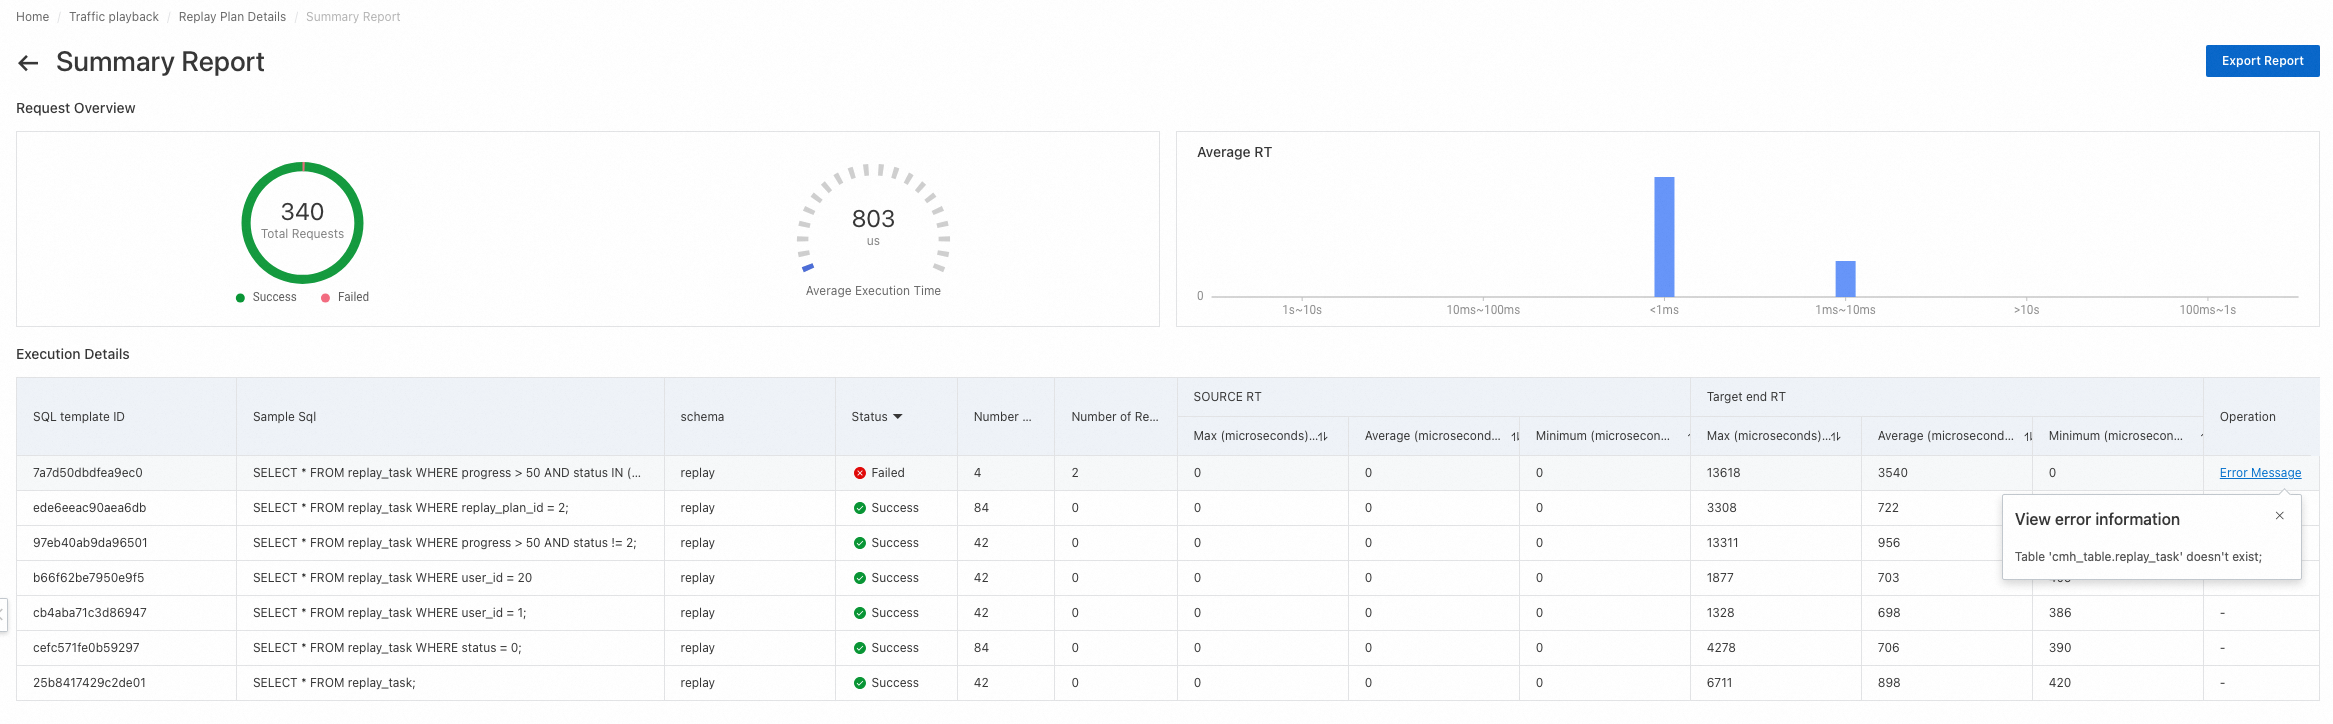
4.3.5 View a playback report
After a playback task is executed, you can click Details in the Operation column to view the playback report.
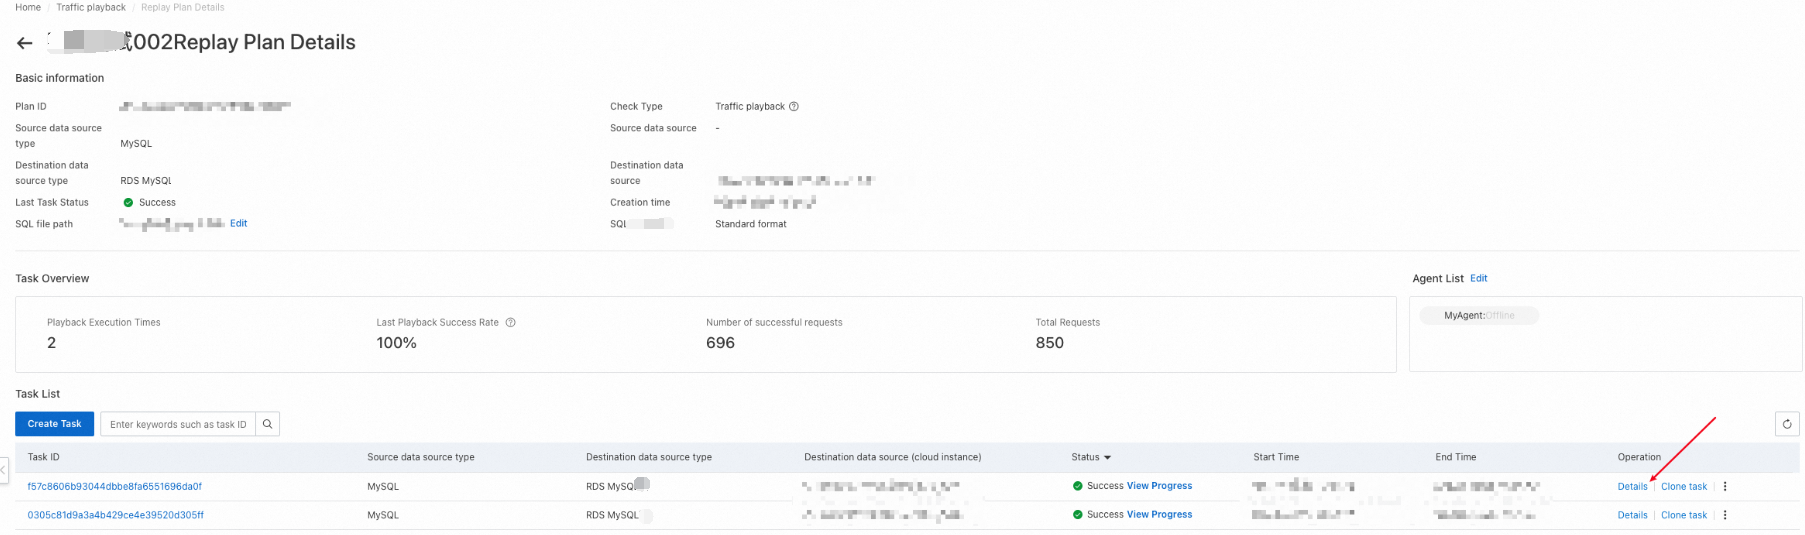
Request Overview: displays the total number of requests, average execution time, and average response time.
Execution Details: displays the execution information of each SQL template in a list. The information includes the sample SQL statement, schema, execution status, number of requests, number of request errors, and response time of the source and destination databases. You can also click Error Message in the Operation column to view error information.
Export Report: allows you to export the report to an EXCEL file.
5. FAQ
5.1 What are the storage positions and descriptions of playback task logs?
/<Agent directory>/log/application-<Agent name>.log
This file contains agent running logs.
/<Agent directory>/run/replay-task-<Times>/result/result.xlsx
This file contains the result details of the nth playback task, including the task overview and SQL details.
/<Agent directory>/run/replay-task-<Times>/access.log
This file contains the execution details of the nth playback task, including the task progress and number of requests.
/<Agent directory>/run/replay-task-<Times>/detail.csv
This file contains the SQL execution details of the nth playback task.
If you want to obtain this file, you must set the Whether to enable detailed SQL playback log parameter in the Advanced Configuration section to Yes when you create a playback task.
/<Agent directory>/run/replay-task-<Times>/error.log
This file contains the error logs of the nth playback task.
/<Agent directory>/sharding/merge.json/
This file contains the sharding data of SQL files.
5.2 How do I troubleshoot an agent deployment failure?
Log on to the . In the left-side navigation pane, choose Maintenance & Monitoring > Cloud Assistant. On the page that appears, click the Command Execution Result tab to check whether the agent installation command is successfully executed.
Open the /<Agent directory>/log/application-<Agent name>.log file to view agent running logs.