You can install the ARMS Application Monitoring component ack-onepilot to monitor Java applications that are deployed in Container Service for Kubernetes ACK or Container Compute Service ACS. After the installation, you can view the application topology, API calls, abnormal and slow transactions, and other monitoring data. This topic describes how to install agents for Java applications in Container Service for Kubernetes ACK and Container Compute Service ACS.
The installation procedures for agents in Container Service for Kubernetes ACK and Container Compute Service ACS are identical. This topic uses Container Service for Kubernetes ACK as an example.
ack-onepilot component overview
ARMS Agent Onboarding Assistant (ack-onepilot) is a key component that helps ARMS users automatically prepare ARMS agent packages and configure the reporting environment in containerized environments. For more information about how ack-onepilot works, see How ack-onepilot works.
After installation, ack-onepilot automatically upgrades the agent to the latest version when your application restarts after a new agent version is released. If you do not want automatic updates, you can manually control the agent version. For more information, see Control agent versions manually.
The legacy application monitoring component arms-pilot is no longer maintained. You must install the upgraded ack-onepilot component to monitor your applications. ack-onepilot is fully compatible with arms-pilot, so you can migrate seamlessly without changing your application configuration. For more information, see Uninstall arms-pilot and install ack-onepilot.
Prerequisites
An ACK cluster or an ACS cluster is created.
ACK clusters: Create an ACK managed cluster, Create an ACK One registered cluster, Create an ACK dedicated cluster (no longer available for new creation), Create an ACK serverless cluster.
ACS clusters: Create an ACS cluster.
A namespace is created. For more information, see Manage namespaces and quotas. The namespace that is used in this example is arms-demo.
Check your JDK version. For more information about the requirements, see Supported JDK versions.
The maximum heap memory of the process must be greater than 256 MB.
Step 1: Install the ARMS Agent Onboarding Assistant (ack-onepilot)
-
Log on to the ACK console. On the Clusters page, click the name of the cluster.
-
In the left-side navigation pane, click . On the Add-ons page, search for ack-onepilot.
-
Click Install on the ack-onepilot card.
NoteBy default, the ack-onepilot component supports 1,000 pods. For every additional 1,000 pods in the cluster, you must add 0.5 CPU cores and 512 MB memory for the component.
-
In the dialog box that appears, configure the parameters and click OK. We recommend that you use the default values.
NoteAfter you install ack-onepilot, you can upgrade, configure, or uninstall it on the Add-ons page.
Step 2: Grant access permissions to ARMS resources
ACK managed clusters
If your ACK managed cluster does not have an ARMS Addon Token, you must manually grant access permissions to ARMS resources. If an ARMS Addon Token already exists, go to Step 3.
If a cluster has ARMS Addon Token, ARMS performs password-free authorization on the cluster. ARMS Addon Token may not exist in some ACK managed clusters. We recommend that you check whether an ACK managed cluster has ARMS Addon Token before you use ARMS to monitor applications in the cluster. If the cluster has no ARMS Addon Token, you must authorize the cluster to access ARMS.
Dedicated clusters and registered clusters
To monitor applications in ACK dedicated clusters and ACK One registered clusters, you must ensure that your Alibaba Cloud account has the AliyunARMSFullAccess and AliyunSTSAssumeRoleAccess permissions. For more information about how to add permissions, see Manage permissions for RAM users.
After you install the ack-onepilot component, you must also provide the AccessKey ID and AccessKey secret of an Alibaba Cloud account that has ARMS permissions to the ack-onepilot component.
Method 1: Specify the AccessKey ID and AccessKey secret directly in Helm
Log on to the ACK console. In the left navigation pane, click Clusters.
On the Clusters page, click the name of your cluster. In the navigation pane on the left, choose . Click Update next to the ack-onepilot component.
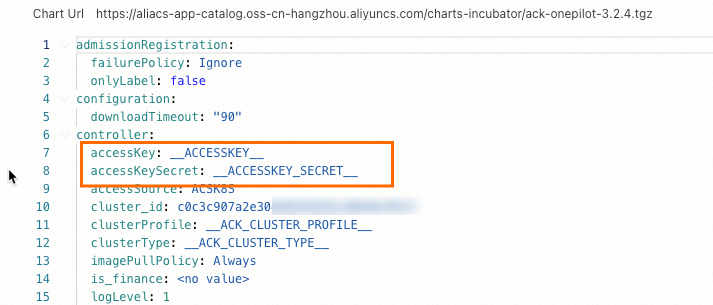
Replace the values of
accessKeyandaccessKeySecretwith the AccessKey ID and AccessKey secret of your account. Then, click OK.NoteFor more information about how to obtain an AccessKey pair, see Create an AccessKey pair.
Restart the application deployment.
Method 2: Use a Kubernetes secret to provide the AccessKey ID and AccessKey secret
Log on to the Container Service for Kubernetes console. In the navigation pane on the left, select Clusters.
On the Clusters page, click the name of your cluster. In the navigation pane on the left, choose .
Select the ack-onepilot namespace and create a secret to store the AccessKey ID and AccessKey secret.
NoteFor more information about how to obtain an AccessKey pair, see Create an AccessKey pair.

In the navigation pane on the left, choose . Click the ack-onepilot component. The component is usually named ack-onepilot-ack-onepilot and is in the ack-onepilot namespace.
In the upper-right corner of the ack-onepilot-ack-onepilot page, click Edit. In the Environment Variables section, add
ONE_PILOT_ACCESSKEYandONE_PILOT_ACCESSKEY_SECRET, and reference the values that are stored in the secret. Then, click OK.
ASK/ECI clusters
To monitor applications in ACK serverless clusters or clusters that are integrated with ECI, you must complete authorization on the Resource Access Authorization page. Then, restart all pods of the ack-onepilot component.
Step 3: Enable ARMS Application Monitoring for Java applications
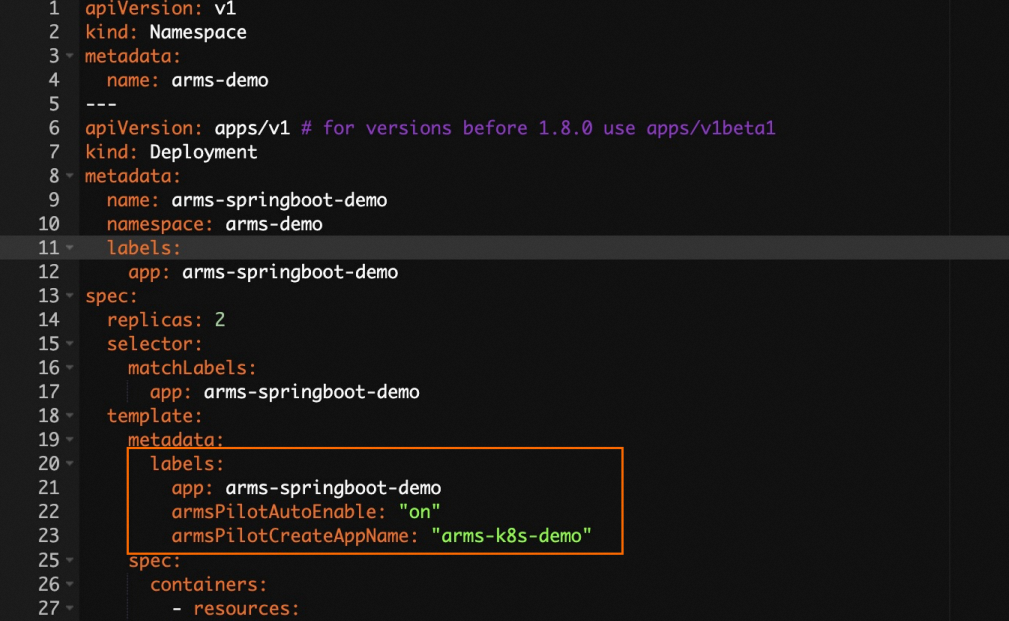
The following YAML template shows how to create a stateless application (Deployment) and enable ARMS Application Monitoring:
Log on to the ACK console. In the left navigation pane, click Clusters.
On the Clusters page, click the name of your cluster. In the navigation pane on the left, choose .
On the Stateless page, select
 > YAML Edit to the right of the target application.
To create a new application, click Create from YAML.
In the YAML file, add the following
labelsto the `spec.template.metadata` section:labels: armsPilotAutoEnable: "on" armsPilotCreateAppName: "<your-deployment-name>" # Replace <your-deployment-name> with your application name. aliyun.com/app-language: javaNoteFor more information about application security, see What is application security?.
For more information about application security billing, see Billing overview.
Click Update.
On the Stateless page, click
> ARMS Console in the Actions column of the target application to view the application monitoring details.
FAQ
Why is the monitoring data abnormal after I change the cluster or namespace of an application?
How do I use ack-onepilot when a VPC connection cannot be established?
Why does an ARMS agent fail to be installed for an application in an ACK cluster?
Why are the suffixes of application names missing after I update the applications?