This topic describes how to synchronize change data in a database to ApsaraMQ for RocketMQ by using Canal.
Background information
Change data capture (CDC) is a solution that is used to identify and capture changes to data in a database. CDC is commonly used to synchronize data between heterogeneous data sources. Canal is a lightweight CDC tool that can be used to parse incremental logs in a database and allows you to subscribe to and consume incremental data. Canal can deliver data change records to ApsaraMQ for RocketMQ and implement diverse business logic by using various message processing policies provided by ApsaraMQ for RocketMQ.
Canal is an open source project. For more information, see canal.
Scenarios
The following items describe common scenarios in which incremental data is subscribed to and consumed based on binary logs:
Database mirroring
Real-time database backup
Index building and real-time index maintenance, such as sharding heterogeneous indexes and inverted indexes
Update of business cache
Processing of incremental data related to business logic
Solution introduction
The following figure shows the CDC solution that is used to synchronize change data in a database to ApsaraMQ for RocketMQ by using Canal.
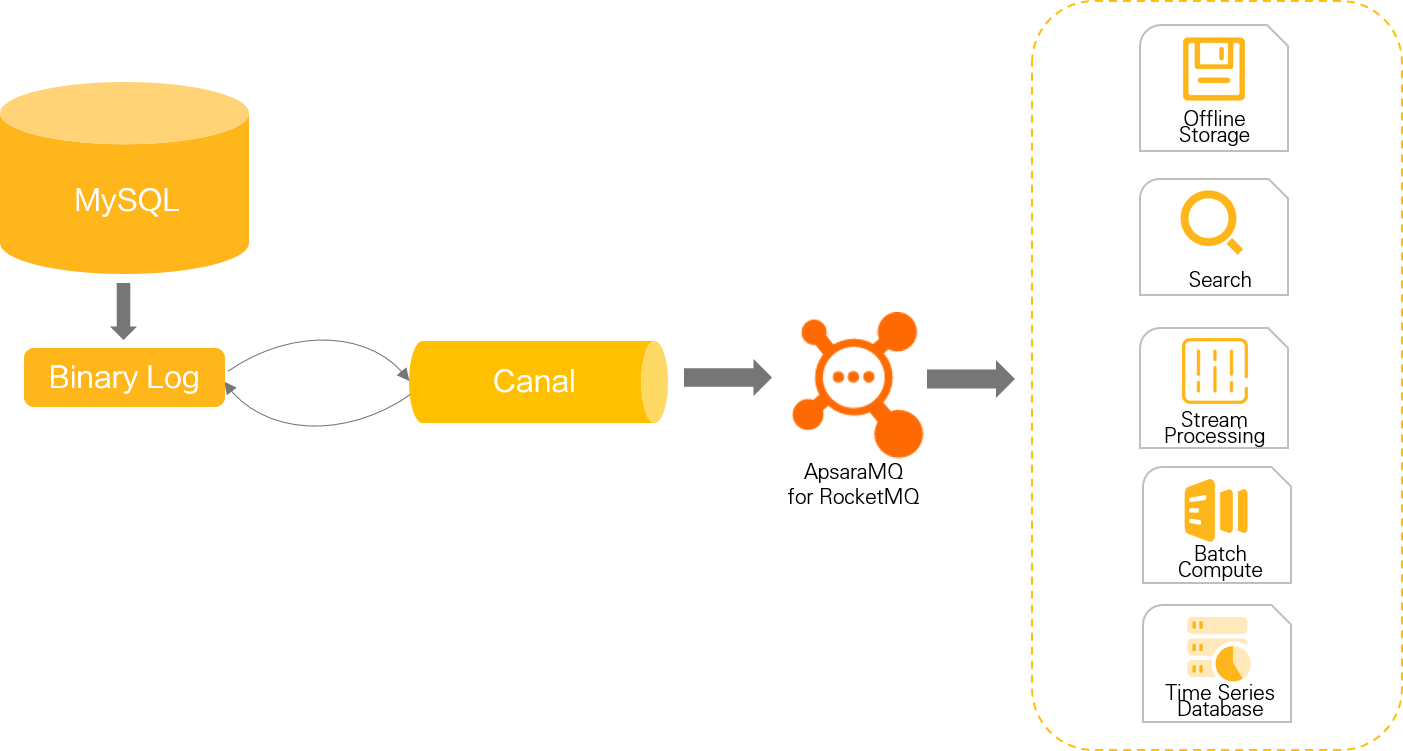
In the preceding figure, Canal is disguised as a library that is used to listen to and receive binary logs from the MySQL database. Then, the logs are synchronized to storage or middleware systems such as ApsaraMQ for RocketMQ.
The following steps are performed:
Configure MySQL: Enable the binary logging feature for MySQL and create the database and tables that are required by the test.
Deploy Canal: Deploy Canal Deployer, which serves as a server, and use Canal Deployer to receive the binary logs of the MySQL database.
Verify the result: Verify message sending after data is changed.
Environment requirements
Resources
An ApsaraMQ for RocketMQ instance that is in the running state is created. For more information, see Create an instance.
A MySQL instance that is in the running state is created. In this topic, an ApsaraDB RDS for MySQL instance is created. For more information, see Create an ApsaraDB RDS for MySQL instance.
A machine that is used to deploy and run Canal-related components is prepared. In this topic, an Elastic Compute Service (ECS) instance is created and used. For more information, see Create and manage an ECS instance in the console (express version).
Networks
The nodes on which Canal Deployer is deployed can connect to databases and ApsaraMQ for RocketMQ instances. In most cases, ECS instances and containers that reside in virtual private clouds (VPCs) can be used as nodes.
Versions
Service
Version
Description
Service
Version
Description
Canal
1.1.6
For information about other versions, see Canal.
MySQL
8.0
Canal supports source databases whose engines are MySQL 5.1.x, 5.5.x, 5.6.x, 5.7.x, and 8.0.x.
ApsaraMQ for RocketMQ
5.x
Canal supports ApsaraMQ for RocketMQ 4.x and 5.x instances. We recommend that you use ApsaraMQ for RocketMQ 5.x instances.
Canal does not support serverless ApsaraMQ for RocketMQ 5.x instances.
1. Configure MySQL
1.1 Enable the binary logging feature
The binary logging feature is automatically enabled for an ApsaraDB RDS for MySQL instance, and an Alibaba Cloud account is automatically granted the permissions to dump binary logs. You can skip this step.
Enable the binary logging feature and specify ROW as the format of binary logs. The following sample code provides an example of the configurations in the my.cnf file:
[mysqld]
log-bin=mysql-bin  # Enable the binary logging feature.
binlog-format=ROW  # Specify ROW as the format of binary logs.
server_id=1  # Specify the server ID of the MySQL database. The server ID cannot be the same as the secondary node ID of Canal.
Create a user named canal and grant the user permissions on the secondary MySQL node.
CREATE USER canal IDENTIFIED BY 'canal';
GRANT SELECT, REPLICATION SLAVE, REPLICATION CLIENT ON *.* TO 'canal'@'%';
FLUSH PRIVILEGES;
1.2 Create a database
Execute the following SQL statement to create a database named canal:
CREATE DATABASE canal DEFAULT CHARACTER SET utf8mb4 COLLATE utf8mb4_general_ci;1.3 Create a table
Execute the following SQL statement to create a table named students in the canal database:
CREATE TABLE students (
    id INT AUTO_INCREMENT,
    name VARCHAR(100) NOT NULL,
    age INT,
    gender VARCHAR(10),
    PRIMARY KEY (id)
);
2. Deploy Canal
2.1 Install JDK
Run the following command to install JDK:
sudo yum install java-1.8.0-openjdk2.2 Download Canal Deployer
Run the following command to download the installation package of Canal Deployer:
sudo wget https://github.com/alibaba/canal/releases/download/canal-1.1.6/canal.deployer-1.1.6.tar.gz2.3 Decompress the installation package
Run the following commands to create a directory named canal-server and decompress the downloaded installation package to the directory:
# Create a directory named canal-server.
sudo mkdir -p /usr/local/canal-server

# Decompress the downloaded installation package to the canal-server directory.
sudo tar -zxvf canal.deployer-1.1.6.tar.gz -C /usr/local/canal-server
2.4 Modify configurations
Run the following command to configure the canal.properties file:
sudo vi /usr/local/canal-server/conf/canal.properties# The server mode.
canal.serverMode = rocketMQ
# The username that is used to access the ApsaraMQ for RocketMQ instance. You can obtain the username on the Intelligent Authentication tab of the Access Control page corresponding to the instance in the ApsaraMQ for RocketMQ console.
canal.aliyun.accessKey = 6W0xz2uPf******
# The password that is used to access the ApsaraMQ for RocketMQ instance. You can obtain the password on the Intelligent Authentication tab of the Access Control page corresponding to the instance in the ApsaraMQ for RocketMQ console.
canal.aliyun.secretKey = sK56k1DrGx******
# The method that is used to access message queues.
canal.mq.accessChannel = cloud
# The format in which messages are sent. ApsaraMQ for RocketMQ does not allow you to encapsulate multiple change records into a message. You must set canal.mq.flatMessage to false. After a consumer receives a message body, the consumer must deserialize the message body. For Java applications, you can use the com.alibaba.otter.canal.client.CanalMessageDeserializer#deserializer(byte[]) method to implement the deserialization. For applications written in other programming languages, you can refer to the preceding Java method to implement the deserialization.
canal.mq.flatMessage = false
# The name of the group on the ApsaraMQ for RocketMQ instance.
rocketmq.producer.group = canal_test
# Specify whether to enable the message trace feature.
rocketmq.enable.message.trace = false
# The topic that is used to store message traces.
rocketmq.customized.trace.topic =
# The namespace of the ApsaraMQ for RocketMQ instance. If the instance is an ApsaraMQ for RocketMQ 5.x instance, you do not need to configure this parameter.
rocketmq.namespace =
# The endpoint of the ApsaraMQ for RocketMQ instance. You can obtain the endpoint on the Instance Details page in the ApsaraMQ for RocketMQ console.
rocketmq.namesrv.addr = rmq-cn-xxx.{$RegionId}.rmq.aliyuncs.com:8080
# The number of retries.
rocketmq.retry.times.when.send.failed = 0
# Specify whether to enable the VIP Netty channel to send messages.
rocketmq.vip.channel.enabled = false
# The message tag.
rocketmq.tag = Run the following command to configure the instance.properties file:
sudo vi /usr/local/canal-server/conf/example/instance.properties# The endpoint of the ApsaraDB RDS for MySQL instance.
canal.instance.master.address=rm-uf62****.rwlb.rds.aliyuncs.com:3306
# The username that is used to access the ApsaraDB RDS for MySQL database.
canal.instance.dbUsername=xxx
# The password that is used to access the ApsaraDB RDS for MySQL database.
canal.instance.dbPassword=xxx
# The MySQL tables to which Canal listens. The value of this parameter can be a regular expression. The value canal\\..* specifies that all tables in the canal schema are listened to.
canal.instance.filter.regex=canal\\..*
# The name of the topic on the ApsaraMQ for RocketMQ instance.
canal.mq.topic=canal_topic2.5 Start Canal Deployer
Run the following command to start Canal Deployer:
/usr/local/canal-server/bin/startup.sh2.6 Verify the startup
Run the following command to view the canal.log file and check whether Canal is started:
sudo vi /usr/local/canal-server/logs/canal/canal.log 2024-07-15 17:24:12.154 [main] INFO com.alibaba.otter.canal.deployer.CanalLauncher - ## set default uncaught exception handler
2024-07-15 17:24:12.202 [main] INFO com.alibaba.otter.canal.deployer.CanalLauncher - ## load canal configurations
2024-07-15 17:24:12.497 [main] INFO c.a.o.c.c.rocketmq.producer.CanalRocketMQProducer - ##Start RocketMQ producer##
2024-07-15 17:24:12.799 [main] INFO com.alibaba.otter.canal.deployer.CanalStarter - ## start the canal server.
2024-07-15 17:24:12.984 [main] INFO com.alibaba.otter.canal.deployer.CanalController - ## start the canal server[172.17.XX.XX:11111]
2024-07-15 17:24:16.208 [main] INFO com.alibaba.otter.canal.deployer.CanalStarter - ## the canal server is running now ......Run the following command to view the example.log file and confirm that the Canal instance is started:
sudo vi /usr/local/canal-server/logs/example/example.log 2024-07-15 18:22:15.667 [main] INFO c.a.otter.canal.instance.spring.CanalInstanceWithSpring - start CannalInstance for 1-example
2024-07-15 18:22:15.699 [main] WARN c.a.o.canal.parse.inbound.mysql.dbsync.LogEventConvert - --> init table filter : ^canal\..*$
2024-07-15 18:22:15.699 [main] WARN c.a.o.canal.parse.inbound.mysql.dbsync.LogEventConvert - --> init table black filter : ^mysql\.slave_.*$
2024-07-15 18:22:16.030 [main] INFO c.a.otter.canal.instance.core.AbstractCanalInstance - start successful....3. Verify the result
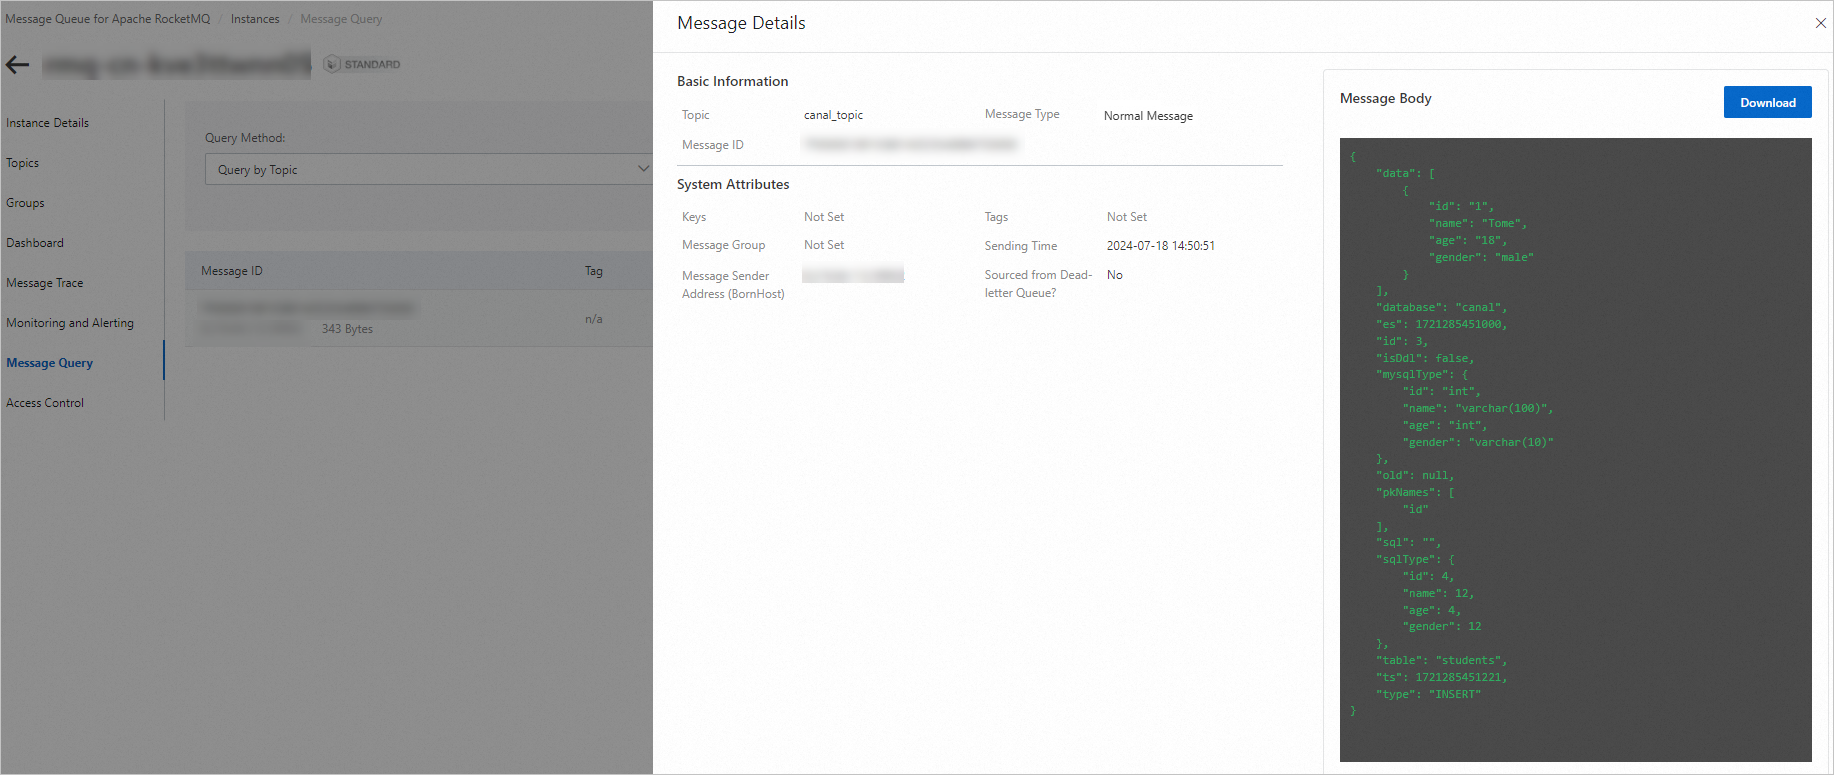
3.1 Add a data entry to the MySQL database
Execute the following SQL statement to add a data entry to the students table created in 1.3 Create a table:
INSERT INTO`students` (`name`, `age`, `gender`)VALUES('Tome', 18, 'male');3.2 View the message sent by Canal
Log on to the ApsaraMQ for RocketMQ console. In the left-side navigation pane, click Instances. On the Instances page, click the name of the instance that you configured. In the left-side navigation pane of the Instance Details page, click Message Query to view the message sent by Canal.