Node pool upgrade includes upgrading the kubelet version and container runtime version of nodes in the node pool. You can choose between in-place upgrade and disk replacement upgrade based on your requirements.
Precautions
If the cluster has enabled the Auto Scaling feature, to ensure that the auto scaling function is not affected, the cluster will automatically update Cluster Autoscaler to the latest version after the upgrade is successful. After the cluster upgrade, confirm whether the Cluster Autoscaler version is normal. For more information, see Enable node autoscaling.
After upgrading the cluster to version 1.18, ACK will configure node resource reservation by default. If the cluster does not have resource reservation configured and the node water level is high, there is a risk that Pods cannot be quickly scheduled after eviction during the upgrade. Reserve some resources for nodes, and it is recommended that CPU usage does not exceed 50% and memory usage does not exceed 70%. For more information, see Node resource reservation policy.
In clusters of version 1.24 and below, if the workload Pod only configures a startup probe, the Pod will experience a brief NotReady phenomenon after kubelet restarts. Adopt a multi-replica deployment strategy to distribute the workload across multiple nodes to ensure that there are sufficient available Pods during the restart of a node.
If a Pod accesses another Pod on the same node through the SLB address of a Service of type
LoadBalancer, and theexternalTrafficPolicyof the Service is set toLocal, then after node rotation, the two Pods may no longer be on the same node, resulting in network unavailability.Custom OS images are not strictly verified by ACK. ACK cannot guarantee the upgrade success completely.
Cluster upgrade requires using yum to download the software packages needed for the upgrade. If you have modified the network configuration of the nodes or used a custom OS image, ensure that yum on the nodes can be used normally. Execute
yum makecacheto check.If you have made configuration changes to the cluster, such as enabling SWAP partitions, modifying kubelet configuration or runtime configuration through black screen operations, the cluster upgrade process may fail, or custom configurations may be overwritten.
When upgrading nodes through disk replacement, ACK will perform node draining operations, evicting Pods on the nodes to other available nodes under the premise of following Pod Disruption Budget (PDB). To ensure service high availability, adopt a multi-replica deployment strategy to distribute workloads across multiple nodes, and configure PDB for critical services to control the number of Pods interrupted simultaneously.
The default timeout for node draining is 30 minutes. If Pod migration cannot be completed within the timeout period, ACK will terminate this upgrade to ensure business stability.
When upgrading nodes through disk replacement, ACK will reinitialize the nodes according to the current configuration of the node pool (such as node login method, labels, taints, OS image, runtime version). Normally, to update the node pool configuration, you must use the method described in Create and manage node pools. If you have made changes to the nodes through other methods, these changes will be overwritten during the upgrade.
If Pods in the node reference HostPath, and the HostPath points to the system disk, the data in the HostPath directory will be lost after disk replacement upgrade.
During the node pool upgrade process, only expansion operations are supported, and scaling operations are not supported.
If the node is a detached node, that is, a Worker node not managed by the node pool, Add free nodes to a node pool to complete the migration.
When upgrading the ACK cluster version, Lingjun node pools are temporarily not supported for upgrade.
Procedure
Log on to the ACK console. In the left navigation pane, click Clusters.
On the Clusters page, find the cluster to manage and click its name. In the left navigation pane, choose .
In the Node Pools list, choose
 > Kubelet Upgrade for the target node pool in the Actions column, and complete the configuration according to the following content.
Configuration item
Description
Kubelet upgrade information
View the current Kubelet version and select the desired upgrade version.
Runtime upgrade information
View the current runtime version and select the desired runtime version.
When upgrading from Docker to containerd, the node pool nodes will be upgraded through disk replacement and reset (replace the node system disk). The upgrade process will clear all content on the system disk. For more information, see Migrate the container runtime from Docker to containerd.
If your cluster version is 1.22 and the installed containerd version is 1.6.34 (relatively new), upgrade is temporarily not supported.
Upgrade nodes
Specify the nodes to be upgraded (all nodes or partial nodes).
Upgrade method
Select the upgrade method. Both In-place upgrade and Disk replacement upgrade are supported. See In-place upgrade and disk replacement upgrade to learn about the upgrade logic and process description.
In-place upgrade: After checking, the required components will be updated and replaced on the original node. In-place upgrade will not replace the system disk and will not reinitialize the node. The data of the original node is not affected.
Disk replacement upgrade: After checking, the node will be reinitialized by replacing the node system disk. The instance attributes of the node will not change, such as node name, instance ID, and IP, but the data on the node system disk will be deleted. Data disks additionally mounted on the node are not affected.
Ignore Warnings
Specifies whether to ignore warning-level check items at the node pool level and continue with the upgrade. An example of a warning-level check item is that a pod in the node pool uses a HostPath that points to the system disk.
Batch upgrade strategy
Maximum number of nodes per batch
The upgrade process will upgrade nodes in batches according to the set maximum parallelism. For the upgrade process description, see In-place upgrade and disk replacement upgrade below.
Automatic pause strategy
Pause strategy during the node upgrade process.
Interval time between batches
When the automatic pause strategy is not to pause, you can choose whether there needs to be a time interval between each upgrade batch or the duration of the interval. The optional range is 5-120 minutes.
Automatic snapshot
If you have important business data on the node system disk, choose whether to create a snapshot for the node before upgrading the node pool to back up and restore node data. Using snapshots will incur charges (see Snapshot billing). The creation progress will dynamically change. After the upgrade, if the snapshot is no longer needed, delete it.
NoteIf you choose disk replacement upgrade as the upgrade method, it is recommended that you enable automatic snapshot. Creating snapshots will incur resource fees. For billing details, see Snapshot billing.
After the configuration is complete, click Precheck, and start the upgrade operation according to the page prompts after the pre-check passes.
NoteIf the pre-check execution fails or there are warning items, refer to Solutions for failed check items or check the Check Report according to the page prompts for troubleshooting and remediation.
During the upgrade, you can perform the following operations according to the page prompts.
Pause: Cluster pause status is an intermediate state of node pool upgrade. Do not operate on the cluster during this period, and complete the upgrade process as soon as possible. Clusters in intermediate states will close the upgrade process and clean up all upgrade-related events and log information after 7 days.
After pausing, the kubelet and container runtime of completed upgraded nodes do not support version rollback.
Cancel: Cancel the upgrade. After clicking Cancel, the kubelet and container runtime of completed upgraded nodes do not support version rollback.
After the upgrade, you can click the node name on the Nodes page, and view whether the kubelet version, container runtime version and other information of the node meet expectations on the Basic Information tab.
In-place upgrade and disk replacement upgrade
Process
During the node pool upgrade process, nodes will be upgraded in batches according to the set maximum parallelism. The number of upgrade nodes in each batch is 1, 2, 4, 8... until the maximum parallelism is reached. After reaching the maximum parallelism, each batch will upgrade nodes according to the maximum parallelism.
For example, if the maximum parallelism is set to 4, then the number of nodes upgraded in the first batch is 1, the number of nodes upgraded in the second batch is 2, the number of nodes upgraded in the third batch is 4, and the number of nodes upgraded in each subsequent batch is 4.
The following figure introduces the batch execution process with maximum parallelism=N as an example, that is, the number of upgrade nodes in each batch is 1, 2, 4, 8... until the maximum parallelism N is reached.
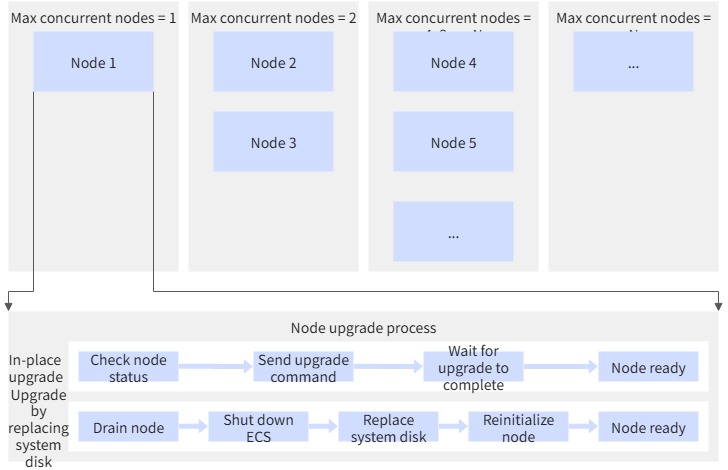
In-place upgrade logic within a single node
Perform pre-upgrade checks. If the container has critical exceptions (such as inability to serve ttrpc requests normally, or processes in the container cannot respond to signals normally), the upgrade will be stopped.
Save the current container and Pod status to the tmp temporary directory.
Upgrade containerd, crictl and related configuration files to the new version provided by ACK, and restart containerd (this behavior will not affect running containers). If you have previously modified the
/etc/containerd/config.tomlconfiguration on the node, this upgrade will cause your modifications to be overwritten.Ensure that kubelet is running normally and the node is ready.
Disk replacement upgrade logic within a single node
Perform node draining (if the node is schedulable, the system will set it to unschedulable).
ECS shutdown, that is, stop the node.
Replace the system disk. The system disk ID will change, but the cloud disk type, instance IP address and elastic network card MAC address will remain unchanged.
Reinitialize the node.
Restart the node, and the node is ready. Set the node to schedulable.
If a node has been set to unschedulable before performing node draining, the node will not automatically recover to schedulable after disk replacement upgrade is completed.
FAQ
Does node pool upgrade support version rollback?
No, neither kubelet nor container runtime supports version rollback after version upgrade. The operating system supports version rollback after upgrade, but you must ensure that the original image is still supported by the node pool.
Will the service be affected during the upgrade process?
In-place upgrade: Pods will not restart and services will not be affected.
Disk replacement upgrade: During disk replacement upgrade, node draining will be performed. If Pods implement graceful exit logic (Graceful shutdown and zero downtime deployments in Kubernetes) and are deployed in multiple replicas on multiple nodes, there will be no impact on services. To avoid multiple replicas of the same application being upgraded in one batch, manually adjust the parallelism to be less than the number of Pod replicas.
How long does each batch upgrade take?
In-place upgrade: Within 5 minutes
Disk replacement upgrade: Generally within 8 minutes without involving snapshots. If snapshots are selected during the upgrade, the upgrade will be executed after the snapshot is completed. The execution time depends on the snapshot time. The node pool upgrade tolerates snapshots for 40 minutes. If the snapshot has not ended within 40 minutes, the node upgrade will be judged as timeout failure. The failed node has not yet started the upgrade operation at this time. If you do not save business data in the system disk, you can deselect snapshots to avoid prolonged upgrade time.
Will node data be lost during the node upgrade process?
When performing node runtime upgrade by replacing the node system disk, do not save important data in the system disk or make backup preparations in advance. Data disks are not affected during the upgrade process.
After the node replaces the system disk, will the node's IP address change?
In the disk replacement method, the system disk ID will change, but the cloud disk type, instance IP address and elastic network card MAC address remain unchanged. For more information, see Replace the system disk (operating system).
How to upgrade cluster nodes that do not belong to any node pool?
In old clusters created before the node pool function went online, there will be detached nodes that do not belong to any node pool. Migrate detached nodes to a node pool, then upgrade it. See Add free nodes to a node pool.
After the node runtime switches from Docker to containerd, what should I do if the Docker directory is not cleaned up and occupies disk space?
In addition to container, image, and log files managed by the Kubernetes cluster, the Docker directory also contains file paths you created yourself. If not needed, manually delete the Docker directory in the data disk after the runtime switch.
How to restore data based on snapshots?
Node pool upgrade supports creating snapshots for nodes. The snapshot will be retained for 7 days by default, and you can also manually clean up the snapshot in advance. In extreme scenarios, such as discovering data loss after the upgrade, restore the data through one of the following methods.
If it is an in-place upgrade, such as only upgrading the kubelet version, roll back the snapshot. See Roll back a disk by using a snapshot.
If it is a disk replacement upgrade, such as upgrading the operating system or container runtime, create a cloud disk through the snapshot. See Create a data disk from a snapshot.
Related documentation
Enable the cluster auto upgrade function to reduce version operation and maintenance pressure. See Automatically upgrade a cluster.
For containerd change logs, see containerd runtime release notes.
ACK managed node pools provide automatic CVE vulnerability repair function for the operating system. See Automatically patch OS CVE vulnerabilities (recommended).
Kubernetes 1.24 will no longer support using Docker as the built-in container runtime. Please migrate the node container runtime from Docker to containerd. See Migrate the container runtime from Docker to containerd.
The command line tools of Docker and containerd are different. See Comparison of the commonly used commands provided by Docker Engine and containerd.
Update the OS image version as soon as possible. See Change an operating system.