A GPU needs a Tesla driver to deliver high-performance computing (HPC) for deep learning and AI. The driver is also needed for smooth graphics in scenarios such as OpenGL, Direct3D, and cloud gaming. If you did not install a Tesla driver when you created a GPU-accelerated compute-optimized instance that runs Linux, you must install the driver manually. This topic describes how to manually install a Tesla driver on a GPU-accelerated compute-optimized instance that runs Linux.
Procedure
This procedure applies to all GPU-accelerated compute-optimized instances that run Linux. For more information, see GPU-accelerated compute-optimized (gn/ebm/scc series). You must install a Tesla driver for Linux that is compatible with the operating system of your instance.
Step 1: Download the NVIDIA Tesla driver
Visit the NVIDIA Driver Download Page.
NoteFor more information about how to install and configure NVIDIA drivers, see the NVIDIA Driver Installation Quickstart Guide.
Set the search criteria and click Search to find a suitable driver.
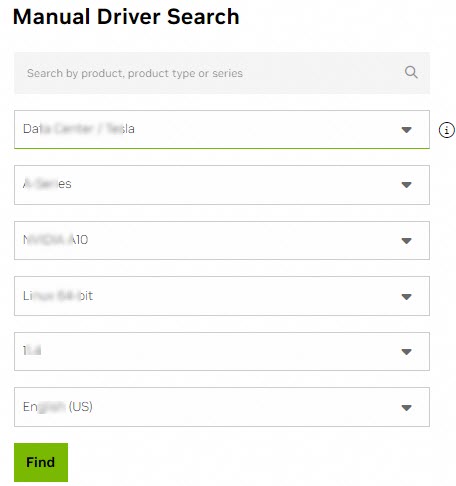
The following table describes the settings.
Setting
Description
Example
Product Type
Product Series
Product Family
Select the product type, series, and family that correspond to the GPU of your instance type.
NoteFor more information about how to view details of a GPU-accelerated instance, such as the instance ID, instance type, and operating system, see View instance information.
Data Center / Tesla
A-Series
NVIDIA A10
Operating system
Select the Linux operating system version that corresponds to the image used by the instance.
Linux 64-bit
CUDA Toolkit version
Select the CUDA Toolkit version.
11.4
Language
Select the language for the driver.
Chinese (Simplified)
On the driver search results page, click Expand to view more versions.
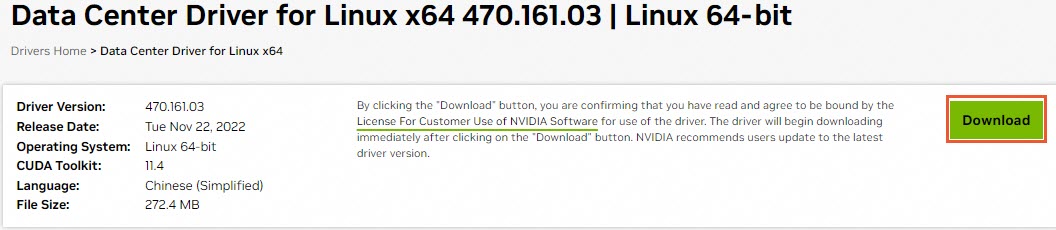
Find the driver to download and click View next to it.
For example, select Data Center Driver for Linux x64 with driver version 470.161.03 and CUDA Toolkit version 11.4.
On the product page for the driver, right-click Download and select Copy link address.
Remotely connect to the GPU-accelerated instance that runs Linux.
For more information, see Log on to a Linux instance using Workbench.
Run the following command to download the driver installation package.
The driver download address in the command example is the download link from Step 5.
wget https://us.download.nvidia.com/tesla/470.161.03/NVIDIA-Linux-x86_64-470.161.03.run
Step 2: Install the NVIDIA Tesla driver
The method for installing the Tesla driver varies depending on the operating system. The following sections describe the procedures.
CentOS
Run the following command to check whether the kernel-devel and kernel-headers packages are installed on the GPU-accelerated instance.
sudo rpm -qa | grep $(uname -r)If a response similar to the following example is returned, the packages are installed. The response includes the version information for the kernel-devel and kernel-headers packages.
kernel-3.10.0-1062.18.1.el7.x86_64
kernel-devel-3.10.0-1062.18.1.el7.x86_64
kernel-headers-3.10.0-1062.18.1.el7.x86_64
If the response does not contain kernel-devel-* and kernel-headers-*, you must download and install the kernel-devel and kernel-headers packages that match your kernel version.
ImportantIf the kernel-devel version does not match the kernel version, a compilation error occurs when you install the driver. Check the version number of kernel-* in the response and download the matching version of kernel-devel. In the sample response, the kernel version is 3.10.0-1062.18.1.el7.x86_64.
Grant permissions and install the Tesla driver.
For a driver for Linux 64-bit, use the .run file, such as NVIDIA-Linux-x86_64-xxxx.run. Run the following commands to grant permissions and install the Tesla driver.
NoteIf you are using a Tesla driver in another format, such as .deb or .rpm, see the NVIDIA CUDA Installation Guide for Linux for installation instructions.
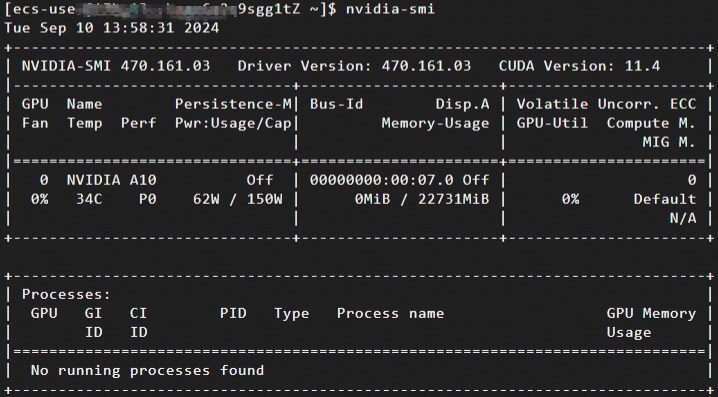
sudo chmod +x NVIDIA-Linux-x86_64-xxxx.runsudo sh NVIDIA-Linux-x86_64-xxxx.runRun the following command to check whether the Tesla driver is installed.
nvidia-smiA response similar to the following example indicates that the Tesla driver is installed.
(Optional) Enable Persistence-M mode using the NVIDIA Persistence Daemon.
After the Tesla driver is installed, Persistence-M is
offby default. The driver is more stable when Persistence-M is on. To ensure stable service, enable Persistence-M mode using the NVIDIA Persistence Daemon. For more information, see Persistence Daemon.NotePersistence-M (Persistence Mode) is a user-configurable driver property that keeps the target GPU initialized.
Enabling Persistence-M by running
nvidia-smi -pm 1is not recommended because it can cause issues, such as the setting being lost after an instance restart. For more information, see Persistence Mode is disabled and ECC status or MIG settings fail after a GPU-accelerated instance is restarted. Instead, enable Persistence-M using the NVIDIA Persistence Daemon.
Run the following command to start the NVIDIA Persistence Daemon.
sudo nvidia-persistenced --user username
# Replace username with your username.
Run the following command to check the status of Persistence-M.
nvidia-smiA response similar to the following example indicates that Persistence-M is
on.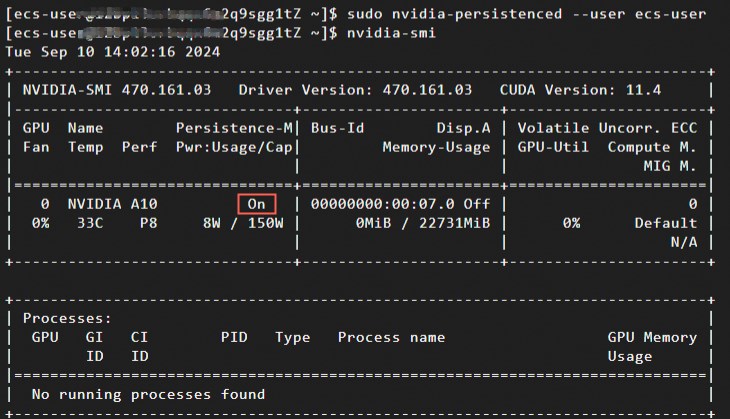
(Optional) Enable Persistence-M after a system restart.
If the system restarts, the
onstate of Persistence-M is not preserved. You can perform the following steps to re-enable the Persistence-M property.The Tesla driver installation package installs the NVIDIA installation scripts, such as sample scripts and installer scripts, to the
/usr/share/doc/NVIDIA_GLX-1.0/samples/nvidia-persistenced-init.tar.bz2path.Run the following commands to decompress and install the NVIDIA installation scripts.
cd  /usr/share/doc/NVIDIA_GLX-1.0/samples/
sudo tar xf nvidia-persistenced-init.tar.bz2
cd  nvidia-persistenced-init
sudo sh install.sh
Run the following command to check whether the NVIDIA Persistence Daemon is running.
sudo systemctl status nvidia-persistencedThe NVIDIA Persistence Daemon is running if the response is similar to the following example.
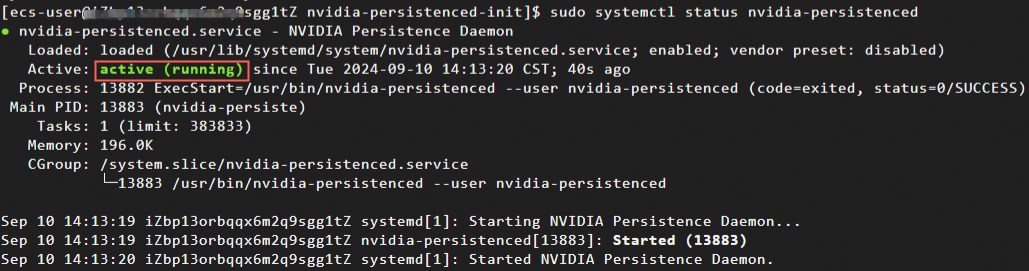 Note
NoteYou can adapt the NVIDIA Persistence Daemon installation script to ensure that it works correctly on your operating system.
Run the following command to confirm that Persistence-M is
on.nvidia-smi(Optional) Run the following commands to stop the NVIDIA Persistence Daemon.
If you do not need to run the NVIDIA Persistence Daemon, you can stop it.
sudo systemctl stop nvidia-persistenced
sudo systemctl disable nvidia-persistenced
If your GPU-accelerated instance family is ebmgn8v, ebmgn7, ebmgn7e, install the nvidia-fabricmanager service that corresponds to the driver version.
ImportantIf the GPU-accelerated instance family is ebmgn8v, ebmgn7, ebmgn7e, the GPU-accelerated instance will not function correctly if the nvidia-fabricmanager service that corresponds to the driver version is not installed.
If the GPU-accelerated instance family is not ebmgn8v, ebmgn7, ebmgn7e, skip this step.
Install the nvidia-fabricmanager service.
You can install the nvidia-fabricmanager service from the source code or from a package. The following examples show the commands for CentOS 7.x and CentOS 8.x. In the following examples, the driver version (driver_version) is 460.91.03. Replace
driver_versionwith the version number of the driver that you downloaded in Step 1: Download the NVIDIA Tesla driver.From source code
Package-based installation
Run the following commands to start the nvidia-fabricmanager service.
sudo systemctl enable nvidia-fabricmanager
sudo systemctl start nvidia-fabricmanager
Run the following command to check if the nvidia-fabricmanager service is installed.
systemctl status nvidia-fabricmanagerThe following output indicates that the nvidia-fabricmanager service is installed.

Ubuntu and other operating systems
Grant permissions and install the Tesla driver.
For a driver for Linux 64-bit, use the .run file, such as NVIDIA-Linux-x86_64-xxxx.run. Run the following commands to grant permissions and install the Tesla driver.
NoteIf you are using a Tesla driver in another format, such as .deb or .rpm, see the NVIDIA CUDA Installation Guide for Linux for installation instructions.
sudo chmod +x NVIDIA-Linux-x86_64-xxxx.runsudo sh NVIDIA-Linux-x86_64-xxxx.runRun the following command to check whether the Tesla driver is installed.
nvidia-smiA response similar to the following example indicates that the Tesla driver is installed.
(Optional) Enable Persistence-M mode using the NVIDIA Persistence Daemon.
After the Tesla driver is installed, Persistence-M is
offby default. The driver is more stable when Persistence-M is on. To ensure stable service, enable Persistence-M mode using the NVIDIA Persistence Daemon. For more information, see Persistence Daemon.NotePersistence-M (Persistence Mode) is a user-configurable driver property that keeps the target GPU initialized.
Enabling Persistence-M by running
nvidia-smi -pm 1is not recommended because it can cause issues, such as the setting being lost after an instance restart. For more information, see Persistence Mode is disabled and ECC status or MIG settings fail after a GPU-accelerated instance is restarted. Instead, enable Persistence-M using the NVIDIA Persistence Daemon.
Run the following command to start the NVIDIA Persistence Daemon.
sudo nvidia-persistenced --user username
# Replace username with your username.
Run the following command to check the status of Persistence-M.
nvidia-smiA response similar to the following example indicates that Persistence-M is
on.
(Optional) Enable Persistence-M after a system restart.
If the system restarts, the
onstate of Persistence-M is not preserved. You can perform the following steps to re-enable the Persistence-M property.The Tesla driver installation package installs the NVIDIA installation scripts, such as sample scripts and installer scripts, to the
/usr/share/doc/NVIDIA_GLX-1.0/samples/nvidia-persistenced-init.tar.bz2path.Run the following commands to decompress and install the NVIDIA installation scripts.
cd  /usr/share/doc/NVIDIA_GLX-1.0/samples/
sudo tar xf nvidia-persistenced-init.tar.bz2
cd  nvidia-persistenced-init
sudo sh install.sh
Run the following command to check whether the NVIDIA Persistence Daemon is running.
sudo systemctl status nvidia-persistencedThe NVIDIA Persistence Daemon is running if the response is similar to the following example.
NoteYou can adapt the NVIDIA Persistence Daemon installation script to ensure that it works correctly on your operating system.
Run the following command to confirm that Persistence-M is
on.nvidia-smi(Optional) Run the following commands to stop the NVIDIA Persistence Daemon.
If you do not need to run the NVIDIA Persistence Daemon, you can stop it.
sudo systemctl stop nvidia-persistenced
sudo systemctl disable nvidia-persistenced
If your GPU-accelerated instance family is ebmgn8v, ebmgn7, ebmgn7e, install the nvidia-fabricmanager service that corresponds to the driver version.
ImportantIf the GPU-accelerated instance family is ebmgn8v, ebmgn7, ebmgn7e, the GPU-accelerated instance will not function correctly if the nvidia-fabricmanager service that corresponds to the driver version is not installed.
If the GPU-accelerated instance family is not ebmgn8v, ebmgn7, ebmgn7e, skip this step.
Install the nvidia-fabricmanager service.
You can install the nvidia-fabricmanager service from the source code or from a package. The following examples show the commands for Ubuntu 16.04, Ubuntu 18.04, Ubuntu 20.04, Ubuntu 22.04, and Ubuntu 24.04. Replace
driver_versionwith the version number of the driver that you downloaded in Step 1: Download the NVIDIA Tesla driver.ImportantTo install the nvidia-fabricmanager service on Ubuntu 22.04, the Tesla driver version must be 515.48.07 or later. The following sample code for Ubuntu 22.04 uses driver version 535.154.05 as an example.
To install the nvidia-fabricmanager service on Ubuntu 24.04, the Tesla driver version must be 550.90.07 or later. The following sample code for Ubuntu 24.04 uses driver version 570.133.20 as an example.
From source code
From a package
Run the following commands to start the nvidia-fabricmanager service.
sudo systemctl enable nvidia-fabricmanager
sudo systemctl start nvidia-fabricmanager
Run the following command to check whether the nvidia-fabricmanager service is installed.
systemctl status nvidia-fabricmanagerThe following response indicates that the nvidia-fabricmanager service is installed.
 Note
NoteThe nvidia-fabricmanager package version must match the Tesla driver version to ensure that the GPU works correctly. On Ubuntu, if you install the nvidia-fabricmanager service from a package, the apt-daily service might automatically update the package. This can cause a version mismatch between the nvidia-fabricmanager package and the Tesla driver. As a result, the nvidia-fabricmanager service fails to start and the GPU becomes unusable. For more information about how to resolve this issue, see The GPU is unusable because the nvidia-fabricmanager version is inconsistent with the Tesla driver version.
References
If you have a GPU-accelerated compute-optimized instance that runs Windows, you must manually install a Tesla driver to use the instance for general computing scenarios, such as deep learning and AI. For more information, see Manually install a Tesla driver on a GPU-accelerated compute-optimized instance (Windows).
To install a Tesla driver when you create a GPU-accelerated instance, see Automatically install or load a Tesla driver when you create a GPU-accelerated instance.
For information about how to uninstall the current Tesla driver, see Uninstall a Tesla driver.
If the driver version on your GPU-accelerated instance is not suitable for your scenario, or if you installed an incorrect driver that causes the instance to become unusable, you can uninstall the current driver and install a new one, or upgrade the driver directly. For information about how to upgrade the driver, see Upgrade an NVIDIA driver.