By Jeff Cleverley, Alibaba Cloud Tech Share Author
In the previous tutorials we successfully installed WordPress on a highly performant lamp stack using an Alibaba ECS Cloud Instance. The only problem was that our WordPress application had no email functionality, we couldn't subscribe new users, send email notifications, nor change passwords by email.
In today's tutorial, we are going to use the Alibaba Cloud DirectMail service as the SMTP provider for our WordPress application's transactional emails.
Go to your Alibaba Cloud Console, and find DirectMail from the Products and Services panel:
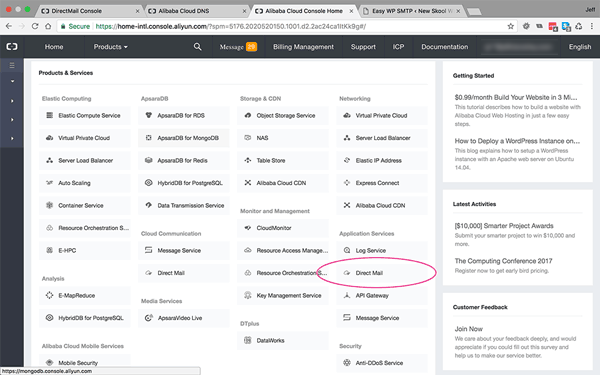
<DirectMail in the ECS Console Products & Services panel>
If you haven't already activated the DirectMail service, you will be greeted with an 'Activate Now' button:
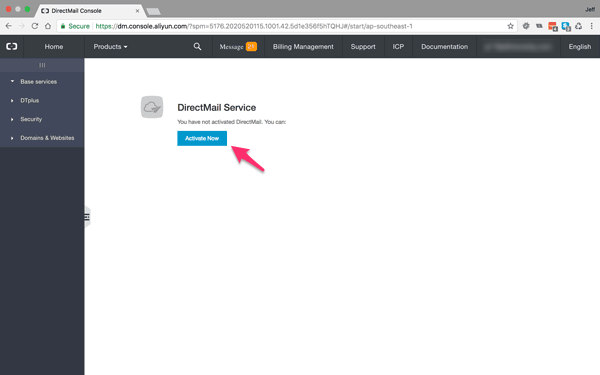
<Activate DirectMail>
Click the activate button, and you will have to confirm your order before you are taken to the DirectMail overview panel:
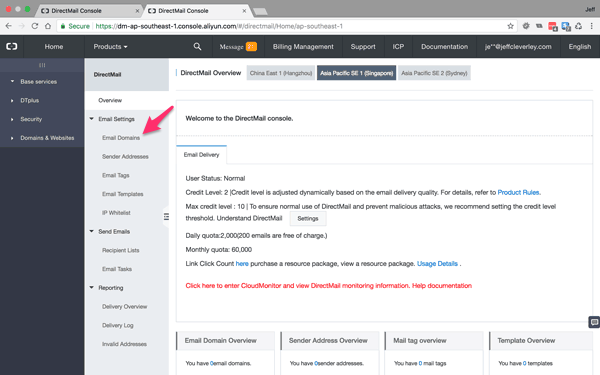
<DirectMail overview panel>
The DirectMail overview panel shows you information about your user status, credit level, sending quotas and other useful information.
In the horizontal menu to the left of the overview panel you will see 'Email Domains', click that menu option to be taken to the following panel:
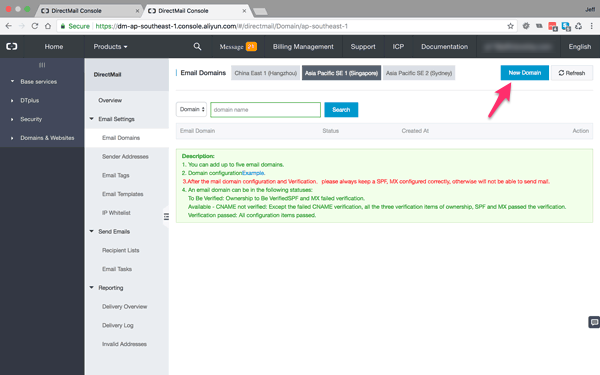
<Add a new domain on the Email Domains page>
Click the blue button in the top right to add a 'New Domain':
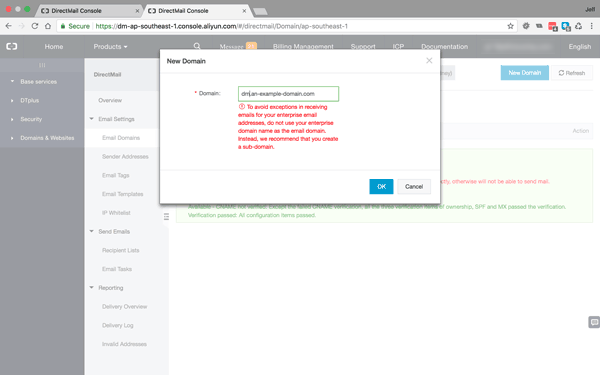
<Create New Email Domain>
A pop up window will open for you to enter your email-sending domain. Since this will be a domain for DirectMail to use, it is advised to use a subdomain of your WordPress applications main domain.
In the example, my domain is an-example-domain.com so the subdomain I chose was:
dm.an-example-domain.com
You can choose any subdomain that you wish.
Once the new domain has been created you will need to configure it before you can verify it:
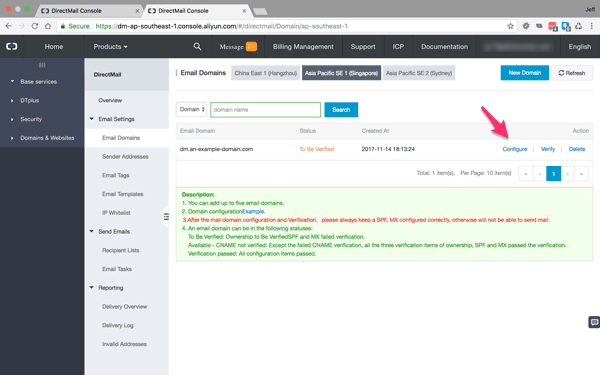
<New email domains need to be configured>
First, click the link to configure your domain
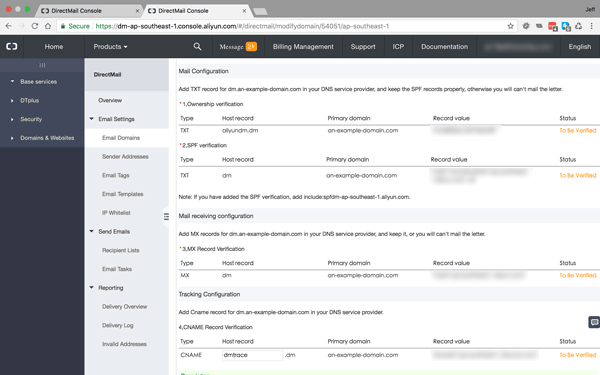
<Email domain DNS configurations>
You will be taken to a screen that will display the different DNS setting you need to configure for your email domain. Take a note of these settings.
Open a new tab in your browser and go to the Alibaba Cloud DNS settings that you previously configured for your WordPress application domain:
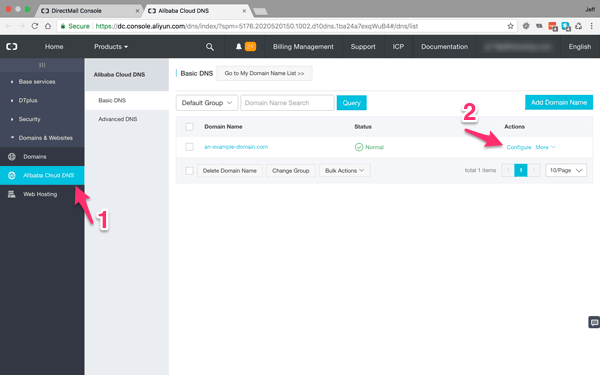
<Alibaba Cloud DNS Settings>
Find the primary domain you are using, and click the configure link.
You will now need to enter the new DNS settings provided for you by the DirectMail Email Domain configuration window. There should be two TXT settings, an MX setting, and a CNAME setting:
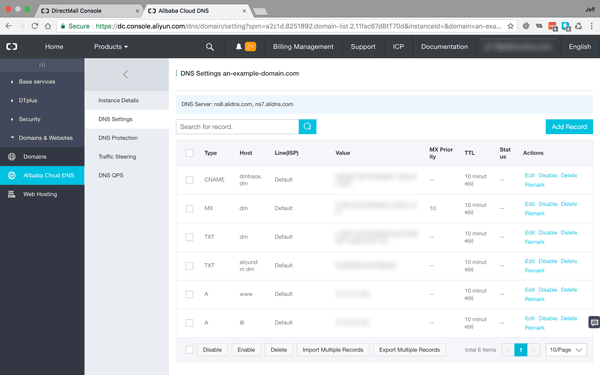
<DNS configured for with additional DirectMail settings>
Once these settings have been entered correctly, you can return to the DirectMail Email Domain panel.
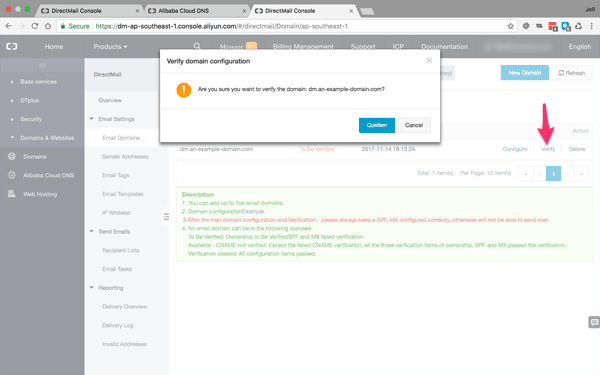
<DirectMail Email Domains - Verify your domain>
At the right of the row containing your Email Domain, you will see a link to verify your domain. Now that your DNS has been configured, you can go ahead and complete the verification:
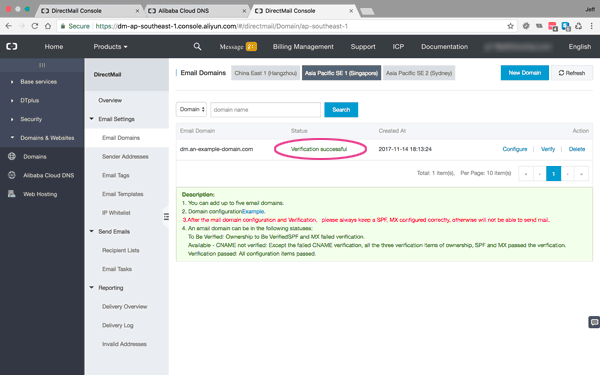
<Verified Email Domain>
Assuming everything has been configured correctly, your email domain should now be verified. If there was a problem, go back and check all your settings again and correct any mistakes.
Before you can use DirectMail you need to add a sender address:
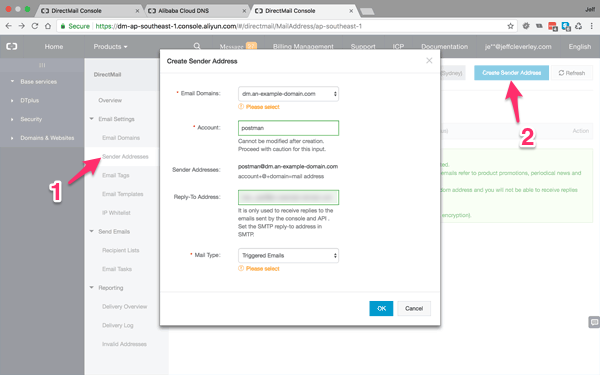
<Create a new sender address>
Choose 'Sender Addresses' from the horizontal DirectMail menu, and you will be taken to an empty list screen.
Click the blue button in the top right of the screen to 'Create Sender Address' and a Pop up window will appear.
You will need to select the Email Domain, create an Account, add a Reply-To address, and select the Mail Type for this Sender Address.
The Account name you create can't be changed later, and it will also be used in the from email address in the WordPress SMTP plugin later, and as your login name for the SMTP API, so select an appropriate name.
The Reply-To address will only be used for notifications from DirectMail and the Console, but it will need to be verified before you can progress, so use a working email.
In Mail Type, there are two options, triggered emails and bulk emails. In today's tutorial, we are only interested in transactional emails, so select 'Triggered Emails.'
Once you have completed these settings click OK, and find the 'verify the Reply-To' link for the Sender Address:
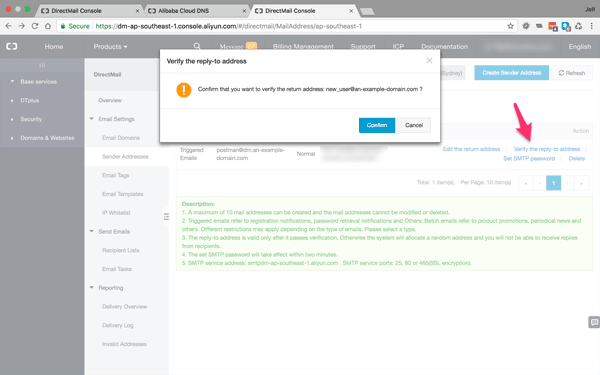
<Verify your new sender address>
Alibaba Cloud will send an email to the address you used for verification. Go to your inbox and find the email, click the link contained, and the address will be verified:
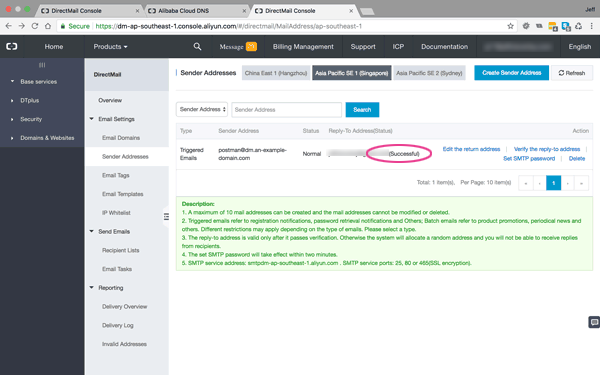
<Sender address verified>
Now that your sender address has been verified you will be able to set your SMTP password:
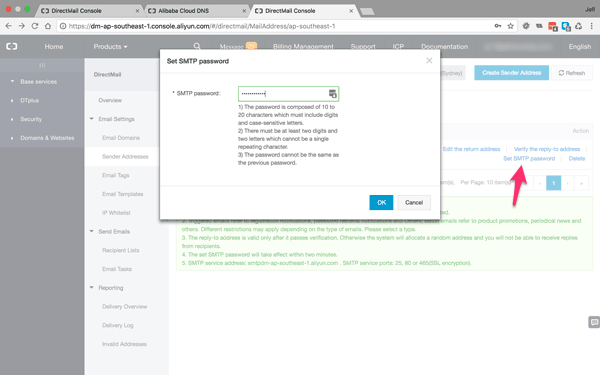
<Set SMTP password>
Follow the instructions to set an appropriate password and keep note of it.
The WordPress plugin repository features several plugins to configure your WordPress application to use a third party SMTP service for its transactional emails.
My recommended plugin is Easy WP SMTP.
Login in to your WordPress installation, and search for Easy WP SMTP from the Plugins settings page:
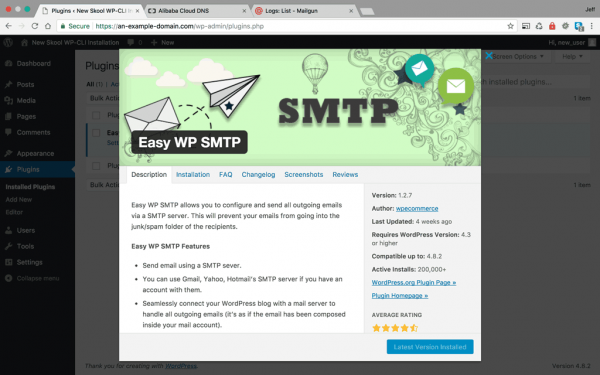
<Easy WP SMTP Plugin>
Install the plugin and activate it, then head to the Easy WP SMTP settings page:
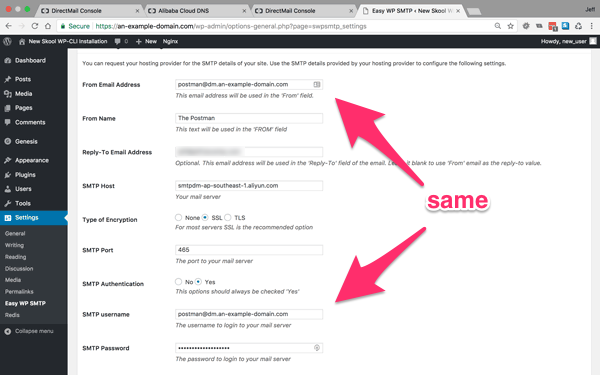
<Easy WP SMTP settings page>
In the settings page you need to complete some fields.
The 'From Email Address' and the 'SMTP Username' will be the same as your DirectMail Sender Address.
Your 'SMTP password' will be the password you noted earlier.
You can choose any name for the 'From Name' field.
The 'SMTP Host', 'Encryption Type' and 'Port' can be found here. They are currently:
SMTP Host: smtpdm-ap-southeast-1.aliyun.com
SMTP Port: 465
Encryption Type: SSL
Once you have configured these settings, click save. You can now test your set up. Scroll to the bottom of the page and you will find a 'Test Email' panel:
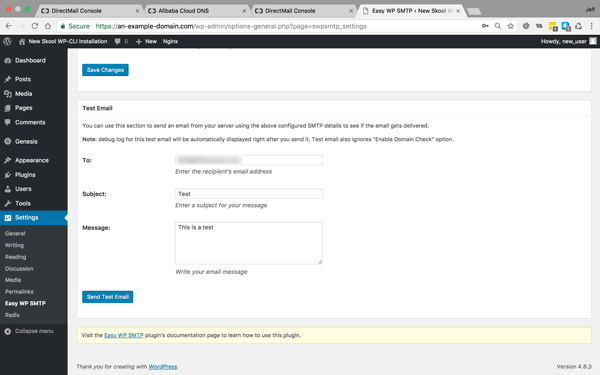
<Easy WP SMTP Test Email>
Fill in the necessary email details and click 'Send Test Email'
A process log window will open at the top of the page:
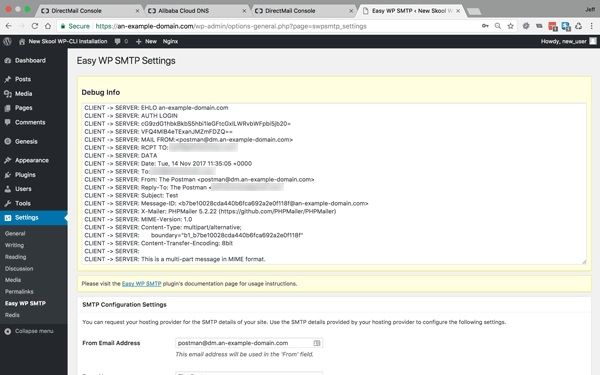
<Easy WP SMTP Test Email has been sent>
You will see something similar to above if everything is working correctly. If you have any problems, take note of the error code. You can check any error codes here to troubleshoot any potential problems.
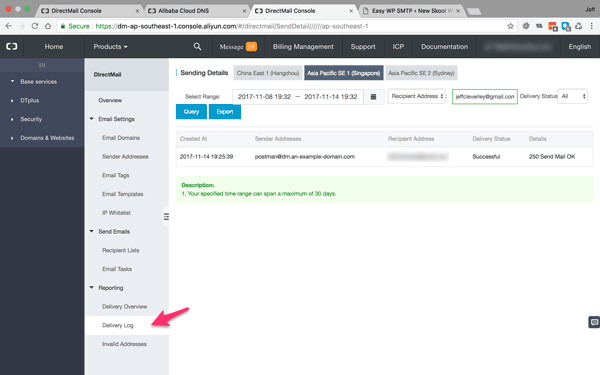
To verify that your test email has been sent, you can go to the DirectMail Delivery Log panel in the Cloud Console:
<DirectMail Delivery Log>
Alternatively, you can just visit your inbox and check to make sure you received the email.
Everything is done. We now have WordPress up and running and fully functional on an Alibaba stack.

2,593 posts | 792 followers
FollowAlibaba Clouder - December 12, 2017
Alibaba Clouder - July 3, 2018
Alibaba Clouder - August 15, 2018
Alibaba Clouder - August 15, 2018
Alibaba Clouder - December 6, 2017
Alibaba Clouder - February 22, 2018

2,593 posts | 792 followers
Follow Marketplace
Marketplace is an online market for users to search and quickly use the software as image for Alibaba Cloud products.
Learn MoreMore Posts by Alibaba Clouder
5616676074028206 December 24, 2020 at 1:08 pm
Great ! That works for me, Thanks a lot. You have saved my day