Let’s say you are a container micro-services developer. You have a lot of container images, each with multiple versions, and all you are looking for is a fast, reliable, secure, and private container registry. You also want to instantly upload and retrieve images, and deploy them as a part of your uninterrupted integration and continuous delivery of services. Well, look no more! This article is for you.
This article introduces you to the Alibaba Cloud Container Registry service and its abundance of features. You can use it to build images in the cloud and deploy them in your Alibaba Cloud Docker cluster or premises. After reading this article, you should be able to deploy your own Alibaba Cloud Container Registry.
Create a Name Space
A namespace is a collection of repositories and repository is a collection of images. I recommend creating one namespace for each application and one repository for each service image.
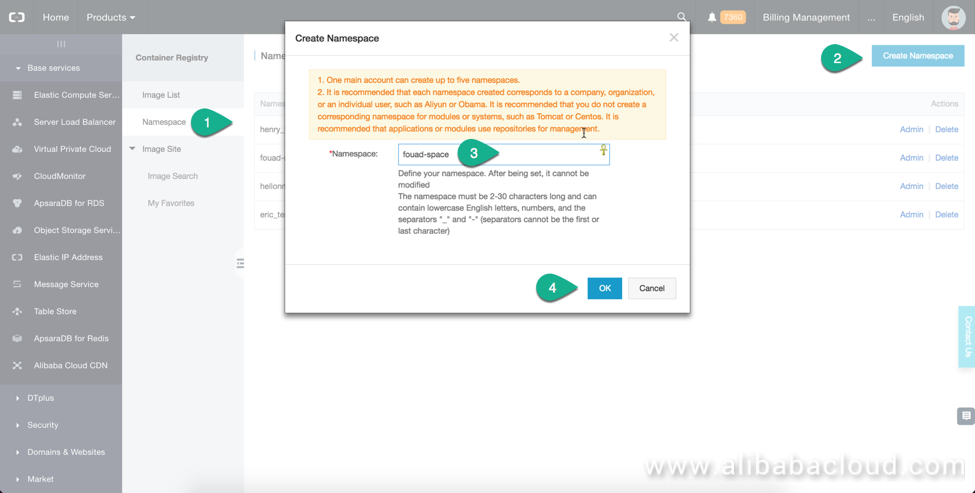
After creating a namespace, you can set it up as public read or private in the settings.
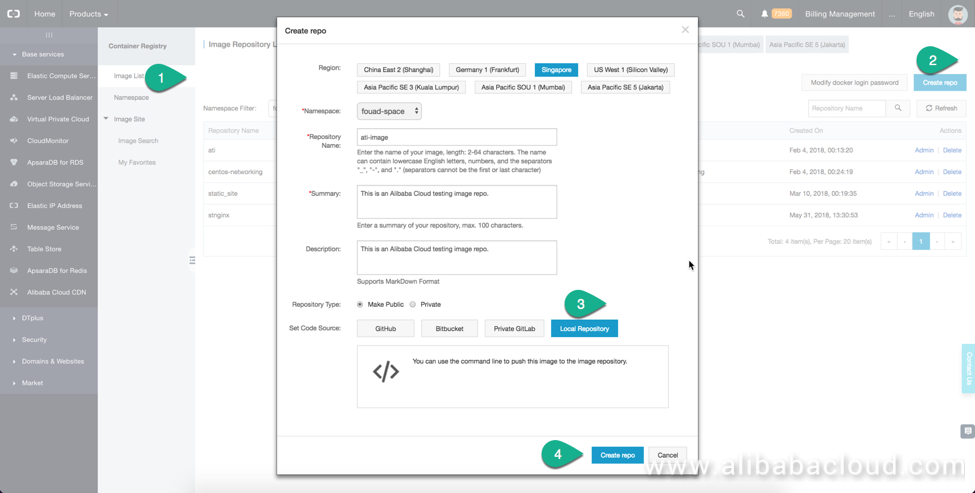
Create and upload a Local Repository
A repository (repo) is a collection of images. I suggest you collect all versions of the image of one service in one repository. Click Create Repo and fill out the information in the page. Select Local Repository. After a short while, a new repository will be created, which has its own Repository URL. You can see it on the image list page.
You can now upload your locally built image to this repository.
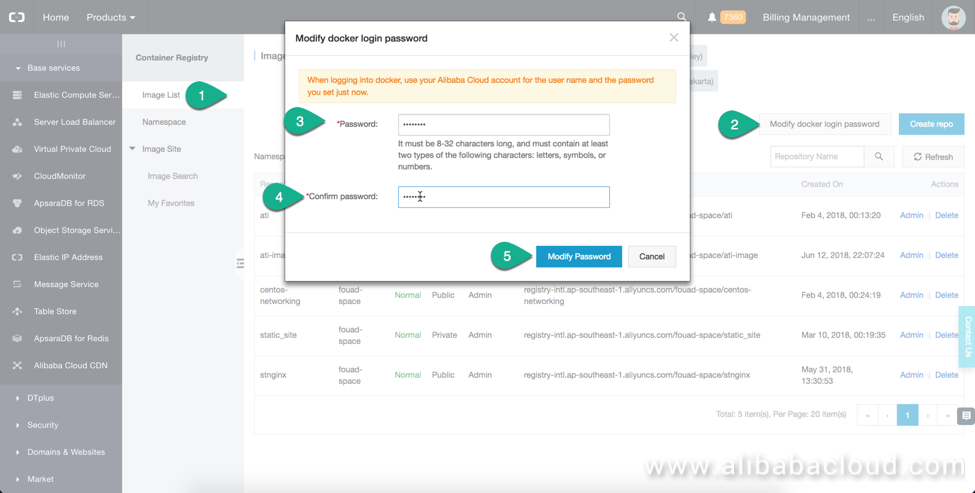
In order to connect to any container registry from Docker client, you first need to set Docker login password in the ACR console. You will use this password on your Docker client to login onto the registry.
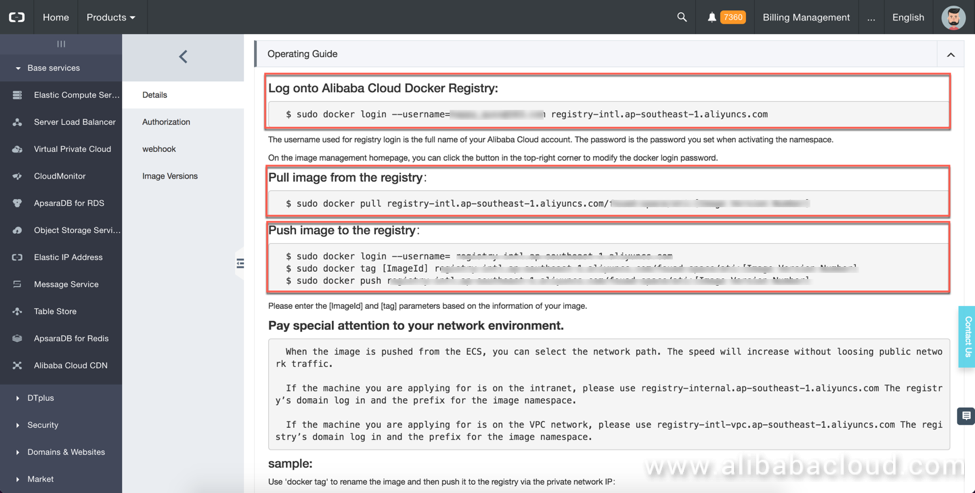
Next, on the Image List page, click on Admin in front of the repository you want to connect. Here you can find all the necessary information and commands to allow Docker client access the repository. You can see Image Name, Image Type, Internet and intranet addresses of the repository. You can use the internet address to access the repository from anywhere in the world. If you want to use the repository with your Alibaba Cloud container cluster, you should use the internet address because it will be much faster.
Copy the Login, push and pull commands. You will need it later.
Start up the Docker client in your local machine. You can refer to docker.io to install a Docker client on to your computer. On MAC, run the docker.app application to start the Docker client.
Login as user on Docker client.
docker login --username=random_name@163.com registry-intl.ap-southeast-1.aliyuncs.comNote: Replace random_name with the actual username.
You will see a login successful message after your enter the password and hit enter. At this point, you are authenticated and connected to the Alibaba Cloud Container Registry.

Let's write a Dockerfile to build an image. The following is a sample Dockerfile; you can choose to write your own Dockerfie:
######################
# This is the first image for the static site.
#####################
FROM nginx
#A name can be given to a new build stage by adding AS name to the FROM instruction.
#ARG VERSION=0.0.0
LABEL NAME = static-Nginx-image
START_TIME = 2018.03.10
FOR="Alibaba Community"
AUTHOR = "Fouad"
LABEL DESCRIPTION = "This image is built for static site on DOCKER"
LABEL VERSION = 0.0.0
#RUN mkdir -p /var/www/
ADD /public /usr/share/nginx/html/
EXPOSE 80
RUN service nginx restart</code></pre>

Run the Docker build command to build the image. In order to later push the image to the repository, you need to tag the new image with the registry:

<pre><code>docker build -t registry-intl-internal.ap-southeast-1.aliyuncs.com/fouad-space/ati-image .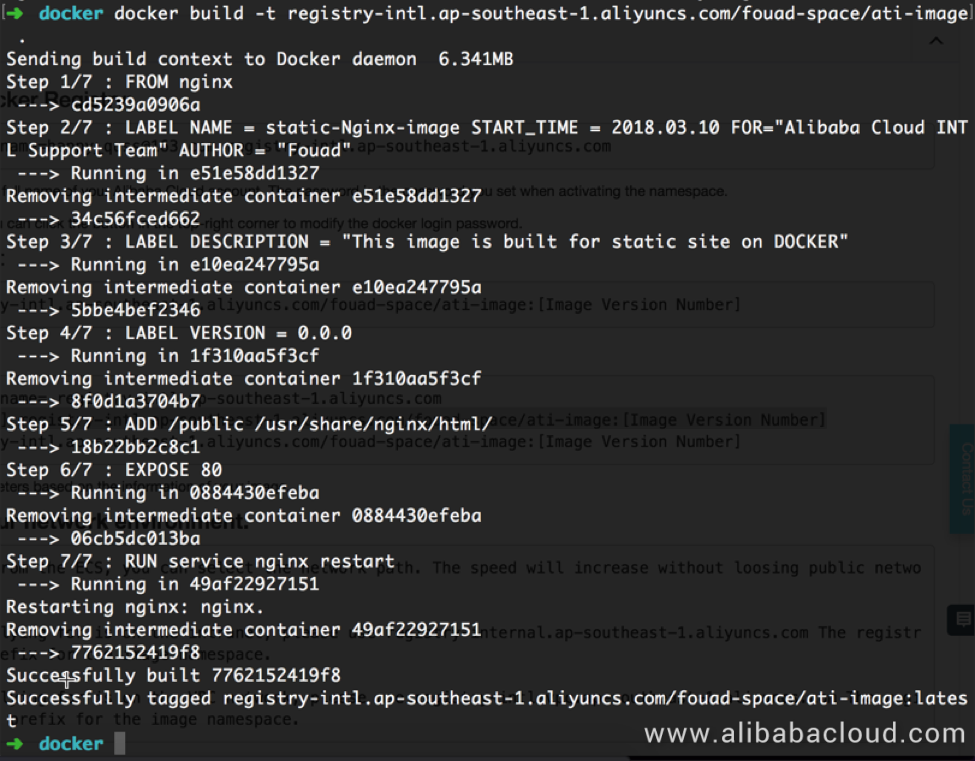
Once the build is complete, it will be tagged with repository name already. You can see the new image in by using the command:
Docker image ls
Push the image to ACR repository with the command:
docker push registry-intl.ap-southeast-1.aliyuncs.com/fouad-space/ati-image:latest
To verify that the image is pushed successfully, see it in the Container Registry console. Click on Admin in front of the repository name and then click Image version.
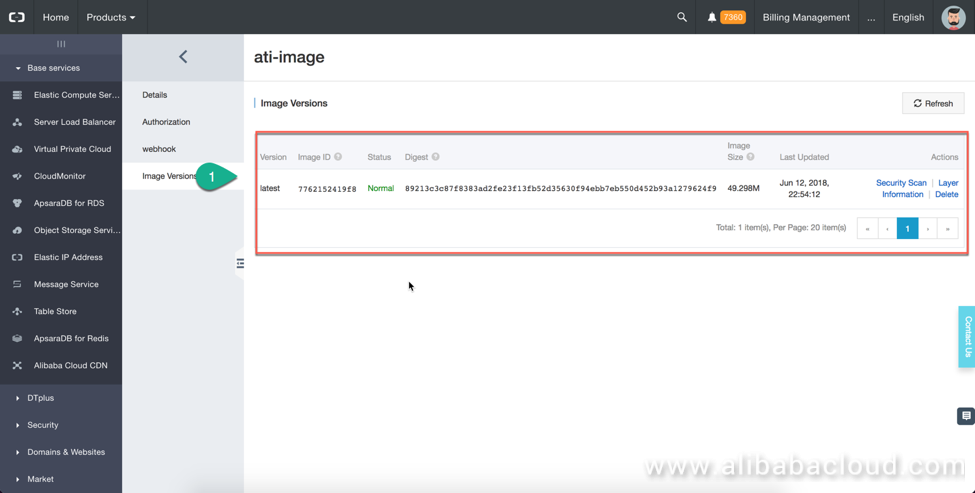
Pull the image and create a container. Run the docker pull command:
docker pull registry-intl.ap-southeast-1.aliyuncs.com/fouad-space/ati-image:latest
Since I have already pulled the image to my local computer, the message says image is up to date.
Create a new container using this image:
docker run -ti -p 80:80 registry-intl.ap-southeast-1.aliyuncs.com/fouad-space/ati-image bash
With Alibaba Cloud Container Registry, you can build images in the cloud as well as push them directly to the registry. Besides this, Container Repository supports automatically triggering the build when the code changes.
If Automatically create an image when the code changes is selected in Build Settings, the image can be automatically built after you submit the code, without requiring you to manually trigger the build. This saves manual work and keeps the images up-to-date.
Create a GitHub repo and upload your Docker file to the repo.
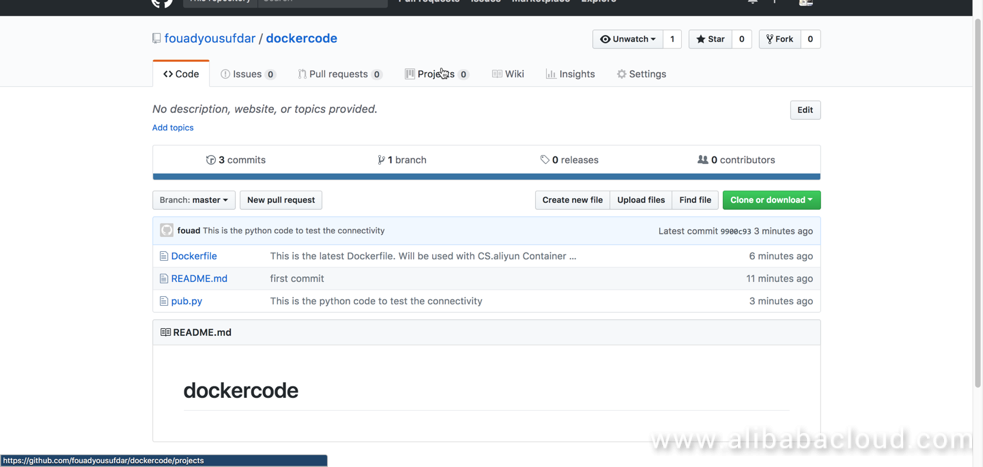
Then, return to the Container Registry console to create a repo. Select GitHub repo path and complete the repository creation steps.
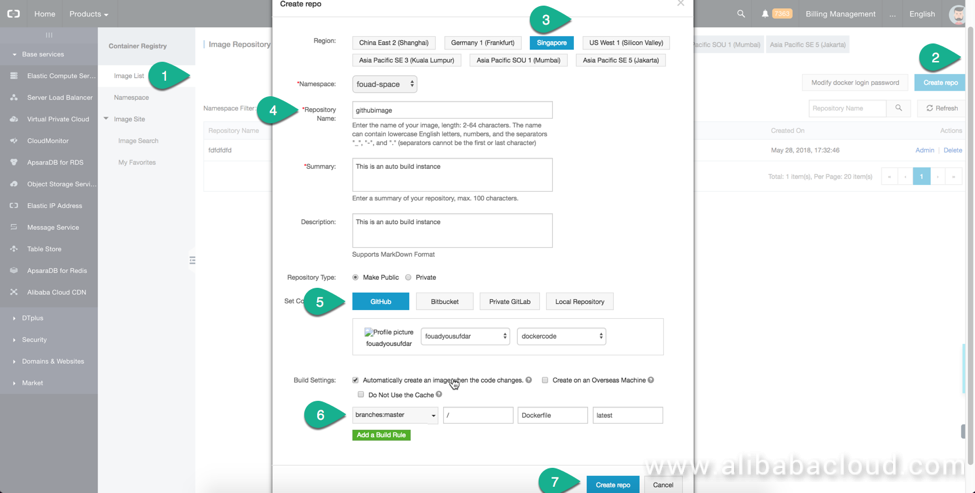
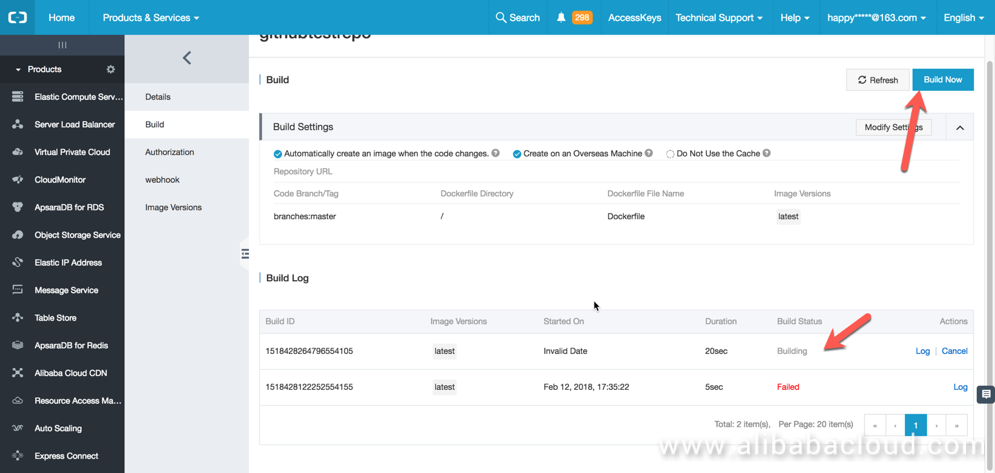
Once the repository is created, go to Image List and click on Admin on the repo name, click Build, and finally click Build Now.
You can see the build progress in the menu and the complete logs of the build process.
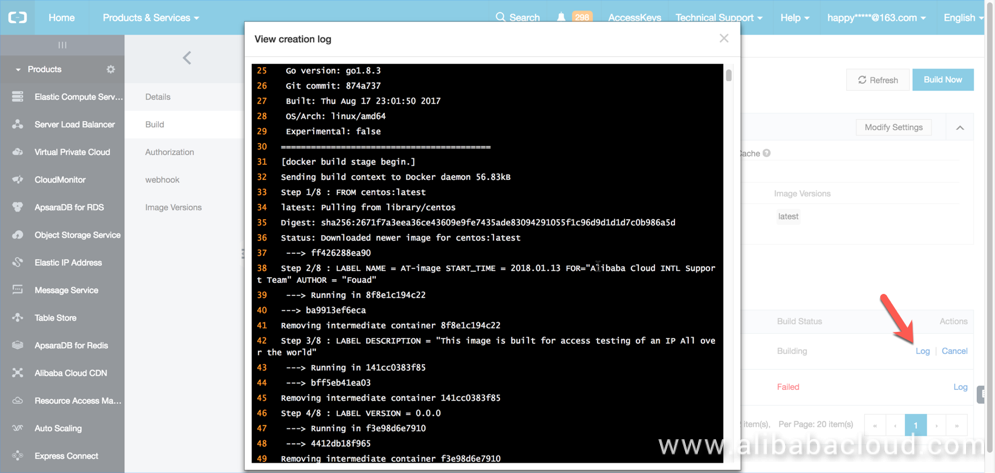
You can also see all the build logs. Isn't it neat?
Once the build is complete, your image is ready to be deployed. You can pull it to the local Docker engine or deploy this image on Alibaba Cloud Container Service.
How does it work? Well, suppose you have set a Container Service trigger for Webhook. When an image is built or rebuilt, the applications in Container Service are automatically triggered to pull the latest image and re-deployed.
To create a webhook, you first need to go to container service and get the application web URL.
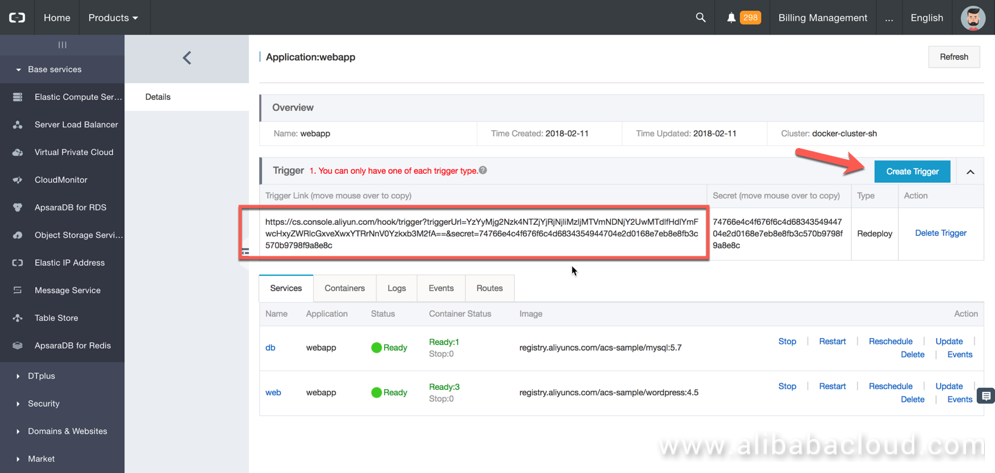
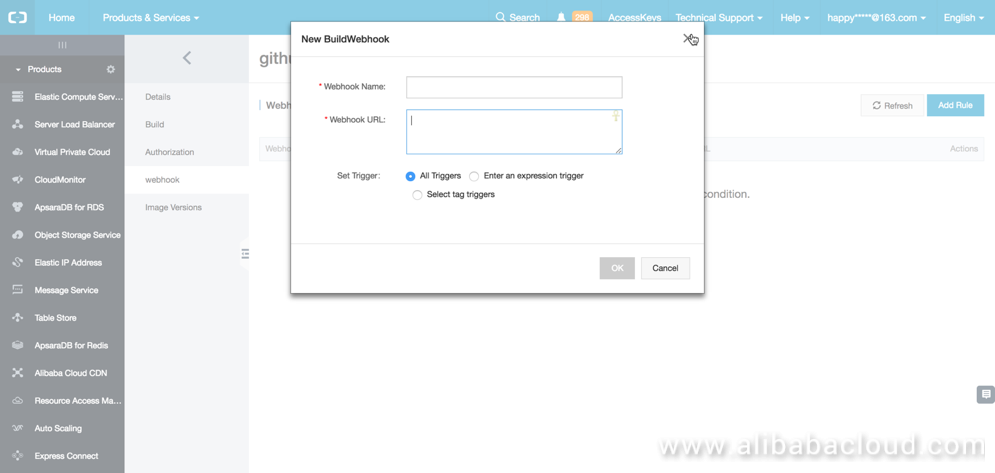
Now use this URL to configure a hook. Every time the image in the container registry is updated, this application will be re-deployed with the new image. Be very careful though, incorrect setup can bring down the whole application. But rollback is possible in the container service so no big worries.
In this article, you should have learned the following:
Alibaba Clouder - October 18, 2018
JDP - September 10, 2021
Alibaba Clouder - September 16, 2019
Alibaba Clouder - July 3, 2019
Alibaba Clouder - June 14, 2019
Alibaba Clouder - March 5, 2019
 ACK One
Provides a control plane to allow users to manage Kubernetes clusters that run based on different infrastructure resources
Learn More Container Registry
A secure image hosting platform providing containerized image lifecycle management
Learn More Container Service for Kubernetes
Alibaba Cloud Container Service for Kubernetes is a fully managed cloud container management service that supports native Kubernetes and integrates with other Alibaba Cloud products.
Learn More Elastic Container Instance
An agile and secure serverless container instance service.
Learn MoreMore Posts by Fouad
Little Prince February 17, 2019 at 9:05 am
bravo