Before we get started, be sure to check out part one of this article: caching.
No matter how powerful the system is, it is always troublesome when traffic bursts in a short period of time, so another essential module for high concurrency is rate limiting.
Rate limiting is a technique that protects the system from overload by controlling the frequency or number of requests. The essence of rate limiting is to limit the number of requests per unit of time to maximize the reliability and availability of the system.
Rate limiting is a policy introduced to protect the stability and availability of the system in a highly concurrent environment. By limiting the number or frequency of concurrent requests, you can prevent the system from being overwhelmed by excessive requests or running out of resources.
Common rate limiting algorithms include fixed window, sliding window, leaky bucket, token bucket, and sliding log.
The Fixed Window Rate Limiting Algorithm is the simplest rate limiting algorithm. Its principle is to limit the number of requests within a fixed time window (per unit of time).
Fixed window is the simplest rate limiting algorithm. If you specify a time window, a counter is maintained to count the number of access and implement the following rules:
public class FixedWindowRateLimiter {
    private static int counter = 0;  // Count the number of requests
    private static long lastAcquireTime = 0L;
    private static final long windowUnit = 1000L; // Assume that the fixed time window is 1000 ms
    private static final int threshold = 10; // The window threshold is 10

    public synchronized boolean tryAcquire() {
        long currentTime = System.currentTimeMillis();  // Obtain the current system time
        if (currentTime - lastAcquireTime > windowUnit) {  // Check whether it is within the time window
            counter = 0;  // Clear the counter
            lastAcquireTime = currentTime;  // Open a new time window
        }
        if (counter < threshold) {  // Less than the threshold
            counter++;  // The counter is increased by 1
            return true;  // The request is successfully obtained
        }
        return false;  // The request cannot be obtained because the threshold is exceeded
    }
}
Code Description:
A static counter variable is used to record the number of requests, and the lastAcquireTime variable records the last timestamp when acquiring the request. The windowUnit represents the length of the fixed time window, and the threshold represents the threshold of the number of requests within the time window.
The tryAcquire() method uses the synchronized keyword to implement the thread safety. The following operations are performed in the method:
currentTime.windowUnit. If the time window is exceeded, the counter is cleared and the lastAcquireTime is updated to the current time to indicate entering a new time window.counter is less than the threshold, the counter is incremented by 1, and true is returned to indicate that the request is successfully obtained.Advantages
Disadvantages
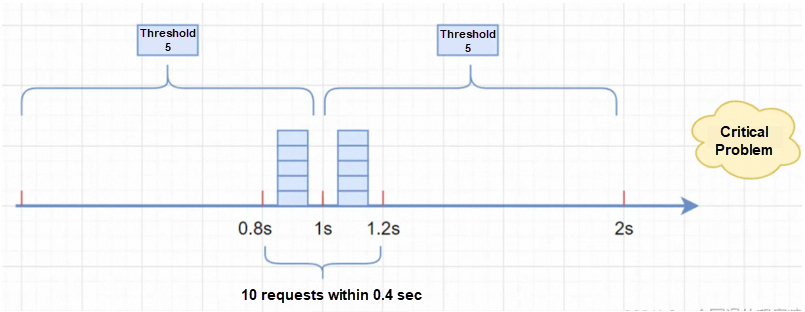
For example, if the threshold is 5 requests, the time window unit of time is 1 sec, and we have 5 concurrent requests respectively in the 0.8 sec to 1 sec and 1 sec to 1.2 sec, although none of them exceed the threshold, when we count the requests within the 0.8 sec to 1.2 sec, the concurrency is as high as 10 which has exceeded the definition of not exceeding the threshold of 5 per unit of time.
We can introduce the sliding window to solve the critical change point problem. A large time window is split into several sub-windows with finer granularity. Each sub-window is counted independently, and rate limiting is centralized based on the time sliding of the sub-window.
When the sliding window has more grid periods, the rolling of the sliding window will be smoother, and the statistics of the rate limiting will be more accurate.
Per unit of period is divided into N small periods to record the access times of the interface in each small period. The expired small periods are deleted based on the time sliding. It can solve the critical value problem of the fixed window.
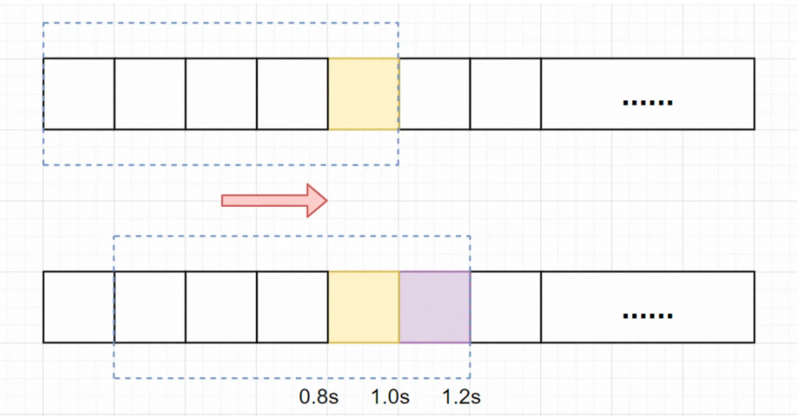
Assuming that the per unit of time is still 1 sec, the sliding window algorithm divides it into 5 small periods, that is, the sliding window (per unit of time) is divided into 5 small grids. Each grid represents 0.2 sec. Within each 0.2 sec, the time window will slide one grid to the right. Then, each small period has its independent counter. If the request arrives at 0.83 sec, the corresponding counter in the 0.8 sec to 1.0 sec grid will be increased by 1.
Assuming that the threshold within 1 sec is still 5 requests, 5 requests arrive within 0.8 sec to 1.0 sec (e.g. 0.9 sec) and they will fall into the yellow grid.
After the grid of 1.0 sec, 5 more requests arrive and fall into the purple grid. If it is a fixed window algorithm, it will not be limited. However, if it is a sliding window algorithm, it will slide one grid to the right every time it passes a small period. After the grid of 1.0 sec, it will slide one grid to the right. The current period per unit of time is 0.2 sec to 1.2 sec. The requests in this area have exceeded the threshold of 5, and the current rate limiting has been triggered. In fact, all requests in the purple grid have been rejected.
import java.util.LinkedList;
import java.util.Queue;

public class SlidingWindowRateLimiter {
    private Queue<Long> timestamps; // Timestamp queue that stores requests
    private int windowSize; // Window size which is the number of requests allowed within the time window
    private long windowDuration; // Window duration, unit: milliseconds

    public SlidingWindowRateLimiter(int windowSize, long windowDuration) {
        this.windowSize = windowSize;
        this.windowDuration = windowDuration;
        this.timestamps = new LinkedList<>();
    }

    public synchronized boolean tryAcquire() {
        long currentTime = System.currentTimeMillis(); // Obtain the current timestamp

        // Delete timestamps that exceed the window duration
        while (!timestamps.isEmpty() && currentTime - timestamps.peek() > windowDuration) {
            timestamps.poll();
        }

        if (timestamps.size() < windowSize) { // Determine whether the number of requests in the current window is smaller than the window size
            timestamps.offer(currentTime); // Add the current timestamp to the queue
            return true; // The request is successfully obtained
        }

        return false; // The request cannot be obtained because the window size is exceeded
    }
}
Code Description:
In the above code, a queue Queue is used to store the timestamp of the request. The window size windowSize and window duration windowDuration are passed in the constructor.
The tryAcquire() method uses the synchronized keyword to implement the thread safety. The following operations are performed in the method:
currentTime.windowSize.With this sliding window throttling algorithm, you can limit the frequency of requests within a certain time window. Requests that exceed the window size will be limited. You can adjust and use it based on your actual needs and business scenarios.
It is suitable for scenarios with fixed windows and high traffic limiting requirements where you need to better handle burst traffic.
Advantages
Burst traffic cannot be processed, that is, it cannot handle a large number of requests in a short period of time. Once the request reaches the rate limiting condition, the request will be directly rejected. In this case, we may lose some requests, which is not good for the product. Therefore, we need to adjust the size of the time window reasonably.
It is based on the output flow rate for flow control. It is often used for traffic shaping in network communication, which can solve the smoothness problem.
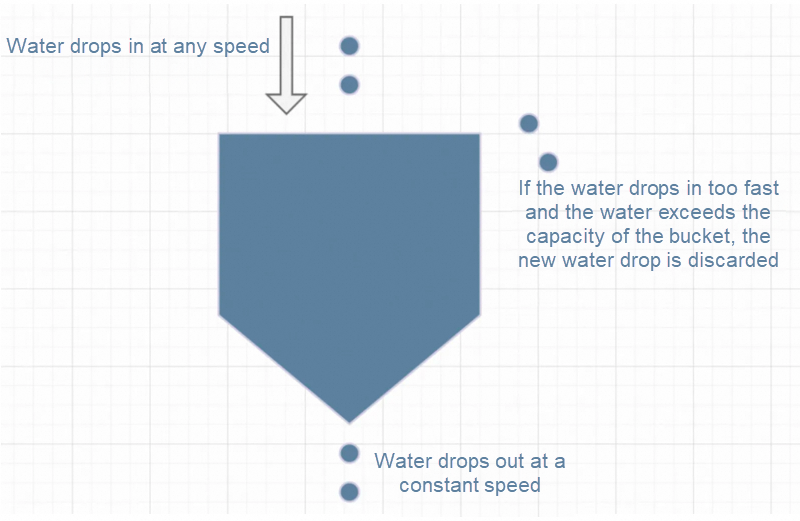
We can think of the data package as a water drop, and the leaky bucket as a bucket with a fixed capacity. The data package flows into the bucket from the top of the bucket like a water drop and flows out at a certain speed through a small hole in the bottom of the bucket, thereby limiting the flow of data packages.
Add each incoming data package to the leaky bucket and check whether the current amount of water in the leaky bucket exceeds the capacity of the leaky bucket. If the capacity is exceeded, excessive packages will be discarded. If there is still water in the leaky bucket, the data package is output from the bottom of the bucket at a certain rate to ensure that the output rate does not exceed the pre-set rate to achieve the purpose of rate limiting.
public class LeakyBucketRateLimiter {
    private long capacity; // Leaky bucket capacity which is the maximum number of requests allowed
    private long rate; // Water output rate which is the number of requests allowed to pass per second
    private long water; // Current water volume of the leaky bucket
    private long lastTime; // Timestamp of the last request

    public LeakyBucketRateLimiter(long capacity, long rate) {
        this.capacity = capacity;
        this.rate = rate;
        this.water = 0;
        this.lastTime = System.currentTimeMillis();
    }

    public synchronized boolean tryAcquire() {
        long now = System.currentTimeMillis();
        long elapsedTime = now - lastTime;

        // Calculating the water volume of the leaky bucket
        water = Math.max(0, water - elapsedTime * rate / 1000);

        if (water < capacity) { // Determine whether the water volume of the leaky bucket is less than the capacity
            water++; // The water volume of the bucket is increased by 1
            lastTime = now; // Update the timestamp of the last request
            return true; // The request is successfully obtained
        }

        return false; // The request cannot be obtained because the bucket is full
    }
}
Code Description:
In the above code, the capacity indicates the capacity of the leaky bucket, that is, the maximum number of allowed requests. The rate indicates the water output rate, that is, the number of requests allowed to pass per second. The water indicates the current water volume of the leaky bucket, and the lastTime indicates the timestamp of the last request pass.
The tryAcquire() method uses the synchronized keyword to implement the thread safety. The following operations are performed in the method:
now.elapsedTime.It is generally used to protect third-party systems. For example, when your system needs to call a third-party interface, to protect the third-party system from being defeated by your calls, you can use the leaky bucket algorithm to limit traffic and ensure that your traffic is smoothly transferred to the third-party interface.
Advantages
Disadvantages
It is based on the input flow rate for flow control.
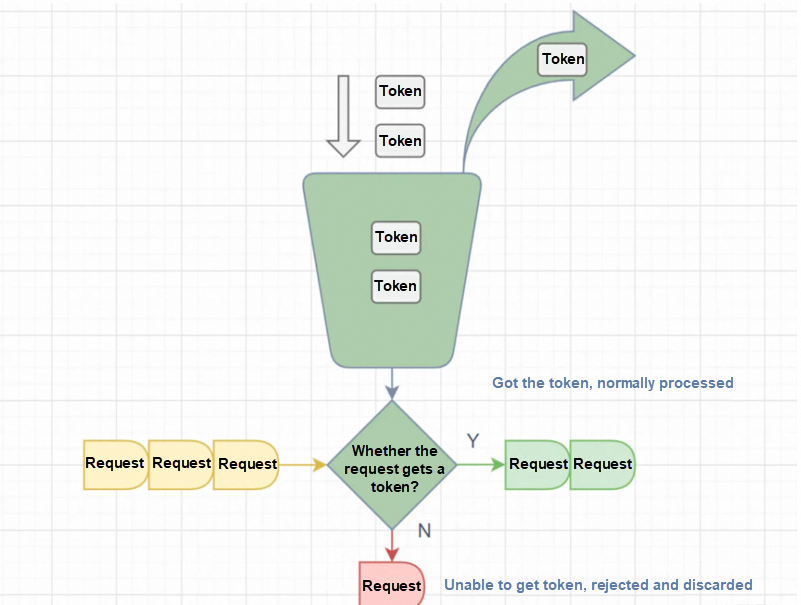
The algorithm maintains a token bucket with a fixed capacity and puts a certain number of tokens into the token bucket every second. When a request comes, if there are enough tokens in the token bucket, the request will be allowed to pass and one token will be consumed from the token bucket. Otherwise, the request will be rejected.
import java.util.concurrent.ScheduledExecutorService;
import java.util.concurrent.ScheduledThreadPoolExecutor;
import java.util.concurrent.TimeUnit;

public class TokenBucketRateLimiter {
    private long capacity; // Token bucket capacity which is the maximum number of requests allowed
    private long rate; // Token generation rate which is the number of tokens generated per second
    private long tokens; // Number of current tokens
    private ScheduledExecutorService scheduler; // Scheduler

    public TokenBucketRateLimiter(long capacity, long rate) {
        this.capacity = capacity;
        this.rate = rate;
        this.tokens = capacity;
        this.scheduler = new ScheduledThreadPoolExecutor(1);
        scheduleRefill(); // Start the token replenishment task
    }

    private void scheduleRefill() {
        scheduler.scheduleAtFixedRate(() -> {
            synchronized (this) {
                tokens = Math.min(capacity, tokens + rate); // Replenish tokens within the capacity
            }
        }, 1, 1, TimeUnit.SECONDS); // Generate a token every second
    }

    public synchronized boolean tryAcquire() {
        if (tokens > 0) { // Determine whether the number of tokens is greater than 0
            tokens--; // Consume a token
            return true; // The request is successfully obtained
        }
        return false; // The request cannot be obtained because there are not enough tokens
    }
}
Code Description:
The capacity indicates the capacity of a token bucket, which is the maximum number of requests allowed. The rate indicates the token generation rate, which is the number of tokens generated per second. The tokens indicates the current number of tokens. The scheduler is the thread pool used to schedule token replenishment tasks.
In the construction method, the capacity of the token bucket and the current number of tokens are initialized, and the token replenishment task scheduleRefill() is started.
The scheduleRefill() method uses the scheduler to periodically execute the token replenishment task, replenishing tokens every second. In the replenishment task, the number of tokens is updated by locking to ensure thread safety. The number of replenished tokens is the current number of tokens plus the generation rate, but the number of replenished tokens will not exceed the capacity of the token bucket.
The tryAcquire() method uses the synchronized keyword to implement the thread safety. The following operations are performed in the method:
The Guava RateLimiter rate limiting component is implemented based on the token bucket algorithm.
It is generally used to protect the system, limiting the caller to protect the system from burst traffic. If the actual processing capability of the system is larger than the configured traffic limit, a certain degree of traffic burst may be allowed, so that the actual processing rate is higher than the configured rate, and the system resources can be fully utilized.
Advantages
Disadvantages
The sliding log speed limiting algorithm needs to record the timestamp of the request, which is usually stored in an ordered set. We can track all the requests of users in a period of time in a single ordered set.
The sliding log algorithm can be used for rate limiting to control the number of requests processed by the system per unit of time to protect the system from overload. The following is how the sliding log algorithm is used for rate limiting:
The sliding log algorithm is used to implement rate limiting, which can accurately control the requests per unit of time. It is based on real-time statistics, dynamically adapts to changes in request traffic, and is more efficient in memory usage. At the same time, by adjusting the length of the time window and the setting of the threshold, the accuracy and sensitivity of the current throttling can be flexibly controlled.
import java.util.LinkedList;
import java.util.List;

public class SlidingLogRateLimiter {
    private int requests; // Total number of requests
    private List<Long> timestamps; // Timestamp list which stores the requests
    private long windowDuration; // Window duration, unit: milliseconds
    private int threshold; // Threshold for the number of requests in the window

    public SlidingLogRateLimiter(int threshold, long windowDuration) {
        this.requests = 0;
        this.timestamps = new LinkedList<>();
        this.windowDuration = windowDuration;
        this.threshold = threshold;
    }

    public synchronized boolean tryAcquire() {
        long currentTime = System.currentTimeMillis(); // Obtain the current timestamp

        // Delete timestamps that exceed the window duration
        while (!timestamps.isEmpty() && currentTime - timestamps.get(0) > windowDuration) {
            timestamps.remove(0);
            requests--;
        }

        if (requests < threshold) { // Determine whether the number of requests in the current window is less than the threshold
            timestamps.add(currentTime); // Add the current timestamp to the list
            requests++; // The total number of requests increases
            return true; // The request is successfully obtained
        }

        return false; // The request cannot be obtained because the threshold is exceeded
    }
}
Code Description:
In the above code, the requests represents the total number of requests. The timestamps is used to store a list of timestamps for requests. The windowDuration represents the window duration, and the threshold represents the threshold for the number of requests within the window.
The threshold for the number of requests within the window and the duration of the window are passed in the constructor.
The tryAcquire() method uses the synchronized keyword to implement the thread safety. The following operations are performed in the method:
currentTime.This sliding log rate limiting algorithm can be used to limit the frequency of requests within a certain time window. Requests that exceed the threshold are limited. You can adjust and use it based on your actual needs and business scenarios.
It is suitable for advanced rate limiting scenarios that require high real-time performance and precise control of the request rate.
Advantages
Disadvantages
| Algorithm | Introduction | Core idea | Advantages | Disadvantages | Open source tools/middleware | Scenario |
|---|---|---|---|---|---|---|
| Fixed window rate limiting | Requests are counted within a fixed time window, and rate limiting is enabled when the threshold is reached. | It divides time into fixed-size windows with independent counts within each window. | It is simple to implement with good performance. | There may be burst traffic when the time window is switched. | Nginx, Apache, and RateLimiter (Guava) | It is suitable for scenarios that require simple rate limiting and are not sensitive to traffic bursts. For example: It can be used by the e-commerce platform to prevent the system from being overwhelmed by instantaneous high traffic at the beginning of the daily scheduled flash sale activity. |
| Sliding window rate limiting | Requests are counted within a sliding time window, and rate limiting is enabled when the threshold is reached. | It divides time into multiple small windows to count the total number of requests in the recent period. | It supports smooth requests to avoid burst traffic in the fixed window algorithm. | It is more complex than a fixed window to implement and consumes more resources. | Redis and Sentinel | It is suitable for scenarios that require high traffic smoothness. For example: It can be used by the message-sending function of the social media platform to smoothly process message-sending requests during peak hours to avoid short-term service overload. |
| Token bucket rate limiting | Tokens are added to the bucket at a constant rate, and the request consumes the tokens. Rate limiting is enabled when there is no token. | Tokens are generated at a certain rate and the request can only be executed when it has tokens. | It allows a certain degree of burst traffic and smoothly processes requests. | Tolerance for burst traffic may result in resource overload for a short time. | Guava, Nginx, and Apache Sentinel | It is suitable for scenarios that require burst traffic and a certain degree of smoothing. For example: It can be used by the video streaming service that allows users to quickly load videos when the network is in good condition, while smoothly reducing the request rate when the network is congested. |
| Leaky bucket algorithm | The water output of the leaky bucket is at a fixed rate. Requests flow into the bucket at any rate and overflow when the bucket is full (rate limiting). | Requests are processed at a constant rate beyond which requests will be limited. | The output traffic is stable and can limit the maximum rate of flow. | It cannot handle burst traffic, and the request waiting time may be too long. | Apache and Nginx | It is suitable for scenarios where the processing rate needs to be strictly controlled but the request response time is not required. For example: API Gateway provides external services to make sure that the call rate of the backend service does not exceed its maximum processing capability to prevent service crashes. |
| Sliding log rate limiting | It uses a sliding time window to record request logs which can be used to determine whether the rate limit is exceeded. | It records the request logs in the recent period to determine whether the request exceeds the limit in real time. | The request rate can be controlled more finely and more fairly than the fixed window. | The implementation is complex, and the cost of storing and computing request logs is high. | - | It is suitable for advanced rate limiting scenarios that require high real-time performance and precise control of the request rate. For example: It can be used by high-frequency trading systems which need to accurately control the transaction request rate based on real-time transaction data to prevent overload from affecting the stability of the overall market. |
It is a multi-thread rate limiter whose implementation is based on the token bucket algorithm. It can process requests evenly. It is not a distributed rate limiter. Instead, it only limits the standalone. It can be applied in timing pull interface numbers. You can use AOP, filters, and interceptors to achieve rate limiting.
Here is a basic RateLimiter usage example:
import com.google.common.util.concurrent.RateLimiter;

public class RateLimiterDemo {
    public static void main(String[] args) {
        // Create a RateLimiter that allows 2 requests per second.
        RateLimiter rateLimiter = RateLimiter.create(2.0);

        while (true) {
            // Request a token from RateLimiter.
            rateLimiter.acquire();
            // Execute the operation.
            doSomeLimitedOperation();
        }
    }

    private static void doSomeLimitedOperation() {
        // Simulate some operations.
        System.out.println("Operation executed at: " + System.currentTimeMillis());
    }
}
In this example, RateLimiter.create(2.0) has created a speed limiter that allows only 2 operations per second. rateLimiter.acquire() method blocks the current thread until permission is obtained, ensuring that the doSomeLimitedOperation() operation is not called more frequently than the limit.
RateLimiter also provides other methods, such as tryAcquire() which will try to obtain the permission without blocking and immediately return the result of the success or failure of the acquisition. A waiting time limit can also be set, for example, tryAcquire(long timeout, TimeUnit unit) can set a maximum waiting time.
Guava RateLimiter supports multiple modes, such as the smooth burst limit (SmoothBursty) and smooth warming-up limit (SmoothWarmingUp). You can select an appropriate throttling policy based on specific scenarios.
Sentinel is an open-source component of Alibaba that is used for traffic control and circuit breaking degradation in distributed systems. It provides functions such as real-time traffic control, circuit breaker degradation, system load protection, and real-time monitoring, which can help developers protect the stability and reliability of the system.
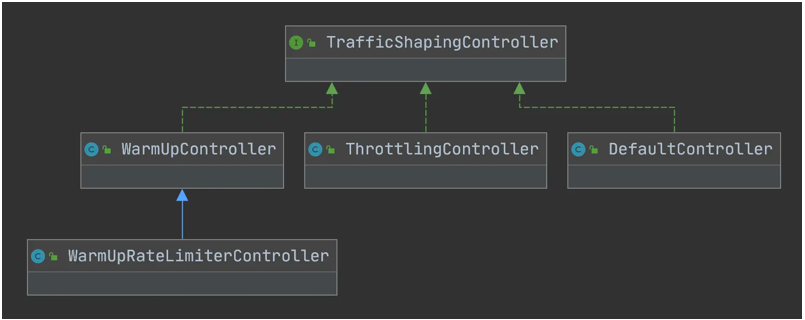
You can use one of the following methods to start the rate limiting server of a Sentinel cluster:
The usage of Sentinel mainly includes the following aspects:
1. Introduce dependencies: it can be used to introduce Sentinel-related dependencies into the project. You can use Maven or Gradle to manage dependencies. For example, you can add the following dependencies to the pom.xml file of the Maven project:
<dependency>
    <groupId>com.alibaba.csp</groupId>
    <artifactId>sentinel-core</artifactId>
    <version>1.8.2</version>
</dependency>
2. Configure rules: it can be used to configure Sentinel traffic control rules and circuit breaker degradation rules based on actual needs. You can configure rules by programming or by using a configuration file. For example, you can use annotations to configure traffic control rules in the startup class:
@SentinelResource(value = "demo", blockHandler = "handleBlock")
public String demo() {
// ...
}
3. Start the Agent: when the application starts, the Agent of Sentinel is also started to enable the system protection of traffic control and circuit breaking degradation, You can start the Agent from the command line or in code. For example, you can add the following code to the startup class of Spring Boot:
public static void main(String[] args) {
    System.setProperty("csp.sentinel.dashboard.server", "localhost:8080"); // Set the console address
    System.setProperty("project.name", "your-project-name"); // Set the application name
    com.alibaba.csp.sentinel.init.InitExecutor.doInit();
    SpringApplication.run(YourApplication.class, args);
}
4. Monitor and manage: you can use the Sentinel console for real-time monitoring and configuration management. You can access the Sentinel console through a browser to view the running status and traffic control status of the system. In the console, you can dynamically modify rules and view monitoring data and alert information.
From the perspective of the gateway, Nginx can be used as the most advanced gateway to block most network traffic. Therefore, it is also a good choice to use Nginx for rate limiting. Nginx also provides common policy configurations based on rate limiting.
Nginx provides two rate limiting methods: one is to control the rate, and the other is to control the number of concurrent connections.
We need to use limit_req_zone to limit the number of requests per unit of time, that is, rate limiting.
Because Nginx's rate limiting statistics are based on milliseconds, the speed we set is 2 request/sec. After the conversion, it is that a single IP is only allowed to pass one request within 500 milliseconds, and the second request is only allowed from 501 ms.
Although the above rate control is very accurate, it is too harsh in the production environment. In practice, we should control the total access number of each IP per unit of time, instead of being accurate to milliseconds as above. We can use the burst keyword to enable this setting.
burst=4 means that up to 4 bursty requests are allowed per IP address.
You can control the concurrency by using the limit_conn_zone and limit_conn instructions.
limit_conn perip 10 indicates that a single IP can hold up to 10 connections at the same time. limit_conn perserver 100 indicates that the server can handle a total of 100 concurrent connections at the same time.
Note: only after the request header is processed by the backend will this connection be counted.
Degradation is a technical means of discarding non-critical business or simplifying processing in the case of high concurrency or exceptions.
According to the type, it can be divided into sensitive degradation and insensitive degradation.
When detecting the occurrence or imminent occurrence of an exception through certain monitoring, it quickly returns the service failure or switches and resumes the service call when indicators return to positive. This type can also be called circuit breaking.
The system is insensitive. If an exception occurs when calling a service, it automatically ignores it and performs an empty return or no operation. The essence of degradation is to act as a service caller to avoid the risks brought by the provider.
In rate limiting, the service caller maintains a finite state machine for each called service. In this state machine, there will be three states: closed (calling the remote service), half open (trying to call the remote service), and open (returning error). The switching between these three states is as follows:
When the number of failed calls accumulates to a certain threshold, the circuit breaking mechanism switches from the closed state to the open state. Usually in implementation, if the call is successful once, the number of call failures will be reset.
When the circuit breaking is in the open state, we will start a timer, and when the timer expires, it switches to the half open state. It is also possible to set a timer and periodically detect whether the service is restored.
When the circuit breaking is in the half-open state, the request can reach the backend service. If a certain number of successful calls are accumulated, it switches to the closed state. If a call fails, it switches to the open state.
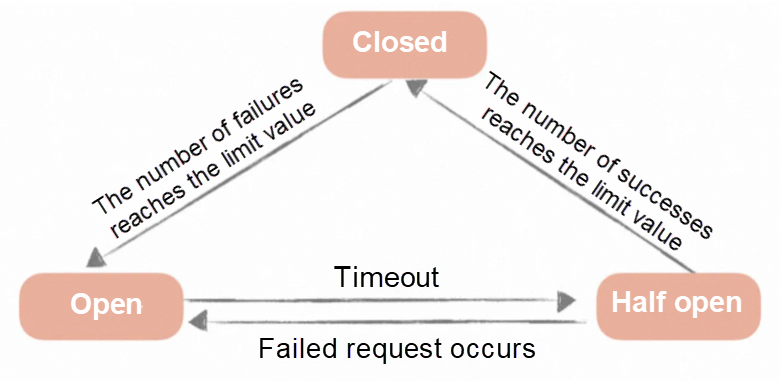
In the program, circuit breaking refers to disconnection. If an event occurs, the program temporarily (disconnects) stops the service for a period of time for the sake of overall stability to ensure that the program can be used again when it is available.
Circuit breaking: the program temporarily (disconnected) stops the service for a period of time for the sake of overall stability. Degradation: it means to reduce the grade of services. It is a mechanism to ensure that some features are still available when problems occur in a program.
The trigger conditions for circuit breaking and degradation are different for different frameworks. Take Hystrix as an example:
By default, Hystrix triggers the circuit breaking mechanism if it detects that the failure rate of requests within 10 seconds exceeds 50%. Then, it retries to request the microservice every 5 seconds. If the microservice fails to respond, it continues the circuit breaking mechanism. If the microservice is reachable, the circuit breaking mechanism is closed, and normal requests are resumed.
By default, Hystrix triggers the degradation mechanism under the following four conditions:
The degradation mechanism may be called when the circuit breaking is triggered, while the circuit breaking mechanism is usually not called when the degradation is triggered. Because the circuit breaking is based on the global situation and stops services to ensure system stability, while degradation is the guaranteed minimum solution, their ownerships are different (the ownership of circuit breaking is higher than that of degradation).
Disclaimer: The views expressed herein are for reference only and don't necessarily represent the official views of Alibaba Cloud.
Three Strategies of High Concurrency Architecture Design - Part 1: Caching

1,320 posts | 464 followers
FollowAlibaba Cloud Community - May 14, 2024
Alibaba Clouder - March 20, 2018
Alibaba Cloud Native Community - September 9, 2025
Alibaba Cloud Native Community - August 7, 2025
zcm_cathy - November 11, 2019
Alibaba Cloud Native Community - November 26, 2025

1,320 posts | 464 followers
Follow Application High Availability Service
Application High Available Service is a SaaS-based service that helps you improve the availability of your applications.
Learn More Elastic High Performance Computing Solution
High Performance Computing (HPC) and AI technology helps scientific research institutions to perform viral gene sequencing, conduct new drug research and development, and shorten the research and development cycle.
Learn More Elastic High Performance Computing
A HPCaaS cloud platform providing an all-in-one high-performance public computing service
Learn MoreMore Posts by Alibaba Cloud Community