By Erick Otenyo, Alibaba Cloud Tech Share Author. Tech Share is Alibaba Cloud's incentive program to encourage the sharing of technical knowledge and best practices within the cloud community.
This tutorial is a continuation of the article Setup and Deploy Geodjango Application on Alibaba Cloud Part 1. In part 1, we were able to setup the environment and install the geospatial libraries needed to create Geospatial applications with GeoDjango. We were also able to start the coffee shops application and test it in development mode. In this tutorial, we will continue building the coffee shops application to incorporate geospatial functionalities.
Usually when developing an application that should deployed on the cloud, you develop it locally, make edits, test it and then deploy to the cloud. We tested our application on an Alibaba Cloud Elastic Compute Service (ECS) instance, and now we can go ahead and download the project's folder for local development and later update the server copy with the changes.
To keep track of our applications's python packages, we will create a requirements.txt file that will have a list of all the required packages for our application and their respective version using the following command:
(geodjango) $ pip freeze > requirements.txtMake sure your virtual environment is activated prior to running the above command.
To copy the folder from our Alibaba ECS instance, you will use the scp command line tool from your local computer. Type the following command on your local computer terminal:
scp -r user@your_server_ip:/coffeeshops /home/user/Desktop/You will be prompted for your instance's password after which you will have the project downloaded in the location you specified. In this case we will have a coffeeshops folder with our code on the Desktop.
Go ahead and set up your environment by installing all the requirements as in the previous tutorial so as to have everything working. Also don't forget to create and activate Python 3 your virtual environment on your local development computer. Create the database, set the correct database settings in settings.py and test your application if it works.
We are now ready to start building the main part of the application . First we will need to create a django app inside our project. To do that, type the following inside our project's root folder:
(geodjango) :~/home/user/Desktop/coffeeshops/$ djang-admin startapp geoThis will create a new django app called geo inside our coffeeshops directory. A django app describes a Python package that provides some set of features. Django apps may also be reused in various projects. The new directory will look like this:
geo/
   __init__.py
   admin.py
   apps.py
   migrations/
       __init__.py
   models.py
   tests.py
   views.py
Add the created app to settings.py under installed apps
INSTALLED_APPS = [
   ...
   'django.contrib.gis',
   'geo'
]
Now that we have our app setup, we will create a model to represent the data that each coffee shop will contain. To make it simple , each coffee shop will contain the following information:
We will tell django of this structure of our data through the models.py file. A model in Django contains the essential fields and behaviors of the data we are storing. Each model will map to a database table. A geodjango model is a django model that inherits from the django.contrib.gis module and supports geometry fields. Our location field will be a geometry field, thus we will need to define a Geodjango model.
Open the geo/models.py file and remove everything from it, and write code like this :
geo/models.pyfrom django.contrib.gis.db import models
class CoffeeShop(models.Model):
name = models.CharField(max_length=50)
location = models.PointField(srid=4326)
# Returns the string representation of the model.
def __str__(self):
return self.nameNote that the location field is a GeoDjango specific geometry field. This field is not available in the normal Django model fields definition.
The following table shows the common geographic data types and how they are represented in Geodjango models fields
| Data Type | Field Type |
| ------------- |---------------------------------------|
| Points | PointField/MultiPointField |
| Lines | LineStringField/MultiLineStringField |
| Polygons | PolygonField/MultiPolygonField |
This means not only can you have point data in Geodjango, but also you can have lines for example roads and polygon data for example buildings.
After defining our model, we need to sync with the database. First we create a database migration:
(geodjango) $ python manage.py makemigrationsThen run the migration:
(geodjango) $ python manage.py migrateDjango will create the actual table in our database using the fields defined in our model.
We now need to load data to our created table. We are going to use GeoDjango's layer mapping data import utility to quickly import our data into the database table.
The LayerMapping utility provides a way to map the contents of vector spatial data files (e.g. shapefiles/geojson) into GeoDjango models.
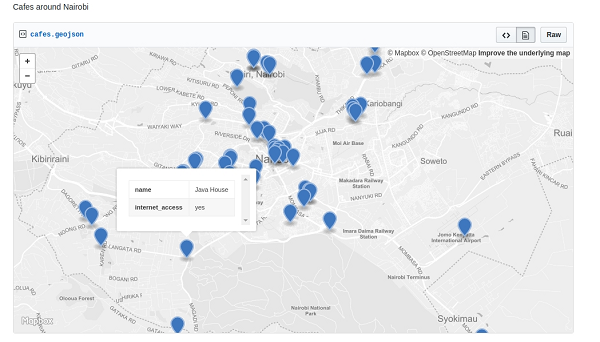
We are going to use this cafes.geojson file, which contains the cafes that sell coffee around the Nairobi area in Kenya. Github Gist provides us with a nice preview of the data.

Download the cafes.geojson file, create a folder called data and save the cafes.geojson file there.
To use layermapping, create a file called load.py inside the geo folder with the following content:
geo/load.pyimport os
from django.contrib.gis.utils import LayerMapping
from django.conf import settings
from .models import CoffeeShop
coffeeshop_mapping = {
'name':'name',
'location':'POINT'
}
coffeeshops_file = os.path.join(settings.BASE_DIR, 'data', 'cafes.geojson')
def run(verbose=True):
lm = LayerMapping(CoffeeShop, coffeeshops_file, coffeeshop_mapping, transform=False)
lm.save(strict=True, verbose=verbose)Each key in the coffeeshop_mapping dictionary corresponds to a field in the CoffeeShop model. The value is the name of the geojson property that data will be loaded from. The key location for the geometry field is POINT, the geometry type GeoDjango will import the field as. The transform keyword is set to False because the data does not need to be converted – it's already in WGS84 (SRID=4326).
To import the data, invoke the Django shell from your project's root directory
(geodjango) $ python manage.py shell
>>> from geo import load
>>> load.run()
The data will be imported into the database.
Using GeoDjango, we can quckily visualize each coffeeshop on a map in the django admin interface. A specific class called OSMGeoAdmin extends the normal django admin class to display a map of the point under the location field.
Edit the geo/admin.py with the following content:
from django.contrib import admin
from django.contrib.gis.admin import OSMGeoAdmin
from .models import CoffeeShop

# Register your models here.
admin.site.register(CoffeeShop, OSMGeoAdmin)
Edit your settings.py under ALLOWED_HOSTS to enable your app run on localhost:
ALLOWED_HOSTS = ['your_server_ip','localhost']To view the changes so far, run the following commands
(geodjango) $ python manage.py createsuperuser
(geodjango) $ python manage.py runserver
You can view you app at http://localhost:8000 and the admin page at http://localhost:8000/admin
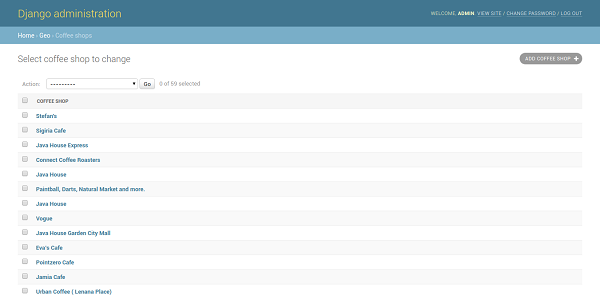
On the Admin page after logging in, click on Coffee Shops under GEO to see the list of the coffeeshops

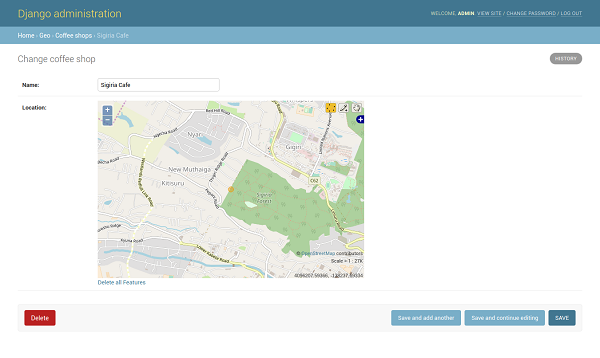
Click on one shop to view the details and map.

The location field will automaticall display a map showing a point of where the cafe is located.
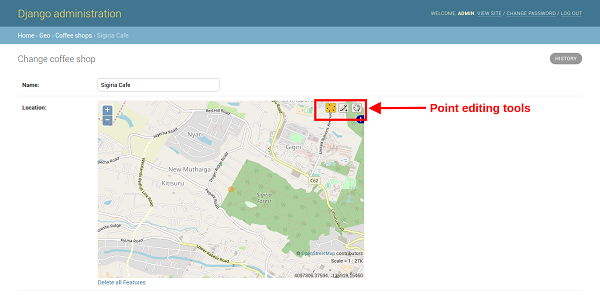
You can also use tools provided at the right corner of the map edit the location.

You can perform geospatial queries on a Geodjango model. In our model, this includes queries like finding a cafe that is within some distance from a given point, or sorting the results by the distance from a point.
Let us do a query to get the cafes that are 1 kilometer or less from a given point. We will run this sample query from the django shell. Usually, you will not run the queries from the shell, but use django views to manage the queries, and display the results to the user probably on a map. We will use the Django shell to see how typical geospatial queries work.
(geodjango) $ python manage.py shell
>>> from django.contrib.gis.geos import Point
>>> pnt = Point(36.8145,-1.2890)
>>> from geo.models import CoffeeShop
>>> from django.contrib.gis.measure import D
>>> CoffeeShop.objects.filter(location__distance_lte=(pnt,D(km=1)))[:5]
The above will give a Django QuerySet of 5 cafes that are 1 kilometer or less from a point with coordinates [36.8145,-1.2890].
The above query just returns the results as they are obtained from the database. What if you need to sort them by distance such that the nearest cafe is the first one in the result?
The following code will return the 5 cafes sorted by distance, so that the nearest one is the first one:
(geodjango) $ python manage.py shell
>>> from django.contrib.gis.geos import Point
>>> pnt = Point(36.8145,-1.2890)
>>> from geo.models import CoffeeShop
>>> from django.contrib.gis.db.models.functions import Distance
>>> CoffeeShop.objects.annotate(distance=Distance('location',pnt)).order_by('distance')[:5]
Django supports other distance lookups from example finding cafes that are more than 2 km away and other geospatial queries. We have barely just scratched the surface of what is possible with GeoDjango. For a complete reference, check out the GeoDjango Database API.
We have made quite some changes to our project, and now we need to update the server project to match the local project folder. There are many approaches of making the changes. You can use git and push the changes to a remote, and then clone or pull the project on the server. But for simplicity, we are going to copy the local project to the server, and overwrite the existing one using the scp command line tool:
scp -r /home/user/Desktop/coffeeshops user@your_server_ip:~/Activate your virtual environment on the server:
workon geodjangoRun migrations:
(geodjango) user@server_ip:~/coffeeshops$ python manage.py migrateImport coffee cafes to the server database:
(geodjango) user@server_ip:~/coffeeshops$ python manage.py shell
>>> from geo import load
>>> load.run()
Run development server:
(geodjango) user@server_ip:~/coffeeshops$ python manage.py runserver 0.0.0.0:8000You should be able to view the application on http://your_server_ip:8000!
To run the application on production with nginx and uwsgi server, please refer to this tutorial that walks on setting up a typical Django application on Alibaba Cloud with nginx and uwsgi server included.
And there we are! We have successfully set up a GeoDjango application and seen the kind of queries that can be performed on Geographic Django models. An Alibaba Cloud ECS instance allowed us to install Geospatial libraries that we needed, the Postgres/PostGIS database and the Python Environment to run our application.
The code for the application is on GitHub. Feel free to raise issues on the repo and I will address them.
Setup and Deploy Geodjango App on Alibaba Cloud Part 1: Basic Setup
From Cloud to Cloud Intelligence: Highlights from The Computing Conference Beijing 2019

2,599 posts | 765 followers
FollowAlibaba Clouder - March 22, 2019
Alibaba Clouder - March 15, 2019
Alibaba Clouder - March 18, 2019
Alibaba Clouder - March 18, 2019
- September 5, 2017
Alibaba Clouder - November 27, 2018

2,599 posts | 765 followers
Follow ECS(Elastic Compute Service)
Elastic and secure virtual cloud servers to cater all your cloud hosting needs.
Learn More ApsaraDB RDS for PostgreSQL
An on-demand database hosting service for PostgreSQL with automated monitoring, backup and disaster recovery capabilities
Learn More OSS(Object Storage Service)
An encrypted and secure cloud storage service which stores, processes and accesses massive amounts of data from anywhere in the world
Learn MoreMore Posts by Alibaba Clouder