By Te Wang (Yixia)
Seata is an open-source distributed transaction solution that aims to provide high-performance and user-friendly distributed transaction services in a microservices architecture. Seata offers multiple transaction modes, including AT, TCC, SAGA, and XA, to address transactional consistency issues in various business scenarios.
This article primarily focuses on the usage and best practices of Seata Saga mode. It focuses on three parts.
This article aims to help users effectively and efficiently utilize Seata Saga mode.
The Saga pattern is one of the solutions to distributed transactions, and the concept originated in the Sagas paper published by Hector and Kenneth in 1987. It divides the entire distributed transaction process into multiple stages, with each stage corresponding to a sub-transaction. These sub-transactions are executed by local transactions and committed after execution.

Saga mode follows a failure-based design. In this mode, each activity or sub-transaction process generally has a corresponding compensation service. In case of an exception in a distributed transaction, a recovery process must be performed. There are two ways to recover: reverse compensation and forward retry. For example, if the execution of T3 fails in the above distributed transaction, reverse compensation will sequentially perform the corresponding C3, C2, and C1 operations to cancel the effect of the transaction activity. Forward compensation is relentless. If the execution of T3 fails, it will continue retrying and then execute T4, T5, and so on.
Based on the design of Saga mode, we can identify the advantages and disadvantages of the Saga transaction mode.
Advantages
Disadvantages
Therefore, it is important to consider the impact when using the Saga mode. Saga mode can be used in the following scenarios:
Now, let's take a look at the implementation of Seata Saga. The mainstream implementations of Saga are orchestration and coordination. The implementation of Seata Saga is orchestration and is based on a state machine engine. The smallest unit of execution in the state machine is a node, which represents a service call. The corresponding Saga transaction is a sub-transaction activity/process. By configuring the compensation node, you can create a state machine call process by linking nodes together. Currently, Seata describes the calling process using JSON and executes it using the state machine engine. In case of an exception, we can select a compensation policy and trigger transaction compensation through the Seata coordinator.
You may be wondering if this is service orchestration. However, Seata Saga's state machine combines Saga with service orchestration, supporting compensation services and ensuring eventual consistency.
Let's look at a simple state machine process definition:
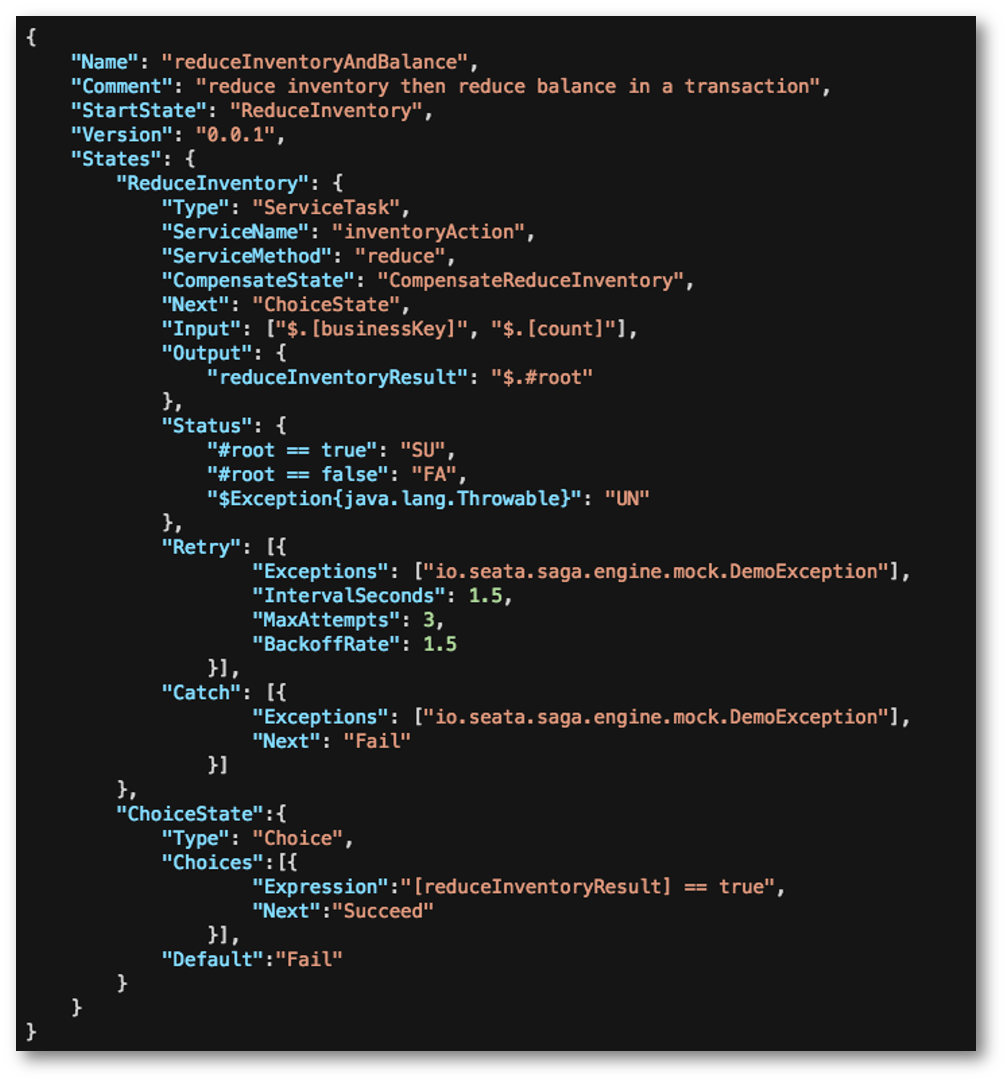
The image above is a state machine description with the name of reduceIncentoryAndBalance, which specifies the service call node of the ServiceTask type and the corresponding compensation node CompensateReduceInventory.
Let’s look at some basic properties:
For more information about types and syntax, please refer to the Seata official documentations [1]. It is evident that declaring a state machine in JSON can be somewhat challenging. To simplify the compilation of the JSON state machine, we also provide a visualized orchestration interface [2]. This interface, as shown in the following diagram, allows for the orchestration of more complex workflows.
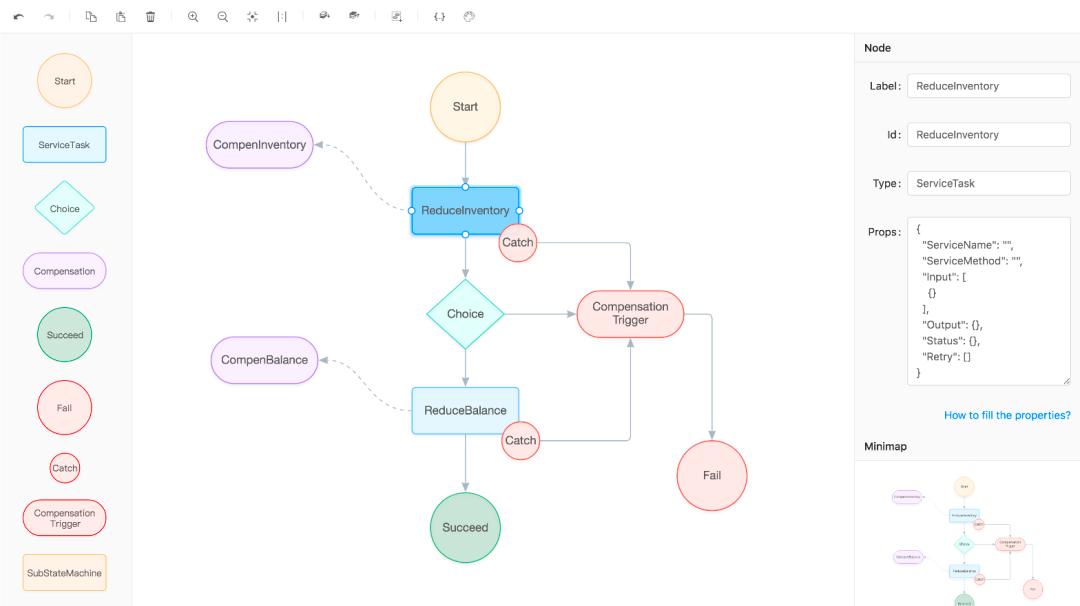
Now, let's start practicing.
Seata has three roles: TC, TM, and RM. TC (server side) is deployed as a separate server, and TM and RM (client side) are integrated by the business system.
The server-side storage mode currently has three types: file, db, and redis (raft and mongodb will be introduced later). The file mode does not need to be changed and can be started directly.
From the newcomer's document, it can be seen that Seata is still a traditional CS model. First, we need to deploy the Seata server side. The default storage mode on the server side is the file mode. You can directly run the main method of the springboot startup class to start the Seata server without any changes. For convenience, this demonstration uses the file mode. For other modes of the start methods, please refer to the detailed information in the official document.
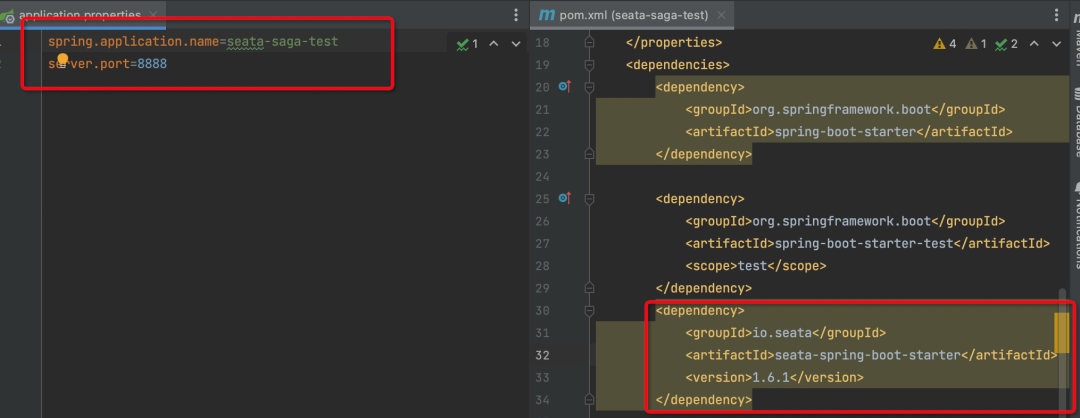
At the same time, we need to create a client-side test application named seata-saga-test. Use the springboot framework, configure spring's application name and port, and introduce seata-spring-boot-starter dependencies. That is how we complete the build of the client-side application.
In general, to understand the function of a framework, it is recommended to start by examining the unit tests of its entry point. In the Seata repository, locate the test module for Seata Saga and begin with the outermost test class, io.seata.saga.engine.StateMachineTests. Typically, this class serves as the entry point for open-source projects.
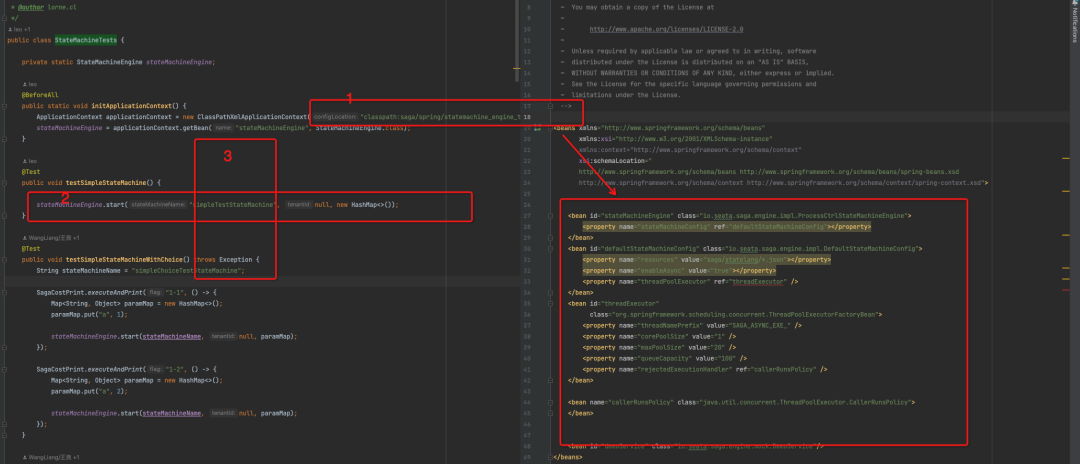
As can be seen from the screenshot above, the entry test method is mainly divided into three parts.
The spring configuration file at [1] declares StateMachineEngine Bean and its corresponding attributes. Additionally, at [2], this class is referenced to execute the start method, indicating that it serves as the entry class for our state machine. In fact, the StateMachineEngine class acts as the operational entry point for the Seata Saga state machine, controlling operations such as start and recovery. An important attribute of the StateMachineEngine is resources, which specifies the storage path for the state machine JSON file. Upon starting the Seata Saga state machine engine, the state machine definition located at the corresponding path is loaded for subsequent use. This path can be modified according to our requirements.
At [3], the start method of the StateMachineEngine is called, passing the state machine name and start parameters to initiate a state machine process call. Let's briefly examine the implementation. It can be observed that the state name corresponds to the name attribute in the JSON definition of the state machine under the resource path.
To test the Seata Saga state machine flow, we need to have a state machine JSON definition. Use the Seata Saga StateMachine Designer to define a state machine process where a simple AService#doA method calls the BService#doB method and includes an input parameter. Finally, our class#method and the state machine JSON appear as follows.
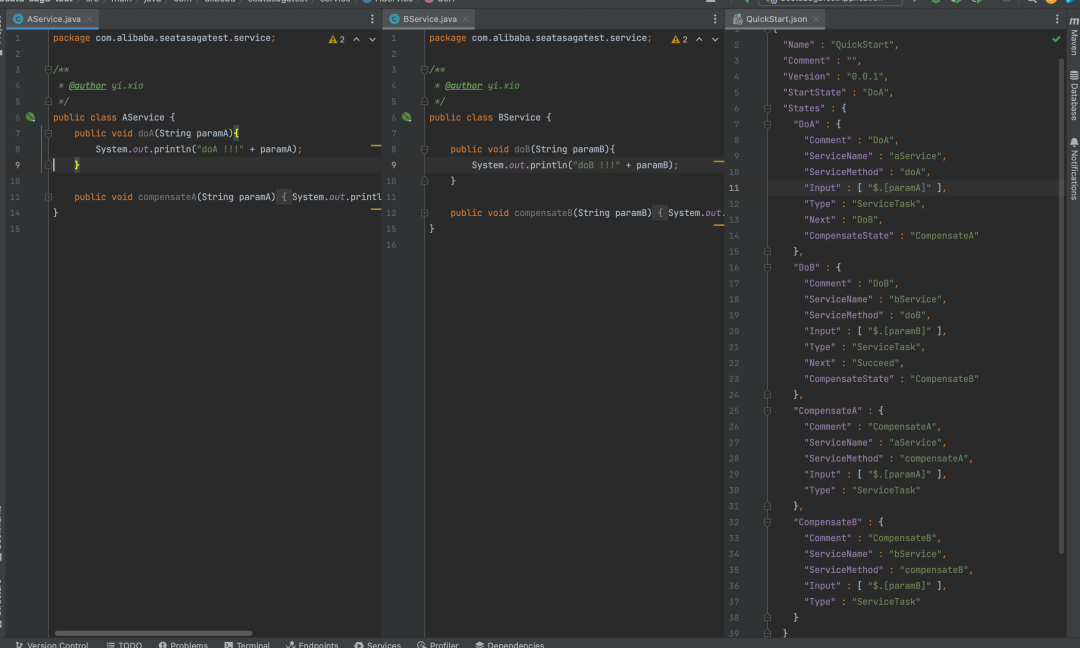
With the basic calling model and state machine JSON definition, according to the test case, we also declare the state machine Bean and the execution entry (note: the state machine name in the start method needs to be consistent with the name in the state machine JSON definition). After executing the main method, we can find that the AService#doA and BService#doB methods are both called.
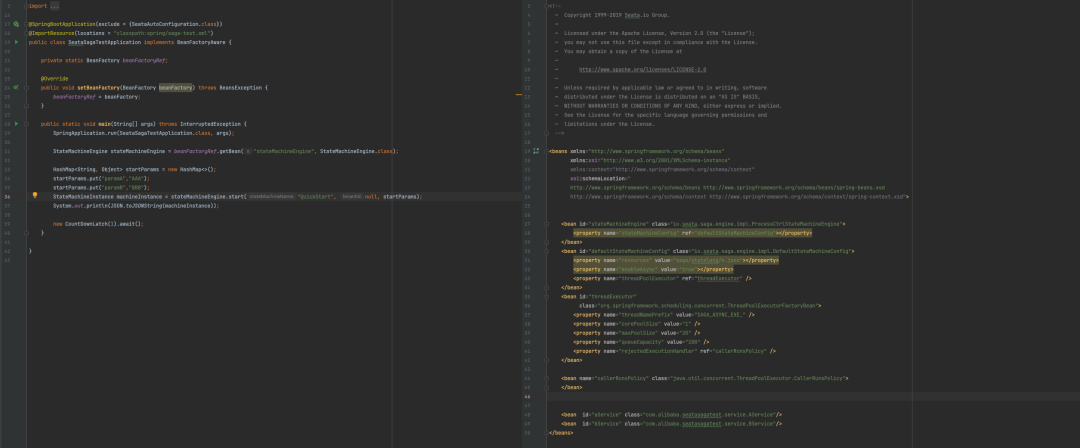
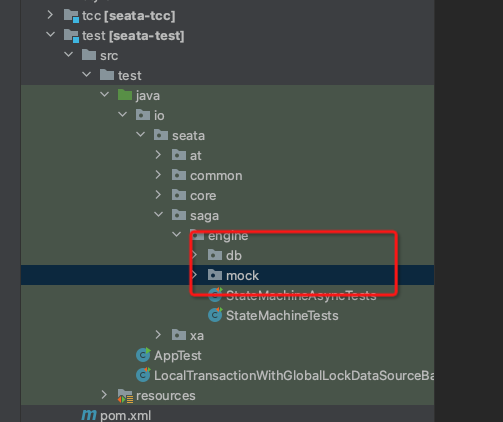
At this point, we have completed the quick start of the Seata Saga state machine. Continuing to observe the single test, we find that Seata Saga single test has two modules, DB and Mock.
Let's take a look at the single test of the DB module first. We can see that the single test class of the DB module is basically similar to the above. The only difference lies in the state machine engine, which specifies DB storage and executes DDL SQL (initializes Seata Saga tables). If the DB storage is specified, the execution process of our state machine will be persisted in the DB storage, which is convenient for transaction execution process query and exception recovery, and is also a practical way in the production environment.
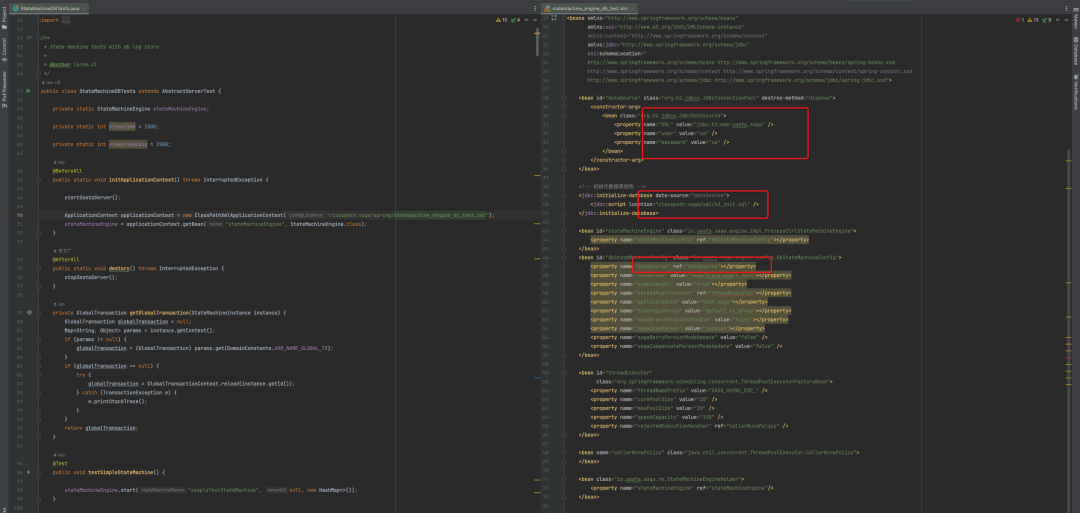
The Mock module is separated from the Seata Sever through mock translocation and uses only the service orchestration capabilities of Seata Saga. If you are interested, you can practice using DB and Mock modules again.
However, it is important to note that mastering the current implementation of Seata Saga's state machine can still be challenging. On one hand, we are committed to making the Seata Saga state machine mode more user-friendly. On the other hand, we are designing Saga's annotation mode and streaming orchestration mode to provide users with a more product-oriented Seata Saga.
You are very welcome to join the co-construction of Seata Saga state machine.
[1] Seata official website
http://seata.io/en-us/index.html
[2] Visual orchestration interface
http://seata.io/saga_designer/index.html#/
Towards Native: Examples and Principles of Spring and Dubbo AOT Technology
Use OpenKruise to Implement End-to-end Canary Release Based on Higress

640 posts | 55 followers
FollowAlibaba Cloud Native Community - August 8, 2023
Stone Doyle - January 28, 2021
Alibaba Developer - October 20, 2021
Alibaba Cloud Native Community - June 25, 2021
Alibaba Cloud Native Community - March 11, 2024
Alibaba Clouder - January 30, 2019

640 posts | 55 followers
Follow Best Practices
Follow our step-by-step best practices guides to build your own business case.
Learn More Quick Starts
Deploy custom Alibaba Cloud solutions for business-critical scenarios with Quick Start templates.
Learn More Quick BI
A new generation of business Intelligence services on the cloud
Learn More Managed Service for Prometheus
Multi-source metrics are aggregated to monitor the status of your business and services in real time.
Learn MoreMore Posts by Alibaba Cloud Native Community