Suimu, one of the technical leaders of PolarDB-X, a cloud-native distributed database developed by Alibaba Cloud, graduated from Zhejiang University. He has a good understanding of operating systems, cryptography, and distributed systems. In 2017, he joined the PolarDB-X Team to develop MySQL distributed systems with high concurrency and low latency. Currently, he is responsible for building the cloud-native platform of PolarDB-X, ecosystem connections, open-source, and other ecological construction work.
The PolarDB-X Practice Series discusses the PolarDB-X community version. The content covers usage scenarios of the PolarDB-X to cultivate the ability of operation and practice. It will focus on the full cycle process of using PolarDB-X, covering several aspects such as installation and deployment, usage, diagnosis and optimization, and operation and maintenance management.
Before the deployment, you can refer to the PolarDB-X document: https://doc.polardbx.com
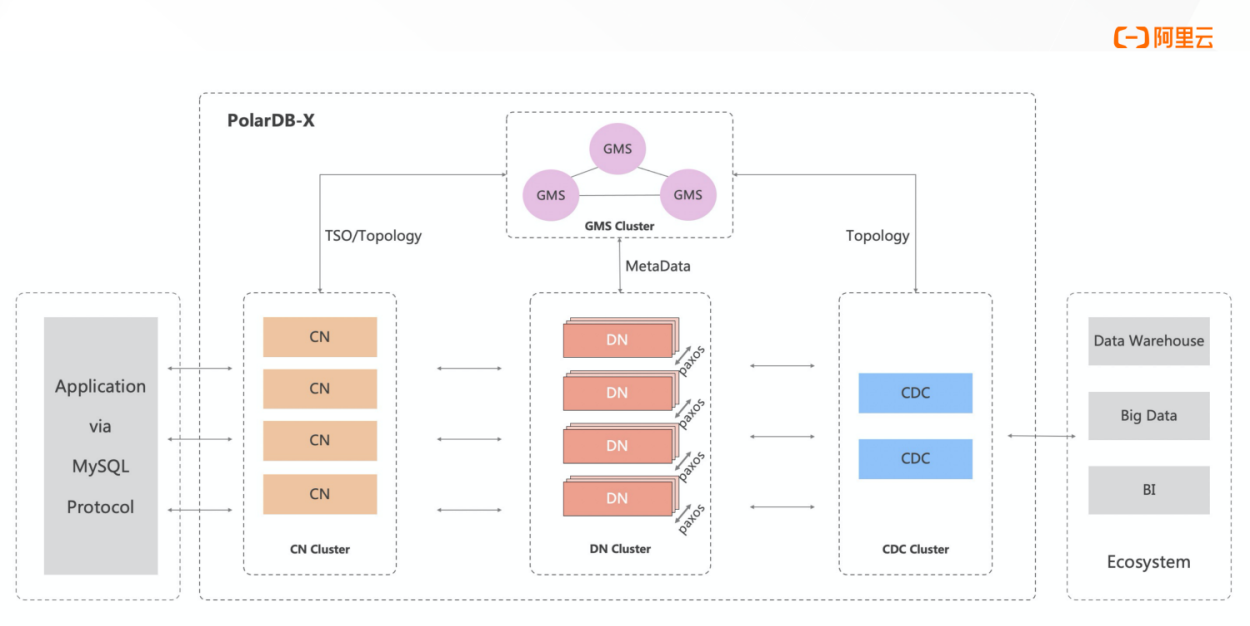
Let's look at the system architecture first. PolarDB-X is designed with the shared-nothing architecture and storage-computing separation architecture. The system consists of four core components.

As the entry point of the system, compute node adopts a stateless design, including SQL parser, optimizer, executor, and other modules. It is responsible for distributed data routing, computing and dynamic scheduling, distributed transaction 2PC coordination, global secondary index maintenance, etc. It provides enterprise-level features (such as SQL throttling and three-role mode).
Data node is responsible for data persistence. It provides high data reliability and strong consistency assurance based on the Paxos protocol. It also maintains the visibility of distributed transactions through MVCC.
Global meta service maintains globally consistent system Meta information (such as Table, Schema, and Statistics). It maintains security information (such as accounts and permissions) and provides Timestamp Oracle (TSO).
Change data capture provides incremental data subscription capabilities that are fully compatible with the MySQL Binlog format and protocol and master-slave replication capabilities that are compatible with the MySQL Replication protocol.
In this deployment, you can think of four components as four docker containers or four processes that collaborate with each other to pull up a complete PolarDB-X.
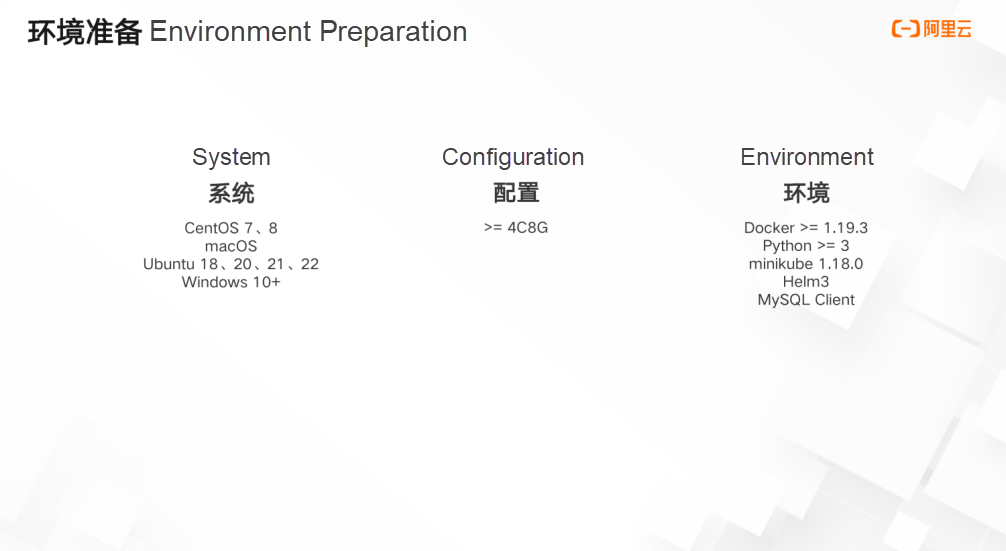
Please see the following figure for the system, configuration, and test environment required for this deployment:

You must install Python3 and Docker first to deploy a PolarDB-X database using PXD:
Note: We recommend using a virtual environment to install PXD:
python3 -m venv venv
source venv/bin/activate
Before installation, we recommend running the following command to upgrade pip:
pip install --upgrade pip Run the following command to install pxd:
pip install pxd Note: The speed of downloading packages from pypi is slow for some domestic users. You can use the following command to install pxd from Alibaba Cloud images:
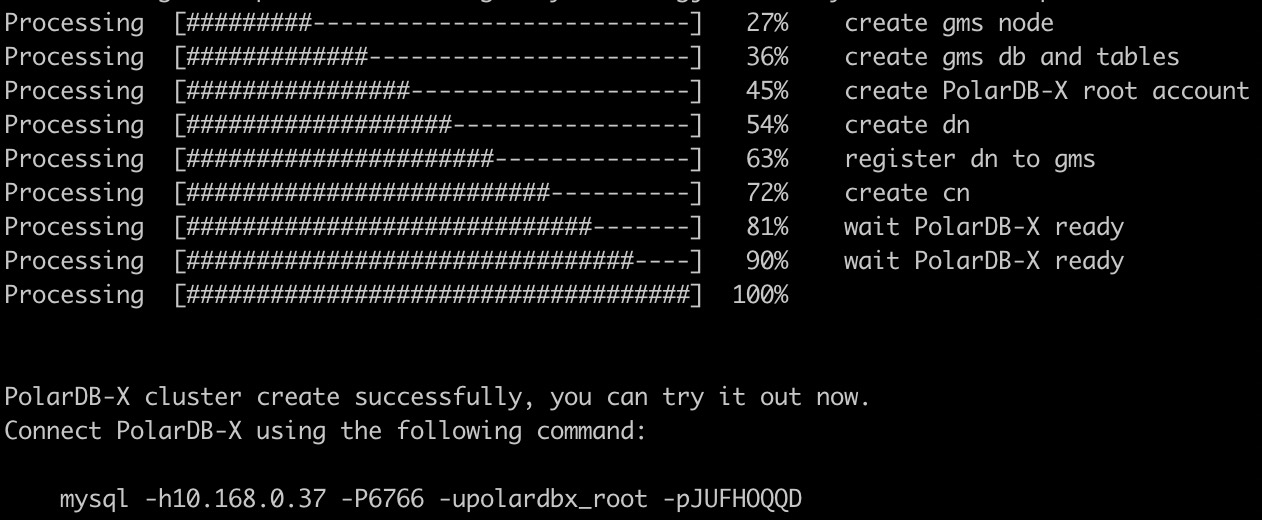
pip install -i https://mirrors.aliyun.com/pypi/simple/ pxd pxd tryoutpxd tryout -cn_replica 1 -cn_version latest -dn_replica 1 -dn_version latest -cdc_replica 1 -cdc_version latestAfter the PolarDB-X database is created, the corresponding connection information is output:

Note: The password of the PolarDB-X administrator account is randomly generated and only shows once. Please remember to save it.
You can connect to the PolarDB-X database through MySQL Client. Execute the following SQL statements to experience the distributed features of the PolarDB-X:
# Check GMS
select * from information_schema.schemata;
# Create partitioned tables
create database polarx_example partition_mode='partitioning';
use polarx_example;
create table example (
  `id` bigint(11) auto_increment NOT NULL,
  `name` varchar(255) DEFAULT NULL,
  `score` bigint(11) DEFAULT NULL,
  primary key (`id`)
) engine=InnoDB default charset=utf8
partition by hash(id)
partitions 8;
insert into example values(null,'lily',375),(null,'lisa',400),(null,'ljh',500);
select * from example;
show topology from example;
# Check CDC
show master status ;
show binlog events in 'binlog.000001' from 4;
# Check DN and CN
show storage ;
show mpp ;Run the following command to view the list of PolarDB-X in the current environment:
pxd list Run the following command to clean up all PolarDB-X in the local environment:
pxd cleanup The section above is the process of deploying a PolarDB-X cluster locally with PXD.
Minikube is a tool maintained by the community to create Kubernetes test clusters quickly. It is suitable for testing and learning Kubernetes. Kubernetes clusters created by minikube can run in containers or virtual machines. In this section, Kubernetes is created on CentOS 8.2.
Note: Some steps may be slightly different if you deploy minikube on other operating systems (such as macOS or Windows).
Before deployment, make sure minikube and Docker have been installed and meet the following requirements:
Minikube requires a non-root account for deployment. You must create a new account if you use the root account to access the machine.
$ useradd -ms /bin/bash galaxykube
$ usermod -aG docker galaxykube
If you use another account, please add it to the Docker group (as shown above) to ensure that it can directly access Docker.
Use su to switch to galaxykube:
$ su galaxykube Run the following command to start a minikube:
minikube start --cpus 4 --memory 7960 --image-mirror-country cn --registry-mirror=https://docker.mirrors.ustc.edu.cn Note: Here, we use the minikube image origin of Alibaba Cloud and the Docker image origin provided by USTC to accelerate image pulling.
In this case, minikube is running properly. Minikube will automatically set the kubectl configuration file. If kubectl has been installed before, you can use kubectl to access the cluster:
$ kubectl cluster-info
kubectl cluster-info
Kubernetes control plane is running at https://192.168.49.2:8443
CoreDNS is running at https://192.168.49.2:8443/api/v1/namespaces/kube-system/services/kube-dns:dns/proxy
To further debug and diagnose cluster problems, use 'kubectl cluster-info dump'.
Note: Subcommands of minikube kubectl require "--" before the kubectl parameters. If you use bash shell, you can use alias kubectl="minikube kubectl -- "to set shortcut commands. Kubectl commands will be used in the following.
Now, we can start deploying PolarDB-X Operator.
Before you begin, make sure that the following prerequisites are met:
A running Kubernetes cluster is available. Ensure that:
First, create a namespace called polardbx-operator-system:
$ kubectl create namespace polardbx-operator-system Run the following command to install PolarDB-X Operator:
$ helm install --namespace polardbx-operator-system polardbx-operator https://github.com/ApsaraDB/galaxyView the running status of PolarDB-X Operator components and wait until they are all in the Running state:
$ kubectl get pods --namespace polardbx-operator-system
NAME                                           READY   STATUS    RESTARTS   AGE
polardbx-controller-manager-6c858fc5b9-zrhx9   1/1     Running   0          66s
polardbx-hpfs-d44zd                            1/1     Running   0          66s
polardbx-tools-updater-459lc                   1/1     Running   0          66s
Congratulations! PolarDB-X Operator has been installed. Now, you can start deploying the PolarDB-X cluster!
Now let's quickly deploy a PolarDB-X cluster, which includes 1 GMS, 1 CN, 1 DN, and 1 CDC. Run the following command to create such a cluster:
echo "apiVersion: polardbx.aliyun.com/v1
kind: PolarDBXCluster
metadata:
  name: quick-start
  annotations:
    polardbx/topology-mode-guide: quick-start" | kubectl apply -f -
You will see the following output:
polardbxcluster.polardbx.aliyun.com/quick-start created Run the following command to view the creation status:
$ kubectl get polardbxcluster -w
NAME          GMS   CN    DN    CDC   PHASE      DISK   AGE
quick-start   0/1   0/1   0/1   0/1   Creating          35s
quick-start   1/1   0/1   1/1   0/1   Creating          93s
quick-start   1/1   0/1   1/1   1/1   Creating          4m43s
quick-start   1/1   1/1   1/1   1/1   Running    2.4 GiB   4m44s
When the PHASE column is displayed as Running, the PolarDB-X cluster has been deployed. Congratulations! Now, you can start connecting and experiencing the PolarDB-X distributed database.
● Download polardbx-engine code, main branch
● Download polardbx-sql code, main branch
● Download polardbx-glue code, main branch
● Download polardbx-cdc code, main branch
This step involves compiling and installing polardbx-engine (MySQL)
yum install cmake3
ln -s /usr/bin/cmake3 /usr/bin/cmake
# Install GCC7
yum install centos-release-scl
yum install devtoolset-7-gcc devtoolset-7-gcc-c++ devtoolset-7-binutils
echo "source /opt/rh/devtoolset-7/enable" >>/etc/profile
# Install dependencies
yum install make automake git openssl-devel ncurses-devel bison libaio-devel# Install GCC7
apt install -y gcc-7 g++-7
update-alternatives --install /usr/bin/gcc gcc /usr/bin/gcc-7 60 \
--slave /usr/bin/g++ g++ /usr/bin/g++-7
update-alternatives --config gcc
gcc --version
g++ --version
# Install dependencies
apt install make automake cmake git bison libaio-dev libncurses-dev libsasl2-dev libldap2-dev libssl-dev pkg-config# Enter galaxyengine directory
cd galaxyengine
# Install boost 1.70 (Note: Put boost into the repository to avoid downloading)
wget https://boostorg.jfrog.io/artifactory/main/release/1.70.0/source/boost_1_70_0.tar.gz
mkdir extra/boost
cp boost_1_70_0.tar.gz extra/boost/
# Compile and install
# For detailed parameters, see https://dev.mysql.com/doc/refman/8.0/en/source-configuration-options.html
cmake . \
-DFORCE_INSOURCE_BUILD=ON \
-DCMAKE_BUILD_TYPE="Debug" \
-DSYSCONFDIR="/u01/mysql" \
-DCMAKE_INSTALL_PREFIX="/u01/mysql" \
-DMYSQL_DATADIR="/u01/mysql/data" \
-DWITH_BOOST="./extra/boost/boost_1_70_0.tar.gz"
make -j8
make install# Access to CDC code
# Compile and package
mvn install -D maven.test.skip=true -D env=release
# Packaged in /polardbx-cdc-assemble/target/
# Decompress the package and run it
tar zxvf polardbx-binlog.tar.gzThis step involves compiling and installing the polardbx-cdc code.
# Access to CDC code
# Compile and package
mvn install -D maven.test.skip=true -D env=release
# Packaged in /polardbx-cdc-assemble/target/
# Decompress the package and run it
tar zxvf polardbx-binlog.tar.gzNote: You should start DN under an account other than root
Start MySQL:
mkdir -p /u01/my3306/{data,log,run,tmp,mysql}
/u01/mysql/bin/mysqld --defaults-file=my.cnf --initialize-insecure
/u01/mysql/bin/mysqld --defaults-file=my.cnfAfter the MySQL process is started, the PolarDB-X can be initialized. The following configurations need to be prepared:
my_polarx
polardbx_meta_db_polardbx
asdf1234ghjk5678
polarx_root
123456. You can reset it by -S
Note: You should start CN under an account other than root
Modify the configuration file (conf/server.properties) and replace the following configuration items one by one:
# PolarDB-X Port
serverPort=8527
# PolarDB-X RPC Port
rpcPort=9090
# MetaDB Address
metaDbAddr=127.0.0.1:4886
# MetaDB X-Protocol Port
metaDbXprotoPort=32886
# MetaDB Account
metaDbUser=my_polarx
metaDbName=polardbx_meta_db_polardbx
# PolarDB-X Instance Name
instanceId=polardbx-polardbx
Initialize PolarDB-X:
bin/startup.sh \
    -I \
    -P asdf1234ghjk5678 \
    -d 127.0.0.1:4886:32886 \
    -r "" \
    -u polardbx_root \
    -S "123456"
In this step, the internal and encrypted passwords are generated, which need to be filled in the conf/server.properties for subsequent access:
Generate password for user: my_polarx && M8%V5%K9^$5%oY0%yC0+&1!J7@8+R6)
Encrypted password: DB84u4UkU/OYlMzu3aj9NFdknvxYgedFiW9z59bVnoc=
Root user for polarx with password: polardbx_root && 123456
Encrypted password for polarx: H1AzXc2NmCs61dNjH5nMvA==
======== Paste following configurations to conf/server.properties ! =======
metaDbPasswd=HMqvkvXZtT7XedA6t2IWY8+D7fJWIJir/mIY1Nf1b58=
The last step is to start PolarDB-X:
bin/startup.sh -P asdf1234ghjk5678 Connect to PolarDB-X to verify. If you can connect, it means the database is started successfully, try some SQLs:
mysql -h127.1 -P8527 -upolardbx_root After the PolarDB-X process is started, PolarDB-X CDC component can be initialized. The following configurations need to be prepared:
my_polarx
polardbx_meta_db_polardbx
HMqvkvXZtT7XedA6t2IWY8+D7fJWIJir/mIY1Nf1b58=
4886
asdf1234ghjk5678
polardbx_root
H1AzXc2NmCs61dNjH5nMvA==
8527
Note: You should start CDC under an account other than root:
useEncryptedPassword=true
polardbx.instance.id=polardbx-polardbx
mem_size=16000
metaDb_url=jdbc:mysql://127.0.0.1:4886/polardbx_meta_db_polardbx?useSSL=false
metaDb_username=my_polarx
metaDbPasswd=HMqvkvXZtT7XedA6t2IWY8+D7fJWIJir/mIY1Nf1b58=
polarx_url=jdbc:mysql://127.0.0.1:8527/__cdc__
polarx_username=polardbx_root
polarx_password=H1AzXc2NmCs61dNjH5nMvA==
dnPasswordKey=asdf1234ghjk5678
storage.persistBasePath=${HOME}/logs/rocksdb
binlog.dir.path=${HOME}/binlog/
Run the following commands to start the CDC daemon process:
After startup, check the process status by jps command. CDC will have three secondary processes: DaemonBootStrap, TaskBootStrap, and DumperBootStrap. The system log of CDC will be output to ${HOME}/logs directory, and global binlog logs will be output to the directory configured by binlog.dir.path. After the TaskBootStrap process and DumperBootStrap process are killed, they will be automatically pulled up by the Daemon process.
bin/daemon.sh start Log on to the PolarDB-X, perform some DDL or DML operations, and execute the show binary logs and show binlog events commands to verify the global binlog. Enjoy it!
These are the three ways to deploy PolarDB-X. I hope everyone can successfully deploy and experience it locally. You are welcome to join us if you are interested in open-source PolarDB-X!
ApsaraDB - February 21, 2023
ApsaraDB - April 20, 2023
ApsaraDB - April 20, 2023
ApsaraDB - March 27, 2024
ApsaraDB - April 10, 2024
ApsaraDB - January 3, 2024
 PolarDB for PostgreSQL
Alibaba Cloud PolarDB for PostgreSQL is an in-house relational database service 100% compatible with PostgreSQL and highly compatible with the Oracle syntax.
Learn More PolarDB for Xscale
Alibaba Cloud PolarDB for Xscale (PolarDB-X) is a cloud-native high-performance distributed database service independently developed by Alibaba Cloud.
Learn More PolarDB for MySQL
Alibaba Cloud PolarDB for MySQL is a cloud-native relational database service 100% compatible with MySQL.
Learn More Architecture and Structure Design
Customized infrastructure to ensure high availability, scalability and high-performance
Learn MoreMore Posts by ApsaraDB