By Yu Tao (Xunfei), from Alibaba Cloud Storage Team
Programmers that use the C++ Programming Language as their main development language should agree that building a development environment is annoying. When compiling a program, in addition to downloading various dependent packages, we may face various problems (such as incompatibility with local systems, inconsistent compiler versions, and package version conflicts). In the process of operating the iLogtail open-source community, I found that the development and debugging environment is also one of the most frequently asked questions by members. Is there a way to completely solve this problem?
The answer is yes. Container technology enables applications to be deployed with one click and executed consistently in various environments. The same principle also applies to development environment deployment. We can make the entire development environment run in a remote container using the Remote-Development plug-in of VSCode. This approach ensures development and compilation in a consistent environment and isolates multiple development environments. Let's build such a remote container development environment from easy to difficult.
Why do we need Remote + Container? Remote solves the resource problem of development machines and code security risk. The CPU and memory of the local computer are limited. In order to improve the compilation and testing efficiency, a machine specially used for development and testing is generally prepared, while some companies only allow internal development machines to access the code library to prevent code leakage. Containers realize development environment consistency. The combination of the two can build an ideal development environment.
When using the Remote-Development plug-in, the plug-in will connect to the remote development machine through Secure Shell (SSH). Then it starts it according to the configuration or starts the development environment container after casting the development environment image. Mount the Workspace directory of the development machine as a source to the container at startup. After the development environment container is started, the plug-in will automatically install VS Code Server and the VS Code plug-in specified by configuration. Once the VS Code Server in the container is started, the local VS Code will establish communication with the VS Code Server in the container. All files in Workspace can be accessed within the container, and the files will not be lost if the container exits for modifications. The VS Code plug-ins available for container development environments are specified in the devcontainer.json configuration of Workspace, which is described in detail below.
The /vscode directory in the development container mounts a Docker volume to improve the startup speed and retain the configuration of plug-ins in the container, which will not be automatically recycled when Docker exits.
Therefore, from the second connection to the container development environment, it is unnecessary to reinstall VS Code Server and plug-ins, and the startup speed is significantly improved.
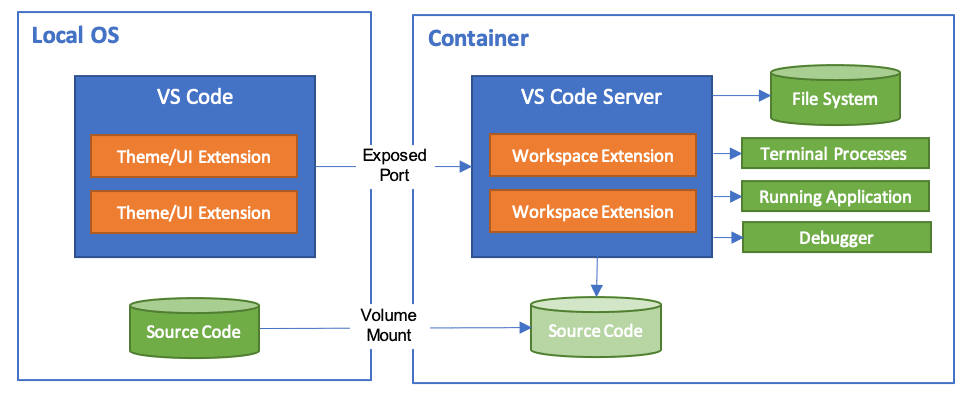
In order to enable VS Code to connect to the development machine remotely, it is best to use the ssh key to establish a trust relationship between the local computer and the development machine. Docker must be installed on the development machine to use containers for development. There are many related tutorials on the Internet, so I will not repeat them here.
Note: The account that establishes the trust relationship must have Docker usage permission to enable VS Code to connect to the development machine through ssh and start the development environment container through Docker. The root account has the permission. If it is not root account, we can use one of the following methods to grant Docker permission to the account.
sudo usermod -aG docker $USER
sudo chmod 777 /var/run/docker.sock
This assumes the development machine uses Linux, has established a trust relationship with the local computer, and has installed Docker with access rights.
Search Remote Development in the VS Code Marketplace to install the plug-in:
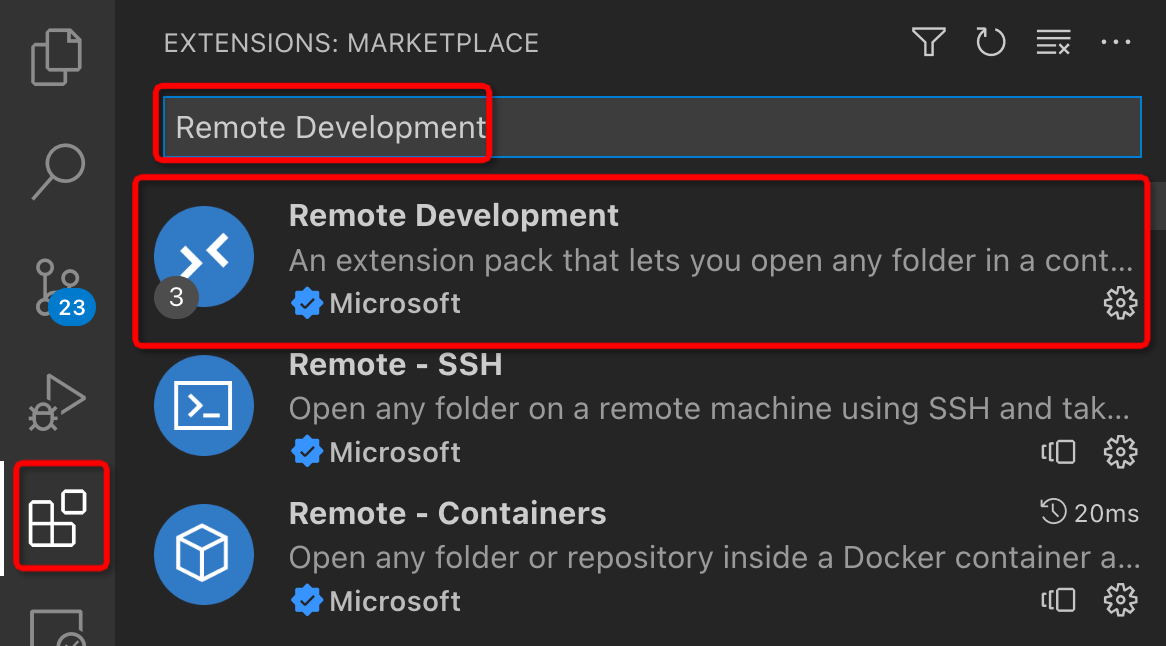
After the installation is complete, we will find that there are three more sub-plug-ins:
The most direct way to use the Remote Development plug-in is to start the development container using the existing compilation image. I will use iLogtail (an open-source project with a complex dependency environment written in the C++ Programming Language and Go Programming Language) as an example to illustrate how to use the Remote Development plug-in to develop remote containers.
Create a .devcontainer directory in the top-level directory of the iLogtail Workspace and create a devcontainer.json file in the .devcontainer directory.

The contents of the configuration file are listed below:
{
  "image": "sls-opensource-registry.cn-shanghai.cr.aliyuncs.com/ilogtail-community-edition/ilogtail-build-linux:latest",
  "customizations": {
    "vscode": {
      "extensions": [
        "golang.Go",
        "ms-vscode.cpptools-extension-pack"
      ]
    }
  }
}
Among them, the image field is the image address of the Remote Development plug-in that starts the development environment and customizations.vscode.extensions specifies the plug-ins for the development environment. Part of the plug-ins are introduced below. Developers can modify them accordingly.
| Plug-In Name | Usage |
| golang.Go | Essential plug-in for Go development |
| ms-vscode.cpptools-extension-pack | Essential plug-in for C++ development |
Press Shift + Command + P (macOS) or Ctrl + Shift + P (Windows) to open the command panel, enter reopen, and select Remote-Containers: Reopen in Container:

If the following message appears, we can click Reopen in Container:

It will be slow the first time. Since we have to download the image and install the plug-in, it will be faster to open it again. Follow the prompts to build the image.
After completing the steps above, we can use VS Code for code editing and code compiling.
Note: If you have pulled a compiled image before, you may need to trigger Remote-Containers: Rebuild Container to rebuild.
After the development container is started, we can browse the Workspace code in VS Code. However, when we open a file, it is full of error prompts, and the jump function of the code does not work properly because the includePath of the C++ development environment is not configured correctly.

Open the command panel, enter C++ config, and select C/C++: Edit Configurations(UI):

Locate the Include path and enter the path of the dependency library in the image.

This way, we can find that all the error prompts disappear, and the function definition can jump normally.
Open a new Terminal (if you can't find it, you can enter Terminal in the command panel and select a new one).

make vendor # If the update of plug-in dependency library is needed.
make plugin_local # Start from here after each update of the plug-in code.
mkdir -p core/build # If it has not been built before.
cd core/build
cmake .. # If you want to add or delete files, you need to execute them again after you modify CMakeLists.txt.
make -sj$(nproc) # Start from here after each update of core code. 

Since VS Code directly mounts the code library directory to the image, the host can access the compilation output in the image.

Here, if the requirements are not high, they can be finished. If you are careful, you must have found a problem. The files generated in the container are all root permissions on the host and must execute sudo chown -R $USER for repairing.
Is there any way to automatically adapt the permission in the container to the host? It is not difficult for VS Code to solve this problem. The Remote Development plug-in allows us to use Dockerfile to develop in a container, which means we can use Docker to build a development image before starting the development container. This allows us to correct the permissions of accounts in the container.
The correction works like this:
Next, let's move to the actual operation.
In the configuration file, change the image section to the build section and use Dockerfile to start the development container. At the same time, add initializeCommand to expose the account information to Docker before building the image.
{
  "build": {
    "dockerfile": "Dockerfile",
    "args": {
      "USERNAME": "${localEnv:USER}"
    }
  },
  "initializeCommand": ".devcontainer/gen_env.sh",
  "onCreateCommand": "sudo chown -R $(id -un):$(id -gn) /root",
  "customizations": {
    "vscode": {
      "extensions": [
        "golang.Go",
        "ms-vscode.cpptools-extension-pack"
      ]
    }
  }
}Use the compiled image as the base image and write a Dockerfile to correct the account and file permissions in the image.
FROM sls-opensource-registry.cn-shanghai.cr.aliyuncs.com/ilogtail-community-edition/ilogtail-build-linux:latest
ARG USERNAME=admin
USER root
# Create the user
COPY .env /tmp/.env
RUN source /tmp/.env && rm /tmp/.env; \
    if getent passwd $USERNAME; then userdel -f $USERNAME; fi; \
    if [ $HOST_OS = "Linux" ]; then \
    if getent group $GROUPNAME; then groupdel $GROUPNAME; fi; \
    groupadd --gid $GROUP_GID $GROUPNAME; \
    fi; \
    useradd --uid $USER_UID --gid $GROUP_GID -m $USERNAME; \
    echo $USERNAME ALL=\(root\) NOPASSWD:ALL > /etc/sudoers.d/$USERNAME; \
    chmod 0440 /etc/sudoers.d/$USERNAME; \
    chown -R $USERNAME:$GROUPNAME /opt/logtail $(eval echo ~$USERNAME); \
    chmod 755 $(eval echo ~$USERNAME);
USER $USERNAME
COPY .env /tmp/.env copies the account information of the host to the container in the form of files.
The next few lines create the corresponding accounts in the container based on this information.
echo $USERNAME ALL=\(root\) NOPASSWD:ALL > /etc/sudoers.d/$USERNAME; Grant the user sudo premission.
The lines of chmod and chown are used to correct the file permissions so the new user has permission to read and write the corresponding directory.
We must correct the HOME(~$USERNAME) directory here. Otherwise, the VS Code Sever will not have permission to install, failing to start the plug-in.
The content of the gen_env.sh script is listed below. This script is also compatible with macOS.
bset -ue
set -o pipefail
if uname -s | grep Linux; then
  echo -e "HOST_OS=Linux\nUSERNAME=$USER\nUSER_UID=$(id -u $USER)\nGROUPNAME=$(id -gn $USER)\nGROUP_GID=$(id -g $USER)" > .devcontainer/.env;
else
  echo "HOST_OS=Darwin\nUSERNAME=$USER\nUSER_UID=$(id -u $USER)\nGROUPNAME=root\nGROUP_GID=0" > .devcontainer/.env;
fi
After the first three steps are completed, the configuration directory in Workspace should have three files like this:
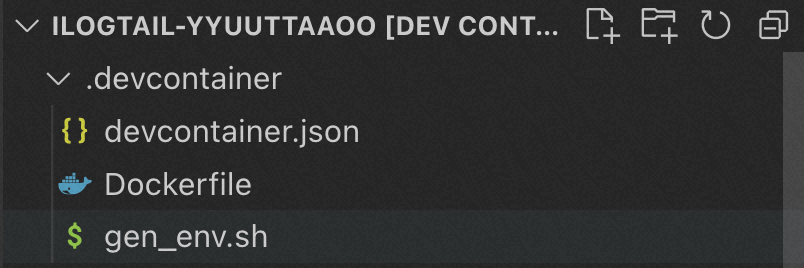
Press Shift + Command + P (macOS) or Ctrl + Shift + P (Windows) to open the command panel, enter reopen, and select Remote-Containers: Rebuild Container.

Re-execute the id command in the container to view the account information. We can find that account information is the same as the development machine.

Re-execute the previous compilation command in the container. Then, view the generated file permissions on the development machine. We can see that the files generated in the container have become the correct permissions on the development machine.

In addition to compiling code, another important function of the development environment is local debugging. Open a unit test file of the iLogtail plug-in, set the power off, and click debug test.

What?
Failed to launch: could not launch process: fork/fork/exec ...: operation not permitted.
Something went wrong!
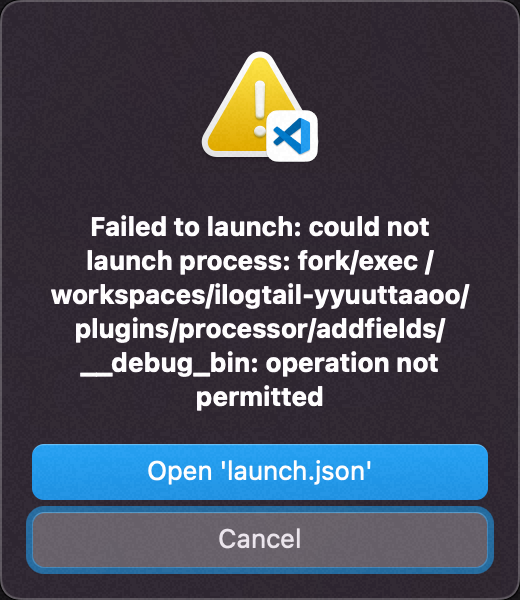
After looking up data, it turned out that the default security policy of Docker uses the Secure computing mode (seccomp) to only allow whitelist system calls. System calls required by debug were rejected. We will try to add a line of "runArgs": [ "--cap-add=SYS_PTRACE", "--security-opt", "seccomp=unconfined" ] to the configuration file to disable the function.
{
  "build": {
    "dockerfile": "Dockerfile",
    "args": {
      "USERNAME": "${localEnv:USER}"
    }
  },
  "initializeCommand": ".devcontainer/gen_env.sh",
  "runArgs": [ "--cap-add=SYS_PTRACE", "--security-opt", "seccomp=unconfined" ],
  "customizations": {
    "vscode": {
      "extensions": [
        "golang.Go",
        "ms-vscode.cpptools-extension-pack",
        "DavidAnson.vscode-markdownlint"
      ]
    }
  }
}
After rebuilding the container, we tried the debugging function again. It works!

So far, we can develop in the remote container smoothly through the Remote Development plug-in of VS Code. In addition, the compiled images and plug-in configuration files used are portable and repeatable. After continuously integrating into the code library, it can be used by any developer. All the code mentioned in the article is available in the GitHub repository of iLogtail.
There are still many functions of the Remote Development plug-in that are not used in this article. Interested readers can study and explore them according to the references at the end of this article.
Alibaba Cloud's Energy Expert Helps Analyze Carbon Footprint for The First Olympic Esports Week

1,097 posts | 322 followers
FollowAlibaba Clouder - February 14, 2020
Alibaba Cloud Native Community - July 6, 2022
Alibaba Cloud Community - February 8, 2022
Alibaba Cloud Serverless - June 9, 2022
OpenAnolis - June 9, 2022
Alibaba System Software - November 29, 2018

1,097 posts | 322 followers
Follow Storage Capacity Unit
Plan and optimize your storage budget with flexible storage services
Learn More Container Service for Kubernetes
Alibaba Cloud Container Service for Kubernetes is a fully managed cloud container management service that supports native Kubernetes and integrates with other Alibaba Cloud products.
Learn More ACK One
Provides a control plane to allow users to manage Kubernetes clusters that run based on different infrastructure resources
Learn More Container Registry
A secure image hosting platform providing containerized image lifecycle management
Learn MoreMore Posts by Alibaba Cloud Community