By Martin Tumusiime, Alibaba Cloud Tech Share Author. Tech Share is Alibaba Cloud's incentive program to encourage the sharing of technical knowledge and best practices within the cloud community.
In this article, I am assuming that the reader has a WordPress site somewhere on a third party platform. This article uses Bluehost as a specific example, and shows you how to migrate your entire existing WordPress blog from Bluehost to an Alibaba Cloud Elastic Compute Service (ECS) server.
Although conceptually simple, sometimes the process of transferring an existing website from one host to another turns out to be a nightmare for webmasters. Questions like how to set up a database, which FTP client to use and others always come into mind.
Today I'll share the step by step process that actually helped me migrate my WordPress blog from Bluehost to my new Alibaba Cloud server.
You don't necessarily have to copy each and every step included in this article (some steps may differ depending on your situation). Even if you are using a different platform right now, no problem, you may also adjust accordingly depending on your situation. This article will work more as a general reference to those who want to move their existing sites from other hosting platforms to Alibaba cloud server.
The following requirements may be necessary if you want to successfully migrate your existing WordPress blog.
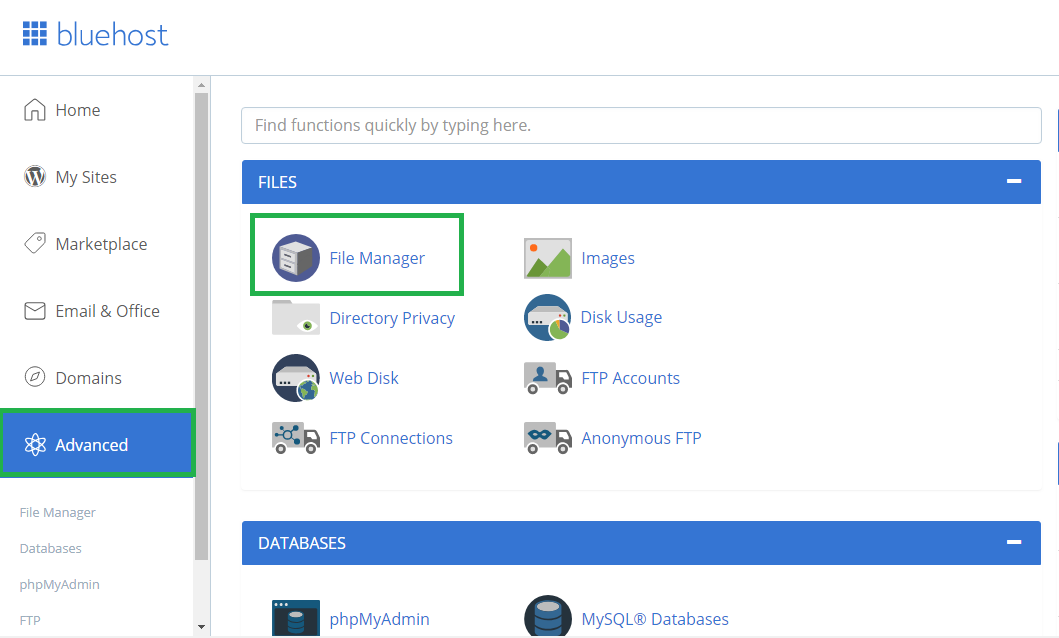
To do this, Login to your Bluehost User Dashboard > Tap Advanced section > select File Manager in the Control Panel.

In the File manager, usually, your website files are contained in the public_html folder or under the folder name for your website for subdomain URLs.
In this folder, select all your files, right click and zip them. Once zipping is complete, download the zipped file to your computer.
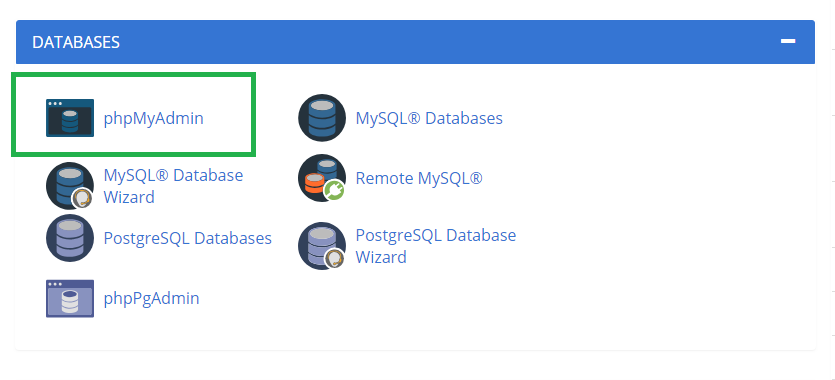
Go back to Advanced control panel in your Bluehost dashboard and select PhpMyAdmin.

You'll be redirected to your phpMyAdmin tab were we shall download our WordPress MySQL database files.
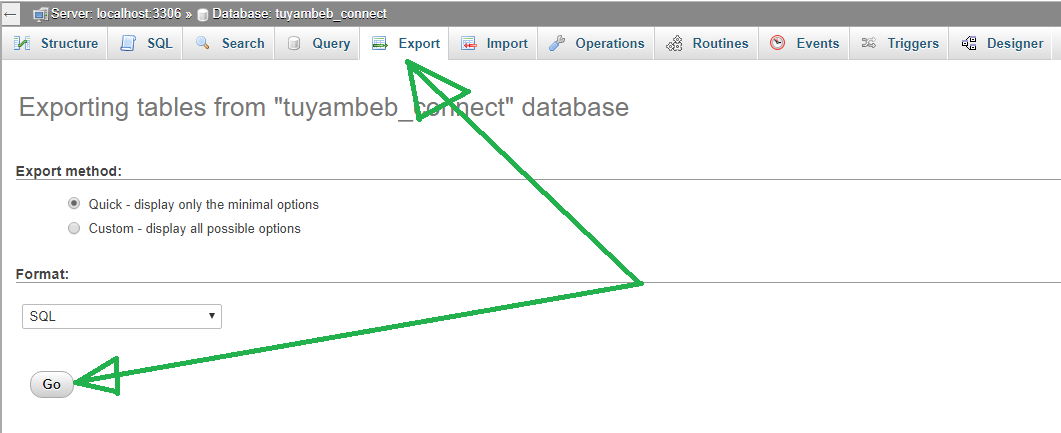
In the left section of your phpMyAdmin, tap on your WordPress MySQL database name, and then navigate to the top section of the dashboard and select Export files. Continue with the default settings, tap Go to download your MySQL database straight to your computer as well.

After this, to move your files to your Alibaba cloud server follow the instructions in the next step.
There are two ways you can do this, I would recommend deploying a control panel on your server for most non-technical users. Or else, if you like doing things from scratch, then try out the second option.
Follow this article, How to deploy cPanel on your server instance on Alibaba Cloud, to understand how to install cPanel on your server instance.
After installing cPanel and confirming that everything is working out fine for you, then continue with the following steps.
Access your cPanel from https://ip_address.com/cpanel , you'll be required to login with the credentials you set up in the previous section.
Once the login is successfully completed, go to File manager and open your Public_html folder.
Tap upload icon in the top bar of the control panel and select your WordPress zipped file from the previous section.
Once the upload is complete, Go back to the folder public_html, Tap the zipped file, right click and extract all your file content in this folder.
Similarly, you can use the FTP file client of your choice as described in this article to help you push your files on the hosting much more quickly.
In the next section, we shall set up our WordPress database in the PHPMyAdmin tool.
Go to your control panel, and select MySQL Database wizard to create a database for your WordPress website.
Enter the name of your WordPress database.
Next, we need to create a user for the created database, assign the database a username easier to remember plus a password as required and click create a database user.
Next, we shall go to phpMyAdmin to upload our database files, Go back to cPanel and select phpMyAdmin. You'll be redirected to another tab.
From the drop-down in the left section of your phpMyAdmin, select the database we just created.
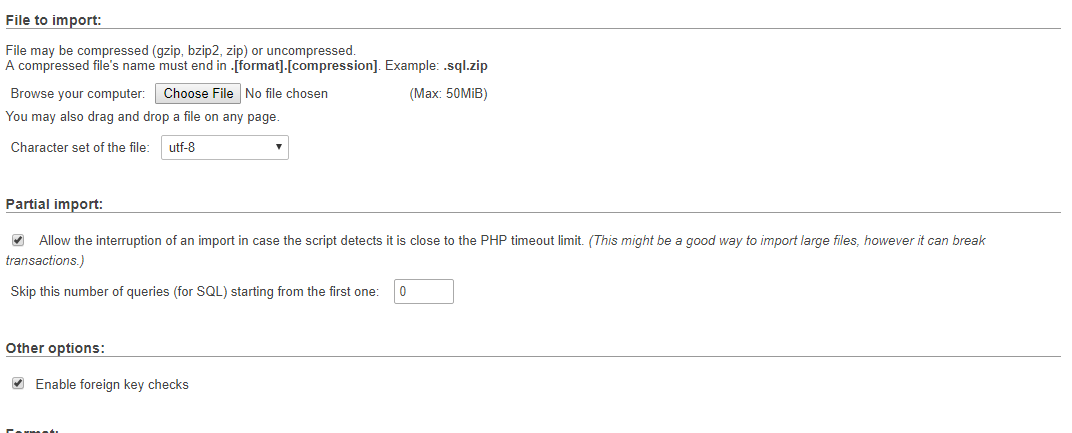
Navigate to the top bar menu and select Import. You'll be provided with a section to browse and upload your MySQL database files we saved on the computer in the previous section.

After the uploading is finished, click the Go button and wait. Once everything is successfully uploaded in your MySQL database, it's time to make the necessary configurations in the WordPress config file to allow the database and WordPress files work together.
Go back to File manager > Public_html and look for the file called wp-config.php. Tap and right click to select Edit option.
Enter your current database name, database user and password. Please critically review this step to make sure you fill in the right information as required.
The following lines will require updating to allow your WordPress files to connect with the MySQL database;
define('DB_NAME', 'username_wp123');
define('DB_USER', 'username_wpuser');
define('DB_PASSWORD', 'example_password');
define('DB_HOST', 'localhost');
$table_prefix  = 'wp_';
When all this is complete, you can now visit your https://ip-address.com and confirm whether your WordPress website is up and running as before.
In the second option, we shall set up and configure our Alibaba cloud instance from scratch in order to migrate our existing WordPress site onto this new server.
Deploy and configure an instance for our WordPress website, we shall set up our server with an Ubuntu 18.04 machine. Read this article to clearly understand how to deploy and setup your Alibaba cloud server instance.
Next, we shall need to upload our files onto the public_html folder of our server. Don't worry about this easy. Use any FTP client of your choice, personally, I prefer FileZilla. Read this article to clearly understand how you can move your files from computer to an Alibaba cloud server instance using FileZilla.
Once done with uploading all of your WordPress files, we shall also need to configure and set up our MySQL database.
To do this in our server terminal, follow the instructions below.
The mysqldump console utility is helpful when it comes to transferring MySQL database files.You will need the database name itself as well as the username and password to an account with privileges allowing at least full read-only access to the database.
I recommend that you use similar names as your previous databases, this will avoid the hustle of trying to configure the same details in the WordPress wp-config.php file. However, if you do not recall the details, you can always go back to the wp-config.php file and confirm.
The commands below we'll help you set up your MySQL database;
mysqldump -u username -p database_name > wordpress-database.sql
username is the username you can log in to the database withdatabase_name is the name of the database that will be exportedwordpress-database.sql is the file in the current directory that the output will be saved toThe above command will not necessarily produce any visual output, but you can inspect the contents of database.sql to check if it's a legitimate SQL dump file by running the following command:
wordpress-database.sql
The above command should output something like this below to show that it's MySQL dump for a database named database_name
SQL dump fragment
-- MySQL dump 10.13  Distrib 5.7.16, for Linux (x86_64)
--
-- Host: localhost    Database: database_name
-- ------------------------------------------------------
-- Server version       5.7.16-0ubuntu0.18.04.
In case of any errors during the export process, MySQL dump will clearly print them on the screen.
Once the database is clearly set up, you can now access your website from the IP address associated to your host server. You can also read the article on how to point URL name servers on your Alibaba cloud server.
In case of errors like lack of authorization to view the website content and others, you may need to properly configure your wp-config.php database information and make sure they match with those of your MysQL database.
Now you can update the DNS settings with your Domain Registrar. For the A record, update the IP address to the new value (IP address of your Alibaba cloud server instance) or you could also move your DNS to your cloud host provider (and add A records there). For Alibaba cloud, you need to put these name servers:
ns7.alidns.com
ns8.alidns.comNote: Your DNS server will start propagating the new values but it will take some time, so do not terminate your old Bluehost account immediately after the transition (preferably after a day).

2,593 posts | 775 followers
FollowAlibaba Cloud Indonesia - November 6, 2023
Alibaba Cloud Serverless - June 28, 2022
Alibaba Clouder - August 22, 2018
Alibaba Clouder - August 26, 2020
Alibaba Clouder - April 26, 2019
Alibaba Cloud Community - October 25, 2021

2,593 posts | 775 followers
Follow Marketplace
Marketplace is an online market for users to search and quickly use the software as image for Alibaba Cloud products.
Learn MoreLearn More
More Posts by Alibaba Clouder
Start building with 50+ products and up to 12 months usage for Elastic Compute Service
Get Started for Free Get Started for Free