By Sai Sarath Chandra, Alibaba Cloud Tech Share Author. Tech Share is Alibaba Cloud's incentive program to encourage the sharing of technical knowledge and best practices within the cloud community.
In this article, we will be setting up a MEAN stack on Alibaba Cloud using Simple Application Server (SAS)
Log in to the Alibaba Cloud console and find Simple Application Server under Products. If you are using Simple Application Server service for the first time then you won't see anything available on the page, then you will have some text asking to "buy now". Once you click Buy now, you need to setup some configurations. Let me walk you through each of them.
Before we go further, you need an Alibaba Cloud account for carrying out the steps in this article. If you don’t have one, you can get a free one by clicking on this link.
This is the region of where you want to deploy your instance of "Simple Application Server" image. Currently the server instances can only be deployed in US West 1(Silicon Valley), Asia Pacific SE 2(Sydney), EU Central 1(Frankfurt). More regions will be added in the future.

Alibaba Cloud provides two types of images:

The image below shows some plans for the Alibaba Cloud "Simple Application Server". For demo purposes, l I will select the $4.5/month plan where we get 1 Core, 0.5GB Memory (RAM), 1TB transfer, 20GB SSD. Comparatively, Simple Application Server is much cheaper than Elastic Compute Service, but if you want more control than what we discuss here, you need to opt for ECS. Read this article to learn more about the differences between ECS and SAS.

In SAS, you will not be able to subscribe with a Pay-As-You-Go model. The minimum subscription for SAS is 1 month. You can also reset the complete instance to original state.

Once you click on Buy Now, you will be asked to confirm the order.
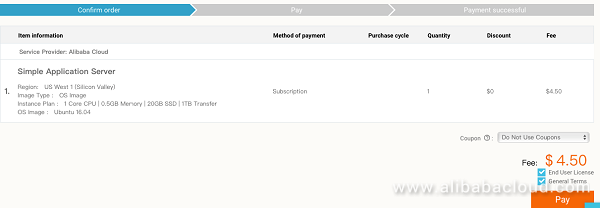
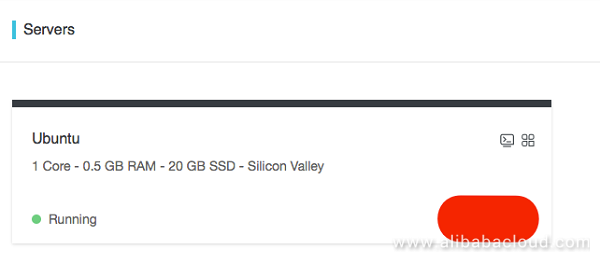
Once you confirmed the order, you need to pay through your preferred payment method. If you head over to the same Simple Application Server console, you will see an instance created.
Log in to your SAS instance using SSH. On Mac, you can use the terminal directly, but if you are using windows, you can do this with Putty. The commands remain the same.
Input
ssh root@Output
Saraths-MacBook-Pro:~ sarathchandrap$ ssh root@<YOUR-HOST-NAME>
root@ YOUR-HOST-NAME>'s password:
Welcome to Ubuntu 14.04.5 LTS (GNU/Linux 4.4.0-108-generic x86_64)

 * Documentation:  https://help.ubuntu.com/
New release '16.04.4 LTS' available.
Run 'do-release-upgrade' to upgrade to it.

Welcome to Alibaba Cloud Elastic Compute Service !

root@iZrj9gu3lzfytle0g2yhtiZ:~#
Congratulations! Your Ubuntu image is ready for use. If you wondering where you can find the password for your instance, go to the Simple Application Server Console. Click on the instance and set a password.
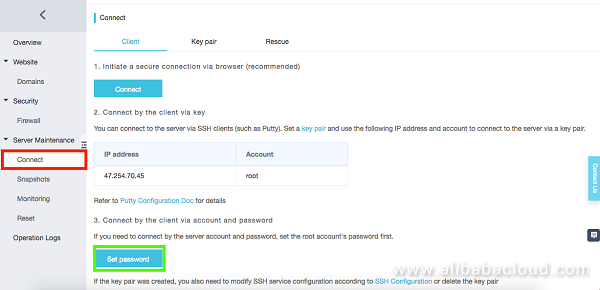
Let's make the Simple Application Server (SAS) Linux instance useful by installing a MEAN stack.
LAMP stack is a proven methodology of hosting websites with Linux, Apache, MySQL, and PHP. The greatest advantage is the abundance of support available on various blogs and forums & security. It is the easiest way you can go online without spending too much time setting up. All are configurable and lot of tutorials are available. But the downside of it is that you need work on a Linux OS. If you are person like me that prefers JavaScript over Linux and don't want to learn PHP for this purpose, well, MEAN stack is for you.
MEAN stack uses a single programming language for its backend, server side, and client side. MEAN uses MongoDB, Express.js, Angular.js, Node.js. Unlike MySQL, MongoDB is a document-based NoSQL database which is fast and great for web developers and mobile application developers to scale up easily and accommodate unexpected changes. If you have opted for MEAN, you are not limited to Linux machines as MEAN works on all operating systems. You have more control of the complete product and it is completely developed in a single language (JavaScript).
There are few installations you need to do for setting up MEAN stack on Linux.
We install Git version control to maintain the code. Below are the commands we use to install the git packages for Ubuntu. Run update first and then install.
Input
sudo apt-get update
sudo apt-get install git
Output
Need to get 2973 kB of archives.
After this operation, 21.9 MB of additional disk space will be used.
Do you want to continue? [Y/n] Y
cURL stands for "Client Uniform Resource Locator". This is used to make API calls to the other third-party servers. To install cURL, run "update" first and then install.
sudo apt-get update
sudo apt-get install curl
Node.js is an open-source cross platform environment for server-side applications. This uses the Event loop, so all the applications on this need to be designed in an event-driven fashion. Node.js is powered by same Google's V8 JavaScript engine which is known for its speed and reliability. Google Chrome itself is powered by this engine. All the applications on NodeJS are Non-Blocking IO operations. Another advantage is that there are numerous packages/libraries which can greatly improve the productivity by reducing lot of boilerplate code. Node.js is easy to learn too.
Input
curl -sL https://deb.nodesource.com/setup_8.x | sudo -E bash -
sudo apt-get install -y nodejs
You can verify the installation after this commands by running
node -vv 8.11.1MongoDB falls into the category of NoSQL databases. Relational databases like MySQL requires a "Schema" upfront for creation of database. Companies/Products who are in prototyping phase cannot afford the change of schema every time there is a requirement change. This issue is solved by NoSQL databases as they adapt to the changing requirements and doesn't require a schema upfront. Since this is also a document-based database you can easily access the data and make bulk operations. MongoDB is light weight and can run on any operating system.
To install MongoDB, we need to first import the GPG key from the MongoDB servers.
sudo apt-key adv --keyserver hkp://keyserver.ubuntu.com:80 --recv 2930ADAE8CAF5059EE73BB4B58712A2291FA4AD5Then, update MongoDB repo for download. At the time of this writing the version of Ubuntu that comes with the Simple Application Server is 14.04 (trusty). Execute the following command to update the MongoDB repository for download.
echo "deb [ arch=amd64 ] https://repo.mongodb.org/apt/ubuntu trusty/mongodb-org/3.6 multiverse" | sudo tee /etc/apt/sources.list.d/mongodb-org-3.6.listIf you have upgraded to 16.04 you can execute the following command.
echo "deb [ arch=amd64,arm64 ] https://repo.mongodb.org/apt/ubuntu xenial/mongodb-org/3.6 multiverse" | sudo tee /etc/apt/sources.list.d/mongodb-org-3.6.listReload the database package
sudo apt-get updateThen install the MongoDB Packages. Here, we want the latest version of MongoDB. The below command will install the latest version.
sudo apt-get install -y mongodb-orgThe specific release can be installed by executing the below command.
sudo apt-get install -y mongodb-org=3.6.4 mongodb-org-server=3.6.4 mongodb-org-shell=3.6.4 mongodb-org-mongos=3.6.4 mongodb-org-tools=3.6.4You can verify the installation by starting the service. This should be done automatically but you can try starting the service if it is not done automatically.
sudo service mongod startMake sure it has started successfully by looking specifically for this in the output.
[initandlisten] waiting for connections on port 27017If you encounter dbpath error while starting up, as shown below,
ERROR: dbpath does not existThen, you need to issue the following command.
sudo mongod --dbpath=/var/lib/mongodbThis essentially sets where all the documents of your database will store to. You can try starting the service, but it should start automatically.
You can stop the service using the below command.
sudo service mongod stopYou can restart the service using the command.
sudo service mongod restartNow we will clone the mean.js boilerplate code to get started, before we do that we need to install bower globally by issuing the following command
npm install -g bowerCreate a folder as you wish and clone the code using below command
git clone https://github.com/meanjs/mean.git meanjsThen run "npm install" to download all the dependencies for the project from npm repository
Start the mean.js application by running
npm startyou will see a lot of text, but at the end you will be seeing something like this
--
MEAN.JS - Development Environment

Environment:     development
Server:          http://0.0.0.0:3000
Database:        mongodb://localhost/mean-dev
App version:     0.6.0
MEAN.JS version: 0.6.0
--
Congratulations! Your application is live and running at :3000. But as per default installation of Simple Application Server, your server is enabled with only some basic ports. We will head over to the console and start adding the port 3000 to the whitelist.
Go to Simple Application Server Console > Click on the server created > navigate to Firewall > Click on Add rules > Add the rule as shown below > Click OK.
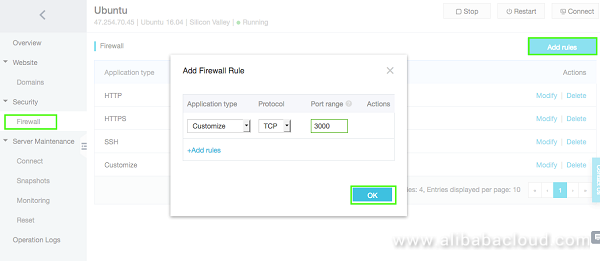
Then if you head over to the browser and hit http://:3000. You should see something like this.
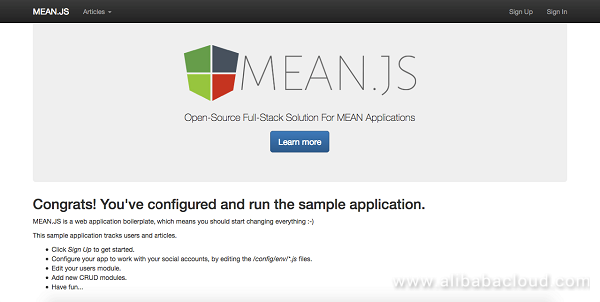
This means that the MEAN stack is correctly set up. You can use Alibaba Cloud Domain, Alibaba Cloud DNS Service to associate your Simple Application Server (SAS) with a domain and many other features.

2,593 posts | 793 followers
FollowAlibaba Clouder - November 14, 2017
Alibaba Clouder - August 17, 2020
Alibaba Clouder - March 19, 2019
Alibaba Clouder - December 5, 2017
Alibaba Clouder - February 9, 2021
Neel_Shah - May 20, 2025

2,593 posts | 793 followers
Follow ECS(Elastic Compute Service)
Elastic and secure virtual cloud servers to cater all your cloud hosting needs.
Learn More Web Hosting Solution
Explore Web Hosting solutions that can power your personal website or empower your online business.
Learn More Elastic Desktop Service
A convenient and secure cloud-based Desktop-as-a-Service (DaaS) solution
Learn More Web App Service
Web App Service allows you to deploy, scale, adjust, and monitor applications in an easy, efficient, secure, and flexible manner.
Learn MoreMore Posts by Alibaba Clouder