By Bruce Wu
In the previous article in this series, we described several application upgrade methods for different deployment methods. We also showed you how to configure upgrade strategies for native-supported deployment methods of Kubernetes (K8s): downtime release and rolling release. This article will show you how to implement the blue-green release, canary release, and A/B testing of applications in K8s through secondary development or by using third-party tools.
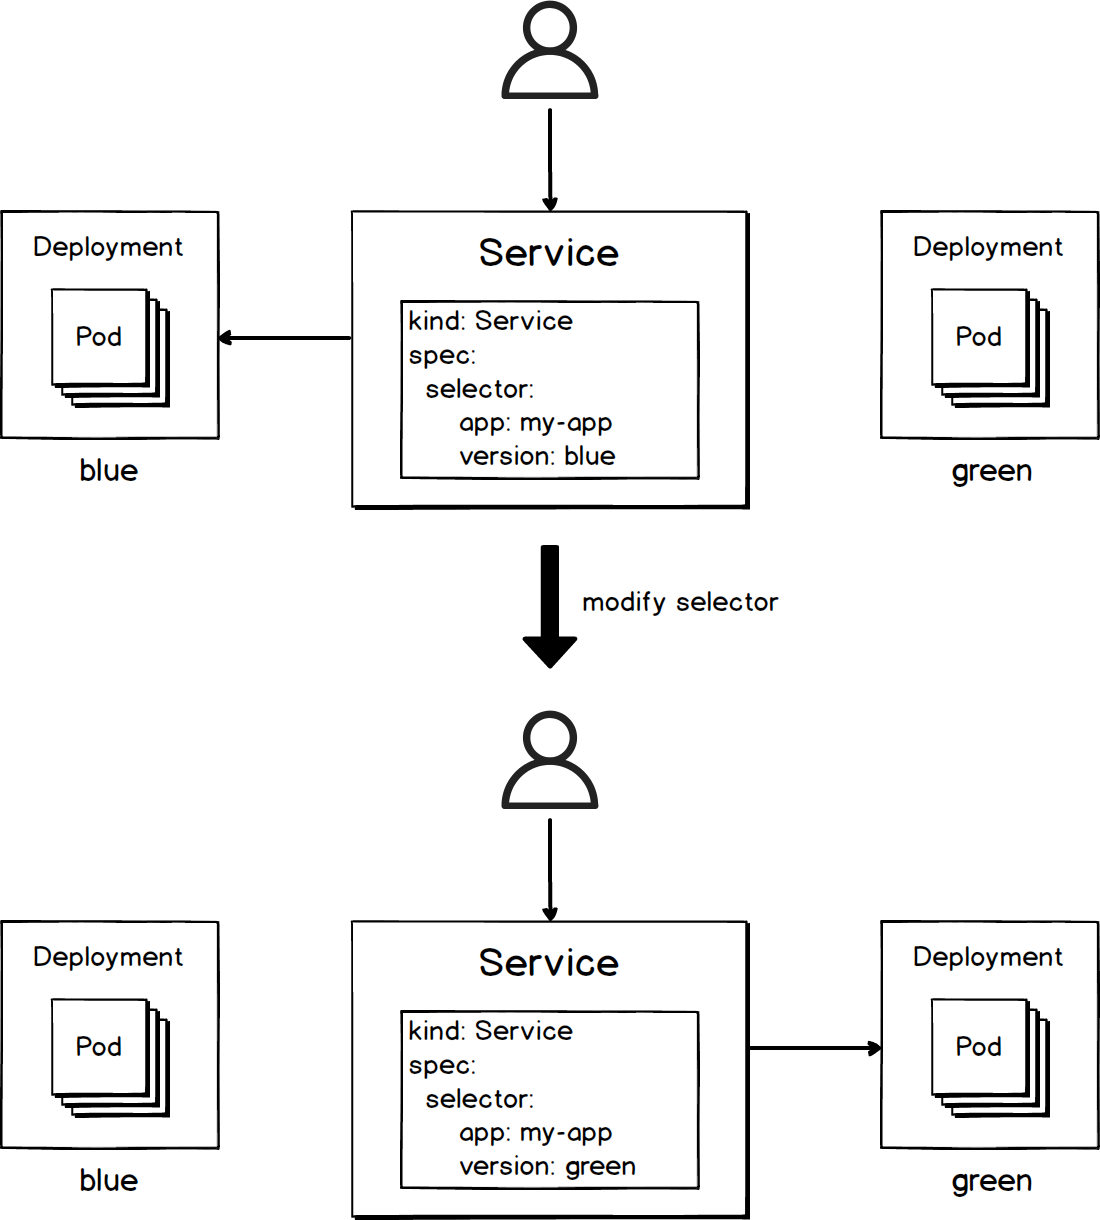
You can choose blue-green release if the old and new application versions cannot coexist, you hope to implement zero-downtime upgrade, and you have sufficient system resources. You can easily implement blue-green release by using the label-selector mechanism of K8s. As shown in the following figure, all you have to do is to add labels to applications of different versions, and then implement traffic switch by modifying the selector of a service.

The configuration for the blue-green release is provided as follows. For complete configuration, see blue-green.
[...]
kind: Service
spec:
# The selector of the Service will choose the pod that has the matching app label and version label
  selector:
    app: spring-boot-probes
    # Implement traffic switch by changing the version value. For example, change v2.0.0 to
    version: v1.0.0
[...]
kind: Deployment
metadata:
  name: spring-boot-probes-v1
spec:
  selector:
    matchLabels:
      app: spring-boot-probes
      version: v1.0.0
  template:
    metadata:
      labels:
          app: spring-boot-probes
        # The version label of the Pod
        version: v1.0.0
[...]
kind: Deployment
metadata:
  name: spring-boot-probes-v2
spec:
  selector:
    matchLabels:
      app: spring-boot-probes
      version: v2.0.0
  template:
    metadata:
      labels:
        app: spring-boot-probes
        # The version label of the Pod
        version: v2.0.0
[...]You can perform the following steps to implement blue-green release after completing the preceding configuration:
1. Run command kubectl apply -f ./spring-boot-probes-v2.yaml to deploy the v2 application. K8s does not send traffic to v2 pods even when they all become ready, because the selector of the service only matches with v1 pods.
2. When everything is ready, you can run command kubectl patch service spring-boot-probes-svc -p '{"spec":{"selector":{"version":"v2.0.0"}}}' to modify the selector of the service to direct the traffic to v2 pods. Then all traffic of the service is sent to v2 pods.
3. If you encounter any problems after running the v2 application for a while, you can run command kubectl patch service spring-boot-probes-svc -p '{"spec":{"selector":{"version":"v1.0.0"}}}' to roll back and switch the traffic to v1 pods.
4. If the v2 application meets your expectations, you can run command kubectl delete deploy spring-boot-probes-v1 to delete the Deployment of v1 to save resources.
Canary release significantly reduces risks of upgrades and updates by transiting traffic from old pods to new pods gradually. Therefore, it is extensively used. In comparison with other release methods, the most obvious advantage of canary release is its flexible traffic control. In K8s, we recommend that you use Istio to implement canary release. By virtue of the powerful traffic management feature of Istio, you can flexibly control traffic sent to different versions, regardless of the number of pods deployed for each version. In a K8s environment without Istio, traffic sent to old and new versions is in direct proportion to the number of their pod instances.
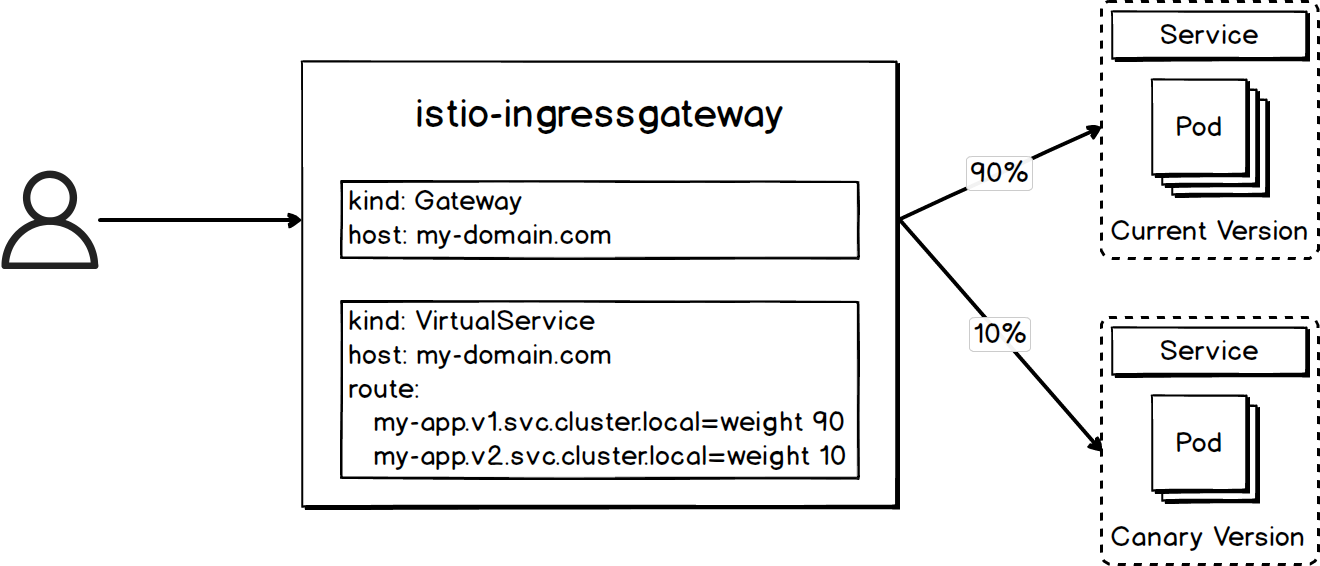
The following figure shows the key components for Istio-based canary release. You can send 10% of the service traffic to the canary version by adjusting the value of the weight field of VirtualService.

You can use the following configuration to send 90% of the service traffic to service spring-boot-probes-svc-v1, and 10% to service spring-boot-probes-svc-v2. Service spring-boot-probes-svc-v1 is bound to pods of the current version, and service spring-boot-probes-svc-v2 is bound to pods of the canary version. For complete configuration, see canary.
[...]
kind: VirtualService
metadata:
  name: spring-boot-probes
spec:
  hosts:
    - spring-boot-probes.local
  gateways:
    - spring-boot-probes
  http:
    - route:
        - destination:
            host: spring-boot-probes-svc-v1
          weight: 90
        - destination:
            host: spring-boot-probes-svc-v2
          weight: 10
[...]
kind: Service
metadata:
  name: spring-boot-probes-svc-v1
spec:
  selector:
    app: spring-boot-probes
    version: v1.0.0
[...]
kind: Service
metadata:
  name: spring-boot-probes-svc-v2
spec:
  selector:
    app: spring-boot-probes
    version: v2.0.0
[...]You can perform the following steps to implement canary release after completing the preceding configuration:
1. Run command kubectl apply -f ./spring-boot-probes-v2.yaml to deploy the v2 service and a small number of pod instances. The traffic is not sent to v2 because the route destination of VirtualService contains only v1.
2. When v2 pods are ready, run command kubectl apply -f ./virtualservice-weight.yaml to modify the routing rule of VirtualService to send some traffic to v2 pods.
3. If the running status of the v2 application meets your expectations, you can increase the weight to increase the proportion of traffic to be sent to v2. In addition, the number of v1 and v2 pods can be further adjusted based on the actual situation. You can even configure Horizontal Pod Autoscaler for them.
4. If you encounter any problem while running the v2 application, you can switch the traffic back to v1 by modifying the routing rule of VirtualService.
5. When all traffic goes to v2, run command kubectl delete -f ./spring-boot-probes-v1 to delete the v1 application resources.
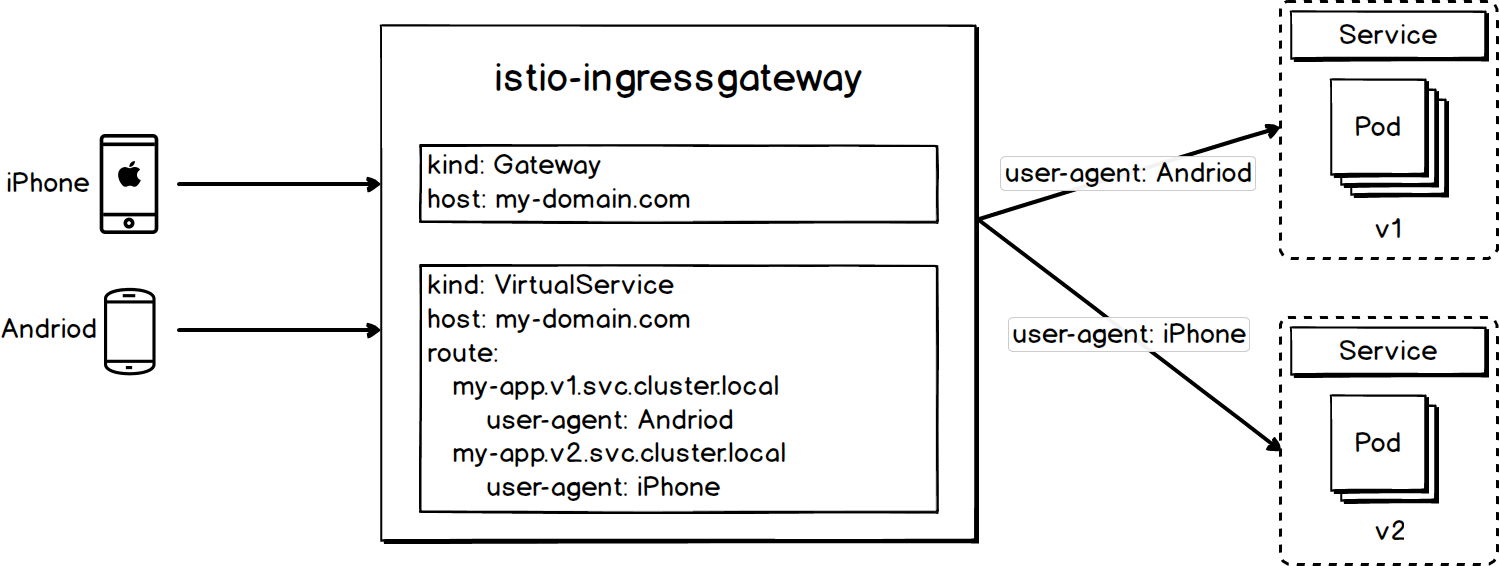
Assume that you have changed the user interface (UI) of your website, but you are unsure about whether your users like the new version. You can use A/B testing to collect user feedback, and determine the best solution based on the user feedback. The key to implement A/B testing is to send the traffic to different versions based on different conditions. You need to select different conditions based on the actual situation. Commonly used conditions include the user location information, user-agent, custom header, request parameters, and language. By virtue of the powerful traffic management feature, Istio is the best solution to implement A/B testing in k8s. The following figure shows how access traffic is distributed based on the user-agent information.

You can use the following configuration to send access traffic from Android to spring-boot-probes-svc-v1, and access traffic from iPhone to spring-boot-probes-svc-v2. spring-boot-probes-svc-v1 and spring-boot-probes-svc-v2 are bound to pods of different versions.
For the complete configuration, see ab-testing.
[...]
kind: VirtualService
metadata:
  name: spring-boot-probes
spec:
  hosts:
    - spring-boot-probes.local
  gateways:
    - spring-boot-probes
  http:
    - route:
        - destination:
            host: spring-boot-probes-svc-v1
      match:
        - headers:
            user-agent:
              exact: Andriod
    - route:
        - destination:
            host: spring-boot-probes-svc-v2
      match:
        - headers:
            user-agent:
              exact: iPhone
[...]
kind: Service
metadata:
  name: spring-boot-probes-svc-v1
spec:
  selector:
    app: spring-boot-probes
    version: v1.0.0
[...]
kind: Service
metadata:
  name: spring-boot-probes-svc-v2
spec:
  selector:
    app: spring-boot-probes
    version: v2.0.0
[...]You can perform the following steps to implement A/B testing after completing the preceding configuration:
1. Run command kubectl apply -f ./spring-boot-probes-v2.yaml to deploy the v2 service and the corresponding pod instances.
2. When v2 pods are ready, run command kubectl apply -f ./virtualservice-match.yaml to modify the routing rule of VirtualService to send traffic from Android to v1 and traffic from iPhone to v2.
3. Run these two versions simultaneously for a specified period of time and continuously collect user feedback.
4. If you find that using user-agent as a condition cannot achieve good testing results, you can perform A/B testing based on other conditions by changing the VirtualService routing rules.
5. If you find one version more popular through comprehensive analysis, change VirtualService routing rules to send all traffic to the more popular one, and then delete the resources of the other. [Do not translate]
This article describes best practices for blue-green release, canary release, and A/B testing in K8s. As you can see, the powerful traffic management feature of Istio can simplify the complex release process of applications and significantly reduce the implementation costs.

57 posts | 12 followers
FollowAlibaba Developer - October 13, 2020
Alibaba Developer - September 23, 2020
Alibaba Cloud Storage - June 4, 2019
Alibaba Cloud Native Community - May 27, 2025
Alibaba Developer - April 15, 2021
Xi Ning Wang - March 1, 2019

57 posts | 12 followers
Follow Container Service for Kubernetes
Alibaba Cloud Container Service for Kubernetes is a fully managed cloud container management service that supports native Kubernetes and integrates with other Alibaba Cloud products.
Learn More ACK One
Provides a control plane to allow users to manage Kubernetes clusters that run based on different infrastructure resources
Learn More Cloud-Native Applications Management Solution
Accelerate and secure the development, deployment, and management of containerized applications cost-effectively.
Learn More Simple Log Service
An all-in-one service for log-type data
Learn MoreMore Posts by Alibaba Cloud Storage