By Bruce Wu
The serverless architecture allows developers to focus more on business expansion and innovation, without worrying about traditional server purchase, hardware maintenance, network topology, and resource resizing.
With the popularization of the serverless concept, major cloud computing vendors have launched their own serverless products, including AWS Lambda, Azure Function, Google Cloud Functions, and Alibaba Cloud Function Compute.
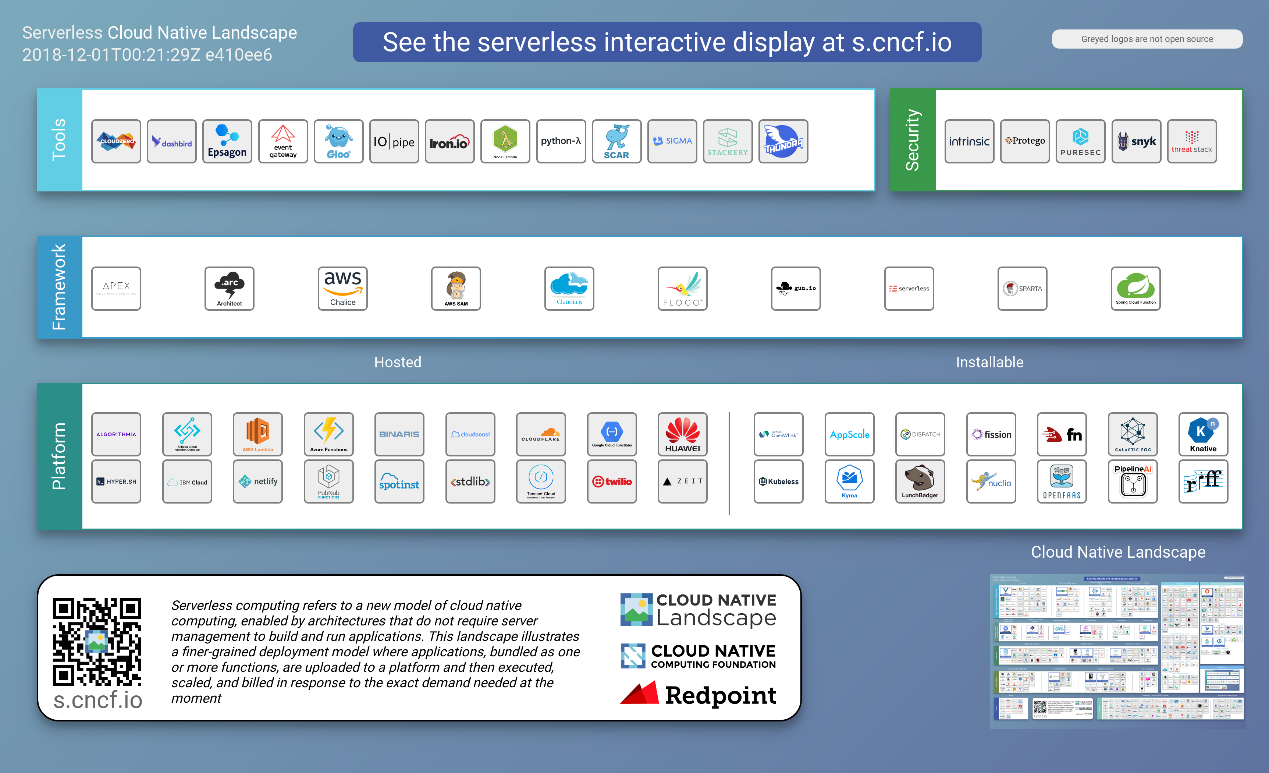
In addition, the Cloud Native Computing Foundation (CNCF) created the Serverless Working Group in 2016, which marked the combination of cloud native technologies and serverless technologies. The CNCF serverless landscape is presented as follows. It divides these serverless products into four categories: tools, security products, framework products, and platform products.
The development of containers and container orchestration tools significantly reduces the development costs of serverless products, and has facilitated the birth of many excellent opensource serverless products. Most of these opensource serverless products are Kubernetes -based. Some representatives of them are presented in the following figure.
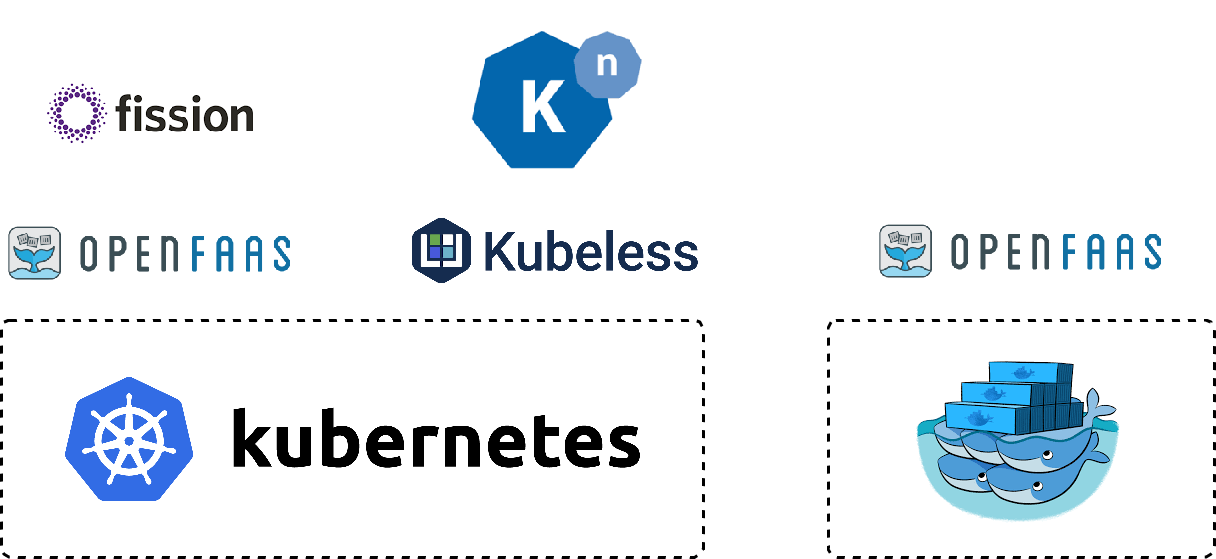
Kubeless is a typical representative of these opensource serverless products. According to the official definition, Kubeless is a Kubernetes-native serverless framework that allows you to build advanced applications with FaaS on top of Kubernetes (K8s). According to the categorization of CNCF, Kubeless is a platform product.
Kubeless has three core concepts:
1. Functions - the user code that needs to be executed. Functions also include other information such as runtime dependencies and building directives.
2. Triggers - event sources that are associated with the functions. If you compare event sources to producers, and functions to executors, triggers are a bridge that connects them together.
3. Runtime - the environment that is required to run the function.
This section takes Kubeless as an example to show you the basic capabilities that a serverless product must have, and how to implement them by using existing K8s features. These features include:
1. Agile building: the ability to quickly build executable functions based on source code submitted by users, and to simplify the deployment process.
2. Agile triggering: the ability to conveniently trigger the execution of functions upon occurrence of various events, and to quickly integrate new event sources.
3. Auto-scaling: The ability to automatically scale up and down without human intervention based on business needs.
The study of this article is made based on Kubeless v1.0.0 and Kubernetes v1.13.
According to CNCF, the lifecycle of a function is presented in the following figure. Users only need to submit the source code and function specifications. The function building and development are generally completed by the platform. Therefore, the ability to quickly build executable functions based on source code submitted by users is an essential capability of a serverless product.

In Kubeless, building functions is simple:
kubeless function deploy hello --runtime python2.7 \
                                --from-file test.py \
                                --handler test.hello
Parameters of this command are defined as follows:
1. hello: the name of the function to be deployed.
2. --runtime python2.7: specifies Python 2.7 as the runtime environment. For more information about optional runtime environments for Kubeless, see runtimes.
3. --from-file test.py: specifies the source code file of the function (supports zip format).
4. --handler test.hello: specifies that requests must be handled by the hello method of test.py.
A Kubeless function is a custom K8s object, precisely a K8s operator. The mechanism of K8s operators is provided as follows:

Taking Kubeless as an example, the general workflow process of a K8s operator is as follows:
1. Use CustomResourceDefinition(CRD) of K8s to define resources. In this case, a CRD named functions.kubeless.io is created to represent the Kubeless function.
2. Create a controller to monitor the ADD, UPDATE, and DELETE events of custom resources, and bind it with a handler. In this case, a CRD controller named function-controller is created. This controller monitors the ADD, UPDATE, and DELETE events of Kubeless functions, and is bound with a handler (see AddEventHandler);
3. A user runs a command to add, update, and delete custom resources.
4. The controller calls the corresponding handler based on the detected event.
In addition to Kubeless functions, Kubeless triggers to be described next are also K8s operators.
After a Kubeless function-controller detects an ADD event of a function, it triggers the corresponding handler to build the function. A function consists of multiple K8s objects, such as ConfigMap, Service, Deployment, and Pod, as shown in the following figure:
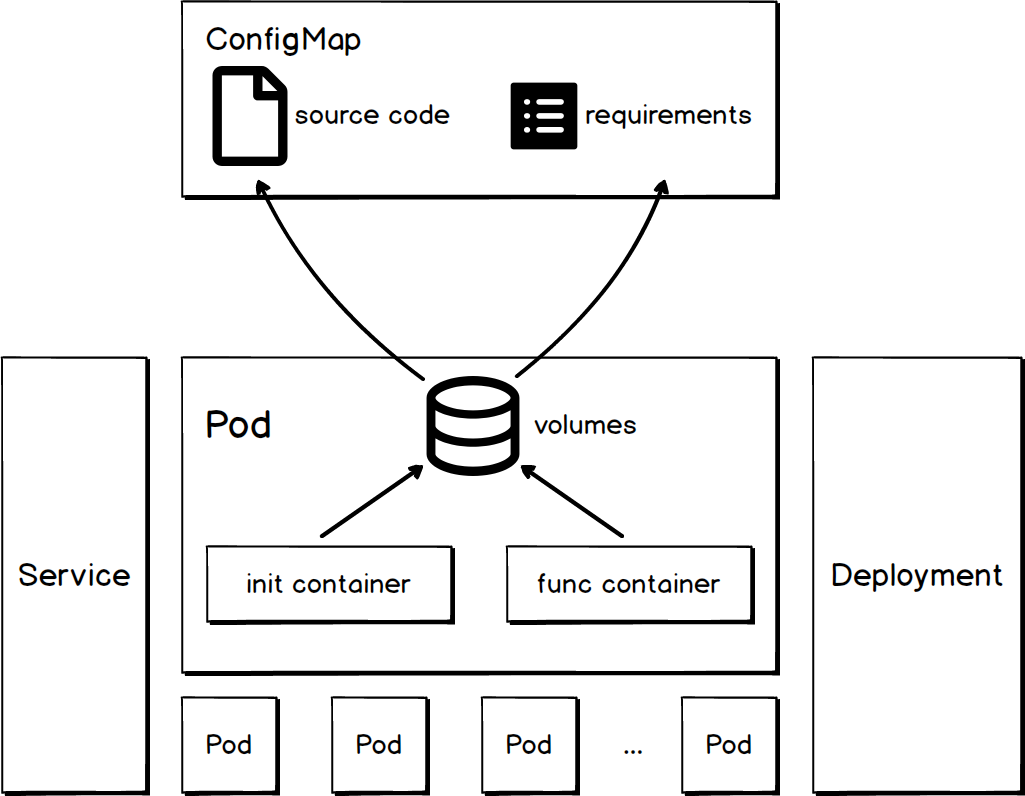
The ConfigMap object of a function is used to describe the source code and dependencies of the function.
apiVersion: v1
data:
  handler: test.hello
   # Third-party Python library that the function depends on
  requirements.txt: |
    kubernetes==2.0.0
  # Function source code
  test.py: |
    def hello(event, context):
      print event
      return event['data']
kind: ConfigMap
metadata:
  labels:
    created-by: kubeless
    function: hello
  # The ConfigMap name
  name: hello
  namespace: default
...The service object of a function is used to describe the access method of the function. The service is associated with pods that execute the function logic. The service type is ClusterIP.
apiVersion: v1
kind: Service
metadata:
  labels:
    created-by: kubeless
    function: hello
  # The service name
  name: hello
  namespace: default
  ...
spec:
  clusterIP: 10.109.2.217
  ports:
  - name: http-function-port
    port: 8080
    protocol: TCP
    targetPort: 8080
  selector:
    created-by: kubeless
    function: hello
  # The service type
  type: ClusterIP
...The Deployment object of a function is used to deploy pods that execute the function logic. You can use this object to specify the number of replicas of the function.
apiVersion: extensions/v1beta1
kind: Deployment
metadata:
  labels:
    created-by: kubeless
    function: hello
  name: hello
  namespace: default
  ...
spec:
  # Specify the number of replicas of the function
  replicas: 1
...The pod object of a function contains one or more containers that execute the function logic.
Volumes
Volumes of a pod specifies the ConfigMap of the function. By doing so, you can add the source code and dependencies of ConfigMap to directories designated by volumeMounts.mountPath. From the perspective of containers, the paths of the directories are /src/test.py and /src/requirements.
...
  volumeMounts:
  - mountPath: /kubeless
    name: hello
  - mountPath: /src
    name: hello-deps
volumes:
- emptyDir: {}
  name: hello
- configMap:
    defaultMode: 420
    name: hello
...
Init Container
Main roles of the Int Container inside a pod is as follows:
1. To copy and paste the source code and dependencies to the designated directories.
2. To install third-party dependencies.
Func Container
The Func Container inside a pod loads the source code and dependencies prepared by the Int Container, and executes the function. The loading method varies with different runtime environments. For more information, see kubeless.py and Handler.java.
1. Kubeless comprehensively uses various components of Kubernetes and the dynamic loading capabilities of different languages to build functions from the source code and to implement these functions.
2. For the sake of function running security, the Security Context mechanism is used to prevent processes of the containers from being run by non-root roles.
A mature serverless product must possess flexible triggering capabilities to cope with diversified characteristics of event sources, and be able to conveniently integrate new event sources. CNCF divides function triggering methods into the following categories. For more information, see Function Invocation Types.
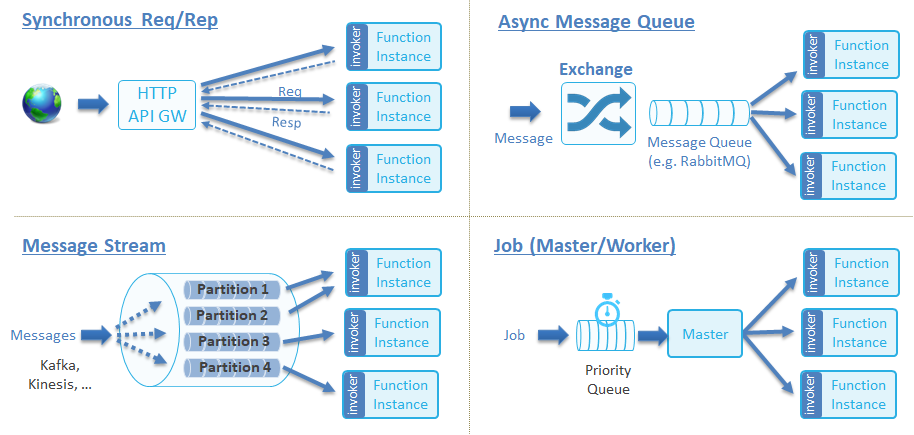
For Kubeless functions, the simplest triggering method is to use Kubeless CLI. Other triggers are also supported. The following table shows the currently supported triggering methods and their categories.
| Triggering method | Category |
| kubeless CLI | Synchronous Req/Rep |
| Http trigger | Synchronous Req/Rep |
| Cronjob trigger | Job (master/worker) |
| Kafka trigger | Async message queue |
| Nats trigger | Async message queue |
| Kinesis trigger | Message stream |
The following figure shows some triggering methods and mechanism of Kubeless functions.
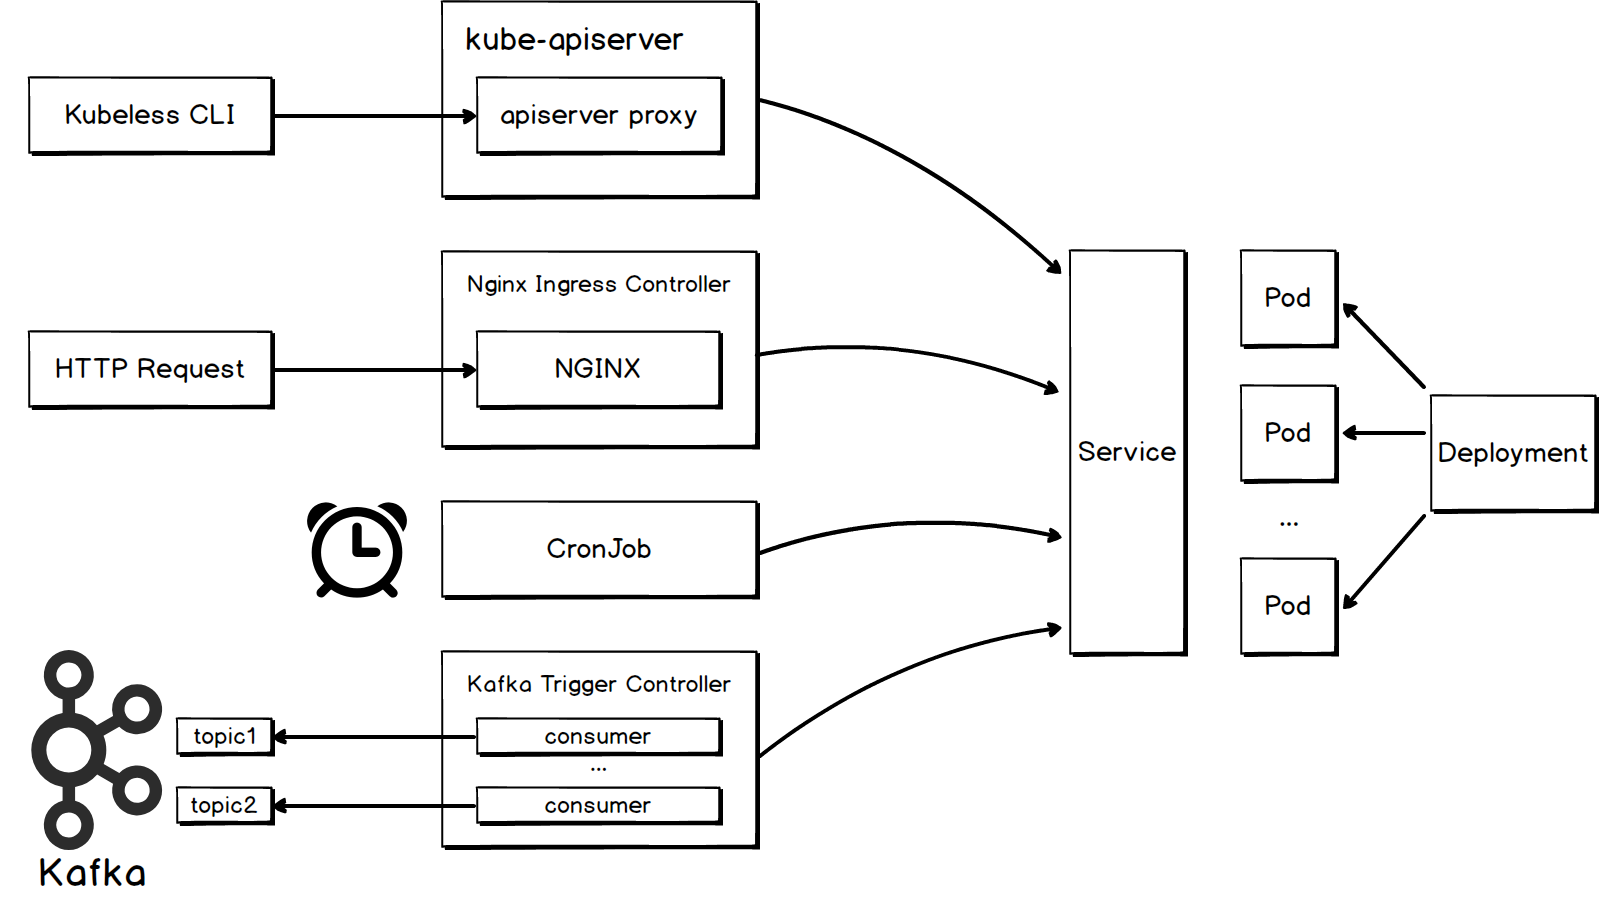
If you want to trigger the execution of a function by sending HTTP requests, you need to create an HTTP trigger for the function. Kubeless uses the K8s ingress mechanism to implement an HTTP trigger. Kubeless creates a CRD named httptriggers.kubeless.io to represent the HTTP trigger object. In addition, Kubeless contains a CRD controller named http-trigger-controller. It continuously monitors ADD, UPDATE, and DELETE events of HTTP triggers and Kubeless functions, and execute the corresponding operations upon detection of such events.
You can use the following command to create an HTTP trigger named http-hello for the hello function, and to specify NGINX as the gateway.
kubeless trigger http create http-hello --function-name hello --gateway nginx --path echo --hostname example.comAfter you run this command, the following ingress object will be created. For more information about the logic of creating an ingress object, see CreateIngress.
apiVersion: extensions/v1beta1
kind: Ingress
metadata:
  # The name of the ingress object, which was specified when you create the HTTP trigger.
  name: http-hello
  ...
spec:
  rules:
  - host: example.com
    http:
      paths:
      - backend:
          # Direct the request to the service that has been created by Kubeless for the hello function. The type of this service is ClusterIP.
          serviceName: hello
          servicePort: 8080
        path: /echo
Ingress is used to describe routing rules. To make sure these rule take effect and forward requests, the cluster must also have a running ingress controller. A variety of ingress controllers are available, such as Contour, F5 BIG-IP Controller for Kubernetes, Kong Ingress Controller for Kubernetes, NGINX Ingress Controller for Kubernetes, and Traefik. The idea of separating routing rule description and routing function implementation perfectly represents the design concept of demand-supply separation that has been adhered to by K8s.
The preceding command specifies NGINX as the gateway when it creates the trigger, therefore a controller named nginx-ingress-controller must be deployed. The basic working mechanism of the controller is presented as follows:
1. It starts a pod to run in an independent namespace.
2. It opens a hostPort for external access.
3. It runs an NGINX instance internally.
4. It monitors events related to the resources, such as ingress and service. If these events eventually affect the routing rules, the ingress controller will update the routing rules. This can be done by either sending a new endpoints list to the Lua hander, or by directly modifying nginx.conf and reloading NGINX.
For more information about the working mechanism of nginx-ingress-controller, see how-it-works.
After completing the preceding procedures, we can send an HTTP request to trigger the execution of the hello function.
1. The HTTP request is first processed by NGINX of the nginx-ingress-controller.
2. NGINX transfers the request to the corresponding service of the function based on the routing rule of nginx.conf.
3. At last, the request is transferred to a function mounted to the service for processing.
The sample code is as follows:
curl --data '{"Another": "Echo"}' \
  --header "Host: example.com" \
  --header "Content-Type:application/json" \
  example.com/echo

# Function return
{"Another": "Echo"}If you wish to trigger the function execution regularly, you need to create a cronjob trigger for the function. K8s supports using CronJob to regularly run jobs. Kubeless uses this feature to implement the Cronjob trigger. Kubeless creates a CRD named cronjobtriggers.kubeless.io to represent the Cronjob trigger object. In addition, Kubeless has a CRD controller named cronjob-trigger-controller. It continuously monitors ADD, UPDATE, and DELETE events of Cronjob triggers and Kubeless functions, and execute the corresponding operations upon detection of such events.
You can use the following command to create a Cronjob trigger named scheduled-invoke-hello for the hello function. This trigger triggers the hello function every minute.
kubeless trigger cronjob create scheduled-invoke-hello --function=hello --schedule="*/1 * * * *"This command will create the following CronJob object. For more information about how to create a CronJob object, see EnsureCronJob.
apiVersion: batch/v1beta1
kind: CronJob
metadata:
  # The CronJob name, which was specified when you create the CronJob trigger.
  name: scheduled-invoke-hello
  ...
spec:
  # The CronJob execution schedule, which was specified when you create the CronJob trigger.
  schedule: */1 * * * *
  ...
  jobTemplate:
    spec:
      activeDeadlineSeconds: 180
      template:
        spec:
          containers:
          - args:
            - curl
            - -Lv
            # HTTP headers, including some other information, such as event-id, event-time, event-type, and event-namespace.
            - ' -H "event-id: xxx" -H "event-time: yyy" -H "event-type: application/json" -H "event-namespace: cronjobtrigger.kubeless.io"'
            # Kubeless will create a service of the ClusterIP type for the function
            # The endpoint can be spelled based on the name and namespace of the service
            - http://hello.default.svc.cluster.local:8080
            image: kubeless/unzip
            name: trigger
          restartPolicy: Never
...If default triggers provided by Kubeless cannot meet your business needs, you can customize new triggers. You can perform the following procedures to build a new trigger:
1. Create a CRD for new event sources to describe event source triggers;
2. Describe the properties of the event source in the specification that defines the custom resource objects, such as KafkaTriggerSpec and HTTPTriggerSpec.
3. Create a CRD controller for this CRD.
i. This controller needs to constantly monitor CRUD operations on the source event trigger and the function, and properly deal with these operations. For example, if the controller detects an event that deletes the function, the controller needs to delete the trigger that is bound with the function.
ii. When an event occurs, trigger the execution of the associated function.
As you can see, the custom triggering flow follows the design model of the K8s operator.
1. Kubeless provides some basic and commonly used triggers, and supports integration of custom triggers for other event sources.
2. The integration methods vary with different event sources, but they share the common mechanism that executes the function by accessing the service of the ClusterIP type.
K8s implements automatic horizontal scaling of pods by using Horizontal Pod Autoscaler (HPA). Kubeless functions are deployed through K8s deployment, so they can use HPA to implement auto-scaling.
The first step of auto-scaling is to allow HPA to obtain a sufficient amount of measurement data. Currently, Kubeless functions support auto-scaling based on two measurement metrics: CPU usage and queries per second (QPS). The following figure shows how HPA obtains these two kinds of measurement data.
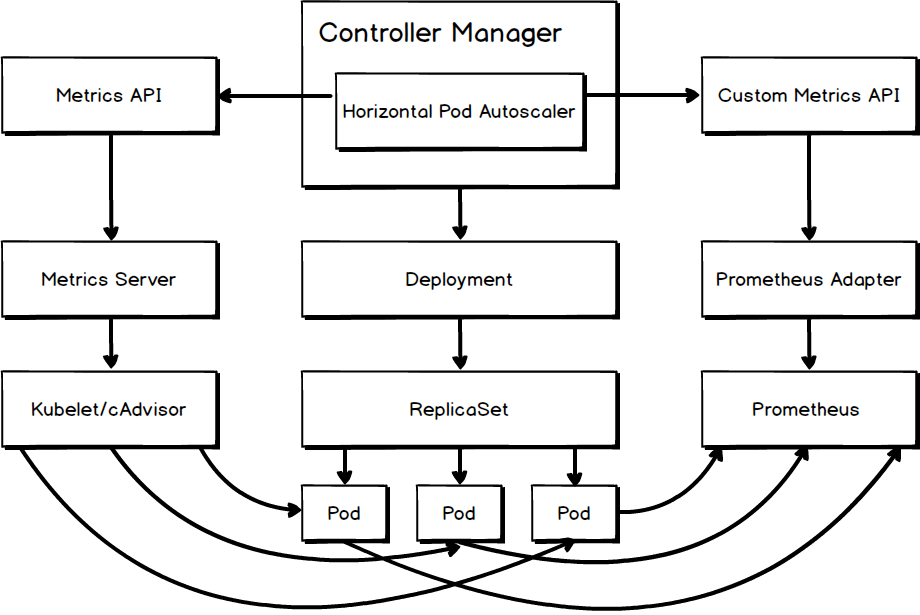
Built-in Measurement Metric CPU
CPU usage is a built-in measurement metric. HPA can use the metrics API to retrieve data of this metric from Metrics Server. Metrics Server is the inheritor of Heapster, and it can retrieve measurement data from Kubelet and cAdvisor by using kubernetes.summary_api.
Custom Measurement Metric QPS
QPS is a custom measurement metric. You can perform the following procedure to retrieve the measurement data of custom measurement metrics:
1. Deploy a system to store the measurement data. In this case, the Prometheus (a CNCF project) database is used. Prometheus is an open-source system monitoring and alerting time series data solution, and is widely used by cloud native leaders such as DigitalOcean, Red Hat, SUSE, and Weaveworks.
2. Collect the measurement data, and write the data to an established Prometheus database. The function framework provided by Kubeless will write the following measurement data to the Prometheus database every time when the function is called: function_duration_seconds, function_calls_total, and function_failures_total. For more information, see Python example.
3. Deploy a custom API server that implements custom metrics API. In this case, the measurement data is stored in a Prometheus database. Therefore, k8s-prometheus-adapter is deployed to retrieve measurement data from the Prometheus database.
After you complete the preceding procedure, HPA can retrieve the QPS measurement data from Prometheus Adapter by using custom metrics API. For more information about the detailed configuration steps, see kubeless-autoscaling.
Introduction to K8s Measurement Metrics
Sometimes, CPU usage and QPS are in sufficient for auto-scaling of functions. If you want to use other measurement metrics, you need to learn about the measurement metric types defined by K8s and how they can be retrieved.
Currently, measurement metrics supported by K8s v1.13 are as follows:
| Type | Description | Retrieving method |
| Object | Measurement metrics that represent K8s objects, for example, the function_calls metric. |
custom.metrics.k8s.io After collecting measurement data, you need to retrieve the data by using existing adapters or custom adapters. Existing adapters include k8s-prometheus-adapter, azure-k8s-metrics-adapter, and k8s-stackdriver. |
| Pod | Custom measurement metrics in each pod of the auto-scaling target. These measurement metrics include the number of transactions per second (TPS) of each pod. Before you compare the data value with the target value, you need to divide the data value by the number of pods. | Same as above |
| Resource | The K8s built-in resource metrics (such as CPU and memory) in each pod of the auto-scaling target. Before you compare the data value with the target value, you need to divide the data value by the number of pods. |
metrics.k8s.io You need to retrieve the measurement data from Metrics Server or Heapster. |
| External | External is a global measurement metric. It is irrelevant to any K8s objects. It allows the target to automatically scale up and down based on information outside the cluster. For example, the QPS of an external load balancer or the length of a cloud message queue. |
external.metrics.k8s.io After collecting the measurement data, you need to retrieve the data by using the adapter provided by the cloud platform vendor or your custom adapter. Available adapters from cloud platform vendors include azure-k8s-metrics-adapter and k8s-stackdriver. |
Prepare the corresponding measurement data and data retrieval components, then HPA can perform auto-scaling based on such data. For more information about K8s measurement metrics, see hpa-external-metrics.
After understanding how HPA retrieves the measurement data, you may wonder how HPA performs auto-scaling of functions based on such data.
Auto-Scaling Based on CPU Usage
Assume that you have a function named hello. You can use the following command to create a CPU usage-based HPA for this function. This HPA can control the number of pods that run this function between one and three, and maintain the average CPU usage of these pods at 70%.
kubeless autoscale create hello --metric=cpu --min=1 --max=3 --value=70The version of the HPA API used by Kubeless is autoscaling/v2alpha1. You can use this command to create the following HPA:
kind: HorizontalPodAutoscaler
apiVersion: autoscaling/v2alpha1
metadata:
  name: hello
  namespace: default
  labels:
    created-by: kubeless
    function: hello
spec:
  scaleTargetRef:
    kind: Deployment
    name: hello
  minReplicas: 1
  maxReplicas: 3
  metrics:
  - type: Resource
    resource:
      name: cpu
      targetAverageUtilization: 70
You can use the following formula to calculate the number of target pods for this HPA:
TargetNumOfPods = ceil(sum(CurrentPodsCPUUtilization) / Target)Auto-Scaling Based on QPS
You can use the following command to create a QPS-based HPA for this function. This HPA can control the number of pods that run this function between one and five. It ensures the total number of requests processed by pods that are mounted with the hello function at 2000 by increasing and decreasing the number of pods.
kubeless autoscale create hello --metric=qps --min=1 --max=5 --value=2kYou can use this command to create the following HPA:
kind: HorizontalPodAutoscaler
apiVersion: autoscaling/v2alpha1
metadata:
  name: hello
  namespace: default
  labels:
    created-by: kubeless
    function: hello
spec:
  scaleTargetRef:
    kind: Deployment
    name: hello
  minReplicas: 1
  maxReplicas: 5
  metrics:
  - type: Object
    object:
      metricName: function_calls
      target:
        apiVersion: autoscaling/v2beta1
        kind: Service
        name: hello
      targetValue: 2k
Auto-Scaling Based on Multiple Metrics
If you plan to perform auto-scaling on the function based on multiple measurement metrics, you need to create an HPA for the deployment object that runs the function.
You can use the following yaml file to create an HPA named hello-cpu-and-memory for the hello function. This HPA can control the number of pods that run this function between one and ten. It also strives to maintain the average CPU usage of these pods at 50%, and the average memory usage at 200 MB. In the case of multiple measurement metrics, K8s calculates the number of pods that are required for each metric, and take the maximum value as the final number of pods for the target metrics.
kind: HorizontalPodAutoscaler
apiVersion: autoscaling/v2alpha1
metadata:
  name: hello-cpu-and-memory
  namespace: default
  labels:
    created-by: kubeless
    function: hello
spec:
  scaleTargetRef:
    kind: Deployment
    name: hello
  minReplicas: 1
  maxReplicas: 10
  metrics:
  - type: Resource
    resource:
      name: cpu
      targetAverageUtilization: 50
  - type: Resource
    resource:
      name: memory
targetAverageValue: 200MiAn ideal auto-scaling policy should be able to properly address the following scenarios:
1. When the load bursts, it should enable the function to quickly scale up to cope with the sudden increase in traffic.
2. When the load drops, it should enable the function to quickly scale down to save resource consumption.
3. It should posses the anti-noise capability to accurately calculate the target capacity.
4. It should be able to avoid too frequent auto-scaling, which may cause system jigger.
The HPA used by Kubeless takes into full account these scenarios, and constantly improves its auto-scaling policy. The policy will now be described by taking Kubernetes v1.13 as an example. If you want to know more about the principle of the policy, see horizontal.
The HPA synchronizes the number of pods in the RC/Deployment object that is associated with the HPA at a fixed interval based on the retrieved measurement data. The interval is specified by the parameter --horizontal-pod-autoscaler-sync-period of kube-controller-manager. The default interval is 15s. During each synchronization, the HPA needs to undergo the following calculation process:

Calculate the Number of Target Replicas
Calculate the number of pods that are required for each metric listed on the HPA list: replicaCountProposal. Take the maximum value of replicaCountProposal as metricDesiredReplicas. The following factors are taken into account when replicaCountProposal of each metric is calculated:
1. Certain difference between the target measurement value and the actually measured value is allowed. If the difference falls within the acceptable range, currentReplicas is directly used as the replicaCountProposal. This avoids system jitter that is caused by too frequent auto-scaling within an acceptable range. The acceptable difference between the target measurement value and the actually measured value is specified by the parameter --horizontal-pod-autoscaler-tolerance of kube-controller-manager. The default value is 0.1.
2. The measurement value reflected by a pod at startup is usually inaccurate. HPA takes such pods as unready. During the calculation of the measurement value, HPA skips unready pods. This clears the interference of noises. You can specify the values of parameters --horizontal-pod-autoscaler-cpu-initialization-period and --horizontal-pod-autoscaler-initial-readiness-delay of kube-controller-manager to adjust the time when a pod is considered unready. The default values of these two parameters are respectively five minutes and 30 seconds.
Smooth the Number of Target Replicas
Record the values of the recent metricDesiredReplicas, and take the maximum value as stabilizedRecommendation. This allows the process of scaling down to be smooth, and eliminates the negative impact of abnormal data fluctuation. You can specify this period by using the parameter --horizontal-pod-autoscaler-downscale-stabilization-window. The default value is five minutes.
Normalize the Number of Target Replicas
1. Set the maximum number of desiredReplicas to currentReplicas × scaleUpLimitFactor. This avoids unnecessarily sharp scaling up. Currently, the scaleUpLimitFactor cannot be specified by any parameter. Its value is fixed to two.
2. Set the desiredReplicas to be greater than and equal to hpaMinReplicas and smaller than and equal to hpaMaxReplicas.
Perform the Scaling Operation
If the desiredReplicas calculated through the preceding steps does not equal currentReplicas, "perform" the scaling operation. To "perform" means to assign the value of desiredReplicas to replicas of RC / Deployment. The creation and deletion of pods is asynchronously implemented by kubelets on the kube-scheduler and worker node.
1. The auto-scaling feature provided by Kubeless is a simple encapsulation of K8s HPA, and avoids directly exposing complex details of creating the HPA.
2. Currently, Kubeless does not support reducing the number of function instances to 0. That is because the auto-scaling feature of Kubeless directly depends on HPA, and the minimum number of replicas supported by HPA is one.
3. Currently, measurement metrics provided by Kubeless is too less and the functions are too simple. If you want to integrate new measurement metrics, use multiple measurement metrics, or adjust the auto-scaling effect, you must learn more about HPA.
4. Currently, the HPA auto-scaling policy adjusts the number of target replicas passively based on what happened, and does not support performing proactive scaling based on historical rules.
Kubeless provides a relatively complete serverless solution based on K8s. However, it still has some room to improve in comparison with some commercial serverless products.
1. Kubeless needs optimization in many aspects, such as image pulling, code download, and container startup, which leads to the cold start time being too slow.
2. Kubeless does not support multitenancy. If you want to run functions of multiple users in the same cluster, you need to perform secondary development.
3. Kubeless does not support coordination among different functions, and it does not support workflow customization like AWS Step Functions does.
Fission: A Deep Dive Into Serverless Kubernetes Frameworks (2)

57 posts | 12 followers
FollowAlibaba Cloud Storage - June 4, 2019
Alibaba Cloud Serverless - February 22, 2022
Alibaba Cloud Serverless - June 23, 2021
Alibaba Clouder - June 8, 2020
Alibaba Developer - August 8, 2019
Farah Abdou - November 27, 2024

57 posts | 12 followers
Follow ACK One
Provides a control plane to allow users to manage Kubernetes clusters that run based on different infrastructure resources
Learn More Container Service for Kubernetes
Alibaba Cloud Container Service for Kubernetes is a fully managed cloud container management service that supports native Kubernetes and integrates with other Alibaba Cloud products.
Learn More Container Registry
A secure image hosting platform providing containerized image lifecycle management
Learn More Function Compute
Alibaba Cloud Function Compute is a fully-managed event-driven compute service. It allows you to focus on writing and uploading code without the need to manage infrastructure such as servers.
Learn MoreMore Posts by Alibaba Cloud Storage
Start building with 50+ products and up to 12 months usage for Elastic Compute Service
Get Started for Free Get Started for Free