By Oluwabukunmi Ige, Alibaba Cloud Community Blog author.
Alibaba Cloud's machine learning platform provides its customers with some powerful GPUs that are fully capable of performing some impressive deep learning and reinforcement learning tasks. In this tutorial, I will discuss how you can implement your own reinforcement learning tasks on Alibaba Cloud's Machine Learning Platform.
Before we get into the main part of this tutorial, let's first cover some important concepts:
Reinforcement Learning (RL) is a type of machine learning algorithm that trains algorithms based on a mechanism in which certain actions are associated with certain rewards.
RL approbates the concept of infants interacting with their environment, performing actions, drawing intuitions and learning from experience with limited human input. The model employs a trial-and-error method that is based on a reward-and-penalty system. That is, the model learns by trying all possible routes and then selecting the route that gives a reward with the least possible penalties.
RL comes into play when there is no hard-coded method for performing a task, but rather there are some set of rules that need to be followed in order for a model to achieve its desired objectives. RL as a machine learning algorithm models how humans learn and has been predicted as being pivotal in attaining Artificial General Intelligence in AI-based applications.
Keras is an open-source neural network library written in Python. Keras runs on a high-level API that handles the way models are built, layers are defined or set up in multiple inputs and output models. Keras outsources its low-level API tasks like making tensors and computational graphs, so on, to its backend engine. Keras is generally preferred in reinforcement learning scenarios because it is easy to understand, fast to deploy, has a large community that supports it, has support for multiple backends, and it is easy to implement on many different platforms, including iOS, Android, and desktop browsers.
In this tutorial, we will specifically be using Reinforcement learning concepts to build a digit image recognizer. The dataset that we will be using is MNIST dataset available in the keras.datasets module. The model will be trained on an Alibaba Cloud GPU running on a Jupyter Notebook.
The prerequisites to building this RL model on Alibaba Cloud instance are as follows:
To get ready for the rest of this tutorial,can complete the prerequisites given above, you'll want to first complete these steps:
! pip install keras or conda install -c conda-forge keras (recommended) from your command line interface terminal.After you've completed all of the steps above, the next step for you to do is to build and train the model. The code snippets below will show a step-by-step analysis of how the model is being built and trained. You'll want to run each code block by pressing shift + enter in your Jupyter Notebook.
from keras.layers import Input, Dense
from keras.models import Model
import numpy as np
import matplotlib.pyplot as pltfrom keras.datasets import mnist
(x_train, y_train), (x_test, y_test) =x_train = x_train.astype('float32') / 255
x_test = x_test.astype('float32') / 255
x_train = x_train.reshape((len(x_train), np.prod(x_train.shape[1:])))
x_test = x_test.reshape((len(x_test), np.prod(x_test.shape[1:])))The next few steps are related to figuring out your model architecture:
InputModel = Input(shape=(784,))RELU.EncodedLayer = Dense(32,
activation='relu')(InputModel)SIGMOID.DecodedLayer = Dense(784, activation='sigmoid')(EncodedLayer)AutoencoderModel = Model(InputModel, DecodedLayer)
AutoencoderModel.compile(optimizer='adadelta', loss='binary_crossentropy')
history = AutoencoderModel.fit(x_train, x_train,
batch_size=256,
epochs=100,
shuffle=True,
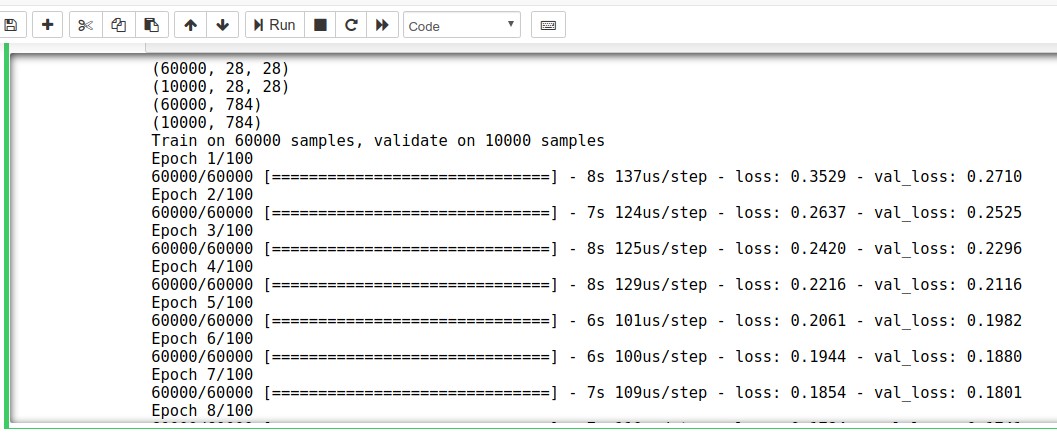
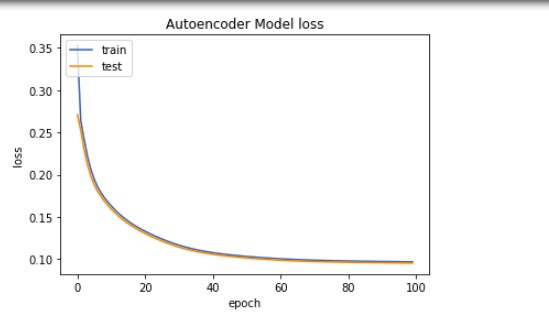
validation_data=(x_test, x_test))x_test).DecodedDigits = AutoencoderModel.predict(x_test)val_loss for each epoch. It trains until it gets the loss as close as possible to the train set.
plt.plot(history.history['loss'])
plt.plot(history.history['val_loss'])
plt.title('Autoencoder Model loss')
plt.ylabel('loss')
plt.xlabel('epoch')
plt.legend(['train', 'test'], loc='upper left')
plt.show()
n=10
plt.figure(figsize=(20, 4))
for i in range(n):
   ax = plt.subplot(2, n, i + 1)
   plt.imshow(x_test[i].reshape(28, 28))
   plt.gray()
   ax.get_xaxis().set_visible(False)
   ax.get_yaxis().set_visible(False)
   ax = plt.subplot(2, n, i + 1 + n)
   plt.imshow(DecodedDigits[i].reshape(28, 28))
   plt.gray()
   ax.get_xaxis().set_visible(False)
   ax.get_yaxis().set_visible(False)
plt.show()
From the image above, you can see that your model has been able to generate entirely new handwriting images close to the original using the Auto-encoders Reinforcement Learning technique.
In this tutorial, you've learn a bit about the concept of reinforcement learning and how you can implement it on Alibaba Cloud. Next, through this tutorial, you were able to have a reinforcement learning model built to generate a handwritten image. In many ways, this is just one simple example of how you can leverage Alibaba Cloud's powerful architecture for any of your Machine Learning tasks. In reality, the limits of this technology are only your imagination.

2,593 posts | 793 followers
FollowAlibaba Clouder - October 29, 2019
Ahmed Gad - August 26, 2019
Ahmed Gad - August 26, 2019
Ahmed Gad - August 26, 2019
Alibaba Clouder - September 30, 2019
Alibaba Clouder - September 2, 2019

2,593 posts | 793 followers
Follow ECS(Elastic Compute Service)
Elastic and secure virtual cloud servers to cater all your cloud hosting needs.
Learn More Platform For AI
A platform that provides enterprise-level data modeling services based on machine learning algorithms to quickly meet your needs for data-driven operations.
Learn MoreMore Posts by Alibaba Clouder
walid September 14, 2020 at 1:03 am
Hello,Please can you explain where are the (state, action, reward, environment, policy) in this technique, because I just understood that you used the autoencoder approach to train the model.
walid September 14, 2020 at 1:08 am
xvc