By Nestor Campos, Alibaba Cloud Community Blog author.
Alibaba Cloud ElasticSearch is a non-relational database engine that stores data which can be used as search engine for other systems. That is, Elasticsearch can serve as a search engine which can be catered to your needs, easily making it is the most popular of its kind.
Beyond the advantages of being a non-relational data engine, Elasticsearch is the best option to implement a search engine in a web application. Elasticsearch has many features that can make life easier for you and other developers, such as enabling search for documents such as MS Word documents, searches for synonyms or similar words (such as misspelled words), among other smart searches.
At its foundation, Elasticsearch is a bunch of indexes, which serve to store and organize data which can then be queried. An index in Elastisearch is like a table in an SQL engine (assuming the differences in the types of data engines).
Therefore, in this tutorial we will see how to implement the Elasticsearch service with Alibaba Cloud and connect it to a Web application developed in .NET Core in less than 1 hour.
Throughout this tutorial, we will only need the following:
Before we go directly into the tutorial, it is important to understand that the Elasticsearch engine runs on a cluster of servers (instance), which allows to ensure the appropriate storage of the data and the high availability of this data. Therefore, when we talk about instance, we refer to a set of related servers that run Elasticsearch.
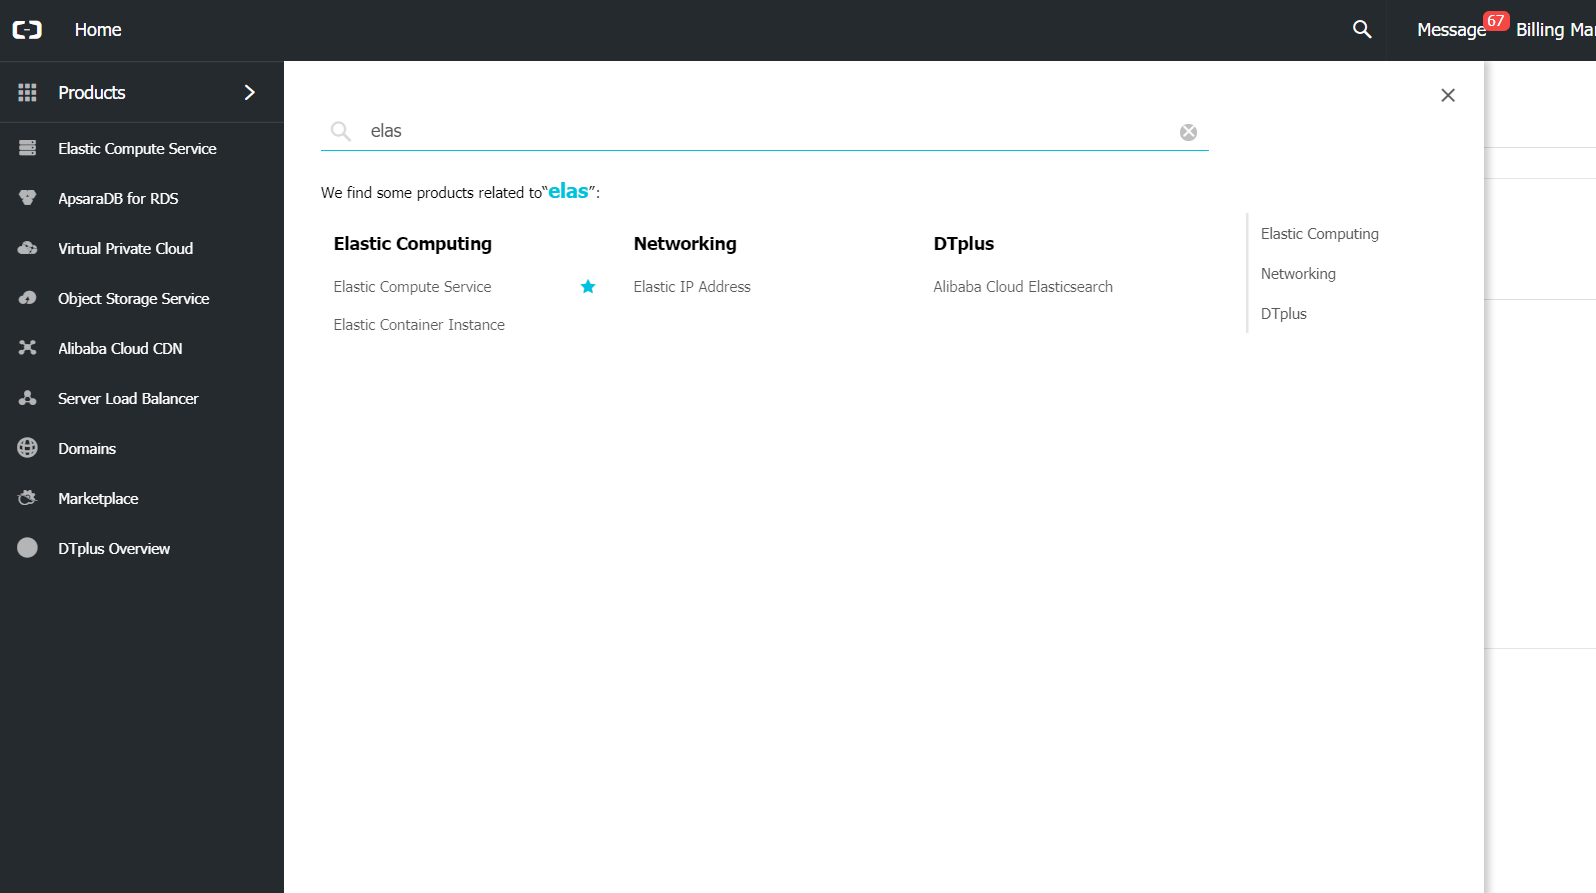
1. To start, from the Alibaba Cloud console, we can search for the Elasticsearch server:
2. We click to go to the Elasticsearch service module, which gives a list with the instances that we already have created (or nothing if we do not currently have any).
3. And we click on Create to create a new instance of Elasticsearch.

4. In the form that appears, we must select the region and area in which our instance will be available (ideally in the closest region in which we are located).
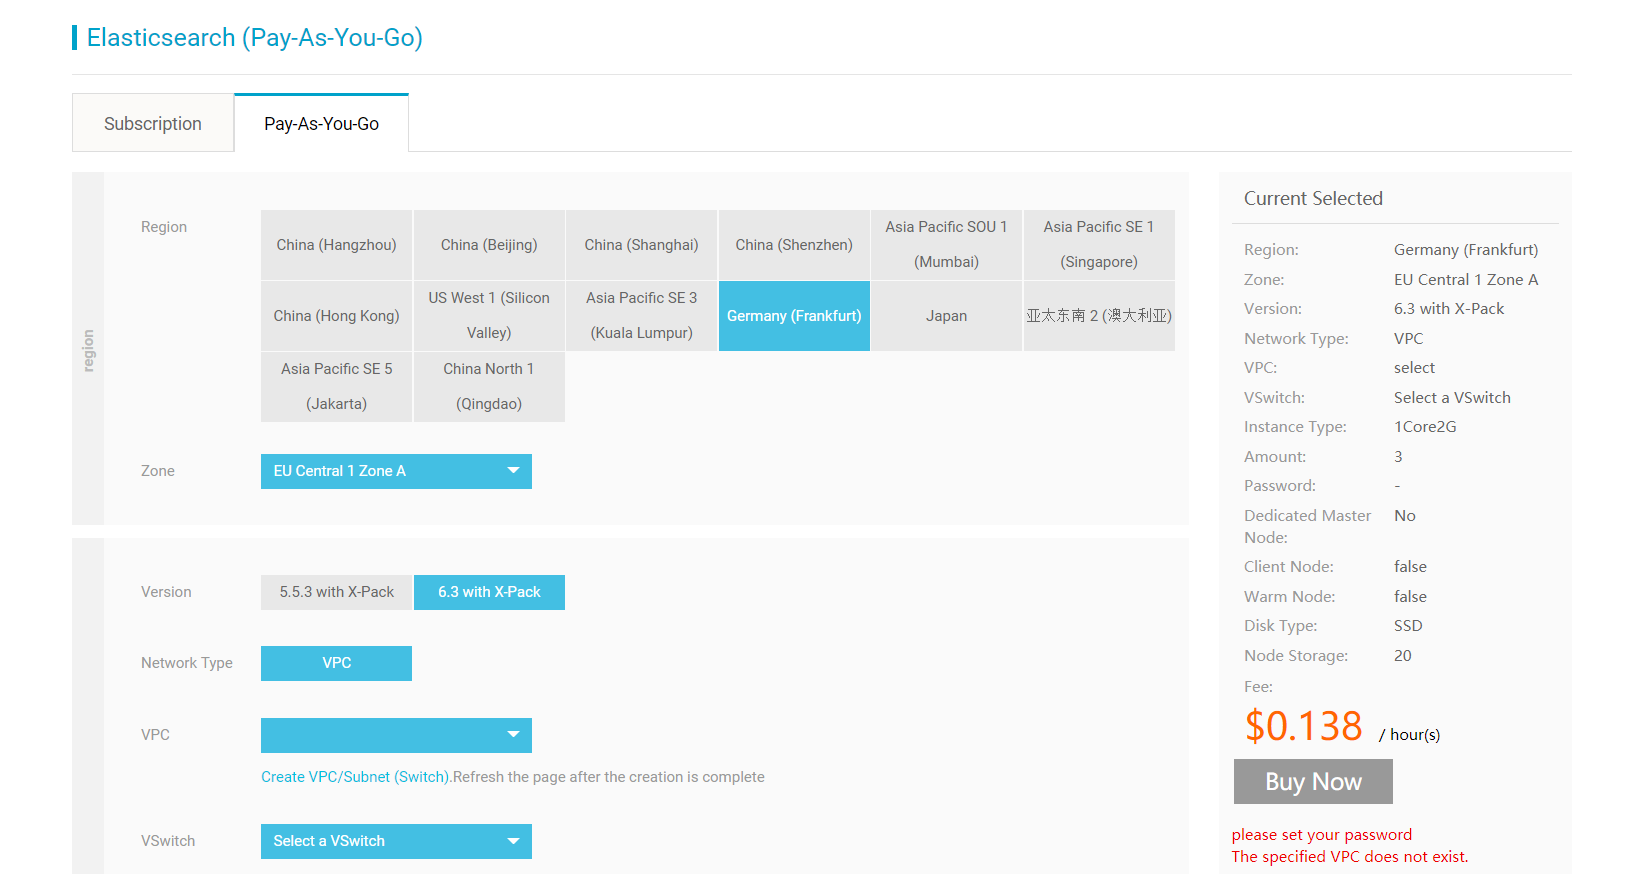
5. We will also be asked to select a version of Elasticsearch, a VPC (to group our Alibaba Cloud resources in an isolated environment if we want), the number of nodes (servers) that the instance will have (for testing purposes, we will select 2, which is the minimum).
While we are changing the parameters, we can see the cost of the service consumption
6. Finally, we add a password for our cluster (the username is already selected, but later we can change it if we want, which is recommended by security issues), in order to ensure access to our instance.
This user and password will be used later, so I recommend that you keep it until you use it.
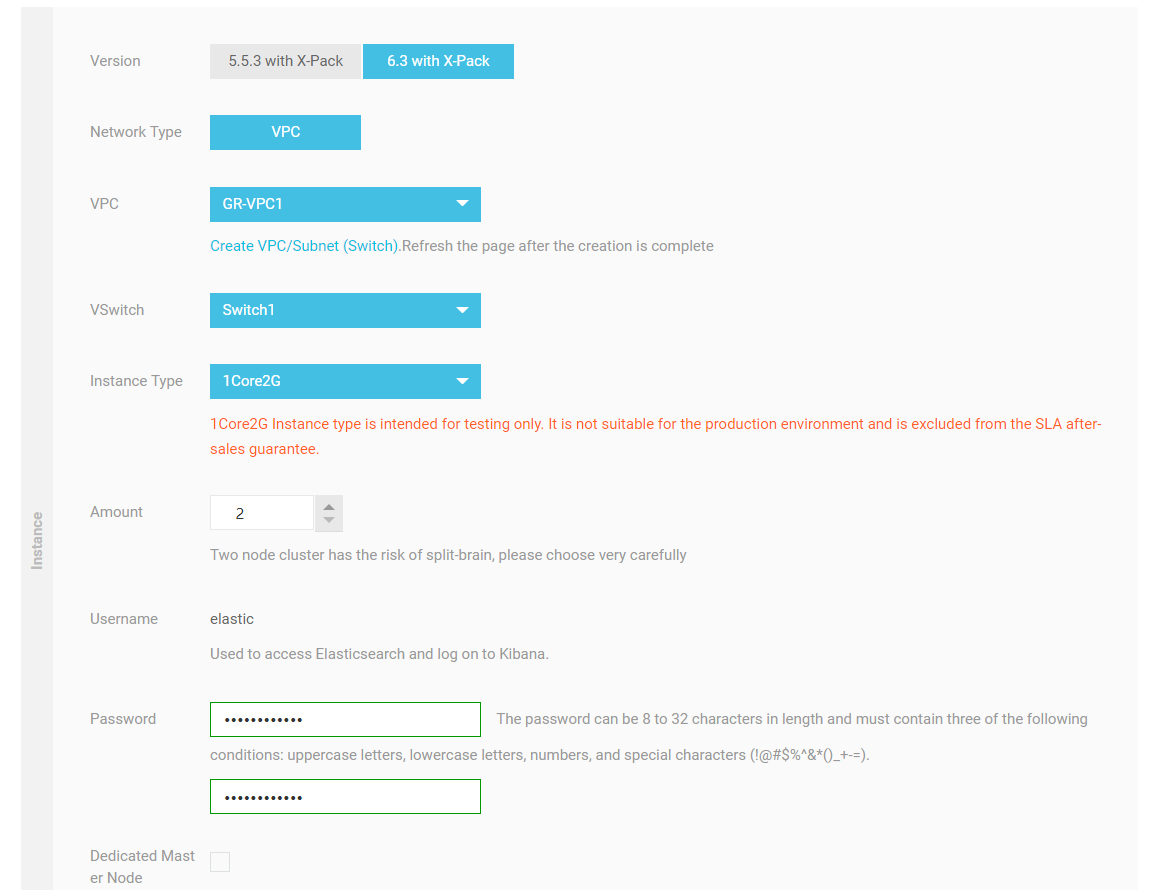
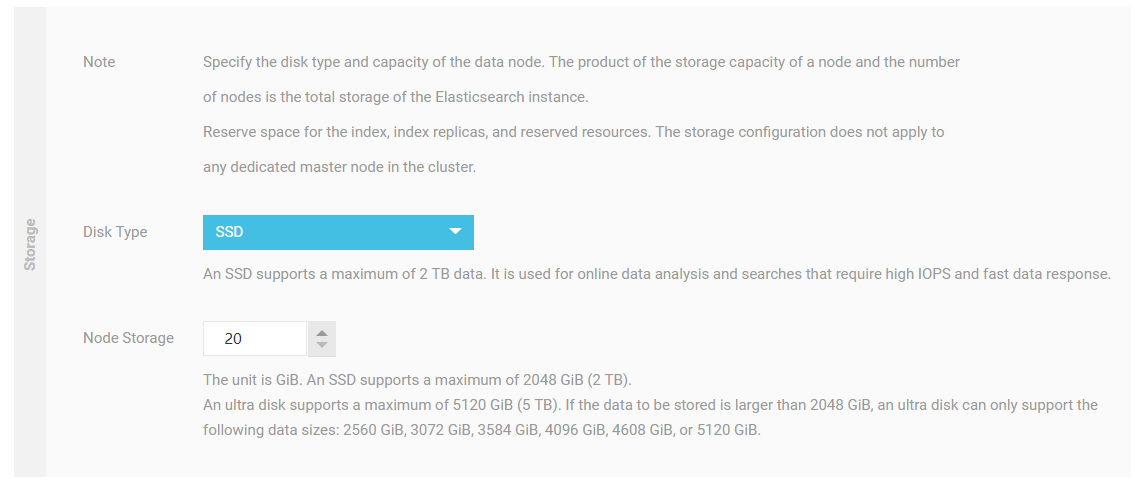
7. The rest of the parameters are left by default. As the type of disk, we can select, such as SSD and Ultra-disk, or the amount of storage GB per node (obviously in a production environment these parameters must be carefully selected).
8. If everything is fine so far, we created the instance. This should take a few minutes (depending on the options selected, such as the number of nodes or the storage of each node). Anyway, we will see the instance within the list, with the status "Initializing".

9. After a few minutes, if the status of the instance is "Running", we select the "Manage" option, which will display the basic information and a series of additional options with which to work in the instance.

10. Next, we must make sure that our instance has been created correctly. To do this, click on the "Kibana Console" button which will open the Kibana application in another window (we will be asked for a username and password, which we added when creating the instance).
Kibana is an application within the Elasticsearch stack to be able to work on the cluster in a friendlier way, verify the available data and even doing Business Intelligence with the instance.
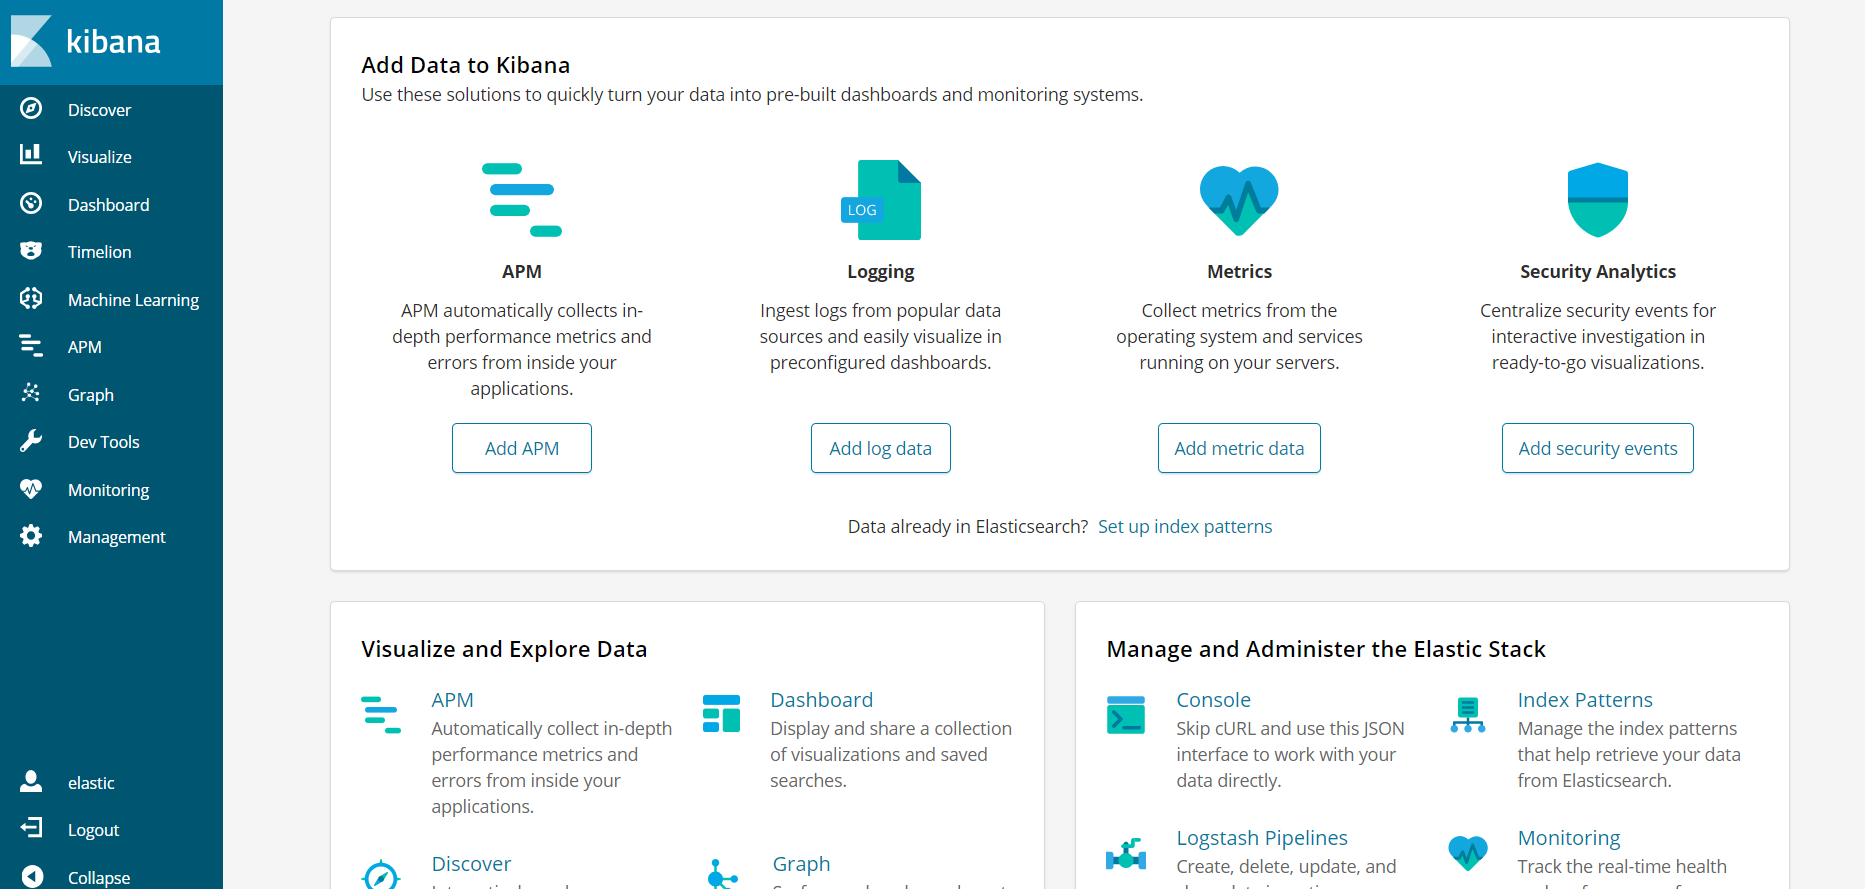
11. Going back to the page with information about our instance in Alibaba Cloud, we have to enable a public address in order to connect from outside the VPC network:

Which should be in something like the following:
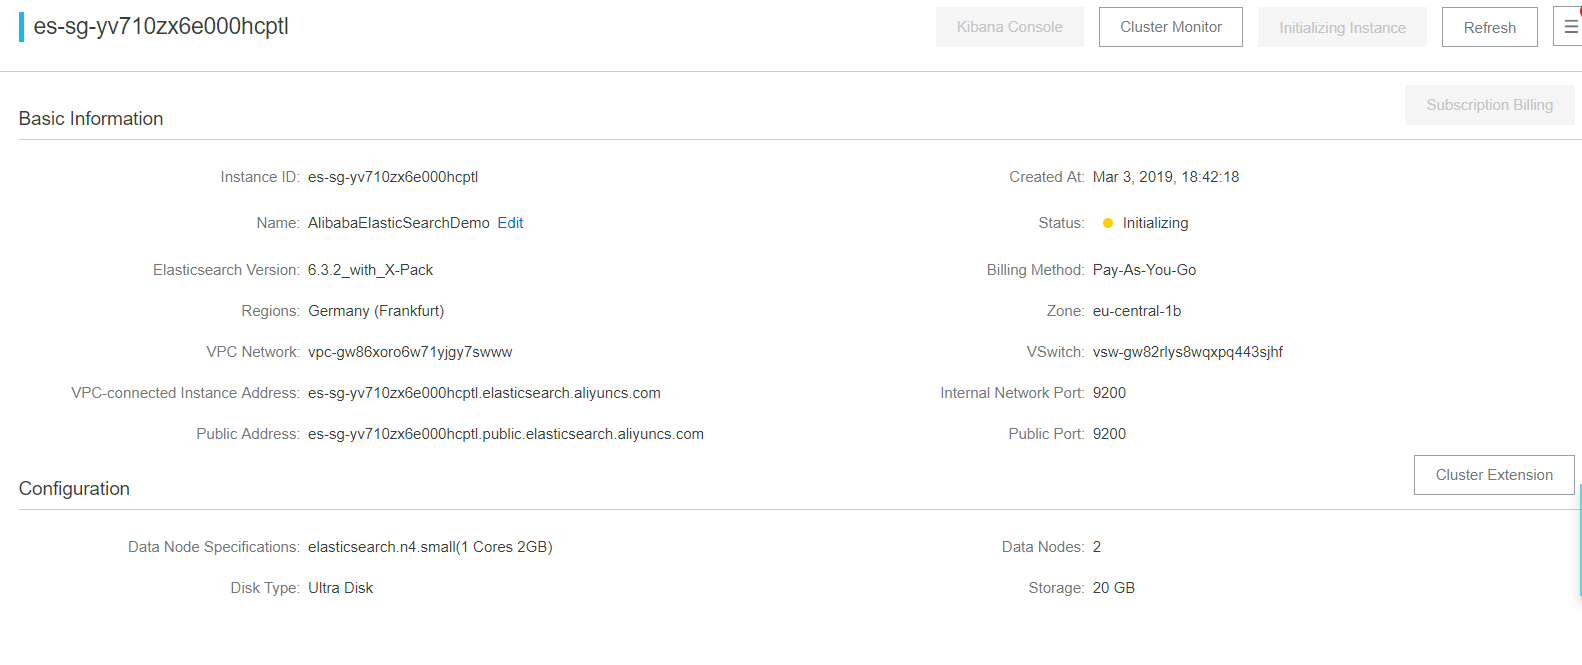
We now have a public address, but we still cannot connect from outside our VPC. Why not? Because for security reasons, our Elasticsearch instance has restricted access.
12. To enable access from outside, go to the option "Security" and select "Update" in Public IP Address Whitelist. By default, 127.0.0.1 will appear.

13. We changed 127.0.0.1 to 0.0.0.0/0. With this, we are leaving the instance to any IP in the world (this is a test, but in production we must put the range of IPs that should be connected).

Now that we have our Elasticsearch instance available, we must connect it to our testing Web application.
The Code of the application is available here.
This application uses the NEST library. An official library of Elasticsearch to connect to an instance and manipulate it, by means of .NET technology
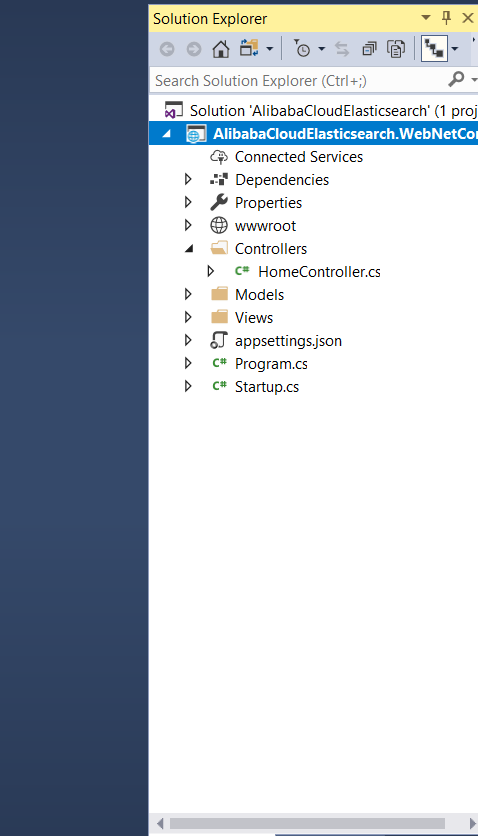
14. We open our application in Visual Studio or Visual Studio Code, which must have a structure like the following:
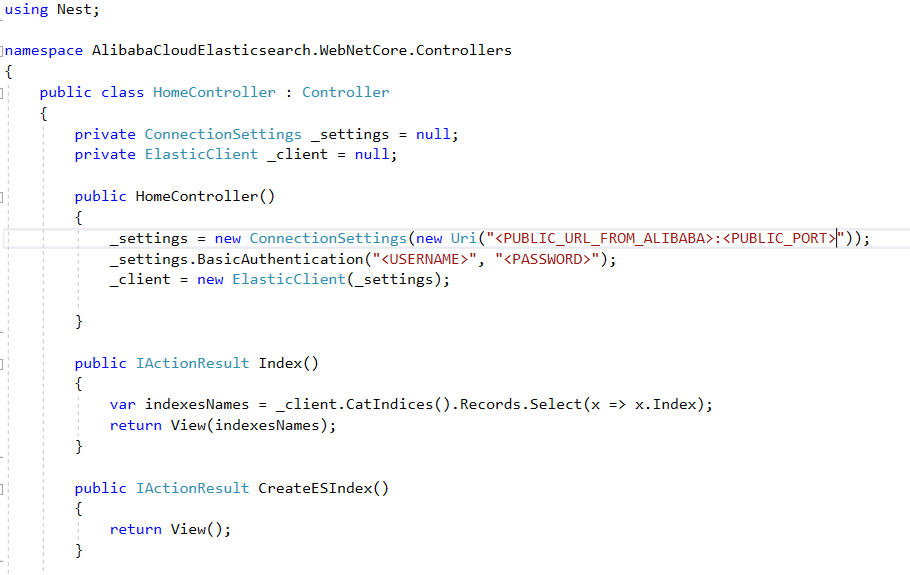
15. Open the file HomeController.cs, which will have some methods, but the important thing is in the HomeController () constructor. There we must replace the data with those of our instance (public address of the instance, user and password).
16. Next, we run the application to verify if it works.
In case it does not work, we will see the empty "Indexes" section (most likely because we did not put the public address of our instance well).

And if everything goes as it should, then we will see some indices already created (those that are created by default in each new instance of Elasticsearch).

17. If the indexes appear on the home page, it means that we can create new ones. With the "Create new index" button we will go to a form to create an index just by typing its name.
Note: In Elasticsearch, the simplest option is to create an index without mapping (structure), since such a structure will be updated as the data is inserted, that is, it is dynamic (like any NoSQL data engine).

And if the creation is successful, we will see our index in the list.

18. Later, in our new index, we go to the "Add data" option to add new data.
We put the data in each column.

If our data was successfully added to the new index in Elasticsearch, we will arrive at the form with the list of available data in our index.

19. We can also start looking for the data by any of the available columns (in Elasticsearch, we can even specify the detail of how the searches should be executed and discard columns when we do not want to filter them).

20. We can also verify in Kibana that we have created our index successfully.
To do this, in Kibana we select the option "Dev Tools", which will show us a console to write text.
If we want to verify if our new index exists, we write the following to show the list of indexes created:
GET _cat/indices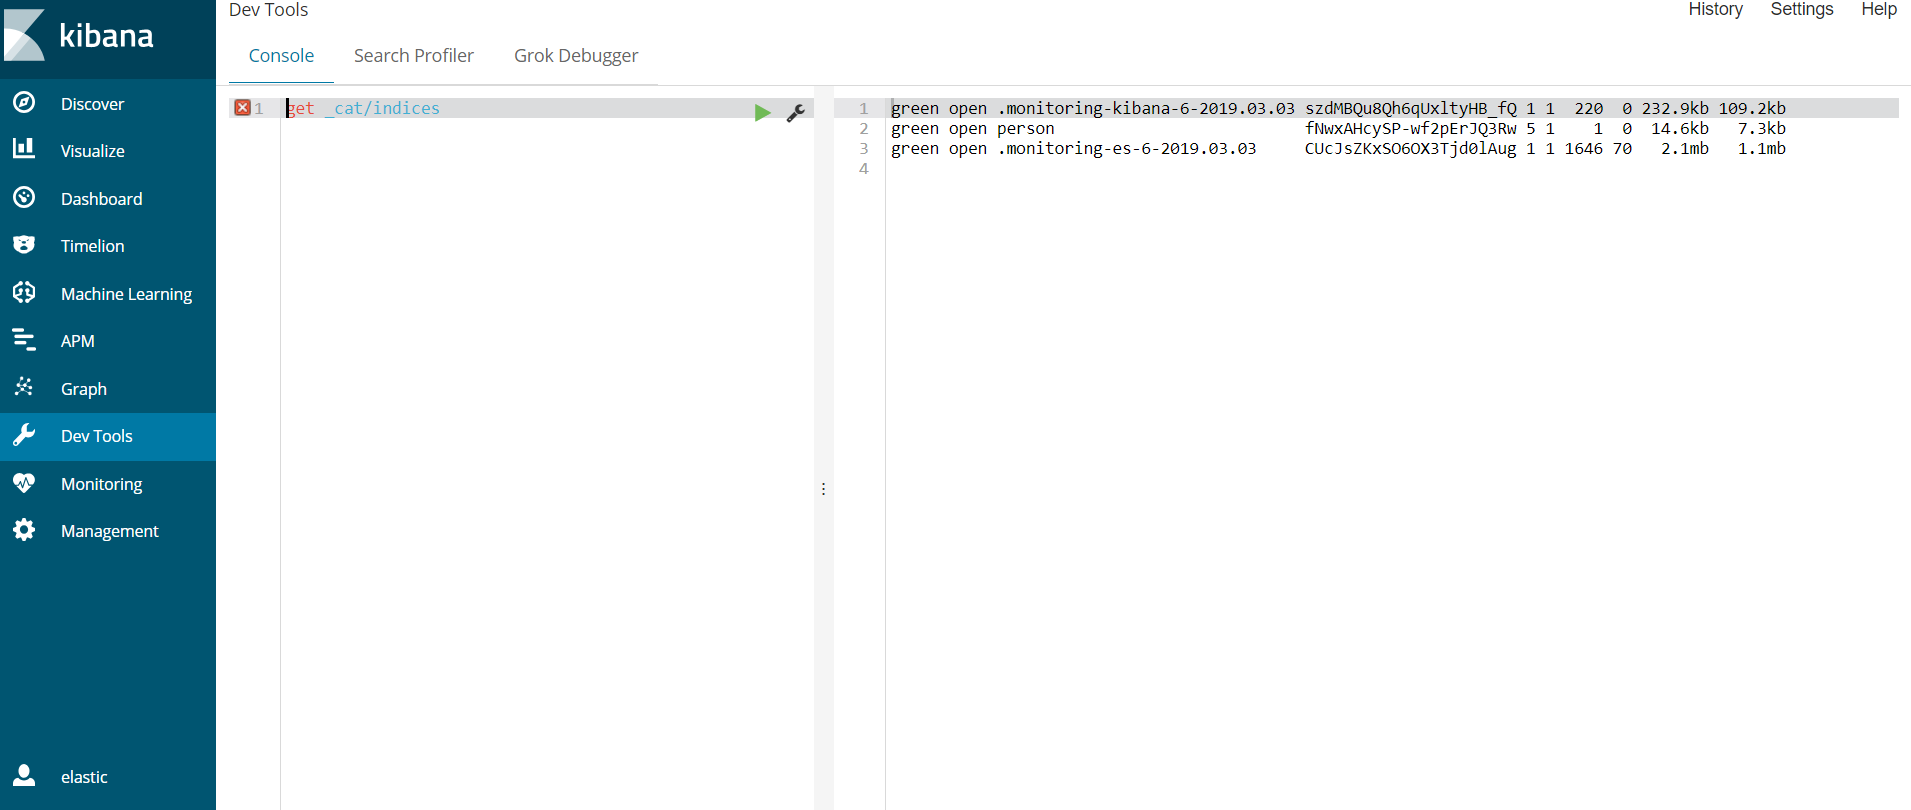
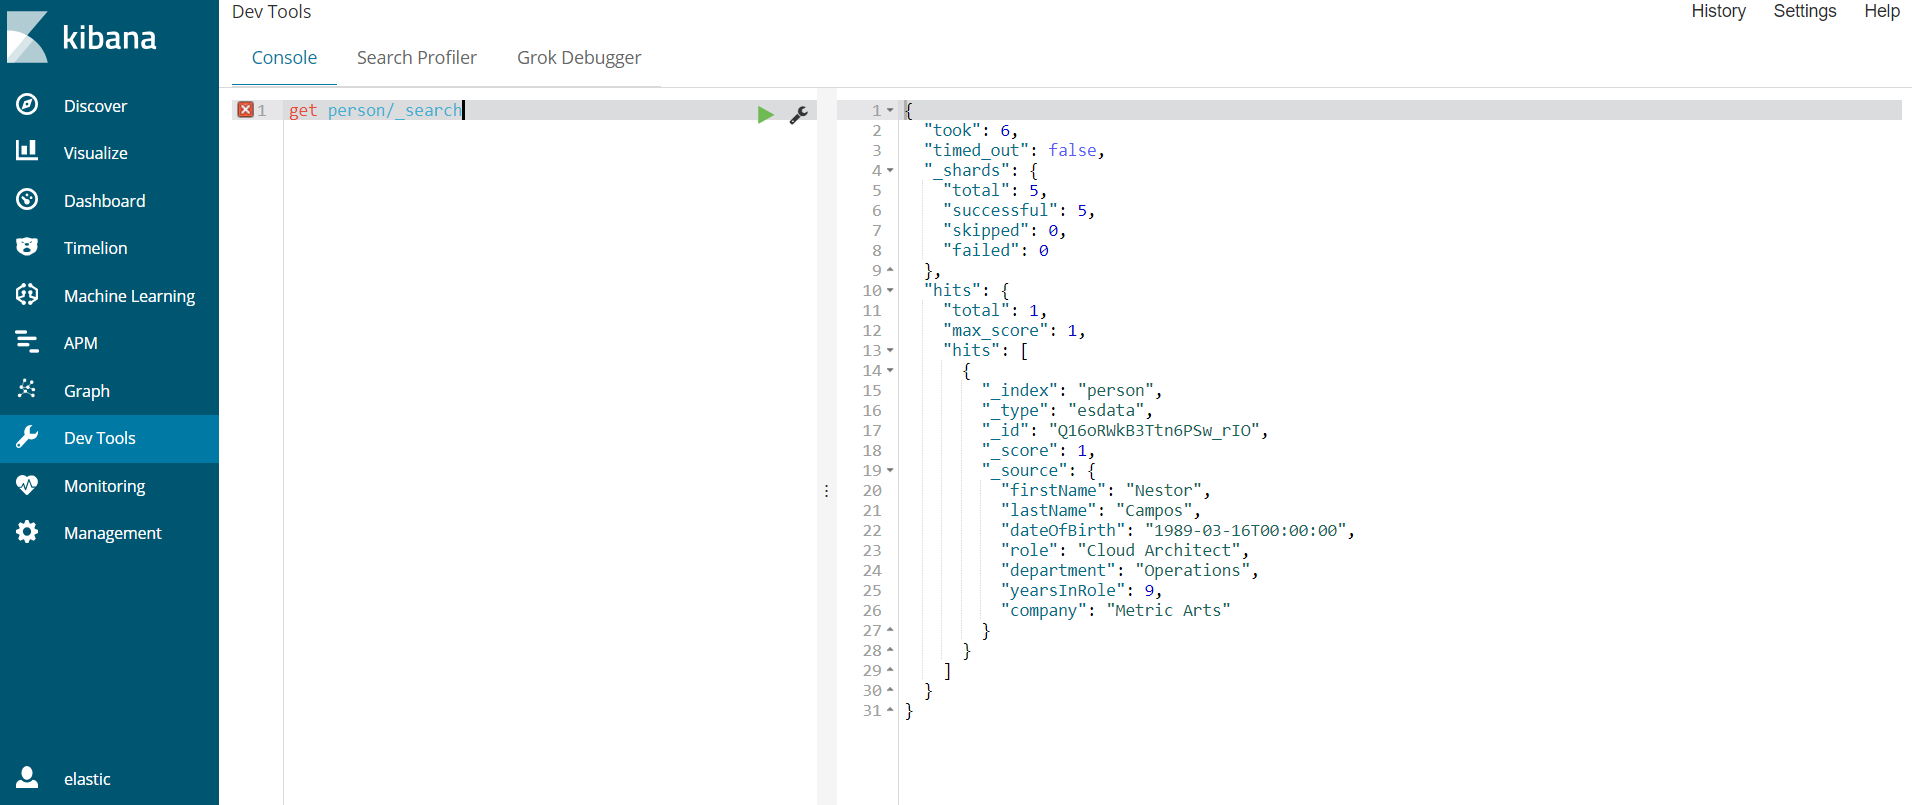
21. And if we want to verify if our data was created in the index, we execute the following query:
GET person/_searchIf everything is fine, we will obtain the data in JSON format with the list that we create from our Web.
From now on, we can refine our site and do more interesting things, like recommending similar terms (exactly as the most popular search engines do), paging our results, among others.
Finally, we have connected a web application with Elasticsearch in a few steps. We take advantage of Elasticsearch to search for data, and the advantages of Alibaba Cloud, which allows us to create a cluster in a matter of minutes and not have to worry about maintaining the cluster, in addition to scaling it when required, and integrating it with other cloud services, such as Elastic Compute Service or Container Service.

2,593 posts | 791 followers
FollowAlibaba Clouder - March 12, 2019
Alibaba Clouder - December 30, 2020
Data Geek - April 29, 2024
Alibaba Cloud Storage - February 27, 2020
Alibaba Cloud Indonesia - May 11, 2023
Alibaba Clouder - December 30, 2020

2,593 posts | 791 followers
Follow Alibaba Cloud Elasticsearch
Alibaba Cloud Elasticsearch helps users easy to build AI-powered search applications seamlessly integrated with large language models, and featuring for the enterprise: robust access control, security monitoring, and automatic updates.
Learn More DataWorks
A secure environment for offline data development, with powerful Open APIs, to create an ecosystem for redevelopment.
Learn More ECS(Elastic Compute Service)
Elastic and secure virtual cloud servers to cater all your cloud hosting needs.
Learn MoreMore Posts by Alibaba Clouder