By Ximing
Make sure you have successfully deployed PolarDB-X as per the previous tutorial and can connect to the PolarDB-X database.
This step will guide you on how to simulate service traffic using Sysbench Select.
CREATE DATABASE sysbench_test;USE sysbench_test; in the top-right corner to create a new terminal: Terminal 3.
su galaxykubecdvim sysbench-prepare.yamli to enter insert mode, copy the following code into the file, then press ESC, type :wq, and press Enter to save and exit the file.apiVersion: batch/v1
kind: Job
metadata:
name: sysbench-prepare-data-test
namespace: default
spec:
backoffLimit: 0
template:
spec:
restartPolicy: Never
containers:
- name: sysbench-prepare
image: severalnines/sysbench
env:
- name: POLARDB_X_USER
value: polardbx_root
- name: POLARDB_X_PASSWD
valueFrom:
secretKeyRef:
name: polardb-x
key: polardbx_root
command: [ 'sysbench' ]
args:
- --db-driver=mysql
- --mysql-host=$(POLARDB_X_SERVICE_HOST)
- --mysql-port=$(POLARDB_X_SERVICE_PORT)
- --mysql-user=$(POLARDB_X_USER)
- --mysql_password=$(POLARDB_X_PASSWD)
- --mysql-db=sysbench_test
- --mysql-table-engine=innodb
- --rand-init=on
- --max-requests=1
- --oltp-tables-count=1
- --report-interval=5
- --oltp-table-size=160000
- --oltp_skip_trx=on
- --oltp_auto_inc=off
- --oltp_secondary
- --oltp_range_size=5
- --mysql_table_options=dbpartition by hash(`id`)
- --num-threads=1
- --time=3600
- /usr/share/sysbench/tests/include/oltp_legacy/parallel_prepare.lua
- runkubectl apply -f sysbench-prepare.yamlkubectl get jobsThe following result is returned. Wait about 1 minute. When COMPLETIONS shows 1/1, the data initialization is complete.

vim sysbench-select.yamli to enter insert mode, copy the following code into the file, then press ESC, type :wq, and press Enter to save and exit the file.apiVersion: batch/v1
kind: Job
metadata:
name: sysbench-point-select-k-test
namespace: default
spec:
backoffLimit: 0
template:
spec:
restartPolicy: Never
containers:
- name: sysbench-point-select-k
image: severalnines/sysbench
env:
- name: POLARDB_X_USER
value: polardbx_root
- name: POLARDB_X_PASSWD
valueFrom:
secretKeyRef:
name: polardb-x
key: polardbx_root
command: [ 'sysbench' ]
args:
- --db-driver=mysql
- --mysql-host=$(POLARDB_X_SERVICE_HOST)
- --mysql-port=$(POLARDB_X_SERVICE_PORT)
- --mysql-user=$(POLARDB_X_USER)
- --mysql_password=$(POLARDB_X_PASSWD)
- --mysql-db=sysbench_test
- --mysql-table-engine=innodb
- --rand-init=on
- --max-requests=0
- --oltp-tables-count=1
- --report-interval=5
- --oltp-table-size=32000000
- --oltp_skip_trx=on
- --oltp_auto_inc=off
- --oltp_secondary
- --oltp_range_size=5
- --mysql-ignore-errors=all
- --num-threads=8
- --time=3600
- --random_points=1
- /usr/share/sysbench/tests/include/oltp_legacy/select_random_points.lua
- runkubectl apply -f sysbench-select.yamlkubectl get podsThe following result is returned. The pod name starting with sysbench-point-select-k-test- is the target pod.

Note: You need to replace "target pod" in the command with the actual pod name starting with sysbench-point-select-k-test-.
kubectl logs -f target podSQL throttling in PolarDB-X restricts SQL queries that meet specific criteria. Assuming the Sysbench Select traffic severely impacts other services, use SQL throttling to limit Select SQL.
show full processlist where info is not nullThe following result is returned:

create ccl_rule block_select on sysbench_test.* to 'polardbx_root'@'%' for select filter by keyword('pad') with max_concurrency=0;After executing the SQL command for intercepting Select SQL queries in Terminal 2, you will see many SQL errors in Terminal 3.

show ccl_rules;The following result is returned:

After slow SQL queries are restricted, the system returns to normal. Next, optimize SQL. The built-in SQL Advisor of PolarDB-X provides optimization suggestions for a given SQL statement.
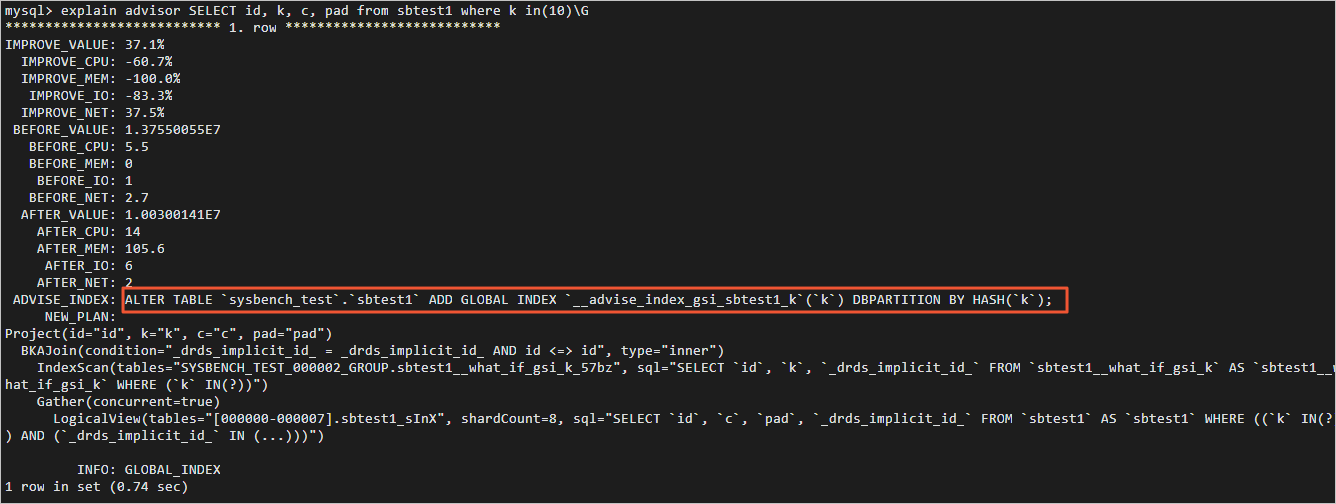
explain advisor SELECT id, k, c, pad from sbtest1 where k in(10)\GThe following result is returned. In the ADVISE_INDEX section, you will find the suggestions provided by SQL Advisor.

ALTER TABLE `sysbench_test`.`sbtest1` ADD GLOBAL INDEX `__advise_index_gsi_sbtest1_k`(`k`) DBPARTITION BY HASH(`k`);drop ccl_rule block_select;After removing the rate limit in Terminal 2, you will see a significant increase in QPS in Terminal 3.

Try out database products for free:
ApsaraDB - June 4, 2024
ApsaraDB - August 13, 2024
ApsaraDB - August 23, 2024
ApsaraDB - June 3, 2024
ApsaraDB - September 19, 2022
ApsaraDB - October 16, 2024
 PolarDB for PostgreSQL
Alibaba Cloud PolarDB for PostgreSQL is an in-house relational database service 100% compatible with PostgreSQL and highly compatible with the Oracle syntax.
Learn More PolarDB for Xscale
Alibaba Cloud PolarDB for Xscale (PolarDB-X) is a cloud-native high-performance distributed database service independently developed by Alibaba Cloud.
Learn More PolarDB for MySQL
Alibaba Cloud PolarDB for MySQL is a cloud-native relational database service 100% compatible with MySQL.
Learn More Database for FinTech Solution
Leverage cloud-native database solutions dedicated for FinTech.
Learn MoreMore Posts by ApsaraDB
Santhakumar Munuswamy August 4, 2024 at 8:14 am
Thanks for Sharing and good write-up